FW_UTM培训胶片
DPtechFW-UTM基本功能测试方案

DPtech 防火墙 /UTM 产品测试方案缩略语清单:缩略语英文全名ACL Acess Control ListCLI Command Line InterpreterDOS Denial of ServiceGUI Graphical User InterfacesHTTP Hypertext Transfer ProtocolIMAP Internet Message Access Protocol IPSEC IP Security ProtocolLDAP Lightweight Directory Access Protocol NAT Network Address TranslationPAT Port Address TranslatePOP Post Office ProtocolQoS Quality of ServiceOSPF Open Shortest Path FirstRADIUS Remote Access Dial-InUser Service RIP Routing Information ProtocolTCP Transfer Control ProtocolSMTP Simple Message Transfer Protocol SNMP Simple network Management rotocol SSH Secure ShellSSL Security Socket LayerUDP User Datagram ProtocolURL Uniform Resource LocatorVPN Virtual Private NetworkVLAN Virtual Local Area Network中文解说接见控制列表命令行解说程序拒绝服务图形用户接口超文本传输协议因特网信息接见协议因特网安全协议轻度目录接见协议网络地点变换端口地点映照邮局协议服务质量开放最短路径优先远程用户拨号认证路由信息协议传输控制协议简单邮件传输协议简单网络管理协议安全防卫盾加密套接字协议层用户数据报协议一致资源定位器虚构个人网络虚构局域网目录1 简介 (4)1.1 目的 (4)1.2 范围 (4)2 测试计划 (4)2.1 测试环境一 (4)2.2 测试环境二 (5)3 测试方法及步骤 (5)3.1 性能特征测试项目 (5)T01 防火墙 /UTM 性能指标测试 (5)T01-01 防火墙 /UTM 整机转发吞吐量 (5)T01-02 每秒新建连结能力 (6)T01-03 防火墙 /UTM 最大并发会话数 (6)T01-04 防火墙 /UTMVPN加密地道的吞吐量 (7)3.2 功能特征测试项目 (8)T02 管理功能测试 (8)T03 端口映照 (8)T04 ACL (9)T05 包过滤 (9)T06 NAT (10)T06-01 静态地点变换 (10)T06-02 动向地点变换 (10)T06-03 内部服务器 (11)T07 SNMP (11)T08 Flood攻击防备 (12)T08-01 SynFlood (12)T09 防火墙 /UTM 动向路由支持 (12)注:路由协议的测试已设施实质支持的状况为准 (12)T09-01 RIPv1/v2 (12)T09-02 OSPF (13)T09-03 BGP (13)T10 FW/UTM虚构防火墙功能 (13)T10-01 FW/UTM虚构防火墙功能 (13)T11 FW/UTM IPS功能测试 (14)T12 FW/UTM防病毒测试 (15)T13 FW/UTM URL过滤功能测试 (15)T14 FW/UTM带宽管理功能测试 (16)1简介1.1 目的本文给出了 DPtech 防火墙 /UTM 产品测试所需的软硬件环境、测试思路以及测试用例供参照。
FW&UTM培训胶片

• 基本组网
Internet
untrust域
ETH0/2 所属域:untrust,三层接口,接口类型:WAN
ETH0/3 所属域:untrust,三层接口,接口类型:WAN
ETH0/4 所属域:DMZ,三层接口,接口类型:LAN
ETH0/7 所属域:trust,三层接口,接口类型:LAN ETH0/6 所属域:trust,三层接口,接口类型:LAN
•
•
16
组网模式及其部署——透明模式 透明模式 组网模式及其部署
• 接口管理 组网配置:修改工作模式为 二层接口,类型为 access,(trunk)选中所属VLAN.内网用户可以使用 VLAN-IF接口对FW设备进行管理。
17
组网模式及其部署——路由模式 路由模式 组网模式及其部署
11
串口下修改管理口地址。 串口下修改管理口地址。
• •
如果不想使用192.168.0.1的地址,可以在串口下修改,(web页面不能进入 的情况),也可以在WEB页面修改。 串口下修改管理口地址,以eth0_7为例。 进入串口密码:DPTECH(大写)。(图一) 查看接口信息(show interface)。(图二)
•
组网应用场景 – 需结合透明模式及路由模式 特点 – 在VLAN内做二层转发 – 在VLAN间做三层转发 – 支持各类安全特性:攻击防护、包过滤、应用识别及应用访问控制等 配置要点 – 接口添加到相应的域 – 接口为二层接口,根据需要,配置接口类型为ACCESS或TRUNK – 接口配置VLAN属性 – 添加三层接口,用于三层转发 – 配置一个vlan-ifxxx的地址 ,用于三层转发
26
功能特点
•
支持无用户限制NAT – 解除单IP受限于端口的限制 – 单IP可支持百万级别以上会话 – 节约公网IP地址 多WAN口备份 – 增加出口带宽 – 线路备份 – 负载均衡策略:支持会话方式、流量方式
UTM投影简介
1.UTM投影系统简介——UTM (Universal Transverse Mercator)坐标系是由美国军方在1947提出的。
虽然我们仍然将其看作与“高斯-克吕格”相似的坐标系统,但实际上UTM 采用了网格的分带(或分块)。
除在美国本土采用Clarke 1866椭球体以外,UTM在世界其他地方都采用WGS84。
UTM是由美国制定,因此起始分带并不在本初子午线,而是在180度,因而所有美国本土都处于0-30带内。
UTM投影采用6度分带,从东经180度(或西经180度)开始,自西向东算起,因此1带的中央经线为-177(-180 -(-6)),而0度经线为30带和31带的分界,这两带的分界分别是-3和3度。
纬度采用8度分带,从80S到84N共20个纬度带(X带多4度),分别用C到X的字母来表示。
为了避免和数字混淆,I和O没有采用。
UTM的“false easting”值为500km,而南半球UTM带的“false northing”为10000km2.UTM投影分带问题——“WGS 1984”(1)北半球地区,选择最后字母为“N”的带;(2)可根据公式计算,带数=(经度整数位/6)的整数部分+31如:江西省南昌新建县某调查单元经度范围115°35′20″—115°36′00″,带数=115/6+31=50,选50N,即WGS 1984 UTM ZONE 50N3.UTM投影分带对于矢量裁剪遥感影像批处理的影响——比如在资源环境卫星应用中心下载的环境小卫星2级产品,研究区所在影像尽管投影都为UTM投影,但是却被划分到不同的投影分度带:如UTM Zone 47N 和UTM Zone 48N。
这给矢量裁剪批处理带来的影响是:裁剪所用的.evf文件需要根据不同的投影分度带也做相应的调整,才能裁剪成功。
UTM投影UTM(UNIVERSAL TRANSVERSE MERCARTOR GRID SYSTEM,通用横墨卡托格网系统)坐标是一种平面直角坐标,这种坐标格网系统及其所依据的投影已经广泛用于地形图,作为卫星影像和自然资源数据库的参考格网以及要求精确定位的其他应用。
UTM设备安装指南说明书

Installation GuideFamiliarize yourself with the connectors and controls on the back of the unit.Complete the Basic SetupFollow these steps to quickly setup the UTM appliance.Connect the UnitFor initial setup, connect the WAN Ethernet port to an active WAN connection such as a broadband modern, connect a DHCP enabled PC to a LAN port, and turn on the unit.Verify the following:• Power LED : It takes about a minute to boot. The power LED should turn solidgreen. If it does not, see the Troubleshooting section of the Reference Manual . • Test LED : When you first turn on the unit, the amber test LED will be lit forapproximately 2 minutes.• WAN Status LED : The status LED on the connected WAN port should be lit. Ifnot, make sure the Ethernet cable is securely attached to the modem and the WAN port, and that the modem is powered on.• LAN Status LED : A LAN status LED should be lit. If not, ensure that the Ethernetcable from the computer to the unit is securely attached at both ends, and that the computer is turned on.Log in to the Unit1. Use a browser to connect tohttps://192.168.1.1.7. Kensington lock 8. Console port 9. Factory reset button10. Power connector7109https://192.168.1.12. When prompted, enter admin for the UserName and password for the Password. Click Login.You are now connected. After 5 minutes of inactivity (the default login time-out), you are automatically logged out.Note: When the unit scans secure HTTPS traffic, import its root CA certificate into client browsers. Click the link at the bottom of the login screen to download it.Use the Setup Wizard for Basic ConfigurationThe Setup Wizard will guide you through the basic network and scanning setup. Note: If you choose to bypass the Setup Wizard, be sure to configure an alerts email address and change the admin password.1. Start the Setup Wizard.Select Wizards > SetupWizard to start the wizard.For guidance on how to fill in the wizard screens, refer to the online help or the Reference Manual via a link in theSupport > Documentation page.2. Use the Setup Wizard to configure these basic network and scanning settings:• LAN and WAN network settings.• System time (NTP server) and time zone.• Scanning of network protocols and services.• Default scan actions when the unit detects threats.• Scan exceptions like the maximum file size.• Specify the notification server and notices to be used in email notifications.•Scan engine and signature updates.ProSecure™ Unified Threat Management (UTM) ApplianceFollow these instructions to configure your ProSecure Unified Threat Management appliance to use a single WAN interface, and enable the default threat management scanning. Then, consult the Reference Manual for instructions on configuring other options such as multiple WAN settings, VPN, firewall, and custom scanning. You can access the Reference Manual from the product management interface, via the Resource CD and from the NETGEAR support site: . Estimated time: 30 minutes.Verify the Package Contents• ProSecure™ UTM appliance. • Installation Guide.• Resource CD.• Rubber feet (4) with adhesive backing.• Rack mount brackets (some models).• Power cord.Familiarize Yourself with the UnitFamiliarize yourself with the ports and status lights on the front of the unit.1.Green power LED2.Amber test LEDB port (for future use)4.Gigabit LAN portsN port 4 DMZ identifier6.Gigabit WAN ports, dualWAN model shown12536November 2010This symbol was placed in accordance with the European Union Directive 2002/96 on the Waste Electrical and Electronic Equipment (the WEEE Directive). If disposed of within the European Union, this product should be treated and recycled in accordance with the laws of your jurisdiction implementing the WEEE Directive.©2010 by NETGEAR, Inc. All rights reserved. NETGEAR and the NETGEAR logo are registered trademarks of NETGEAR, Inc. in the United States and/or other countries. Other brand and product names are trademarks or registered trademarks of their respective holders. Information is subject to change without notice.3. Click Apply to save your changes.The unit will reboot. Your computer will lose its connection to the unit if its IP address is now on a different subnet. If so, restart the computer to refresh its network settings.LicensesYour unit is bundled with three 30-day trial licenses.• Web scanning • Email scanning• Support and maintenanceActivating the licenses starts their term of use. Activate the licenses only when you are ready to start using this unit. If your unit has never been registered before you can use the 30 day trial period for all 3 types of licenses to perform initial testing and configuration.Note: Be sure the unit has Internet access before registering the licenses.• Activate the trial licenses by selecting Support > Registration and click the “Trial ” button. Once you activate the trial licenses, you can then update the unit with the latest UTM build and signature & engines during the 30-day trialperiod.• If you purchase a license subscription bundled with your unit, a license will be assigned to your unit’s serial number. When you register your unit, the license key will automatically be downloaded to your unit. Select Support > Registration , fill out the registration page, and click “Register ” to activate the services. Note: the 30-day trial licenses will be revoked once you activate the purchased service license keys. The purchased service license keys offer one year or three years of service.For additional information on licenses see the reference manual.Register and Activate the LicensesNote: Be sure the unit has Internet access before registering the licenses.1. Log in to the unit.2. Select Support > Registrationto display the Registration tab.3. Enter the customer information. If using the trial licenses, click Trial . If youhave purchased licenses, click Register . The unit will activate the licenses. After registration is complete the unit will display the license keys and their expiration dates.Online Documentation and SupportSelect Support > Documentation to view the reference manual. Select Support > Knowledge Base to view the support page, which includes this document and the reference manual. Going to/support and selecting your product modelnumber takes you to the same page.Consult the reference manual for instructions on how to use the online supportremote diagnostics.Technical SupportThank you for selecting NETGEAR products.After installing your device, locate the serial number on the label of your product and use it to register your product at /register . Registration is required before you can use the telephone support service. Registration via our website is strongly recommended.Go to for product updates and Web support . For additional information about setting up, configuring, and using your Product Name Only, see the User Manual .For complete DoC please visit the NETGEAR EU Declarations of Conformity website at: /app/answers/detail/a_id/11621/。
康塔克自动扩展镜头胶片腾展套件说明书

A ll featu res ide ntical wi t h A uto Bell ows F2 , except t hat it is supp lied wi th th e Do u ble Cab le Re lease . Thi s be ll ows attac hm ent is des igned exc lu sively f o r use wi th the Yashica FX-3 and FX-7. • Size: 200 x 120 x 70 mm (7-7 /8 x 4-3 /4 x 2-3 /4 in .) • Weight: 660 grams (1.46 Ibs .)
Pr ic e Pri ce Price
CONTAX SLIDE COPIER
Price
Designed exclusively for use with the Auto Extension Bellows PC, this Slide Copier attaches to the mount on the base of the lensboard and permits convenient copying of mounted slides or color filmstrips. Features filmstrip trays and clip-on film holder for ease in setting the frame for copying . • Size: 131 x 97 x 180 mm (5-3/16 x 3-13/16 x 7-1/16 in.) • Weight: 374 grams (13.2 ozs.)
utmsource 原理

utmsource 原理
UTM(Urchin Tracking Module)来源是一种用于跟踪在线广
告和营销活动效果的参数。
它通过在URL中添加特定的参数
来追踪访问来源、广告媒介、广告系列、关键字等信息。
在Google Analytics等分析工具中可以通过这些参数进行分析和
报告。
UTM参数由五个主要参数构成:
1. utm_source:指定流量的来源,例如搜索引擎、社交媒体网
站等。
2. utm_medium:指定流量的媒介或广告类型,例如广告、合
作伙伴链接、电子邮件等。
3. utm_campaign:指定流量的广告系列或营销活动名称,例如特定广告活动、产品促销等。
4. utm_term:指定广告或关键字的相关信息,例如搜索关键字、广告组等。
5. utm_content:指定广告具体内容或差异化参数,例如不同广告版位、文案等。
当用户点击带有UTM参数的链接访问网站时,这些参数会被
记录并传送到分析工具中进行跟踪和分析。
通过分析UTM参数,营销人员可以了解不同渠道和广告的效果、转化率等,从
而优化营销策略和投入。
总结起来,UTM来源的原理是通过URL参数来追踪和标识不同的广告渠道、广告系列和关键字等,从而进行营销活动效果的跟踪和分析。
柯达胶片
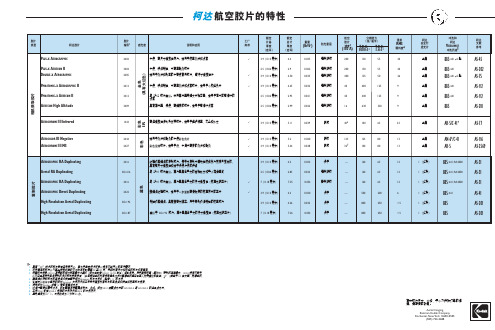
√
7(0.18 毫米)
7.35
0.054
着色明胶
—
160
63
12
超精细纹理胶片,适用于一步复制高清晰度的航空底片或正片
√
3.9(0.10 毫米)
4.2
0.030
快干
—
500
200
6
颗粒极其精细,具有超高分辨率,用于复制极细颗粒的航空胶片
3.9(0.10 毫米)
4.26
5
表I 具有 ESTAR 片基的黑白胶片
三种不同厚度的 ESTAR 片基 (2.5 密耳、3.9 密耳、7 密耳)导致卷在标准航空胶片卷筒上的胶片长度也各不相 同。下面的部件列表说明了每种类型的胶片提供的标准长度。
胶片 规格 编号
4922 4932 4942 5332 536
5272 514 5282 530 5352
50 英尺 100 英尺 200 英尺 500 英尺 500 英尺
40 英尺 75 英尺 150 英尺 350 英尺 350 英尺
—
— 100 英尺 200 英尺 200 英尺
70 毫米 70 毫米 70 毫米 70 毫米 70 毫米
1,000 英尺 1,000 英尺 2,000 英尺 2,000 英尺
931 991 883 8973
884 8983 886 8993
949 952 9814 955
957 961 960
胶片 宽度
胶片长度 ( 无 导 片 或 拖 片)
ESTAR 薄 片基
( 2.5 密 耳)
ESTAR 片基 ( 3.9 密 耳)
ESTAR 厚 片基
(7 密 耳)
70 毫米 70 毫米 70 毫米 70 毫米 70 毫米
绿盟下一代防火墙产品介绍

易用
稳定
让入侵防护强大
怎样强化安全能力?
• 获得NSS Labs推荐的IPS签名库 • 3000+无重复特征库 • 检出率国际领先 • 13年自研经验,国内技术领军
FROST & SULLIVAN
绿盟科技
下一代防火墙
继承
蠕虫
间谍软件
SQL 注入
木马
怎样强化安全能力?
让潜在威胁无处遁形
• WEB信誉防范钓鱼,挂马网站 • 启发式分析快速识别病毒变种 • 文件过滤轻松屏蔽恶意软件
APP signature
非法应用
可疑应用
进 站
合法应用
AV
IPS
signature signature
Malware
URL
signature signature
内容过滤
出
站
病毒防御
URL过滤
入侵防护
一体化安全策略框架
用户价值篇 安全、易用、稳定
绿盟下一代防火墙核心价值
安全
绿盟科技 下一代防火墙
15Mbps Http病毒
应用层
内容层
OSI分层
1+1<1的原因
防火墙
防火墙安全策略 IP协议/端口解析
L2数据包解析
URL引擎
URL分类策略 应用层协议解码 IP协议/端口解析 L2数据包解析
IPS引擎
威胁防护策略 威胁签名匹配 应用层协议解码 IP协议/端口解析 L2数据包解析
AV引擎
病毒防护策略
怎样提高稳定性?
安全引擎故障不影响转发 安全引擎升级不中断转发 双引擎间资源共享
快速升级,高风险,低可靠
安全引擎
- 1、下载文档前请自行甄别文档内容的完整性,平台不提供额外的编辑、内容补充、找答案等附加服务。
- 2、"仅部分预览"的文档,不可在线预览部分如存在完整性等问题,可反馈申请退款(可完整预览的文档不适用该条件!)。
- 3、如文档侵犯您的权益,请联系客服反馈,我们会尽快为您处理(人工客服工作时间:9:00-18:30)。
组网模式及其部署——透明模式
• 接口管理组网配置:修改工作模式为 二层接口,类型为 access,(trunk)选中所属VLAN.内网用户可以使用 VLAN-IF接口对FW设备进行管理。
• 接口类型的选择:ACCESS口(支持默认VLAN1数据通过)、TRUNK口(支持 VLAN透传)
• 接口VLAN的设置 – 三层接口的配置
• 接口类型的先择:LAN、WAN、管理口(管理口不转发流量) • IP地址分配:静态IP、PPPoE、DHCP
• VLAN的配置
– 添加VLAN
• 包过滤策略的配置
IPv6双栈环境 • 真环保:提供可回收、低辐射、无公害、低功耗的平台 • 国产化:国内自主知识产权,通过国家安全认证,符合中国“等级保护”等国家
级安全要求
衡量防火墙性能的几个重要指标
主要参考以下3种性能指标:
• 整机吞吐量:指防火墙在状态检测机制下能够处理一定包长数据的最大转发 能力,业界默认一般都采用大包衡量防火墙对报文的处理能力。
DPTECH N系列防火墙产生背景
目前,Web2.0、音频/视频、P2P、云计算等各种新应用、新业务层出不穷,传统的基 于端口进行应用识别和访问控制的防火墙,已远远无法满足各种新应用下安全防护的 需求,增加其它辅助设备又会增加组网复杂性;而通过在传统防火墙上简单叠加部分 应用层安全防护功能,也由于系统设计和硬件架构的天然不足,造成性能的大幅衰减 ,导致应用层功能不敢真正启用。特别在对性能、稳定性要求苛刻的数据中心,此问 题显得尤为严峻。
登录WEB管理页面
• 第一,确保主机同FW管理口(默认最后一个接口)通讯正常(主机跟管理口 配置同一个网段的IP)。
• 第二,打开IE浏览器,输入http://192.168.0.1(管理口默认地址),进入WEB 页面。
串口下修改管理口地址。
• 如果不想使用192.168.0.1的地址,可以在串口下修改,(web页面不能进入 的情况),也可以在WEB页面修改。
组网模式及其部署——路由模式
• 基本组网
组网模式及其部署——路由模式
• 组网应用场景
– 需要路由功能做三层转发 – 需要共享Internet接入 – 需要对外提供应用服务 – 需要使用虚拟专用网
DPtech防火墙产品
DPtech (UTM)统一威胁管理产品
产品简介
• 创新性:新一代网络安全架构 ,专用定制的Conplat平台 • 管理性:Web配置所见即所得 • 集成性:集路由器、VPN、防火墙设备功能于一身 • 高性能:高吞吐量 • 高密度接口:丰富了用户的应用,并节约了成本。
杭州迪普科技有限公司
立连接以后记录状态信息并时时更新,所有会话数据都要与状态表信息相匹 配;否则会话被阻断。DPTECH 防火墙属于状态检测型防火墙。
状态检测技术
防火墙硬件架构的发展趋势
DPTECH FW
多核技术
纯软件工控机NP技术Fra bibliotek技术发展
ASIC技术
处理性能
防火墙的发展趋势
• 高性能:容量更大的万兆处理平台,满足更高端万兆需求 • 深识别:提供深度识别技术,可以实现对应用层(如P2P)深层识别 • 多功能:支持基于应用的虚拟防火墙,满足不同业务应用的逻辑划分 • 双协议:支持IPv6,可以为IPV6网络的安全保驾护航,支持使用在IPv4、
• 串口下修改管理口地址,以eth0_7为例。 进入串口密码:DPTECH(大写)。(图一) 查看接口信息(show interface)。(图二)
目录
第一章 DPtech Firewall/UTM产品概述 第二章 Firewall/UTM组网及部署 第三章 Firewall/UTM基本配置 第四章 常见问题定位排查
• 最大并发连接数:由于防火墙是针对连接进行处理报文的,并发连接数目是 指的防火墙可以同时容纳的最大的连接数目,一个连接就是一个TCP/UDP的 访问。
• 每秒新建连接数:指每秒钟可以通过防火墙建立起来的完整TCP/UDP连接。 该指标主要用来衡量防火墙在处理过程中对报文连接的处理速度,如果该指 标低会造成用户明显感觉上网速度慢,在用户量较大的情况下容易造成防火 墙处理能力急剧下降,并且会造成防火墙对网络攻击防范能力差。
组网模式及其部署——透明模式
• 基本组网
组网模式及其部署——基本配置
• 安全域的配置
– 安全域优先级的配置 • 配置相同优先级,支持域间的隔离 • 配置高低优先级,支持高优先级到低优先级的直接访问
– 安全域接口列表的添加
• 接口的配置
– 工作模式的配置选项:三层接口、二层接口 – 二层接口的配置
组网模式及其部署——透明模式
• 组网应用场景 – 需要二层交换机功能做二层转发 – 在既有的网络中,不改变网络拓扑,而且需要安全业务 – 防火墙的不同网口所接的局域网都位于同一网段
• 特点 – 对用户是透明的,即用户意识不到防火墙的存在 – 部署简单,不改变现有的网络拓扑,无需更改其他网络设备的配置 – 支持各类安全特性:攻击防护、包过滤、应用识别及应用访问控制等
为解决上述难题,迪普科技推出了基于全新多核处理器架构的下一代防火墙—DPtech FW1000 N系列应用防火墙。FW1000对网络层、应用层安全进行融合,并采用独有 的“并行流过滤引擎”技术,全部安全策略可以一次匹配完成,即使在应用层功能不断 扩展、特征库不断增加的情况下,也不会造成性能的下降和网络时延的增加。
FW_UTM培训胶片
2020年5月22日星期五
目录
第一章 DPtech Firewall/UTM产品概述 第二章 Firewall/UTM组网及部署 第三章 Firewall/UTM基本配置 第四章 常见问题定位排查
防火墙技术发展介绍
• 主要分为以下3种类型防火墙: • 包 过 滤 防 火 墙 :根据一组规则允许/阻塞一些数据包。 • 应用代理型防火墙:作为应用层代理服务器,提供安全防护。 • 状态检测型防火墙:比包过滤防火墙具有更高的智能和安全性,会话成功建