ch1-ch2_turbo c操作环境介绍
CH1单片机基础知识概述

物联网设备需要大量的单片机进行数据处理和控制。单片机作为物联网的底层硬 件,承担着数据采集、传输和处理的任务。随着物联网技术的不断成熟,单片机 在智能家居、工业自动化和智慧城市等领域的应用将更加广泛。
THANKS FOR WATCHING
感谢您的观看
ROM用于存储程序,RAM用于存储运 行时的变量和数据。
输入/输出接口
输入/输出接口是单片机与外部设备进行通信的桥 梁。
单片机通过输入接口接收外部设备的数据,通过 输出接口发送数据给外部设备。
常见的输入/输出接口有并行接口、串行接口和模 拟数字转换接口等。
时钟电路
时钟电路为单片机提 供时钟信号,控制单 片机的运行速度和时 序。
软件编程与调试
编程语言选择
根据开发环境和单片机型 号,选择合适的编程语言 (如C、汇编等)。
程序编写
根据系统需求,编写程序 代码,实现所需功能。
程序调试
通过调试工具和方法,测 试和修正程序中的错误和 问题,确保程序正确性和 稳定性。
系统集成与测试
系统集成
将硬件和软件集成在一起,搭建完整的单片机应用系统。
Visual Studio
其他
这是一个通用的开发环境,通过安装相应 的插件,也可以用于单片机的开发。
如Proteus、MPLAB等,这些软件主要用 于电路设计和单片机仿真。
04 单片机的开发流程
系统需求分析
确定系统功能
明确单片机应用系统的功能需求,如控制、检测、 通信等。
确定性能指标
根据应用需求,确定系统的性能指标,如响应时 间、精度、稳定性等。
单片机的应用领域
总结词
单片机广泛应用于智能家居、工业控制、医疗器械等 领域。
TurboC语言概述

TurboC语言概述简介TurboC是一种经典的C语言集成开发环境〔IDE〕,由Borland公司开发并于1990年发布。
作为C语言开发的先驱,TurboC在当时的计算机编程领域具有重要的地位。
它提供了一个强大的开发环境,帮助开发者编写和调试C语言程序。
开发环境TurboC最初是为MS-DOS操作系统开发的,它提供了一个友好的图形用户界面〔GUI〕,让开发者能够轻松地编辑、编译、运行和调试C语言程序。
TurboC还提供了集成的调试器,让开发者能够快速定位和修复代码中的错误。
功能特点TurboC具有许多强大的功能特点,使其成为当时最受欢送的C语言开发工具之一。
编译器TurboC的编译器具有出色的性能和高效的编译速度。
它能够将C 语言源代码转换为可执行的机器代码,从而实现程序的运行。
编辑器TurboC的编辑器提供了许多方便的编辑功能,如代码高亮显示、自动补全和代码折叠等。
它还支持多文件编辑,使开发者能够同时编辑多个源文件。
调试器TurboC的调试器是其最大的特点之一。
它允许开发者逐行执行代码,检查变量的值,设置断点和监视表达式等。
调试器还提供了单步执行、跳过和跳入函数等功能,帮助开发者更好地理解程序的执行过程。
库函数TurboC内置了许多常用的库函数,如输入输出函数、字符串处理函数和数学函数等。
这些库函数能够满足开发者各种不同的需求,极大地提高了程序的开发效率。
TurboC的影响TurboC的发布对计算机编程产生了深远的影响。
它让C语言的学习和使用变得更加容易和高效,吸引了大量的开发者选择C语言作为他们的主要开发语言。
同时,TurboC也为其他集成开发环境的开展奠定了根底,如Microsoft Visual C++和Eclipse等。
虽然TurboC已经过时并不再被广泛使用,但它的影响依然存在。
许多C语言的根底教程和例如代码仍然使用TurboC作为开发工具。
此外,TurboC的开发理念和设计思想影响了许多后来的C语言开发环境,成为了现代集成开发环境的基石。
Linux_curses库使用

以上仅列出笔者较常使用的一些控制键, 至於其他控制键的定义, 请自行参阅 man curses (* 注三). 一并为您列出其他常用的一些特殊字元:
• [TAB] /t • [ENTER] /r • [ESC] 27 • [BACKSPACE] 127
10. 如何改变萤幕显示字元的属性: 为了使输出的萤幕画面更为生动美丽, 我们常须要在萤幕上做一些如反白, 闪烁等变化. curses 定义 了一些特殊的属性, 透过这些定义, 我们也可以在 curses 程式控制萤幕的输出变化.
}
3. 如何编译(compile): 当您编辑好您的程式, 在 UNIX 提示符号下键入: gcc [file.c] -lcurses 或 gcc [file.c] -lcurses -ltermlib(*注二)
4. 如何开始我的第一个 curses 程式: 在开始使用 curses 的一切命令之前, 您必须先利用 initscr()这个函式来开启 curses 模式. 相对的, 在结束 curses 模式前 ( 通常在您结束程式前 ) 也必须以 endwin()来关闭 curses 模式. #include <curses.h> main() { initscr(); :: :: :: endwin(); }
TurboC软件实用介绍

Turbo C 绘图软件
--1--绘图程序的基本结构
整型变量int. 第9,10行中的函数
getmaxx,getmaxy,getmaxcolor是测定 所选模式的最大列数、行数和最多颜色数. 7-10行是输出全部数据.
{ 1 int l,h,cc; 2 int gmode,gdriver=DETECT; 3 initgraph(&gmode,&gdriver,”C:\\TC\\bgi”); 4if(graphresult()!=grOk){printf(“error”);getch(
);exit(l);} 5 getmoderange(gdriver,&l,&h); 6 cc=getmaxmode(); 7 printf(“gdriver=%-4d gmode=%-
一个简单的绘图程序由进入图形方式、绘图和退出图 形方式三个部分组成。
进入图形方式(格式) pgl.c #include<graphics.h> #include<stdio.h> #include<conio.h> #include<process.h> main()
Turbo C 绘图软件
--1--绘图程序的基本结构
Turbo C 绘图软件
--2--进入、退出图形方式等有关函数
进入、退出图形方式等有关函数 -1- inigraph 初始化图形系统 Inigraph通过磁盘装入一个图形驱动程序对图
形系统初始化,并把系统置为图形模式。 要启动图形系统首先要调用inigraph函数。 -2- detectgraph 通过检测硬件确定所使Turbo C 绘图软件
第一节 C语言介绍及数据类型
第一节C语言介绍及数据类型1:针对学生的计算机基础知识参差不齐,本节对一些c基本知识做一个简单的介绍,为以后的学习做好准备,并对c语言数据类型作详细介绍。
1.1学习目的:1.简单的介绍一些C基本知识,为以后做好准备2.对C语言数据类型作详细介绍1.2学习内容:1.语言的诞生与发展2.简单的C程序介绍3.数据类型1.3学习重点:程序介绍2.数据类型1.4教学方法:讲授法+练习法1.5学习方法:听课、做笔记、课后作业1.6学习时间:第一周2:引入: [5分钟]程序看作对一系列动作执行过程的描述,为了与计算机交流,指挥它工作,同样需要有与之交流的方式,需要一种意义清晰、人用起来比较方便、计算机也能处理的描述方式。
可供人编程序用的语言就是程序设计语言。
程序设计语言是人描述计算的工具,也是人与计算机交流信息的媒介:通过用程序语言写程序,人能指挥计算机完成各种特定工作,完成各种计算。
人们经历了机器语言、汇编语言,1954年诞生了第一个高级程序语言。
在C语言诞生以前,系统软件主要是用汇编语言编写的。
由于汇编语言程序依赖于计算机硬件,其可读性和可移植性都很差,一般的高级语言又难以实现对计算机硬件的直接操作(这正是汇编语言的优势),于是人们盼望有一种兼有汇编语言和高级语言特性的新语言,C 语言应运而生。
C语言是贝尔实验室于70年代初研制出来的,后来又被多次改进,并出现了多种版本。
在微机上广泛使用的C语言编译系统有Microsoft C、Turbo C 、Borland C 等注:本书选定的上机环境是win TC3:课程知识点讲解:具体知识点1:简单的C程序介绍[10分钟]案例讲解:【案例2.1】显示“This is a C program.”。
#include <stdio.h>main(){printf(“This is a C program.\n”); /*输出字符串后换行*/}程序运行结果:This is a C program.分析:1其中main表示“主函数”名,每一个C程序都必须有一个而且只能有一个main主函数。
CH1 系统设置与优化和病毒防治工具

《工具软件》实训讲义●课程定位《实用工具软件实训》是一门实践性极强的课程,以计算机应用为基础,以工具软件操作为主线,主要内容包括虚拟机、系统优化、磁盘管理、电子图书、媒体播放、图片管理、光盘刻录、虚拟光驱、网络安全、数据恢复等软件的安装和使用技巧。
通过理论和实践教学,使学生掌握工具软件的选择方法,了解工具软件的特点和分类,掌握常用工具软件的设置和使用方法;可以熟练地安装和操作常用的工具软件,掌握计算机工具软件的日常升级和维护。
●课程内容与要求●课程考核与评价1. 考核评价及方式:课前准备、实验操作、实验报告2. 教学过程评价:实验。
3. 课程成绩形成方式:●什么是工具软件是指用来辅助计算机软件开发,维护和管理的软件。
●工具软件分类1.系统工具2.网络工具3.图像媒体4.编程开发5.防毒杀毒CH1 系统设置与优化和病毒防治工具一.系统维护与优化有的时候我们会发现打开电脑启动速度特别慢,电脑使用过程中经常死机,或者卡住。
让人非常头疼,那有什么好的办法可以防止这些问题呢?或者说让电脑有飞一般的速度呢?主要从以下几方面对电脑优化操作,可以使电脑速度提升。
一.启动优化二.登陆优化三.内存优化四.硬盘优化五.网络优化这些方面的优化我们可以使用Windows优化大师来完成。
&Windows优化大师大师介绍Windows优化大师是一款功能强大的系统工具软件,它提供了全面有效且简便安全的系统检测、系统优化、系统清理、系统维护四大功能模块及数个附加的工具软件。
使用Windows优化大师,能够有效地帮助用户了解自己的计算机软硬件信息;简化操作系统设置步骤;提升计算机运行效率;清理系统运行时产生的垃圾;修复系统故障及安全漏洞;维护系统的正常运转。
【软件功能】●系统信息自动检测1.查看系统信息2.系统性能测试●系统性能优化1.磁盘缓存2.桌面菜单3.文件系统4.网络系统5.开机速度6.系统安全7.个性设置8.后台服务●系统清理1.注册信息清理2.磁盘文件清理&超级兔子魔法设置(推荐自学)超级兔子是一个完整的系统维护工具,可能清理你大多数的文件、注册表里面的垃圾,同时还有强力的软件卸载功能,专业的卸载可以清理一个软件在电脑内的所有记录。
实验指导_Turbo C 2.0程序设计集成环境的使用
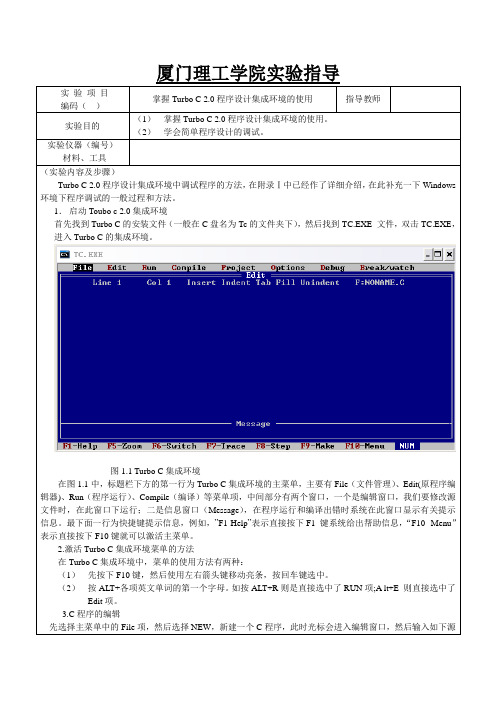
在Turbo C集成环境中,菜单的使用方法有两种:
(1)先按下F10键,然后使用左右箭头键移动亮条,按回车键选中。
(2)按ALT+各项英文单词的第一个字母。如按ALT+R则是直接选中了RUN项;A lt+E则直接选中了Edit项。
3.C程序的编辑
先选择主菜单中的File项,然后选择NEW,新建一个C程序,此时光标会进入编辑窗口,然后输入如下源程序:
del
删除光标处的一个字符
Ctrl+n
插入一行
4.C程序的运行
选择选择主菜单RUN项(见图1.2),然后选择其中的二级菜单中的RUN或直接按Crtl+F9键,就可以运行正在编辑的程序。
图1.2选择RUN项示意图
5察看结果
如果程序有错,在信心窗口将显示相关的错误信息,这时,选择主菜单的Edit项,回到编辑窗口,对源程序进行编辑、修改,直到没有错误信息显示为n *********************”);
printf(“\n * *”);
printf(“\n * Hello *”);
printf(“\n * *”);
printf(“\n *********************”);
}
在编辑状态,可以使用下表中的常用键对源程序进行编辑:
查找且替换
Ctrl+qr
光标移到文件开始处
Ctrl+qf
查找
Ctrl+qc
光标移到文件结束处
Ctrl+qn
寻找标记出
Ctrl+qb
光标移到字块开始处
Ctrl+kw
将字块写道一个文件中
TURBO.CONTROL i操作指南说明书

Part No.800100V0004TURBOVAC i(X)TURBO.CONTROL i Software DescriptionOperating Instructions 300702826_002_C0ContentsPage1 Description 32 Operation 42.1 Switching on 42.2 Operation 42.3 Operation via display 62.4 Operation via web server 102.5 Data viewer 22These Operating Instructions are a translation of the German originali nstructions 300702826_001_C0.2300702826_002_C0 - 12/2017 - © LeyboldDescription3Operation4300702826_002_C0 - 12/2017 - © Leybold2 Operation2.1 Switching onThe display starts by applying the 24 VDC supply voltage. The communica-tion between TURBO.CONTROL i and a turbo molecular pump can be esta-blished via RS485 or USB.TURBO.CONTROL i automatically detects the pump and loads the appropri-ate setting. This process may take a few seconds. Only one pump can be controlled and monitored.2.2 Operation■The meanings of the function keys F1 - F4 are shown in the lowest line of the display.■A modified value or setting becomes active by confirming with green. If aborted with red, the old value remains valid.■If the value is again saved by confirming, it remains after a power reset. All the values previously changed are saved by confirming the query.■The saving procedure may take a few seconds. The pump must not be separated from the supply voltage during the saving procedure.Status LEDsFunction keys Arrow button UpArrow button Cancel/Return Arrow button Confirm/Continue Arrow button DownFig. 1 Front sideOperation5300702826_002_C0 - 12/2017 - © LeyboldOperation: Display6300702826_002_C0 - 12/2017 - © Leybold2.3 Operation via displayControl priorityWhen TURBO.CONTROL i is connected with a TURBOVAC i(X), the pump at first cannot be controlled.To do so, press the function key F2 (REMOTE). Now Start / Stop / Error Reset are possible The pump can be started and stopped with F1.With F2 the control priority is reset (DIS.REM). By resetting, an imminent start instruction is also reset.Main screenIn the main screen you can switch from the values indicated in the list on the right to a large view (nominal speed, current, bearing temperature, pressure values - the pressure value of the TURBOVAC iX is at the end).MenuF3 opens 4 menus■Error memory■Configuration (gauge heads, TMP , accessory connections). If no pump is attached, only a reduced selection is available. ■Parameters■SystemError memoryThe complete error memory of the pump is shown in the error memory. A selected error or a selected warning can be indicated in plain text.ConfigurationThe 24-VDC connections (accessory), the interface X1 (I/O X1), the gauge heads (gauges) and the TURBOVAC i(X) (TMP) can be configured under"Configuration".Fig. 3 shows an example of the configuration of the 24-VDC connectionX201. For function codes and settings see the instructions for use300450826 Serial Interfaces for TURBOVAC i/iX.Operation: Display7300702826_002_C0 - 12/2017 - © LeyboldFig. 3 Configuration of the 24 VDC connection X201GaugesIn the gauge menu the connected gauge heads can be configured (change of unit torr, pascal, mbar, setting a gas correction factor and the gauge head parameters of the TURBOVAC iX).The gauge heads are automatically recognized and allocated:■Gauge head 1 = connection Gauge 1 at the TURBO.CONTROL i ■Gauge head 2 = connection Gauge 2 at the TURBO.CONTROL i■Gauge head 3 = connection Gauge at the TURBOVAC iXTMPIn the TMP menu the connected TURBOVAC i(X) can be configured. Start function:■Start the TURBOVAC i(X) when start command active (default setting)■Start of TURBOVAC i(X) depending on pressure. The turbo pump starts depending on pressure, if the value of the selected gauge head is under-cut.■ Pressure 1 = connection Gauge 1 at the TURBO.CONTROL i ■ Pressure 2 = connection Gauge 2 at the TURBO.CONTROL i■Pressure 3 = connection Gauge at the TURBOVAC iXThe value can be adapted under "Pressure Value".Parameters: Activation of standby speed and reading/writing of selectedparameters of the TURBOVAC i(X)Service: Start of the bearing run-in function and status of the bearing run-in. The bearing run-in is shown via a warning message on the TURBOVAC i(X)and the TURBO.CONTROL i.Operation: Display8300702826_002_C0 - 12/2017 - © LeyboldService: Resetting the parameters of the TURBOVAC i(X) to factory setting (resets all changed parameters of the pump).The reset parameters become active only after a restart (power on/off) of the pump.This will not reset the internal parameters of the TURBO.CONTROL i.Address: Setting the RS 485 or Profibus address of the TURBOVAC i(X).ParametersHere parameters of the attached TURBOVAC i(X) and the internal parametersof the TURBO.CONTROL i can be read and written.System See Fig. 4.Operation: Display9300702826_002_C0 - 12/2017 - © LeyboldOperation: Webserver10300702826_002_C0 - 12/2017 - © Leybold2.4 Operation via web serverConnect a computer with the interface ETH of the TURBO.CONTROL i. Then access the IP address of the TURBO.CONTROL i using a browser (via dis-play: Menu à System à Network Info).The IP address must be co-ordinated with the attached PC.This is done via a new assignment of the IP via DHCP (Press F3 key 2x in the menu "Network Info" à DHCP off à on). This procedure causes TURBO.CONTROL i to connect to the PC.The web server integrated in TURBO.CONTROL i can be opened with any browser. To do so, enter the IP address of TURBO.CONTROL i in the address field.To operate the turbo pump via the web server, change the control hierarchy in the TURBO.CONTROL i to ETH Remote (under Menu à System à Control H).Logging in Username: userPassword: userThen press LOGIN.Fig. 5 Basic view before log-in. Data can only be read. Start/stop of the TURBOVAC i (X) is not possible.Fig. 6 Basic view after log-inThe top bar shows the state of the TURBOVAC i(X).After activation by remote the functions start / stop / activate standby / error reset are available.If the remote is reset, the start command is also reset.Fig. 7 Error memoryError MemoryThe error memory holds the errors of the turbo pump in chronological order. The operating time at the point of time the error has occurred is also indicat-ed. By clicking on the corresponding line of the error, a detailed description will be displayed.Fig. 8 Data ViewerData ViewerObserving the logged data in real time.To correctly display the trend of the data even after a longer downtime fullypowered down it is necessary that the instrument has recorded 512 datarecords first. Depending on the setup LoggingCycle this can take more orless time.Logging Cycle / Memory CapacityFor an estimate as to how long the device will be capable of recording data,refer to the following formula:The log file has a size of 3264512 bytes → 3264512/32 = 102016 entries inthe log file. → 102016 entries x 1 second (LoggingCycle) = 102016 seconds.From this there results a recording duration of approximately 1700 minuteswhich is roughly equal to 28 hours.The recording duration will vary depending on the selected LoggingCycle.The measuring data can be selected via the respective checkmarks.Display of cyclically logged dataThe LoggingCycle can be varied. This determines at what intervals the dataof each data point are recorded. The requested data are continuously updat-ed in a table shown below the graph.Switching to the sequentially logged data is possible. This is where actionsare logged (e.g. change of a parameter, pump change, etc.)Fig. 9 Data viewer: Display of cyclically logged dataFig. 10 Data viewer: Display of sequentially logged dataFig. 11 Accessories configurationConfiguration: Accessories & I/O X1 Configuration of 24-VDC connection and interface X1 of the TURBOVAC i(X).For function codes and settings see the instructions for use 300450826Serial Interfaces for TURBOVAC i/iX.Fig. 12 Configuration: I/O X1Configuration: Gauge headsHere the connected gauge heads can be configured (change of unit torr,pascal, mbar, setting a gas correction factor and the gauge head parameters of the TURBOVAC iX).The gauge heads are automatically recognized and allocated:■Gauge head 1 = connection Gauge 1 at the TURBO.CONTROL i■Gauge head 2 = connection Gauge 2 at the TURBO.CONTROL i ■Gauge head 3 = connection Gauge at the TURBOVAC iXFig. 13 Gauges configurationConfiguration: TMPStart function:■Start of TURBOVAC i(X) when start command active (default setting) ■Start of TURBOVAC i(X) depending on pressure. The turbo pump starts depending on pressure, if the value of the selected gauge head is under-cut.■Pressure 1 = connection Gauge 1 at the TURBO.CONTROL i■Pressure 2 = connection Gauge 2 at the TURBO.CONTROL i■Pressure 3 = connection Gauge at the TURBOVAC iXFig. 14 TMP configurationConfiguration: TMP ServiceStart of the bearing run-in function and status of the bearing run-in.The bearing run-in is shown via a warning message on the TURBOVAC i(X) and the TURBO.CONTROL i.Reset factory settings:Resetting the parameters of the TURBOVAC i(X) to factory setting (resets all changed parameters of the pump).The reset parameters become active only after a restart (power on/off) of the pump.This will not reset the internal parameters of the TURBO.CONTROL i.Fig. 15 Configuration: TMP ServiceConfiguration: TMP addressSetting the RS 485 or Profibus address of the TURBOVAC i(X). If theTURBOVAC i(X) has a Profibus module, this is automatically recognised and the respective parameters are provided.ParametersDisplay of all parameters of the TURBOVAC i(X). The respective parameterscan be selected via a drop-down list. If you want to change a parameter, thisis possible using the input field or through the slide.Fig. 16 Configuration: TMP addressFig. 17 ParametersSystem: User settingsChanging of user name and passwordDefault setting upon delivery:User name: userPassword: userSystem: LanguageChange the language from German to English and vice versa.System: ClockSetting time and date. The UTC time is taken over via GET PC TIME.Fig. 18 System menu: user profileSystem: System infoInformation about the connected TURBOVAC i(X) and theTURBO.CONTROL i.System: Ethernet settingsDisplays the current IP address of the device, the subnet mask, the DNS server, the gateway address as well as the DHCP status. All these data can be changed through the entry field and the drop-down list.■DHCP on – automatic address assignment via DHCP , e.g. a router or com-pany network■DHCP off – setting when wishing to configure a static address.System: Data ExportExport of the error memory and the parameter settings into one csv file.Fig. 19 System infoFig. 20 System: NetzwerkeinstellungenOperation: Webserver21300702826_002_C0 - 12/2017 - © Leybold File uploadSoftware update of TURBO.CONTROL iA new firmware can be put into the dotted field per drag & drop or selected by clicking on the field. The respective file can be uploaded to the unit via UPLOAD.Logout of the web serverThe control hierarchy is not automatically returned to the TURBO.CONTROL i.The logout occurs automatically if the control hierarchy is set to Display on the TURBO.CONTROL i.Saving changed valuesFunctions or parameters are selected via a drop-down list.A value can be changed through a slide bar or by typing the value into the field.The change of a value becomes active through SET. In the case of CANCEL the original value remains.If the value is saved via SAVE (separate inquiry), it remains after a power reset.Caution: All values changed up to then are saved when the SAVE button is clicked.The saving of the pump parameters may take a few seconds. The pumpmust not be separated from the supply voltage during the saving procedure.Fig. 21 File UploadOperation: Data Viewer22300702826_002_C0 - 12/2017 - © Leybold2.5 Data viewerThe DataViewer can be downloaded on the Leybold homepage under Downloads à Download Software.This tool serves the purpose of analysing and assessing the data recorded from the pump system. Here the process engineering measurement data is displayed by way of a graph as well as in a table.Establishing the LinkThe IP address of the connected TURBO.CONTROL i is automatically detect-ed and displayed in the "Devices" window. In order to make a connection,click on the IP address and press "Connect".An IP address can be entered in the input field "IP address". This then appears in the "Devices" window via "Add Device".Fig. 22 Start screen of the DataViewerOperation: Data Viewer23300702826_002_C0 - 12/2017 - © Leybold Fig. 23 Trend displayDownload of data in the graph menuThe buttons in the lower section of the display allow the following:■Loading data from the device. Downloading is indicated through the coun-ter incrementing at the bottom right-hand corner. ■Opening a previously exported log file ■Exporting a downloaded log file into a .log file■Exporting a downloaded log file to the Excel CSV file formatUnder Graph the measured trend data is displayed in a graph. Through the red sliders, the selection window may be moved to a certain point of time and you may zoom into the data.Zooming into the data is effected also through the third mouse key or the key combination ALT + left mouse button. To remove or show the data, switch the checkmark at the corresponding data off or on.The scales can be shifted with the keyboard shortcut alt + left mouse click.Operation: Data Viewer24300702826_002_C0 - 12/2017 - © LeyboldData ListThrough the data list, all recorded data points can be viewed.Furthermore, a list of all relevant occurrences is shown in the right window. You can access the corresponding row in the data points by double-clicking on a row of events.You can access the corresponding point in the graph by double-clicking on a row of the data points.Fig. 24 Data list25300702826_002_C0 - 12/2017 - © Leybold NotesHeadquarter Leybold GmbH Bonner Strasse 498D-50968 Cologne T: +49-(0)221-347-0F: +49-(0)221-347-1250****************GermanyLeybold GmbHSales, Service, Support Center (3SC)Bonner Strasse 498D-50968 CologneT:+49-(0)221-347 1234F: +49-(0)221-347 31234*****************Leybold GmbH Sales Area North Branch Office Berlin Industriestrasse 10b D-12099 BerlinT:+49-(0)30-435 609 0F: +49-(0)30-435 609 10********************Leybold GmbH Sales Office South Branch Office MunichKarl-Hammerschmidt-Strasse 34D-85609 Aschheim-DornachT:+49-(0)89-357 33 9-10F: +49-(0)89-357 33 9-33******************************************Leybold Dresden GmbHService Competence Center Zur Wetterwarte 50, Haus 304D-01109 Dresden Service:T:+49-(0)351-88 55 00F: +49-(0)351-88 55 041*******************EuropeBelgiumLeybold Nederland B.V .Belgisch bijkantoorLeuvensesteenweg 542-9A B-1930 Zaventem Sales:T:+32-2-711 00 83F: +32-2-720 83 38********************Service:T:+32-2-711 00 82F: +32-2-720 83 38**********************FranceLeybold France S.A.S.Parc du Technopolis, Bâtiment Beta 3, Avenue du Canada F-91940 Les Ulis cedex Sales and Service:T:+33-1-69 82 48 00F: +33-1-69 07 57 38*****************************************Leybold France S.A.S.Valence Factory 640, Rue A. Bergès B.P . 107F-26501 Bourg-lès-Valence CedexT:+33-4-75 82 33 00F: +33-4-75 82 92 69************************Great BritainLeybold UK LTD.Unit 9Silverglade Business Park Leatherhead Road Chessington Surrey (London)KT9 2QL Sales:T: +44-13-7273 7300F: +44-13-7273 7301********************Service:T: +44-13-7273 7320F: +44-13-7273 7303**********************ItalyLeybold Italia S.r.l.Via Filippo Brunelleschi 2I-20093 Cologno Monzese Sales:T: +39-02-27 22 31F: +39-02-27 20 96 41********************Service:T: +39-02-27 22 31F: +39-02-27 22 32 17**********************NetherlandsLeybold Nederland B.V .Floridadreef 102NL-3565 AM Utrecht Sales and Service:T: +31-(30) 242 63 30F: +31-(30) 242 63 31******************************************SwitzerlandLeybold Schweiz AG Hinterbergstrasse 56CH-6312 SteinhausenWarehouse and shipping address:Riedthofstrasse 214CH-8105 Regensdorf Sales:T: +41-44-308 40 50F: +41-44-302 43 73********************Service:T: +41-44-308 40 62F: +41-44-308 40 60**********************SpainLeybold Hispánica, S.A.C/. Huelva, 7E-08940 Cornellá de Llobregat (Barcelona)Sales:T: +34-93-666 43 11F: +34-93-666 43 70********************Service:T: +34-93-666 46 11F: +34-93-685 43 70**********************AmericaUSALeybold USA Inc.5700 Mellon RoadUSA-Export, PA 15632T: +1-724-327-5700F: +1-724-325-3577*******************Sales:T: +1-724-327-5700F: +1-724-333-1217Service:T: +1-724-327-5700F: +1-724-325-3577BrazilLeybold do BrasilRod. Vice-Prefeito Hermenegildo Tonolli,nº. 4413 - 6B Distrito Industrial Jundiaí - SPCEP 13.213-086Sales and Service:T: +55 11 3395 3180F: +55 11 99467 5934******************************************AsiaP . R. ChinaLeybold (Tianjin)International Trade Co. Ltd.Beichen EconomicDevelopment Area (BEDA),No. 8 Western Shuangchen Road Tianjin 300400ChinaSales and Service:T: +86-400 038 8989T: +86-800 818 0033F: +86-22-2697 4061F: +86-22-2697 2017******************************************IndiaLeybold India Pvt Ltd.T -97/2, MIDC Bhosari Pune-411 026IndienSales and Service:T: +91-80-2783 9925F: +91-80-2783 9926********************************************JapanLeybold Japan Co., Ltd.HeadquartersShin-Yokohama A.K.Bldg., 4th floor 3-23-3, Shin-Yokohama Kohoku-ku, Yokohama-shi Kanagawa-ken 222-0033Japan Sales:T: +81-45-471-3330F: +81-45-471-3323********************Leybold Japan Co., Ltd.Tsukuba Technical Service Center 1959, Kami-yokobaTsukuba-shi, Ibaraki-shi 305-0854Japan Service:T: +81-29 839 5480F: +81-29 839 5485***********************MalaysiaLeybold MalaysiaLeybold Singapore Pte Ltd.No. 1 Jalan Hi-Tech 2/6Kulim Hi-Tech Park Kulim, Kedah Darul Aman 09000MalaysiaSales and Service:T: +604 4020 222F: +604 4020 221******************************************South KoreaLeybold Korea Ltd.3F . Jellzone 2 Tower Jeongja-dong 159-4Bundang-gu Sungnam-si Gyeonggi-doBundang 463-384, Korea Sales:T: +82-31 785 1367F: +82-31 785 1359********************Service:623-7, Upsung-Dong Cheonan-SiChungcheongnam-Do Korea 330-290T: +82-41 589 3035F: +82-41 588 0166**********************SingaporeLeybold Singapore Pte Ltd.42 Loyang DriveLoyang Industrial Estate Singapore 508962SingaporeSales and Service:T: +65-6303 7030F: +65-6773 0039******************************************TaiwanLeybold Taiwan Ltd.10F ., No. 32, Chenggong 12th St.,Zhubei City, Hsinchu County 302Taiwan, R.O.C.Sales and Service:T: +886-3-500 1688F: +886-3-583 3999******************************************Sales and ServiceL V _20469_2017 12.17。
- 1、下载文档前请自行甄别文档内容的完整性,平台不提供额外的编辑、内容补充、找答案等附加服务。
- 2、"仅部分预览"的文档,不可在线预览部分如存在完整性等问题,可反馈申请退款(可完整预览的文档不适用该条件!)。
- 3、如文档侵犯您的权益,请联系客服反馈,我们会尽快为您处理(人工客服工作时间:9:00-18:30)。
34
三、Run(运行)菜单
Turbo C操作环境介绍
按Alt+R可进入Run菜单, 该菜单有以下各项 Run(运行程序) 运行由Project/Project name项指定的 文件名或当前编辑区的文件。如果对上 次编译后的源代码未做过修改, 则直接 运行到下一个断点(没有断点则运行到结 束)。否则先进行编译、连接后才运行, 其热键为Ctrl+F9。 Program reset(程序重启) 中止当前的调试, 释放分给程序的空间, 其热键为Ctrl+F2。
21
操作步骤
Turbo C操作环境介绍
(D)配置路径。从上到下依次为: e:\turboc2\include e:\turboc2\lib e:\00 e:\turboc2 设置步骤:ALT+O↑↓功能键回车回车
22
操作步骤
Turbo C操作环境介绍
(E) 保存配置。按Esc键退出路径设置,选择
24
主菜单
Turbo C操作环境介绍
主菜单 在Turbo C 2.0主屏幕顶上一行, 显示下 列内容: File Edit Run Compile Project Options Debug Break/watch 除Edit外, 其它各项均有子菜单, 只要用Alt加 上某项中第一个字母(即大写字母), 就可进入该项 的子菜单中。
16
操作步骤
turbo C主屏幕 光标
Turbo C操作环境介绍
17
操作步骤
turbo C主屏幕 光标
Turbo C操作环境介绍
18
操作步骤
Turbo C操作环境介绍
(D)配置路径。从上到下依次为: e:\turboc2\include e:\turboc2\lib e:\00 e:\turboc2 设置步骤:使用ALT+O打开Option菜单
28
Turbo C操作环境介绍
Os shell(暂时退出)
Quit(退出) 说明:
暂时到DOS提示符, 此时可以运行DOS 命 令, 若想回到Turbo C , 只要在DOS状态下 键入EXIT即可。 退出TC, 返回到DOS操作系统中, 其热键为 Alt+X。 以上各项可用光标键移动色棒进行选择, 回车 则执行。也可用每项第一个大写字母直接选择。 若要退到主菜单或从它的下一级菜单列表框退 回均可用Esc键, Turbo C 2.0所有菜单均采用 这种方法进行操作, 以下不再说明。
40
五、Project(项目)菜单
Turbo C操作环境介绍
按Alt+P可进入Project菜单, 该菜单包括以下内容
Project name(项目名) 项目名具有.PRJ的扩展名, 其中包括将要 编译、连接的文件名。例如有一个程序由 file1.c, file2.c, file3.c组成, 要将这3 个文件编译装配成一个file.exe的执行文 件, 可以先建立一个file.prj的项目文件, 其内容如下: file1.c file2.c file3.c
12
操作步骤
Turbo C操作环境介绍
双击桌面快捷图标进入turbo C操作界面
按Esc键
13
操作步骤
turbo C主屏幕
Turbo C操作环境介绍
14
操作步骤
turbo C主屏幕
Turbo C操作环境介绍
主菜单
编辑区
信息区
功能键提示行
15
操作步骤
turbo C主屏幕
Turbo C操作环境介绍
32
Turbo C操作环境介绍
说明: Turbo C 2.0的双界符包括以下几种符 号: 花括符 {和} 尖括符 <和> 圆括符 (和) 方括符 [和 ] 注释符 /*和*/ 双引号 " 单引号 '
33
Turbo C操作环境介绍
Turbo C 2.0在编辑文件时还有一种功 能, 就是能够自动缩进, 即光标定位 和上一个非空字符对齐。在编辑窗口中, Ctrl+OL为自动缩进开关的控制键。
送桌面快捷方式。
5
操作步骤
Turbo C操作环境介绍
(1)配置Turbo C 2.0集成环境并启动。
(B)打开文件夹,找到tc.exe,设置属性并发
送桌面快捷方式。
6
操作步骤
Turbo C操作环境介绍
(1)配置Turbo C 2.0集成环境并启动。
(B)打开文件夹,找到tc.exe,设置属性并发
Turbo C操作环境介绍
Turbo C操作环境介绍
操作步骤
Turbo C操作环境介绍
(1)配置Turbo C 2.0集成环境并启动。
(A)复制Turboc2文件夹到某个盘,如E:\;
2
操作步骤
Turbo C操作环境介绍
(1)配置Turbo C 2.0集成环境并启动。
(A)复制Turboc2文件夹到某个盘,如E:\;
Save options, 保存在
e:\turboc2\tcconfig.tc
(2)编辑程序。
(3)保存程序。按F2
(4)编译和连接、运行程序。按Ctrl+F9组合键
(5)查看运行结果并分析。按Alt+F5组合键
23
Turbo C 2.0集成开发环境
Turbo C操作环境介绍
四个窗口构成了Turbo C 2.0的主屏幕, 以后的编 程、 编译、调试以及运行都将在这个主屏幕中进 行。下面详细介绍主菜单的内容。
36
Turbo C操作环境介绍
Step over(单步执行) 执行当前函数的下一条语句, 即使用户 函数调用, 执行长条也不会跟踪进函数 内部, 其热键为F8。 User screen(用户屏幕)
显示程序运行时在屏幕上显示的结 果。其热键为Alt+F5。
37
四、Compile(编译)菜单
31
Turbo C操作环境介绍
Ctrl+KY Ctrl+KR Ctrl+KW Ctrl+KP Ctrl+F1 则
块删除 读文件 存文件 块文件打印 如果光标所在处为TC库函数,
获得有关该函数的帮助
信息 Ctrl+Q[ Ctrl+Q] 查找TC 2.0双界符的后匹配符 查找TC 2.0双界符的前匹配符
19
操作步骤
Turbo C操作环境介绍
(D)配置路径。从上到下依次为: e:\turboc2\include e:\turboc2\lib e:\00 e:\turboc2
设置步骤:使用ALT+O打开Option菜单,使用↑↓功能键
20
操作步骤
Turbo C操作环境介绍
(D)配置路径。从上到下依次为: e:\turboc2\include e:\turboc2\lib e:\00 e:\turboc2 设置步骤:ALT+O↑↓功能键回车
3
操作步骤
Turbo C操作环境介绍
(1)配置Turbo C 2.0集成环境并启动。
(A)复制Turboc2文件夹到某个盘,如E:\;
并在E:\建一个自己的文件夹,如E:\00。
4
操作步骤
Turbo C操作环境介绍
(1)配置Turbo C 2.0集成环境并启动。
(B)打开文件夹,找到tc.exe,设置属性并发
送桌面快捷方式。
9
操作步骤
Turbo C操作环境介绍
(1)配置Turbo C 2.0集成环境并启动。
(B)打开文件夹,找到tc.exe,设置属性并发
送桌面快捷方式。
10
操作步骤
Turbo C操作环境介绍
(1)配置Turbo C 2.0集成环境并启动。
(A)复制Turboc2文件夹到某个盘,如E:\;
Turbo C操作环境介绍
按Alt+C可进入Compile菜单, 该菜单有以下几 个内容 Compile to OBJ(编译生成目标码) 将一个C源文件编译生成.OBJ目标文 件, 同时显示生成的文件名。其热键为 Alt+F9。 Make EXE file(生成执行文件) 此命令生成一个.EXE的文件, 并显示生 成的.EXE文件名。其中.EXE文件名是 下面几项之一。
29
二、Edit(编辑)菜单
Turbo C操作环境介绍
按Alt+E可进入编辑菜单, 若再回车, 则光标 出现在编辑窗口, 此时用户可以进行文本编辑。 可用F1键获得有关编辑方法的帮助信息。与 编辑有关的功能键如下: F1 获得Turbo C 2.0编辑命令帮 助信息 F5 扩大编辑窗口到整个屏幕 F6 在编辑窗口与信息窗口之间进 行切换 F10 从编辑窗口转到主菜单
38
Turbo C操作环境介绍
由Project/Project name说明的项目文 件名。 若没有项目文件名, 则由Primary C file 说明的源文件。 若以上两项都没有文件名, 则为当前窗 口的文件名。 Link EXE file(连接生成执行文件) 把当前.OBJ文件及库文件连接在一起生成.EXE 文件。 Build all(建立所有文件) 重新编译项目里的所有文件, 装配生成.EXE文件。 不作过时检查(上面的命令要作过时检查, 即如 果目前项目里源文件的日期和时间与目标文 件相 同或更早, 则拒绝对源文件进行编译)。
26
Turbo C操作环境介绍
Pick(选择) 将最近装入编辑窗口的8个文件列成一个表让用 户选择, 选择后将该程序装入编辑区, 并将光 标置在上次修改过的地方。其热健为Alt-F3。 New(新文件) 说明文件是新的, 缺省文件名为NONAME.C, 存盘时可改名。 Save(存盘) 将编辑区中的文件存盘, 若文件名是 NONAME.C时, 将询问是否更改文件名, 其热 键为F2。