开源硬件平台(6)——BeagleBone.演示稿
BeagleBone Black 安装操作系统说明书

BeagleBone Black: Installing OperatingSystemsCreated by Justin Cooperhttps:///beaglebone-black-installing-operating-systemsLast updated on 2023-08-29 02:20:17 PM EDT33445571012Table of ContentsOverviewChoosing an Operating SystemAngstrom• Download• Default User/Password and SSH Ubuntu• Download• Default User/Password and SSH Copying the Image to a microSD CardWindowsMac OS X• Using a GUI• Using the command line Flashing the BeagleBone BlackFAQOverviewThe BeagleBone Black includes a 2GB or 4GB on-board eMMC flash memory chip. It comes with the Debian distribution factory pre-installed. You can flash new operating systems including Angstrom, Ubuntu, Android, and others. The following pages will illustrate the steps to getting the latest of each type of supported distribution onto the on-board eMMC.In addition to the eMMC, you can also boot directly from a microSD card similarly to the original BeagleBone.Choosing an Operating SystemThere are a few operating systems you can choose to use on your BeagleBone Black. The following sub-pages include the download location, and some useful information about each operating system you may want to use.Angstrom, Ubuntu, and Debian all appear to have stable images.Android is currently working from a 3rd party build. We don't have a guide on how toinstall this as of yet.AngstromAngstrom is the default Linux distribution that is pre-installed on the eMMC on the BeagleBone Black. It's a stripped down version of Linux specifically designed for embedded devices.Depending on how long ago you purchased your BeagleBone Black, you may not have the latest version of Angstrom installed. It's usually preferable to get the latest version, especially this early in the product's lifecycle.DownloadTo start with, download the latest version of Angstrom for the BeagleBone Black. You can find the latest version at the BeagleBoard Latest Images () page. Once you've downloaded the file, you'll want to jump to the section for your specific OS (Mac OS X, Linux, Windows).Default User/Password and SSHThe default login user/password for angstrom is "root". There is no password set, so you can bypass the password prompt by just hitting enter without typing anything in. Angstrom comes with the Avahi Daemon pre-installed. This is really useful because you can now ssh in simply by using 'beaglebone.local' instead of trying to find the IP address. For example, type this into your favorite terminal:************************UbuntuUbuntu is an unsupported operating system for the BeagleBone Black (BBB), but does have quite a few users, and a stable image with the 3.8 Linux kernel. DownloadTo start with, download the latest version of Ubuntu for the BeagleBone Black. You can find the latest version at the Ubuntu software support page (). Choose the file that is compatible with flashing to the eMMC. Once you've downloaded the file, you'll want to jump to the section for your specific OS (Mac OS X, Linux, Windows).It is important that you download a version of Ubuntu specifically built for the BeagleBone Black unless you're an expert at configuring Linux and working with thekernel. It's not necessary to download the most recent version, but it's highly recommended. The BBB ecosystem is rapidly changing, and each release offers many new improvements.Default User/Password and SSHIf you've used the the image to flash Ubuntu to the eMMC, the default username for Ubuntu 13.04 (Raring Ringtail) is "ubuntu". The default password is 'temppwd'. Ubuntu does not come with the avahi daemon pre-installed, so you'll need to ssh in using the IP address using your favorite terminal:**************.1.15Copying the Image to a microSD CardOnce you've downloaded an image for the operating system you're interested in using, you'll need to copy it to a microSD card in order to flash it onto the BeagleBone Black's built-in eMMC flash. It sounds confusing, but it's rather simple.Navigate to the next sub-page for the host operating system you'll be using to copy the image to the microSD card.WindowsOnce you've downloaded the img.xz file, in my case it is titled BBB-eMMC-flasher-2013.05.08.img.xz, you'll need to extract the archive. To extract the archive, you'll want to download and install 7zi ()p. 7zip is a free and open source utility that is able to extract img.xz files (among many other file types!).It will take a minute or two to extract the file, and you should then end up with a 3.66 GB .img file (notice that the .xz is removed from the file extension).Next, download the free Win32 Disk Imager () software that we'll use to copy theimage to the microSD card. After downloading the software, extract it from the zip file (7zip can be used here as well).Launch the Win32 Disk Imager Software by double clicking the "Win32DiskImager"file in the folder that you extracted it to. You should see the following screen once it launches:Click the folder icon (arrow pointed to it above), and choose the image file, and click Open:Next, insert your SD card, and choose the correct "Device" drive letter. You may want to open windows explorer to help figure out which one to choose. Another way is to view the drive letters by clicking the dropdown below "Device", and then inserting your SD card to see which one gets added to the list.Once you've made your selections, click the "Write" button illustrated above, and wait for it to complete writing to your SD Card.You can now continue on to the Flashing the BeagleBone Black () page to continue. Mac OS XOnce you've downloaded the img.xz file, in my case it is titled BBB-eMMC-flasher-2013.05.08.img.xz, you'll need to extract the archive. I've found the easiest utility to use is called "The Unarchiver". You can find it on the app store, or from their site (). Once you've installed "The Unarchiver", just navigate to the .img.xz file, typically located in Finder in the "Downloads" section, and double click the file to begin extraction.It will take a minute or two to extract the file, and you should then end up with a 3.66 GB .img file (notice that the .xz is removed from the file extension).There are now a few ways to continue. You can use terminal commands, or software that will guide you through it. Let's start with the guided software using a graphical interface.Using a GUIFirst, you'll want to download PiFiller (). It was designed to install images onto SD cards for the Raspberry PI, but there isn't any reason why it wouldn't work for BeagleBone images as well.Once you've downloaded Pi Filler, locate it in Finder (typically Downloads), and double click it to extract it. You may want to copy it to your Applications folder.Launch Pi Filler, and follow the on-screen prompts. The first thing it will ask is for you to locate your .img file. It mentions the Raspberry Pi, but you can ignore that, it doesn't make any difference.Select the appropriate .img file, and click "Choose".Then, insert your microSD card into your Mac, and click Continue. Pi Filler will look foryour SD Card, and then notify you once it finds it.Click Continue once you're certain its found the correct SD card.It can take 15-20 minutes to write the image to the microSD card. Once it's complete, remove the microSD card and insert it into the powered down BeagleBone Black. You will only be able to insert the card one way, and it needs to snap in fully. Navigate to the Flashing the BeagleBone Black () page, and follow the instructions on how to flash the newly copied image onto the on-board flash memory of the BeagleBone Black.Using the command lineAnother alternative is to flash the microSD card entirely from the command line. You'll first want to extract the img.xz file you've downloaded, and the best program for that is still "The Unarchiver" mentioned in the GUI instructions. Once you've got the extracted .img file, open a terminal to get started.Execute the following command to see the list of connected storage devices:df -hNext, insert your microSD card, and then execute the following command again:df -hCompare the two outputs, and find the newly added device. In my case, the microSD card was '/dev/disk4s1'.Once you've got the name of the device, you'll want to unmount that disk using the following command, but replacing the specifics with your card details:sudo diskutil unmount /dev/disk4s1Now, you'll want to execute the command that actually copies the image onto the SD card. You have to be really careful here, and make sure you're entering the correct device details. You could end up copying over the wrong drive, such as your master hard disk, and then you'd end up having a bad day. Double check everything!Note that we subtly changed the device name from "/dev/disk4s1" to "/dev/rdisk4". You'll want to do the same when you execute the below command.Also, choose the right file location for your .img file in the input file field (if=...).sudo dd bs=1m if=~/Downloads/BBB-eMMC-flasher-2013.05.08.img of=/dev/rdisk4This process can take anywhere from 15-30 minutes depending on the speed of your computer and microSD card. Once it has completed, remove the microSD card, and insert it fully into the BeagleBone Black microSD card slot.Navigate to the Flashing the BeagleBone Black () page, and follow the instructions on how to flash the newly copied image onto the on-board flash memory of the BeagleBone Black.Flashing the BeagleBone BlackNow that you have the latest image of Angstrom loaded onto your microSD card slot, you'll need to flash it onto the on-board flash memory of the BeagleBone Black.To start, make sure the BeagleBone Black is powered down, and unplugged from thepower source.Now, insert the microSD card into the slot on the back of the BeagleBone Black. It should snap into place.Now, find the "User Boot" button. it's located on the same side of the BeagleBone Black as the microSD card slot, and is the only button in that area. See the below screenshot (from ) highlighting the 'User Boot" button.Hold the "User Boot" button down, and then plug in the power (USB or 5V adaptor). Keep holding down the button until you see the bank of 4 LED's light up for a few seconds. You can now release the button.It will take anywhere from 30-45 minutes to flash the image onto the on-board chip. Once it's done, the bank of 4 LED's to the right of the Ethernet will all turn off. You can then power down your BeagleBone Black.Remove the SD Card, and power up your BeagleBone Black.FAQWhen I attempt to flash the OS onto the on-board eMMC memory, nothing happens. What do I do?If you've followed the "Flashing the BeagleBone Black" instructions exactly, and nothing really happens when you attempt to flash it (the 4 LED's don't light up),then you can try the following suggestions:Ensure you have a good power supply. This is the most important thing as flashing the BBB is pretty power intensive. The USB power supply featured in this guide is fully capable.Unplug the Ethernet while flashing. It can consume a bit of powerunnecessarily.Try again. Sometimes it can take a couple of tries to get the process going.Also, make sure you've held the user boot button down the entire time until the LED's light up, prior to plugging in the power. Re-seat the SD card.Copy the image to your SD card again. It's possible that this process wasn't fully successful.How do I use ssh-keygen to generate ssh keys on Angstrom?Angstrom comes pre-installed with the dropbear ssh package by default, instead of the more common openssh package. The easiest way to generate ssh keys is to simply install the openssh-keygen client.You can do this by executing the following command:opkg update ; opkg install openssh-keygen1. 2. 3. 4.How do I set the time and date? It's always wrong when I reboot.There are a few options. The first would be to setup a real time clock breakout board.Another option is to execute the following command (configure it to execute on startup as well):/usr/bin/ntpdate -b -s -u How can I use opkg upgrade on Angstrom?Execute the following commands. tmpfs is quite small on the default Angstrom installation.opkg --tmp-dir ~ updateopkg --tmp-dir ~ upgrade。
三大主流开源硬件对比分析

三大主流开源硬件对比:Arduino vs BeagleBone vs Raspberry Pi发表于2013-05-02 14:07| 71688次阅读| 来源CSDN| 58条评论| 作者翟方庆开源硬件ArduinoRaspberry PiBeagleBoneGo Mobile摘要:本文对比了三款比较流行的,也是比较具代表意义的开源硬件平台Arduino Uno、BeagleBone和Raspberry Pi。
从性能以及可扩展性等方面对它们进行对比,帮助开发者了解如何选择适合自己的开源硬件平台。
软硬件整合是今年一再被提及的话题,如今我们也可以看到不少硬件创业的成功案例,比如Jawbone Up、Pebble手表等可穿戴设备,它们可与用户的手机同步,实现软件与硬件的结合。
通过硬件创新与软件整合的概念还有许多。
但是如何将创意变为现实,是一个难题。
许多大公司均选择硬件闭源,从而形成的技术壁垒与专利版权,阻碍着小规模创新者的发展。
而开源硬件,让创业者可以更轻松地将创意转化为现实。
这篇文章由Roger Meike撰写,并在发布于Digital Dinner上。
文中对比了三款最流行的,也是最具代表意义的开源硬件平台Arduino Uno、BeagleBone和Raspberry Pi。
Roger从性能以及可扩展性等方面对它们进行对比,帮助开发者了解如何选择适合自己的开源硬件平台。
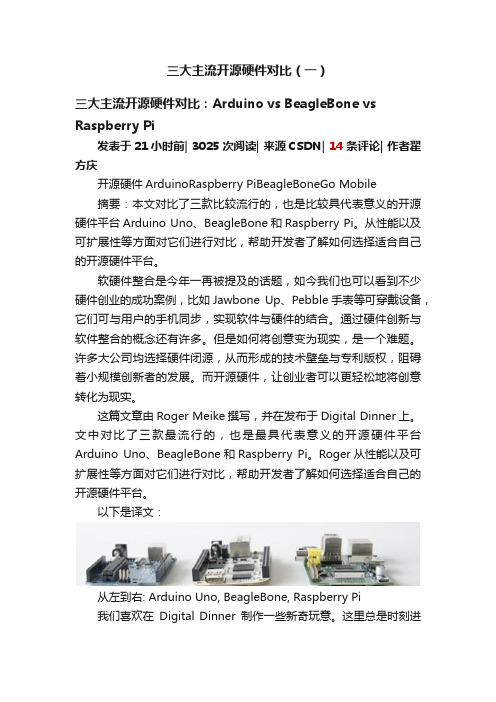
以下是译文:从左到右: Arduino Uno, BeagleBone, Raspberry Pi我们喜欢在Digital Dinner制作一些新奇玩意。
这里总是时刻进行着各种项目。
这些天以来,我们大部分的项目都包含了一种电子零件——微控制器。
如果你还没被“创客”(Maker)灵魂附体,我们强烈建议你动起手来试一试,它会让你非常有成就感!如果本身在编程方面有一定基础,那么一些网站、平台和工具可以帮助你获得硬件开发的所需知识,逐步让你可以使用按钮、旋钮和从动系统,做出实际可用的产品。
BeagleBone

=================================================================== 文章与文章之间的分隔线 ============================ 文章的结束 ===================================================================wangkj 发表于 2013-8-22 09:49:27 |只看该作者 |倒序浏览 回复 |返回版面|屏蔽本帖最后由 wangkj 于 2013-8-22 21:14 编辑做板子,找编译工具,编译内核,交叉编译,烧写内核,自己写程序,这是老式的linux arm学习方式过时啦!术业有专攻,现在每个步骤,都有专门的开源先小组去做,对于想玩转linux arm的爱好者玩家而言,就像攒电脑一样,找到不同的部件,用螺丝刀拧起来。
搞定!=======================================wangkj 发表于 2013-8-22 11:42:07 |只看该作者 点评回复 |返回版面|屏蔽继续说现在的选型。
目前的项目,需要操作系统,128M ram,128M flash,工业级.符合条件的 atmel的9G45,但atmel以前趁火打劫,高价卖自己的芯片,弄的很多公司很惨,躲开。
而且,9G45用户不是很多,频率一般。
samsung的 s5pc110系列,这个不错,但工业级的芯片很难买到。
st的arm: 最多就是支持sdram,做到128M sdram成本较高。
而且,带sdram跑linux的属于新片,俺不做小白鼠。
fsl 的imx5xx系列,这个也符合要求,但fsl的A8用户不多,技术支持一般。
当然,他的低端芯片不错。
正选队员出场:ti的am335x 720M 2G 闪存,还有tf卡,512M ddr3 sdram!工业级芯片能买到,原理图pcb全部公开,现成的板子390块钱就能买到。
这款开放式硬件,迷倒不少电子发烧友!

这款开放式硬件,迷倒不少电子发烧友!
今天要说的这个硬件,性价比绝对高。
我们知道BeagleBone®开放式硬件计算机平台可以打造功能齐全的机器人控制,可以运行Linux系统,而Blue是社区支持的全开源产品。
BeagleBone Blue拥有高性能与灵活的网络功能,加上实时可操作的Linux 系统,以及一套可快速、低成本地构建移动机器人的外围设备,能够快速构建移动机器人。
通过利用预配置WiFi 接入点,只需连上电池并打开Web 浏览器,即可执行代码开发,真的是专为电子发烧友设计。
下面是实物展示:
那幺这款硬件到底有哪些功能?
在实物的开发平台上,具有可充电的板载电池管理系统、用于6V伺服电机或电子速度控制器的PWM/PPM输出、直流电机驱动器、正交编码器输入、板载传感器、各种GPIO和串行协议连接器、连接PC的USB接口、两个用户配置按钮和11个用户配置LED指示灯等等。
六年级上册信息技术2.1《开源硬件及软件》川教版

课题
第1节《开源硬件及软件》
单元
二单元
学科
信息技术
年级
六年级
学习
目标
【核心素养】
信息意识:
能根据解决问题的需要,利用编程软件实现智能感知,并根据教室、图书角的光线情况,实现自动调光。具有自主动手解决问题,掌握核心技术的意识。
计算思维:
在教师指导下,学习开源硬件的基础知识,体验智能家居对生活带来的便利。能通过软件和硬件相结合的项目活动采集、分析和呈现数据,用编程实现智能感知。将知识建构、技能培养与思维发展融入信息技术核心素养之中。
欢欢发现用于编程的软件有很多,其中有许多是可以自由使用的开源软件。
情景展示:
欢欢:爷爷,Arduino板怎么用呢?
爷爷:我们可以借助软件编程来实现对Arduino板的控制。
2、开源软件
开源软件就是开放源代码的软件,在遵守相关协议的前提下,人们可以自由使用、修改、分发。常见的安卓、Linux等属于开源的系统软件,Seratch、Mind+等编程软件属于开源的应用软件。
【教学目标】
知识与技能:
1、了解开源硬件的定义及信息;
2、了解开源软件;
3、了解Mind+界面由哪几部分组成;
4、了解软件与硬件的通讯。
过程与方法:
通过新知讲解,了解开源硬件和开源软件;通过探索实践,熟悉Mind+软件。
情感、态度与价值观:
拓展学生知识面,提高学生生活实践应用能力和信息素养,使学生乐于使用信息技术解决生活中的问题。培养学生的计算机思维和自主探究、小组合作能力。培养孩子们的动手操作能力。
欢欢:爷爷,接下来我该怎么做呢?
爷爷:我们需要让Mind+识别到Arduino主控板。
三大主流开源硬件对比(一)
三大主流开源硬件对比(一)三大主流开源硬件对比:Arduino vs BeagleBone vs Raspberry Pi发表于21小时前| 3025次阅读| 来源CSDN| 14条评论| 作者翟方庆开源硬件ArduinoRaspberry PiBeagleBoneGo Mobile摘要:本文对比了三款比较流行的,也是比较具代表意义的开源硬件平台Arduino Uno、BeagleBone和Raspberry Pi。
从性能以及可扩展性等方面对它们进行对比,帮助开发者了解如何选择适合自己的开源硬件平台。
软硬件整合是今年一再被提及的话题,如今我们也可以看到不少硬件创业的成功案例,比如Jawbone Up、Pebble手表等可穿戴设备,它们可与用户的手机同步,实现软件与硬件的结合。
通过硬件创新与软件整合的概念还有许多。
但是如何将创意变为现实,是一个难题。
许多大公司均选择硬件闭源,从而形成的技术壁垒与专利版权,阻碍着小规模创新者的发展。
而开源硬件,让创业者可以更轻松地将创意转化为现实。
这篇文章由Roger Meike撰写,并在发布于Digital Dinner上。
文中对比了三款最流行的,也是最具代表意义的开源硬件平台Arduino Uno、BeagleBone和Raspberry Pi。
Roger从性能以及可扩展性等方面对它们进行对比,帮助开发者了解如何选择适合自己的开源硬件平台。
以下是译文:从左到右: Arduino Uno, BeagleBone, Raspberry Pi我们喜欢在Digital Dinner制作一些新奇玩意。
这里总是时刻进行着各种项目。
这些天以来,我们大部分的项目都包含了一种电子零件——微控制器。
如果你还没被“创客”(Maker)灵魂附体,我们强烈建议你动起手来试一试,它会让你非常有成就感!如果本身在编程方面有一定基础,那么一些网站、平台和工具可以帮助你获得硬件开发的所需知识,逐步让你可以使用按钮、旋钮和从动系统,做出实际可用的产品。
openplc实现方法

openplc实现方法OpenPLC是一种基于开源硬件和软件的可编程逻辑控制器(PLC)解决方案,它使用户能够使用开源工具和技术来构建自己的PLC系统。
本文将介绍OpenPLC的实现方法,包括硬件和软件的选择、PLC程序编写和调试等方面。
一、硬件选择在选择硬件时,需要考虑PLC系统的规模和性能要求。
OpenPLC支持多种硬件平台,包括Arduino、Raspberry Pi和BeagleBone等。
对于小型应用,Arduino可能是一个经济实惠的选择,而对于大型或高性能的应用,Raspberry Pi或BeagleBone可能更合适。
此外,还需要选择适当的输入输出模块,以满足系统的输入输出需求。
二、软件选择OpenPLC的软件部分主要包括OpenPLC运行时和PLC编程环境。
OpenPLC运行时是一个基于Linux系统的软件,负责解释和执行PLC 程序。
PLC编程环境用于编写和调试PLC程序。
OpenPLC运行时可以在支持的硬件平台上安装和运行。
对于Raspberry Pi和BeagleBone等平台,可以使用官方提供的镜像文件进行安装。
对于Arduino平台,可以使用Arduino IDE和OpenPLC的库文件进行编程。
PLC编程环境有多种选择,包括Ladder Logic、Structured Text和Function Block Diagram等。
Ladder Logic是一种图形化的编程语言,类似于传统的继电器逻辑图。
Structured Text是一种基于文本的编程语言,类似于C语言。
Function Block Diagram是一种图形化的编程语言,类似于电路图。
三、PLC程序编写PLC程序是OpenPLC系统的核心部分,它定义了PLC的逻辑和功能。
编写PLC程序时,需要根据应用需求设计逻辑关系和功能模块,并将其转化为相应的PLC程序。
在使用Ladder Logic编写PLC程序时,可以使用图形化的工具进行逻辑关系的设计和调试。
2.2开源硬件开发基础优秀教学案例人教中图版高中信息技术选择性必修6开源硬件项目设计

4. 教师对学生的项目设计过程和成果进行全面评价,关注学生的知识掌握、能力发展和品质培养,为学生的持续进步提供指导和建议。
四、教学内容与过程
(一)导入新课
1. 利用多媒体展示一些生活中常见的开源硬件应用案例,如智能家居、可穿戴设备等,引发学生的兴趣和好奇心。
2. 向学生介绍本节课的主题:“开源硬件项目设计”,并提出本节课之前学过的相关知识,为新课的学习做好铺垫。
(二)讲授新知
1. 介绍开源硬件的定义、特点和应用领域,让学生了解开源硬件的概念和基本知识。
2. 讲解开源硬件平台的使用方法,如Arduino、Raspberry Pi等,让学生掌握基本的使用技巧。
1. 培养学生对信息技术学科的兴趣,增强他们对开源硬件和创新的热爱,激发他们不断探索未知领域的动力。
2. 通过开源硬件项目设计,让学生体验到成功的喜悦,增强他们的自信心和自我成就感。
3. 培养学生关注社会、关爱环境的责任感,使他们意识到开源硬件在可持续发展方面的重要作用。
4. 引导学生树立正确的价值观,明白知识的力量,学会与他人分享、协作,培养良好的团队精神。
2. 创新性:在教学过程中,本案例鼓励学生进行创新性设计,引导学生关注开源硬件在实际生活中的应用,激发他们的创新意识。学生通过独立思考和团队协作,设计出具有创新性的开源硬件项目,提高了他们的创新能力。
3. 合作性:本案例采用小组合作的形式,组织学生进行项目设计和讨论。在合作过程中,学生学会了沟通、协商、分工和合作,培养了团队精神和协作能力。
在学科知识方面,本章节主要介绍了开源硬件的定义、特点和应用领域,以及如何使用开源硬件平台进行项目设计。为了让学生更好地掌握这些知识,我以实际项目为载体,引导学生深入了解开源硬件的原理和应用,提高他们在实际项目中解决问题的能力。
- 1、下载文档前请自行甄别文档内容的完整性,平台不提供额外的编辑、内容补充、找答案等附加服务。
- 2、"仅部分预览"的文档,不可在线预览部分如存在完整性等问题,可反馈申请退款(可完整预览的文档不适用该条件!)。
- 3、如文档侵犯您的权益,请联系客服反馈,我们会尽快为您处理(人工客服工作时间:9:00-18:30)。
中国版的BeagleBone——BB-Black
• • 中国版的BeagleBone称作BB-Black,价格约¥380,是深圳市英蓓特科 技有限公司推出的一款基于AM3359处理器的开发套件BB-Black。 与BeagleBone相同,处理器集成了高达1GHz的ARM Cortex-A8 内核,并 提供了丰富的外设接口。
中国版的BeagleBone——BB-Black
Beagl用的是TI公司的AM3359处理器,是一款ARM Cortex-A8单 核32位RISC处理器,是一款用于工业现场实时控制的高可靠性高端实时 嵌入式控制的处理器,Arduino即将推出的新款高端产品就要使用这一 处理器。 • AM3359支持Linux、WinCE等操作系统,具有SDRAM和Flash存储器支持 能力,存储器具有强大的纠检错校验能力,通过eMMC接口支持SD/TF 卡等外部存储,GPIO/ADC/PWM支持外部采集和控制功能,拥有 UART/SPI/I2C/CAN/USB Host/USB OTG/以太网/LCD等常用的数据通信接 口,具备GPMC接口支持高速存储器型器件(如FPGA等)的控制和访问。 • AM3359功耗很低,执行MPEG-4、H.264编解码和3D图像处理等高强度 运算时,功耗也仅600~700mW。 • AM3359 内置的POWERVR SGX图形加速器子系统,可用于3D图形加速 以支持显示和游戏效果,该子系统的主要特性如下:
BeagleBone技术规格
BeagleBone构成及接口
BeagleBone软件系统
• BeagleBone主要针对嵌入式控制应用,相比Raspberry Pi而言更类似于 Arduino,但是凭借32位的ARM处理器,其运算处理能力比采用8位MCU 的Arduino强大得多。BeagleBone可运行Linux,也可直接编程运行。 与Arduino类似,BeagleBone的开发工作及开发环境主要集中在PC上位 机中,设备通过USB连接PC后被系统识别为一个硬件外设。
开源软件和开源硬件都在于共享,分 享。不管是开源软件也好,开源硬件 也好,都有四个维度: 第一:人人可用(任何人可以任何目 的自由的使用); 第二:人人可探(任何人可以探知其 原理); 第三:人人可改(任何人可以按照自 己的方式自由修改); 第四:人人可再分发(任何人可以把 自己修改过成果自由地再次发布)。
•
BeagleBone软件系统
• 这是其PC端的IDE开发环境:
BeagleBone软件系统
• 板子加电并通过网线连接PC后,可以通过PC上的浏览器访问其上运行 的一个内置Web服务器页面:
BeagleBone扩展资源
• 类似Arduino,BeagleBone的主要特点是扩展板资源丰富:
BeagleBone扩展资源
BeagleBone的处理器
BeagleBone的处理器
BeagleBone的处理器
工业实时以太网
• AM3359最大特点是内置2个10/100/1000Mbps以太网接口(但Beaglebone只配 备了其中一个以太网接口,且速率为10/100Mbps),支持多种工业实时以太网 标准(如EtherCAT、PROFIBUS、EtherNet/IP等,包含对IEEE1588等支持,实时 性高),便于构建现场控制的工业实时以太网控制网络。
开源硬件平台
——BEAGLEBONE
随着嵌入式软硬件的发展,各项技术 的集成度越来越高。软硬件结合开发 的门槛越来越高,工程师学习的周期 也越来越长。 这两年,以Arduino为代表的开源硬 件运动在世界范围内越来越普及,用 户群体开始从工程师扩散到大学生, 然后到中学生,甚至小学生。各种开 源硬件平台的出现,通过全球网络社 区的驱动共享资源,极大的降低了学 习门槛,刺激了创新,加速了各种创 意从构思到实现的落地。
Tile-Based架构,处理能力高达20Mploy/秒 通用可扩展渲染引擎是一个具有像素和顶点渲染功能的多线程引擎 超过Microsoft VS3.0、PS3.0和OGL2.0的高级渲染功能指令集 工业标准API,支持Direct3D Mobile、OGL-ES 1.1和2.0、OpenVG 1.0和OpenMax
BeagleBone扩展资源
BeagleBone扩展资源
BeagleBone扩展高速FPGA
• BeagleBone凭借AM3359处理器的支持,通过其扩展的GPMC接口(通 用存储器控制接口,数据/地址/控制并行访问接口,用于与FLASH、 SRAM、FPGA等实现高速并行连接),可以非常方便地扩展高速FPGA 应用,如音视频处理、通信、软件无线电等,这是Arduino采用的8位低 速MCU难以具备的功能。
BeagleBone概述
• 开源硬件社区中另一个比较知名的平台是由德州仪器(TI)和Dig-Key合 作开发的BeagleBone(狗骨头),价格约¥380,使用TI公司的元器件, 并形成了一个TI开发者的社区。 • BeagleBone的开放程度更高,其硬件的原理图和PCB都是开放的,可免 费下载,采用的是Cadence Allegro软件格式。
工业实时以太网
AM3359的以太网使用 模式
AM335x的以太网有3种使用模式: • 缺省模式下使用内部的ALE(Automatic Learning Engine),设置一个地 址,用于一个网段,内部识别来自两个网口的通信,类似双通道冗余 设置:
AM3359的以太网使用 模式
• ETH1(Dual MAC Mode)模式,设置不同的地址,用于不同的网段:
AM3359的以太网使用 模式
• NAT(Gateway Mode),网关模式,用于不同网络环境间的互通:
谢谢!