JAXWS实现WebService
真正的轻量级WebService框架——使用JAX-WS(JWS)发布WebService
真正的轻量级WebService框架——使⽤JAX-WS(JWS)发布WebService WebService历来都很受重视,特别是Java阵营,WebService框架和技术层出不穷。
知名的XFile(新的如CXF)、Axis1、Axis2等。
⽽Sun公司也不⽢落后,从早期的JAX-RPC到现在成熟的、⽀持RPC调⽤与消息传递的JAX-WS都经过了市场的考验,⼗分成熟,⽽且使⽤JAX-WS开发WebService的收益是很⼤的,它是轻量级的。
我们使⽤JAX-WS开发WebService只需要很简单的⼏个步骤:写接⼝和实现=>发布=>⽣成客户端(测试或使⽤)。
⽽在开发阶段我们也不需要导⼊外部jar包,因为这些api都是现成的。
⾸先是接⼝的编写(接⼝中只需要把类注明为@WebService,把要暴露给客户端的⽅法注明为@WebMethod即可,其余如@WebResult、@WebParam等都不是必要的,⽽客户端和服务端的通信⽤RPC 和Message-Oriented两种,区别和配置以后再说):package service;import java.util.Date;import javax.jws.WebMethod;import javax.jws.WebParam;import javax.jws.WebResult;import javax.jws.WebService;import javax.jws.soap.SOAPBinding;/*** 作为测试的WebService接⼝** @author Johness**/@WebService@SOAPBinding(style = SOAPBinding.Style.RPC)public interface SayHiService {/*** 执⾏测试的WebService⽅法*/@WebMethodvoid SayHiDefault();/*** 执⾏测试的WebService⽅法(有参)** @param name*/@WebMethodvoid SayHi(@WebParam(name = "name") String name);/*** 执⾏测试的WebService⽅法(⽤于时间校验)** @param clentTime 客户端时间* @return 0表⽰时间校验失败 1表⽰校验成功*/@WebMethod@WebResult(name = "valid")int CheckTime(@WebParam(name = "clientTime") Date clientTime);}然后是实现类(注解@WebService及其endpointInterface属性是必要的):package service.imp;import java.text.SimpleDateFormat;import java.util.Date;import javax.jws.WebService;import javax.jws.soap.SOAPBinding;import service.SayHiService;/*** 作为测试的WebService实现类** @author Johness**/@WebService(endpointInterface = "service.SayHiService")@SOAPBinding(style = SOAPBinding.Style.RPC)public class SayHiServiceImp implements SayHiService {@Overridepublic void SayHiDefault() {System.out.println("Hi, Johness!");}@Overridepublic void SayHi(String name) {System.out.println("Hi, " + name + "!");}@Overridepublic int CheckTime(Date clientTime) {// 精确到秒String dateServer = new java.sql.Date(System.currentTimeMillis()).toString()+ " "+ new java.sql.Time(System.currentTimeMillis());String dateClient = new SimpleDateFormat("yyyy-MM-dd HH:mm:ss").format(clientTime);return dateServer.equals(dateClient) ? 1 : 0;}}然后是发布(⼀般有两种⽅式): ⽅式⼀(此⽅式只能作为调试,有以下bug: jdk1.6u17?以下编译器不⽀持以Endpoint.publish⽅式发布document⽅式的soap,必须在service接⼝和实现类添加“@SOAPBinding(style =SOAPBinding.Style.RPC)”注解; 访问受限,似乎只能本机访问(应该会绑定到publish的URL上,如下使⽤localhost的话就只能本机访问)……):package mian;import javax.xml.ws.Endpoint;import service.imp.SayHiServiceImp;public class Main {/*** 发布WebService* 简单*/public static void main(String[] args) {Endpoint.publish("http://localhost:8080/testjws/service/sayHi", new SayHiServiceImp());}}⽅式⼆(基于web服务器Servlet⽅式): 以Tomcat为例,⾸先编写sun-jaxws.xml⽂件并放到WEB-INF下:<?xml version="1.0" encoding="UTF-8"?><endpoints xmlns="/xml/ns/jax-ws/ri/runtime"version="2.0"><endpoint name="SayHiService"implementation="service.imp.SayHiServiceImpl"url-pattern="/service/sayHi"/></endpoints>然后改动web.xml,添加listener和servlet(url-pattern要相同哦):<?xml version="1.0" encoding="UTF-8"?><web-app xmlns:xsi="/2001/XMLSchema-instance" xmlns="/xml/ns/javaee" xmlns:web="/xml/ns/javaee/web-app_2_5.xsd" xsi:schemaLocation="/xml/ns/javaee http://ja <listener><listener-class>com.sun.xml.ws.transport.http.servlet.WSServletContextListener</listener-class></listener><servlet><servlet-name>SayHiService</servlet-name><servlet-class>com.sun.xml.ws.transport.http.servlet.WSServlet</servlet-class></servlet><servlet-mapping><servlet-name>SayHiService</servlet-name><url-pattern>/service/sayHi</url-pattern></servlet-mapping><welcome-file-list><welcome-file>index.html</welcome-file><welcome-file>index.htm</welcome-file><welcome-file>index.jsp</welcome-file></welcome-file-list></web-app>最后部署到Tomcat⾥,值得⼀提的是您可能需要添加以下jar包(因为Tomcat没有): 启动Tomcat。
SpringBoot使用JAX-WS调用WebService服务

SpringBoot使⽤JAX-WS调⽤WebService服务除了 CXF 我们还可以使⽤ Spring Boot ⾃⾝默认的组件 JAX-WS 来实现 WebService 的调⽤。
1 新建 Spring Boot Maven ⽰例⼯程项⽬注意:是⽤来 IDEA 开发⼯具1. File > New > Project,如下图选择Spring Initializr然后点击【Next】下⼀步2. 填写GroupId(包名)、Artifact(项⽬名)即可。
点击下⼀步groupId=com.fishproartifactId=webservicejaxws3. 选择依赖Spring Web Starter前⾯打钩。
4. 项⽬名设置为spring-boot-study-webservicejaxws.注意不需要额外导⼊第三⽅组件2 ⾃动⽣成 JAX-WS 代码右键包 user (没有新建⼀个包名)弹出⽣成框中输⼊wsdl的地址在启动类中输⼊测试代码@SpringBootApplicationpublic class WebservicejaxwsApplication {public static void main(String[] args) {SpringApplication.run(WebservicejaxwsApplication.class, args);UserService userService=new UserService();UserDto userDto= userService.getUserPortName().getUserById("1");System.out.println("userdto "+userDto.getUserName());}}**右键 WebserviceclientApplication 点击 Run WebserviceclientApplication**2019-08-12 21:40:29.230 INFO 64345 --- [ main] c.f.w.WebservicejaxwsApplication : Started WebservicejaxwsApplication in 2.087 seconds (JVM running for 2.765) userdto admin。
Java使用JAX-WS来写webservice时UnabletocreateJAXBCo。。。

Java使⽤JAX-WS来写webservice时UnabletocreateJAXBCo。
webservice,作为web开发⼈员来说必须掌握的⼀门技术,它的好处这⾥就不多说了,eclipse中⾃带了⼀种⽣成webservice的⽅法,使⽤JAX-WS,如果我没有弄错的话,它需要javaEE5.0、JDK1.5以上,了解完这些就开始写接⼝⽅法。
各种随⼼所欲。
不料在⽤ eclipse⽣成webservice时出现错误了,⽣成不了,错误信息如下“ An internal error occurred during: "Generating JAX-WS Web Services". Unable to create JAXBContext ” ,错误堆栈如下:⼗⼀⽉ 16, 2015 1:01:32 下午 org.apache.catalina.core.ApplicationContext log信息: Initializing Spring root WebApplicationContext⼗⼀⽉ 16, 2015 1:01:35 下午 org.apache.catalina.core.StandardContext filterStart严重: Exception starting filter ssoFilterjavax.xml.ws.WebServiceException: Unable to create JAXBContextat com.sun.xml.internal.ws.model.AbstractSEIModelImpl.createJAXBContext(AbstractSEIModelImpl.java:156)at com.sun.xml.internal.ws.model.AbstractSEIModelImpl.postProcess(AbstractSEIModelImpl.java:84)at com.sun.xml.internal.ws.model.RuntimeModeler.buildRuntimeModel(RuntimeModeler.java:234)at com.sun.xml.internal.ws.server.EndpointFactory.createSEIModel(EndpointFactory.java:328)at com.sun.xml.internal.ws.server.EndpointFactory.createEndpoint(EndpointFactory.java:190)at com.sun.xml.internal.ws.api.server.WSEndpoint.create(WSEndpoint.java:498)at com.sun.xml.internal.ws.transport.http.server.EndpointImpl.createEndpoint(EndpointImpl.java:246)at com.sun.xml.internal.ws.transport.http.server.EndpointImpl.publish(EndpointImpl.java:170)at com.sun.xml.internal.ws.spi.ProviderImpl.createAndPublishEndpoint(ProviderImpl.java:118)at javax.xml.ws.Endpoint.publish(Endpoint.java:240)at com.pcitc.sso.client.SSOFilter.init(SSOFilter.java:42)at org.apache.catalina.core.ApplicationFilterConfig.getFilter(ApplicationFilterConfig.java:295)at org.apache.catalina.core.ApplicationFilterConfig.setFilterDef(ApplicationFilterConfig.java:422)at org.apache.catalina.core.ApplicationFilterConfig.<init>(ApplicationFilterConfig.java:115)at org.apache.catalina.core.StandardContext.filterStart(StandardContext.java:4038)at org.apache.catalina.core.StandardContext.start(StandardContext.java:4692)at org.apache.catalina.core.ContainerBase.addChildInternal(ContainerBase.java:799)at org.apache.catalina.core.ContainerBase.addChild(ContainerBase.java:779)at org.apache.catalina.core.StandardHost.addChild(StandardHost.java:546)at org.apache.catalina.startup.HostConfig.deployDirectory(HostConfig.java:1041)at org.apache.catalina.startup.HostConfig.deployDirectories(HostConfig.java:964)at org.apache.catalina.startup.HostConfig.deployApps(HostConfig.java:502)at org.apache.catalina.startup.HostConfig.start(HostConfig.java:1277)at org.apache.catalina.startup.HostConfig.lifecycleEvent(HostConfig.java:321)at org.apache.catalina.util.LifecycleSupport.fireLifecycleEvent(LifecycleSupport.java:142)at org.apache.catalina.core.ContainerBase.start(ContainerBase.java:1061)at org.apache.catalina.core.StandardHost.start(StandardHost.java:785)at org.apache.catalina.core.ContainerBase.start(ContainerBase.java:1053)at org.apache.catalina.core.StandardEngine.start(StandardEngine.java:463)at org.apache.catalina.core.StandardService.start(StandardService.java:525)at org.apache.catalina.core.StandardServer.start(StandardServer.java:701)at org.apache.catalina.startup.Catalina.start(Catalina.java:585)at sun.reflect.NativeMethodAccessorImpl.invoke0(Native Method)at sun.reflect.NativeMethodAccessorImpl.invoke(NativeMethodAccessorImpl.java:57)at sun.reflect.DelegatingMethodAccessorImpl.invoke(DelegatingMethodAccessorImpl.java:43)at ng.reflect.Method.invoke(Method.java:606)at org.apache.catalina.startup.Bootstrap.start(Bootstrap.java:289)at org.apache.catalina.startup.Bootstrap.main(Bootstrap.java:414)Caused by: java.security.PrivilegedActionException: com.sun.xml.internal.bind.v2.runtime.IllegalAnnotationsException: 2 counts of IllegalAnnotationExceptions javax.servlet.http.HttpServletRequest is an interface, and JAXB can't handle interfaces.this problem is related to the following location:at javax.servlet.http.HttpServletRequestat public javax.servlet.http.HttpServletRequest com.pcitc.sso.client.webservice.jaxws.GetLoginUser.arg0at com.pcitc.sso.client.webservice.jaxws.GetLoginUserjavax.servlet.http.HttpServletResponse is an interface, and JAXB can't handle interfaces.this problem is related to the following location:at javax.servlet.http.HttpServletResponseat public javax.servlet.http.HttpServletResponse com.pcitc.sso.client.webservice.jaxws.GetLoginUser.arg1at com.pcitc.sso.client.webservice.jaxws.GetLoginUserat java.security.AccessController.doPrivileged(Native Method)at com.sun.xml.internal.ws.model.AbstractSEIModelImpl.createJAXBContext(AbstractSEIModelImpl.java:143)... 37 moreCaused by: com.sun.xml.internal.bind.v2.runtime.IllegalAnnotationsException: 2 counts of IllegalAnnotationExceptionsjavax.servlet.http.HttpServletRequest is an interface, and JAXB can't handle interfaces.this problem is related to the following location:at javax.servlet.http.HttpServletRequestat public javax.servlet.http.HttpServletRequest com.pcitc.sso.client.webservice.jaxws.GetLoginUser.arg0at com.pcitc.sso.client.webservice.jaxws.GetLoginUserjavax.servlet.http.HttpServletResponse is an interface, and JAXB can't handle interfaces.this problem is related to the following location:at javax.servlet.http.HttpServletResponseat public javax.servlet.http.HttpServletResponse com.pcitc.sso.client.webservice.jaxws.GetLoginUser.arg1at com.pcitc.sso.client.webservice.jaxws.GetLoginUserat com.sun.xml.internal.bind.v2.runtime.IllegalAnnotationsException$Builder.check(IllegalAnnotationsException.java:91)at com.sun.xml.internal.bind.v2.runtime.JAXBContextImpl.getTypeInfoSet(JAXBContextImpl.java:442)at com.sun.xml.internal.bind.v2.runtime.JAXBContextImpl.<init>(JAXBContextImpl.java:274)at com.sun.xml.internal.bind.v2.runtime.JAXBContextImpl.<init>(JAXBContextImpl.java:125)at com.sun.xml.internal.bind.v2.runtime.JAXBContextImpl$JAXBContextBuilder.build(JAXBContextImpl.java:1127)at com.sun.xml.internal.bind.v2.ContextFactory.createContext(ContextFactory.java:173)at com.sun.xml.internal.bind.api.JAXBRIContext.newInstance(JAXBRIContext.java:95)at com.sun.xml.internal.ws.developer.JAXBContextFactory$1.createJAXBContext(JAXBContextFactory.java:98)at com.sun.xml.internal.ws.model.AbstractSEIModelImpl$1.run(AbstractSEIModelImpl.java:151)at com.sun.xml.internal.ws.model.AbstractSEIModelImpl$1.run(AbstractSEIModelImpl.java:143)... 39 more⼗⼀⽉ 16, 2015 1:01:35 下午 org.apache.catalina.core.ApplicationContext log信息: Closing Spring root WebApplicationContext真⼼让⼈郁闷,尤其是刚开始搞webservice的时候。
利用JAX—WS开发WebService
WS技 术开发 We ev e的 完整 过程 , 包括 环 境 配置 、We ev e的 开发 和发 布 bSri c bSri c
以及 We evc 客 户端 的 开发 。 bS rie
bS r c v A t S 2 An , J R 一2 4, J R 一 1 1
系统的技术 ,可 以用几 种计算 机语言 编写 这些起砖 块作 用 的
We e ie 在 JE 平 台 , 可 以 采 用 J X — P 技 术 开 发 bSr c 。 v 2E A RC
的 WS L文 件 生成 Jv D aa类 来 实 现服 务 ,又 可 以从 Jv aa类 着
手 ,使 用 A nt i 来 生成 WS L文 件 。 no tn ao D 使 用 J X—WS技 术 , 可 以 将 P J 类 和 无 状 态 Ssi A OO es n o
三 、W e evc b S ri e开发
假 定 员 工 基 本 信 息 管 理 服 务 具 有 新 增 、修 改 、删 除 和查 询
分 ,作为 J X—R C1 1 A P . 的后续发行版本 ,J X—WS A 简化 了使
用 Jv 技 术 开 发 We b e i aa b We r c Sv e的工 作 ,并 且 通 过 对 多 种 协 议
类 ,从 而 支 持 数 据 绑 定 功 能 。 J X A B消 除 了 将 S A O P消 息 中 的 X ML模 式 消 息 转 换 为 Jv 类 的 工 作 , 因 而 不 必 全 面 了解 X L aa M 和SA O P解 析 。J X A B规 范 定 义 Jv 和 X 模 式 之 问 的 绑 定 , aa ML
We Sri ,该 P J be c v e O O类 应 打 包 在 w r 件 中 ,通 过 A ntin a文 no t ao
jax-ws webservice注解详解
- exclude 指定是否从 Web Service 中排除某一方法。缺省值为 false。(布尔值)
javax.jws.Oneway
@Oneway 注释将一个方法表示为只有输入消息而没有输出消息的 Web Service 单向操作。
将此注释应用于客户机或服务器服务端点接口(SEI)上的方法,或者应用于 JavaBeans 端 点的服务器端点实现类。
注释目标:类型或方法 属性:
- style 定 义 发 送 至 Web Service 和 来 自 Web Service 的 消 息 的 编 码 样 式 。 有 效 值 为
DOCUMENT 和 RPC。缺省值为 DOCUMENT。(字符串) - use 定 义 用 于 发 送 至 Web Service 和 来 自 Web Service 的 消 息 的 格 式 。 缺 省 值 为
使用注释来配置绑定、处理程序链、端口类型的集合名称、服务以及其他 WSDL 参数。注 释用于将 Java 映射至 WSDL 和模式, 以及在运行时控制 JAX-WS 运行时处理和响应 Web Service 调用的方式。 下表中列示了 JAX-WS 支持的注释。注释的目标适用于下列 Java 对象:
径或绝对路径。(字符串)
javax.jws.WebMethod
@WebMethod 注释表示作为一项 Web Service 操作的方法。
将此注释应用于客户机或服务器服务端点接口(SEI)上的方法,或者应用于 JavaBeans 端 点的服务器端点实现类。
要点:
? 仅支持在使用 @WebService 注释来注释的类上使用 @WebMethod 注释。
诸如 Java 类、枚举或接口等类型 方法 用于表示 Java 类中局部实例变量的字段 Java 方法中的参数
WebService学习之旅(二)JAX-WS基于Web容器发布WebService

WebService学习之旅(二)JAX-WS基于Web容器发布WebService在上节中我们定义Web服务接口和实现类后,调用Endpoint类的静态方法publish发布来webservice,这种方法使用起来虽然简单,但是对于一个企业级应用来说通常对外提供的服务可能不止一个,如果每个WebService都去编写一个main方法显然不合适,不利于Web服务的集中管理,而且不方便WebService与Web应用整合。
所以绝大多数情况下都会使用Web容器集中管理WebService,本文將向大家介绍如何使用JAX-WS基于Web应用服务器来发布WebService。
一、准备工作1.获取JAX-WS所需所有JAR包,如下图所示所有jar包下载地址:/detail/rongbo_j/94718772.打开Eclipse,新建一个web工程,將上节中的WebService接口和实现类拷贝到src目录下。
HelloWorld .javapackage com.csdn.jaxws.recipe01;import javax.jws.WebMethod;import javax.jws.WebService;import javax.jws.soap.SOAPBinding;import javax.jws.soap.SOAPBinding.Style;import e;@WebService@SOAPBinding(style = Style.DOCUMENT, use=Use.LITERAL) public interface HelloWorld {@WebMethodString sayHello(String text);}HelloWorldImpl.javapackage com.csdn.jaxws.recipe01;import javax.jws.WebService;@WebService(endpointInterface = "com.csdn.jaxws.recipe01.HelloWorld")public class HelloWorldImpl implements HelloWorld {@Overridepublic String sayHello(String name) {return "hello," + name;}}3.將上面的jar包添加的classpath中,并发布到WEB-INF/lib目录下,接着在WEB-INF/web.xml文件中,添加如下内容:<listener><listener-class>com.sun.xml.ws.transport.http.servlet.WSServletContextLi stener</listener-class></listener><servlet><servlet-name>WSServlet</servlet-name><servlet-class>com.sun.xml.ws.transport.http.servlet.WSServlet</servlet-class><load-on-startup>2</load-on-startup></servlet><servlet-mapping><servlet-name>WSServlet</servlet-name><url-pattern>/service/*</url-pattern></servlet-mapping>以/service/*结尾的Http请求会经过WSServlet处理,生成WebService及WSDL文档。
java jax-ws webservice入门
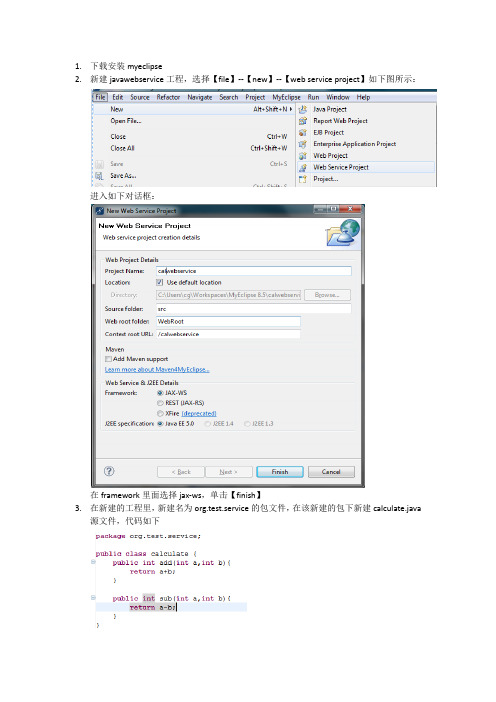
1.下载安装myeclipse2.新建javawebservice工程,选择【file】--【new】--【web service project】如下图所示:进入如下对话框:在framework里面选择jax-ws,单击【finish】3.在新建的工程里,新建名为org.test.service的包文件,在该新建的包下新建calculate.java源文件,代码如下在工具栏上单击New Web Service,如下图的按钮:弹出如下的对话框:在strategy里面选择Create web service from java class,点击next,在弹出的对话框如下图:选择上述建立的calculate.java源文件,勾选【Generate WSDL in project】后完成,这样webservice建立完成。
4.配置tomcat服务器。
打开myeclipse的【window】-【reference】,如下图:选择安装的tomcat,本机上的tomcat版本为6.0,选择tomcat的安装路径,如上图。
单击tomcat6.x下的jdk,弹出下图的对话框:点击【add】添加本机上安装的jdk,完成后确定。
5.添加myeclipse库文件,在项目上右击,点击【reference】,弹出的对话框如下:点击【add library】,在弹出的对话框中选择【Myeclipse libraries】,如下图:单击【next】,选择如下图的两个jar文件:然后确定,目前为止,所有的环境配置完成。
6.部署项目:点击工具栏上的如下图的按钮:点击【configure server】进入如下的对话框:注意点击tomcat server下的【enable】命令,完成。
启动tomcat6.x服务器。
在工具栏上点击命令,弹出如下的对话框:点击add,弹出如下的对话框:选择自己的项目,发布即可。
7.测试在浏览器上输入如下的地址:http://localhost:8080/webservice/calculatePort?wsdl,可以测试wsdl文件。
基于JAX-WS开发部署WebService

基于JAX-WS开发部署WebService1.1 基于wsdl开发WebService客户端1.1.1 一般Webservice客户端开发1.1.1.1 使用wsimport生成客户端代码一般的,发布WebService时要公布wsdl文件,以供客户端程序调用时使用。
该wsdl文件一般可以通过在浏览器上访问http地址来获取,比如http://localhost:7001/WebRoot/HelloService?wsdl,对于这种情况,可采用以下步骤自动生成WebService客户端。
WSDL文件示例如下:<?xml version="1.0" encoding="UTF-8" ?>-<!-- Published by JAX-WS RI at . RI's version is Oracle JAX-WS 2.1.3-07/10/2008 08:41 PM(bt).--><!-- Generated by JAX-WS RI at . RI's version is Oracle JAX-WS2.1.3-07/10/2008 08:41 PM(bt). --><definitions xmlns:soap="/wsdl/soap/"xmlns:tns="http://endpoint.helloservice/"xmlns:xsd="/2001/XMLSchema"xmlns="/wsdl/"targetNamespace="http://endpoint.helloservice/" name="HelloService"><types><xsd:schema><xsd:import namespace="http://endpoint.helloservice/"schemaLocation="http://localhost:7001/WebRoot/HelloService?xsd=1"/></xsd:schema></types><message name="sayHello"><part name="parameters" element="tns:sayHello" /></message><message name="sayHelloResponse"><part name="parameters" element="tns:sayHelloResponse" /></message><portType name="Hello"><operation name="sayHello"><input message="tns:sayHello" /><output message="tns:sayHelloResponse" /></operation></portType><binding name="HelloPortBinding" type="tns:Hello"><soap:binding transport="/soap/http"style="document" /><operation name="sayHello"><soap:operationsoapAction="" /><input><soap:body use="literal" /></input><output><soap:body use="literal" /></output></operation></binding><service name="HelloService"><port name="HelloPort" binding="tns:HelloPortBinding"><soap:addresslocation="http://localhost:7001/WebRoot/HelloService" /></port></service></definitions>在本地磁盘新建一个目录,比如D:\jaxWSClient,在该目录下,新建一个文件夹generate运行如下命令:Wsimport–s generatehttp://localhost:7001/WebRoot/HelloService?wsdl如果返回Parsing WSDL… generating code…说明运行成功。
- 1、下载文档前请自行甄别文档内容的完整性,平台不提供额外的编辑、内容补充、找答案等附加服务。
- 2、"仅部分预览"的文档,不可在线预览部分如存在完整性等问题,可反馈申请退款(可完整预览的文档不适用该条件!)。
- 3、如文档侵犯您的权益,请联系客服反馈,我们会尽快为您处理(人工客服工作时间:9:00-18:30)。
1.在web.xml中配置下列代码
<!-- 配置环境参数,制定Spring配置文件的位置 -->
<context-param>
<param-name>contextConfigLocation</param-name>
<param-value>classpath:applicationContext.xml</param-value>
</context-param>
<!-- 配置Spring的ContextLoaderListener监听器,初始化Spring容器 -->
<listener>
<listener-class>org.springframework.web.context.ContextLoaderList ener</listener-class>
</listener>
<servlet>
<servlet-name>JAXWSServlet</servlet-name>
<servlet-class>com.sun.xml.ws.transport.http.servlet.WSSpringServ let</servlet-class>
</servlet>
<servlet-mapping>
<servlet-name>JAXWSServlet</servlet-name>
<url-pattern>/ws/*</url-pattern>
</servlet-mapping>
2.在编写serviceImpl实现类的时候注意注解问题,如:
package com.jboa.service.impl;
import javax.annotation.Resource;
import javax.jws.WebMethod;
import javax.jws.WebService;
import .EmployeeBiz;
import com.jboa.pojo.Employee;
import com.jboa.service.EmployeeService;
@WebService(serviceName="employeeService",name="employeeService") public class EmployeeServiceImpl implements EmployeeService{ @Resource
private EmployeeBiz employeebiz;
@WebMethod(exclude=true)
public EmployeeBiz getEmployeebiz() {
return employeebiz;
}
@WebMethod(exclude=true)
public void setEmployeebiz(EmployeeBiz employeebiz) {
this.employeebiz = employeebiz;
}
/**
* 根据Id查询员工信息
* @param id
* @return
*/
@WebMethod
public Employee findById(String id){
return employeebiz.findById(id);
}
}
3.在applicationContext.xml中需要应用的
<beans
xmlns="/schema/beans"
xmlns:xsi="/2001/XMLSchema-instance"
xmlns:p="/schema/p"
xmlns:ws="/spring/core"
xmlns:wss="/spring/servlet"
xsi:schemaLocation="/schema/beans /schema/beans/spring-beans-3.0.xsd
/spring/core
/spring/core.xsd
/spring/servlet
/spring/servlet.xsd
">
以及配置
<wss:binding url="/ws/employeeService">
<wss:service>
<ws:service bean="#employeeService"
impl="com.jboa.service.impl.EmployeeServiceImpl"></ws:service> </wss:service>
</wss:binding>
4.在项目中新建文件夹(名字为wsdl)
然后将项目拷贝到D盘上面,进入DOS命令
5,新建项目的时候需要添加所需要的架包
1.新建新的项目以后选中项目右击new----->Other----->MyEclipse----->WebService选中需要的,然后将服务器端查看wsdl文档的网址复制进去生成文件
2.applicationContext.xml中添加,如:
<bean id="employeeService"
class="org.springframework.remoting.jaxws.JaxWsPortProxyFactoryBean"> <property name="serviceInterface"
value="com.jboa.service.impl.EmployeeService"></property>
<property name="wsdlDocumentUrl"
value="http://localhost:8080/JBOA_JAXWS_Service/ws/employeeService?ws dl"></property>
<property name="namespaceUri"
value="/"></property>
<property name="serviceName"
value="employeeService"></property>
<property name="portName"
value="employeeServicePort"></property>
</bean>
<bean id="employeeAction"class="com.jboa.action.EmployeeAcion" scope="prototype">
<property name="employeeService"
ref="employeeService"></property>
</bean>。