福昕阅读器企业版激活方法.
福昕高级PDF编辑器企业版 适用于Windows 用户手册说明书

© 2016福昕软件保留所有权未经福昕公司授权,此文档禁止以任何形式复制、转移、分配或储存。
Anti-Grain Geometry -Version 2.4Copyright (C) 2002-2005 Maxim Shemanarev ()本产品的某些部分属于© [2001-2016] Solid Documents所有。
在所有副本中的版权提示允许的情况下,您可以复制、使用、修改、出售和分配该软件。
此软件不含任何隐藏条款,对于使用本软件所产生的任何后果,均由用户本人承担。
目录目录 (2)第一章–概述 (5)福昕高级PDF编辑器概述 (5)功能新增和改进 (6)关于手册 (7)快速安装指南 (7)关于福昕插件 (7)GPO功能 (9)使用Foxit Setup Customization Tool (9)第二章–使用入门 (11)工作区域 (11)自定义工作区 (18)偏好设置 (18)第三章–阅读 (19)打开PDF文档 (19)保存PDF文档 (20)关闭PDF文档 (21)导出PDF文件 (21)Foxit PDF IFilter (22)PDF行业标准验证及创建符合PDF相应标准的文档 (22)阅读 (23)选择&复制 (40)字数统计 (41)检查PDF的辅助功能 (41)东亚语言包 (43)第四章–创建 (44)用不同方式创建PDF文档 (44)创建和定制PDF文件包 (60)将PDF文档识别成可搜索和可编辑的PDF文档 (61)从书签中创建PDF文档的目录 (65)第五章–编辑 (66)链接 (66)附件 (70)书签 (73)图像 (75)PDF优化 (81)动作向导 (82)多媒体 (84)段落编辑 (90)对象 (90)关于图像编辑窗口 (105)拼写检查 (115)PDF属性 (116)第六章–页面管理 (118)插入页面 (118)旋转、移动、交换和删除页面 (122)提取、复制和替换页面 (124)拆分文档到多个文件 (126)裁剪页面 (126)扁平化页面 (128)添加页眉页脚、水印和背景 (128)贝茨数 (132)格式化页码 (133)第七章–注释 (135)注释工具 (135)更改注释外观 (148)管理注释 (151)第八章–共享文档 (158)将PDF文档作为邮件附件发送 (158)SharePoint集成 (158)共享审阅和邮件审阅 (164)NetDocuments集成 (171)第九章–表单 (173)交互式表单和非交互式表单 (173)填写PDF表单 (174)添加表单注释 (176)表单域 (178)运行JavaScript (196)第十章–安全 (199)查看PDF文档安全性 (199)密码保护和证书保护 (199)活动目录权限管理服务(AD RMS) (203)删除敏感信息 (224)密文(仅适用于企业版) (225)使用AD RMS功能保护密文(仅适用于企业版) (227)第十一章–签名 (229)数字签名 (229)PDF快速签名 (237)第十二章–打印 (239)打印PDF文档 (239)设置“打印”对话框 (240)设置Foxit PhantomPDF Printer属性 (243)第十三章–附录 (248)快速安装指南 (248)组策略手册 (259)福昕高级PDF编辑器多语言安装包的组策略分发 (268)SharePoint配置 (271)Windows Azure活动目录权限管理快速入门 (273)Web Service配置 (273)键盘快捷键 (285)命令行 (289)联系我们 (290)第一章–概述福昕高级PDF编辑器概述欢迎使用福昕PDF电子文档处理套装软件。
银河麒麟wps激活方法

银河麒麟wps激活方法随着信息技术的快速发展,办公软件成为了现代工作中必不可少的工具之一。
WPS Office作为一款功能强大且易于使用的办公软件,深受广大用户的喜爱。
本文将介绍银河麒麟系统下WPS Office的激活方法,帮助用户正式启用该软件。
激活流程:在开始正式介绍激活方法之前,我们先了解一下激活的流程。
银河麒麟WPS激活主要分为以下几个步骤:1. 下载和安装WPS Office软件。
2. 打开WPS Office软件,点击菜单栏上的“账号”选项。
3. 在账号页面中,选择“激活账号”选项。
4. 输入激活码,点击“激活”按钮。
5. 确认激活成功后,开始正常使用WPS Office软件。
激活方法:1. 下载和安装WPS Office软件:在银河麒麟系统中,打开应用商店,搜索“WPS Office”,找到并下载最新版本的WPS Office软件。
下载完成后,按照提示完成软件的安装。
2. 打开WPS Office软件,进入账号页面:安装完成后,打开WPS Office软件。
在主界面的菜单栏上,找到并点击“账号”选项。
这将进入账号管理页面。
3. 选择“激活账号”选项:在账号管理页面,找到并点击“激活账号”选项。
这将打开激活账号的界面。
4. 输入激活码并激活:在激活账号的界面中,根据您购买的WPS Office版本,找到并输入您的激活码。
确保输入时没有错别字或者其他错误。
点击“激活”按钮。
5. 确认激活成功:在激活成功后,系统会提供相关提示,并显示您的账号已成功激活。
此时,您可以关闭激活界面,并开始正常使用WPS Office软件。
小贴士:1.确保网络连接正常:在进行激活过程中,确保您的设备已连接到稳定的网络环境。
只有在网络正常的情况下,您才能够顺利完成激活过程。
2. 购买正版激活码:为了遵守软件版权法规,强烈建议您购买正版的WPS Office激活码。
通过正规途径购买的激活码能够保证您的使用权益,并且获得后期软件更新和技术支持。
Foxit PDF Creator注册 福昕 注册方法
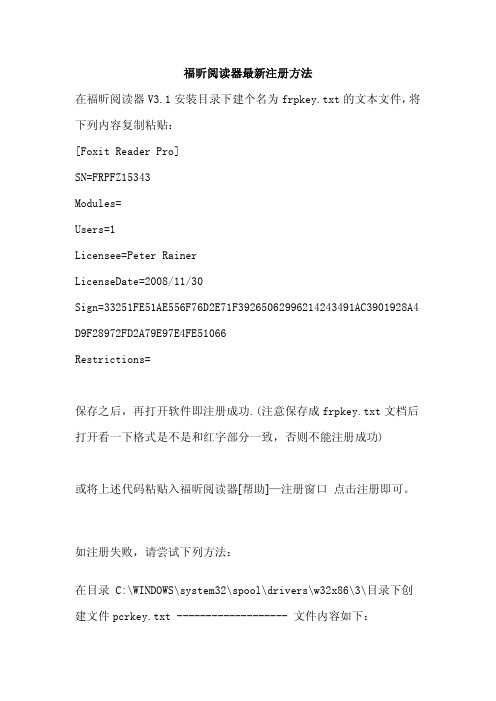
福昕阅读器最新注册方法在福昕阅读器V3.1安装目录下建个名为frpkey.txt的文本文件,将下列内容复制粘贴:[Foxit Reader Pro]SN=FRPFZ15343Modules=Users=1Licensee=Peter RainerLicenseDate=2008/11/30Sign=33251FE51AE556F76D2E71F39265062996214243491AC3901928A4 D9F28972FD2A79E97E4FE51066Restrictions=保存之后,再打开软件即注册成功.(注意保存成frpkey.txt文档后打开看一下格式是不是和红字部分一致,否则不能注册成功)或将上述代码粘贴入福昕阅读器[帮助]—注册窗口点击注册即可。
如注册失败,请尝试下列方法:在目录 C:\WINDOWS\system32\spool\drivers\w32x86\3\目录下创建文件pcrkey.txt ------------------- 文件内容如下:[Foxit License]SN=PCRFZINTModules=Users=10Licensee=Foxit Software InternalLicenseDate=2006/08/11Sign=349AFC742821803EE5614BF1C39713F07B13464062FF6C48AE0F30 AF7251DAEB67A85C886F96AAD7FoxitReader3.0注册码和foxit pdf creator keyFoxitReader3.0注册码如下,文件名为:frpkey.txt=========================================================== ==============================[Foxit Reader Pro]SN=FRPFZ15343Modules=Users=1Licensee=Peter RainerLicenseDate=2008/11/30Sign=33251FE51AE556F76D2E71F39265062996214243491AC3901928A4 D9F28972FD2A79E97E4FE51066Restrictions============================================================ ==========foxit pdf creator key 如下,文件名为:pcrkey.txt=========================================================== ==========[Foxit License]SN=PCRFZINTModules=Users=10Licensee=Foxit Software InternalLicenseDate=2006/08/11Sign=349AFC742821803EE5614BF1C39713F07B13464062FF6C48AE0F30 AF7251DAEB67A85C886F96AAD7。
Microsoft Word - 福昕pdf阅读器使用说明
在我所有使用过的、免费的能最强大的阅读器。
它打开文件。
它还可以为没有书签通过小标题链接,位置精确可以全书朗读;使用经典工 为了帮助那些没有使用使用方法,特制作以下说明pdf 阅读器很多,不少象怎样打开福昕阅读器和怎安装了阅读器的朋友都早已功能操作作一此较详细的说一,介绍一下福昕阅读器的1,Ribbon 工具栏模式界面这种新颖的工具栏模式特点用pdf 阅读器的朋友。
缺点慢调节功能)。
福昕pdf 阅读器使用说明免费的pdf 阅读软件中,我感觉福昕pdf 阅读器打开速度快捷,既可以阅读,又可以用有书签的pdf 文档制作书签。
制作书签方法不但置精确。
除了阅读文档,还可以听读文档,既可经典工具栏模式时还可以调节朗读快慢速度,有使用过,或刚开始试用软件的朋友快速掌握福下说明,希望能给这些朋友起到帮助。
不少阅读器大家都使用过,大多数功能和使用器和怎样点击福昕阅读器文件按钮打开文档之类都早已清楚,我就不作说明,下面我就福昕阅读细的说明。
读器的两种不同模式的工具栏界面。
式界面 (图1)图1式特点是:直观、明了,操作者容易理解和掌握缺点是有些功能比经典工具栏少一些(如朗读阅读器是是好,功word 文档创建pdf 法不但简单、而且既可以选听,也,非常迷人。
掌握福昕阅读器的和使用方法雷同, 档之类,相信只要昕阅读器几个重要和掌握。
适用于初如朗读缺少朗读快2,,经典工具栏模式界面这种为大家熟悉的经典用习惯了的老用户所喜欢二,两种工具栏模式的转换有些福昕阅读器安装完成后使用经典工具栏模式界面的1,Ribbon 工具栏模式转换 在Ribbon 工具栏模式界 中,所以要点击‘文件界面 (图2)图2的经典工具栏模式特点是:界面清晰、功能细喜欢。
转换:完成后,一打开后便是Ribbon 工具栏模式界面界面的朋友便要转换一下。
式转换成经典工具栏模式:模式界面中,更改工具栏模式选项在‘文件文件’(图3)能细、齐全,为使式界面,因此习惯文件’菜单在出来菜单中选中‘更改工(图4)2,经典工具栏模式转换成图3更改工具栏模式’选中经典工具栏模式后按提示重 图4转换成Ribbon 工具栏模式提示重启阅读器。
新版福昕阅读器(Foxit Reader)启动速度慢解决办法

新版福昕阅读器(Foxit Reader)启动速度慢解决办法
之前喜欢使用福昕阅读器的原因就是看中了其小巧,可是最近版本的阅读器打开速度变得慢了很多(不是电脑配置问题),比Adobe Reader还要慢,这我就忍受不了了,于是在网上广泛搜索,终于找到了解决办法:
福昕阅读器启动速度变慢的罪魁祸首就是加载项,可以删除4个文件夹:plugins(变慢的主要文件夹)、Shell Extensions(扩展功能)、Advertisement(广告文件夹)和Foxit Cloud(福昕云服务,如果用户使用他们家的这个服务,就不要删)。
删除之后,再去试着打开PDF文件,真是飞一般的感觉!
但是,还会出现一个问题,就是会有一个启动页一直显示在第一个标签那里,对于不需要这个的人来说,这也是不能忍受的,解决办法:打开福昕阅读器—>文件—>偏好设置—>常规,最下面一行把“显示启动页面”和“显示广告条”的打钩都去掉,搞定!。
如何改变福昕阅读器的背景颜色和阅读字体

4、备注:如果不懂如何修改“自定义颜色”,看下面的方法。
具体自定义颜色:打开调色板——》右边的框可以修改深度——》添加到自定义颜色——》选择自定义颜色(否则不会被选 中)——》确定。
打开调色板右边的框可以修改深度添加到自定义颜色选择自定义颜色否则不会被选中确定
如何改变福昕阅读器的背景颜色和阅读字体
如何改变福昕阅读器的背景颜色、阅读字体 1、文章目的 看到网上太多水货的回答,不爽,决定自己研究出来,再发布! 2、福昕阅读器的版本:7.1.1.3.9
3、如何改变背景颜色和阅读字体(图解) 文件——》偏好设置——》访问——》修改成功。 (注意:如果你勾选了“只改变颜色内容是黑/白的内容”,背景颜色没有改变,一定要取消勾选!)
foxit reader 部署和配置手册说明书
Copyright © 2004-2015 Foxit Software Incorporated. All Rights Reserved.No part of this document can be reproduced, transferred, distributed or stored in any format without the prior written permission of Foxit.Anti-Grain Geometry – Version 2.4Copyright (C) 2002-2004 Maxim Shemanarev ()Permission to copy, use, modify, sell and distribute this software is granted provided this copyright notice appears in all copies. This software is provided "as is" without express or implied warranty, and with no claim as to its suitability for any purpose.ContentsContents (III)Introduction (1)About the User Manual (1)About Foxit Reader (MSI) (1)Foxit Reader (MSI) Overview (1)Installing Foxit Reader (1)Deployment and Configuration (8)Using Group Policy (8)What is Group Policy? (8)Personal Computer Setting (8)GPO Deployment (for Server) (10)GPO Items (15)Using XML Editor (18)Contact Us (20)Foxit Reader Deployment and Configuration IntroductionAbout the User ManualWelcome to Foxit Reader (MSI) -- your right choice to view and print PDF documents!Foxit Reader (MSI) is developed on the basis of Foxit Reader (EXE) , but it extends the usability and performance of viewing and editing of Foxit Reader (EXE). This User Manual introduces the deployment and configuration of Foxit Reader. Please follow the instructions below for details.About Foxit Reader (MSI)Foxit Reader (MSI) OverviewFoxit Reader (MSI), hereafter referred to as Foxit Reader, is a PDF document viewer and printer. It launches quickly and is easy to install. Just run “Foxit Reader Setup.msi”and then follow the installation guides to complete installation.Foxit Reader enables users to create, edit and secure reliable PDF documents quickly, easily and economically. In addition to the basic PDF viewing functions, Foxit Reader also includes various advanced features, such as RMS Protection, GPO Control, and XML Control.Installing Foxit ReaderWindows System RequirementsFoxit Reader runs successfully on the following systems. If your computer does not meet these requirements, you may not be able to use Foxit Reader.Operating Systems•Windows Vista Home Basic, Home Premium, Business, Ultimate, or Enterprise with or without Service Pack 1(32-bit & 64-bit)•Windows 7 (32-bit & 64-bit)•Windows 8 Full Version•Windows 10•Microsoft Office® 2007 or later version (required for some PDF creation features)•For users utilizing the Active Directory Rights Management Service and SharePoint integration capability, Windows 7 or Windows Vista with Service Pack2 (SP2) is required•Verified as Citrix Ready® with Citrix XenApp® 7.6Recommended Minimum Hardware for Better Performance• 1.3 GHz or faster processor•512 MB RAM (Recommended: 1 GB RAM or greater)• 1 GB of available hard drive space•1024*768 screen resolutionHow to Install?Double-click the installation file and you will see the Install Wizard pop up. Click Next to continue.In order to install Foxit Reader on your system, you are required to accept the terms and conditions of Foxit’s License Agreement. Please read the Agreement carefully and then check I accept the terms in the License Agreement and click Next to continue. If you cannot accept it, please click Cancel to exit the installation.Choose one of the setup types as needed:A. Typical–installs all features by default but requires more disk space.B. Custom—allows users to choose the features to be installed.For Typical setup, just click Install. For Custom setup, do the following:A) Click Browse to change the installation directory of the PDF Viewer plug-in.B) Click Disk Usage to check the disk space available for the selected features.C) Check the options you want to install and click Next to continue.D) Select the additional tasks you would like to perform while installing Foxit Reader, click Next and then Install to begin the installation.Finally, a message will appear to inform you the successful installation. Click Finish to complete the installation.Command-line InstallationYou can also use the command-line to install the application:msiexec /Option <Required Parameter> [Optional Parameter] [PROPERTY=PropertyValue]For detailed information on msiexec.exe options, required parameters, and optional parameters, type “msiexec” on the command line or visit Microsoft TechNet help center.Public Properties of the Foxit Reader MSI installation package.Foxit Reader installation properties supplement the standard MSI public properties to give administrators greater control over the installation of the application.For the complete list of standard public properties please refer to:/en-gb/library/aa370905(VS.85).aspxThe Foxit Reader properties are:--------------------------------------------------------------------------------------------------------------- ADDLOCAL<list of features> The value of the ADDLOCAL property is a comma delimited listof features which the installation of Foxit Reader will makeavailable locally. Foxit Reader installer defines the followingfeatures:FX_PDFVIEWER - Foxit PDF Viewer and its components;FX_FIREFOXPLUGIN - Plugin which is used for opening PDF filesin Mozilla Firefox, Opera, Safari, and Chrome browsers. Thisfeature requires FX_PDFVIEWER feature to be installed.FX_SPELLCHECK - Spell check tool which is used for finding anymisspelled words in typewriter or form filler mode andsuggesting the correct spellings. This feature requiresFX_PDFVIEWER feature to be installed.FX_SE - Plugins for Windows Explorer and Windows shell. Theseextensions allow viewing PDF thumbnails in Windows Explorer,previewing PDF files in Windows Vista and Office 2007. Thisfeature requires FX_PDFVIEWER feature to be installed.FX_CREATOR - Foxit Reader Creator installs a virtual printer onyour system. You can use Creator to convert any printabledocuments into high-quality PDFs conveniently and efficiently.This feature requires FX_PDFVIEWER to be installed.FX_CONVERTEXT - Shell extension which is used for convertingPDF or combining supported files from right click menu. Thisfeature requires FX_CREATOR to be installed.FX_CREATORWORDADDIN - MS word toolbar add-in to createPDFs by just one click. This feature requires FX_CREATOR to beinstalled.FX_CREATOREXCELADDIN - MS Excel toolbar add-in to createPDFs by just one click. This feature requires FX_CREATOR to beinstalled.FX_CREATORPPTADDIN - MS PPT toolbar add-in to create PDFsby just one click. This feature requires FX_CREATOR to beinstalled.INSTALLLOCATION Specifies the folder where products will be installed.MAKEDEFAULT Default value of "1", Foxit Reader will be set as defaultapplication for opening PDF files.VIEW_IN_BROWSER Default value of "1", Foxit Reader will be configured to openPDF files inside browsers.DESKTOP_SHORTCUT Default value of "1", installer will place a shortcut for theinstalled application on Desktop.STARTMENU_SHORTCUT Default value of "1", installer will create program menu groupfor installed application and its components. LAUNCHCHECKDEFAULT Default value of "1", Foxit Reader will check if the Reader is thedefault reader when it’s launched.SAFEMODE Default value of "1", Foxit Reader will run in the Safe ReadingMode.CLEAN Executes with the command /uninstall, re moving all of Reader’sregistry data and related files with the value of “1”. (Note: This isa command for uninstallation.)AUTO_UPDATE Do not download or install updates automatically with thevalue of “0”; Automatically download updates, b ut let userschoose when to install them with the value of “1”;Automatically install updates with the value of “2”.REMOVENEWVERSION Forces an installation to overwrite the higher version of FoxitReader with the value of “1”.REMOVEGAREADER Forces to uninstall Foxit Reader (Desktop Version). Command-line Examples:1. Silently install the application (no user interaction) to folder "C:\Program Files\Foxit Software":msiexec /i "Foxit Reader.msi" /quiet INSTALLLOCATION="C:\Program Files\ Foxit Software "2. Install Foxit PDF Viewer only:msiexec /i "Foxit Reader.msi" /quiet ADDLOCAL="FX_PDFVIEWER"3. Force an installation to overwrite the same or higher version of Foxit Reader:msiexec /i "Foxit Reader.msi" REMOVENEWVERSION="1"4. Remove registry and user data when performing silent uninstallation:msiexec /x "Foxit Reader.msi" /quiet CLEAN="1"Deployment and ConfigurationUsing Group PolicyWhat is Group Policy?Group Policy (GPO), a feature of the Microsoft Windows NT family of operating systems, is a set of rules that control the working environment of user accounts and computer accounts. It offers the centralized management and configuration of operating systems, applications, and users' settings in an Active Directory environment.Group Policy can configure most system settings, save power by utilizing smart power settings, give individual users more control over their machines with administrator privileges and increase system security.Group Policy in part controls what users can and cannot do on a certain program to accomplish the goal of central management of a group of applications. Users can configure Foxit Reader easily through Group Policy. Please refer to the instructions below for details.Personal Computer SettingFoxit Reader offers two types of group policy template: .adm and .admx. Different types are compatible with different operation systems, but have the same settings. The template of .adm file type is compatible with Windows XP and later, while .admx is compatible with Server 2008, Server 2012, Windows Vista and later.Set Template PreferenceFor .adm file, follow the steps as below:●Please click Start > Run or use the shortcut key Windows + R and type gpedit.msc to openLocal Group Policy Editor.●Right-click the management template and choose Add/Remove Templates in the contextmenu. In the opened dialogue box, add the group policy template of Foxit Reader (Foxit Reader.adm). The Foxit Reader template will appear in the left navigation pane and you can set its template preferences.For .admx file, put the .admx file in C:\Windows\PolicyDefinitions and do the setting. The .admx file should be used in combination with an .adml file. And the .adml file should be put in C:\Windows\PolicyDefinitions\language. For example, if in the English OS, the .adml file should be put in C:\Windows\PolicyDefinitions\en_us.Take Set the Page Display menu as an example and other options are configured in the same fashion.●Choose Foxit Reader > Menu > View > Page Display.●Double-click Page Display to open the dialog box.Select Enabled, check the submenus to be removed in the Options, and the corresponding submenu items will be removed from Foxit Reader.Note: If you select all the submenus in the Options and confirm the configuration, all the submenus under Page Display will be removed.Select Disabled or Not Configured, and no changes will be made to the display status of Foxit Reader.Note: Group Policy setting includes computer configuration and user configuration. Computer configuration takes precedence over user configuration. The application will use the computer configuration if both the computer and user configure a specific function at the same time.GPO Deployment (for Server)Create GPO Management●If you already have an Active Directory domain and organizational unit configured, pleaseskip to “Apply the Foxit Template” section.●Choose Start > Administration Tools> open “Active Directory Users and Computers” >right-click the field “” > choose New > Organization Unit in the right-click menu.●In the opened New Object-Organization Unit dialogue box, type the unit name (For thisexample, we have named the unit “qa”) and click OK.●Right click the created organization unit “qa” and choose New > User in the right-click menu.For this example, we have named the user “King”.Click Start> Programs> Administration Tools> open the Group Policy ManagementConsole and right-click the created organization unit “qa” and choose Create a GPO in this domain, and Link it here.If you cannot find the Group Policy Management in Administration Tools, please install the application package GPMC.MSI. You can download the package by clicking the link /en-us/download/details.aspx?id=21895.Apply the Foxit Template●Type the GPO name in the New GPO dialogue box and click OK.●Right-click the new GPO and choose Edit in the right-click menu to open Group Policy Editor.●Right-click the Template Management and choose Add/Remove Templates to add FoxitReader.adm. Please refer to Set Template Preference.●For configuring options, please refer to Example: Set the Page Display.GPO ItemsThe following table shows the deployable options and their functions in GPO to speed up your working process.Items in GPO TemplateUsing XML EditorBesides GPO Configuration, users can also configure Foxit Reader by XML Configuration. XML configuration takes precedence over GPO configuration. The application will use the XML configuration if both the XML and GPO configure a specific function at the same time.The XML file in Reader’s folder (C:\Program Files (x86)\Foxit Software\Foxit Reader\ProfStore) can be configured with XML Editor. The configurable items of XML file are the same with GPO, please refer to GPO Items for details.To configure a XML file with XML Editor, please follow the steps below:●Open the XML Editor.●Click Import to import the XML file to be configured. Please ensure that the XML file youimport is compatible with your currently-used version of Foxit Reader. If not, you should change the version number to the one of your currently-used application in the Version box(the version number should be 7.x.x).●Set the preferences in the corresponding menus. For example, choose Preferences Tab >click Start Page on the left panel > check Hide Start Page to remove the start page from Foxit Reader.●Click Save to save the configured XML file.Note: (Alternatively) You can configure relevant items by XML Editor directly, then export and save the XML file in C:\Program Files (x86)\Foxit Software\Foxit Reader\ProfStore to replace the default XML file of Foxit Reader.Contact UsFeel free to contact us should you need any information or have any problems with our products. We are always here, ready to serve you better.。
福昕阅读器快速指南说明书

目录目录 (2)福昕阅读器使用方法 (3)安装与卸载 (3)打开、关闭、保存 (4)自定义工作区 (5)查看命令 (9)阅读功能 (10)跳转至指定页面 (10)查看文档 (11)调整文档查看模式 (13)阅读辅助命令 (14)PDF操作 (14)复制文本、图片和页面等 (14)标尺、参考线、线宽和测量命令 (14)撤销和重做 (17)阅读PDF文章 (17)搜索PDF (17)查看和处理PDF文档中的3D内容 (17)PDF签名 (18)共享文档 (20)互联PDF(仅适用于企业版) (21)注释 (21)基本注释命令 (22)图章 (25)PDF审阅 (25)表单 (27)填写PDF表单 (28)添加表单注释 (28)导入/导出表单数据 (28)生成二维条形码 (31)验证XFA表单中的签名 (32)高级编辑 (32)书签 (33)打印 (34)如何打印PDF文档? (34)如何打印部分页面? (34)如何打印指定页面或章节? (35)打印优化 (35)打印对话框 (36)联系我们 (37)福昕阅读器使用方法安装与卸载双击安装包,然后根据提示进行安装。
或者您也可以通过命令行安装福昕阅读器。
福昕阅读器安装属性:---------------------------------------------------------------------------------------------------------------/COMPONENTS <功能列表> /COMPONENTS的属性值是以逗号分隔的功能列表。
它使得福昕阅读器可以在本地安装使用。
Foxit Reader安装包定义了以下功能:pdfviewer –福昕阅读器及其组件;ffaddin –在Mozilla Firefox、Opera、Safari和Chrome浏览器中打开PDF文件的插件。
使用该功能,需提前安装pdfviewer。
- 1、下载文档前请自行甄别文档内容的完整性,平台不提供额外的编辑、内容补充、找答案等附加服务。
- 2、"仅部分预览"的文档,不可在线预览部分如存在完整性等问题,可反馈申请退款(可完整预览的文档不适用该条件!)。
- 3、如文档侵犯您的权益,请联系客服反馈,我们会尽快为您处理(人工客服工作时间:9:00-18:30)。
1、安装完成后,打开安装目录,里面会有一个LocalConfig 文件。
把其内容改成下面内容保存就好了(右键用记事本打开)。
<?xml version="1.0" encoding="utf-8" ?>
<!--不要随便修改,否则将导致Foxit PhantomPDF没有权限运行-->
<config_info >
<!--本地化语种,需要框架、第三方程序语言id一致,不一致需要根据这个进行对应转换-->
<LangId name="langid" value="49007"/>
<!--key会有授权的语种,与这个不一致,将视为当前的PhantomPDF没有得到授权-->
<KeyLang name="keylang" value="en_us"/>
</config_info>
以上是 LocalConfig文件内容。
2、然后打开福昕PDF电子文档处理套件企业版,在帮助菜单下点“激活”\选“安装福昕PDF套件授权文件”\点“下一步”。
有个文本框让填注册码,把下面的内容粘贴进去。
弹出成功激活的对话框,该软件重启下就好了。
注意不要修改以下内容:
[Foxit License]
SN=FPMRK1913
Modules=Express,PDF/A
validation,DocProcess,TouchUp,PageFormat,FormDesigner,Organizer,Certi ficateEncryption,DigtalSignature,OCR,PDF2Other,Optimizer,Redaction,Ce rtifyDocument,RMSProtector,RMSPolicyManager,HighCompression,Advanced Editor
Users=1
Licensee=Mario Steiner
LicenseDate=2011/06/12
Sign=7B20D9F4EE9D35E10357C1649A7A8CCB34C4E86386939D0F0EDEC74AB24A2B25 B827BAEE3341F14A
Restrictions=Ver:5,Keyver:2,Edition:Business,Code:30101-03000-NR100,L ang:en_us。