测距仪LM50 说明书
激光测距仪操作文档

激光测距仪操作说明书一.激光测距仪硬件介绍HUDLCD显示器RS232数据串口扳机LCD显示器二.测距仪的技术指标a)罗盘(抗磁性传感器,Post-Fluxgate 技术)i."0.5 º 精确度b)磁倾仪i."0.1 º 倾斜精度ii."40 º 倾斜范围c)测距i.精度–测85米外的白目标精度为0.1米ii.最大距离–1850米(反射目标)iii.最小距离–3米iv.高压输电线175米v.杆状标志400米vi.树(无叶)400米vii.建筑物,树(有叶)800米三.激光测距仪的基本操作3.1 如何校对激光测距仪●开启电源●按“MENU” 健●用>?键来进行功能选择●选择“COMP” 并按下“Enter” 键●选择“CAL” 并按下“Enter” 键●LCD显示窗显示“Initializing Please Wait!” &“Rotate Unit for Calibration” 信息●以射击的姿势扣住扳机. LCD显示窗显示“Data PointCount” 信息●慢慢转动Contour枪1-2圈. 每圈用45-60秒钟完成●慢慢转动Contour枪1-2圈. 每圈用45-60秒钟完成●在转动中,慢慢地从上到下,从左到右移动(±40º的范围)●虽着 Contour 的移动, 你将看到数据点(Data PointCount) 在增加。
当其值增加到275时,罗盘校对操作就完成了。
松开板机,系统恢复原来的设置●每次系统上电都必须要重复以上操做3.2 开机自检自检信息:仪器开机后将进行自检,自检信息将显示在LCD 显示屏上:Selft TestControur XLRic当自检信息结束后回到以前的测量界面时,说明自检成功,否则会出现以下错误信息:End Of Self Test*** Fall3.3 标准测量模式下的测量标准模式是仪器在开机后默认的模式,在这种模式下,仪器将显示所测目标的距离、方位和倾斜值。
激光测距仪LMD2000用户手册说明书
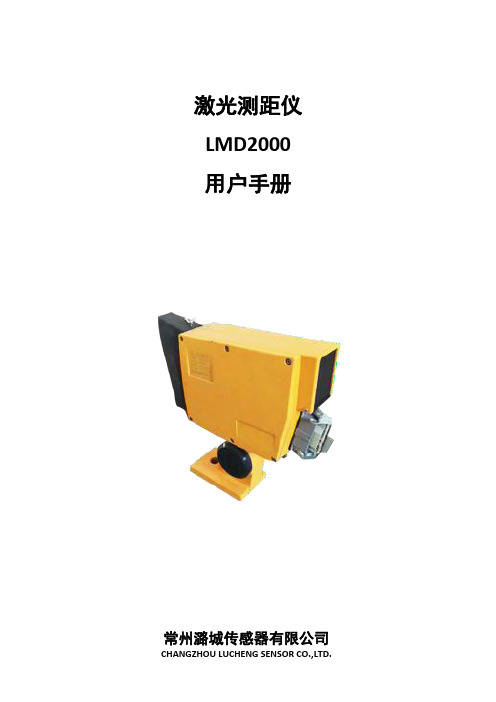
激光测距仪LMD2000用户手册常州潞城传感器有限公司目录1.0概述 (2)1.1系统原理 (2)1.2技术性能与指标 (2)1.3接线表 (3)2.0参数代码说明 (3)2.0.1模拟量输出范围的起点Range Beginning(RB) (3)2.0.2模拟量输出范围的终点Range End(RE) (3)2.0.3报警值选择(OPT) (4)2.0.4报警点1(DL) (4)2.0.5报警点2(DH) (4)2.0.6报警迟滞Alarm Hysteresis(AH) (5)2.0.7RS485或RS232选择 (6)2.0.8串口地址设置 (6)2.0.9软件版本号 (6)3.0操作说明 (7)3.0.1后面板示意图 (7)3.0.2参数设置过程 (7)3.0.2.1按键功能 (7)3.0.2.2参数设置步骤及说明 (7)4.0串口参数设定 (8)4.0.1串口连接 (8)4.0.2定义ASCII码RS485和RS232通讯协议 (8)4.0.2.1RS232通讯 (8)4.0.2.2RS485通讯 (10)5.0错误信息 (12)6.0机械尺寸 (12)1.0概述LMD2000激光测距仪专门用于对固定和移动物体的距离测量。
主要特点如下:•在恶劣的户外环境下,仍能保持很高的测量精度和可靠性•测量范围最大可达100米•使用可见激光束,易于瞄准被测物•灵活的可扩展的连接电缆,便于供电、电平信号、开关量和模拟量输出•可用不同的参数对开关量输出和模拟量输出分别编程•随意设定距离范围,并能用开关量输出表示距离的正负超差1.1系统原理LMD2000激光测距仪采用相位比较原理进行测量。
激光传感器发射不同频率的可见激光束,接收从被测物返回的散射激光,将接收到的激光信号与参考信号进行比较,最后,用微处理器计算出相应相位偏移所对应的物体间距离,可以达到mm级测量精度。
1.2技术性能与指标测量范围1:0.2~30m内,可直接测量;30~100米,需使用特制反射器测量精度2:0.2~30米:±2mm;30~100米:±3mm;分辨率:1mm激光发散角:0.6mrad供电电压:DC24V直流或交流AC(100~240)V(用户选择)数据接口:通过按键或串口(RS232或RS485)进行参数设置继电器输出:AC250V,10A;DC30V,5A响应时间小于320ms电平输出:PNP高电平DC24V,低电平0V;最大负载电流300mA;响应时间小于160ms。
徕卡测距仪使用说明书

徕卡测距仪使用说明书徕卡测距仪使用说明书:一、使用前的准备,一,电池的装入/更换打开仪器尾部的固定挡板。
向前推卡钮~向下将底座取下。
按住红色的卡钮推开电池盒盖。
安装或更换电池。
关闭电池盒盖~安装底座和卡扣。
当电池的电压过低时~显示屏上将持续闪烁显示电池的标志{B~21}。
此时应及时更换电池。
1、按照极性正确装入电池。
2、使用碱性电池,建议不要使用充电电池,。
3、当长时间不使用仪器时~请取出电池~以避免电池的腐蚀。
更换电池后~设置和储存的值都保持不变。
,二,多功能底底座固定挡板可以在下面的测量情况下使用:边缘测量~将固定挡板拉出~直到听到卡入的声音。
1、从2、从角落测量~将固定挡板拉出~直到听到卡入的声音~轻轻将固定挡板向右推~此时固定挡板完全展开。
仪器自带的传感器将辨认出固定挡板的位置~并将自动设置测量其准点。
,三,内置的望远镜瞄准器在仪器的右部有一个内置的望远镜瞄准器。
此望远镜瞄准器为远距离测量起到辅助的作用。
通过瞄准器上的十字丝可以精确地观察到测量目标。
在30米以上的测量距离~激光点会显示在十字线的正中。
而在30米以下的测量距离~激光点不在十字线中间。
,四,气泡一体化的水泡使仪器更容易调平。
,五,键盘1、开/测量键2、第二级菜单功能3、加+键4、计时,延迟测量,键5、等于[=]键6、面积/体积键7、储存键8、测量基准边键9、清除/关键10、菜单键11、照明键12、间接测量,勾股定律,键13、减-键14、BLUETOOTH ,六,显示屏1、关于错误测量的信息2、激光启动3、周长4、最大跟踪测量值5、最小跟踪测量值6、测量基准边7、调出储存值8、储存常数9、主显示10、单位~包括乘方立方,2/3,11、顶的面积12、墙面积13、3个额外显示,如:测量中间值,14、BLUETOOTH蓝牙开/关15、第二级菜单功能开16、硬件故障17、间接测量-利用勾股定律18、间接测量-利用勾股定律-部分高度19、面积/体积20、带常数的测量21、电池充电量显示二、菜单功能,一,设置在菜单中可以改变设置~并将其长久保存~并在关机和更换电池后不改变。
大型直行测量仪器用户指南说明书

A Method of Calculating Measuring Interval forLarge-Size StraightnessShengzhou Luline 1:Mechanical and Electrical Engineering line 2: Harbin Institute of Technologyline 3: Harbin, Chinaline4:e-mail:*****************Zhongxi Shaoline 1:Mechanical and Electrical Engineering line 2: Harbin Institute of Technologyline 3: Harbin, Chinaline4:e-mail:*********************Weishun Wangline 1:Research and Development Center line 2: Qiqihar Heavy CNC Equipment CORP. LTDline 3: Qiqihar, Chinaline4:e-mail:138****************Hongya Fuline 1:Mechanical and Electrical Engineering line 2: Harbin Institute of Technologyline 3: Harbin, Chinaline4:e-mail:****************.cnAbstract—Accurately straightness measuring has a direct relation to the promotion of the machine precision. In the process of straightness measurement, since the measuring interval has a great impact on the accuracy and efficiency of large-size straightness measurement, and there is no detailed measurement interval calculation method at present, it is necessary to make a deeply research to the measuring interval. This paper gives theoretical derivation to the measuring interval based on the Nyquist sampling theorem. Maximum frequency M and the number of measuring points in one period N are determined based on measurement tolerance, and then calculate the optimal theoretical measuring interval. Finally, measure the straightess of the guide rail under diferent measuring interval including the optimal one. Validate the calculation method through the straightess measuring experiment. The experimental results show that the optimal theoretical measuring interval derived in this paper is suitable, which proves the correctness of the calculating method.Keywords-Straightness; Measuring interval; Large-size; Accuracy; Optimal theoretical measuring interval.I.I NTRODUCTIONStraightness tolerance is one of the geometric tolerances which are specified in the national standard and the international organization for standardization (ISO), and it is mainly used to control the shape error of straight line in plane or space[1]. The accurate measurement and evaluation of the straightness error is very important to eligibility judgment and guarantee of geometry parts with the straightness tolerance requirements[2]. Straightness measurement usually adopts the method of equal intervals measurement to measure the measured object through the measuring interval. There isn’t convincingly theoretical basis about the definition of the measuring interval in the related standard of country and enterprise[3], while the definition mostly depends on the experience of the technician[4][5]. The large measuring interval brings few measuring points,which will result in part of information losing that can cause the shape of the measured object cannot be accurately measured. Conversely, if the measuring interval is too small and the measuring points are too many, it will bring some interference information and useless data, especially for large-size straightness measurement, therefore this will cause low measuring efficiency and untrusted measuring results. So it is necessary to make a deeply theoretical analysis about how to choose the straightness measuring interval of large-size, and to choose suitable measuring interval in measurement of large-size under the premise of measurement requirement,aiming to improve the efficiency of straightness measurement and evaluation and to ensure the credibility of the measurement results.II.T HE DETERMINATION OF MEASURING INTERVAL IN LARGE-SIZE STRAIGHTNESS MEASUREMENTA.Nyquist sampling theoremAt present, the theoretical basis of determining the measuring interval is the Nyquist sampling theorem at home and abroad [6], the content of the theorem is as follows: If the maximum frequency of a continuous single value analog is M and the sampling frequency is 2M, it will completely determine the analog waveform. It means that there must be sampled at least twice times in one changing cycle of the maximum frequency. The sampling period now is presented by Eq.(1)12M∆<(1) where ∆and M respectively stand for sampling period and the maximum frequency of single value analog.International Conference on Chemical, Material and Food Engineering (CMFE-2015)The measuring interval corresponds to the sampling period of the signal in the time domain[7]. By the Nyquist sampling theorem, the number of measuring points in total length K can be determined by the maximum frequency M and the number of sampling in one changing cycle N of the maximum frequency. With the total measurement length L, the measuring interval can be determined as Eq.(2)=L L K MN∆= (2)where L,K,M and N respectively represent total measuring length, theoretical optimum measurement points in total measurement length, the maximum frequency and the number of sampling N in one changing cycle of the maximum frequency(2N >).It is observed that the measuring interval ∆ can be determined by total measurement length L, the maximum frequency M of the signal of the surface shape of the measured guide rail and the number of measuring points N in one changing cycle of the maximum frequency. Figure.1 describes the calculation process of theoretical measuringLarge-size StraightnessB. The determination of the maximum frequency MSince the determination of the maximum frequency of surface profile signal M is related with the measurement tolerance δ, there needs to introduce the measurement tolerance δ. The purpose of straightness measurement is to truly express the measured surface shape. The measurement errors from the measuring method and instrument will cause that the machining errors of the measured object cannot be accurately measured, so we should try to reduce measuring errors which mainly refers to errors from the method. Inpractice, the measurement method of equal interval is often used in straightness measurement, but the uncertainty of measuring interval brings the uncertainty of the position of measuring. The measuring errors from the method are mainly caused by mismatching between the measurement points and the extreme values points of the measured surface profile, and the measurement tolerance δ is used to restrict the measuring errors especially from measuring methods. Literature [8] points out that measurement tolerance δ relate with tolerance grade level and size of the measured object. By selecting the appropriate measurement tolerance δ based on the characteristics of the measured object, we can determine the maximum frequency M of the measured object surface shape of the signal.The error signal of the surface profile in the measured guide rail contains geometrical form error 、 surface waviness and surface roughness. In terms of frequency and amplitude, the low frequency and large amplitude makes the geometrical form error be the major factor affecting the surface appearance. The surface roughness frequency is high and amplitude is small. The frequency and amplitude of the surface wave are between both the above[9]. In the actual measurement, because of the difference of measured surface, the maximum frequency M of surface profile signal is not the same. The specific way to determine the M is to find out the former M order harmonic components of the measured surface profile signal, then compare each order harmonic amplitude with the measurement tolerance δ, find the maximum frequency M whose amplitude is above the measurement tolerance δ.In summary, according to the selected measuring interval determined by the total length L of the measured object and related national standards, measure the object and get the measurement data, and then modify the data through least square method to eliminate the influence of the installation inclination of the measured surface. Process the revised data by Fourier transform and data X(k) after Fourier transform which is described as Eq.(3)21()[()]()j ikn ni X k DFT x i x i eπ−−===∑ (3)where x(i) and n respectively represent the original measurement data and the total number of measuring points. Compare each order harmonic amplitude C i with the measurement tolerance δ, find the harmonic C m whose amplitude is above the measurement tolerance δ and order is the highest, then the maximum frequency is M.C. The determination of the number of meauring points in one cycle NIn the process of straightness measurement,the extreme values ultimately determine the straightness error value. Any one periodic signal can be formed by a number of sinusoidal signals, so we can assume that the measured surface profile is a sine wave, its period is T and its amplitude is a as Figure.2 describes, then we can see B and D is the determinant to straightness error value. As can be seen from Figure.2, thedecrease of the measuring interval will make the measurement points much closer to the extreme values points and then finally decrease the deviation caused by the mismatching between the measurement points and the extreme values points. But the decrease of the measuring interval and the increasing of the measurement points reduce the measurement efficiency and increase the amount of calculation, there is need to discuss the optimum number of Y PositionAssume that the number of measuring points in one changing cycle of the maximum frequency on the measured surface is N, the amplitude of the frequency component is a and its period T=2π,so the measuring interval is 2π/N . The measuring starting point is zero A, and B fall between K and K+1(K=0,1,2……N ), then the difference between K and B ∆Y K. and K and B ∆Y K+1 are determined as Eq.(4) and Eq.(5)sin(2/)Y a a K N K π∆=− (4)sin(2(+1)/)+1Y a a K N K π=−∆ (5) In actual measurement, the position of the measured point is unknown. Assume that the actual positions of the measured points and the measuring point position deviation is △X, then the difference of B value and K and K+1 point measurements are respectively determined as Eq.(6) and Eq.(7) sin((2/N)X)K Y a a K π∆=−+∆ (6) 1sin((2(1)/N)X)K Y a a K π+∆=−++∆ (7) Point B is between point K and point K+1, so when the actual position of measuring point changes, the variation trend of ΔY K and ΔY K+1 is just the opposite, one increases, another reduces. It can be proved that the limitation of measurement error caused by the mismatching between the measurement points and the extreme values points.ΔY K =ΔY K+1, the change of the actual measurement point △X is as Eq.(8) (42)/(2)X N K N π∆=−− (8) Take Eq.(8) into Eq.(6) and Eq.(7), the limit of measurement error near B is as Eq.(9) max (1cos(/N))B Y a π∆=− (9) Similarly, the limit of measurement error near the extreme value point D is as Eq.(10) max (1cos(/N))D Y a π∆=− (10)Therefore, the limit of straightness measurement error ΔY max caused by mismatching between the measurement points and the extreme values points are determined as Eq.(11)max max max2(1cos(/N))B D Y Y Y a π∆=∆+∆=−(11)As can be seen from Eq(11), with the number of measuring points N increasing,limit error of straightness measurement gets smaller. Therefore, as long as we know the amplitude of the maximum frequency of the measured surface signal a , we can get the number of measuring in one cycle of the maximum frequency N with measurement tolerance δ.D. Determination of straightness measuring interval Δ Combine the maximum frequency M and the number of sampling in one changing cycle of the maximum frequency N , we can get the number of measuring points K in the total measuring length which descibes the determination of theoretically optimal measuring points as Eq.(12) =K MN(12) And theoretically optimal measuring interval in total measurement length is determined as Eq.(13)=L L K MN∆= (13)III. E XPERIMENTAL VERIFICATION TO THE CALCULATIONMETHOD FOR MEASURING INTERVAL OF L ARGESTRAIGHTNESS Theoretically optimal measuring interval can be deduced according to the large-size straightness measuring interval calculation method with the original experimental data obtained. Validate the theoretically optimal measuring interval derived in this paper is reasonable, through measuring the straightness by different measuring interval including the optimal one.The measuring object in experiment is straightness within the vertical plane of the 5m guide rail whose accuracy index T is 0.02mm and the measuring instruments is Renishaw XL-80 laser interferometer. In order to eliminate the effect of the tilt of the rail to straightness measurements, use the least squares method to assess the straightness. It is recommended that the measurement tolerance δ in the calculation can be T/5~T/10.Figure.3 Measuring the Straightness of Guide Rail The length of bridgeboard used in straightness measurement are 160mm,500mm,750mm and 1000mm. Figure.3 describes straightness measurement by Renishaw XL-80 laser interferometer. TABLE 1 describes the impact of different measurement tolerance δto the measuring intervals that are derived.TABLE 1 The Impact of Different Measurement Tolerance δ to theMeasuring IntervalsMeasurement tolerance Theoretically optimal measuring interval [mm] δ=T/10 544δ=T/8 544δ=T/6 620δ=T/5 620As can be seen from TABLE 1, the theoretically optimal measuring interval derived under the case of δ=T/10 is 544mm, so the raw data obtained by the 160mm can be used to calculate as true values. TABLE 2 below describes the results of straightness measurement under the case of different measuring intervals by laser interferometer.TABLE 2 Straightness under Different Measuring IntervalsMeasuring interval [mm] Straightness [μm]160 40.922500 43.782750 33.81000 26.846The theoretically optimal measuring interval derived is about 550mm, and the interval less than 550mm can be used in practical. Taking the purpose of measuring efficiency and true expression of the straightness of the measured object into account, we can choose 500mm as measuring interval. As can be seen from TABLE 2, the results of straightness measurement got under the case of interval 160mm and 500mm are basically the same, while the results are significantly smaller under the case of interval 750mm and 1000mm, so the interval 500mm can be the optimal measuring interval.IV.C ONCLUSIONThis article proposes a calculation method for the large-size straightness measuring interval based on Nyquist sampling theorem. The results of validation experiments indicate that the method is feasible. According to the rail experimented, the interval 500mm through theoretical derivation can be its optimal measuring interval. Because the measurement tolerance δis from experiment in this paper, the subsequent research should give theoretical derivation and inspect the relationship between the measurement tolerance δ and measurement length.A CKNOWLEDGMENTThis work is supported by the National Science and Technology Major Project of China (2013ZX04013-011-09) and Heilongjiang Postdoctoral Fund in 2013 (LBH-Z13209). The authors would like to express their appreciation to the contribution of Xiaozhong Lou and Zhonghe Xu, who are the engineers at Qiqihar Heavy CNC Equipment CO., LTD, for offering help in experiments.R EFERENCES[1] F.G. Huang. The Number of Measurement Extraction Points forStraightness Error Evaluation[J]. Journal of Huaqiao university: Natural Science Edition, 2011, 32(6): 615-617.[2] F.G. Huang and Y.J. Zheng. Research straightness error measurementsampling scheme[J].Tool and Technology, 2007,10:95-98.[3]X.F. Hou. Research of Sampling Spacing in Measuring StraightnessBased on CMM[J].Tool and Technology, 2008, 42(6): 102-103. [4]M. M. Dowling, P. M. Griffin, K.-L. Tsui and C. Zhou. StatisticalIssues in Geometric Feature Inspection Using Coordinate Measuring Machines. Tchnometrics, 1997,39(1)3~24.[5] A. Weckenmann, H. Eitzert, M. Garmer and H. Weber. Functionality-Oriented Evaluation and Sampling Strategy in Coordinate Metrology.Precision Engineering,1995,17:244~252.[6]Y.H Zheng, L.N. Zhang and K.W. Qing. Extraction scheme of the newgeneration GPS and its application research[J]. Machinery Design & Manufacture, 2008 (6): 193-194.[7]L.L. Huang, L.X. Wang, Yu Wang, H.L. Wang and F.G. Huang.Extraction of Straightness Error Signal with Harmonic Analysis. [J].Journal of Huaqiao university: Natural Science Edition, ,2014,01:7-10.[8]Z Li and Z.G. Xu and X.Q.Jiang. Interchangeability andMeasurement Technology——Geometrical Product Specifications and Verification(Higher Education Press,China 2004). pp.67.[9] B.Fei, Y.J. Fan and WenXiong Xu. Adaptive Sampling Method——Anew method used in measuring the shape error[J]. Journal of Applied Sciences, 1994, 12(4): 423-430.[10]F.X Zhang and H. Zhao. Theoretical research between sample step anddeviation shape in straightness measurement[J]. Aiavtion method & measurement technology. 1995, 15(2): 9-11.。
lomvum测距仪说明书

lomvum测距仪说明书Lomvum测距仪是一款精密测量工具,可以快速、准确地测量各种长度、面积、体积以及间距等。
一、产品外观Lomvum测距仪外观简洁,主要由测量部分、显示屏、控制按键和电池仓组成。
二、产品特点1、高精度测量:Lomvum测距仪采用激光技术,具有高精度、高速度的测量能力,测量范围从0.05米到60米不等。
2、多功能:Lomvum测距仪支持长度、面积、体积、连续测量、最大/最小值测量等多种测量方式,满足不同测量需求。
3、易操作:Lomvum测距仪采用大尺寸LCD液晶显示屏,界面简洁、易读,同时操作简单方便,适用于各种人群使用。
4、自动校准:Lomvum测距仪自动支持校准,准确度高,保证了测量数据的可靠性。
三、使用方法1、按下电源键开启测距仪,在显示屏上可以看到“0.00”数值。
2、选择需要进行的测量方式:(1) 按功能键进行选择,如:长度、面积、体积等。
(2) 点击单位键,选择需要的单位,如:米/英尺/英寸等。
3、使用参考位标记测量:(1) 将测量仪对准需要测量的起始点,按下“测量”按键。
(2) 将测量仪对准需要测量的终点,按下“测量”按键。
(3) 显示屏会显示所测得的数值。
4、键入参数测量:(1) 直接通过键盘键入需要测量的数值,然后按下“测量”按键。
(2) 显示屏会显示所测得的数值。
5、最大/最小测量:(1) 点击“MAX/MIN”键,选择需要测量的模式。
(2) 将测量仪对准需要测量的目标,按下“测量”按键。
(3) 显示屏会显示所测得的最大/最小数值。
四、注意事项1、使用时请避免阳光直射、划痕、碰撞等情况。
2、请使用干燥的抹布清洁测距仪,避免使用含酸性或碱性的清洁剂。
3、使用时请遵循使用说明,避免误操作或酿成其他危害。
4、在不使用时请关闭电源,避免耗电等情况。
5、Lomvum测距仪只能在室内环境下使用,不能在室外使用,避免影响精度。
测距仪怎么使用

测距面板示意图.................................................................................................................................................. 4
激光测距仪操作说明高尔夫专用-激光测距望远镜

激光测距仪操作说明(高尔夫专用)产品特性:物镜:21mm放大倍率:6X视场角:7.2°出瞳:16mm分辨率:+/-1MLCD尺寸:1.8寸最大测程:LW600PRO600MLW1000PRO1000M 最近测程:LW600PRO4MLW1000PRO5M电池:3V(CR2)防水产品尺寸:长:97mm(不含目镜)106mm(含目镜)宽:39mm高:73mm(前端)68mm(后端)重量:175g1、开机按键开机开机画面,是上次操作后的功能界面。
2、单位转换长按键可切换距离单位,M和Y。
在“测距”,“旗杆锁定”,“高尔夫距离修正”,“雾天”4种模式中,都可以通过长按键来切换M,Y单位,单位切换后将在4种模式中统一使用。
3、模式选择短按键可在“测距”,“旗杆锁定”,“高尔夫距离修正”,“雾天”,之间切换选择。
侧屏的内容将与望远镜内显示内容同步。
侧屏中有出现MD符号时表示显示的是实测距离,出现RD时表示显示的是建议距离。
3-1测距原理望远镜显示界面侧屏显示界面短按键开始测距望远镜显示界面侧屏显示界面3-2“旗杆锁定”模式原理说明在旗杆锁定模式中,可以将点D从众多的背景点中分离出来,并只保留该点的距离d1。
从而达到自动锁定旗杆,并清除旗杆背后的树林等杂散目标的目的。
望远镜显示界面侧屏显示界面在旗杆扫描模式画面出现后,按住启动旗杆扫描功能,此时画面中的旗帜周围的方框会闪动,将测距机的瞄准点在被测旗杆的两侧来回扫描,当旗杆的数据被测到后,数据将被保留,而画面中旗帜周围的方框也不再闪动,表示旗杆数据被锁定。
望远镜显示界面侧屏显示界面3-3高尔夫距离修正:将测距值AB与坡度值(<±20°)带入到高尔夫飞行弹道的方程中,根据距离解算出高尔夫的建议击球距离。
在坡度为正时,击球距离要远。
距离:AB点间距=AD点间距若按实际距离,击球抛物线为1,此时由于坡度为正,实际只能飞行到C 点。
要达到B点,需要按抛物线2击球,此时的飞行距离应该是AE点间的距离。
深达威激光测距仪50米 说明书米

激光测距仪带速度测量功能的SNDWAYSW-600A,SW-1000A,SW-1500A具有距离、速度、坡度和高度测量功能的多功能设备操作说明该产品的设计符合标准:GB/T14267-2009广东制造,货号:00000950安全说明使用前仔细阅读安全要求和操作说明在使用该设备之前,请阅读所有的安全和操作说明。
任何未在这些说明中描述的措施都可能导致设备发生故障,影响测量的准确性或对用户或第三方造成伤害。
请勿自行打开或修理该装置。
严禁对激光发射器的功能做任何修改或调整。
妥善存放设备,不要让儿童接触到它,避免未经授权的人使用。
切勿将激光发射器对准自己或旁人,对准你身体的任何部位或任何高度反射的物体。
该设备的电磁辐射会对其他电子设备造成干扰。
不要在飞机上或医疗设备附近使用本装置。
不要在爆炸性或易燃性环境中使用本设备。
不要将废旧电池和无法使用的电器与家庭垃圾一起处理。
请按照现行法律和关于处理此类设备的规定来处理设备。
如果您在使用过程中遇到任何问题或疑问,请立即联系您的SNDWAY官方代表,我们将尽快帮助您解决问题。
感谢你购买SNDWAY手持式激光测距仪!带倾斜测量功能的SNDWAY多功能激光测距仪是一款集双筒望远镜和激光测距仪功能于一体的便携式激光倾斜测距仪。
主要应用。
•对于物体的详细检查,测量静态物体或低速移动且在可视范围内的物体。
该仪器的特点是测量精度高,测量速度快,可检测参数的可视化。
经济性:提供自动断电和低耗电。
•多功能激光测距仪结合了最新技术,可同时显示物体的距离和倾角。
在确定与物体的距离时,它可以显示到目标点的线路与地面的角度(仰角定义为正,俯角定义为负),相对高度和可见地平线的范围。
激光发射器的功率足够低,对人眼来说很安全。
它能够测量任何物体的范围,其体积小、重量轻,便于携带。
它由一个可充电的锂离子电池供电。
测距仪广泛用于电力设施(复杂的测量和扫描功能可以方便地检查远处的物体,如电力线和电线杆)、高速铁路、公用事业、林业设计、建筑、互联网通信设计、通信线路的检查和维修等,在开放的乡村和高尔夫、狩猎和野营旅行中使用。
- 1、下载文档前请自行甄别文档内容的完整性,平台不提供额外的编辑、内容补充、找答案等附加服务。
- 2、"仅部分预览"的文档,不可在线预览部分如存在完整性等问题,可反馈申请退款(可完整预览的文档不适用该条件!)。
- 3、如文档侵犯您的权益,请联系客服反馈,我们会尽快为您处理(人工客服工作时间:9:00-18:30)。
▪ 当屏幕电量符号变空时请更换新电池。 ▪ 长期不使用本仪器,请取出电池。 ▪ 电池的品牌和型号都应该相匹配。 ▪ 不要新旧电池混合使用。 ▪ 及时取出废旧电池,按照当地相关法令处理废旧电池。 勿将电池扔到火中。 开/关机 1. 按动“电源键”打开激光测距仪,仪器默认进入单段 距离测量模式。 2. 按住“电源键”约2秒关闭仪器。 3. 如在5分钟内没有对仪器进行操作,仪器将自动关闭以 节省电池电量。 切换测量基准 仪器默认的测量基准为该仪器的尾端。反复按动“测 量基准切换键”可以在仪器的三脚架螺母位置、仪器的前 端、仪器的延伸杆及仪器的尾端进行基准切换设置,下次 测量将以用户设定的基准位置开始。 关机后,测量基准自动还原为仪器的尾端。
按键功能 (图2)
图1
器的前端、延伸杆进行基准的切换。 7. 单位转换键– 在米、毫米、小数英尺、分数英尺、小数 英寸和分数英寸单位之间进行循环切换。 8. 最大/最小值测量键– 调用最大、最小值测量模式。
指示当前在单勾股定理测量模式 指示当前在双勾股定理测量模式 指示当前在最小值测量模式 指示当前在最大值测量模式 指示当前在连续测量模式
READ
CON
3 5
2
1
液晶显示
4 6 7
指示电池满电量 指示电池低电量 指示测量基准是从激光测距仪的延伸杆为起点 指示测量基准是从激光测距仪的尾端为起点
8
使用说明 本激光测距仪是一款高精度的测量仪器,请严格按照 以下使用说明操作,以保证本仪器的最佳性能。 ▪ 测量时不要将本激光测距仪指向太阳或其他强光源,这 样会使测量出错,或测量不准确。 ▪ 不要在潮湿、沙尘等恶劣环境下使用本产品。长时间在 恶劣环境下使用会损坏本激光测距仪的内部器件或导致 测量数据不准确。 ▪ 将本激光测距仪从一个环境带到另一个环境时,如两个 环境的温差很大,请待仪器温度与环境温度大体一致后 再使用。 ▪ 本激光测距仪在测量浅色液体(如:水)、透明玻璃、 聚苯乙烯泡沫塑料,或者其他类似半透明、低密度的物 质时会导致错误。
不可触及的地方。 ▪ 只有使用原配的零配件,才能保证仪器的正常使用。 Do not allow children to operate the instrument, 3.请不要让小孩操作此仪器,仪器不用时放在小孩 2.只有专业人员方可修理此仪器,请勿擅自修理。
数字激光测距仪简介
了解数字激光测距仪 (图1)
2. 按“测量键”打开激光,激光指示图标从下向上闪 烁。 3. 将激光束瞄向所要测量的目标。
m
体积测量 1. 按“模式键”选择体积 测量模式。图标 “ ” 上闪烁的线表 示将要测量体积的长度 边(图11)。
图11
4. 按“测量键”,第一条 图9 边的长度测量值显示在 屏幕的第一行(图9), 同时图标“ ”上宽 度的边开始闪烁。 5. 将激光束瞄向所要测量 的另一条边。 6. 按“测量键”,所测面 积值显示在屏幕的最下 图10 行;同时宽度值在第二 行显示(图10)。 7. 按“测量键”进行下一 个面积测量。
4
指示测量基准是从激光测距仪的三脚架连接螺母位 置为起点 指示测量基准是从激光测距仪的前端为起点 激光打开指示 指示当前在单段距离测量模式 指示当前在面积测量模式 指示当前在体积测量模式
*重要说明:在不良环境条件下(如室外或者环境光 较强,测量表面反光过弱、表面太粗糙等)使用该仪器时 请配合标靶使用,否则可能会导致较大测量误差。
m
m
5. 要进行第二次测量,再 图6 按一次“测量键”打开 激光,第一次测量数值 向上移一行显示,以小 字体显示(图6)。 6. 瞄向新的目标。 7. 再按一次“测量键”进 行第二次测量。 8. 第二次测量数据在屏幕 图7 的最下行显示,测量结 束后激光自动关闭( 图7)。 9. 重复以上第5~8步序进 行新的长度测量。 注意:若选择了面积,体 积或勾股定理测量模式 后,按“清除键”返回到 单段距离测量模式。 面积测量 1. 按“模式键”选择面积 测量模式,图标 “ ”上闪烁的线表 示将要测量面积的第一 条边(图8)。
起伤害。 ▪ 使用本仪器时不要撕掉或损毁仪器上的警告标签。 ▪ 避免眼睛遭受直接的激光暴露辐射,这样会导致人眼出 现瞬间的视觉盲区。 ▪ 此激光测距仪不是玩具,请将仪器放在儿童不能拿到的 地方。不要将仪器射出的激光束直接对准任何人。 ▪ 请勿在小孩周围操作仪器,或者让孩子自行操作。 ▪ 请勿将仪器放置在容易被人有意或无意直视激光束的地 方。 ▪ 不要将激光束打到有高反光面的物体上,高反光面上反 射回来的激光束会伤害到使用者或者周边人员的眼睛。 ▪ 不使用该仪器时将激光关闭。否则会增加不经意间直视 激光束的危险。 ▪ 不要试图以任何的方式改变激光器的性能,这样可能会 导致严重的激光辐射伤害。 ▪ 不要试图维修或者拆解此仪器,非专业人员维修可能会 1.仪器使用者请确保按照说明书来操作仪器。 导致严重的激光辐射伤害。任何的维修必须由专业的人 User should make sure to operate the instrument in accordance with user manual. 员进行。 ▪ 不要在存有易燃物的区域使用本仪器,如易燃液体、气 Only professionals can repair the instrument, please do not repair it by yourself. 体和粉尘等。
▪ 高反光面的被测量物会使激光束偏斜导致错误的测量结 果。 ▪ 高亮度的周围环境结合低反射效果的测量面,会缩小仪 器的测量范围,降低测量精度。 ▪ 不要将本仪器浸在水里!使用干净的软湿布擦拭灰尘。 不要使用腐蚀或挥发性物质清理本仪器。对光学部件( 如激光接收镜头和激光束射出孔)要像对待眼镜和照相 机镜头一样来对待。 ▪ 本激光测距仪遭跌落或其他外力挤压后,要重新校对精 度才能使用。 安装电池 (图3) 该激光测距仪使用4节 “AAA”碱性电池工作。 图3 1. 推动锁钩取下电池盖。 2. 装入4节新的“AAA” 碱性电池,注意电池盒 内的电池极性标记,以 保证装入电池极性 (+/-)正确。 3. 合上电池盖并卡到位。 注意:
20
2
▪ 将电池放在小孩触摸不到的地方。
keep the instrument out of reach of children when not in use.
本激光测距仪外形轻巧、握持舒适、操作携带方便, 测距精确、快速。
3
激光辐射 不要直视激光束
2类激光产品 激光最大输出功率:P≤1mW 激光波长:λ=635nm 本产品符合标准 EN60825-1: 2007
激光辐射 不要直视激光束
2类激光产品 激光最大输出功率:P≤1mW 激光波长:λ=635nm 本产品符合标准 EN60825-1: 2007
LASER RADIATION DO NOT STARE INTO BEAM Class 2 laser product P≤1mW λ=635nm EN60825-1: 2007
测量单位转换 按动单位转换键可以进行测量单位切换,从“米”到“毫 米”到“十进制英尺”到“分数英尺”到“十进制英寸” 再到“分数英寸”循环切换,如下表所示: 单位设定 meters millimeters decimal units of feet 1/16-in. increments decimal units of inches 1/16-in. increments of inches 开始测量 手握机器放置在准备测量的起始点,按“测量键”打开激 光,将激光瞄准想要测量的目标,再按一次“测量键”进 行测量。 注意:激光打开20秒内没有进行任何操作,激光会自动关 闭。如测量操作时间超过20秒,请再按一次“测量键”键 打开激光。 不要将激光束直接对准任何人或动物。 不要凝视激光
5
2
3. 延伸杆– 用于从墙角开始测试 4. 1/4 英寸的三脚架连接螺母– 用于连接三脚架使用 5. 电池仓– 装入4节AAA 电池 6. 激光接收镜头– 接收反射回来的激光来计算距离 7. 激光射出孔– 射出激光束
3 6 7
(苏)制01000337号
型号(Model): LM50 电制(Battery): 6V (4x1.5V AAA battery ) 制造商: (外资)南京德朔实业有限公司 Manufacturer: Nanjing Chervon Industry Co., Ltd.
图1 1 4
▪ 本仪器的测量量程为0.1-50米,精度高达±2毫米。 ▪ 该仪器适用于: ▪ 测量长度、宽度、高度及间隙 ▪ 很难直接测量的场合,可以通过单勾股定律和双勾股 定理进行间接测量 ▪ 计算面积和体积 ▪ 本仪器有自动关机功能。连续5分钟不使用仪器,仪器将 自动关机,这将有效的延长电池的使用时间。 1. LCD 显示屏– 带有白色背景灯光的大屏幕液晶显示屏, 即使在较暗的环境中使用也可以方便地读取测量结果 2. 键盘– 新的防水防尘键盘在使用时更舒适
7
或借助其他光学器具直视激光光束。 清除当前测量值 按“清除键”清除当前测量值,同时显示以前的测量值。 在面积、体积、勾股测量模式下,反复按清除键可以返回 到单段距离测量模式。 单段距离测量 1. 按“电源键”打开激光 图4 测距仪。仪器自动进入 单段距离测量模式 (图4)。 2. 按“测量键”打开激 光,激光指示图标从下 向上闪烁,将激光束瞄 向所要测量的目标。 3. 再按一次“测量键”进 图5 行测量。 4. 测量结果以大字体显示 在屏幕的最下行,测量 结束后激光自动关闭( 图5)。
长度 meters millimeters feet (decimal) feet & 1/16 inch Inches (decimal) inches & 1/16 inch
面积 m2 m
2
体积 m3 m3 feet3 feet3 feet3 feet3
feet2 feet2 feet2 igital Laser Distance Meter