Linux Redhat操作系统Initiator软件安装、配置和使用指导书
RedHat LINUX安装全步骤(附图)
LINUX软件安装步骤1.在Vmware 中创建一个Linux 的虚拟机版本是Red Hat Linux ,其中硬盘最少要有2GB 的空间(建议分4GB 其他硬盘,网卡的配置和Windows 虚拟机一样即可)。
2.把Vmware 的光驱制定到对应的镜像文件上,我们这里是linux iso 文件中的第一张盘。
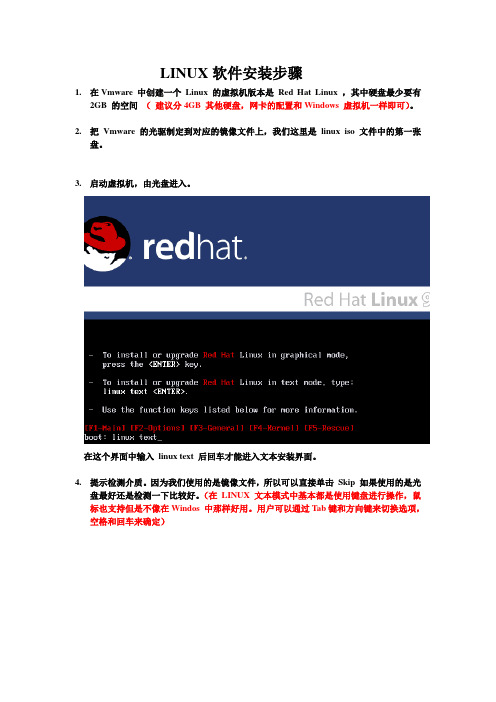
3.启动虚拟机,由光盘进入。
在这个界面中输入linux text 后回车才能进入文本安装界面。
4.提示检测介质。
因为我们使用的是镜像文件,所以可以直接单击Skip 如果使用的是光盘最好还是检测一下比较好。
(在LINUX 文本模式中基本都是使用键盘进行操作,鼠标也支持但是不像在Windos 中那样好用。
用户可以通过Tab键和方向键来切换选项,空格和回车来确定)如果上面选择的是Skip就会直接跳到第8步。
5.开始检测。
如果是使用的光盘CD 需要先插入CD 后在Test 因为我们使用的是镜像文件所以就可以直接Test6.检测完毕。
选择OK7.提示是否检测其他的盘。
如果你为了保险起见可以继续检测,但是时间可能会长一些。
8.选择语言安装过程,在这里选择英语。
(如果选择的不是英语的话,在以后的一些提示显示中会出现乱码看不懂)9.选择键盘类型,在这里选择us 即可。
10.选择鼠标类型,在Linux 这类操作系统中,经常用到三键鼠标,因此,除了选择鼠标类型外,一般还选中下面的“Emulate 3 Buttons?”,这样同时点击鼠标左右键,代表点击中键。
11.选择安装类型。
在这里我们选择第4个Custom(定制)。
12.准备分区。
在这里选择Autopartition 。
13.这里会让用户选择如何处理硬盘上的原始分区。
因为我们是新建的所以选那个都无所谓,但是如果在已经安装好Windows 的系统上进行安装,一般选择第三项。
意思就是使用硬盘当中没有使用的空间来创建相应的分区。
在下面会让用户选择。
要安装到那个硬盘中,在这里只有一个硬盘sda ,所以直接选择即可。
说明linux操作系统的安装步骤和简单配置方法。
说明linux操作系统的安装步骤和简单配置
方法。
Linux操作系统是一种非常流行的操作系统,包括基于Linux内核的Ubuntu、 Fedora和CentOS等操作系统。
下面就介绍一下Linux 操作系统安装和简单配置方法。
一、安装Linux
1、首先下载Linux系统,通常有ISO文件和USB启动盘安装,要根据个人情况来选择。
2、在BIOS中设置开机方式,一般有光驱可开机、硬盘可开机和启动盘可开机三种,找到与自己电脑相匹配的模式,设置后使之可以正常进入安装界面。
3、根据安装引导界面的提示,一步步配置系统的语言、时区、磁盘分区等,将参数设置完毕后系统即可正常安装完毕。
二、简单配置
1、给系统设置一个开机密码以保护系统,以免被恶意攻击,常见的系统有root、admin、administrator等,可以根据自己的情况设置。
2、添加新用户,可以给不同的用户设置不同的权限和登录环境,有助于管理用户和资源,使用useradd命令就可以添加新用户。
3、Linux支持常见的网络服务,但为了确保网络安全,可以使用iptables工具对防火墙进行策略设置,当未知IP发起连接时,可以让iptables来作出判断,阻止一些恶意攻击。
总之,以上就是安装和简单配置Linux操作系统的方法,具体的操作可以根据实际情况进行调整,以保证系统的安全性和高效性。
Red Hat Enterprise Linux 8 虚拟化配置和管理说明书

Red Hat Enterprise Linux 8配置和管理虚拟化设置您的主机、创建和管理虚拟机并了解 Red Hat Enterprise Linux 8 中的虚拟化功能Last Updated: 2023-08-03Red Hat Enterprise Linux 8 配置和管理虚拟化设置您的主机、创建和管理虚拟机并了解 Red Hat Enterprise Linux 8 中的虚拟化功能法律通告Copyright © 2023 Red Hat, Inc.The text of and illustrations in this document are licensed by Red Hat under a Creative Commons Attribution–Share Alike 3.0 Unported license ("CC-BY-SA"). An explanation of CC-BY-SA is available at/licenses/by-sa/3.0/. In accordance with CC-BY-SA, if you distribute this document or an adaptation of it, you must provide the URL for the original version.Red Hat, as the licensor of this document, waives the right to enforce, and agrees not to assert, Section 4d of CC-BY-SA to the fullest extent permitted by applicable law.Red Hat, Red Hat Enterprise Linux, the Shadowman logo, the Red Hat logo, JBoss, OpenShift, Fedora, the Infinity logo, and RHCE are trademarks of Red Hat, Inc., registered in the United States and other countries.Linux ® is the registered trademark of Linus Torvalds in the United States and other countries. Java ® is a registered trademark of Oracle and/or its affiliates.XFS ® is a trademark of Silicon Graphics International Corp. or its subsidiaries in the United States and/or other countries.MySQL ® is a registered trademark of MySQL AB in the United States, the European Union and other countries.Node.js ® is an official trademark of Joyent. Red Hat is not formally related to or endorsed by the official Joyent Node.js open source or commercial project.The OpenStack ® Word Mark and OpenStack logo are either registered trademarks/service marks or trademarks/service marks of the OpenStack Foundation, in the United States and other countries and are used with the OpenStack Foundation's permission. We are not affiliated with, endorsed or sponsored by the OpenStack Foundation, or the OpenStack community.All other trademarks are the property of their respective owners.摘要要将 Red Hat Enterprise Linux (RHEL)系统用作虚拟化主机,请按照本文档中的说明操作。
Linux操作系统及应用 项目1 安装与基本配置Red Hat Enterprise Linux 8

理解Linux操作系统的体系结构。 掌握如何搭建Red Hat Enterprise Linux 8 服务器 掌握如何登录、退出Linux服务器。
理解Linux的启动过程和运行级别。 掌握如何排除Linux服务器安装的故障。
2
内容导航
1
项目知识准备
2
项目设计与准备
RHEL 8同时对管理员和管理区域进行 了改善的,让系统管理员、Windows管理 员更容易访问。
项目1安装与配置Linux操作系统
11
内容导航
1
项目知识准备
2
项目设计与准备
3
项目实施
4
项目实录:Linux系统安装与基本配置
项目1安装与配置Linux操作系统
12
二、项目设计与准备——项目设计
本项目需要的设备和软件如下: ➢ 1台安装有Windows 10操作系统的计算机,名称为Win10-1,IP地址为192.168.10.31/24。 ➢ RHEL 8的ISO映像文件一套。 ➢ VMware Workstation 15.5 Pro软件一套。 ➢ 本项目借助虚拟机软件要完成如下3项任务: ➢ 安装VMware Workstation。 ➢ 安装RHEL 8第一台虚拟机,名称为Server01。 ➢ 完成对Server01的基本配置。
Linux一般有3个主要部分:内核 (Kernel)、命令解释层(shell或其他操 作环境)、实用工具。
1.内核
内核是系统的心脏,是运行程序和管理 磁盘及打印机等硬件设备的核心程序。操作 环境向用户提供一个操作界面,它从用户那 里接受命令,并且把命令送给内核去执行。 由于内核提供的都是操作系统最基本的功能, 所以如果内核发生问题,那么整个计算机系 统就可能会崩溃。
Linux下iSCSI initiator的安装和设置
Linux下iSCSI initiator的安装和设置环境:1、OS:RedHat AS4 (内核版本:2.6.9-22.ELsmp)2、Initiator软件:linux-iscsi-4:0.1.11具体步骤1.在客户端安装RedHat AS4.2 (内核版本:2.6.9-22.ELsmp)光盘。
安装时选择启动激活网卡的端口,并且安装模式选择“个人定制安装”,选择软件包时,在网络配置选项中选中iscsi选项。
2.安装完毕后,通过ifconfig命令,确保Linux系统的IP与IX1000业务口IP在同一网段。
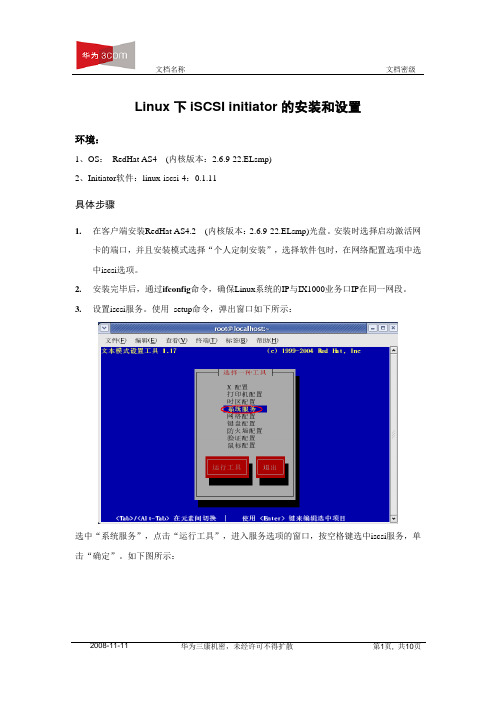
3.设置iscsi服务。
使用setup命令,弹出窗口如下所示:选中“系统服务”,点击“运行工具”,进入服务选项的窗口,按空格键选中iscsi服务,单击“确定”。
如下图所示:4.使用/etc/init.d/iscsi start命令先启动iscsi服务。
5.在/etc/iscsi.conf这个配置文件下,有3项内容需要配置:DiscoveryAddress,OutgoingUsername,OutgoingPassword。
其中“DiscoveryAddress”是业务口IP地址,这个地址是在NeoStor上为Target所分配的IP 地址。
举例说明:注意:如果在NeoStor上没有设置CHAP认证,只需要设置DiscoveryAddress一项内容。
“OutgoingUsername”和“OutgoingPassword”,指的是在NeoStor上创建iSCSI 协议下的Client的过程中,或者是Client的iSCSI协议的属性里,已设置CHAP认证的用户名和密码。
这是针对在NeoStor上设置CHAP认证的情况进行的设置。
对/etc/iscsi.conf这个文件配置如下DiscoveryAddress=10.1.5.2:3260相关的CHAP认证的设置,如:OutgoingUsername=huawei-3comOutgoingPassword=123456789123注意:输入用户名和密码时注意区分大小写!6.在/etc/initiatorname.iscsi文件下设置Initiator的名字,格式如下:Initiatorname=iqn.xxx.xxx:xxx此Initiator是创建时为Client分配的Initiator。
Linux RedHat6.2 系统安装步骤
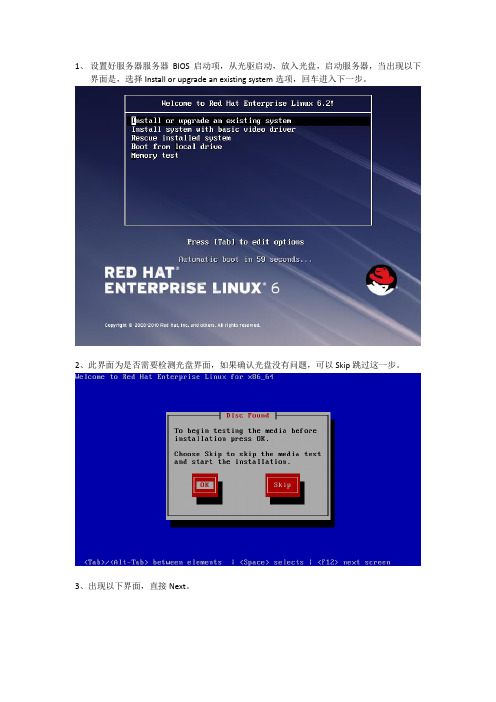
1、设置好服务器服务器BIOS启动项,从光驱启动,放入光盘,启动服务器,当出现以下界面是,选择Install or upgrade an existing system选项,回车进入下一步。
2、此界面为是否需要检测光盘界面,如果确认光盘没有问题,可以Skip跳过这一步。
3、出现以下界面,直接Next。
4、选择语言5、选择键盘类型6、选择系统存储设备类型,选择Basic Storage Devices,下一步。
7、此处选择Yes,discard any data。
8、主机名设置,如:cq02-pay-ab24.cq02,下一步9、选择时区,这里选择Asia/Shanghai,下一步。
10、设置系统管理员用户root的密码。
11、如果第10步密码过于简单,点击下一步时会出现以下界面,选择Use Anyway就好。
12、选择Create Custom Layout,下一步。
13、出现以下界面点击Create选择Standard Partition,点击Create Storage 面板上的Cerate。
可以自己在Mount Point中写入,无需下拉框选择。
填写分区信息,确认后选择OK,其它分区依此设置(SWAP分区除外)。
点击File System Type 下拉框,选择SWAP。
选择SWAP,设置SWAP大小。
分区都配置好以后,点击Next,出现以下界面,点击Format。
出现以下图示,点击Write Changes to disk。
14、以下界面,选择下一步。
15、出现以下界面,选择Customize Now自定义软件安装,下一步。
16、选择Development,选中右框中的选项。
17、选择Languages,选中右框中的Chinese Support选项18、以上都设置好以后,点击下一步,进入安装界面。
19、安装完成以后,选择Reboot。
20、重启后,出现登录界面,系统安装完成。
Redhat_Enterprise_Linux7.2系统环境搭建手册

RedHatLINUX系统环境搭建手册版本历史目次1引言 (1)2操作系统安装 (1)2.1准备工作 (1)2.2安装R EDHAT7.2系统 (1)3操作系统设置 (16)3.1网络配置 ......................................................................................................... 错误!未定义书签。
3.2防火墙 (16)3.3S ELINUX (17)3.4FTP (17)3.5GDM (17)3.6附件安装SVN、服务端 ................................................................................ 错误!未定义书签。
创建仓库...................................................................................................................... 错误!未定义书签。
svn create 创建仓库 ........................................................................................... 错误!未定义书签。
修改配置文件.......................................................................................................... 错误!未定义书签。
增加用户passwd................................................................................................. 错误!未定义书签。
RHEL_5中安装配置iSCSI_Initiat or

IncomingPassword=<anotherpassword>
注意,incoming安全所使用的username和password不能和outgoing安全使用的一样。参考此文下面的相关文章以获得更多关于设置安全参数的信息.
此文件也包含有安全设置选项.如果有incoming,outgoing或者bi-directional方面的安全需要,编辑iscsi.conf文件的这些行以便启用安全设置:
OutgoingUsername=<username>
OutgoingPassword=<password>
(record ID is the targetname and portal) of the node discovered in the
diห้องสมุดไป่ตู้covery above:
iscsiadm -m node -T targetname -p ip:port --op update -n node.startup -v automatic
## DO NOT EDIT OR REMOVE THIS FILE!
## If you remove this file, the iSCSI daemon will not start.
## If you change the InitiatorName, existing access control lists
## may reject this initiator. The InitiatorName must be unique
## for each iSCSI initiator. Do NOT duplicate iSCSI InitiatorNames.
- 1、下载文档前请自行甄别文档内容的完整性,平台不提供额外的编辑、内容补充、找答案等附加服务。
- 2、"仅部分预览"的文档,不可在线预览部分如存在完整性等问题,可反馈申请退款(可完整预览的文档不适用该条件!)。
- 3、如文档侵犯您的权益,请联系客服反馈,我们会尽快为您处理(人工客服工作时间:9:00-18:30)。
Linux Redhat 操作系统下软件Initiator的安装、配置和使用指导书关键词:Linux Redhat、软件Initiator缩略语清单:1 安装环境:1.1 应用系统信息1、以下这些是成功的版本,注意:WS3.4只能与IX5000挂载,不能与IX1000挂载。
OS Kernel 自带Initiator initiator版本Redhat AS3.6 2.4.21-37.EL 是iscsi-initiator-utils-3.6.3-3 Redhat ES3.6 2.4.21-37.EL 是iscsi-initiator-utils-3.6.3-3 Redhat ES4.2 2.6.9-22.EL 否iscsi-initiator-utils-4.0.3.0-2 Redhat AS3.5 2.4.21-32.EL 是iscsi-initiator-utils-3.6.2-7 Redhat AS4.2 2.6.9-22.EL 否iscsi-initiator-utils-4.0.3.0-2 Redhat WS3.5 2.4.21-32.EL 是iscsi-initiator-utils-3.6.2-7Redhat WS3.4 2.4.21-27.EL 是iscsi-initiator-utils-3.6.2-4Redhat WS4.2 2.6.9-22.EL 是iscsi-initiator-utils-4.0.3.0-2 Redhat AS3.3 2.4.21-20.EL 否iscsi-initiator-utils-3.6.3-3 Redhat WS3.6 2.4.21-37.EL 是iscsi-initiator-utils-3.6.3-3 Redhat AS3.4 2.4.21-37.EL 是iscsi-initiator-utils-3.6.3-3 Redhat 9 2.4.20-8smp iscsi-initiator-utils-3.6.2-72、以下是不成功的版本Redhat AS4.0 2.6.9-5.ELRedhat ES3.2 2.4.21-15.ELRedhat ES4.1 2.6.9-11.ELRedhat WS4.1 2.6.9-11.ELRedhat AS4.1 2.6.9-11.EL对于没有自动安装initiator 的版本,如果在操作系统安装盘上的没有找到initiator ,参见附件linux-initiator.rar ,里面包含了需要的rpm 包。
2 Initiator安装过程2.1 软件安装步骤1.WS4.2在安装操作系统的时候,系统自动安装initiator;AS4.2和ES4.2没有自动安装,在安装盘的CD4上,有initiator的安装文件。
关于各个版本initiator安装情况,详见附件。
2.以root用户登录系统,拷贝Initiator软件到到/tmp目录下。
.3.为谨慎起见,建议在安装Initiator之前备份系统。
(这一步通常可以跳过)4.安装软件包:rpm -ivh iscsi-initiator-utils-4.0.3.0-2.i386.rpm再使用面的命令查看是否安装成功:# rpm -qa | grep iscsi如果显示以下信息,则说明安装成功:iscsi-initiator-utils-4.0.3.0-25.安装完毕后,通过ifconfig命令,确保Linux服务器的IP与存储设备业务口IP在同一网段。
2.2 软件卸载步骤1、以root用户登录。
2、执行以下命令:rpm -e iscsi-initiator-utils-4.0.3.0-2说明:1、在卸载软件前,请确保umount所有已经挂载的IP SAN资源,并在fstab文件中删除自动mount IP SAN资源的配置行。
2.3 软件配置过程1、以root用户登录。
2、配置initiator名字在/etc/initiatorname.iscsi 文件中设置InitiatorName:InitiatorName=xxxxx注意:InitiatorName必须注意大小写,同时,必须顶格写。
3、在/etc/iscsi.conf中添加业务口IP地址,如,DiscoveryAddress=192.168.10.200:3260注意:注意大小写,且必须顶格写如果采用CHAP认证,需要在下面加入名字和密码DiscoveryAddress=192.168.10.200:3260OutgoingUsername=xxxxxxxOutgoingPassword=xxxxxxx注意:OutgoingUsername和OutgoingPassword先空两格,然后再写。
4、如果名字、CHAP认证无误,可以使用iscsi-ls –l 命令来查看连接上的target,也可以使用fdisk –l 来查看系统所连接的磁盘设备。
5、使用fdisk devname对所连接的磁盘设备分区,其中devname可以由fdisk –l命令得知。
如,fdisk /dev/sda,指定/dev/sda为一个分区/dev/sda1,在执行的过程中有详细的帮助。
6、在分区上创建文件系统使用mkfs –t fstype pastitionname在刚刚建立的分区上创建文件系统,其中pastitionname表示分区的名字,fstype表示文件系统的类型,如:mkfs –t ext2 /dev/sda17、挂载分区使用mount pastitionname dir命令挂载分区pastitionname到特定的节点dir,如:mount /dev/sda1 /mnt/t02.4 安装过程注意事项说明Linux有一个特性,对某个分区mount、umount很多次后,系统会对该分区进行检测,这就会导致硬盘反映速度很慢,非常影响业务,所以最好去掉这个动作。
采用tune2fs命令:tune2fs /dev/sda1 –c -1 –i 0解释一下:1、首先用tune2fs -l /dev/sda –l 查看该分区的信息:[root@h3c root]# tune2fs -l /dev/sda1tune2fs 1.32 (09-Nov-2002)Filesystem volume name: <none>Last mounted on: <not available>Filesystem UUID: 1f5b8a37-50bf-4049-8caf-e6c6968b073fFilesystem magic number: 0xEF53Filesystem revision #: 1 (dynamic)Filesystem features: filetype sparse_superDefault mount options: (none)Filesystem state: not cleanErrors behavior: ContinueFilesystem OS type: LinuxInode count: 655360Block count: 1310460Reserved block count: 65523Free blocks: 1289878Free inodes: 655348First block: 0Block size: 4096Fragment size: 4096Blocks per group: 32768Fragments per group: 32768Inodes per group: 16384Inode blocks per group: 512Filesystem created: Mon Apr 10 13:57:51 2006Last mount time: Mon Apr 10 14:01:04 2006Last write time: Tue Apr 11 11:51:38 2006Mount count: 3Maximum mount count: -1Last checked: Mon Apr 10 13:57:51 2006Check interval: 0 (<none>)Reserved blocks uid: 0 (user root)Reserved blocks gid: 0 (group root)First inode: 11Inode size: 128红色的地方注明了,这个已经修改过。
当Mount count达到Maximum mount count的时候,系统就会检查。
检查的间隔时间也规定了:Check interval2、用tune2fs –-help查看:[root@h3c root]# tune2fs --helptune2fs 1.32 (09-Nov-2002)tune2fs: invalid option -- -Usage: tune2fs [-c max-mounts-count] [-e errors-behavior] [-g group][-i interval[d|m|w]] [-j] [-J journal-options][-l] [-s sparse-flag] [-m reserved-blocks-percent][-o [^]mount-options[,...]] [-r reserved-blocks-count][-u user] [-C mount-count] [-L volume-label] [-M last-mounted-dir][-O [^]feature[,...]] [-T last-check-time] [-U UUID] device可以看出-i和-c就可以修改上面的参数,于是有了上面的命令。
3 自动挂载脚本1、在2.6内核自动挂载脚本,需要修改一些代码。
2、在/sbin 目录下,查看是否存在iscsi-mountall 和iscsi-umountalll 执行文件,如果不存在,内容见下面:iscsi-mountall#! /bin/sh## Mount iSCSI devices listed in /etc/fstabBASEDIR=/PATH=/sbin:/bin:/usr/sbin:/usr/bin:$BASEDIR/sbin:$BASEDIR/bin:$PATHFSTAB="/etc/fstab.iscsi"NUM_RETRIES=10SLEEP_INTERVAL=1# only show completion bar if stdout is a ttyif [ -t 1 ] ; thenFSCK_OPTS="-C -a -T"elseFSCK_OPTS="-a -T"fiif [ ! -f $FSTAB ]; thenexit 1fi;try_fsck(){local device=$1 retries=$NUM_RETRIES sleep_interval=$SLEEP_INTERVAL fstype=$2while [ $retries -gt 0 ];dofsck -t $fstype $FSCK_OPTS $device > /dev/nullerr=$?if [ $err -le 1 ]; then # fsck succeededreturn 0elif [ $err -eq 8 ]; then # assume device not yet availablesleep $sleep_intervalretries=$(($retries - 1))echo "*** device not yet available, $retries retries remaining" elif [ $err -ge 2 ]; then # fatal errorecho "*** automated fsck on $device failed"echo "*** repair manually with 'fsck $device'"return 1fidonereturn 1}try_mount(){local dev=$1local mountp=$2local fstype=$3local options=$4## First check to see if the device entry in /etc/fstab.iscsi# matches anything in the mount output. If it does, the# LUN is already mounted, and we don't need to fsck again.#for device in `mount |grep "$dev"|awk '{print $1}'`;doif [ "$dev" = "$device" ];thenreturnfidone## The user could have specified a /udev/iscsi... link# in the /etc/fstab.iscsi file. If this is the case,# the output from the mount command may not match# (it may contain the actual device, whereas the user# specified the /udev/iscsi... link). Thus, if it's# a symlink in the /etc/fstab.iscsi file, we need to# resolve the link and do an additional check.#if [ -L $dev ]; thenlnname=`ls -l $dev | cut -d ">" -f 2 | cut -d " " -f 2` dev=$lnnamefifor device in `mount |grep "$dev"|awk '{print $1}'`;doif [ "$dev" = "$device" ];thenreturnfidoneif try_fsck $dev $fstype ; thenmount -t $fstype -o $options $dev $mountpfi}while read dev mountp fstype options dummy1 dummy2docase $devin\#*) continue ;; # ignore comments'') continue ;; # ignore empty linesesacif echo $options | grep -v -q noauto ; thentry_mount $dev $mountp $fstype $options &fidone < $FSTABiscsi-umountall#! /bin/sh## Unmount all iSCSI devices.BASEDIR=/PATH=/sbin:/bin:/usr/sbin:/usr/bin:$BASEDIR/sbin:$BASEDIR/bin:$PATH USAGE="Usage:iscsi-umountall [-t] [-k]"MTAB=/etc/mtabFSTAB=/etc/fstab.iscsifslist=""if [ -e /proc/mounts ] ; thenMTAB=/proc/mountsfi# defaultsterminate=kill=# get argumentswhile getopts hskt cdocase $c ink) kill="yes";;t) terminate="yes";;h) echo "$USAGE" 1>&2;exit 2;;*) echo "$USAGE" 1>&2;exit 2;;esacdoneshift `expr $OPTIND - 1`is_iscsi() # check for iSCSI devices{if iscsi-device "$dev" > /dev/null 2>&1; thenreturn 0fiif [ -e $FSTAB ]; thenlocal dev mountp etcwhile read dev mountp etcdocase "$dev"in\#*) continue ;; # ignore comments'') continue ;; # ignore empty linesesacif [ "$mountp" = $2 ]; thenreturn 0fidone < $FSTABfireturn 1}cat $MTAB | tac | # process mtab in reverse order{while read dev mountp fstype mode dummy dummy2doif is_iscsi $dev $mountp ; thenif [ "$terminate" ] || [ "$kill" ]; then # SIGTERM fs usersif fuser -k -TERM -m $mountp > /dev/null 2>&1; thenecho Waiting for users of $mountp to terminatesleep 5fifiif [ "$kill" ]; then # SIGKILL fs usersif fuser -k -m $mountp > /dev/null 2>&1; thenecho Waiting for users of $mountp to exitsleep 2fifiumount -r $mountpfidone},同时,采用chmod 777 iscsi_mountall/iscsi-umountall 让他们可执行。