深信服AC-1200配置手册
speedefyAC1200路由器中文说明书

speedefyAC1200路由器中文说明书
1、首先,请把AC1200双频路由器的WAN口,用网线连接到猫的网口;如果宽带没有用到猫,请把入户的宽带网线,插在AC1200双频路由器的WAN口。
然后把电脑用网线连接到AC1200路由器的LAN 接口。
2、第二步,设置电脑IP地址在正式设置AC1200双频路由器之前,需要先把电脑中的IP地址设置成:自动获得(动态IP)。
3、设置管理员密码:在电脑浏览器中输入:网址打开设置界面,根据页面提示,设置路由器的管理员密码。
4、设置无线参数:根据页面中的提示信息,设置AC1200双频路由器的2.4G无线名称和无线密码、5G无线名称和无线密码。
5、完成。
设置好无线名称和密码后,系统会自动应用刚才设置信息,结果对路由器的设置。
NETGEAR AC1200 WiFi 范围扩展器说明书
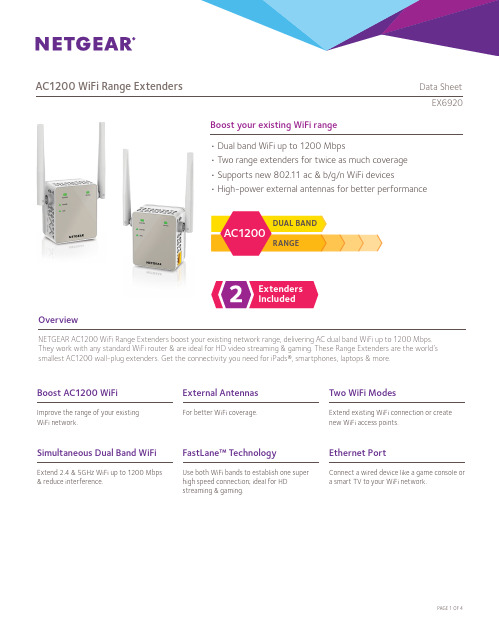
Boost your existing WiFi rangeOverviewNETGEAR AC1200 WiFi Range Extenders boost your existing network range, delivering AC dual band WiFi up to 1200 Mbps. They work with any standard WiFi router & are ideal for HD video streaming & gaming. These Range Extenders are the world’s smallest AC1200 wall-plug extenders. Get the connectivity you need for iPads®, smartphones, laptops & more.• Dual band WiFi up to 1200 Mbps• Two range extenders for twice as much coverage • Supports new 802.11 ac & b/g/n WiFi devices• High-power external antennas for better performanceExtenders IncludedRANGEDUAL BAND AC1200AC1200 WiFi Range Extende r s Data SheetEX6920Simultaneous Dual Band WiFiExtend 2.4 & 5GHz WiFi up to 1200 Mbps & reduce interference.Ethernet PortConnect a wired device like a game console o r a smart TV to your WiFi network.Boost AC1200 WiFiImprove the range of your e xisting WiFi network.Two WiFi ModesExtend existing WiFi connection or create new WiFi access points.FastLane™ TechnologyUse both WiFi bands to establish one superhigh speed connection; ideal for HDstreaming & gaming.External AntennasFor better WiFi coverage.AC1200 WiFi Range Extende r s Data SheetEX6920WiFi Range ExtendersBoost the range of your existing WiFi & create a stronger signal inhard-to-reach areas.Existing WiFiSometimes your router does not provide the WiFicoverage you need.Power on/offEthernet port Secure Connection (WPS)WiFi Range Extenders boost your existing WiFi & deliver greater wireless speed & coverage to where WiFi signals are weak. Improve your home’s WiFi and get better connections for iPads®, smartphones, laptops & more.r s Data Sheet AC1200ExtendeWiFiRangeEX6920 WiFi Analytics AppHow strong is your WiFi signal? Use the NETGEAR WiFi Analytics app & get advanced analytics to optimize your existing or newly extended WiFi network. Check your network status, WiFi signal strength, identify crowded WiFi channels & much more!Here’s what you can do with the WiFi Analytics App!• Get a network status overview• Check WiFi signal strength• Measure WiFi channel interference• Keep track of WiFi strength by location• and more...Scan to install appThis product comes with a limited warranty that is valid only if purchased from a NETGEAR authorized reseller.*24/7 basic technical phone support provided for 90 days from purchase date.¹Works with devices supporting Wi-Fi Protected Setup™ (WPS). Data throughput, signal range, and wireless coverage per sq. ft. are not guaranteed and may vary due to differences in operating environments of wireless networks, including without limitation building materials and wireless interference. Specifications are subject to change without notice. The product may not be compatible with routers or gateways with firmware that has been altered, is based on open source programs, or is non-standard or outdated.NETGEAR, and the NETGEAR Logo are trademarks of NETGEAR, Inc. Mac and the Mac logo are trademarks of Apple Inc. Any other trademarks herein are for reference purposes only. ©2015 NETGEAR, Inc.NETGEAR, Inc. 350 E. Plumeria Drive, San Jose, CA 95134-1911 USA, /supportD-EX6920-0AC1200 WiFi Range Extende r s Data SheetEX6920Package Contents• Two (2) AC1200 WiFi Range Extenders (EX6120)• Quick start guidePhysical Specifications• Dimensions: 55.17 x 67.17 x 39 mm (2.17 x 2.64 x 1.54 in) each • Weight: 130 g (0.29 lb) eachWarranty• /about/warrantySecurity• Wi-Fi Protected Access® (WPA/WPA2–PSK) and WEPStandards• IEEE® 802.11 b/g/n 2.4 GHz • IEEE® 802.11 a/n/ac 5 GHz• One (1) 10/100 Mbps F ast Ethernet port with a uto-sensingtechnologySupport• 24/7 basic technical phone support for 90 daysfrom date of purchaseEase of Use• CD-less setup—great f or mobile devices • Push ‘N’ Connect using Wi-Fi P rotected Setup® (WPS)1System Requirements• 2.4 and/or 5 GHz 802.11 ac & b/g/n wireless router or gateway• Microsoft® Internet Explorer 8.0, Firefox® 20, Safari® 5.1, Google Chrome 25.0 browsers or higher。
TP-Link AC1200 Wi-Fi 范围扩展器用户指南说明书
User GuideAC1200 Wi-Fi Range Extender with AC Pass-throughRE365ContentsAbout This Guide 1 Chapter 1 Get to Know About Y our Extender 2 1. 1. Product Overview. . . . . . . . . . . . . . . . . . . . . . . . . . . . . . . . . . . . . . . . . . . . . . . . . . . . . . . . . . . . 3 1. 2. Appearance . . . . . . . . . . . . . . . . . . . . . . . . . . . . . . . . . . . . . . . . . . . . . . . . . . . . . . . . . . . . . . . . . 31. 2. 1. L ED Explanation. . . . . . . . . . . . . . . . . . . . . . . . . . . . . . . . . . . . . . . . . . . . . . . . . . . . . . . 41. 2. 2. P ort and Button Description. . . . . . . . . . . . . . . . . . . . . . . . . . . . . . . . . . . . . . . . . . . 4 Chapter 2 Set Up Internet Connection 5 2. 1. Quick Setup . . . . . . . . . . . . . . . . . . . . . . . . . . . . . . . . . . . . . . . . . . . . . . . . . . . . . . . . . . . . . . . . . 62. 1. 1. M ethod 1: Via a Web Browser. . . . . . . . . . . . . . . . . . . . . . . . . . . . . . . . . . . . . . . . . . 62. 1. 2. M ethod 2: Via the TP-Link T ether App. . . . . . . . . . . . . . . . . . . . . . . . . . . . . . . . .102. 1.3. M ethod 3: Via the WPS Button. . . . . . . . . . . . . . . . . . . . . . . . . . . . . . . . . . . . . . . .11 2. 2. Position Y our Extender. . . . . . . . . . . . . . . . . . . . . . . . . . . . . . . . . . . . . . . . . . . . . . . . . . . . . .12 Chapter 3 Customize Y our Network13 3. 1. Check Internet Status. . . . . . . . . . . . . . . . . . . . . . . . . . . . . . . . . . . . . . . . . . . . . . . . . . . . . . .14 3. 2. Configure Wireless Network . . . . . . . . . . . . . . . . . . . . . . . . . . . . . . . . . . . . . . . . . . . . . . . .14 3. 3. Change LAN Settings. . . . . . . . . . . . . . . . . . . . . . . . . . . . . . . . . . . . . . . . . . . . . . . . . . . . . . .16 3.4. Specify DHCP Server Settings. . . . . . . . . . . . . . . . . . . . . . . . . . . . . . . . . . . . . . . . . . . . . .17 3.5. Adjust Wi-Fi Coverage . . . . . . . . . . . . . . . . . . . . . . . . . . . . . . . . . . . . . . . . . . . . . . . . . . . . . .18 3.6. Set Access Control . . . . . . . . . . . . . . . . . . . . . . . . . . . . . . . . . . . . . . . . . . . . . . . . . . . . . . . . .18 Chapter 4 More Features of Y our Extender 21 4. 1. Use Y our Extender as a Wireless Adapter. . . . . . . . . . . . . . . . . . . . . . . . . . . . . . . . . . . .22 4. 2. Transform Y our Existing Wired Network to a Wireless One . . . . . . . . . . . . . . . . . . .224. 2. 1. T o Set Up the Extender as an Access Point . . . . . . . . . . . . . . . . . . . . . . . . . . .224. 2. 2. T o Connect Y our Wireless Devices to the Extender via WPS. . . . . . . . . . .24 Chapter 5 TP-Link Cloud Service 265. 1. Register a TP-Link ID. . . . . . . . . . . . . . . . . . . . . . . . . . . . . . . . . . . . . . . . . . . . . . . . . . . . . . . .27 5. 2. Change Y our TP-Link ID Information. . . . . . . . . . . . . . . . . . . . . . . . . . . . . . . . . . . . . . . . .27 5. 3. Manage the User TP-Link IDs . . . . . . . . . . . . . . . . . . . . . . . . . . . . . . . . . . . . . . . . . . . . . . .28 5. 4. Manage the Extender via TP-Link T ether App. . . . . . . . . . . . . . . . . . . . . . . . . . . . . . . .30 Chapter 6 Manage Y our Extender 316. 1. Set Up System Time . . . . . . . . . . . . . . . . . . . . . . . . . . . . . . . . . . . . . . . . . . . . . . . . . . . . . . . .32 6. 2. Control LEDs . . . . . . . . . . . . . . . . . . . . . . . . . . . . . . . . . . . . . . . . . . . . . . . . . . . . . . . . . . . . . . .326. 4. Upgrade the Firmware . . . . . . . . . . . . . . . . . . . . . . . . . . . . . . . . . . . . . . . . . . . . . . . . . . . . . .34 6. 5. Backup and Restore Configuration Settings. . . . . . . . . . . . . . . . . . . . . . . . . . . . . . . . .35 6. 6. Change Login Password . . . . . . . . . . . . . . . . . . . . . . . . . . . . . . . . . . . . . . . . . . . . . . . . . . . .36 6.7. System Log. . . . . . . . . . . . . . . . . . . . . . . . . . . . . . . . . . . . . . . . . . . . . . . . . . . . . . . . . . . . . . . . .36 FAQ 38About This GuideThis guide is a complement to Quick Installation Guide. The Quick Installation Guide provides instructions for quick internet setup, while this guide contains details of each function and demonstrates how to configure them.When using this guide, please notice that features of the extender may vary slightly depending on the model and software version you have, and on your location, language, and internet service provider. All screenshots, images, parameters and descriptions documented in this guide are used for demonstration only. ConventionsMore InfoThe latest software, management app and utility are available from the Download Center at /support.The Quick Installation Guide can be found where you find this guide or inside the package of the range extender.Specifications can be found on the product page at .A T echnical Support Forum is provided for you to discuss our products at .Our T echnical Support contact information can be found at Contact T echnical Support page at /support.Chapter 1Get to Know About Y our ExtenderThis chapter introduces what the extender can do and its appearance. It contains the following sections:• Product Overview• Appearance1 1 Product OverviewBring Dead Zones Back to LifeTired of Wi-Fi “dead zones”? The TP-Link extender is connected to your router wirelessly, strengthening its signal and expanding its coverage into areas that could not otherwise be reached. The device also reduces signal interference to ensure reliable Wi-Fi coverage throughout your home or office.Easy Installation & Quick PositionThe extender works with any standard wireless router. Instantly connect the extender to a router by pressing the router’s WPS button (if available) followed by the extender’s RE/WPS button. Alternatively, follow the Quick Setup instructions on the extender’s web management page.Once the extender is connected to a router, you can relocate it to your preferred location with no further configuration required. The intelligent signal light can help to find the best location.Easy Management with the TP-Link T ether AppT ether provides a simple, intuitive way to access and manage your extender with your smart devices.1 2 Appearance1 2 1 LED ExplanationChapter 2Set Up Internet ConnectionThis chapter informs you how to boost your host wireless coverage. Please follow the step-by-step instructions to set up the internet connection.It contains the following sections:• Quick Setup• Position Y our Extender2 1 Quick SetupPower onPlug the extender into an electrical outlet next to your host router, and then wait until the Power LED is solid on.Note: For safety, we suggest that you plug the extender in upright directions as shown below.ether app, and via the WPS button.2 1 1 Method 1: Via a Web Browser1. Connect your computer to the extender's wireless network.Tips:Before connecting, please find the SSID (network name) on the label of the extender.• For Windows Users1 ) Unplug the Ethernet cable from your computer (if any).2 ) Click the Wi-Fi icon on the taskbar and connect to the extender’s wirelessnetwork: TP-Link_Extender_2.4GHz or TP-Link_Extender_5GHz.• For Mac OS X Users 1 ) Unplug the Ethernet cable from your computer (if any).2 ) Click the Wi-Fi icon in the top right corner of the screen, and connect to the extender’s network: TP-Link_Extender_2.4GHz or TP-Link_Extender_5GHz .2. Follow the instructions of Quick Setup Wizard to connect the extender to your host router.1 ) Launch a web browser, enter or http://192.168.0.254 in the address field, and then create a password for future login attempts, and click Start .Tips: If the login window does not appear, please refer to FAQ .2 ) Select your host router’s 2.4GHz SSID (network name), enter its password (NOT the password you just created for management), and click Next .3 ) Select your host router’s 5GHz SSID (network name), enter its password (NOT the password you just created for management), and click Next.Tips: If your host router does not support 5GHz wireless network, please click Skip to continue.4 ) Either keep the default SSIDs (network names) or customize them for the extended networks, and then click Next.5 ) Verify your wireless settings and click Next. The corresponding LED(s) (2.4GHzor 5GHz) should turn on.6 ) T o enjoy a more complete service from TP-Link (remote management, TP-LinkDDNS, etc.), log in with your TP-Link ID or click Register Now to get one. Then follow the instructions to bind the extender to your TP-Link ID.Note:• T o learn more about the TP-Link Cloud service, please refer to the TP-Link Cloud Service section.• If you do not want to register a TP-Link ID for now, you may click Log In Later to proceed.7 ) Enjoy! Connect to the extended network and enjoy the internet. Both extendedbut may have different network names if you have customized the SSIDs during the configuration.Tips: Since the performance of the extended network will be affected by the distance between extender and host router, we highly recommend you to relocate your extender referring to Position Y our Extender .2 1 2 Method 2: Via the TP-Link T ether App1. Launch the Apple App Store or Google Play Store and search TP-Link T ether or simplyscan the QR code to download and install the app.OR2. Go to Wi-Fi Settings and connect your device to the extender’s wireless network: TP-Link_Extender_2.4GHz or TP-Link_Extender_5GHz .3. Launch T ether and select your extender from the Local Device list.4. Create a password for future logins and click Create.5. Follow the on-screen instructions to complete the configuration.Tips: Y ou can manage your extender via T ether, such as controlling LEDs, sharing passwords of your• For more information about using WPS button on your host router, please refer to the router manufacturer’s user guide.2. Wait until the Signal LED changes to solid blue, which indicates that the WPS connection is successful. If it doesn’t, please refer to other methods.3. If you are connecting the extender to a dual-band router but only the 2.4GHz or 5GHz LED is on, repeat Step 1 and 2 to connect to the other band.4. Enjoy! Connect to the extended network and enjoy the internet. Both extended networks share the same SSIDs (network names) and passwords as those of your host networks.Tips:extender and host router, we recommend that you relocate your extender by referring to Position Y our Extender.2 2network.Tips: Tmonitors.Chapter3Customize Y our NetworkThis chapter guides you on how to configure network settings that are available for this extender.It contains the following sections:• Check Internet Status• Configure Wireless Network• Change LAN Settings• Specify DHCP Server Settings• Adjust Wi-Fi Coverage• Set Access Control3 1 Check Internet StatusY ou can view the internet status of your extender to check whether you have successfully set up the extended network(s).1. Visit , and log in with the password you set for the extender.2. Go to Settings > Status to view the internet status of your extender.• The extender is functioning normally.• The extender is not connected to the host networks. Please go to Settings > Wireless > Connect to Network to check the passwords of the host networks. If the problem still exists, please refer to the FAQ section.• The extender is connected to the host network, but is not transmitting data. Please check your router’s internet connection.• The extender is connected to the router abnormally. Please go to Settings > Network and try setting your extender to obtain an IP address automatically.Click the Internet/Router/Range Extender/Clients icon to view corresponding information.3 2 Configure Wireless NetworkIf you want to extend another host network after Quick Setup, you can refer to thisVisit , and log in with the password you set for the extender. Note: Here we take the configuration of the 2.4GHz network as an example. If the 5GHz network is available on your extender, please refer to the instructions to set your 5GHz network.¾T o extend another host network:1. Go to Settings > Wireless > Connect to Network.2. Enable Connect to 2.4GHz Network and click Wireless Scanner to find all available networks.3. Select the 2.4GHz host network you want to extend.Note:If the network you want to extend is on but not listed, please try the following steps.1. Move the extender closer to your router, and click Rescan in the top-right corner of the list.2. You can manually enter the SSID (network name) and password of the network you want to extend, and clickSave.4. Once a host network is selected, the SSID and security type will be automatically filled in. If the selected network is encrypted, enter the password in the Password field.5. Click Save.¾T o enable or disable the extended network:1. Go to Settings > Wireless > Extended Network.2. Extended networks are enabled by default. If you want to disable the wireless function of a certain band, just clear the Enable checkbox. In this case, all the wireless settings of this band will be invalid.3. Click Save.¾T o change the wireless network name (SSID):1. Go to Settings > Wireless > Extended Network.2. Create a new SSID in Extended 2.4GHz SSID or click Copy Host SSID. The value is case-sensitive.3. Click Save.Note: If you have changed the wireless settings via a wireless device, you will be disconnected after the settings are applied. Please write down the new SSID for future use.¾T o hide the SSID of the extended network:1. Go to Settings > Wireless > Extended Network.2. Select Hide SSID broadcast, and the corresponding SSID will not be displayed when wireless devices scan for local wireless networks. Devices must join the network manually in order to connect.3. Click Save.3 3 Change LAN SettingsThe extender is preset with a default LAN IP 192.168.0.254, with which you can log in to the web management page. The LAN IP address, together with the Subnet Mask, also defines the subnet that the connected devices are on. If the IP address conflicts with another device on your local network or your network requires a specific IP subnet, you can change it.1. Visit , and log in with the password you set for the extender.2. Go to Settings > Network.3. Select Use the following IP address.4. Enter a new IP address as needed and leave the Subnet Mask as the default settings and enter the gateway that is in the same subnet as the IP address. The gateway is usually the LAN IP address of your extender.5. Click Save.3 4 Specify DHCP Server SettingsBy default, the DHCP (Dynamic Host Configuration Protocol) Server is enabled and the extender acts as a DHCP server; it dynamically assigns TCP/IP parameters to client devices from the IP Address Pool. Y ou can change the settings of the DHCP Server if necessary.1. Visit , and log in with the password you set for the extender.2. Go to Settings > Network.¾T o specify the IP address that the extender assigns:1. Select Auto (recommended) or On to enable the DHCP Server.2. Enter the starting and ending IP addresses in the IP Address Pool.3. Enter other parameters if the ISP requires them. The Default Gateway is automatically filled in and is the same as the LAN IP address of the extender.4. Click Save.¾T o view the DHCP Client List:Y ou can view the information of the DHCP clients connected to the extender in the DHCP Client List.3 5 Adjust Wi-Fi CoverageY ou can set the extender’s Wi-Fi coverage depending on how large you want your Wi-Fi area to be.1. Visit and log in with the password you set for the extender.2. Go to Settings > Advanced Settings > Wi-Fi Coverage.3. Select Min, Mid or Max to adjust your Wi-Fi coverage of the extender.4. Click Save.3 6 Set Access ControlAccess Control allows you to permit or block specific devices from accessing the internet for a specific period.1. Visit and log in with the password you set for the extender.3. Enable Access Control.¾T o block specific device(s):Note: Devices connected to the extender via an Ethernet cable cannot be blocked.1. Select Blacklist and click Save.2. Select the device to be blocked in the Online Devices table by ticking the corresponding checkbox.3. Click Block and the selected device(s) will be added to the Devices in Blacklist table.4. Click in the Devices in Blacklist table to set the Effective Time for a certain entry as needed.5. Click OK.¾T o permit specific device(s):1. Select Whitelist and click Save.2. Click Add in the Devices in Whitelist table. Enter the Device Name and MAC Address. And you can set the Effective Time for a certain entry as needed.3. Click OK.Chapter 4More Features of Y our ExtenderThis chapter explains how to use the extender as a wireless adapter and as an access point.It contains the following sections:• Use Y our Extender as a Wireless Adapter• Transform Y our Existing Wired Network to a Wireless One4 1 Use Y our Extender as a Wireless AdapterThe extender can be used as a wireless adapter to connect any wired-only device, such as a Blu-ray player, game console, DVR, or smart TV, to your wireless network. After configuration, you can connect an Ethernet-enabled device to the extender via an Ethernet cable.Note: Extenders that have no Ethernet port do not support this feature.By default, the Ethernet port of the extender is connected to the 5GHz wireless netwok. ¾T o change the connected wireless frequency:1. Visit , and log in with the password you set for the extender.2. Go to Settings > Network.3. Select 2.4GHz or 5GHz and click Save.4 2 Transform Y our Existing Wired Network to aWireless OneThe extender can work as an access point, transforming your existing wired network to a wireless one.4 2 1 T o Set Up the Extender as an Access Point1. Visit , and log in with the password you set for the extender.2. Click Mode in the top right corner of the page. Select Access Point and click Save. The extender will reboot and switch to Access Point mode.3. After rebooting, connect the extender to your modem or wired router via an Ethernet cable.4. Visit , and log in with the password you set for the extender.5. Go to Quick Setup to configure your extender.1 ) Configure your wireless settings and click Next.2 ) Confirm the information and click Finish. Now, you can enjoy Wi-Fi.4 2 2 T o Connect Y our Wireless Devices to the Extender via WPS Wi-Fi Protected Setup (WPS) provides an easier way to set up a secure Wi-Fi connection. Wireless devices that support WPS, including Android phones, tablets and most USB network cards, can be connected to your extender through this method (not supported by iOS devices).1. Visit , and log in with the password you set for the extender.2. Go to Settings > Wireless > WPS.3. Enable WPS.4. Connect via WPS:• AP’s PIN: Enable AP’s PIN and enter the PIN on your device. Y ou can click Generate to get a new PIN or click Default to restore the PIN to its factory one.• Push Button (Recommended): Click Connect and push the WPS button on the client device.• PIN code: Enter the client’s PIN, and click Connect.Chapter 5TP-Link Cloud ServiceTP-Link Cloud service provides a better way to manage your cloud devices. Log in to your extender with a TP-Link ID, and you can easily monitor and manage your home network when you are out and about via the T ether app on your smartphone or tablet. T o ensure that your extender stays new and gets better over time, the TP-Link Cloud will notify you when an important firmware upgrade is available. Surely you can also manage multiple TP-Link Cloud devices with a single TP-Link ID.This chapter introduces how to register a new TP-Link ID, bind or unbind TP-Link IDs to manage your extender, and the T ether app with which you can manage your home network no matter where you may find yourself.It contains the following sections:• Register a TP-Link ID• Change Y our TP-Link ID Information• Manage the User TP-Link IDs• Manage the Extender via TP-Link T ether AppChapter 5TP-Link Cloud Service 5 1 Register a TP-Link IDIf you have skipped the registration during the Quick Setup process, you can:1. Visit , and log in with the password you set for the extender.2. Go to Settings > TP-Link Cloud.3. Click Register Now and follow the instructions to register a TP-Link ID.4. After activating your TP-Link ID, come back to the TP-Link Cloud page to log in. The first-time login TP-Link ID will be bound automatically to your cloud extender as an Admin.Note:• T o learn more about the Admin and User TP-Link ID, refer to Manage the User TP-Link IDs.• Once the extender is bound to your TP-Link ID, you need to log in to the extender with the TP-Link ID.• Y ou can register another TP-Link ID via the T ether APP. Please refer to Manage the Extender via TP-Link T ether App to install the app and register a new one• If you want to unbind the Admin TP-Link ID from your extender, please go to Settings > TP-Link Cloud, click Unbind in the Device Information section.5 2 Change Y our TP-Link ID InformationFollow the steps below to change your email address and password of your TP-Link ID as needed.1. Visit , and log in with your TP-Link ID.2. Go to Settings > TP-Link Cloud, and focus on the Account Information section.¾Change your email address1. Click behind the Email.2. Enter the password of your TP-Link ID, then the new email address. And click Save.¾Change your password1. Click behind the Password.2. Enter the current password, then a new password twice. And click Save.5 3 Manage the User TP-Link IDsThe first-time login TP-Link ID will be bound automatically to your extender as an Admin account. An Admin account can add or remove other TP-Link IDs to the same extender as User s. Admin account and User accounts both can monitor and manage the extender locally or remotely, except that user accounts cannot:• Reset the extender to its factory default settings from the web management page or the T ether app.• Add/remove other TP-Link IDs to/from the extender.5 3 1 Add an TP-Link ID to Manage the Extender1. Visit , and log in with your TP-Link ID.2. Go to Settings > TP-Link Cloud, and focus on the Bound Accounts section.3. Click , enter another TP-Link ID as needed and click Save.Note:If you need another TP-Link ID, please refer to Manage the Extender via TP-Link T ether App to install the app and register a new one.4. The new TP-Link ID will be displayed in the Bound Accounts table as a User.5 3 2 Remove TP-Link ID(s) From Managing the Extender1. Visit , and log in with your TP-Link ID.2. Go to Settings > TP-Link Cloud, and focus on the Bound Accounts section.3. Check the box(es) of the TP-Link ID(s) you want to remove and click Unbind.5 4 Manage the Extender via TP-Link T ether App The T ether app runs on iOS and Android devices like smartphones and tablets.1. Open the Apple App Store or Google Play and search the key word TP-Link T ether or simply scan the QR code to download and install the app.OR2. Connect your device to the extender’s wireless network.3. Launch the T ether app, select the model of your extender and log in with your TP-Link ID or the password you set for the extender.4. Manage your extender as needed.Chapter 6 Manage Y our Extender This chapter presents how to manage and maintain your extender.It contains the following sections:• Set Up System Time• Control LEDs• Power Schedule• Upgrade the Firmware• Backup and Restore Configuration Settings• Change Login Password• System Log6 1 Set Up System TimeThe System Time of the extender will be used for time-based functions such as the Power Schedule function. If you have enabled the Daylight Saving Time feature, the system time will be sychronized with the daylight saving time you configure.1. Visit , and log in with the password you set for the extender.2. Go to Settings > System T ools > Time Settings.¾T o get system time:1. Select your local Time Zone from the drop-down list.2. Click Save.¾T o set up Daylight Saving Time:1. Select Enable Daylight Saving Time.2. Select the Start and End date and time of the daylight saving time at your local time zone.3. Click Save.6 2 Control LEDsThe LEDs of the extender indicate its activities and status. Y ou can enable the Night Mode feature to specify a time period during which the LEDs are off.1. Visit , and log in with the password you set for the extender.2. Go to Settings > System T ools > LED Control.¾T o specify a time period when LEDs are off:1. Select Night Mode.2. Specify a time period in the LED Off Time field, and the LEDs will be off during this period.3. Click Save.6 3 Power ScheduleThe Power Schdule feature allows you to specify a time period during which the extender is off.1. Visit , and log in with the password you set for the extender.2. Go to Settings > Advanced Settings > Power Schedule.¾T o specify a time period when the extender is off:1. Select Enable Power Schedule.2. Specify a time period in the Power-Off Time field and days in the Day(s) field, and the extender will be off during this period.3. Click Save.6 4 Upgrade the FirmwareTP-Link is committed to improving product features, giving you a better network experience. Y ou can upgrade the firmware online or download the latest firmware file from the Support page at our website and upgrade the extender to the latest firmware version.Note:1. Make sure the latest firmware file is matched with the hardware version (as shown in the download section of the Support page).2. Make sure that you have a stable connection between the extender and your computer. It is NOT recommended to upgrade the firmware wirelessly.3. Backup your extender configuration.4. Do NOT power off the extender during the firmware upgrade.¾T o upgrade the firmware online:1. Visit , and log in with the password you set for the extender.2. Go to Settings > System T ools > Firmware Upgrade, and click Check for upgrade to see whether a new firmware is released.3. Focus on the Online Upgrade section, and click Upgrade.4. Wait a few minutes for the firmware upgrade to complete and the extender to reboot.¾T o upgrade the firmware locally:1. Download the latest firmware file for the extender from our website .2. Visit , and log in with the password you set for the extender.3. Go to Settings > System T ools > Firmware Upgrade.5. Wait a few minutes for the firmware upgrade to complete and the extender to reboot.6 5 Backup and Restore Configuration SettingsThe configuration settings are stored as a configuration file in the extender. Y ou can backup the configuration file and restore the extender to the previous settings from the backup file when needed. Moreover, if necessary, you can erase the current settings and reset the extender to the default factory settings.1. Visit , and log in with the password you set for the extender.2. Go to Settings > System T ools > Backup & Restore.¾T o backup configuration settings:Click Backup to save a copy of the current settings to your local computer. A ‘.bin’ file of the current settings will be stored on your computer.¾T o restore configuration settings:1. Click Browse to locate the backup configuration file stored on your computer, and click Restore.2. Wait a few minutes for the restore and reboot.Note: During the restore process, do not power off or reset the extender.。
深信服AC_1200配置手册
附件五上网行为管理AC-1200配置管理文档1. 设备名称本系统上网行为管理设备采用深信服公司生产的AC-1200。
2.设备功能根据用户提出的应用需求,AC-1200在本系统中的设计功能是对网络资源进行合理的分配,并对内部工作人员的上网行为进行规范,以及对防火墙的功能进行必要的补充。
3.设备硬件信息3.1 AC-1200产品外形AC-1200产品外形和接口信息如图1所示。
图1 AC-1200产品外形和接口信息网络连接与管理方式AC-1200的ETH0(LAN)口通过透明网桥的方式与核心交换机CISCO4506的GE3/1连接,加入本地局域网络。
ETH2(WAN1)口与路由器CISCO2821,与Internet连接。
ETH1(DMZ)端口作为WEB管理端口连接到核心交换机的G3/30。
设备端口IP地址分配见表1。
本设备只提供WEB管理方式。
通过网络连接到WEB管理端口,打开浏览器,在地址栏输入https://192.168.5.41 ,进入管理页面输入用户名和密码,单击“登录”,即可进入管理界面,如图2所示。
表1设备端口IP地址分配表图2 WEB登录页面4. 配置管理4.1 WEBUI界面登录后看到的是WEB管理的首页,包含左侧的功能菜单栏和右侧的状态信息显示。
如图3所示。
图3 WEB用户管理界面4.2 系统配置系统配置部分包含系统信息、管理员帐户、系统时钟等信息。
4.2.1 系统信息系统信息包含系统内的序列号和license信息,如图4所示。
图4系统信息4.2.2 管理员帐户本系统内除admin帐户外,另创建了一个gtyl管理员帐户,其权限与admin相同。
图5所示为管理员帐户列表。
图5管理员帐户列表如需对管理员帐户进行配置,直接单击蓝色用户名,如需创建新管理员,单击左上角“新增”图标,即可进入创建页面。
4.2.3 系统时间系统时间设置界面如图6所示。
图6系统时间设置页面4.2.4 系统升级如图7列表中所显示的,除病毒库未购买升级服务,网关补丁不需购买服务外,其他服务都在2012年4月7日到期,到时可根据实际情况决定是否购买。
(完整word版)深信服AC产品选型

200用户
3
AC-13003.5
70M以内
300用户
4
AC-16005.3
120M以内
500用户
深信服AC产品选型
序号
产品名称
说明
性能参数
备注
1
AC-11008500
包含上网认证、终端检查、访问控制、行为监控、外发管理、带宽管理、行为审计、统计报表和安全增强等功能
含一年URL库升ቤተ መጻሕፍቲ ባይዱ(一年以后每年10%设备价格)
含一年硬件质保(一年以后每年5%设备价格)
20M以内
100用户
2
AC-1200
50M以内
NETGEAR AC1200 WiFi高速DSL模式路由器说明书

AC1200 WiFi High-Speed DSL Modem Router —Simultaneous Dual Band GigabitData SheetD6220Performance & UseThe NETGEAR Difference - D6220Overview• Beamforming+—Faster, more reliable connections• ReadySHARE USB access—Wirelessly access & share USB hard drives • Built-in VDSL2 modem• High-speed connectivity for dual band WiFi devices like iPad ® and iPhone ®The NETGEAR AC1200 WiFi High-Speed DSL Modem Router with dual band Gigabit is an incredibly fast modem router delivering AC1200 WiFi and Gigabit Ethernet speeds. This DSL modem router provides a fast VDSL2 modem and it also works with ADSL2+ connections. It offers extremely high performance in wireless coverage for large homes with 10 or more devices. With this AC1200 modem router you get 3x faster access than with similar 802.11n technology and more reliable streaming. It delivers the speed and reliability needed for applications such as smooth, lag-free, multiple HD video streaming, multi-player gaming, ultra-fast speed for a secure and reliable connection to the Internet. The AC1200 Modem Router also includes NETGEAR genie ® home network manager for easy installation and home network management.Compatible with AC WiFi devices and backward compatible with 802.11 a/b/g/n devices, this VDSL/ADSL modem router enables HD streaming throughout your home. With up to 300+900† and simultaneous dual band WiFi technology, it avoids wireless interference, ensuring top WiFi speeds and reliable connections. In addition, Beamforming+ technology boosts speed, reliability and range of WiFi connections. These technologies also provide ultimate connectivity for dual band wireless devices like iPad ® and iPhone ®.• Focuses WiFi signals from the wireless router to WiFi devices likesmartphones, tablets and laptops• Automatic signal management checks with your device to keep WiFi signal at its optimal strength• Designed for home environments to support multiple WiFi deviceconnections for highest quality• Extends WiFi coverage, reduces deadspots, and boosts signal strengthBeamforming+—For More Reliable ConnectionsD6220WiFi RangeBEST RANGE—Wireless coverage for large homesBest WiFi Range Homes come in all shapes and sizes. The NETGEAR AC1200 WiFi High-Speed DSL Modem Router with additional high-power amplifiers provides WiFi connectivity throughout your home for all your Internet-enabled devices.VDSL2 MODEM—Built-in VDSL2, also compatible withADSL2+ connectionsSpeed makes HD video better. Speed makes onlinegaming awesome. Speed makes all your devices really go. And anyplace you need speed, with NETGEAR you got it. Extreme download speeds up to 300+900 Mbps †. Next-generation 11ac WiFi with dual band technology providing whole home coverage with Gigabit wired and wireless connection. Everything you need for a fast, fast, fast connected home.SpeedAC1200—Up to 300+900 Mbps †GIGABIT WIRED—Ideal for HD gaming & video CABLE—Also connects to cable modem via GigabitEthernet WAN portBest WiFi Speed • Home network manager• Remote access to manage your network away from home• Turbo Transfer—Share files between computers and Android ® mobile devices via WiFi• Makes any printer AirPrint ® compatible to print from an iPad ® or iPhone ®• MyMedia ®—Find and play media files in your network• EZ Mobile Connect—Scan QR Code to connect to your home network • For PC, Mac ®, iPhone ®, iPad ®, & Android ® devices • Provides device-level enhanced parental controlsNETGEAR genie ® Home Networking SimplifiedAC1200 WiFi High-Speed DSL Modem Router —Simultaneous Dual Band GigabitData SheetD6220NETGEAR makes it easy to do more with your digital devices. Manage your network with NETGEAR genie ® App—a personal, icon-based dashboard that can control and monitor all your devices. Or, use Push ‘N’ Connect to add devices to your WiFi network with a push of a button. And the simple browser-based installation with no CD makes router installation easy using an iPad, tablet, smartphone, or computer.Ease Of UseEASY INSTALL—Easy setup for iPad ®, tablets, smartphones & computersNETGEAR GENIE ® APP—Personal dashboard to monitor, control & repair your home network, anytime & from anywhere withremote accessPUSH ‘N’ CONNECT —Easy push button WiFi connections (WPS)Simple network management WIFI & POWER ON/OFF —Convenient power savingsStay connected—with your devices, your media, and your friends. Simultaneous Dual Band WiFi provides two separate WiFi networks—2.4GHz for legacy devices and 5GHz which is less interference-prone for media streaming. Theadvanced QoS technology provides higher priority for media streaming application for smoother HD video streaming and low-latency online gaming.Reliable ConnectionsSIMULTANEOUS DUAL BAND—Reduces WiFi interference & doubles bandwidthBEAMFORMING+—Boosts speed, reliability, & range of WiFi connectionsADVANCED QoS—Optimized for smooth HD streaming & gamingEnjoy high-performance connectivity throughout your home Relive memories and share them with others. Find photos, videos and music stored on a shared USB hard drive and enjoy them on your DLNA TV right from your couch. If it's secure and shared storage access you want, NETGEAR has easy ways to do it.SharingDLNA ®—Find & play your media o n DLNA TVs & game consoles Share & stream your movies, music, photos READYSHARE ® USB ACCESS—Wirelessly access & share USB hard drivesAC1200 WiFi High-Speed DSL Modem Router —Simultaneous Dual Band GigabitData SheetD6220With the AC1200 WiFi High-Speed DSL Modem Router create a powerful home network for applications such as lag-free, multiple HDstreaming, multi-player online gaming, ultra-fast, reliable connection to the Internet and a secure wireless connection.ApplicationsEMAIL, CHAT, SURF, MUSIC, VIDEO—Enjoy a fast, reliable and secure wireless connection to the InternetO NLINE GAMING—Optimized for multi-player gaming with no lags HD STREAMING—Enjoy high-quality HD streamingIdeal UsesMULTIPLE HD STREAMING—Optimized for a smooth, lag-freemultiple HD streaming experienceKeep your Internet browsing experience safe and secure with the free parental controls. It allows you to limit access to certain web sites at certain times. For example, no social networking or gaming site access after dinner time. Guest networks create a completely separate WiFi network for your guests’ devices, ensuring they do not have access to your home network or to the shared USB hard drive with all your personal data. Secure WiFi connections offer high level WPA/WPA2 security.SecurityENHANCED PARENTAL CONTROLS—Safer web surfing for all your connected devices. Use genie app to manage policy per device GUEST NETWORK ACCESS—Separate & secure access for guests SECURE WIFI CONNECTIONS—High level wireless security with WPA/WPA2Safeguard your network Connection DiagramUSB 2.0 PortGigabit EthernetResetDSL port PowerWiFi On/OAC1200 WiFi High-Speed DSL Modem Router —Simultaneous Dual Band GigabitData SheetD6220This product comes with a limited warranty that is valid only if purchased from a NETGEAR authorized reseller.*24/7 basic technical phone support provided for 90 days from purchase date.†Maximum wireless signal rate derived from IEEE 802.11 specifications. Actual data throughput and wireless coverage will vary and may be lowered by network and environmental conditions, including network traffic volume and building construction. NETGEAR makes no representations or warranties about this product’s compatibility with future standards.‡Compatible with 802.11n and 802.11ac WiFi devices.NETGEAR, the NETGEAR Logo, ReadySHARE, and NETGEAR genie, are trademarks of NETGEAR, Inc. Mac and the Mac logo are trademarks of Apple Inc. Any other trademarks herein are for reference purposes only. ©2016 NETGEAR, Inc.NETGEAR, Inc. 350 E. Plumeria Drive, San Jose, CA 95134-1911 USA, /supportD-D6220-0Package Contents• AC1200 WiFi High-Speed DSL Modem Router (D6220)• Ethernet cable • Phone cable • DSL phone filter • Quick start guide • Power adapterPhysical Specifications• D imensions: 240 x 182 x 41 mm (9.44 x 7.16 x 1.61 in)• Weight: 341 g (0.75 lb)Warranty• /about/warranty/Support• 24/7 basic technical phone support for 90 days from date of purchaseTechnical Specifications• A C1200 WiFi- B and1:************** - B and 2: 900 Mbps @ 5GHz • S imultaneous Dual Band WiFi - T x/Rx 2x2 (2.4GHz) + 2x2 (5GHz)-I EEE ® 802.11 b/g/n 2.4GHz -I EEE ® 802.11 a/n/ac 5GHz• H igh-speed VDSL2/ADSL2+ modem built-in • M emory: 128 MB flash and 128 MB RAM • WiFi Boost with high-power radio amplifiers • Implicit & Explicit Beamforming+ for 5GHz band • Advanced Quality of Service (QoS)• IPv6 Support (Internet Protocol Version 6)Standards• Five (5) 10/100/1000 Mbps Gigabit Ethernet ports - 1 WAN & 4 LAN with auto-sensing technology - 1 Gigabit Ethernet port can be used as WAN port to connect to cable modem • One (1) DSL port • One (1) USB 2.0 portSystem Requirements• B roadband Internet service• V DSL2/ADSL2+ broadband Internet service, or • C able Internet service- C onnects to cable modem via GigabitEthernet WAN port •M icrosoft ® Windows ® 7, 8, 10, Vista ®, XP ®, 2000, Mac ® OS, UNIX ®, or Linux ®•M icrosoft ® Internet Explorer ® 5.0, Firefox ® 2.0, Safari ® 1.4, or Google Chrome ™ 11.0 browsers or higher • U se laptop with 3x3 300 Mbps adapter like Centrino@ 6300/5300 for maximum performance • U se with an 802.11ac adapter like NETGEAR A6210 for maximum performanceSecurity• WiFi Protected Access ® (WPA/WPA2—PSK)• Double firewall protection (SPI and NAT firewall)•Denial-of-service (DoS) attack prevention。
深信服1200功能介绍
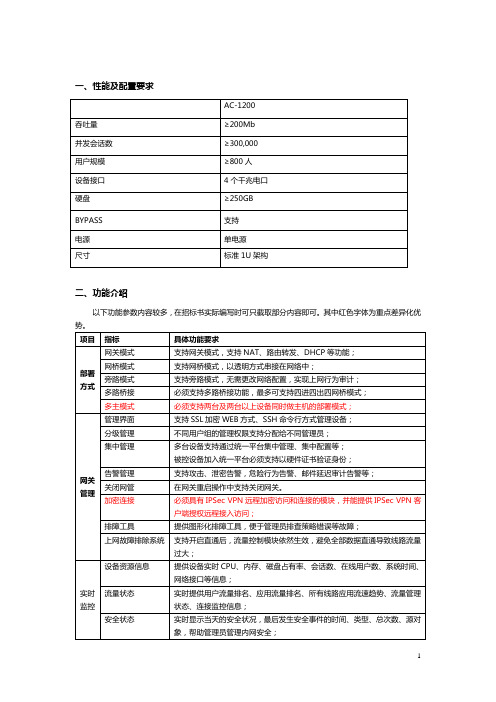
一、性能及配置要求AC-1200吞吐量≥200Mb并发会话数≥300,000用户规模≥800人设备接口4个千兆电口硬盘≥250GBBYPASS 支持电源单电源尺寸标准1U架构二、功能介绍以下功能参数内容较多,在招标书实际编写时可只截取部分内容即可。
其中红色字体为重点差异化优势。
项目指标具体功能要求部署方式网关模式支持网关模式,支持NAT、路由转发、DHCP等功能;网桥模式支持网桥模式,以透明方式串接在网络中;旁路模式支持旁路模式,无需更改网络配置,实现上网行为审计;多路桥接必须支持多路桥接功能,最多可支持四进四出四网桥模式;多主模式必须支持两台及两台以上设备同时做主机的部署模式;网关管理管理界面支持SSL加密WEB方式、SSH命令行方式管理设备;分级管理不同用户组的管理权限支持分配给不同管理员;集中管理多台设备支持通过统一平台集中管理、集中配置等;被控设备加入统一平台必须支持以硬件证书验证身份;告警管理支持攻击、泄密告警,危险行为告警、邮件延迟审计告警等;关闭网管在网关重启操作中支持关闭网关。
加密连接必须具有IPSec VPN远程加密访问和连接的模块,并能提供IPSec VPN客户端授权远程接入访问;排障工具提供图形化排障工具,便于管理员排查策略错误等故障;上网故障排除系统支持开启直通后,流量控制模块依然生效,避免全部数据直通导致线路流量过大;实时监控设备资源信息提供设备实时CPU、内存、磁盘占有率、会话数、在线用户数、系统时间、网络接口等信息;流量状态实时提供用户流量排名、应用流量排名、所有线路应用流速趋势、流量管理状态、连接监控信息;安全状态实时显示当天的安全状况,最后发生安全事件的时间、类型、总次数、源对象,帮助管理员管理内网安全;上网行为监控实时显示设置过滤条件的用户上网行为监控,支持手动设置刷新时间;用户管理本地认证支持触发式WEB认证,静态用户名密码认证等;第三方认证支持LDAP、Radius、POP3、Proxy等第三方认证;支持ISA\ lotus ldap\novel ldap\oracle、sql server、db2、mysql等数据库等第三方认证;双因素认证必须支持以USB-Key方式实现双因素身份认证;IP、MAC认证支持绑定IP认证、绑定MAC认证,及IP/MAC绑定认证等;支持通过SNMP服务器跨三层获取MAC地址;支持当用户MAC地址变动时,需要重新认证;短信认证支持短信认证方式,用户输入手机号作为用户名,通过短信猫或短信平台发送验证码;短信认证能够根据不同用户推送不同认证页面,该认证页面可自定义,编辑内容包括文字、颜色风格、图片,且图片支持轮询播放微信认证支持与微信结合的认证方式,用户关注微信公众号后即通过身份认证,后台记录用户ID二维码认证支持二维码认证,管理员扫描访客的二维码后对其网络访问授权新用户认证根据新用户的源IP网段实现新用户差异化账户创建、自动分组、认证规则;公用账户支持多人使用同一帐号登录,且支持重复登陆检测机制;账户有效期指定账户支持有效期限制,并支持自动过期;单点登录支持AD、POP3、Proxy、PPPOE、H3C IMC/CAMS、锐捷SAM、城市热点等系统进行认证单点登录,简化用户操作;可强制指定用户、指定IP段的用户必须使用单点登录;强制AD认证指定用户必须用AD域账户登录操作系统,否则禁止上网;安全组嵌套同步支持AD安全组嵌套同步;认证失败支持为认证失败用户提供基本网络访问权限机制;认证后页面跳转认证成功的用户支持页面跳转:1.跳转到用户原本输入的URL地址;2.跳转到管理员指定的URL地址;3.跳转到该用户上网信息排行页面;4.跳转到注销页面;帐户导入支持从本地导入和扫描导入,支持以CSV格式文件导入帐户/分组/IP/MAC/描述/密码等信息;支持从外部LDAP服务器导入账户及分组信息;组织结构用户分组支持树形结构,支持父组、子组、组内套组等;用户状态查询支持用户登录时间、注销时间、在线时长的查询;自动注销支持自动注销指定时间内无流量的已认证用户;冻结用户支持冻结认证失败次数超过最大值的用户,在冻结时间结束后恢复登录;用户密码强度可设置用户密码不能等于用户名;新密码不能与旧密码相同;可设置密码最小长度;可设置密码必须包括数字或字母或特殊字符;终端系统识别支持识别终端操作系统版本、系统补丁安装情况;(管理文件识别支持识别终端硬盘指定目录下的文件情况;进程识别支持识别终端系统后台运行的进程信息,防止间谍软件的运行;注册表识别支持识别终端系统注册表中指定的表项和键值;自定义识别支持终端调用管理员指定脚本/程序以满足个性化检查要求;终端准入支持win 7 64位操作系统,支持在旁路模式部署下准入生效;支持禁止不满足终端检查要求的用户访问互联网;应用管理应用识别规则库1、支持根据标签选择应用,标签分类至少包含安全风险、高带宽消耗、发送电子邮件、降低工作效率、外发文件泄密风险、主流论坛和微博发帖6大类;2、支持给每个应用自定义标签;3、支持根据标签选择一类应用做控制;4、支持对每一种应用的定义和解释,帮助客户快速定位应用的分类;5、支持给每一种应用列上图标,易于客户了解应用的特征。
NETGEAR AC1200智能WiFi路由器(型号 R6220)说明书

Performance & UseThe NETGEAR Diff erence - R6220Overview• AC1200 WiFi—300+867 Mbps † speeds • External antennas for improved WiFi coverage• Ideal for homes with 8 or more WiFi devices • NETGEAR genie ® App—Enjoy more of your connected home• 880 MHz processor delivers h igh-performance connectivity • USB 2.0 port—Wirelessly access & share USB hard drive • Connectivity for dual band WiFi devices l ike iPad ®/iPhone5®AC1200 Smart WiFi Router with External AntennasData SheetR6220The NETGEAR AC1200 Smart WiFi Router with External Antennas is an incredibly fast router delivering AC1200 WiFi and GigabitEthernet speeds. External antennas provide improved WiFi coverage for larger homes. This router off ers 3x faster speed than similar 802.11n and more reliable streaming for mobile phones and tablets. It delivers the speed and reliability needed for applications such as lag-free multiple HD video streaming, multi-player gaming, ultra-fast speed and a secure and reliable connection to the Internet. The AC1200 Smart WiFi Router with External Antennas also includes NETGEAR genie ® home network manager for easy installation and home network management.Compatible with next generation WiFi devices and backward compatible with 802.11 a/b/g/n devices, it enables HD streamingthroughout your home. With up to 300+867 Mbps † speed and simultaneous dual band WiFi technology, it avoids wireless interference, ensuring top WiFi speeds and reliable connections. These technologies also provide ultimate connectivity for dual band wireless devices like iPad ® and iPhone5®. The 880 MHz processor delivers high-performance connectivity, while the USB 2.0 port provides wireless access and sharing of USB hard drives.RANGE• Home network manager• Turbo Transfer—Share fi les within your home network betweenPC, Mac ® or Android™• Makes any printer AirPrint ® compatible to print from an iPad ® or iPhone ®• MyMedia ™—Find and play media fi les in y our network• EZ Mobile Connect—Scan QR code to connect t o your home network • For PC, Mac ®, iPhone ®, iPad ®, & Android ™ devicesNETGEAR genie ® Home Networking Simplifi edAC1200 Smart WiFi Router with External AntennasData SheetR6220Speed makes HD video better. Speed makes online gaming awesome. Speed makes all your devices really go. And anyplace you need speed, with NETGEAR you got it. Extreme download speeds up to 300+867 Mbps. Next generation 11ac WiFi with dual band technology providing whole home coverage with Gigabit wired and wireless connection. Everything you need for a fast, fast, fast connected home.Relive memories and share them with others. Find photos, videos and music stored on a shared USB hard drive and enjoy them on your DLNA TV right from your couch. If it's secure and shared storage access you want NETGEAR has easy ways to do it.SpeedSharingWiFi RangeAC1200 WIFI—Up to 300+867 Mbps †DL N A ®—Find & play your media o n DLNA TVs & game consolesBETTER RANGE—Wireless coverage for large homesGIGABIT WIRED—Ideal for HD gaming & videoReadySHARE ®PRINTER—Wirelessly access & share a USB printerUltimate WiFi Speed Ultimate WiFi Range Share & stream your movies, music, photos Homes come in all shapes and sizes. TheNETGEAR AC1200 Smart WiFi Router with External Antennas provides WiFi connectivity throughout your home for all your Internet-enabled devices.READYSHARE ® USB ACCESS—Wirelessly access & share USB hard drive via one (1) USB 2.0 portStay connected—with your devices, your media, and your friends. Simultaneous dual band WiFi provides two separate WiFi networks—2.4GHz for legacy devices and 5GHz which is less interference-prone for media streaming. Theadvanced QoS technology provides higher priority for media streaming application for smoother HD video streaming and low-latency online gaming.Reliable ConnectionsSIMULTANEOUS DUAL BAND—Reduces interference for better connections to more WiFi devicesADVANCED QoS—Optimized for smooth HD streaming & gamingEnjoy high-performance connectivity throughout your homeAC1200 Smart WiFi Router with External AntennasData SheetR6220NETGEAR makes it easy to do more with your digital devices. Manage your network with genie ® App—a personal, icon-based dashboard that can control and monitor all your devices. Or, use Push ‘N’Connect to add devices to your WiFi network with a push of a button. And the simple browser-based installation with no CD makes router installation easy using an iPad, tablet, smartphone, or computer.Keep your Internet browsing experience safe andsecure with the free parental controls. It allows you to limit access to certain web sites at certain times. For example no social networking or gaming site access aft er dinner time. Guest networks create a completely separate WiFi network for your guests’ devices, ensuring they do not have access to your home network or to the shared USB hard drive with all your personal data. Secure WiFi connections off er the highest level of WPA/WPA2 security.Ease Of UseSecurityEASY INSTALL—Easy setup for iPad ®, tablets, smartphones& computersPARENTAL CONTROLS—Web filtering for all your connected devices NETGEAR GENIE ® APP—Personal dashboard to monitor, control & repair your home networkGUEST NETWORK ACCESS—Separate & secure access for guests PUSH ‘N’ CONNECT —Easy push button WiFi connections (WPS)SECURE WIFI CONNECTIONS—Highest level wireless security with WPA/WPA2Simple network management Safeguard your network With the AC1200 Smart WiFi Router create a powerful home network for applications such as lag-free multiple HD streaming, multi-player online gaming, ultra-fast, reliable connection to the Internet and a secure wireless connection.ApplicationsEMAIL, CHAT, SURF, MUSIC, VIDEO—Enjoy a fast, reliable and secure wireless connection to the InternetONLINE GAMING—Optimized for multi-player with no lags MULTIPLE HD STREAMING—Optimized for a smooth, lag-free multiple HD streaming experienceH D STREAMING—Enjoy high-quality HD streaming Ideal usesAC1200 Smart WiFi Router with External AntennasData SheetR6220Connection DiagramWiFi On/OffPush ‘N’ Connect with WPSUSB 2.0Gigabit EthernetInternetPower On/OffThis product comes with a limited warranty that is valid only if purchased from a NETGEAR authorized reseller.*24/7 basic technical phone support provided for 90 days from purchase date when purchased from a NETGEAR authorized reseller.†Maximum wireless signal rate derived from IEEE standard 802.11 specifi cations. Actual data throughput and wireless coverage will vary. Network conditions and environmental factors, including volume of network traffi c, building materials and construction, and network overhead, lower actual data throughput rate and wireless coverage. 802.11ac 867 Mbps is approximately 3x faster than 802.11n 300 Mbps. NETGEAR makes no express or implied representations or warranties about this product’s compatibility with any future standards. The country settings must be set to the country where the device is operating. Intended for indoor use only in EU member states, EFTA states, and Switzerland.NETGEAR, the NETGEAR logo, ReadySHARE, and NETGEAR genie, are trademarks and/or registered trademarks of NETGEAR, Inc. and/or its subsidiaries in the United States and/or other countries. Other brand names mentioned herein are for identifi cation purposes only and may be trademarks of their respective holder(s). Information is subject to change without notice. © 2014 NETGEAR, Inc. All rights reserved.NETGEAR,Inc.350E.PlumeriaDrive,SanJose,CA95134-1911USA,1-888-NETGEAR(638-4327),E-mail:****************,D-R6220-0AC1200 Smart WiFi Router with External AntennasData SheetP C• AC1200 Smart WiFi Router with External Antennas (R6220)• Ethernet cable • Quick Start Guide• Power adapter, localized to country of saleP S• Dimensions: 239.65 x 181.45 x 40.6 mm (9.43 x 7.14 x 1.59 in)• Weight: 385 g (0.84 lb)W• For details visit/about/warranty/S• 24/7 basic technical phone support for 90 days from date of purchaseT S• Simultaneous Dual Band WiFi—2.4 & 5 GHz • WiFi Transmitters/Receivers (Tx/Rx) - 2x2 (2.4GHz) + 2x2 (5GHz)• Powerful single-core 880 MHz processor • WiFi Boost with high-powered radio amplifiers • Memory: 128 MB flash and 128 MB RAM • Advanced Quality of Service (QoS)• IPv6 support (Internet Protocol Version 6)S• O ne (1) USB 2.0 port • I EEE ® 802.11 b/g/n 2.4GHz • IEEE 802.11 a/n/ac 5GHz• Five (5) 10/100/1000 (1 WAN and 4 LAN) Gigabit Ethernet ports with auto-sensing technologyS R• Microsoft ® Windows 7, 8, Vista ®, XP ®, 2000, Mac OS ®, UNIX ®, or Linux ®• Microsoft ® Internet Explorer ® 5.0, Firefox ® 2.0, Safari ® 1.4, or Google Chrome ™ 11.0 browsers or higher• U se laptop with 2x2 300 Mbps adapter like Centrino ® 6205/6235, 3x3 450 Mbps adapter like Centrino ® 6300/5300, or 802.11ac adapter like NETGEAR A6210 for maximum performanceS• WiFi Protected Access ® (WPA/WPA2—PSK)• Double firewall protection (SPI and NAT firewall)• Denial-of-service (DoS) attack preventionR6220。
- 1、下载文档前请自行甄别文档内容的完整性,平台不提供额外的编辑、内容补充、找答案等附加服务。
- 2、"仅部分预览"的文档,不可在线预览部分如存在完整性等问题,可反馈申请退款(可完整预览的文档不适用该条件!)。
- 3、如文档侵犯您的权益,请联系客服反馈,我们会尽快为您处理(人工客服工作时间:9:00-18:30)。
附件五上网行为管理AC-1200 配置管理文档1.设备名称本系统上网行为管理设备采用深信服公司生产的AC-1200。
2.设备功能根据用户提出的应用需求,AC-1200在本系统中的设计功能是对网络资源进行合理的分配,并对内部工作人员的上网行为进行规范,以及对防火墙的功能进行必要的补充。
3.设备硬件信息3.1 AC-1200 产品外形AC-1200 产品外形和接口信息如图 1 所示。
图 1 AC-1200 产品外形和接口信息网络连接与管理方式AC-1200的ETH0(LAN)口通过透明网桥的方式与核心交换机CISCO4506的 GE3/1连接,加入本地局域网络。
ETH2(WAN1)口与路由器 CISCO2821,与 Internet连接。
ETH1(DMZ)端口作为WEB管理端口连接到核心交换机G3/30。
的设备端口IP地址分配见表1。
本设备只提供WEB管理方式。
通过网络连接到WEB管理端口,打开浏览器,在地址栏输入 https://192.168.5.41,进入管理页面输入用户名和密码,单击“登录” ,即可进入管理界面,如图 2 所示。
表 1 设备端口 IP 地址分配表接口IP 地址描述ETH0 (LAN)透明模式与核心交换G3/1 连接ETH1 (DMZ)192.168.5.41与 VLAN5某端口连接( WEB管理)ETH2 (WAN1)192.168.1.6与路由器 G0/0/0 连接图 2WEB 登录页面4.配置管理4.1 WEBUI 界面登录后看到的是WEB管理的首页,包含左侧的功能菜单栏和右侧的状态信息显示。
如图 3 所示。
图 3 WEB用户管理界面4.2系统配置系统配置部分包含系统信息、管理员帐户、系统时钟等信息。
4.2.1系统信息系统信息包含系统内的序列号和license信息,如图4所示。
图 4 系统信息4.2.2管理员帐户本系统内除 admin 帐户外,另创建了一个 gtyl 管理员帐户,其权限与 admin 相同。
图 5 所示为管理员帐户列表。
图 5 管理员帐户列表如需对管理员帐户进行配置,直接单击蓝色用户名,如需创建新管理员,单击左上角“新增”图标,即可进入创建页面。
4.2.3系统时间系统时间设置界面如图 6 所示。
图 6 系统时间设置页面4.2.4系统升级如图7 列表中所显示的,除病毒库未购买升级服务,网关补丁不需购买服务外,其他服务都在 2012 年 4 月 7 日到期,到时可根据实际情况决定是否购买。
在服务期内的项目已全部设置自动升级。
图 7 系统升级4.2.5全局排除地址全局排除地址列表中的服务器网址不受监控和限制,如图 8 所示。
本次设置未启动该项目,今后可根据实际应用自行设置。
图 8 全局排除地址4.3网络配置本系统网络配置为透明方式, ETH0(LAN)和 ETH2(WAN1)之间配置网桥, Internet 线路从路由器连接到 WAN1口, LAN端口连接到核心交换机的 VLAN 1端口,配置 DMZ 为管理端口,加入 VLAN 5,IP 地址为 192.168.5.41 。
如图 9 列表所示。
图 9 网络配置4.4防火墙防火墙功能使用USG2220实现,此处不做配置。
4.5安全防护本设备的安全防护功能是对USG2220的部分补充。
4.5.1防DOS攻击DOS攻击(拒绝服务攻击)是通过发送大量请求,耗尽服务器资源,使得合法请求得不到响应。
本设备防 DOS攻击设置如图 10 所示。
图 10 防 DOS攻击设置4.5.2防ARP欺骗ARP欺骗是一种常见的内网病毒,中毒的客户端不断向内网发广播包,严重影响局域网的通讯,甚至断网。
本设备防ARP欺骗设置如图 11 所示。
图 11 防 ARP欺骗4.5.3网关杀毒本设备的杀毒网关未购买病毒库升级服务,病毒库为 2011-03-31 之前,已设置全部杀毒功能。
如图 12 所示。
图 12 网关杀毒配置4.6流量管理4.6.1虚拟线路配置这里的虚拟线路配置实际就是Internet的接入线路配置。
我们配置上、下行线路带宽均为 10240Kbps(10Mbps)。
如图 13 所示。
图 13 虚拟线路配置4.6.2通道配置通道配置是本设备进行网络流量管理的核心内容。
通过添加不同的通道,并对他们进行网络带宽的分配,可以使符合该通道策略的应用得到带宽的保证或限制。
通道配置如图 14 所示。
图 14 通道配置配置列表中的项目,除上班时间流量管理是我们这次添加的项目,其余均为系统根据实际情况已制定的通道。
此次配置将全部应用启动。
下面已低延时保障为例,说明配置参数。
如图 15 和图 16 所示。
图 15 低延时保障通道配置图 16 低延时通道应用范围从图 16 可以看出,本设置适用于实时性较高的应用,如网游、股票行情和交易等。
从图 15 可以看到,系统预留 20%的带宽保证这类应用的流量需求。
实际操作中,我们添加了一个命名为上班时间流量限制的通道,以此为例,讲解添加配置步骤。
首先,单击图 14 左上角的加号“添加通道”。
如图 17 所示,我们设置通道为限制通道,最大上、下行带宽为 50%,优先级为低,并且设置单 IP 资源不超过 50Kbps。
在通道适用范围中,我们设置为适用于所有应用,适用对象为临时人员(自动获取 IP 地址的人员),生效时间为工作时间,目标IP 组为自动获取。
如图 18 所示。
其中用户组“临时人员”、生效时间“工作时间”(周一到周日, 9:00-19 :00)、目标 IP 组“自动获取”都是已经在对象定义和用户管理中定义好。
当带宽资源已经满负荷时,系统将保证优先级高的通道的带宽。
图 17 配置带宽通道设置实例图 18 通道适用范围设置实例4.7用户和上网策略4.7.1上网策略制定上网策略的目的是保证带宽不被非公业务占用和协助行政规定的实施。
这里通过一个示例说明上网策略的配置方法。
(本策略不被启动)。
策略目的:在上班时间段,禁止“临时人员”、“综合管理部人员” 、“财务部人员”、“公司领导”通过互联网使用“ HTTP协议”、“ QQ”、“淘宝”、“迅雷下载”“ P2P 网络视频”。
策略启动后结果:上述人员在周一到周日9: 00-19 :00,无法浏览网页,不能通过 QQ聊天,无法使用迅雷下载,无法观看P2P视频。
设置步骤如下:1)添加上网策略单击导航菜单的“用户与策略管理” “上网策略” “新增” “上网权限策略”,如图 19 所示。
图19 添加上网策略2)配置策略名称和信息在上网权限策略页面中,输入策略名称“办公策略”和策略信息“测试”,如图20所示。
图 20 配置策略名称和信息然后单击“应用”栏下面的显示器图标,选择要配置的应用。
进入图 22 所显示的画面。
选择好应用后,单击“确定” 。
图 22 应用选择确定后进入图 23 所示页面。
图 234)配置适用组和用户单击图23 中的“适用组和用户” ,选中需要禁止应用的用户组,点“提交”如图 24 所示。
图 24 配置适用组和用户至此,本策略配置完成。
4.7.2用户管理在用户管理部分,已经把终端客户按部门分组添加到系统中,每个用户与一个或几个 IP 地址绑定,台式机用户绑定一个,笔记本用户绑定两个,领导绑定三个。
图25 所示为组 / 用户视图,左侧为用户组列表,右侧为选中用户组中的成员。
图25 中选中的是“公司领导”用户组,右侧显示的是改组成员名单。
单击右侧列表中的具体成员名称,可以进入该用户的具体配置信息视图。
在此可以对该用户进行配置。
配置的内容包括用户属性(图 26)和策略列表(图 27)。
如图 26 中设置用户“张先龙”绑定IP 地址 192.168.100.20-192.168.100.22,图 27 中设置该用户应用策略“办公策略” ,(该策略未启动)。
图 25 组/ 用户视图图 26 用户属性设置图 27用户策略列表4.8对象定义对象定义部分包含系统配置所用到的基础信息的定义。
其中各种库资源都由系统自定义,并可从网上自动升级。
本次配置我们定义了IP 组(图 28)和时间计划组(图29)两项内容,其他内容可根据需求再添加。
图 28 IP组定义图 29 时间计划组定义4.9实时状态监控实施状态中包括运行状态、安全状态、流量状态、上网行为监控和在线用户管理等功能。
下面做分别介绍。
4.9.1运行状态图3 所示的是系统实时运行状态概览,包含资源信息、接口吞吐率折线图、应用流量排名、用户流量排名等。
此视图内容可自定义。
4.9.2安全状态本项统计安全事件列表,如图30所示。
图 30 安全状态监控4.9.3流量状态本项内容包括用户流量排名(图 31)、应用流量排名(图 32)、流量管理状态(图33)和连接监控(图 34)。
图 31 用户流量排名图 32 应用流量排名图 33 流量状态管理图 34 连接监控4.9.4上网行为监控针对各个用户的上网行为的监控功能。
如图 35 所示。
图 35 上网行为监控4.9.5在线用户管理本项功能是针对在线用户进行控制管理。
如图 36 所示。
图 36 在线用户管理4.10统计报表在管理页面的任何一页,单击右上角的“内置数据中心”,将会弹出新的页面(图37),这就是内置数据中心。
在这里可以查询各种历史记录和统计报表。
报表以表格、柱状图和饼图等形式展现。
图38 所示,历史记录报表表格。
图39 所示为统计报表中应用流量统计中 2011 年 5 月 8 日全天的各种应用的流量分布。
此统计方式为饼图。
报表功能使用方便,能够提供最全面的网络资源使用数据,帮助IT 管理员作出决策。
本文档不做更多说明。
图 37 内置数据中心首页图 38 历史记录报表图 39 应用流量统计图2018-5-4。