操作无法完成,因为磁盘管理控制台视图不是最新状态
如何使用“磁盘管理”配置基本磁盘

如何使用“磁盘管理”配置基本磁盘重要提示:若磁盘上已储存数据或安装软件请您慎重进行磁盘管理操作。
一些操作可能导致程序无法运行或数据丢失,如果您一定要进行这些操作,请在对磁盘或卷进行任何更改之前完全备份磁盘内容。
本页1.概要2.基本磁盘和卷3.使用磁盘管理4.如何创建新分区或逻辑驱动器5.如何格式化基本卷6.如何查看基本卷的属性7.如何删除分区或逻辑驱动器8.疑难解答9.参考概要本文分步介绍如何使用 Windows XP 的“磁盘管理”单元来配置基本磁盘并准备使用它。
本文还介绍如何创建和删除分区以及如何用FAT、FAT32或NTFS文件系统格式化卷。
基本磁盘和卷基本磁盘存储支持面向分区的磁盘。
基本磁盘是包含主要磁盘分区、扩展磁盘分区或逻辑驱动器的物理磁盘。
基本磁盘上的分区和逻辑驱动器也称作基本卷。
最多可创建四个主要磁盘分区,或者三个主要磁盘分区和一个包含逻辑驱动器的扩展磁盘分区。
如果您在同一台计算机上运行Windows XP Professional和以下一个或多个操作系统,则必须使用基本卷,因为这些操作系统不能访问存储在动态卷上的数据:1.Windows XP Home Edition2.Microsoft Windows NT 4.0 或更低版本3.Microsoft Windows Millennium Edition (Me)4.Microsoft Windows 985.Microsoft Windows 956.MS-DOS使用磁盘管理要启动“磁盘管理”,请按照下列步骤操作:1.以管理员或Administrators组成员的身份登录。
2.单击开始,单击运行,键入compmgmt.msc,然后单击确定。
3.在控制台树中,单击磁盘管理。
出现“磁盘管理”窗口。
磁盘和卷显示在图形视图和列表视图中。
要自定义如何在该窗口的顶端窗格和底端窗格中查看磁盘和卷,请指向查看菜单上的顶端或底端,然后单击要使用的视图。
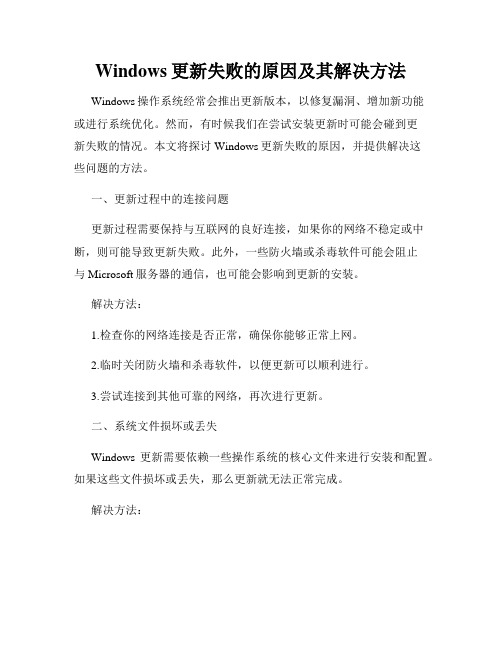
Windows更新失败的原因及其解决方法

Windows更新失败的原因及其解决方法Windows操作系统经常会推出更新版本,以修复漏洞、增加新功能或进行系统优化。
然而,有时候我们在尝试安装更新时可能会碰到更新失败的情况。
本文将探讨Windows更新失败的原因,并提供解决这些问题的方法。
一、更新过程中的连接问题更新过程需要保持与互联网的良好连接,如果你的网络不稳定或中断,则可能导致更新失败。
此外,一些防火墙或杀毒软件可能会阻止与Microsoft服务器的通信,也可能会影响到更新的安装。
解决方法:1.检查你的网络连接是否正常,确保你能够正常上网。
2.临时关闭防火墙和杀毒软件,以便更新可以顺利进行。
3.尝试连接到其他可靠的网络,再次进行更新。
二、系统文件损坏或丢失Windows更新需要依赖一些操作系统的核心文件来进行安装和配置。
如果这些文件损坏或丢失,那么更新就无法正常完成。
解决方法:1.运行系统文件检查工具来修复受损的系统文件。
在命令提示符下(以管理员身份运行),输入“sfc /scannow”命令并按下回车键。
系统将检测并修复受损的系统文件。
2.使用DISM工具来修复映像文件。
在命令提示符下(以管理员身份运行),输入“DISM /Online /Cleanup-Image /RestoreHealth”命令并按下回车键。
三、硬件兼容性问题有时候,更新失败是因为你的计算机硬件与更新版本不兼容。
这可能是因为驱动程序不兼容或设备不满足更新的最低要求。
解决方法:1.检查计算机的硬件规格与更新版本的要求是否一致。
如果不满足最低要求,你需要升级硬件以支持更新。
2.访问计算机制造商的官方网站,下载并安装与更新版本兼容的驱动程序。
四、磁盘空间不足系统更新通常需要足够的磁盘空间来存储和安装更新文件。
如果你的磁盘空间不足,更新将无法完成。
解决方法:1.清理磁盘上的临时文件和垃圾文件,以释放更多的磁盘空间。
你可以使用Windows自带的磁盘清理工具或第三方软件进行清理。
解决电脑硬盘分区异常问题的技巧

解决电脑硬盘分区异常问题的技巧电脑硬盘分区异常问题的技巧随着科技的不断进步,电脑已经成为我们日常生活中不可或缺的一部分。
然而,使用电脑也不可避免地会遇到各种问题,其中之一就是硬盘分区异常。
当我们遇到这样的问题时,应该如何解决呢?本文将分享一些解决电脑硬盘分区异常问题的技巧。
首先,我们需要了解硬盘分区异常的常见原因。
硬盘分区异常可能是由于硬件故障、软件错误或操作失误引起的。
硬件故障包括硬盘损坏、电源故障等,而软件错误则可能是由于系统错误或病毒感染等原因引起的。
操作失误可能包括误删除分区、误格式化分区等。
了解问题的根源有助于我们更好地解决它。
其次,当我们遇到硬盘分区异常问题时,可以尝试使用一些常见的解决方法。
首先,我们可以尝试使用Windows自带的磁盘管理工具来修复分区异常。
打开“计算机管理”,选择“磁盘管理”,找到有异常的分区,右键点击选择“属性”,然后点击“工具”选项卡,选择“错误检查”来修复分区。
这个方法适用于一些简单的分区异常问题。
如果使用Windows自带的工具无法解决问题,我们可以尝试使用一些第三方的分区修复工具。
市面上有很多这样的工具可供选择,如MiniTool Partition Wizard、EaseUS Partition Master等。
这些工具通常提供更多的功能和选项,可以更好地帮助我们解决分区异常问题。
但是,在使用这些工具时,我们需要小心操作,避免误操作导致更严重的问题。
另外,我们还可以尝试使用一些数据恢复工具来解决硬盘分区异常问题。
当分区异常导致数据丢失时,这些工具可以帮助我们恢复被删除或格式化的数据。
市面上有一些知名的数据恢复软件,如Recuva、Wondershare Data Recovery等。
这些软件可以扫描硬盘,找回被删除或格式化的文件。
但是,需要注意的是,数据恢复并不总是成功的,尤其是在分区异常问题比较严重的情况下。
除了上述方法,我们还可以尝试使用一些命令行工具来解决硬盘分区异常问题。
如何使用“磁盘管理”配置基本磁盘

如何使用“磁盘管理”配置基本磁盘重要提示:若磁盘上已储存数据或安装软件请您慎重进行磁盘管理操作。
一些操作可能导致程序无法运行或数据丢失,如果您一定要进行这些操作,请在对磁盘或卷进行任何更改之前完全备份磁盘内容。
本页1.概要2.基本磁盘和卷3.使用磁盘管理4.如何创建新分区或逻辑驱动器5.如何格式化基本卷6.如何查看基本卷的属性7.如何删除分区或逻辑驱动器8.疑难解答9.参考概要本文分步介绍如何使用 Windows XP 的“磁盘管理”单元来配置基本磁盘并准备使用它。
本文还介绍如何创建和删除分区以及如何用FAT、FAT32或NTFS文件系统格式化卷。
基本磁盘和卷基本磁盘存储支持面向分区的磁盘。
基本磁盘是包含主要磁盘分区、扩展磁盘分区或逻辑驱动器的物理磁盘。
基本磁盘上的分区和逻辑驱动器也称作基本卷。
最多可创建四个主要磁盘分区,或者三个主要磁盘分区和一个包含逻辑驱动器的扩展磁盘分区。
如果您在同一台计算机上运行Windows XP Professional和以下一个或多个操作系统,则必须使用基本卷,因为这些操作系统不能访问存储在动态卷上的数据:1.Windows XP Home Edition2.Microsoft Windows NT 4.0 或更低版本3.Microsoft Windows Millennium Edition (Me)4.Microsoft Windows 985.Microsoft Windows 956.MS-DOS使用磁盘管理要启动“磁盘管理”,请按照下列步骤操作:1.以管理员或Administrators组成员的身份登录。
2.单击开始,单击运行,键入compmgmt.msc,然后单击确定。
3.在控制台树中,单击磁盘管理。
出现“磁盘管理”窗口。
磁盘和卷显示在图形视图和列表视图中。
要自定义如何在该窗口的顶端窗格和底端窗格中查看磁盘和卷,请指向查看菜单上的顶端或底端,然后单击要使用的视图。
关于磁盘管理器的一些常见问题

关于磁盘管理器的一些常见问题作者:波哥来源:《电脑爱好者》2020年第21期若遇到磁盘管理器无法打开的情况,可先按下键盘Win+R组合键打开命令“运行”框,输入GPEDIT.MSC并回车,启动组策略编辑器(图1)。
在本地组策略编辑器窗口中,依次点击并展开到“本地计算机策略→用户配置→ 管理模板→Windows组件→Microsoft管理控制台→受限的/许可的管理单元→磁盘管理”(图2)。
接下来,双击“磁盘管理”项,在随后出现的磁盘管理配置窗口中,选择“禁用”或“未配置”选项并确定即可(图3)。
对于家庭版用户来说,可通过编辑注册表来解决。
打开注册表编辑器,依次定位到“HKEY_LOCAL_MACHINE\SYSTEM\CurrentControlSet\Services\DmEnrollmentSvc\Parameters\ServiceDll”,將ServiceDll的键值数据修改为“%systemroot%\system32\Windows.Intern al.Management.dll”,点击“确定”后重启Windows即可(图4)。
在打开磁盘管理器时,如果Windows提示磁盘管理控制台未能连接到远程计算机,这时可先在任务栏上搜索“服务”,打开“服务”管理窗口,然后找到“DCOMServerProcessLauncher”服务(图5)。
接下来,双击该服务后,将“启动类型”更改为“自动”,最后点击“确定”即可(图6)。
如果在Windows 10中使用虚拟磁盘时,系统提示无法启动虚拟磁盘管理服务,同上进入“服务”窗口,找到Vir tual Disk这一项,然后双击该项服务,并将其属性中的“启动类型”改为“手动”即可(图7)。
如果在执行磁盘管理的过程中,遇到“逻辑磁盘管理服务已停用”或“无法连接到逻辑磁盘管理器服务”的错误提示,也是在“服务”窗口中,找到“Logic al DiskManager”和“Logical Disk ManagerAdministrative Ser vice”两项服务,双击检查其属性,看是否被禁用,若被禁用,将其启用,设为“手动”或“自动”即可。
Win10提示无法完成更新正在撤销更改怎么解决

Win10提示无法完成更新正在撤销更改怎么解决有时由于某些故障,系统会提示“window10无法更新,正在撤销”,甚至重启了还是这样,这该怎么办呢?下面店铺就向大家介绍一下windows10系统无法完成更新正在撤销更改的解决方法,欢迎大家参考和学习。
Win10系统提示“无法完成更新正在撤销更改”怎么办解决办法1、按“Windows+X”打开“命令提示符(管理员)”。
2、输入“net stop wuauserv”回车(我们先把更新服务停止)。
3、输入”%windir%\SoftwareDistribution“回车(删除Download和DataStore文件夹中的所有文件)。
4、最后输入“net start wuauserv”回车(重新开启系统更新服务)。
完成以上的步骤之后,我们就可以在“Windows Update”中再次尝试检查更新即可。
检查方法1、按“Win+R”组合键打开运行,输入“services.msc”,点击确定(如果弹出用户账户控制窗口,我们点击“继续”)。
2、双击打开“Background Intelligent Transfer Services”服务。
3、在选项卡点击“常规”,要保证“启动类型”是“自动”或者“手动”。
然后点击“服务状态”“启用”按钮。
4. 重复步骤3分别对“Windows Installer”,“Cryptographic Services”,“software licensing service” 以及“Windows Update”这四项服务进行检查。
以上就是windows10系统无法完成更新正在撤销更改的解决方法介绍了。
遇到同样问题的用户,可以尝试一下这个方法,如果不行,可以留言,小编会继续寻找其他的解决办法。
相关阅读:关机时提示正在更新请不要关闭电脑解决方法1、点击开始菜单,然后点击“控制面板”;2、在控制面板“查看方式”中选择“类别”,然后点击“系统和安全”;3、在“系统和安全”界面,点击“Windows Update” ;4、然后点击左侧栏上的“更改设置”;5、在“Windows Update”的设置界面中,在“重要更新”下拉菜单中,选择“从不检查更新(不推荐)”,然后点击确定即可。
D盘消失磁盘管理控制台视图不是最...

D盘消失磁盘管理控制台视图不是最新状态解决办法(The D disk disappears. The disk management console view is not the lateststate solution)D disk lost disk management console view is the latest state of solution 2010-09-09 19:17 symptoms: D disappeared, although can be displayed in the disk management, but did not drive.The reason: I was not compatible with windows7 because of the pqmagic partition software. When installing, the system reports wrong and then turns off the clock. Start again, D disappeared.Terms of settlement:If you have a disk management software that can change partition properties. Then replace the lost disk with the master and subordinate attributes!No? Let me recommend one. First of all, you need to install the acornis disk director10 software,Download address/AcronisDiskDirector10.rar.It's better to use English original. After downloading, there is a registration machine in the compressed package. When you install it, what kind of registration code is required?,Register this version (~~director10) with the registration machine. (use it and uninstall it. Please support genuine.After successful installation, open the software, select the missing disk (here is d), left column advanced (Advanced) column,It has a convert option, click on, which is used to change the file format of the D disk and the master partition attributes,Our main purpose is to change the host and server attributes. If the original D disk (i.e. the missing letter (primary) is the main partition), then changed to logical (logical partitions);If it turns out to be logical (logical), change to primary (primary partition).Note: if the left column; no [advanced] (Senior) column, then select the menu bar in view->Manual ModeThen mark a flag on the top left corner of commit, which means "change.". In less than a minute, the conversion succeeded. Quit software without restarting,Into my computer, and finally excited shouting, "data preservation!"!!" (you might want to change the drive letter in the disk management, because the drive number is not available after the disk is found and I can't see it on my computer)The Vista or Win7 part of the disk cannot display a problem resolution (the disk management console is not up to date)Causes: using PQMagic, it is said that a key to restore the old version of the software involved in the partition, or first install XP, after loading Win7, may cause problems.I have a Western Digital hard drive 160G, four main partition, the first partition to install Win7, the last partition XP,Only the first partition is active partition, and the Win7 boot is used to refer to the list selection system. The trick is to use the disk PE PQMagic, originally wanted to initialize a new hard disk, in Win7, always show that the device is not ready, and finally completed under XP, the current cause is unknown.Back to the topic, the partition table somewhere error when the PQMagic starts, I did not pay attention to what is the point of the disk repair, then check that PQMagic is indeed the old software for Vista and Win7 partition table,The sigh~ is outside the disk after the restart Win7 and Win7 kernel PE were unable to recognize C, XP and XP PE in the core is no problem, DiskGenius can recognize,However, there are some problems with re scanning the partition table, and only two system partitions can be identified. The middle section shows no formatting. The other two partitioning software, PQMagic, and the Paragon Partition Manager seem to display errors and can not recognize the partitions at all.Fortunately, the data can be copied back, so there is still the mood to consider the possibility of lossless recovery.Win7 showed no symptoms, explorer, computer management disk management shows all partitions without the letter, click Assign a drive letter or attribute operation error: "operation cannot be completed because the disk management console is not the latest status,Please refresh this view with refresh tasks. If the problem is still in place, close the disk management console, and then restart disk management or restart the computer." Of course, restarting is useless.Say the solution of the problem, thanks to this Vista and Win7 under the partition software Acronis Disk Director Suite (click on special download), there are finished Chinese version. When loading, prompt second partitions to have the mistake, does not know is my hard disk's question, or this disaster causes,But no way, have to continue to install, had to ignore. But after the loading distribution letter, can be carried out smoothly, but don't get too happy, there is no effect... So small disappointment, there is no hurry to use it,But in the disk management of C in the compressed volume, the C changed a bit small, as part of more disk compression system will automatically in the D disk, and then restart the computer, C and D are normal,This would also modeled on D disk compression, compression, that become a part of the unallocated space and was not included in the E disk, then turn to the Acronis Disk Director Suite,E changed the size of the disc will be incorporated into the unallocated space, E disk, OK disk, the last one is simple,In the software and continue to tweak the size of Linpan, be accomplished. As it turns out, the three size estimates can be resolved once in a Acronis Disk Director Suite.To sum up, in fact, compatible with Vista and Win7 software to change the partition size to lossless re written Win7 recognize the partition table, it is said that in the Acronis Disk Director Suite, logic partition can also convert the primary partition in this way,However, I don't want to change the main partition into logical partitions, so I didn't try, but this should be a little simpler than resizing.Note: This article reproduced to/hailiannanhai/article/details/6283185 is not my original, just minor modifications, just to share with the vast number of users, in case of such a situation。
遇见操作无法完成,因为磁盘管理控制台视图不是最新状态咋解决?

遇见操作无法完成,因为磁盘管理控制台视图不是最新状态咋解
决?
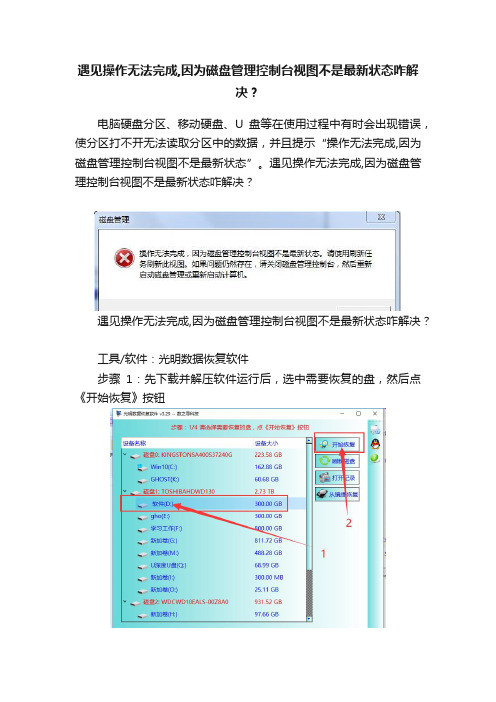
电脑硬盘分区、移动硬盘、U盘等在使用过程中有时会出现错误,使分区打不开无法读取分区中的数据,并且提示“操作无法完成,因为磁盘管理控制台视图不是最新状态”。
遇见操作无法完成,因为磁盘管理控制台视图不是最新状态咋解决?
遇见操作无法完成,因为磁盘管理控制台视图不是最新状态咋解决?
工具/软件:光明数据恢复软件
步骤1:先下载并解压软件运行后,选中需要恢复的盘,然后点《开始恢复》按钮
步骤2:程序找出文件后,会放到与要恢复盘卷标名相同的目录中
遇见操作无法完成,因为磁盘管理控制台视图不是最新状态咋解决?
步骤3:将要恢复的资料打钩,接着点右上角的保存,《另存为》按钮,将打钩的文件COPY出来。
步骤4:等程序将资料拷贝完成就可以了。
遇见操作无法完成,因为磁盘管理控制台视图不是最新状态咋解决?
注意事项1:想要恢复D盘操作无法完成,因为磁盘管理控制台视图不是最新状态需要注意,一定要先寻回资料再格式化。
注意事项2:操作无法完成,因为磁盘管理控制台视图不是最新状态找回出来的资料需要暂时保存到其它盘里。
- 1、下载文档前请自行甄别文档内容的完整性,平台不提供额外的编辑、内容补充、找答案等附加服务。
- 2、"仅部分预览"的文档,不可在线预览部分如存在完整性等问题,可反馈申请退款(可完整预览的文档不适用该条件!)。
- 3、如文档侵犯您的权益,请联系客服反馈,我们会尽快为您处理(人工客服工作时间:9:00-18:30)。
操作无法完成,因为磁盘管理控制台视图不是最新状态
电脑报错,操作无法完成,因为磁盘管理控制台视图不是最新状态。
请使用刷新任务刷新此视图。
如果问题仍然存在,请关闭磁盘管理控制台,然后重新启动磁盘管理或重新启动计算机
出错提示:操作无法完成,因为磁盘管理控制台视图不是最新状态。
请使用刷新任务刷新此视图。
如果问题仍然存在,请关闭磁盘管理控制台,然后重新启动磁盘管理或重新启动计算机。
方法一:
1、这个出错提示只是说明了磁盘管理、移动盘等部位有异常状态。
所以,同样的提示,不一定是同样的出错原因导致的,故可以尝试不同的方法来解决问题。
右键点击问题磁盘→属性。
2、磁盘属性→硬件→点选问题磁盘→属性
3、策略→去掉启用磁盘上的写入缓存(看清楚这样做会导致的问题,如果在意,等到问题解决,再选中即可)前的选中对勾→确定
方法二:
1、使用Win+R调出运行,在其中输入:devmgmt.msc 按回车键(Enter)打开设备管理器。
2、找到有问题的磁盘驱动器→卸载
3、再点击工具栏上的扫描检测硬件改动图标(一个电脑上有一个放大镜),一阵扫描就会找回驱动器,此时也就会还原默认设置。
再去打开驱动器查看就正常了。
方法三:
1、处理问题一般总是采取先易后难的措施,如果以上两个方法不能解决问题,或者出问题的是硬盘某分区,不妨使用这个方法,为的是重建分区表,还原默认值。
2、右键点击计算机图标(Windows XP 操作系统是我的电脑)→管理→磁盘管理→右键点击任意分区→扩展卷(或者压缩卷)→变动之后,再将空间返回,主意不是要更改空间,而是利用这个操作还原分区表,从而达到还原正确的默认值。
3、操作完成,需要重启电脑予以确认。
一般这样一操作都会解决这个问题的。
