IBM+B24光纤交换机设置+lic激活
光纤交换机配置-命令模式

Zoning With CLI CommandsDell™ PowerVault™ 5x F Switches Zoning GuideCreating and Modifying Zone AliasesCreating and Modifying ZonesCreating and Modifying Zone ConfigurationsManaging a Zone ConfigurationYou can zone Dell™ PowerVault™ switches using Command Line Interface (CLI)commands by creating and managing the three principal zoning objecttypes—alias, zone, and configuration. You issue the commands during a Telnetsession with the switch(es). (Refer to your PowerVault switch Installation andTroubleshooting Guide for details on creating a Telnet session with the switch.)NOTE: Before issuing any zoning commands, use the switchShow command on each switch i are connected. All ports used for interswitch links (ISL) display the neighboring switches' WWN Follow this general sequence of steps when creating a new zone configuration.NOTE: See "Zoning Roadmap" in "Introduction" for additional guidelines on creating or managin1.Define the core aliases.2.Define all zones.3.Add aliases and members to the zones.4.Define the zone configuration.5.Add zones to the configuration.6.Enable the configuration.7.Test the configuration.8.Save the configuration.Including Multiple Items in a CLI CommandTo include multiple items in a CLI command, separate the items with semicolons,within a single pair of quotes:command "name_of_zoning_object", "member; member; member"For example, zoneAdd "Red_zone", "1,10;1,12" adds domain 1, port 10 anddomain 1, port 12 to zone "Red_zone".Creating and Modifying Zone AliasesWhile aliases are not required in a zone configuration, they can make it easier to manage complex configurations in your zone. After you create aliases, you can then move to the next section and create and configure zones.aliCreateThe following example shows three instances of the aliCreate command, which creates a new zone alias.aliDeleteThe following example shows the aliDelete command, which deletes an existing zone alias.aliAddThe following example shows three instances of the aliAdd command, which adds one or more new alias members to an existing zone alias and is a list of one or more physical-fabric port numbers (such as 1,2) or WWNs (such as10:00:00:60:69:00:00:8a) separated by semicolons.admin> aliAdd "array1", "21:00:00:20:37:0c:72:51;21:00:00:20:37:0c:71:0a"admin> aliAdd "array2", "21:00:00:20:37:0c:9c:6b;21:00:00:20:37:0c:66:3a"admin> aliAdd "loop1", "21:00:00:20:37:0c:6a:40;21:00:00:20:37:0c:59:7e"White spaces are ignored. The alias members list cannot contain references to any other zone aliases.aliRemoveThe following example shows the aliRemove command, which removes one or more members from an existing zone alias.The members to be removed are found by an exact string match. When removing multiple members, sequence is important. If this command results in all members being removed, the system deletes the zone alias.aliShowThe following example shows the aliShow command, which displays thespecified zone alias definition if a parameter is given (otherwise all zoneconfiguration information is displayed).Creating and Modifying ZonesYou can use the following CLI commands to create or manipulate the zones and their members with a fabric. These members may consist of fabric ports, WWNs, or aliases.zoneCreateUse this command to create a zone with one or more members. The following example shows thre instances of the zoneCreate command.zoneDeleteThe following example shows the zoneDelete command, which deletes anexisting zone.zoneAddThe following example shows the zoneAdd command, which adds one or morenew members to an existing zone.zoneRemoveThe following example shows the zoneRemove command, which removes one ormore members from an existing zone.The members to be removed are found by an exact string match. Therefore, whenremoving multiple members, sequence is important. If this command removes allmembers, the system deletes the zone.zoneShowThe following example shows the zoneShow command, which displays thespecified zone definition if a parameter is given (otherwise all zone configurationinformation is displayed).Creating and Modifying Zone ConfigurationsAfter creating zones, you can create or remove zone configurations and their members using CLI commands.cfgCreateThe following example shows the cfgCreate command, which creates a new zone configuration.cfgDeleteThe following example shows the cfgDelete command, which deletes an existingzone configuration.cfgAddThe following example shows the cfgAdd command, which adds one or more new zones to an existing zone configuration.cfgRemoveThe following example shows the cfgRemove command, which removes one or more zones from an existing zone configuration.The zones to be removed are found by an exact string match. When removing multiple members, sequence is important. If this command removes all members, the system deletes the zone configuration.cfgShowThe following example shows the cfgShow command, which displays the specified zone configuration definition if a parameter is given (otherwise, all zone configuration information is displayed)Adding a New Device to a Configuration1.Create an alias for the device by typingaliCreate "alias_name", WWN (or port number)2.Add the alias to the appropriate zone(s) by typingzoneAdd "zone_name", "alias_name"3.Save the configuration by typingcfgSave "config_name"4.Enable the configuration by typingcfgEnable "config_name"Removing a Device From a Zone Configuration1.Remove the device from the zone:a.If there is only one device in the alias, typezoneRemove "zone_name", "alias_name"a.If you are removing a single device from an alias that includesseveral devices, typezoneRemove "zone_name", "alias_name", WWN (or port number)a.To remove multiple devices, type aliRemove "alias_name", followedby the WWN (or port number) of each device you are removing.2.Save the new configuration by typingcfgSave "config_name"3.Enable the configuration by typingcfgEnable "config_name"Replacing a Device in a Zone Configuration1.Remove the existing device from the zone:a.If you are replacing a single device in an alias that includes severaldevices, remove the device you are replacing by typingzoneRemove "zone_name", "alias_name", WWN (or port number)a.If the device you wish to replace is the only device in the alias, typezoneRemove "zone_name", "alias_name"a.To replace multiple devices, type aliRemove "alias_name", followedby the WWN (or port number) of each device you wish to replace.2.If desired, create an alias for the replacement device by typingaliCreate "alias_name", WWN (or port number)3.Add the device or alias to the appropriate zone(s) by typingzoneAdd "zone_name", "zone member name"orzoneAdd "zone_name", "alias_name"4.Save the configuration by typingcfgSave "config_name"5.Enable the configuration by typingcfgEnable "config_name"Managing a Zone ConfigurationAfter creating the zone configuration, use the following commands to enable, save,disable, or clear the zone configuration.cfgSaveThe following example shows the cfgSave command, which writes a copy of thedefined configuration and the name of the effective configuration to flash memoryin all fabric switches.The saved configuration is automatically reloaded by the switch at system startup.If a configuration was in effect when it was saved, the same configuration isreinstated with an automatic cfgEnable command.NOTE: Dell recommends saving after you enable and test a configuration. Any unsaved configu cfgEnableThe following example shows the cfgEnable command, which enables aspecified configuration.cfgDisableThe following example shows the cfgDisable command, which disables thecurrent zone configuration.The fabric returns to a nonzoned mode, in which all devices see each other.cfgClearThe following example shows the cfgClear command, which you should use withcaution.NOTICE: When executed on any switch in the fabric, the cfgClearcommand removes all alias, zone, and configuration information from allswitches in the fabric. Dell recommends clearing any switch beforeconnecting it to a zoned fabric.When the cfgClear command is used on an enabled zone configuration, it is firstdisabled. The system then deletes all defined zone objects. However, the savedconfiguration remains in flash memory. To clear the configuration from memory,type cfgSave after cfgClear and press <Enter>.。
博科交换机授权license激活新版
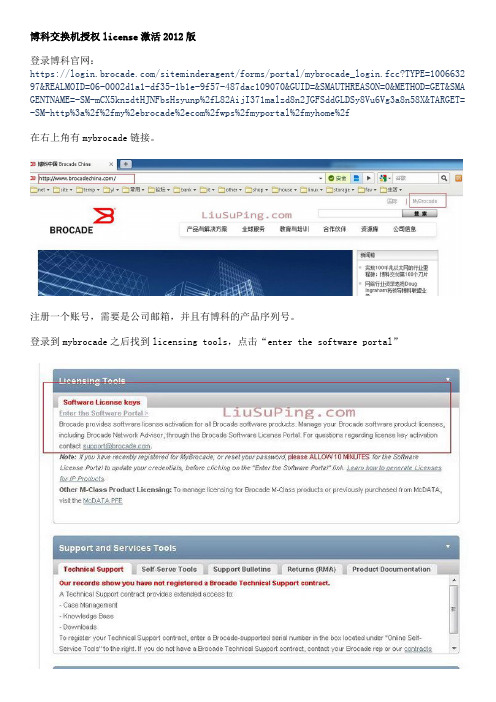
博科交换机授权license激活2012版登录博科官网:https:///siteminderagent/forms/portal/mybrocade_login.fcc?TYPE=1006632 97&REALMOID=06-0002d1a1-df35-1b1e-9f57-487dac109070&GUID=&SMAUTHREASON=0&METHOD=GET&SMA GENTNAME=-SM-mCX5knzdtHJNFbsHsyunp%2fL82AijI371malzd8n2JGFSddGLDSy8Vu6Vg3a8n58X&TARGET= -SM-http%3a%2f%2fmy%2ebrocade%2ecom%2fwps%2fmyportal%2fmyhome%2f在右上角有mybrocade链接。
注册一个账号,需要是公司邮箱,并且有博科的产品序列号。
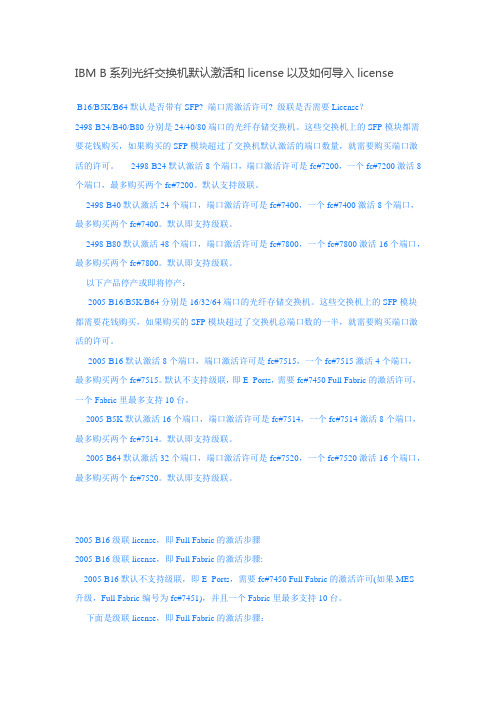
登录到mybrocade之后找到licensing tools,点击“enter the software portal”这里有多种博科产品的license激活选项。
博科光纤交换机的激活是在“Brocade FOS”在必填的选项中填入相关信息。
Email地址用来接收生成license信息ID Type可以输入产品的序列号“Serial #”,也可以输入LID就是机器的WWN号,另外还可以输入主板的序列号。
Transaction key是购买的博科激活license输入正确信息后点击“add”,可以看到description里显示激活license的类型,这里是EF的license点击Generate生成激活码。
点击license可以看到生成好的激活码。
同时在你输入的邮箱中也会受到相应的注册信息。
博科交换机升级LICENSE激活步骤

最新的Brocade交换机使用原来机器带的j2re-1。
4/1。
5,会导致无法读取WEB TOOLS界面,必须删除原来的JA V A,登陆10.77.77.77界面安装随机的JA V A版本。
第一步:获取机器去信息
登陆10.77.77.77界面
用户名admin 密码password
进入以下界面
选择左侧的NAME下拉菜单为WWN
记录下WWN号。
第二步:取得激活码
登陆https:///slkInternet/brocade地址
输入用户信息,这里只输入EMAIL即可。
下拉页面选择选择激活类型
点击“NEXT”
ID Type选择WWN,Unique ID处输入机器的WWN,Transaction key输入激活KEY,
确认填写信息
系统确认KEY信息
无误后点击“Generate”生成激活码
打开机器的WEB TOOLS界面,点击左侧SWITCH ADMIN选项进入管理截面
选择LICENSE
选择ADD
把刚才生成的KEY文件添加进去
这样LICENSE界面就会显示刚才添加的新的KEY
重新启动交换机,激活完成。
IBM B系列光纤交换机默认激活和license以及如何导入license
IBM B系列光纤交换机默认激活和license以及如何导入licenseB16/B5K/B64默认是否带有SFP? 端口需激活许可? 级联是否需要License?2498-B24/B40/B80分别是24/40/80端口的光纤存储交换机。
这些交换机上的SFP模块都需要花钱购买,如果购买的SFP模块超过了交换机默认激活的端口数量,就需要购买端口激活的许可。
2498-B24默认激活8个端口,端口激活许可是fc#7200,一个fc#7200激活8个端口,最多购买两个fc#7200。
默认支持级联。
2498-B40默认激活24个端口,端口激活许可是fc#7400,一个fc#7400激活8个端口,最多购买两个fc#7400。
默认即支持级联。
2498-B80默认激活48个端口,端口激活许可是fc#7800,一个fc#7800激活16个端口,最多购买两个fc#7800。
默认即支持级联。
以下产品停产或即将停产:2005-B16/B5K/B64分别是16/32/64端口的光纤存储交换机。
这些交换机上的SFP模块都需要花钱购买,如果购买的SFP模块超过了交换机总端口数的一半,就需要购买端口激活的许可。
2005-B16默认激活8个端口,端口激活许可是fc#7515,一个fc#7515激活4个端口,最多购买两个fc#7515。
默认不支持级联,即E_Ports,需要fc#7450 Full Fabric的激活许可,一个Fabric里最多支持10台。
2005-B5K默认激活16个端口,端口激活许可是fc#7514,一个fc#7514激活8个端口,最多购买两个fc#7514。
默认即支持级联。
2005-B64默认激活32个端口,端口激活许可是fc#7520,一个fc#7520激活16个端口,最多购买两个fc#7520。
默认即支持级联。
2005-B16级联license,即Full Fabric的激活步骤2005-B16级联license,即Full Fabric的激活步骤:2005-B16默认不支持级联,即E_Ports,需要fc#7450 Full Fabric的激活许可(如果MES升级,Full Fabric编号为fc#7451),并且一个Fabric里最多支持10台。
242 License故障处理

请重新申请或者购买新的 License文件。 请重新申请正确ESN和版 本号的License文件。
请重新申请一份在有效期 内的License文件。
文档版本 21 (2020-05-15)
版权所有 © 华为技术有限公司
36
S12700, S12700E 系列敏捷交换机 License 使用指南
GTL/2/ DEFAULTVALUE:OID [OID] Current license value is default, the reason is [reason].
License文件验证失败。
GTL/2/ RESOURCE_USEDUP:OID [OID] Resource item [item-name] is nearly used up.
6 License 故障处理
License告警信息 GTL/2/ GTL_ESN_MISMATCH:OI D [OID] The ESN of slot [slot] mismatched with the license file.
GTL/2/ GTL_ITEM_INACTIVE:OID [OID] Item [item-name] is inactive.
S12700, S12700E 系列敏捷交换机 License 使用指南
6 License 故障处理
6 License 故障处理
6.1 License激活失败 6.2 设备产生License告警
6.1 License 激活失败
当在设备上执行命令license active file-name激活License文件,设备提示出错时,可 以参考表6-1进行处理。
如何激活Brocade Switch Module的License
如何激活Brocade Switch Module的License适用机型:所有BladeCenter; 所有BladeCenter CP20; 所有BladeCenter H; 所有BladeCenter HC10; 所有BladeCenter HS20; 所有BladeCenter HS21; 所有BladeCenter HS21 XM; 所有BladeCenter HS40; 所有BladeCenter HT; 所有BladeCenter JS20; 所有BladeCenter JS21; 所有BladeCenter LS20; 所有BladeCenter LS21; 所有BladeCenter LS41; 所有BladeCenter S; 所有BladeCenter T标题:如何激活Brocade Switch Module的LicenseBrocade SAN交换机产品通常提供几个可选配的license选件,以提高交换机性能、安全性、管理性、可用性。
用于IBM BladeCenter 上的Brocade 10口4Gb SAN交换模块(P/N:2R1813) 标配如下license Advanced Web Tools (Web)Advanced Zoning (Zoning)Full Fabric License (Fabric)另外10个unlicensed 端口可以通过购买10-Port (Ports-on-Demand) Upgrade license (option 32R1822)进行激活。
用于IBM BladeCenter 上的Brocade 20口4Gb SAN交换模块(P/N:2R1812) 标配如下license Advanced Web Tools (Web)Advanced Zoning (Zoning)Full Fabric License (Fabric)Full Ports on Demand license (10 port upgrade)如下software features 为可选件:Brocade Fabric Watch for IBM BladeCenter (option 32R1855)Brocade ISL Trunking for IBM BladeCenter (option 26K5607)Brocade Advanced Performance Monitoring for IBM BladeCenter (option 26K5612)Brocade Performance Bundle for IBM BladeCenter (includes ISL Trunking and Advanced Performance Monitoring) (option 26K5605)Brocade Extended Fabrics for IBM BladeCenter (option 26K5613)Brocade Advanced Security (Secure OS) for IBM BladeCenter (option 26K5617)Brocade Fabric Manager V5.x for IBM BladeCenter (stand-alone application, 必须单独购买)Brocade Fabric Watch for IBM BladeCenter (option 32R1855). 如图Figure 5-12为Option License Paper-Pak示例:按照如下步骤进行配置1. 从Brocade SAN switch module查看并记录下LicenseID (与World Wide Name WWN一样) 。
光纤交换机简单配置手册.docx
一、光纤交换机的配置备注:默认管理IP:10.77.77.77,默认帐号:admin,默认密码:password第一种:1.1双击桌面图标,。
弹出窗口输入IP、用户名,点击connect,接着输入密码就可以配置。
第二种:IE浏览器http://IP地址,弹出界面输入用户名和密码,就可以图形化界面配置。
1.2、查看交换机信息sw300:admin> switchshowswitchName: sw300switchType: 71.2switchState: OnlineswitchMode: NativeswitchRole: PrincipalswitchDomain: 1switchId: fffc01switchWwn: 10:00:50:eb:1a:06:53:44zoning: OFFswitchBeacon: OFFIndex Port Address Media Speed State Proto==============================================0 0 010000 id N8 Online FC F-Port 21:12:00:02:ac:00:67:451 1 010100 id N8 Online FC F-Port 10:00:00:90:fa:46:c4:e92 2 010200 -- N8 No_Module FC3 3 010300 -- N8 No_Module FC4 4 010400 id N8 Online FC F-Port 20:12:00:02:ac:00:67:455 5 010500 id N8 No_Light FC6 6 010600 -- N8 No_Module FC7 7 010700 -- N8 No_Module FC8 8 010800 -- N8 No_Module FC (No POD License) Disabled9 9 010900 -- N8 No_Module FC (No POD License) Disabled10 10 010a00 -- N8 No_Module FC (No POD License) Disabled11 11 010b00 -- N8 No_Module FC (No POD License) Disabled12 12 010c00 -- N8 No_Module FC (No POD License) Disabled13 13 010d00 -- N8 No_Module FC (No POD License) Disabled14 14 010e00 -- N8 No_Module FC (No POD License) Disabled15 15 010f00 -- N8 No_Module FC (No POD License) Disabled16 16 011000 -- N8 No_Module FC (No POD License) Disabled17 17 011100 -- N8 No_Module FC (No POD License) Disabled18 18 011200 -- N8 No_Module FC (No POD License) Disabled19 19 011300 -- N8 No_Module FC (No POD License) Disabled20 20 011400 -- N8 No_Module FC (No POD License) Disabled21 21 011500 -- N8 No_Module FC (No POD License) Disabled22 22 011600 -- N8 No_Module FC (No POD License) Disabled23 23 011700 -- N8 No_Module FC (No POD License) Disabled1.3、查看licenseshow信息。
ibm b24 光纤交换机详细参数

产品编号2498-B24基础光纤网络交换机IBM System Storage SAN24B-4 易捷版交换机[带有24个端口,其中8个端口已激活(0 到7)]和Brocade Fabric OS (FOS)6.1.0 或更高版本、硬拷贝安装指南、光盘(包含手册)、维修和包装工具、小型客插拔(SFP)拆卸工具、用于机架安装的110V 电源线、滑轨套件、高级分区、增强的组管理(EGM)(在2498-B24 上为标配,在249824E 上为可选)、EZSwitchSetup 向导、全光纤网络(在2498-B24 上为标配,在249824E 上为可选)、Web 工具光纤通道接口E_Port、F_Port、FL_Port 和M_Port光学收发器可选择8Gbps(支持8、4 和2Gbps 链路速度)和4Gbps(支持4、2 和1Gbps 链路速度)短波和长波SFP风扇和电源双风扇,一个电源热插拔组件SFP 光学收发器非机架支持支持非机架安装;必须订购适用于不同国家/地区的电源线支持的服务器*•IBM Power Systems、IBM System i® 与选定的IBM AS/400® 服务器、IBM System p® 与选定的IBM RS/6000® 服务器•IBM System x、选定的IBM Netfinity® 服务器以及其他基于英特尔® 处理器的服务器•选定的Sun 和HP 服务器支持的操作系统*•Microsoft Windows NT®、Windows 2000、Windows 2003 •Red Hat Linux、Red Hat Linux Advanced Server •SUSE Linux、SUSE Linux Enterprise Server (SLES)•IBM AIX、HACMP™、i5/OS®、OS/400•其他选定的操作系统支持的存储产品*•IBM System Storage DS8000 ®、DS6000™ 和DS4000 存储服务器•IBM TotalStorage Enterprise Storage Server® 系统•IBM TotalStorage FAStT 系列存储服务器•IBM System Storage N 系列NAS 文件管理器和网关•IBM TotalStorage 3580、3588、3590 和3592 磁带机•IBM TotalStorage 3494、3582、3583 和3584 磁带库•IBM TotalStorage 3581 磁带自动加载机•IBM TotalStorage 3584 高可用性机架型号HA1•IBM TotalStorage SAN 卷控制器•其他选定的存储系统支持的光纤通道交换机最新的IBM System Storage 和TotalStorage SAN b 型和m 型交换机、路由器和导向器(必须运行最新固件)光纤线缆需要使用光纤线缆,有各种长度的单模和多模规格可供选择电源线附带用于机架安装的跳线;必须订购用于桌面或独立式安装的适用于不同国家/地区的电源线保修1年;客户更换元件(CRU)服务;提供保修服务升级可选特性8 端口激活、适应性联网、高级性能监控器、Enterprise 软件包**、扩展光纤网络、Fabric Watch、全光纤网络(在2498-B24 上为标配,在249824E 上为可选)、干线激活、SAO 许可物理特性高 4.29cm/1.69in 宽42.88cm/16.88in 深30.6cm/12.07in 重量 4.35 kg/9.3 lb温度工作:0°C 到40°C(32°F 到104°F)非工作:-25°C 至70°C(-13°F 至158°F)湿度工作:40ºC (104ºF)时,10% 到85% 非冷凝非工作:70ºC (158ºF)时,10% 到90% 非冷凝功率85 - 264 V AC(通用),47 - 63 Hz。
- 1、下载文档前请自行甄别文档内容的完整性,平台不提供额外的编辑、内容补充、找答案等附加服务。
- 2、"仅部分预览"的文档,不可在线预览部分如存在完整性等问题,可反馈申请退款(可完整预览的文档不适用该条件!)。
- 3、如文档侵犯您的权益,请联系客服反馈,我们会尽快为您处理(人工客服工作时间:9:00-18:30)。
IBM B24光纤交换机配置Zone+LIC激活
系统要求:使用WEB方式连接,配置机器需要安装有JAVA
光纤交换机默认的IP地址:10.77.77.77
默认的子网掩码:255.255.255.0
1.给配置机器配置一个和光纤交换机相同网段的IP地址.
例如:10.77.77.50/24
2.把网线一端插入光前交换机的网络配置口,
备注:光纤交换机上有2个管理口,1个是用串口方式,这里使用的是IP管理口.
3.使用IE,直接键入:10.77.77.77
输入用户名和密码.
默认用户名:admin
默认密码:password
4.下图为初试界面
5.点击界面左侧的Zone Admin
6.下图为Zone Admin的界面
7先点击红线标出的Zone,然后点击绿线标出New Zone,会出现输入Zone Name 的对话框.
8. 先选择Zone名称,然后把交换机的端口添加进Zone内.
9. 然后创建Zone Congfig组
10. 选择congfig名称,然后把配置好的Zone添加进congfig中
11. 然后Save Config ,然后Enable Config
激活LIC步骤:
1.telnet 10.77.77.77
2.admin /password
3.licenseidshow -----可以看到LICENSE ID
4.记录WWN号,如10:00:XX:XX:XX
5.上网,键入:/storage/key
6.根据表单上的要求填写。
7.
8.按continue 后会产生一个Activation Key,
9.在交换机上键入:licenseAdd +网上生成的Activation Key,
10.licenseidshow 看是否已经激活。