ESS静电拉管喷雾机
喷雾仪的正确使用方法

喷雾仪的正确使用方法喷雾仪广泛应用于药物吸入治疗和空气清洁等领域,使用方法的正确与否直接关系到治疗效果和健康安全。
下面将详细介绍喷雾仪的正确使用方法。
一、喷雾仪准备工作:1. 检查喷雾仪的清洁情况,确认无异味或残留物。
2. 检查喷雾仪是否有损坏或损毁,如有损坏应立即更换或修复。
3. 确认喷雾仪的电池是否有足够电量,或者喷雾仪是否充满了电池。
4. 准备好所需的药物或清洁液体,并保证其使用期限和储存条件符合要求。
二、正确使用喷雾仪的步骤:1. 洗手并做好个人卫生,以避免因细菌感染而导致其他并发症。
2. 将喷雾仪置于平坦的表面上,打开喷雾仪的盖子或拆下雾化器。
3. 按照说明书的要求加入所需的药物或清洁液体,注意药物的剂量和浓度。
4. 关闭盖子或安装雾化器,确保其安全牢固。
5. 打开喷雾仪的电源开关,确认喷雾仪是否正常工作。
6. 将喷雾仪呼吸口罩或嘴嚼装置(按照具体款式而定),正确放置在口鼻上,以确保药物或清洁液体能够进入肺部或口腔。
7. 启动喷雾仪,根据需要调节雾化器的喷雾速度和浓度。
8. 深吸气,将药物或清洁液体吸入肺部,保持正常呼吸状态,呼气时注意放松身体,保持舒适。
9. 使用期限或剂量达到要求后,关闭喷雾仪的电源开关。
10. 拆卸或清洁喷雾仪的雾化器,并进行必要的消毒或清洁。
11. 收起喷雾仪,并存放在干燥、通风、避光的地方,避免阳光直射和潮湿。
三、使用喷雾仪需要注意的事项:1. 根据使用说明选择合适的药物或清洁液体,不得随意更换和混合使用。
2. 严格按照药物的剂量和使用频率使用喷雾仪,不得超过医生或厂家的推荐剂量。
3. 保持呼吸口罩或嘴嚼装置的清洁,避免交叉感染。
4. 避免将喷雾仪的配件和零部件与他人共用,避免交叉感染和传播细菌。
5. 定期检查喷雾仪的工作状态,如发现异常应及时修理或更换。
6. 遵守喷雾仪的使用期限和储存条件,不得使用过期或存放不当的药物。
7. 在使用喷雾仪时保持放松、舒适的状态,避免因吸入过重或过轻而影响治疗效果。
来亨科贸 L-217 型实验室高性能喷雾干燥机 使用说明书

L-217型实验室高性能喷雾干燥机使用说明书北京来亨科贸有限责任公司技术开发中心地址:北京市丰台区丰北路甲45号鼎恒中心6A 邮编:100073 电话:(010)63847795 63843373 63815585传真:(010)63815565E-mail:**********************目录一、产品简介 (2)二、控制部分功能指示图 (4)三、仪器安装图示 (5)四、操作说明 (11)五、故障排除方法 (13)六、技术参数 (14)溶液泵、环风流量曲线图 (15)七、产品保修卡 (16)(-)产品简介L-217型实验室微型喷雾干燥机是根据实验的要求,而特殊设计的适合于实验室操作的微型喷雾干燥机,其干燥温度、空气流量、喷雾浓度及得到的干燥样料结果,都可根据实验的要求而随意设定。
为了方便掌控实验结果,整个喷雾干燥实验过程在可观察的玻璃仪器中进行,可随时观察实验结果以便随时调整实验参数,为喷雾干燥实验创造了方便的条件。
L-217型实验室微型喷雾干燥机,采用二流体喷嘴的雾化方式,适用于溶液、悬浮液、乳浊液、及可以泵送的各种溶液,其最大喷液干燥能力≥1500毫升/小时。
其工作原理如下:喷雾干燥技术是使液态物料经过喷嘴雾化成细微的雾状液滴,以获得大的比表面积,在进入干燥塔内流动的热力场后,雾状液滴立即被干燥并分离为粉料的热力过程。
进料可以是溶液、乳浊液、悬浮液、糊状物、胶状液体等可流动的液体。
喷雾干燥技术是干燥领域发展最快、应用范围最广的一种干燥方式,目前被广泛应用于医药工业、食品工业、化学工业、乳品工业、建材工业、染料工业等。
Lab Spray Dryer L-217实验室微型喷雾干燥机采用二流体喷雾的雾化方法,整个喷雾干燥系统采用优质不锈钢材料精密制造,其烘干分离及收集系统采用优质高硼硅耐热玻璃材料制造,使得喷雾干燥实验在无污染及最稳定的环境下进行。
由于采用了透明的玻璃仪器烘干分离系统,使整个喷雾干燥实验在可直接观察的过程中进行,为科研人员掌控实验进程及实验结果提供了极大的便利。
3WBJ多功能静电喷雾器在张家港市的应用

第 3 6卷第 2期
2 1 年 4月 00
农 业 装 备 技 术
Ag iu t r lE u p n & T c n l g rc l a q i me t u e h ooy
V I6 №. o. 3 2
Ap .2 0 r 01
3 J多功能静 电喷雾器在张家港市 的应用 WB
朱正 阳, 朱云才 , 静 , 乔 缪晓霖 ( 港市 机械 推广站) 张家 农业 技术
目前 ,张家 港市 已基本 实 现水 稻 和三 麦 生产 全
程机 械化 , 质高 效 特色 农业 也 已基 本 成 型 , 是 近 优 但 年来 由于种种 原 因 ,虫 害 的发 生呈 现 种类 多 、数 量
大、 世代多 、 围广 、 害严重等特点 , 范 危 致使农药使用 量大大增加 ,农作物和土地 中农药残留量也大大增 加, 如何解 决 这一 问题 已经 迫在 眉 睫 , 而静 电喷雾 技 术能 较好 的解 决 这一 问题 。利 用静 电喷雾 技术 防治 农作 物病 虫 害 , 现代 植保 施 药 的一项 新技 术 。 技 是 该 术利 用高 压静 电使雾 滴 充 电 ,带 电的 雾滴 在静 电场 作用 下 , 速 、 匀 飞 向并 吸附 在 作 物上 , 少 了雾 快 均 减 滴漂 移 , 提高 了农 药 在作 物 茎 叶正反 面 、 隐蔽部 位 的 沉积 率 , 增加 了药 物 与病 虫 害接 触 的机 会 , 减少 了药 液损 失 , 降低 了对 环境 的 污染 。 因此 ,张家 港市 农业 机 械技 术 推 广站 引进 了苏 州稼 乐植 保 机械 有 限公 司生 产 的稼 乐牌 3 J 功 WB 多 能静 电 喷雾器 , 分别进 行 了大 田和大 棚试验 。 并 3 J多 功能 静 电喷 雾 器是 苏 州 稼 乐 植保 机械 WB 科 技有 限公 司研 发 生 产 的将 先进 的静 电技术 运 用 于 农 作 物 的一种新 颖 喷洒 机 械 。2 0 我市 共推 广该 0 9年 机具 450多 台 。作 为 一 款进 入 国家农 机 械 支 持推 0 广 目录 的机具 , 国家补 贴 的力度 相 当大 。 机具 出 厂 该 价格 为 7 0元 / , 过 省市 补 贴之 后 , 8 台 经 到农 民手里 只要 6 0元 / 台。由于价格 便 宜 , 用效 果好 , 受广 使 深 大农 民 的欢 迎 。 我 市 20 09年 共 推 广 了三 批 3 J多 功 能 静 电 WB 喷雾器 ,第一批推广 的 1 0 0台在使用过程 中出现 0 的故 障较 多 , 大部 分是 机 器漏 水 现象 严重 , 了解 主 经 要是 机器底 部 连 接进 出水 和 静力 线 的 三通管 胶 水 固 定不 牢 , 封性 差 , 有三 通 管容 易 老化 断 裂等 造成 密 还 机器 漏水 。 向厂方 反 映这 些情 况后 , 方对 喷雾 器做 厂 出 了相 应 的改进 , 主要 是三 通 管 的材 料换 了 , 去 了 除 三通管 上 连接静 力 线 的一 端 ,直 接用 一 根橡 胶 管连 接进 出水 口, 力线 直 接 固定 在 电器 上 , 静 大大 改善 了 机器漏 水情 况 ,用 户反 映 改进 后 的机 器 使用 情 况 良 好 , 果 明显 。 效 3 J WB 多功 能静 电喷雾 器既 可 以大量 节省 用 药 , 又能提高杀虫效果 , 是农药喷洒机械的换代产品。 从 喷头喷出带电的农药雾滴对作物有被吸附作用 , 即 对靶性 。因此 ,它 比一 般 喷雾 器有 明显 的抗 风 能力 ( 四级 以上风 力抗 风 性能 将 削弱 ) 对 ,能减 少农 药 在
IGEBA TF-35 蒸汽化学喷雾机操作指南说明书
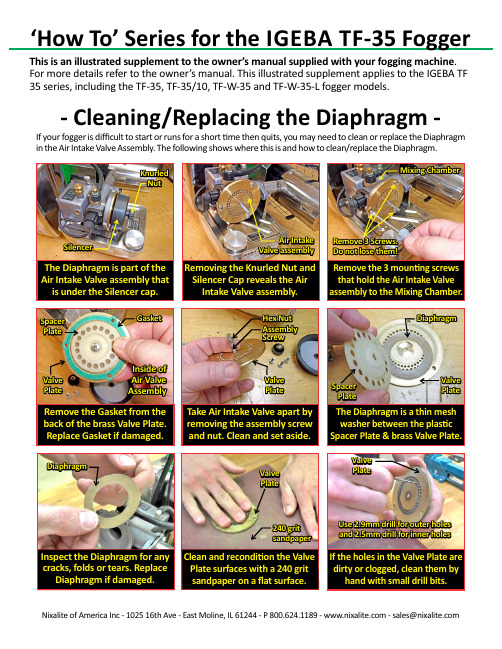
‘How To’Series for the IGEBA TF-35 FoggerThis is an illustrated supplement to the owner’s manual supplied with your fogging machine .For more details refer to the owner’s manual.This illustrated supplement applies to the IGEBA TF 35series,including the TF-35,TF-35/10,TF-W-35and TF-W-35-L fogger models.- Cleaning/Replacing the Diaphragm -Removing the Knurled Nut and Silencer Cap reveals the Air Intake Valve assembly.Remove the 3mounƟng screws that hold the Air Intake Valve assembly to the Mixing Chamber.Nixalite of America Inc -102516th Ave -East Moline,IL 61244-P -******************If your fogger is difficult to start or runs for a short Ɵme then quits,you may need to clean or replace the Diaphragm in the Air Intake Valve Assembly.The following shows where this is and how to clean/replace the Diaphragm.Air Intake Valve assembly Remove 3Screws.Do not lose them!Remove the Gasket from the back of the brass Valve Plate.Replace Gasket if damaged.Take Air Intake Valve apart by removing the assembly screw and nut.Clean and set aside.The Diaphragm is a thin mesh washer between the plasƟc Spacer Plate &brass Valve Plate.Inspect the Diaphragm for any cracks,folds or tears.Replace Diaphragm if damaged.GasketSpacer PlateValve PlateHex Nut Assembly ScrewDiaphragmValve PlateSpacer PlateValve PlateClean and recondiƟon the Valve Plate surfaces with a 240grit sandpaper on a flat surface.If the holes in the Valve Plate are dirty or clogged,clean them by hand with small drill bits.DiaphragmValve Plate240grit sandpaperValve PlateUse 2.9mm drill for outer holes and 2.5mm drill for inner holesInside of Air Valve AssemblyMixing ChamberMORE TIPS &DETAILS:>there’s a spare Diaphragm REMEMBER in the tool kit included with your fogger .Keep this with you so you can quickly install a fresh Diaphragm and get back to fogging.>When puƫng the Air Intake Valve back together,make sure that the Diaphragm stays centered.UnƟl the screw and nut are Ɵght,the Diaphragm can move around.It must be centered over the holes in the brass Valve Plate to run properly.Keep the Diaphragm centered by holding the parts firmly while Ɵghten the assembly screw and nutNixalite of America Inc1025 16th Ave, E. Moline, IL 61244*******************************®Nixalite of America Inc is the US Sales and Service Center for IGEBA EquipmentThis is an illustrated supplement to the owner’s manual supplied with your fogging machine .Always read,understand and follow the safety measures and instrucƟons provided in the manufacturers fogger manual.- Cleaning/Replacing the Diaphragm -Use a soŌclean cloth to clean both sides of the Spacer Plate,Valve Plate and Gasket.The raised hub of the Spacer Plate fits into the depression machined in the Valve Plate.Keep Diaphragm centered over the Valve Plate holes.Reinstall the assembly screw and nut.Place Gasket on the Valve Plate as e a mounƟng screw to help align the gasket.Reinstall the 3mounƟng screws that hold the Air Intake Valve assembly to the Mixing Chamber.Raised Spacer hub of Plate......fits into this depression on the Valve PlateLong Screw and NutGasketUse help align 1screw to gasketReinstall 3ScrewsKnurled NutVIDEOYou can watch /product/igeba-ƞ-35800.624.1189******************。
喷雾机工作原理
喷雾机工作原理
喷雾机是一种常见的喷涂设备,其工作原理是利用高压气体或者泵将液体物质喷射为小颗粒,在空气中形成雾状或者雾状喷雾。
喷雾机的工作原理可以分为以下几个步骤:
1. 液体供给:喷雾机通过液体供给系统获得需要喷射的液体物质。
通常情况下,液体会被储存在一个容器或者供给管道中,然后通过泵或者重力作用送入喷嘴。
2. 压力产生:为了将液体喷射成雾状,需要产生足够高的压力。
这可以通过两种方式来实现,一种是利用高压气体(例如气体罐中的压缩气体)对液体进行压力驱动,另一种是通过泵将液体加压。
3. 喷射过程:当液体受到压力作用,通过喷嘴喷射出来。
喷嘴通常具有特殊的结构,可以将液体分散成微小的颗粒,从而形成雾状或者雾状喷雾。
喷射过程中的液体会与空气接触,通过空气的传导和扩散使得液体颗粒更加细小均匀。
4. 雾化效果:通过以上步骤,喷雾机可以将液体物质喷射为非常细小的小液滴,这些小液滴通常可以悬浮在空气中形成雾状。
喷雾机的设计和喷嘴的选用会影响到雾化效果的精细程度和喷射范围。
总的来说,喷雾机的工作原理就是通过液体供给、压力产生和喷射过程来实现液体物质雾化喷射。
这种工作原理使得喷雾机在农业、园艺、清洁和消毒等领域得到广泛应用。
GEA ISPRAY4 自动乳头喷洒器说明书

GEA ON-PLATFORMTEAT SPRAYER –ISPRAY4The benchmark in teat sprayingON-PLATFORM TEAT SPRAYER - ISPRAY4The next-generation rotary in-bail automatic teat sprayersstandardise the milking process and support a clean and evenmilk-out experience.Designed for rotary milking systems, the iSPRAY4 achievesexceptional coverage, covering the entire teat barrel with teatspray, not just the teat end. Therefore, providing the bestprotection against pathogens that can cause nasty udderinfections.Integrated into any rotary system and fully automated,the iSPRAY4 standardises the milking routine and reducesthe need for an operator at the ‘cups off’ area. Therefore,providing a significant cost-saving on labour and workload,while improving teat and udder health of the entire herd.Four pre-spray nozzles:The iSPRAY4 can deliver full teat barrel pre-spray coverage tocows before reaching the designated cups-on area.Perfect for use when stripping and applying pre-spray to freshly calved cows.Pre-spray nozzles are set wide to ensure coverage of milk-filled udders.Four post-spray nozzles:With four designated post-spray nozzles set closer together to cater for milked-out udders, the iSPRAY4 provides optimal coverage of the full teat barrel directly after milking, ensuring cows are protected from harmful pathogens.Post-spray nozzles set closer together for milked-out udders, whereteats are positioned closer together.Pre-spray nozzles set wider apart for milk-filled udders, where teats areset further apart.1Leg separator Cows stand in the correct position for cupping and teat-spray application every time Post teat-spray applied directly after milkingDirectly after cups are removedBetter spray coverageFor all sizes and breeds of cows and heifers2GEA On-Platform Teat Sprayer – iSPRAY4Grooved centre For optimal cluster and milk tube alignment and easy clean-downCross-fire spray action For full-coverage of all four teat barrels and teat ends Continuous delivery of teat-spray Never again run out of teat-spray mid-milking Use different teat-spray product combinationsAt both pre and post-spraying Reduce labourNo one required at cups-off area3Full teat end and teat barrel coverage, asshown in this UV light test.COVERAGE IS KEYTeat spray applicationUsing automatic teat sprayersWith many automated teat sprayers, the goal is to get a droplet of teat spray on the end of each teat. However, research has determined that this is not enough. Full barrel teat spray coverage of both the teat end and the teat barrel is key to fighting pathogens entering the teat canal after milking, and the iSPRAY4 gives you just that!Utilising cross-fire spray technology, as opposed to lateral spray coverage, the iSPRAY4 provides accurate and complete teat end and teat barrel coverage.The iSPRAY4 applies teat spray directly after milking up to 5seconds after removing the cluster. The application of teat spray directly after milking is crucial, when the teat canal isopen and highly susceptible to pathogens.With full-barrel coverage being the key to the design of the iSPRAY4, the optimal dosage rate ranges from between 18-32mL per cow at each dose. This is slightly higher than older-generation automated teat sprayers but equates to an 80% orhigher coverage rate.Full coverage of all four teat ends and teat barrels5Easy to install and with a future-proof upgrade pathway, the iSPRAY4 can be added to either a new rotary build or an existing parlour!SIMPLE TO INSTALL Milking point configurationOperated using compressed air, this pump lifts teat spray directly from the drum(s) and delivers it directly to the spray unit on the platform, via thecentre glandOne iSPRAY controller is mounted in each bail and has three key functions:1. Controls a timer for precise timing of when animals are sprayed 2. Monitors the complete milking process and detects any milking errors, ensuring animals are only sprayed when milking is completed without error 3. Allows operators to teat spray pre and post milking at a fixed position when used in conjunction with the iREMOTE+iSPRAY4Teat spray is delivered to each cow within the bail directlyafter milking has finished6GEA On-Platform Teat Sprayer – iSPRAY4“Our somatic cell count was sitting at 150,000. Since installing iSPRAY4’sit’s settled at 90,000”.Andrew Pritchard – Taranaki, New ZealandMilking 420 cows through a 50-bail iFLOW rotary.7INTELLIGENT CLUSTER REMOVERS ICR+ WITH EASYSTARTHelping simplify and minimise workload, yousimply lift to activate the vacuum beforeattaching the milking cluster.Giving you more control of each milking point, all while ensuringyour cows are comfortable throughout the milking process.Reliable and heavy-duty, the iCR+ requires no device network noradditional software to operate. With the electronic board locatedin the head of each ram, the iCR+ operates independently. Thisalso means that if one ram is out of operation, all the others willcontinue working.In a nutshellYour RotaryUsing a drop-down mechanism, clusters pass under the bridge and are then presented back to the operator at an ergonomic heightC U P1-2S e c on d sF A S T E RMILKL I F TCU P8GEA On-Platform Teat Sprayer – iSPRAY49Designed to make rotary parlours more efficient and reduce labour at milking time.The iCRS system is connected and operated by the automatic cluster remover installed on the rotary platform.The cow restraint drops down behind the cow when the cluster is attached, keeping the cow on the platform if she has not finished milking - reducing labour requirements at the cluster off area.Simply attach the cluster and the system does the rest!ICRS COW ISPRAY4 RESTRAINT SYSTEM Bail options to suit your herdiCRS Layout• Retains the cow on the platform if she is still milking or has a milking alert • Connects to the iCR+ Intelligent Cluster Remover • Suitable for new installs or retrofits.• Works in combination with the On-Platform Teat Spray systemKey features10GEA On-Platform Teat Sprayer – iSPRAY4INTELLIBLEND TEAT SPRAY MIXERA reliable and robust teat spray mixing and delivery system for integrating with the iSPRAY4.No manual mixing or guesswork The Intelliblend accurately mixes ‘ready to use’ (RTU) teat spray at set ratios of concentrate to water, eliminating product wastage and inconsistencies found with hand mixing.Achieve accuracy, every milking Once switched on, the unit will self-prime and prepare RTU teat spray on-demand before milking. When an extra emollient is required, you can easily programme the unit to add an extra 5% or 10% emollient.Active levels are not compromised The Intelliblend draws teat spray and emollient out of the drum, mixes it and delivers it to the spray nozzle. Teat spray active levels are not compromised by organic material in the water because of the low volumes mixed at a time.Alerts you when it’s time for a new drum An audible alarm notifies staff when teat spray and emollient drum contents run low and again when the drum is empty. There will be enough RTU teat spray for one more milking inthe instance of running out.11FIL TEAT CARE RANGE FIL’s proven range of teat sprays, emollients and creams are formulated with special agents to achieve healthy udders.Iodoshield Active An iodine-based teat spray with Manuka honey and emollient for use as a post milking aid in controlling mastitis.• Best for high-risk environments • Excellent for killing bugs in wet, muddy conditions or if your cows are in a barn or feed pad situation • Contain Manuka honey to restore cracked and chapped teats • Contains 23g/L iodine and 55% mixed emollientsTeatshield Active A chlorhexidine-based teat spray with Manuka honey and added emollient for use as a post milking aid in controlling mastitis.• Best for medium-risk environments • Advanced emollient matrix to assist with cell rejuvenation and conditioning of damaged teats • Green in colour and highly visible on teats •Contains 44g/L chlorhexidine and 55% mixed emollients12GEA On-Platform Teat Sprayer – iSPRAY4Active Teat Conditioner An emollient enriched skin conditioner for adding to FIL teat sprays during early lactation and challenging periods.• Contains quality skincare ingredients, including Manuka Honey, Aloe Vera and Allantoin • Provides extra protection during early lactation or challenging periods • Leaves teats supple, less prone to drying and cracking • A Biogro approved Organic Teat Conditioner is also availablefor organic farmsActive Teat Cream A unique iodine-based antiseptic cream with Manuka Honey. Active Teat Cream is quickly absorbed into the teat surface to restore cracked, damaged, and severely chapped teats in dairy cows.• Always apply to teats after milking • Antiseptic iodine and Manuka honey combination provide intensive care to severely cracked or chapped teats • Iodine kills bugs while the honey helps to nourish •Water-soluble, non-greasy and easy to wash from hands Emollient Salve Emollient Salve is a waterproof lubricant used to protect teats during early lactation or when teat condition is challenged by harsh weather conditions.• Always apply to teats after milking • Antiseptic lubricant and emollient barrier • Waterproof, so it will last on teats for longer in wet weather • Assists in preventing mastitis by ensuring teats do not dry andcrack13。
喷雾干燥的安装步骤

喷雾干燥机的安装步骤
一、基础准备
在安装喷雾干燥机之前,需要对工作场所进行清理和平整,以确保地面坚固、水平,并满足设备承重要求。
同时,需要预留出设备安装位置和周边空间,以便于后续操作和维护。
二、部件组装
按照厂家提供的说明书,将喷雾干燥机的各个部件进行组装。
在组装过程中,需要注意检查各个部件是否完好无损,并确保正确安装。
三、管道连接
将喷雾干燥机的进料管、出料管、热风管等管道进行连接,确保管道连接牢固、无泄漏。
同时,需要调整管道的高度和角度,以满足工艺要求。
四、电控安装
根据设备用电要求,将电源线接入喷雾干燥机的电控箱内,并确保电
源线连接牢固。
同时,需要按照说明书要求连接传感器、执行器等电控元件。
五、安全检查
在设备安装完毕后,需要进行安全检查。
检查内容包括设备外观、管道连接、电控系统等,确保设备无安全隐患。
六、调试运行
在安全检查合格后,需要对喷雾干燥机进行调试运行。
在调试过程中,需要逐步调整设备的各项参数,如温度、压力、流量等,以确保设备正常运行。
同时,需要观察设备的运行状况,及时发现并解决问题。
七、验收交付
在调试运行合格后,需要进行验收交付。
在验收过程中,需要检查设备的各项性能指标是否符合要求,并填写验收报告。
如有问题,需要及时解决并重新验收。
八、操作培训
最后,需要对操作人员进行培训。
培训内容包括设备操作规程、维护保养知识等,以确保操作人员能够熟练掌握设备的操作和维护技能。
同时,需要向操作人员介绍常见故障及排除方法,以便于及时处理问题。
喷雾干燥机结构及工作原理

喷雾干燥机结构及工作原理喷雾干燥机,听名字就让人感觉像是在喝汽水一样清爽,其实它是个相当了不起的家伙,专门用来把液体变成粉末。
让我们一起来揭开这个神奇机器的面纱,看看它是怎么工作的吧!1. 喷雾干燥机的基本结构喷雾干燥机的结构其实并不复杂,简单来说,就像一个巨大的榨汁机。
它主要分为几个部分:进料装置、喷雾系统、干燥室、热风系统和收集器。
1.1 进料装置首先,咱们得有东西来干燥,对吧?进料装置就像是机器的“嘴巴”,负责把液体原料送进去。
这个过程可不简单,得确保液体均匀,不能让它太稠也不能太稀,否则最后干出来的粉末可就不成样子了。
1.2 喷雾系统接下来,就是喷雾系统了!这是个看上去很酷的部分,像个小喷壶一样,把液体原料喷成雾状。
这可是一门技术活,喷雾的细腻程度直接影响到最后的干燥效果。
喷雾的颗粒越小,干燥得越快,干出来的粉末也越细腻。
可别小看了这个过程,调皮捣蛋的喷头可得经常清理,不然就容易“堵车”。
2. 干燥过程的核心好了,喷雾完了,接下来就进入了干燥室,哦哟,这里可热闹了!热风系统在这里开始发威,给干燥室里送入热空气。
想象一下,像在夏天的海滩上,太阳晒得你皮肤发热,这种感觉就是热风系统的工作原理。
2.1 热风系统热风系统负责把空气加热,然后将其送入干燥室。
这股热风与喷雾中的液体颗粒接触时,温度瞬间升高,液体就开始蒸发,变成水蒸气。
哇,感觉就像魔法一样,水分一下子就消失了,只留下干燥的粉末。
这种蒸发的速度可快得惊人,几乎是眨眼之间的事。
2.2 收集器等到粉末干燥后,最后一个环节就是收集器啦!这就像一个大网,专门用来捕捉那些轻飘飘的干粉。
这里的工作原理很简单,通过气流的变化,把干粉从气体中分离出来,落入收集器中,嘿,这样一来,干粉就大功告成了!3. 喷雾干燥机的应用喷雾干燥机可不仅仅是个单打独斗的角色,它的应用范围可是广泛得很!你可能不知道,这玩意儿在食品、化工、药品等领域都有身影。
3.1 食品行业在食品行业,喷雾干燥机常常被用来制作奶粉、果汁粉、调味料等。
- 1、下载文档前请自行甄别文档内容的完整性,平台不提供额外的编辑、内容补充、找答案等附加服务。
- 2、"仅部分预览"的文档,不可在线预览部分如存在完整性等问题,可反馈申请退款(可完整预览的文档不适用该条件!)。
- 3、如文档侵犯您的权益,请联系客服反馈,我们会尽快为您处理(人工客服工作时间:9:00-18:30)。
ESS GPS-5 Sprayer™, GPS-5™, MaxCharge™, and the ESS logo are copyrights or registered trademarks of Electrostatic Spraying Systems, Inc.
ESS GPS-5 OWNER’S MANUAL
i
ESS GPS-5 OWNER’S MANUAL
ii
Table Of Contents
Overview of the ESS GPS-5 Air-assisted Electrostatic Sprayer............. 1 Safe operation of the GPS-5 Sprayer............................................................. 2 Operator’s responsibility............................................................................ 2 Safety precautions....................................................................................... 2 Chemical safety precautions.................................................................... 2 About the low-voltage system of the MaxCharge spray gun ............. 3 Safety decals.......................................................................................................... 4 Features of the GPS-5 sprayer.......................................................................... 5 Technical specifications............................................................................. 5 Operating Instructions....................................................................................... 6 Unpacking and assembling the sprayer.............................................. 6 Before use........................................................................................................ 7 Steps for operation...................................................................................... 8 After spraying................................................................................................ 9 GPS-5 maintenance schedule........................................................................10 REFERENCE SECTION Engine.....................................................................................................................11 Compressor..........................................................................................................12 Compressor air filter..................................................................................12 Tank pressure regulator...................................................................................13 Pop-off valve........................................................................................................13 Tongue handle....................................................................................................13 Hose reel and liquid inlet filter......................................................................14 Stainless steel tank.............................................................................................15 Quick connects....................................................................................................16 How to store the hose quick-connects when not in use.....................17 Spray gun..............................................................................................................18 Air filter...........................................................................................................18 Trigger............................................................................................................19 Liquid filter assembly................................................................................20 Nozzle assembly.........................................................................................21 Pre-spray check...................................................................................................22 Post-spray check.................................................................................................22 Batteries.................................................................................................................23 Yearly spray gun service...................................................................................24 Spraying with your ESS sprayer.....................................................................25 Preparing a tank mix.........................................................................................26 Chemical compatibility....................................................................................27 A note about operating temperatures.......................................................27 Trouble-shooting Guide..................................................................................29 GPS-5 spray gun service parts (drawing)...................................................30 GPS-5 spray gun service parts (key)............................................................31 Flow disk chart....................................................................................................31 GPS-5 exploded view (drawing)....................................................................32 GPS-5 service parts............................................................................................33 Warranty................................................................................................................35 Warranty card.............................................................................................35a Spray gun repair/Yearly service return form.............................................37