BabyTV中文版
LOLTV 为 Android TV 2 的用户指南说明书

LOL TV User guide for Android TVLOL TVUser guideThank you for chosing our LOLTV for Android TV offer!Follow our step-by-step user guide to enjoy all your TV services.This practical guide has been designed to help you use LOLTV on Android TV. If you have any further questions, please do not hesitate to contact our customer service on 2799 0000.We wish you a pleasant experience with Luxembourg TV Online!Summary1. Immersive and interactive experience 4 1.1. Watch LOLTV 4 1.2. Create a list of favorite channels 7 1.3. Control live broadcasts 9 1.4. View current programmes 10 1.5. TV Guide 11 1.6. Replay 13 1.7. Recording 14 1.8. Add to my list 15 1.9. My Media 172. Settings 201. Immersive and interactive experience1.1. Watch LOLTVWhen watching a channel live, you can :You can also view the available languages for the current programme by pressing , and then selecting .You can also open the TV guide by pressing OK , then.Channels View the menuNavigate between channelsNavigate between channelsOKYou can now consult the TV Guide. (find out everything you need to know about the TV Guide on p. 11)When you open the programme details with , you can :READ FROM THE TOP+ MY LIST (see page 15)• RECORD (see page 14)DetailNow TV Guide My MediaSettingsChannelsChannels page 6 page 10TV Guide page 11My Media page 17Settingspage 20ChannelsOnce in the “Channels ” section, you can view the different programmes of the day.Once you have selected your channels, go back to the top and press Save . Your Favourites list is now created.Modify the listTo add or remove channels from your list, press the icon on your Favourites list and then press Edit List . Select the channel in question to add or remove it. Channels selected are marked with a icon. To accept the changes, press Save .Organize the listTo arrange the order of your channels, press the icon and then pressReorder list . Select the channel in question and move it to the desired location. To confirm the changes, press Save .Delete the listTo delete your list, select it, press the icon and then select Delete list . Yourlist is now deleted.Réorganiser liste1.3. Control live broadcastsThe live control allows you to navigate through a programme in progress.To access it, press the button on your remote control. The info panel appears. Press the icon to pause the programme currently on screen. Press again when you want to resume.Controlling the live feed is possible by moving the cursor on the playback bar. You can also return to the beginning of the programme by pressing by pressing . At any time, you can return to the live broadcast by pressing .The channels available with this feature are marked with the icon.You can now see all the programmes in progress. Select the one you want and press OK to view the details.Detail TV Guide My Media SettingsChannelsNowYou can select the desired day and time of day.Press Today to select the day and time of your choice.You can now see all the programmes available according to your previous choices. Navigate through the guide and press OK when you have found the programme you want to view the details.You can now :READ FROM THE TOP WATCH THE CHANNEL +MY LIST (see p. 15)• RECORD (see p. 14)1.6. ReplayYou can watch TV programmes up to 7 days after they have been broadcast.To do this, browse the TV guide and select the desired programme.Then press to view the programme.You can stop the replay at any time and return to live TV by pressing the button.You can also pause your replay to resume it later by pressing the arrow on your remote.YourRecording from the TV GuideGo to the relevant programme in the TV Guide, press OK to open the details, then select . The start and end time of the programme appears, press OK (or adjust the start and end time).. The current programme has beenAdd a programme from the TV GuideGo to the relevant programme in the TV Guide and press to open the details and select . The programme has been added to your list.1.9. My MediaMy listView a programme from my listIn the My list section, choose your programme and click on , theprogramme will start.If you want to review a programme on your list without time limit, you can also record it (see p.14).My Media vallows you to access everything you have recorded andprogrammes added to your list. To access your media, press the key . The menu bar will appear. Then select My Media .Channels Detail Now My MediaSettingsTV GuideMy recordingsFurther down, in the «My recordings» section, you have access to everything you have recorded and to the recordings you have scheduled.View a recordingClick on the recording you wish to view and press to view it.Delete a recordingSelect the record you wish to delete and press to confirm the deletion.To organise your recordings you can create folders and rename your recordings. Create folderClick on , name it and validate by pressing Continue. Your folder is now created.Move a recordingTo move a recording to a folder, select the desired recording, click , select the desired folder and press OK. Your recording will be moved. Rename a recordingTo rename a record, select the desired record, click on, name it andconfirm by pressing Yes..This is everything you can set up:• Language: the languages available for the menus are French German,English, Portuguese and Luxembourgish.• Account information: allows you to view your username and password. • Parental control: allows you to lock/unlock TV channels. • Logout : disconnect.Détail Channels Detail TV Guide Now My MediaSettingsParental control settingsIn the Parental Controls section, you can lock/unlock access to certain channels.By default, the parental control PIN code is 0000. We advise you to change it as soon as possible by selecting Access code.Enter your new PIN code and confirm. You can change your your PIN code at any time in this section.To lock TV channels, click on Restricted channel list.Enter the PIN code.You can now select the channels you wish to to lock/unlock. Scroll to the TV channel in question and press the OK button. The lock symbol appears on the locked channel.That’s it, the parental controls are set up! Once you have made your changes, press the button on the remote control to save.Channels with parental control are listed with a lock icon.Don’t hesitate to contact us:- By phone on 2799-0000- Via the contact form on www.internet.lu- In shop:3, avenue de la Porte Neuve L-2227 Luxembourgwww.internet.lu********************Luxembourg Online was founded in 1995 and is one of Luxembourg‘s main telecommunication operators. Providing Internet access, landline, mobile telephones, television (IPTV), network development and computer software engineering, Luxembourg Online has been present as an expert in the telecomfield for over 25 years.© L u x e m b o u r g O n l i n e , j u i l l e t 2021 • N e p a s j e t e r s u r l a v o i e p u b l i q u e .。
109台 缅甸直播节目表--中国专卖店 首发

套餐基本套餐SN2基本套餐SN2基本套餐SN2基本套餐SN2基本套餐SN2基本套餐SN2基本套餐SN2基本套餐SN2基本套餐SN2基本套餐SN2基本套餐SN2基本套餐SN2基本套餐SN2基本套餐SN2基本套餐SN2基本套餐SN2基本套餐SN2基本套餐SN2基本套餐SN2基本套餐SN2基本套餐SN2基本套餐SN2基本套餐SN2基本套餐SN2基本套餐SN2基本套餐SN2基本套餐SN2基本套餐SN2基本套餐SN2基本套餐SN2基本套餐SN2基本套餐SN2基本套餐SN2基本套餐SN2基本套餐SN2基本套餐SN2基本套餐SN2基本套餐SN2基本套餐SN2基本套餐SN2基本套餐SN2基本套餐SN2基本套餐SN2基本套餐SN2基本套餐SN2基本套餐SN2 美国国际体育频道基本套餐SN2高尔夫频道基本套餐SN2 曼联官方足球俱乐部频道基本套餐SN2 知识频道基本套餐SN2 国家地理频道 东南亚基本套餐SN2基本套餐SN2 国家地理历险基本套餐SN2 动物星球基本套餐SN2 探索频道(东南亚)基本套餐SN2 探索 学习频道基本套餐SN2 探索健康频道基本套餐SN2 探索科学频道基本套餐SN2 探索动力频道基本套餐SN2缅甸联邦议会频道基本套餐SN2 英国独立电视台基本套餐SN2 环球网新闻基本套餐SN2即时资讯基本套餐SN2 美国喜剧中心频道红屏 / 红电影基本套餐SN2英国广播娱乐台英国广播卡通台英国广播新闻台旅游频道极限运动体育台76Edge Sports 极限运动体育台77 History 2 历史第二频道 78 life time 生命时光教育频道基本套餐SN2 农业/家畜基本套餐SN2 健康频道基本套餐SN2基本套餐SN2 警察频道基本套餐SN2套歺套歺套歺套歺套歺/体育 英语 加密 高清套歺 106.MTVLive HD Live HD 高清MTV 现场版 英语 加密 高清套歺 HD107.Disco very HD WORLD 探索 高清频道 HDvery HD WORLD 探索 高清频道 HD 108。
Fitbit Versa 4手冊说明书

使用手冊1.4 版目錄開始 (7)包裝盒內物品 (7)為手錶充電 (8)設定 Versa 4 (8)在 Fitbit 應用程式中查看您的資料 (9)解鎖 Fitbit Premium (10)佩戴 Versa 4 (11)整日佩戴和運動時的佩戴方式 (11)緊固錶帶 (12)慣用手 (13)佩戴與保養技巧 (14)更換錶帶 (14)移除錶帶 (14)安裝錶帶 (15)基本資訊 (16)導覽 Versa 4 (16)基本導覽 (16)按鈕快捷鍵 (17)快速設定 (19)動態磚 (20)調整設定 (20)顯示幕 (20)振動和音訊 (20)通知 (20)目標提醒 (20)靜音模式 (21)快速鍵 (21)語音助理 (21)關於 Versa 4 (21)查看電池電量 (22)設定裝置鎖定 (22)2關閉螢幕 (24)錶面、動態磚與應用程式 (25)變更錶面 (25)重新排列動態磚 (26)管理應用程式 (26)開啟應用程式 (26)移除應用程式 (26)重新安裝應用程式 (27)更新應用程式 (27)調整應用程式設定和權限 (27)語音助理 (28)設定內建 Amazon Alexa (28)與語音助理互動 (28)檢查您的 Alexa 鬧鐘、提醒與計時器 (29)日常生活 (30)天氣 (30)尋找手機 (31)Google 地圖 (31)手機通知 (32)設定通知 (32)查看傳入通知 (32)管理通知 (33)關閉通知 (33)接聽或拒接來電 (34)在腕上接聽手機通話 (35)回覆訊息 (Android 手機) (36)計時 (37)設定鬧鐘 (37)解除或休眠鬧鐘 (37)使用計時器和碼錶 (38)使用碼錶計時 (38)使用倒數計時器追蹤經過的時間 (38)3查看統計資料 (39)追蹤每日活動目標 (40)選擇目標 (40)追蹤每小時的活動 (40)追蹤您的睡眠 (41)設定睡眠目標 (41)深入瞭解長期睡眠行為 (41)瞭解您的睡眠習慣 (41)追蹤您的經期 (41)練習引導式呼吸 (42)查看壓力管理分數 (42)進階的健康指標 (43)運動和心臟健康 (44)自動追蹤您的運動 (44)使用運動應用程式追蹤與分析運動 (45)自訂運動設定 (46)查看您的運動摘要 (46)查看您的心率 (47)自訂心率區間 (48)賺取活動區間分鐘數 (48)接收心率過高通知 (48)檢視您的日常準備分數 (49)檢視心肺健康分數 (50)分享您的活動 (50)感應式付款 (51)使用信用卡和轉帳卡 (51)設定感應式付款 (51)購物 (52)變更預設卡片 (53)支付交通費用 (53)更新、重新啟動和清除 (54)更新 Versa 4 (54)重啟 Versa 4 (54)4清除 Versa 4 (55)疑難排解 (56)找不到心率訊號 (56)沒有 GPS 訊號 (56)其他問題 (57)一般資訊和規格 (58)感應器與元件 (58)材質 (58)無線技術 (58)觸覺反饋 (58)電池 (58)記憶體 (59)顯示幕 (59)錶帶大小 (59)環境條件 (59)瞭解詳情 (60)退貨政策和保固 (60)Regulatory and Safety Notices (61)USA: Federal Communications Commission (FCC) statement (61)Canada: Industry Canada (IC) statement (62)European Union (EU) (63)Argentina (65)Australia and New Zealand (65)Ghana (65)Indonesia (65)Israel (65)Japan (66)Kingdom of Saudi Arabia (66)Malaysia (66)Mexico (66)Morocco (67)Nigeria (67)Oman (67)Paraguay (67)Philippines (68)5Serbia (68)Singapore (68)South Korea (68)Taiwan (68)Thailand (72)United Arab Emirates (72)United Kingdom (73)Vietnam (73)About the Battery (74)IP Rating (74)Safety Statement (74)Regulatory Markings (74)67開始使用 Google 旗下的 Fitbit Versa 4,保持健康狀態並透過例行運動取得更好成果。
20161103兵团卫视收视指南

序号
1 2 3 4 5 6 7 8 9 10 11 12 13 14 15 16 17 18 19 20 21 22 23 24 25 26 27 28 29 30 31 32 33 34 35 36 37 38 39 40 41 42
台
兵团卫视 兵团建设 CCTV-1 CCTV-2 CCTV-3 CCTV-4 CCTV-5 CCTV-6 CCTV-7 CCTV-8 CCTV-9 CCTV-10 CCTV-11 CCTV-12 CCTV-新闻 CCTV-少儿 CCTV-音乐 新疆卫视
名
序号
85 86 87 88 89 90 91 92 93 94 95 96 97 98 99 100 101 102 103 104 105 106 107 108 109 110 111 112 113 114 115 116 117 118 119 120 121 122 123 124 125
中国教育电视台 新疆教育台 河北卫视 北京卫视 天津卫视 上海东方卫视 重庆卫视 浙江卫视 江苏卫视 广东卫视 湖南卫视 黑龙江卫视 深圳卫视 福建东南卫视 广西卫视 云南卫视 四川卫视 湖北卫视 安徽卫视 贵州卫视 山东卫视 河南卫视 江西卫视 辽宁卫视
凤凰卫视中文台 凤凰卫视资讯台 星空卫视 法国时装 兵团卫视高清频道 兵团综合高清频道 CCTV-1高清 CCTV-5+ 北京卫视高清频道 天津卫视高清频道 湖南卫视高清频道 江苏卫视高清频道 黑龙江卫视高清频道 广东卫视高清频道 安徽卫视高清频道 东方卫视高清频道 CCTV-NEWS CCTV-法语频道 CCTV-西班牙频道 CCTV-俄语频道 CCTV-阿拉伯语频道 CCTV-44 45 46 47 48 49 50 51 52 53 54 55 56 57 58 59 60 61 62 63 64 65 66 67 68 69 70 71 72 73 74 75 76 77 78 79 80 81 82 83 84
三星 Galaxy S22 Ultra 用户手册说明书
SM-S9010SM-S9060SM-S9080HongKong China. 02/2022. Rev.1.0/hk目錄新手上路4 裝置結構圖與功能10 為電池充電15 SIM 或 USIM 卡 (nano-SIM 卡)17 開啟與關閉裝置18 初始設定19 三星帳戶20 從之前的裝置傳輸數據 (SmartSwitch)22 瞭解螢幕30 通知面板32 螢幕截圖與螢幕錄製33 輸入文字應用程式與功能36 安裝或解除安裝應用程式37 S Pen (Galaxy S22 Ultra)52 電話55 聯絡人57 訊息58 瀏覽器59 相機76 媒體瀏覽器80 AR 區域86 Bixby88 Bixby Vision 89 Bixby Routines91 多重視窗94 Samsung Pay96 Samsung Health97 Samsung Notes102 Samsung Members102 Samsung Kids103 Samsung Global Goals 103 Galaxy Shop103 Galaxy Wearable104 PENUP (Galaxy S22 Ultra) 104 日曆105 提醒106 錄音機107 我的檔案107 時鐘108 計算機108 遊戲中心109 Game Booster110 SmartThings110 分享內容112 音樂共享113 Smart View114 連結至 Windows115 Samsung DeX121 Google 應用程式目錄149 Google 150 進階功能151 動作與手勢152 視像通話效果153 Dual Messenger 154 數位健康與家長監護154 電池與裝置維護154 優化裝置155 電量155 儲存位置156 記憶體156 裝置保護156 軟件更新156 診斷156 應用程式157 一般管理158 協助工具158 軟件更新159 關於手機使用須知160 使用裝置的注意事項162 關於包裝內容與配件的說明163 抗水和防塵164 裝置過熱情況與解決方案附錄167 協助工具181 故障排除設定122 簡介122 三星帳戶122 連接124 Wi-Fi 125 藍牙126 NFC 與感應式付款128 數據節省器128 僅使用流動數據的應用程式128 流動熱點129 更多連接設定130 聲音和震動131 音質與音效131 分離應用程式聲音132 通知132 顯示133 動作流暢度134 變更螢幕模式或調整顯示色彩135 螢幕牆紙與樣式135 主題135 主螢幕135 鎖定螢幕136 Smart Lock 136 Always On Display 137 生物特徵與安全性138 臉部識別140 指紋識別142 Samsung Pass 144 安全資料夾147 私隱147 位置148 安全與緊急情況148 帳戶與備份149 三星雲端新手上路裝置結構圖與功能► Galaxy S22 Ultra:前置相機音量鍵側鍵SIM 卡匣揚聲器指紋識別感應器側鍵音量鍵觸控屏側屏幕側屏幕前置相機S PenSIM 卡匣話筒測距/光源感應器耳機插孔/多用途插孔 (USB Type-C)後置相機後置相機GPS 天線雷射 AF 感應器閃光燈主天線揚聲器話筒NFC 天線 / 無線充電線圈► Galaxy S22+, Galaxy S22:前置相機音量鍵側鍵SIM 卡匣揚聲器指紋識別感應器側鍵音量鍵觸控屏前置相機SIM 卡匣話筒耳機插孔/多用途插孔 (USB Type-C)測距/光源感應器後置相機後置相機閃光燈主天線話筒揚聲器GPS 天線NFC 天線 / 無線充電線圈•使用揚聲器時,比如播放媒體檔案或使用免提時,請勿將裝置放置於耳朵附近。
动画片Maisy英文和部份中文

Song:Maisy, Maisy, What gonna to do today ? Maisy, Maisy, Do you want to play? Find a friend.Play the toys.Bounce a ball.Makes a noise .Roll and tumble.Fly a place.Splash , Splash , Splash .In the play , from the road . Maisy, Maisy,Maisy, Maisy, Maisy,Maisy, Maisy,Maisy, Maisy mouse.Sail the boat .Be the queen .You can do almost anything . Maisy, Maisy,Maisy, Maisy, Maisy, Maisy, Maisy,Maisy, Maisy, mouse .今天做什么?最喜欢去玩耍。
找小朋友玩玩具拍皮球吹吹打打翻个跟斗开飞机啪哒、啪哒、啪哒踩水坑,喷水花,Maisy,Maisy,Maisy,Maisy,Maisy,Maisy,Maisy,Maisy,Maisy老鼠开帆船当皇后不管任何事你都可以做Maisy,Maisy,Maisy,Maisy,Maisy,Maisy,Maisy,Maisy,Maisy老鼠FarmHello, Maisy! 你好,Maisy!Maisy’s at the farm today. Maisy今天在农场玩。
Where are you going now Maisy ? 你现在要去那里呀Maisy?One egg ,Two eggs ,Three eggs. 一个鸡蛋、二个鸡蛋、三个鸡蛋Are there any more? 还有什么?Oh, What’s that , Maisy ? 那是什么Maisy?Ah, it’s a kitten. 啊,是小猫。
Samsung TV 软件更新指南说明书
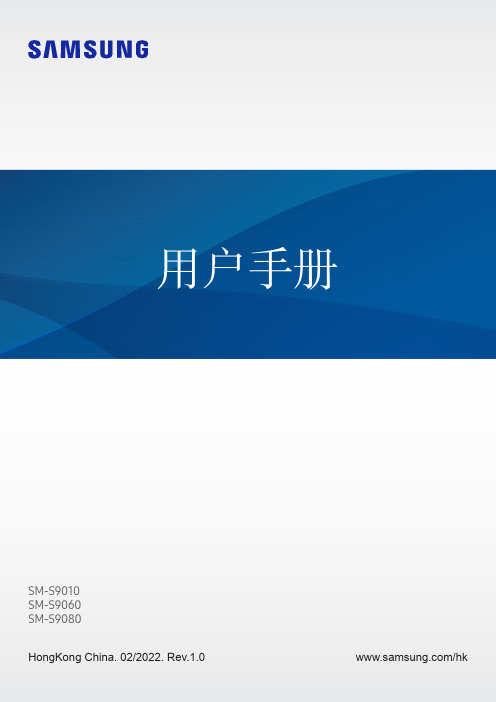
Guide de mise à niveau de logiciel manuelle◆ Avis1. Utiliser le nom de modèle de TV intégral lorsque vous téléchargez des mises à niveau manuellement. Ex) 47LX9500-UA : le nom de modèle de TV intégral doit inclure le suffixe “-UA”.2. Ne pas débrancher le cordon d’alimentation de la télé lorsque la mise à niveau de logiciel s’effectue.1. Différentes méthodes afin de vérifier le nom de modèle de TV intégral.Méthode①Vérifier l’étiquette sur la télé (côté ou endos).orMéthode② Vérifier le Menu – modèles de TV bilatérale1) Appuyer [MENU] sur la télécommande.2) Appuyer (rouge) sur la télécommande.touche (rouge) pour “Soutien au client”. 3) Sélectionner “Info.Produit/Service”4) Vérifier “Modèle/Type”1) Appuyer [Accueil] sur la télécommande.2) Sélectionner “RÉGLAGES”. 3) Déplacer vers ”SOUTIEN”4) Sélectionner “Info.Produit/Service”5) Vérifier “Modèle/Type”Méthode③ Vérifier SETUP – modèles TV bilatérale2. Méthode pour vérifier nom de modèle et motif de mise à niveau de logiciel au site Internet.① Cliquer ”Pilotes es logiciels”.② Cliquer le nom du logiciel. ③ Vérifier le nom de modèle intégral (Ex. 47LX9500-UA) et motif de mise à niveau du logiciel.①②①②1 Télécharger mises à niveau de logiciel① Sélectionner votre pays suite à accéder . ② Cliquer “Assistance”.③ Remplissez votre nom de modèle.Ex. 47LX9500④Cliquer “Continuer”.⑤ Cliquer le nom de modèle.⑥Cliquer ”Pilotes es logiciels”.⑦ Cliquer le nom de mise à niveau de logiciel le plus récent. ⑧ Vérifier le nom de modèle intégral et motif de mise à niveau du logiciel.2 Télécharger une mise à niveau de logiciel à une clé USB. Insérez la clé USB dans une prise USB du téléviseur.3 Emplacement prises USB : côté ou endos① Cliquer la touche “Télécharger ce fichier” afin de le sauvegarder à l’ordinateur.② Dézipper le fichier du logiciel.③ Insérer une clé USB dans une prise USB de votre ordinateur. ④ Créer un dossier à la clé USB et nommez-le “LG_DTV”.⑤ Sauvegarder le fichier du logiciel au dossier “LG_DTV”.or 4 Exécuter la mise à niveau du logiciel.① Si le message suivant apparaît, sélectionnez la touche “Démarrer”.② Suite au démarrage, le message suivant apparaîtra.1) Veuillez attendre alors que la mise à niveau est copiée à la télé.※ Ne retirez pas la clé USB alors que ce message s’affiche à l’écran. ※ Ne pas débrancher l’alimentation si le message est toujours affiché.2) Exécuter la mise à niveau du logiciel.※ Ne pas débrancher l’alimentation si ce message est toujours affiché.3) Suite à la terminaison de la mise à niveau, ce message s’affichera.La télé redémarrera automatiquement après 5 secondes, prête pour utilisation. Note:※ Si le logiciel courant au téléviseur s’avère le même ou plus récent que celui sur la clé USB, le menu de mise à niveau du téléviseur s’abstiendra d’ouvrir.※ Certains périphériques USB risquent ne pas être compatible avec la TV.“Cliquez ”。
迪丽热巴 V2.1 快速安装指南说明书
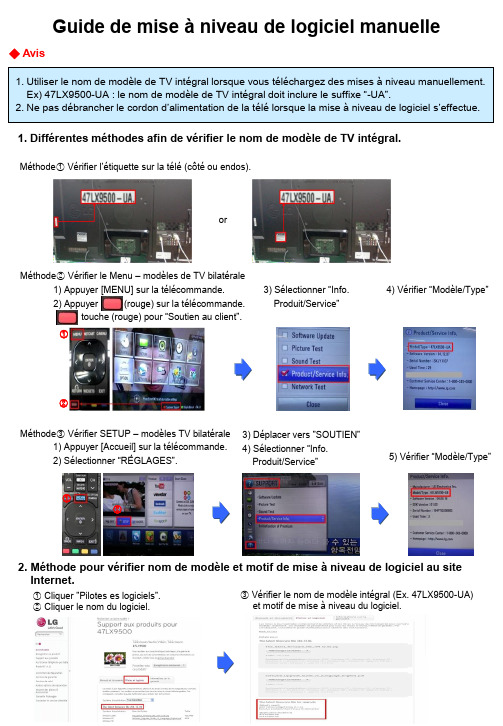
m Quick Installation Guide (V2.1)Important InformationD e f a u l t I P:192.168.1.1(R o u t e r M o d e)192.168.1.254(A P M o d e)192.168.1.254(W i F i A P M o d e)D e f a u l t Username a d m i nD e f a u l t P a s s w o r d a d m i n※Press the Reset button to set the router back to factory settings while forgetting the users name and password.※We suggest using WiMAX modem with a USB extended cable for the best performance.※When you switch the mode, please unplug power adapter and plug in again.Frequently Asked QuestionsFAQ23-241-56-788- 910-1112-1314-1516-1718-1920-212223ConfigurationBasicsTable of ContentsGetting to Know your Router Installing the RouterLogging into your RouterConnecting this Router to a Cable/DSL Modem Connecting this Router to a 3G/4G modem Connecting this Router to a Smartphone Connecting this Router to a WiMAX modem Connecting to an Existing WiFi Network(Public WiFi)Connecting to an Existing Wired IP RouterConnecting to Another WiFi network to extend the Signal Optional Firmware UpgradeResetting Your Router back to Factory Settings1Mini USBPower ConnectorWAN/LAN PortThis connects to your DSL/Cable Modem.LAN PortUse this port to connect to your computer.Mode SwitchGetting to Know your Router1 Router, 1 Power Adapter, 1 Antenna (Detachable),1 Quick Installation GuideRB-1602WAN/LAN IndicatorLAN IndicatorWireless/WPS IndicatorWhen the light is green, wireless is active. When this light starts to flash and turns to reddish orange, WPS setup is in progressResetBack to factory setting.WPS ButtonStatus Indicatorsystem is ready to work. When the light is blinking means reset or firmware update is in progress.See the WPS one-button setup section for additional information.or firmware update is in progress.Use this port to connect a3G/4G/WiMAX modem orsmartphoneWPS ButtonSee the WPS one-buttonsetup section for additionalWAN/LAN IndicatorMini USBPower Connector3RB-1132V2Getting to Know your Router1 Router, 1 AC plug,1 Power Adapter,1 Quick Installation GuideMini USBPower ConnectorWireless/WPS IndicatorLAN Indicator WAN/LAN Indicator Status IndicatorWhen the green light is on,system is ready to work. When the light is blinking means reset or firmware update is in progress.Power IndicatorWhen the light is green, the device is receiving power.USB portUse this port to connect a 3G/4G/WiMAX modem or smartphone.LAN PortUse this port to connectto your computer.LAN/WAN PortThis connects to your DSL/Cable Modem.WPS ButtonSee the WPS one-button setup section for additional information.ResetBack to factory setting.Mode SwitchAC PlugWhen the light is green, wireless is active. When this light starts to WPS setup is in progress.4MB-1132Getting to Know your Router1 Router,2 Li Batteries,1 Power Adapter,1 Quick Installation GuidePower ConnectorMini USBPower ConnectorUse this port to connect a 3G/4G/WiMAX modem orsmartphone.Wireless/WPS IndicatorWhen the light is green, wireless is active. When this light starts to flash and turns to reddish orange, WPS setup is in progress.LAN/WAN IndicatorPower SwitchResetBack to factory setting.in progress.the device is receiving power.WPS ButtonSee the WPS one-button setup section for additional information.5MB-1112Power Connector Mini USBPower ConnectorWPS ButtonUSB Portonly for power outputPower SwitchGetting to Know your Router1 Router,2 Li Batteries, 1 Power Adapter,1 Quick Installation GuideSIM SlotWireless/WPS IndicatorWhen the light is green, wireless is active. When this light starts to flash and turns to reddish orange,WPS setup is in progress.LAN/WAN IndicatorResetBack to factory setting.the device is receiving power.See the WPS one-button setup section for additional information.6Installing the RouterDSL/Cable Modem:Applicable Model : RB-1602/RB-1632/RB-1132V21. Use Ethernet cable to connect the modem and theWAN port of SAPIDO router.Applicable Model : MB-1132/MB-11121. Use Ethernet cable to connect the modem andthe LAN/WAN port of SAPIDO router.2. Connect PC and the SAPIDO router wirelessly.3G/4G/WiMAX modem:1.Connect the 3G/4G/WiMAX modem to the SAPIDOrouter using a USB cable.e Ethernet cable to connect PC and LAN port ofSmartphone:e a USB cable to connect the smartphone to theSAPIDO router. See the smartphone section foradditional information.e Ethernet cable to connect PC and LAN port ofEthernet CablePlug into USB port7Connecting to an Existing WiFi Network (Public WiFi):1.No physical connection is required to receive the signal.WiFi HotspotWireless ModemConnecting to Another WiFi network to extend the Signal:1.No physical connection is required to receive the signal.e Ethernet cable to connect PC and LAN port of the SAPIDO router.Wireless RouterConnecting to an Existing wired IP router:e an Ethernet cable to connect the WAN port of the SAPIDO router to the existing wired IP router.Ethernet Cable84. Select “WAN Interface” is Ethernet Port. Select your “WAN Access Type” according to your Internet source, and enter the username/password. Then, you can start to setup the wireless encryption.1.Open IE browser, type IP 192.168.1.1(P.1), or open“My Network Place”, and click SAPIDO_RB-1632(P2).It can be configured without Internet.Enter the router IP address (defaults below) into your browser and hit “Enter”.Router Mode : 192.168.1.1Access Point & WiFi Access Point Mode : 192.168.1.254Enter Login Information (default below) and click “Login”.Username : admin (P1)192.168.1.13. Select “One Button Setup”(P4) on the left menu.2. Fill in default Username and Password to login(P3).(P3)admin admin(P4)(P2SAPIDO_RB-1632Switch the operation mode to “R”.5. After the setting is finished, you should see a “change successful” page with countdown. When the countdown is completed, your wireless network and security will be active, and you should be able to login immediately with the new password. However, if an error message shows up, please refresh the page and it will go back to the entering page. Afterwards, you can access Internet.910It can be configured without Internet.(P4)4. Select “WAN Interface” is 3.5G USB dongle, and starts the setup and wireless encryption.5. After the setting is finished, you should see a “change successful” page with countdown. When the countdown is completed, your wireless network and security will be active,and you should be able to login immediately with the new password. However, if an error message shows up, please refresh the page and it will go back to the entering page. Afterwards, you can access Internet.1. Open IE browser, type IP 192.168.1.1(P.1), or open “My Network Place”, and click SAPIDO_RB-1632(P2).(P1)192.168.1.13. Select “One Button Setup”(P4) on the left menu.(P3)admin admin2. Fill in default Username and Password to login(P3).※The quality of wireless signal depends on strength of 3G/4G signal.※Please find update support list at SAPIDO official website. (P2)SAPIDO_RB-1632(RB-1602 is not supported)Switch the operation mode to “R”.113G/4G modemChoose “3.5G USB dongle”.4. Select “WAN Interface” is 3.5G USB dongle, and starts the setup and wireless encryption.5. After the setting is finished, you should see a“change successful”page with countdown. When the countdown is completed,your wireless network and security will be active,and you should be able to login immediately with the new password. However, if an error message shows up, please refresh the page and it will go back to the entering page. Afterwards, you can access Internet.3. Select “One Button Setup”(P4) on the left menu.Smartphone Set-up : (Do not need to enter into GUI setting page for set-up.)Enable the “Internet Tethering”, and it’s ready to share Internet access.※If you’re using an iPhone, please change the “Auto-lock” to never, and connect it to SAPIDO router after enable the Internet Tethering feature.GUI Set-up :(P3)admin admin2. Fill in default Username and Password to login(P3).1. Open IE browser, type IP 192.168.1.1(P.1), or open “My Network Place”, and click SAPIDO_RB-1632(P2).(P1)192.168.1.1(P2)SAPIDO_RB-1632(P4)13Choose “3.5G USB dongle”."Auto Switch" is recommended to avoid anydisconnection when 3G/ 3.5G signal is unavailable.According to your smartphone system, select your service as Nokia, Blackberry, etc.Change the “Encryption” dropdown to your preferred form of security. If you are not sure, choose WPA2 (the most commonly used). This sets the password that will be needed to log into your wireless network Enter any wireless network password that is at least 8 characters.This is the name of your wireless network. Change it to something that will be easy for you to identify (e.g. “Smith Family”).144. Select “WAN Interface” is WiMAX, and starts the setup and wireless encryption.5. After the setting is finished, you should see a “change successful”page with countdown When the countdown is completed, your wireless network and security will be active, and you should be able to login immediately with the new password.However,if an error message shows up,please refresh the page and it will go back to the entering page. Afterwards, you can access Internet.2. Fill in default Username and Password to login(P3).3. Select “One Button Setup”(P4) on the left menu.admin admin(P3)1. Open IE browser, type IP 192.168.1.1(P.1), or open “My Network Place”, and click SAPIDO_RB-1632(P2).(P1)192.168.1.1(P2)SAPIDO_RB-1632It can be configured without Internet.※We suggest using WiMAX modem with a USB extended cable for the best performance.※Please find update support list at SAPIDO official website.Switch the operation mode to “R”.(P4)(RB-1602/MB-1112 are not supported)15WiMAX modemSAPIDO_RB-1632Select Operator and enter account info.Choose “WiMAX”.Click “Finish” to complete Setup.Change the “Encryption” dropdown to your preferred form of security. If you are not sure, choose WPA2 (the most commonly used). This sets the password that will be needed to log into your wireless network . Enter any wireless network password that is at least 8 characters.This is the name of your wireless network. Change it to164. Select “WAN Interface” is Wireless. Choose the network you would like to connect, then select the encryption type and fill the encryption key. Select your “WAN Access Type” according to your Internet source, and starts to setup the wireless encryption.5. After the setting is finished, you should see a “change successful” page with countdown. When the countdown is completed, your wireless network and security will be active,and you should be able to login immediately with the new password. However,if an error message shows up,please refresh the page and it will go back to the entering page. Afterwards, you can access Internet.2. Fill in default Username and Password to login(P3).3. Select “One Button Setup”(P4) on the left menu.admin admin(P3)1. Open IE browser, type IP 192.168.1.1(P.1), or open “My Network Place”, and click SAPIDO_RB-1632(P2).(P1)192.168.1.1(P2)SAPIDO_RB-1632Switch the operation mode to “R”.(P4)It can be configured without Internet.17Select the network you would like to connect.Choose “Wireless”.This is the name of your wireless network.Change it to something that will be easy for you to identify (e.g. “Smith Family”).If the wireless is from Public WiFi, please select Dynamic IP. If the wireless is from wifi modem, please select the WAN type and enter account information by your ISP.Select the encryption type of upper network you connect and fill in its encryption key.Change the “Encryption” dropdown to your preferred form of security. If you are not sure, choose WPA2 (the most commonly used). This sets the password that will be needed to log into your wireless network . Enter any wireless network password that is at least 8 characters.Public WiFi/Wireless modem184.Select your encryption type and enter the password.5. After the setting is finished, you should see a“change successful” page with countdown.When the countdown is completed, your wireless network and security will be active,and you should be able to login immediately with the new password. However, if an error message shows up, please refresh the page and it will go back to the entering page. Afterwards, you can access Internet.3.Click “One Button Setup”(P4) on the left menu.2. Fill in default Username and Password to login(P3).admin admin(P3)If ADSL/Fiber/Cable is connected to a wired router, connect the wired router to your SAPIDO router. Then, you can turn wired Internet to wireless and share Internet to multiple devices such as in hotel.1. Open IE browser, type IP 192.168.1.1(P.1), or open “My Network Place”, and click SAPIDO_RB-1632(P2).(P1)192.168.1.1(P2)SAPIDO_RB-1632Switch the operation mode to “A”.(P4)(MB-1132/MB-1112 are not supported)It can be configured without Internet.19Have a wired IP routerChange the “Encryption” dropdown to your preferred form of security. If you are not sure, choose WPA2 This is the name of your wireless network.Change it to something that will be easy for you to identify (e.g. “Smith Family”).Choose your time zone.Enter a new router password to replace the default one to log into the router (this is different from your wireless password).201. Press the WPS button on the 11N product that you would like to connect till the WPS LED starts to flash.2. Press the WPS button on the SAPIDO router till the WIRELESS/WPS LED turns to reddish orange.Then the WiFi AP setup is done.1. Open IE browser, type IP 192.168.1.1(P.1), or open “My Network Place”, and click SAPIDO_RB-1632(P2).(P1)192.168.1.13. Click “One Button Setup”(P4) on the left menu.2. Fill in default Username and Password to login(P3).admin admin(P3)If the network you would like to connect is an 11N product with WPS feature, you may complete the WiFi AP setup with the WPS button.Via WPS Button4. Choose the network you would like to connect. Select the encryption type and fill the encryption key, then starts to setup the wireless encryption.(P2)SAPIDO_RB-1632If ADSL/Fiber/Cable is connected to a wireless router, connect the wireless router to your SAPIDO router, then you can extend wireless signals and share Internet to multiple devices.Via Program5. After the setting is finished, you should see a “change successful”page with countdown. When the countdown is completed,your wireless network and security will be active,and you should be able to login immediately with the new password. However, if an error message shows up , please refresh the page and it will go back to the entering page. Afterwards, you can access Internet.(P4)Switch the operation mode to “W”.(MB-1132/MB-1112 are not supported)It can be configured without Internet.21Select the network you would like to connect.Select the encryption type of upper network you connect and fill in its Change the “Encryption” dropdown to your preferred form of security. If you are not sure, choose WPA2 (the most commonly used). This sets the password that will be needed to log into your wireless network . Enter any wireless network password that is at least 8 characters.Change it to something that will be easy for you to identify (e.g. “Smith Family”).Have a wireless router22Please visit SAPIDO website and upgrade the firmware to achieve optimal performance.1.Log into your router and check the “Firmware Version” on the home screen.2.Go to the SAPIDO website at service & support download center.3.Choose your model number in the Firmware section and click “Go”.4.Check to see if the most recent version is higher than yours. If not, then no updatesare available. If a newer version is available, download the appropriate file.5.Login to the SAPIDO router.6.Select “System Management” → “Firmware Upgrade”.7.Click “Browser” and point to the new firmware file just downloaded. Click “Upload”to upgrade the firmware. Note: Do not change pages or run other programs beforethe router’s reboot is completed, to avoid interrupting the upgrade.8.Press the Reset button on the back panel of the router to complete the firmware upgrade.9.Press F5 or clean cookies, and then login.Note : This will erase all of your configuration settings.To restore the router to factory default settings. Please do the following.1.Power on SAPIDO router, and wait till the Wireless/WPS light is lit.2.Press the reset button on the back of the router with a pencil or paper clip, and hold it down for 10 seconds,until the status light blinks 3-4 times, then release.3.You should see the Wireless/WPS light flash. Once it stays lit (and green), the router is finished being reset.Frequently Asked Questions1. Why can’t I login SAPIDO router?(1) Please make sure your connection is right. Your computer should connect to the LAN port of SAPIDO router.(2) Confirm the browser you used is Microsoft Internet Explorer, and type the IP 192.168.1.1. Enter the default username and password: admin. If it is wrong, please reset your router back to factory settings.2. How to encrypt the SAPIDO router?Login SAPIDO Router and choose “One Button Setup”. Select your encryption type in Wireless Setup or Extended Wireless Setup of the bottom. WPA2 is recommended. Please enter at least 8 characters/numbers.If your computer is not supported WPA2, you can select WEP and enter 10 numbers. Then, click “Finish” to complete setup.24 3. How to connecting your computer to the wireless network? (under Windows 7 OS)(1) In Windows 7, click on the wireless network icon on the bottom right of your desktop, andchoose your wireless network name from the list.e setup.(2) Click “Connect”.(3) If you have setup a security key, it will prompt for your pass code. Enter your pass code,and then click “OK”. Alternatively, you can press the WPS button on the side of the routerto send the password automatically (instead of typing it in).(4) After a few seconds, you should be connected to the network.Troubleshooting:User manual and Frequently Asked Questions are available for SAPIDO router.Please visit SAPIDO website .www.sa pi do t e c h.c o m ADD 383, Sec. 2, Minsheng Rd.,West Central District, Tainan City700, Taiwan E -m a i l *********************.twSAPIDO Technology Inc.。
- 1、下载文档前请自行甄别文档内容的完整性,平台不提供额外的编辑、内容补充、找答案等附加服务。
- 2、"仅部分预览"的文档,不可在线预览部分如存在完整性等问题,可反馈申请退款(可完整预览的文档不适用该条件!)。
- 3、如文档侵犯您的权益,请联系客服反馈,我们会尽快为您处理(人工客服工作时间:9:00-18:30)。
宝贝乐园网站
丰富多彩的主题
丰富多彩的主题
• 探索与发现—宝宝初来到这个充满奇妙
发现和喜人变化的世界,让父母加入孩 子们来一同探索这个美妙的世界
• 文化与艺术—通过生动可爱的节目向宝
宝介绍艺术的世界、音乐的乐趣以及不 同的文化
丰富多彩的主题
• 自然与动物—通过友好的小伙伴、精彩的图片
和音乐来探索迷人而富有魅力的动物世界和大 自然
宝贝乐园的互动模式
宝贝乐园的互动网站为父母和孩子填补了频道上 的缺失并提供了全方位的经验支持:
• 网站用于为宝贝乐园屏幕 外的世界提供乐趣,走进千家万户并加强与观众 的互动
• 宝贝乐园互动网站寓教于乐的特点建立在深受喜
爱的人物角色和适宜家庭活动的基础上,例如创 建属于你自己的生日文件夹、家庭俱乐部、生活 小常识
• 宝贝乐园在全球范围内拥有450多个播放平台
•
• 宝贝乐园的精彩内容可供全球100多个国家使用
• 宝贝乐园提供17多种语言的频道,包括英语、法语、 西班牙语、德语、日语、普通话等
2003年11月
2005年10月
2006年1月
2007年1月
频道首次开播
欧洲首播
在12个国家发 布
24小时全天候 频道在32个国
• 第一首歌—像你的快乐宝宝那样观看和享受节
目,随着宝贝最爱的儿歌一起舞蹈
• 夜间—节目轻柔动人的可视图形和舒缓的音乐
都是孩童睡前需要放松精神的最佳选择
DVD
宝贝乐园的人物角色
我们的人物角色和节目
我们的人物角色和节目
我们的人物角色和节目
我们的人物角色和节目
我们的人物角色和节目
宝贝乐园BabyTV
$25mm
2000
2001
2004
2005
来源:迪斯尼公司报告和新闻发布
产品和目前形势
争取大部分美国幼儿音像销售额 在超过20个国家推出产品 2004年宝贝行星开拓了5个新产品,包
括玩具、青少年产品、固定商品、围嘴、 卫衣、幼儿用具
小行星(为学龄前儿童打造)定于在迪
斯尼DVD和迪斯尼频道首秀
1、农场动物 2、学习颜色 3、学习对立面 4、学习形状 5、让我们一起画画 6、我的花园 7、奥利弗的发现 8、野生动物 9、甜蜜的梦 10、那是什么声音 11、我最喜欢的儿歌1 12、我最喜欢的儿歌2
Farm Animals Learning Colors Learning Opposites Learning Shapes Let’s Paint Together My Garden Oliver Safari Animals Sweet Dreams What’s That Sound My Favourite Nursery Rhymes Vol.1 My Favourite Nursery Rhymes Vol.2
经营模式说明
让宝贝乐园面对消费者
定价模式
保险费/ 收入部 分
免费使用两个月 分享收入
固定费
宝贝乐园和承运人间同意使用固定费
每个订购人 每月
每月订购人需交费
将智能卡交予承运商以备广播
播放
为同视频流一样而降低频带宽
度的需要的特殊音频流
不需要地方基础建设
未来潜在收益模式
宽带 家庭视讯 申请许可证/产品促销 项目的企业联合组织 赞助
成功创制了向儿童推荐精细工艺、古典
音乐、外国语言和诗歌艺术的音像生产 线(起初只针对音乐和自然)
第一年凭借口头宣传广告盈利$100,000
为发布书籍,于2001年同迪斯尼公布
了五年排他协定
2002年3月,当公司被报道以$25mm
售卖时被迪斯尼公司收购
销售进展
$165mm
$200mm
$10mm
在运行和规划 3 岁及 3 岁以下年龄段儿童频道上有丰富经验 在该领域有成功的工作业绩
在该年龄段有丰富的和不断更新的资料 目前拥有 90%的内容被用于该频道 具有所有的跨平台权利
近两年来,该频道已在规模和影响上不断扩大 给予了诸多正面反馈的父母也见证了宝贝乐园真实而有价值的服务
儿童在幼年阶段越来越多地接触到媒体
市场
儿童很早便开始接触电视及各种形式的
媒体
父母在媒体对儿童学习认知方面产生的
潜在影响反应明确
最近的研究强调了针对该年龄范围施行
有用教育内容的重要性
0–3 岁 1.01
花费在看电视上的时间
看电视
0.41 看视频
0.01 玩游戏
0–3 岁
卧室有电视儿童的百分比 4–6 岁
家开播
宝贝乐园致力于成为引导三岁以下儿童快乐成长的领军人物
市场 竞争 诀窍 内容 发展前景
颇具发展潜力的儿童节目正日渐壮大 儿童在其年幼阶段越来越多的被媒体影响
将主流电视频道作为市场竞争目标,例如:尼克国际儿童频道、迪斯尼、卡通频道 不同于传统的儿童市场,宝贝乐园专注于更具发展前景的 3 岁以下儿童市场 目前仍在 3 岁以下儿童市场的竞争者很有限
30%
43%
花费超过1时/天的儿童的百分比
0–3 岁
65%
49%
46%
33%
Source: The Henry J. Kaiser Family Foundation
看电视
听音乐
看视频/DVD 运用视频媒体
宝贝行星品牌的成功
公司历史和策略
创始人朱莉·艾格纳·克拉克于1997年在
地下室创办了该公司,并致力于研发3 岁以下儿童的产品
• 夜间- 宝贝乐园通过播放轻柔舒缓的 歌曲和影像来帮助安抚幼儿进入睡 眠
内容
众所周知,掌握有效安全地同幼儿学 习玩耍的技巧非常重要:
• 宝贝乐园独特的节目设计由众多教育专家 携手完成,并专注于该年龄段的需要与能 力范围
• 宝贝乐园为幼儿初到世界认知社会能力发 展领域的培养树立了新的里程碑
发展迅速
BabyTV
宝贝乐园
探索与发现的小小世界!
宝贝乐园频道
• 同类节目中首部针对婴幼儿的频道 • 24 小时全天候播放,100%没有广告 • 帮助儿童学习、活动和获得乐趣 • 致力于儿童的发展 • 专为父母与孩子的互动交流打造
频道设计
由于父母不能时刻照料在孩子左右, 宝贝乐园提供全天候的陪伴: • 白天 - 宝贝乐园短节目中穿插有儿 童喜爱的歌曲,有助于促进儿童学 习、活动、收获乐趣及亲子间的互 动交流。
《宝贝乐园》的DVD围绕孩子感兴趣,并对孩子有益的主 题展开,组成形式丰富多样,包含:2D、3D、布艺等形 式各异的动画,欢快有趣的儿歌和童谣,取材于现实生活 的情景体验,具有互动性和趣味性的游戏等等。 每张DVD由几个时长为5分钟左右的动画、歌谣、游戏等 构成,契合孩子注意力较为集中的时间。
《宝贝乐园》Baby TV 目录