红苹果PE90FH高清数字矩阵
海康嵌入式多屏控制器-4U 7U 使用说明书

嵌入式多屏控制器V3.1.0前言适用型号嵌入式多屏控制器-4U、嵌入式多屏控制器-7U符号约定防静电窍门修订记录使用安全须知下面是关于产品的正确使用方法、为预防危险、防止财产受到损失等内容,使用设备前请仔细阅读本说明书并在使用时严格遵守,阅读后请妥善保存说明书。
使用要求设备在芬兰、挪威、瑞典和丹麦使用时需要注意:设备可连接到一个IT配电系统。
●请勿将设备放置和安装在阳光直射的地方或发热设备附近。
●请勿将设备安装在潮湿、有灰尘或煤烟的场所。
●请保持设备的水平安装,或将设备安装在稳定场所,注意防止本产品坠落。
●请勿将液体滴到或溅到设备上,并确保设备上没有放置装满液体的物品,防止液体流入设备。
●请将设备安装在通风良好的场所,切勿堵塞设备的通风口。
●仅可在额定输入输出范围内使用设备。
●请勿随意拆卸设备。
●请在允许的湿度和温度范围内运输、使用和存储设备。
电源要求使用双电源时需要注意:双电源,一般要求断电时同时断开。
●请务必按照要求使用电池,否则可能导致电池起火、爆炸或燃烧的危险!●更换电池时只能使用同样类型的电池!●产品必须使用本地区推荐使用的电线组件(电源线),并在其额定规格内使用!●请务必使用设备标配的电源适配器,否则引起的人员伤害或设备损害由使用方自己承担。
●请使用满足SELV(安全超低电压)要求的电源,并按照IEC60950-1符合Limited Power Source(受限制电源)的额定电压供电,具体供电要求以设备标签为准。
●请将I类结构的产品连接到带保护接地连接的电网电源输出插座上。
●器具耦合器为断开装置,正常使用时请保持方便操作的角度。
目录前言 (I)使用安全须知 (II)1 产品概述 (1)1.1产品简介 (1)1.2产品技术参数 (1)1.3功能特性 (3)1.3.1 整机性能 (3)1.3.2 结构特性 (3)1.3.3 硬件特性 (3)1.3.4 软件特性 (4)1.4系统各板卡介绍 (4)1.5主机系统 (6)1.5.1 4U主机箱 (6)1.5.2 7U主机箱 (7)1.5.3 主控板 (7)1.5.4 控制板 (8)1.6业务板 (8)1.6.1 VI0401HD DVI输入卡 (9)1.6.2 VI0801HS SDI输入卡 (9)1.6.3 VI0801HC HDCVI输入卡 (10)1.6.4 VI3201FB CVBS输入卡 (10)1.6.5 VI0201UH HDMI超高清输入卡 (11)1.6.6 VI0801HH HDMI高清输入卡 (11)1.6.7 VI0401HH HDMI采集卡 (12)1.6.8 VI0401HS 3G-SDI采集卡(带环通输出) (12)1.6.9 VO0401HD DVI输出卡 (13)1.6.10 VO0801HH HDMI输出卡 (13)1.6.11 VO0401HH HDMI输出卡 (14)1.6.12 VO0405UH 4路HDMI网络解码卡 (14)1.6.13 VO0801HS HD-SDI输出卡 (15)1.6.14 VO0401HS 3G-SDI输出卡(带复制输出) (15)1.6.15 LSC0801HN 8路LED显示屏发送卡 (16)1.6.16 LSC0805HN 8路RJ45解码发送卡 (16)2 开箱检查和线缆连接 (17)2.1检查步骤 (17)2.2设备安装注意点 (17)2.3安装连接示意图 (18)3 WEB操作 (19)3.1网络连接操作 (19)3.2登录WEB (19)3.3屏幕 (21)3.3.1 添加屏幕 (21)3.3.2 信号配置 (22)3.3.3 添加设备 (25)3.3.4 实时上墙 (25)3.3.5 预案管理 (26)3.3.6 窗口管理 (28)3.3.7 区块/窗口分割 (28)3.3.8 刷新电视墙 (31)3.3.9 鹰眼地图 (31)3.3.10 配电柜开关 (32)3.3.11 屏幕管理 (32)3.3.12 高级功能 (39)3.4设置 (45)3.4.1 系统设置 (45)3.4.2 网络设置 (56)3.4.3 事件管理 (63)3.4.4 信号管理 (64)3.4.5 显示管理 (71)3.4.6 扩展配置 (91)3.5信息 (93)3.5.1 设备信息 (94)3.5.2 帮助 (97)3.6退出 (97)4 本地界面配置 (98)4.1本地界面基本操作 (98)4.1.1 开机 (98)4.1.2 关机 (98)4.1.3 进入系统菜单 (99)4.1.4 主界面 (100)4.1.5 输出设备树 (102)4.1.6 输入设备树 (103)4.1.7 显示设置 (103)4.1.8 输入组 (106)4.1.9 预案 (110)4.2菜单高级操作 (111)4.2.1 菜单导航 (111)4.2.2 菜单操作 (112)4.2.3 系统设置 (112)4.2.4 高级选项 (120)4.2.5 系统信息 (126)4.3关闭系统 (129)5 DSS操作 (131)6 常见问题 (132)6.1常见问题 (132)6.2使用维护 (133)附录1 鼠标操作 (135)附录2 法律声明 (137)附录3 网络安全建议 (138)1产品概述1.1产品简介嵌入式多屏控制器是业界最新一代专业多屏图像处理设备,其基于ATCA(Advanced Telecommunications Computing Architecture 高级电信计算架构)架构设计,融合多项独有专利技术,使得产品具有多个动态画面在多个窗口中拼接缩放叠加在多个屏幕上实时显示的功能。
天津广播电视台2016年播出分控系统高清化改造项目成交明细单项目

11
块
18,986
18
画面分割器
GV
KALEIDO-X16-D
独立一体式16路高标清输入2路输出画面分割器,单电源
Grass valley
加拿大
89,640
2
台
179,280
GV
KXA-X16-PSU
备用电源
Grass valley
加拿大
4,482
2
块
8,964
19
双模卫星校时钟
Hinac
TVZ6100
双模卫星校时钟(北斗和GPS),带天线
青岛广研所
山东
11,700
1
台
11,700
20
高稳时钟
Hinac
GS2
高稳时钟
青岛广研所
山东
7,150
1
台
7,150
Hinac
TVZ3002/E
时码选择器
青岛广研所
山东
975
1
台
975
Hinac
SF12E
时码分配中继器(EBU)
青岛广研所
山东
1,365
冗余电源
Grass valley
加拿大
631
2
块
1,262
GV
CP1604
16×4高清矩阵切换面板
Grass valley
加拿大
996
2
块
1,992
GV
RP16
遥控面板组件
Grass valley
加拿大
2,490
2
个
4,980
12
双联液晶监视器
OSEE
音频设备清单

6400
8
RME/Fireface UFX专业火线音频接口声卡
最新的RME专业音频核心技术,UFX在通过USB或火线时的延迟达到革命性的超低程度。60路192千赫USB和火线音频接口;30条输入/30条输出通路;12个模拟I/O,带先进并行转换(APC)的4个话筒/乐器前置放大器;1个AES/EBU I/O,2个ADAT I/O(或者1个ADAT加光纤SPDIF I/O);2个MIDI I/O,1个字时钟I/O;火线和USB操作,TotalMix FX内部效果;60条音频通路!数字控制的高端前置放大器,基准级的转换器和完整的192千赫操作。USB或火线超低延迟,与传统的RME驱动稳定性相结合地工作方式。包括有源抖动抑制,专业级基准电平支持,先进的独立功能性,RME的独特DIGICheck仪表显示和分析工具,当然可以在Windows电脑和苹果电脑上一样地工作。
1
4500
11
Presonus Central Station PLUS
信号分配器
专门为录音室而设计的一款监听系统新品,它包含有五组立体声输入与输出(两组数字,三组模拟),均能提供最纯的信号通路。在输出方面,模拟输出分为Speaker、Main、Cue三种,第一种为无源式,后两种为有源式并且具有阻抗平衡,都采用了1/4"TRS平衡连接装置。同轴Toslink S/PDIF数字输出能处理的音频数据可达到24-bit/192 kHz。此外,Central Station还具有录音对讲功能,拥有两个高解析度的30段数字式LED电平表。值得一提的是,Central Station的主音频信号通路采用了无源方式,因此不存在任何放大器所带来的噪音、声染色以及失真问题,它将带您通透、平滑、宽频率、高动态余量、低噪音的高质量监听效果。
教室音频系统安装及操作手册说明书
Classroom Audio System教室音频系统 Installation and Operating Manual安装及操作手册V 1.3重要的安全说明重要的安全说明1. 在安装和使用设备前请先仔细阅读本安全操作规程。
2. 请保存好您的安全操作指南便于以后作参考用。
3. 请遵守所有设备操作指南中的“警告”事项。
4. 须遵守各项操作指南中的规章原则。
5. 清洁设备:清洁设备之前,请先关掉电源,从插座中拔出设备插头,将各连接的系统单元拆卸出来,清洁时请用干燥的软布擦拭。
6. 未经生产厂家同意,不要使用任何不匹配的附件配置,这都有可能引起危险事故。
7. 勿将设备置于潮湿或靠近热源的地方,以免发生危险。
8. 设备不应遭受水滴或水溅,不应放置诸如花瓶一类装满液体的物品。
9. 电源插头作为断接装置,应便于操作。
10. 设备应可靠连接到带保护接地的电网电源输出插座上。
11. 勿将设备放置在不稳固的台面上;在运输过程中避免设备遭受强烈振动而引起损坏,建议在运输前选用合适的包装或使用原包装。
12. 请勿阻塞设备上的通风开口,并保持室内的空气通畅,便于设备的维护。
13. 供电电压:AC 100 V-240 V 50 Hz/ 60 Hz14. 设备连接所需要的延长电缆线请绕道穿行,勿有重物挤压,这样能有效维护系统的正常工作。
15. 每套系统中所连接的接收器不得超过规定数量,否则可能会导致整个系统中设备的异常工作,如有特殊要求请与距离您最近的深圳台电售后服务中心取得联系。
16. 确保设备不被任意拆开机壳,也不允许任何硬质导体或液态物质残留在机壳内。
17. 设备有需要维护时,不要自行拆卸,请及时与距离您最近的深圳台电售后服务中心取得联系。
18. 所有TAIDEN产品将提供一定期限(详见保修卡)免费保修,但人为损坏除外,例如:A. 设备因人为作用被摔坏;B. 因操作员操作不当而导致设备受损;C. 自行拆卸后而导致部分设备零件受损或丢失。
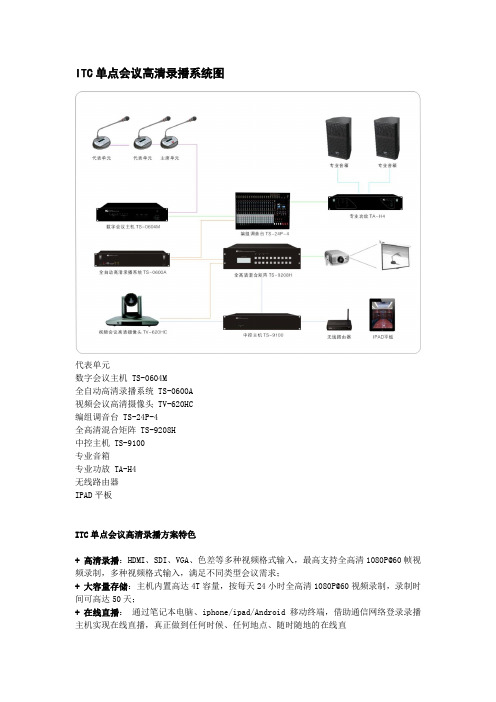
ITC单点会议高清录播系统图
ITC单点会议高清录播系统图
代表单元
数字会议主机 TS-0604M
全自动高清录播系统 TS-0600A
视频会议高清摄像头 TV-620HC
编组调音台 TS-24P-4
全高清混合矩阵 TS-9208H
中控主机 TS-9100
专业音箱
专业功放 TA-H4
无线路由器
IPAD平板
ITC单点会议高清录播方案特色
+ 高清录播:HDMI、SDI、VGA、色差等多种视频格式输入,最高支持全高清1080P@60帧视频录制,多种视频格式输入,满足不同类型会议需求;
+ 大容量存储:主机内置高达4T容量,按每天24小时全高清1080P@60视频录制,录制时间可高达50天;
+ 在线直播:通过笔记本电脑、iphone/ipad/Android移动终端,借助通信网络登录录播主机实现在线直播,真正做到任何时候、任何地点、随时随地的在线直
播;
+ 在线点播:通过台式电脑、笔记本电脑、iphone/ipad/Android移动终端,借助通信网络登录录播主机实现在线点播,支持搜索点播、按日期点播等点播模式,
最大支持超过10个用户同步点播;
+ 在线下载:通过台式电脑或笔记本电脑,借助通信网络登录录播主机实现在线下载,下载标准AVI视频格式,几乎业内的所有播放器都可以打开录像文件,使用方
便,简单。
不需要专用播放器。
+ 视频录播模式:系统支持高达7种录制模式,包括有单画面、画中画、画外画等录制模式,用户可根据现场需求便捷任意选择录播模式;
应用场所
+ 各类中小型会议室、培训会议室、数字法庭、会商室等;。
9030高清终端概述

丢包率
9030
没有超强纠错的产品
小于0.5%
损伤基本无察觉
有损伤可察觉,但不 明显
0.5%~1%
损伤基本无察觉
损伤显著
1%~3%
有损伤基本不可察觉
恶化严重
3%~5%
有损伤可察觉,但不 明显
图像恶劣,沟通无法 进行
2.8强大的字幕、横幅功能
中文会场名显示 ViewPoint 9030高清视讯终端提供了中文会场名显示功 能,用户可以轻松分辨出当前观看的是哪个会场。设置 的字幕可以灵活地在屏幕上、下、左、右显示,更可以 选择16种不同的颜色显示。 数字图片横幅功能 ViewPoint 9030高清视讯终端提供了数字字幕横幅编辑 功能。用户可以方便地向远端会场发送上、中、下三个 区域的横幅组合内容,并且提供区域的自动调整、自适 应实景编辑、图片插入、背景透明度/颜色/字体可调、 多种的字幕滚动方式、中文和英文字幕、预览等强大功 能,更可以选择16种不同的颜色显示。应用强大的字幕 短信功能,增强了与会各会场之间的沟通和交流。
四、终端应用
主屏幕 • 打开监视器与终端电源, 待终端开启完成后, 进入如下
图所示的主屏幕页面。
1 提示信息 2 视频 窗口 3/4 操作项 5 本地 IP 地址 6 状 态图标 7 系统时间
遥控器介绍 可以使用遥控器发出呼叫、调整音量、 浏览页面和选择选项。
• 页面语言设置为中文或英文时, 如果需要 输入文本, 按数字键。 例如, 要输入字母 “ c ”, 请先按遥控器的 键, 将输入法切 换为“ abc ”, 然后连续 3 次按遥控器的数 字“ 2 ” 键或用遥控器的右方向键选择字母 “ c ”后, 按遥控器的 OK键。
如果不希望远端会场听到您的讲话,可以关闭本地麦 克风。 按遥控器的 键,可以关闭或打开本地麦克风。
康佳电视进入总线方法
康佳彩电总线进入方法详解1.康佳彩电18大系列K/N系列、SK系列、S系列、SE系列、SA系列、A系列、C系列、E系列、F系列、ST系列、TA8880CN机芯(画中画系列)、倍频机芯、W机芯(背投系列)、T系列(数字高清)、I系列(数字高清)、M、FM系列(数字高清)、FG、FT系列(数字高清)、MV系列(数字高清)。
2.1 K/N系列2.1.1彩电配置一览表主要IC:超级芯片TDA9380或TDA93832.1.2总线调整方法机型:TDA9380掩膜后的型号为CKP1402SA,代表机型有:P2162K、T2168K、T2168N、P2179K、T2176N、T2176K等;TDA9383掩膜后的型号为CKP1403SA,代表机型有:T3468K、P3460K、P2960K、P2961K、P2962K、P2962K1、P2998K、T2975K、T2968K、T2976K、T2968N、P2562K、P2579K、T2568K、T2568N按MENU(菜单)键调出菜单显示(注:菜单显示时间为10s),在菜单未消失前连续按回看键5次便可进入工厂调整菜单。
按MENU键可依次选择菜单1到菜单4。
选中需调整的菜单后,可用节目+/-键选择需调整的项目(选中后变为红色);用音量控制键调节选中项目的参数值,直至符合要求为止。
当所有调试完成后,再按一次回看键即可退出总线调整模式,回到正常收看状态。
2.1.3总线故障故障现象:接收PAL-I制信号时,伴音音轻且有杂音。
检修提示:进入维修状态,在维修菜单5内设有伴音制式设定项目,其中SOUND FILTER 即是伴音滤波器选择设定项目,数据为"00"时,选择内部SIF电路处理全制式伴音信号;"01"时,选择外部电路处理6.5MHz伴音信号;"02"时,选择外部电路处理6.0MHz伴音信号;"03"时,选择外部电路处理全制式伴音信号。
大恒图像 水星二代(MERCURY2)GigE 数字相机 应用说明书
水星二代(MERCURY2)GigE数字相机应用说明书版本:V2.0.0本手册中所提及的其它软硬件产品的商标与名称,都属于相应公司所有。
本手册的版权属于中国大恒(集团)有限公司北京图像视觉技术分公司所有。
未得到本公司的正式许可,任何组织或个人均不得以任何手段和形式对本手册内容进行复制或传播。
本手册的内容若有任何修改,恕不另行通知。
© 2023中国大恒(集团)有限公司北京图像视觉技术分公司版权所有网站:公司总机:************客户服务热线:400-999-7595销售信箱:************************支持信箱:**************************首先感谢您选用大恒图像产品,水星二代(MERCURY2)GigE接口数字相机是我公司水星一代(MERCURY)数字相机的升级产品,在相机功能上有所增加,结构上有所改进。
水星二代GigE相机包括标准版(MER2-G(-P)系列),Pro版(ME2P-G-P系列)、Super版(ME2S-G-P系列)和China版(ME2C-G(-P)系列)。
相机采用了GigE标准接口,安装、使用方便,适用于工业检测、医疗、科研、教育、安防等领域。
水星二代GigE接口数字相机是微型相机,对于相机尺寸要求苛刻的用户,它们将会是一个不错的选择。
本手册详细介绍了水星二代GigE接口数字相机的应用。
概述 (1)系列概述 (1)型号名称说明 (1)遵循的标准 (1)相关文档及软件下载 (1)注意事项及认证声明 (2)安全声明 (2)使用注意事项 (2)EMI、ESD注意事项 (3)使用环境注意事项 (3)相机机械安装注意事项 (3)认证声明 (3)安装指南 (5)主机端准备 (5)3.1.1. 用户软件组成 (5)3.1.2. 用户软件接口 (5)相机供电 (6)相机驱动安装 (7)3.3.1. 系统要求 (7)3.3.2. 驱动安装 (7)相机IP配置 (7)打开相机采集 (8)性能参数 (9)重要参数解释 (9)4.1.1. 关于光谱响应图 (9)MER2-G(-P) 系列 (9)4.2.1. MER2-041-302GM/C(-P) (9)4.2.3. MER2-134-90GM/C(-P) (12)4.2.4. MER2-137-90GM/C(-P) (14)4.2.5. MER2-160-75GM/C(-P) (15)4.2.6. MER2-202-60GM/C(-P) (17)4.2.7. MER2-203-30GC-P-L (18)4.2.8. MER2-204-30GC-P-L (20)4.2.9. MER2-231-41GM/C(-P) (21)4.2.10. MER2-302-37GM/C(-P) (23)4.2.11. MER2-503-23GM/C(-P) (24)4.2.12. MER2-503-23GM-P POL (26)4.2.13. MER2-507-23GM/C(-P) (27)4.2.14. MER2-507-23GM(-P) NIR (29)4.2.15. MER2-532-22GM/C (30)4.2.16. MER2-630-18GM/C(-P) (32)4.2.17. MER2-1070-10GM(-P) (33)4.2.18. MER2-1220-9GM/C (35)4.2.19. MER2-2000-6GM/C(-P) (36)ME2C-G(-P) 系列 (38)4.3.1. ME2C-041-302GM/C(-P) (38)4.3.2. ME2C-051-120GM/C(-P) (39)4.3.3. ME2C-137-90GM/C(-P) (41)4.3.4. ME2C-160-75GM/C(-P) (42)4.3.5. ME2C-202-60GM/C(-P) (44)4.3.6. ME2C-203-30GC-P-L (45)4.3.7. ME2C-204-30GC-P-L (47)4.3.8. ME2C-231-41GM/C(-P) (48)4.3.9. ME2C-240-48GM/C(-P) (50)4.3.10. ME2C-302-37GM/C(-P) (51)4.3.11. ME2C-503-23GM/C(-P) (53)4.3.12. ME2C-507-23GM/C(-P) (54)4.3.13. ME2C-507-23GM(-P)-NIR (56)4.3.14. ME2C-532-22GM/C (57)4.3.15. ME2C-630-18GM/C(-P) (59)4.3.16. ME2C-1070-10GM(-P) (60)4.3.17. ME2C-1220-9GM/C (62)4.3.18. ME2C-2000-6GM/C(-P) (63)ME2S-G-P 系列 (65)4.4.1. ME2S-1260-9GM/C-P (65)ME2P-G-P 系列 (66)4.5.1. ME2P-231-41GM/C-P (66)4.5.2. ME2P-503-23GM/C-P (68)4.5.3. ME2P-560-21GM/C-P (69)4.5.5. ME2P-900-13GM/C-P (72)4.5.6. ME2P-1220-9GM/C-P (74)4.5.7. ME2P-1230-9GM/C-P (75)4.5.8. ME2P-1840-6GM/C-P (77)4.5.9. ME2P-2000-6GM/C-P (78)4.5.10. ME2P-2621-4GM/C-P \ ME2P-2622-4GM/C-P (80)4.5.11. ME2P-2621-4GM-P NIR \ ME2P-2622-4GM-P NIR (82)机械尺寸 (84)相机尺寸 (84)光学接口 (88)固定块尺寸 (88)滤光片及镜头 (89)滤光片规格参数及响应图 (89)镜头选型参考 (90)6.2.1. HN-2M 系列定焦镜头 (91)6.2.2. HN-5M 系列定焦镜头 (91)6.2.3. HN-6M 系列定焦镜头 (92)6.2.4. HN-20M 系列定焦镜头 (92)6.2.5. HN-P-6M 系列定焦镜头 (93)6.2.6. HN-P-10M 系列定焦镜头 (93)6.2.7. HN-P-20M 系列定焦镜头 (94)6.2.8. HN-P-25M 系列定焦镜头 (94)6.2.9. HN-P 系列8K~16K线扫镜头 (94)电气接口 (95)LED灯状态 (95)网口 (95)I/O接口 (95)7.3.1. I/O接口定义 (95)MER2/ME2P系列 (95)ME2S/ME2C系列 (96)Line0(光耦隔离输入)电路 (97)Line1(光耦隔离输出)电路 (100)Line2/3(双向)电路 (102)7.3.2.3.1. Line2/3配置成输入管脚 (103)7.3.2.3.2. Line2/3配置成输出管脚 (105)功能定义 (108)I/O控制 (108)8.1.1. 配置输入引脚 (108)8.1.2. 配置输出引脚 (109)8.1.3. 读取引脚状态 (113)图像采集控制 (114)8.2.1. 开始采集/停止采集 (114)开始采集 (114)停止采集 (115)8.2.2. 采集模式 (117)8.2.3. 触发类型选择 (117)8.2.4. 触发模式切换 (119)8.2.5. 连续采集及其配置 (120)8.2.6. 突发采集模式 (120)8.2.7. 软触发采集及其配置 (121)8.2.8. 外触发采集及其配置 (121)8.2.9. 交叠曝光和非交叠曝光 (122)8.2.10. 设置曝光 (123)设置曝光模式 (123)设置Sensor曝光模式 (125)设置曝光时间模式 (127)设置曝光时间 (128)8.2.11. 曝光延迟 (128)基本属性设置 (132)8.3.2. 像素格式 (132)8.3.3. ROI (137)8.3.4. 自动曝光和自动增益 (137)自动曝光自动增益ROI设置 (137)自动增益 (138)自动曝光 (139)8.3.5. 测试图 (139)8.3.6. 参数组 (141)8.3.7. 用户自定义名称 (143)8.3.8. 时间戳 (143)8.3.9. Binning (144)8.3.10. 像素抽样 (146)8.3.11. 镜像翻转 (147)8.3.12. 数字移位 (149)8.3.13. 采集状态 (150)8.3.14. 黑电平和自动黑电平 (151)黑电平 (151)自动黑电平 (151)8.3.15. 取消参数范围限制 (151)8.3.16. 用户数据区 (159)8.3.17. 定时器 (159)8.3.18. 计数器 (160)图像处理 (161)8.4.1. 环境光源预设 (161)8.4.2. 自动白平衡 (161)自动白平衡ROI (161)自动白平衡调节 (162)8.4.3. 颜色转换 (163)8.4.4. 饱和度 (164)8.4.5. Gamma (165)8.4.7. 平场校正 (167)平场校正系数的求取和预览 (168)系数的读取和保存 (169)文件的读取与保存 (169)8.4.8. 查找表 (169)8.4.9. HDR (170)8.4.10. 降噪 (171)图像传输 (171)8.5.1. 帧率计算 (171)8.5.2. 最大帧率 (172)8.5.3. 包长 (179)8.5.4. 包间隔 (179)8.5.5. 预留带宽 (180)8.5.6. 传输控制 (180)8.5.7. 帧存控制 (180)事件 (181)8.6.1. 曝光结束事件 (182)8.6.2. 图像帧数据丢弃事件 (182)8.6.3. 帧存不为空事件 (182)8.6.4. 触发信号溢出事件 (182)8.6.5. 事件队列溢出 (182)8.6.6. 帧高速连拍开始触发信号溢出事件 (183)8.6.7. 帧开始触发信号等待事件 (183)8.6.8. 帧高速连拍开始触发信号等待事件 (183)软件使用 (184)IP配置 (184)9.1.1. 界面 (184)9.1.2. 使用说明 (185)枚举 (185)自动配置IP (185)显示信息 (186)修改相机IP地址 (187)修改相机IP配置方式 (187)修改用户自定义名称 (188)复位设备和重连设备 (188)9.1.3. 注意事项 (188)IP地址格式检查 (188)用户自定义名称长度限制 (189)提示信息 (189)帧率计算工具 (189)查找表生成插件 (190)9.3.1. 界面 (190)9.3.2. 使用说明 (192)使用场景 (192)基准Lut选择 (192)调整Lut (194)保存查找表 (195)读取Lut (195)9.3.3. 注意事项 (196)从设备中读取 (196)Lut写入设备 (196)目录结构 (196)平场校正插件 (196)9.4.1. 界面 (197)9.4.2. 使用说明 (198)平场校正执行步骤 (198)采集亮场图像 (198)执行平场校正 (199)校正数据从设备读取/写入设备 (199)校正数据从文件加载/保存到文件 (199)9.4.3. 注意事项 (200)平场校正实现方式 (200)静态坏点校正插件 (201)9.5.1. 界面 (201)9.5.2. 使用说明 (203)执行静态坏点校正步骤 (203)捕获图像 (203)静态坏点校正 (203)坏点数据文件使用 (204)常见问题处理 (205)版本说明 (206)联系方式 (210)销售联系方式 (210)技术支持联系方式 (210)总部及各办事处联系方式 (210)1.概述概述系列概述水星二代(MERCURY2)GigE数字相机是由大恒图像自主研发的成熟产品,性能出色、设计小巧、价格实惠、安装、使用方便。
AV系统集成
日本
1
台
日本
1
台
中国 德国
1 1
台 台
比利时 加拿大
2 8
台 只
加拿大
4
只
加拿大
2
只
2分频,全频扬声器 频响范围(±3 dB):55 Hz - 18 kHz 指向性(-6 dB) H x V:60°x 40° 最大声压级(SPL):132.5 dB 阻抗:8 Ω 功率 (AES / Peak):610 / 2440 W 2分频,同轴扬声器 频响范围(±3 dB):64 Hz - 18 kHz 指向性(-6 dB) H x V:60°x 40° 最大声压级(SPL):133 dB 阻抗:8 Ω 1720 W 2分频,全频扬声器 频响范围(±3 dB):60 Hz - 18 kHz 指向性(-6 dB) H x V:60°x 40° 最大声压级(SPL):132.5 dB 阻抗:8 Ω 功率 (AES / Peak):610 / 2440 W 4通道功率放大器 4*(1300W8Ω ,2300W4Ω ,2500W2Ω ) 高度:2U 重量:13.5kg 4通道功率放大器 4*(1300W8Ω ,2300W4Ω ,2500W2Ω ) 高度:2U 重量:13.5kg 4通道功率放大器 4*(1300W8Ω ,2300W4Ω ,2500W2Ω ) 高度:2U 重量:13.5kg 符合标准 1T8m 2路 24通路跳线板 深度:5.3 in 高度(机架数):1.75 in (1 Rack Units) 位置/触点数量:48 定制 定制 符合国标 符合国标
bnc33个马达推子32通道1主控48条输入混音通道40单声道2立体声2返送通道20个aux8单声道6立体声立体声子母线8个带有rollout的dca编组32个模拟xlrtrs混合麦克风线路输入2个模拟rca立体声线路输入16个模拟xlr输出3434usb20数字录音回放录音回放通过usb存储设备1个支持ny64d音频介面卡的扩展槽小型数字调音台16个推子5条母线3段参量均衡hpf功能每通道压限内置数字效果t45020bva03ncdi75500u8g16gssd1tb1g独显win10计算机外置音频接口rmebabyfacepro德国数字音频处理器apexintellix48比利时主扩扬声器adamsons10加拿大低音扬声器adamsons119加拿大中置音箱adamsonp12加拿大补声音箱adamsonp15加拿大舞台固定返听扬声器adamsonpc12葡萄牙舞台流动返听扬声器adamsonp12加拿大主扩声音箱功放labfp10000q瑞典补声音箱功放labfp10000q瑞典返听和中置音箱功放labfp10000q瑞典线阵扬声器专用吊架adamsonsseriessupportframe符合标准加拿大电动葫芦movecatbgvd81t8m德国葫芦控制器中国音频跳线盘switchcraftmt48fn美国音频地插盒定制定制中国音箱接线盒定制定制中国15音箱支架soundking符合国标中国立地话筒架soundking符合国标中国h3cs1224中国subtotalviky200w中国16eps3544中国18ms3108z4中国32计算机外置数字音频接口12输入和12输出通道spdifio光纤usb20兼容usb数字音频处理器4入8出192khz采样率2分频线阵列全频扬声器频响范围3db
SWIT电子M-1093H 9寸全高清杯具机柜装置LCD显示器用户手册说明书
Model: M-1093H9” Full HD Rack Mount LCD MonitorUser ManualVer :ASWIT Electronics Co., Ltd.Please read th is User Manual throughout before using.Preface1. All internal technologies of this product are protected, including device, software and trademark.Reproduction in whole or in part without written permission is prohibited.2. All brands and trademarks of SWIT Electronics Co., Ltd. are protected and other relativetrademarks in this user manual are the property of their respective owners.3. Due to constant effort of product development, SWIT reserves the right to make changes andimprovements to the product described in this manual without prior notice.4. The warranty period of this product is 2 years, and does not cover the following:(1) Physical damage to the surface of the products, including scratches, cracks or other damage to the LCD screen or other externally exposed parts;(2) The LCD dot defects are not over three;(3) Any damage caused by using third-party power adaptors;(4) Any damage or breakdown caused by use, maintenance or storage not according to the user manual.(5) The product is disassembled by anyone other than an authorized service center.(6) Any damage or breakdown not caused by the product design, workmanship, or manufacturing quality, etc.*Any sales personnel have no rights to provide additional warranty.5. For any suggestion and requirement on this product, please contact us through phone, fax, Email,etc.SWIT Electronics Co., Ltd.Address: 10 Hengtong Road, Nanjing Economic and Technological Development Zone,Nanjing 210038, P.R.ChinaPhone: +86-25-85805753Fax: +86-25-85805296Email:***************Website: MaintenanceWarning1. In order to reduce the risk of fire and electrical shock, do not lay this product in rain or dampplaces.2. Please keep away from the strong magnetic field; it may cause the noise of the video and audiosignals.The power1. Please use the power adapter provided or recommended by the manufacturer in order to avoiddamage.2. For a third party power adapter, please make sure the voltage range, supplied power, andpolarity of power lead are fit.3. Please disconnect the power cable under the following situations:(A). If you do not operate this monitor for a period of time;(B). If the power cable or power adaptor is damaged;(C). If the monitor housing is broken.The monitor1. Please don't touch the screen with your fingers, which would probably deface the screen.2. Please don't press the screen; the LCD is extremely exquisite and flimsy.3. Please don't lay this product on unstable place.Cleaning1. Please clean the screen with dry and downy cloth or special LCD cleanser.2. Please do not press hard when cleaning the screen.3. Please do not use water or other chemical cleanser to clean the screen. The chemical maydamage the LCD.ContentsPreface (2)Maintenance (3)Contents (4)Packing list (4)Introduction (4)Installation Dimensions (5)Operation Instructions (6)Front Panel (6)OSD (7)Back Panel (9)Main Menu (10)Specification (16)Trouble-Shooting (17)Standard Package:1. User Manual2. Warranty Card3. LCD protective film4. Power cableM-1093H adopts IPS LCD panel, with resolution 1920×1200 and wide viewing angle H170°∕V170°. It supports 2 x 3GSDI (Level A/B), 1 x HDMI, 1 x CVBS and 1 x analog audio input. It also supports 2 x 3GSDI, 1 x HDMI, 1 x CVBS and 1 x analog audio loop through output.Features:⏹Support multiple Aspect Ratio and scan modes⏹Support multiple Marker selection (Marker, Safety Area)⏹Support multiple functions user-defined (Source ID, function keys, GPI)⏹Multiple power supply methods to meet different requirements⏹TSL UMD(RS485)Tally, GPI control⏹USB firmware upgrade⏹Support 2KInstallation Dimension The main body (in mm):Operation Instructions·Front Panel⑴Speaker: For SDI/HDMI embedded audio and analog audio monitoring. (Will not work if earphone is plugged in)⑵ButtonSOURCE: Press “SOURCE” to select SDI1, SDI2, HDMI, and CVBS signal input.F1~F5: User definable function keys. Please see details in “4. Function key” under “Main Menu”. For example: Set F1 to “Histogram”. Press F1 to open histogram and press again to close.AUDIOBAR: Press “AUDIOBAR” to switch on/off audio bar.DISPLAY: Press “DISPLAY” to turn on or turn off relevant status information, audio and video waveform.When main menu is activated, press “DISPLAY” to quit menu.⑶Rotary KnobMENU/ENTER: When the menu is inactivated, presses “MENU/ENTE” to turn on the main menu; Revolve “MENU/ENTER” to adjust settings or parameters, and press to apply;When the menu is inactivated, revolve “MENU/ENTER” to adjust sound volume. BRIGHT: 0-100 value adjustment and the default value is 50.CONTRAST: 0-100 value adjustment and the default value is 50SATURATION: 0-100 value adjustment and the default value is 50⑷POWER: Power on/off⑸TALLY Light: Red, Green and Yellow 3-color TALLY indicator·OSD⑴Time code(SDI)Under SDI input, it can display Time code. If no Time code information is detected, it will be displayed as “TC: UNLOCKED”.User can set function keys F1~F5 or GPI pins as “Time code” to turn on or off this function.⑵UMDSet up the UMD under ‘UMD” submenu.⑶AFD (SDI)User can set function keys F1~F5 or GPI pins as “AFD” to turn on or off this function. If no relevant information is detected, it will be displayed as “AFD: UNLOCKED”.⑷AudioMonitor the audio information. User can set function keys F1~F5 or GPI pins as “Audio” to turn on or off this function.The relevant parameters like position, audio channels and blending, etc can be changed under “Audio” submenu.Introduction of audio and video functions◆2-ch embedded audio metersUnder 3G/HD/SD SDI, HDMI and CVBS, it displays 2 channels embedded audio meters. The audio meter is green, and will turn yellow when audio exceeds -20dB, and turn red when audio exceeds -9dB.◆Audio alarmIf the embedded audio value is too low or no embedded audio, it will display “MUTE” or “UNLOCKED” in the audio bar.◆Time code (SDI)Under SDI input, it can display the SMPTE time code (VITC1, VITC2 or LTC) on the top of the screen, which is used extensively for synchronization, and for logging and identifying material in recorded media. If no Time code information is detected, it will be displayed as “UNLOCKED”.◆Internal Color BarUnder SDI and HDMI input, it has 100% internal color bar which helps to analyze the monitor color and adjust the display parameter.User can set function Keys F1~F5 or GPI pins as “color bar” to turn on or off this function.◆Peaking focus assist (red/blue switch)The Peaking focus assist function is to mark the sharpest edges of the image with red or blue color under SDI and HDMI input, for users to check if the subjects are focused.User can set function Keys F1~F5 or GPI pins as “Focus Assist” to turn on or off this function.◆Zebra stripesZebra Stripes are used to check if the image is over exposed or not by showing black and white lines on the monitor. It is considered over exposed when luminance value exceeds 90%.User can set function Keys F1~F5 or GPI pins as “Zebra” to turn on or off this function.◆Freeze FrameThe freeze frame is to capture and display the current broadcast frame.User can set function Keys F1~F5 or GPI pins as “Freeze Frame” to turn on or off this function.◆R/G/B/MonoR/G/B/Mono is to display only the blue/red/green primary signal or the luminance signal only so as to monitor the image noise.User can set function Keys F1~F5 or GPI pins as “R/G/B/Mono” to turn on or off this function.◆False ColorThe false color is used to aid in the setting of camera exposure. Under false color mode, there’s a color chart on the bottom of screen for reference. The color from the dark to the bright will be displayed as blue, cyan, green, yellow, orange and red in a consecutive way. User can set function Keys F1~F5 or GPI pins as “False color” to turn on or off this function.◆AFD (SDI)It is the abbreviation of active format description. AFD is to display the SDI embedded AFD information graphically on the screen.◆H/V Delay (SDI)Under SDI input, H/V Delay can be used to display line/field blanking signal, and to observe the horizontal and vertical synchronous signal.◆UMDWhen using external control unit, it can display the video source ID and tally information on the screen.◆Image FlipHorizontal, vertical, horizontal and vertical two-way image flip function.·Back Panel⑴GPI: TSL UMD&GPI control socket⑵SDI-LOOP1: SDI loop through output from SDI-IN1 (BNC connector)⑶SDI-LOOP2: SDI loop through output from SDI-IN2 (BNC connector)⑷CVBS-OUT: CVBS output (BNC connector)⑸HDMI socketHDMI-IN: HDMI input (HDMI-A connector)HDMI-OUT: HDMI loop through output from HDMI-IN (HDMI-A connector)⑹AUDIO IN: 3.5mm analog audio input (CVBS)⑺AUDIO OUT: 3.5mm audio output, to monitor SDI embedded audio, HDMI and analog audio output⑻DC 12V IN: Connect with DC12V 4-pin XLR power adapter, support 6.5V-24V voltage input (Pin 1:Negative, Pin 4: Positive)⑼CVBS-IN: CVBS input (BNC connector)⑽SDI-IN2: SDI input (BNC connector)⑾SDI-IN1: SDI input (BNC connector)⑿USB socket⒀Power adaptorMain MenuM-1093H has OSD to adjust the parameters and settings, for example: Picture, Color Temp., Function Key, etc.1. Press “MENU/ENTER” button, the main menu will popup from the left top of the screen. The selected main menu highlights in yellow.2. Revolve “MENU/ENTER” to select submenu, the selected submenu highlights in yellow, press “MENU/ENTER” to apply and enter into the selected submenu’s items.3. Revolve “MENU/ENTER” to select the item which needed to be adjusted, press “MENU/ENTER”, the selected item and its parameters will be highlighted in yellow.4. Revolve “MENU/ENTER” to change the selected item’s parameter, press “MENU/ENTER” to apply and save the settings.5. Revolve “MENU/ENTER” to select “Exit”, press “MENU/ENTER” to quit submenu. Select “Exit & Status” under the Main Menu and press to quit Main Menu.Notice:*The items in gray can not be set up.*If there is no operation under the setted time, the menu will automatically save settings and quit.*If the key inhabit function is turned on, except key inhibit function, all other items are in grey. Please turn off the key inhibit function to adjust the items.Submenu introduction(the default values are marked with underline )1. Exit & StatusDisplays the current status, the details are as down below:*1 Display the current video signal and format*2 Display the current function keys setup2. PictureTo adjust picture parameters3. Color TempTo select different color temperature or setup user-defined color parameters.* Only “Color Temp” is set to “User”, the Red/Blue/Green Gain or Red/Blue/Green Bias can be adjusted.4. Function KeyTo define the F1~F5 function keys.*1 Function keys F1-F5 can be setted as the down below functions:Time code, Zebra, Audio Bar, False Color, AFD, H/V Delay, R/G/B/Mono, Marker , Color Bar, UMD,Audio Alarm, Focus Assist , Aspect Ratio, Scan Mode, Zoom Mode, Mute, Freeze Frame, Flip Mode, CVBS,HDMI, SDI1,SDI2, Color Temp.For example: Set F3 to “R/G/B/Mono” under “Function key” submenu. User can press F3 on the front panel to adjust the parameters of “R/G/B/Mono”, and the “R/G/B/Mono” will change and follow the sequence: Blue Only →Red Only →Green Only →Mono →Off.5. GPIUser can set GPI pins1~4 to relevant functions to turn on or off this function.*1 When “GPI control” is set to “On”, the monitor can be operated through external GPI control unit.*2 The GPI pins can be setted to the down below functions:Red Tally, Green T ally, Yellow T ally, Aspect Ratio, Scan Mode, Zoom Mode, Mute, Freeze Frame, Flip Mode, Color Temp, Time code, Zebra, Audio Bar, False Color, AFD, H/V Delay, R/G/B/Mono, Marker, Color Bar, UMD, Audio Alarm, Focus Assist.When connecting the GPI pin with ground, the setted function will be turned on, and goes out when disconnecting.Example 1: Under “GPI ” submenu, set “GPI control” to “On”, set “2 Pin” to “Red Tally”, when the pin 2 of the extenal GPI control unit is connected with ground, the Tally light on the front panel will turn red. When disconnected, the tally light will turn off.Example 2: Under “GPI ” submenu, set “GPI control” to “On”, set “4 Pin” to “Scan Mode”, when the pin 4 of the extenal GPI control unit is connected with ground, the Scan mode will change and follow the sequence: “Normal” →”Overscan”→”Native” .6. UMDSupport “TSL UMD Protocol-V3.1/V4.0” provided by Television System LTDSetup Source ID:Select “Source ID”, revolve “MENU/ENTER” to select the letters and press “MENU/ENTER" to input. Max 8 letters are supported. Select “Exit” to quit and save settings, the source ID will be displayed on top or bottom of the screen.UMD setup:⑴Connect the external control equipment with M-1093H;⑵Set “Display Type” to “UMD” under UMD submenu;⑶Make sure the “address”, “Baud Rate”, “Parity” the same;⑷Adjust the external control equipment and send UMD command, the UMD information will be display as the right photo.User can set the character and color of the UMD and the color of Tally1 and T ally2.Please see “5. GPI” to check the”RS485 pin sequence and definition.7. Marker*1 When “Fit Marker” is “Off”, the size of safety area is benchmarked against the actual display screen, accounting for 80% ~ 95% of actual display screen. When “Fit Marker” is “On”, the size of safety area is benchmarked against the area inside the scales marker, accounting for 80% ~ 95% of the area inside the scales marker.Example:Aspect ratio: 4:3 Aspect ratio: 4:3 Safety Area: 85% Safety Area: 85% Center Marker: On Center Marker: Off Fit Marker: Off Fit Marker: On8. Audio*1 When “Bar Frame” is set to “Off”, only the audio meter will be displayed.When “Bar Frame” is set to “On”, frame and real-time audio value will be displayed.*2 When “Audio Alarm” is set to “On”, if no embedded audio is detected, the audio bar will display “UNLOCKED”. If the audio value is too low, the audio bar will display “MUTE”.*3 Only under SDI I signal, channel1-2 can be selected.In audio bar, the left channel audio value is marked with green and right channel audio value is marked with red.9. Display10. System*1 Source ScanWhen set to “ON”, after turn on the monitor, the signal will be inspected and follow the sequence of “SDI1→SDI2→HDMI→CVBS”.For example: if channel is selected to SDI2, SDI-IN2 has no input, and CVBS has input. When turn on the monitor, after automatic inspection, SDI2 has no recognized signal, and CVBS has recognized signal, then the input signal will be CVBS.When set to “Off”, source scan will not be supported.*2 LogoWhen powered on, the screen will display SWIT logo.*3, *4 Update Driver/ Kernel⑴Power the monitor, insert the USB equipment with update software into the USB socket.⑵Press “MENU” to open the main menu, and revolve to “system” submenu,⑶Set “Update Driver” and “Update Kernel” to “Yes” under “System” Submenu, press “MENU/ENTER” to apply.⑷During the update procedure, please do not power off to make sure the software writing has been successfully completed.⑸After upgrading, the monitor will auto restart.11. OSD12. Key InhibitIf the “Key Inhibit” is “On”, there is no response when all the buttons expert ” MENU/ENTER” are pressed, the sreen will be displayed as ” Key Inhibit”.User can set “Key Inhibit” under “key Inhibit” submenu to “Off” to recover the functions of all buttons.SpecificationLCD PerformanceSize 9inch×2Display area 191.5×119.7 mm×2 Resolution 1920×RGB×1200Color 8 bitAspect ratio 16:9∕4:3Brightness 450 cd∕㎡Contrast 1000:1Viewing Angle Horizontal: 170°Vertical: 170° Input/outputInpu t BNC×4 3G/HD/SD-SDI input BNC×2 CVBS inputHDMI×2 HDMI inputGPI×2 UMD, GPI×1USB×23.5mm×2 analog audio inputOut put BNC×43G/HD/SD-SDI loop through output BNC×2 CVBS loop through outputHDMI×2HDMI loop through output3.5mm×2SDI/HDMI/analog audio outputVideo FormatCVBS NTSC/PALHDMI 480i/576i/480p/576p1080i(60/59.94/50)720p(60/59.94/50)1080p(60/59.94/50/30/29.97/25/24/23.98)1080psf(30/29.97/25/24/23.98)SDI SMPTE-425M-A/B 1080p(60/59.94/50)SMPTE-274M1080i(60/59.94/50)1080p(30/29.97/25/24/23.98)SMPTE-RP211 1080psf(30/29.97/25/24/23.98)SMPTE-296M 720p(60/59.94/50)SMPTE-125M 480i(59.94)ITU-R BT.656 576i(50)SMPTE-2048-2 2048×1080p(23.98/24/25/29.97/30/50/59.94/60)GeneralInput voltage DC: 6.5V~24V Power consumption 36WWorking temperature 0℃~+40℃Working humidity 10%~90%Storage temperature ﹣15℃~﹢60℃Storage humidity 10%~90% Dimensions 484×177×112.8mm Net weight (main body) 2.8 kgTrouble-shootingSymptom Possible Causes SolutionNo display The power is not turned onPlease check if the power isconnected, and thenpress ”POWER” button to turn onthe monitorUnstable power voltage Reconnect to power supply BNC or HDMI cable loosecontact or not correctlyconnectedCheck and correctly connect theBNC or HDMI cableThe attached battery is nopowerChange batteryUsing DIY power supply butthe polarity is reversedRefer to the provided power supply,reconnect the power.Image or color abnormalBad contact of BNC or HDMIcableChange cableVideo signal has Interference Remove the interference source(s) Improper adjustment of thecolor parametersAdjust the “Recall profile” to“Default” under “System” submenu Distortion of the image Reset the Aspect ratioSet to Red/Green/Blue only orMonoTurn the Blue only/ Red Only/Green Only/Mono off underR/G/B/Mono submenuTurn on the “Focus Assist”functionTurn off the “Focus Assist” function Turn on the “False Color”functionTurn off the “False Color” functionNo audio outputSet to MuteTurn off MUTE or revolve“MENU/ENTER” to adjust thevolumeBad contact of signal cable Change signal cableWrong connection or badcontact of Audio cableConnect to the correct input socket.。
- 1、下载文档前请自行甄别文档内容的完整性,平台不提供额外的编辑、内容补充、找答案等附加服务。
- 2、"仅部分预览"的文档,不可在线预览部分如存在完整性等问题,可反馈申请退款(可完整预览的文档不适用该条件!)。
- 3、如文档侵犯您的权益,请联系客服反馈,我们会尽快为您处理(人工客服工作时间:9:00-18:30)。
红苹果PE90FH高清数字矩阵
导读:红苹果PE90FH高清数字矩阵是用于高清/标清、数字/模拟等多种视频上墙的专用设备。
系统核心基于超大规模FPGA阵列数字视频处理、背板交换技术、视频编解码技术、流媒体适配技术和视频存储技术,支持1920×1080P(逐行)分辨率,即“全高清”(简称“FH”)。
向下兼容标清视频,同时具有多通道视频拼接叠加的功能和多个通道整合拼接超大屏幕输出的能力。
产品简介:
红苹果PE90FH高清数字矩阵是用于高清/标清、数字/模拟等多种视频上墙的专用设备。
系统核心基于超大规模FPGA阵列数字视频处理、背板交换技术、视频编解码技术、流媒体适配技术和视频存储技术,支持1920×1080P(逐行)分辨率,即“全高清”(简称“FH”)。
向下兼容标清视频,同时具有多通道视频拼接叠加的功能和多个通道整合拼接超大屏幕输出的能力。
产品功能:
● 支持全高清(1920x1080@60p,3Gbps)视频交换,最大支持64输出交换。
网络视频输入无限制。
● 兼容标清模拟视频交换,最大支持480路输入或64路输出全交换。
● VGA最高支持UXGA(1600×1200@60,115.2Mpixel/s)交换,最大60路输入或16路输出全交换。
● 支持多种视频输入输出接口:高清视频为YPbPr(RCA)接口;标清为CVBS 信号。
● 支持高清H.264、MPEG4网络数据流,可解标准码流,对非标准码流进行码流转换后可进行解码。
● 支持视频分割、缩放、叠加、拼接等图像处理功能。
● 最大支持16路分割和拼接,即最大16屏拼接控制。
● 支持基本图像处理算法,亮度、对比度调节、图像锐化、动态范围扩展、噪声抑制、γ校正。
● 支持在每一路输入的视频信号上叠加字符(ASCII字符+GB2312/18030字符集汉字和图形),颜色24bit(16,777,216色),透明度256级。
● 支持矢量字库,实现高质量文字缩放。
● 支持几何校正和亮度校正,具备正/背投影拼接系统的边缘融合功能。
采用系统级联的方式扩展系统的处理能力和组网能力,级联接口采用SDI接口。
● 支持多种管理接口,以太网、RS485、RS232。
● 系统采用图形化方式配置和管理,最大限度方便系统管理、操作和维护。
● 系统支持键盘操作和计算机管理两种方式。
● 音频输入与视频对应,可使用配套音频箱完成音频切换。
功能介绍:
1。
支持全高清(1920×1080@60p,3Gbps)视频交换;对VGA最高支持UXGA(1600×1200@60,115.2Mpixel/s)交换。
2。
高清/标清、数字/模拟等多种视频上墙的专用设备:
PE90FH高清数字矩阵支持高清/标清、数字/模拟等多种视频接入,多路数字信号多接口输出。
3。
便捷简单却功能强大的高清大屏控制:最大支持64路高清视频输出,输入图像中任意8路高清(或等效32路标清)可在屏幕上漫游、分割和拼接。
传统的大屏控制系统必须有:RGB矩阵、AV矩阵和专业的大屏控制器等设备,涉及的设备多,系统繁杂,大屏控制器大多为PC架构,稳定性不高。
红苹果PE90FH高清数字矩阵自身具备RGB矩阵、AV矩阵、DVI矩阵切换和专业的大屏控制器等设备,轻松实现图像缩放、叠加、拼接、分割、漫游、融合、透明度调节、色差校正、几何校正和亮度校正等丰富功能;PE90FH高清数字矩为嵌入式设备自建CPU核心采用FPGA技术,稳定性高,可维护性好。
4。
模块化设计,灵活实用的系统配置
各单板的接口设计标准,与其它设备连接方便。
通过兼容背板设计、硬件模块化设计等技术,确保硬件上的可扩展性、可维护性及单板即插即用。
通过软件的模块化设计及接口协议的标准化设计,使得软件的维护与升级很方便,易于与未来业务相适配。
红苹果PE90FH高清数字矩阵自身具备RGB矩阵、AV矩阵、DVI矩阵切换和专业的大屏控制器等设备,轻松实现图像缩放、叠加、拼接、分割、漫游、融合、透明度调节、色差校正、几何校正和亮度校正等丰富功能;PE90FH高清数字矩为嵌入式设备自建CPU核心采用FPGA技术,稳定性高,可维护性好。
5。
模拟和数字并联混合应用
针对目前视频监控系统中的多级联网、数字/模拟、标清/高清并存的现状,红苹果提供的数模结合多级联网解决方案,满足了目前公安系统对网络和高清视频图像的要求,方便了普通模拟视频的接入,保证了新建监控系统的运行,同时可将其他区域的已有系统顺利接入,实现互联互控。
普通模拟视频和高清视频分别处理但能实现整体控制,分工明确,集中管理方便实用。
PE90FH高清数字矩阵在监控中心直接将高清视频和标清视频上大屏,实现图像的缩放、叠加、拼接等功能,可完全替代大屏控制器,整体造价较低,可行性好,性价比高。
6。
良好的抗干扰和供电设计
PE90FH在产品设计中严格遵循ITU-T相关建议和中国通讯行业标准,并充分考虑到设备可能会在条件较差的机房内工作,选用了最佳电路设计方案及优质防雷器件以增强抗干扰和防雷能力,并能抵御高压、浪涌等严重干扰,系统运行稳定可靠。
技术参数
编辑解析:
红苹果在研究大量国外矩阵的基础上,结合国内的实际情况,特别是国内各地社会治安监控的需求,开发新系列产品--PE90FH高清数字矩阵。
PE90FHD真正
实现了全数字化任意输入和经高速万兆背板交换到任意输出的矩阵功能。
支持多种模拟、数字等压缩、非压缩高清视频信号输入和多种模拟、数字压缩、非压缩信号的输出转换,并可输出到模拟和数字显示设备,实现对前端监控设备的任意一个监控点到中心任意一个显示设备的切换,是一个综合的数字网络视频监控系统,实现了真正意义上的全高清、全数字化矩阵。
用户看点:
一家地方交通监控平台的技术负责人这样说:红苹果PE90FH高清数字矩阵,能真正实现全高清的视频交换,高达64路的输出,节约了不必要的成本指出,同时也为将来留下了很大的拓展空间。
该矩阵支持的简单的视频处理功能,在实际使用中很有意义。
亮度调节、噪声控制、图像锐化等功能,为交通监控中存在存在的诸多复杂问题提供了优质的解决方案。
最后,该矩阵系统简洁易用的系统管理功能,减少了实际操作中繁琐的步骤,更容易上手,维护也更加简单。
文章来源:/c24/20111/10/218523.html
文章转自:中国安防行业网。