塑料产品限压套螺纹嵌件设计参考
塑料瓶盖螺纹抽芯塑料模具设计说明书

2009届毕业生毕业设计说明书题目: 保温杯瓶盖的螺纹抽芯塑料模具设计院系名称:机电工程学院专业班级:模具学生姓名:学号:指导教师:教师职称:2009 年 5 月30 日目次1引言 (1)1.1 毕业设计目的 (1)1.2 毕业设计的内容 (1)2塑料制品的设计 (2)2.1塑料制品的几何 (2)2.2 塑料制品的尺寸精度 (3)3 塑料注射模具的设计 (3)3.1 注射机的选择 (3)3.2 分型面与浇注系统 (4)3.3 脱模机构设计 (8)3.3.1 齿轮的选择和计算 (10)3.3.2 轴的设计和计算 (15)3.4 成型零件计算 (18)3.4.1 型腔、型芯成型尺寸计算 (18)3.4.2 成型螺纹计算 (18)3.5 合模导向和定位机构的设计 (19)3.6 冷却机构设计 (19)3.7 模架的设计 (19)3.8 注塑机的校核 (20)结论 (22)致谢 (23)参考文献 (24)引言该毕业设计的题目是塑料瓶盖螺纹抽芯塑料模具的设计,是对本专业知识的综合考查。
毕业设计是大学阶段教学的最后一个环节。
毕业设计把大学几年所有本专业的各种基础知识以及相关专业知识进行系统的综合运用,也是对各种理论知识、实践经验进行巩固和提高,在设计中进一步提高自己的综合素质的一个过程。
1.1 毕业设计的目的:1)通过毕业设计,巩固和深化我们这四年里所学的基本理论、基本知识和基本技能,提高我们综合应用的能力。
2)通过毕业设计,树立实践工程的观点和正确的设计思想,获得解决专业范围内工程技术的相关经验、培养解决问题的能力。
3)通过毕业设计,训练和提高我们的设计技能,包括搜集资料、学习资料和应用资料的能力;查阅设计手册和有关参考文献的技能;设计计算、绘图及编写技术文件的能力。
由于本人能力有限,此次设计中难免有许多不正确和不足之处,望老师批评指正。
1.2. 毕业设计的内容:在现代生产中,模具已成为大批量生产各种工业产品和日常生活用品的重要工艺备。
塑胶产品结构设计要点
塑胶产品结构设计要点1.胶厚(胶位):塑胶产品的胶厚(整体外壳)通常在0.80-3.00左右,太厚容易缩水和产生汽泡,太薄难走满胶,大型的产品胶厚取厚一点,小的产品取薄一点,一般产品取1.0-2.0为多。
而且胶位要尽可能的均匀,在不得已的情况下,局部地方可适当的厚一点或薄一点,但需渐变不可突变,要以不缩水和能走满胶为原则,一般塑料胶厚小于0.3时就很难走胶,但软胶类和橡胶在0.2-0.3的胶厚时也能走满胶。
2.加强筋(骨位):塑胶产品大部分都有加强筋,因加强筋在不增加产品整体胶厚的情况下可以大大增加其整体强度,对大型和受力的产品尤其有用,同时还能防止产品变形。
加强筋的厚度通常取整体胶厚的0.5-0.7倍,如大于0.7倍则容易缩水。
加强筋的高度较大时则要做0.5-1的斜度(因其出模阻力大),高度较矮时可不做斜度。
3.脱模斜度:塑料产品都要做脱模斜度,但高度较浅的(如一块平板)和有特殊要求的除外(但当侧壁较大而又没出模斜度时需做行位)。
出模斜度通常为1-5度,常取2度左右,具体要根据产品大小、高度、形状而定,以能顺利脱模和不影响使用功能为原则。
产品的前模斜度通常要比后模的斜度大0.5度为宜,以便产品开模事时能留在后模。
通常枕位、插穿、碰穿等地方均需做斜度,其上下断差(即大端尺寸与小端尺寸之差)单边要大于0.1以上。
4.圆角(R角):塑胶产品除特殊要求指定要锐边的地方外,在棱边处通常都要做圆角,以便减小应力集中、利于塑胶的流动和容易脱模。
最小R通常大于0.3,因太小的R模具上很难做到。
5.孔:从利于模具加工方面的角度考虑,孔最好做成形状规则简单的圆孔,尽可能不要做成复杂的异型孔,孔径不宜太小,孔深与孔径比不宜太大,因细而长的模具型心容易断、变形。
孔与产品外边缘的距离最好要大于1.5倍孔径,孔与孔之间的距离最好要大于2倍的孔径,以便产品有必要的强度。
与模具开模方向平行的孔在模具上通常上是用型心(可镶、可延伸留)或碰穿、插穿成型,与模具开模方向不平行的孔通常要做行位或斜顶,在不影响产品使用和装配的前提下,产品侧壁的孔在可能的情况下也应尽量做成能用碰穿、插穿成型的孔。
塑料件结构设计基本原则(二)
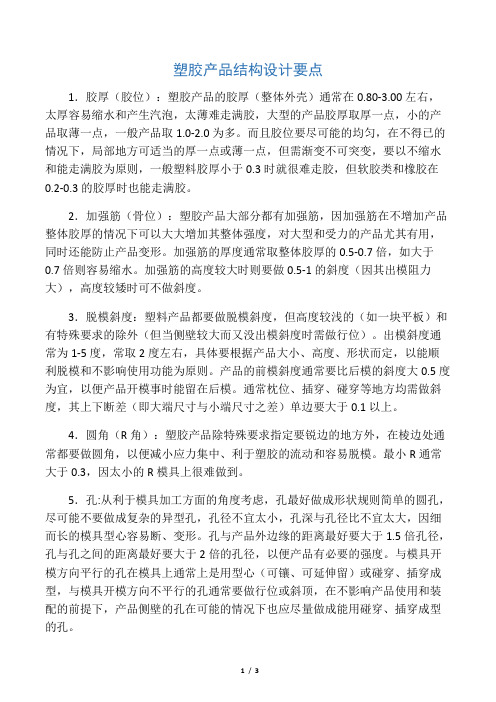
塑料件结构设计基本原则(二)一,塑料件上的嵌件设计塑料件上的嵌件是指在模具注塑时将其它材料的零件植入到塑料产品中,如嵌入螺丝,螺母,导电铜片等。
其主要作用就是提高塑料件的机械强度和耐磨性,想一想也知道,塑料螺丝螺母肯定没有金素螺丝螺母的机械性能高,也没有金素螺母的尺寸精度高。
1,嵌件对尺寸精度要求很高。
2,嵌件的强度要足够高,因为注塑时压力大。
3,嵌件要与塑料件结合紧密,不能出现滚动,松动,如在圆柱形嵌件表面滚花操作就可增加接触强度。
4,嵌件的形状最好是圆柱形,这样会方便在模具中定位。
5,嵌件尺寸不宜过大,厚度不宜过薄,防止注塑时被破坏。
6,包裹在金素嵌件周围的塑料厚度设计参考(单位mm):D <4 4~8 8~12 12~16A 1.5 2.0 3.0 4.0B 1 1.5 2.0 2.5二,塑料件的自攻牙螺丝螺丝是机械行业必须用到的,种类很多,标准也很多,常用螺丝分为:机械螺丝、自攻螺丝、木工螺丝、水泥墙螺丝,(前两者最常用)我们下面讲的就是自攻牙螺丝。
自攻牙螺丝多用在塑料件、软金属、木制品当中,主要起连接固定作用。
1,自攻牙螺丝的分类(1),按头型分:圆头、沉头、圆头加垫圈、六角头、圆柱头、半圆头、半沉头等。
我们平时接触最多的是圆头、平头和六角螺丝。
(还一个盘头,跟圆头差不多少,我把它们看成一样的,懒得去纠结。
)(2),按槽型分:十字形、内六角形、一字型、梅花形、菊花形、三角形、四方形等。
平时用到最多的是十字、内六角、一字型螺丝。
(3),按牙尾型分:平尾、间尾、平尾开口、间尾开口等。
用到最多的是平尾和间尾。
(4),自攻牙的命名:举例说明,PB3.0mm*5.0mm,是圆头平尾,外径3mm,长度5.0mm的自攻牙螺丝。
PWB3.0mm*5.0mm,是指圆头带垫圈平尾的。
PA3.0mm*5.0mm,是圆头尖尾的。
KB3.0mm*5.0mm,是沉头平尾的。
PAT3.0mm*5.0mm,是圆头尖尾开口的。
塑胶件设计规范之壁厚、加强筋、螺丝柱

二、 塑件设计的通用规范
2.1、材料的选择 塑料性能参数含义:
• 1·拉伸强度在规定的标准拉伸实验中,试样直至断裂位置所受的最大拉伸应力。计 算公式δ=P/bd P:试样最大拉伸载荷 b:试样的宽度 d:试样的厚度 拉伸强度表征材料承受拉伸负载时,抵抗破坏的能力。
• 2·拉伸弹性模量E:在比例极限内,拉伸应力与相应的应变之比。计算公式E=δ/ε δ:在比例极限内的试样拉伸应力 ε:相应的拉伸应变
二、 塑件设计的通用规范
2.1、材料的选择 主要从以下几个方面考虑 • 1.满足结构功能的要求: 根据制品的受力类型和受力状态及其对材料产生的应变 来筛选能满足使用要求的材料是很必要的。也就是说,要 考虑上述各种环境下的外力作用变化,是拉伸,压缩、弯 曲、扭曲、剪切、冲击或摩擦,或是几种力的组合。此外 ,还要考虑外力的作用方式是快速的(短暂)或是恒应力 或恒应变的,是反复应力还是渐增应力等等。用于冲击负 荷场合的制品,应选择冲击强度高的;用于恒定应力的场 合而且必须防止变形时,应选择蠕变小的材料;用于反应 力作用的场合应该选择疲劳强度比较高的材料; • 2.满足产品的使用环境: 所谓使用环境是指材料或制品使用时经周围环境的温度 的、湿度介质等,特别是温度和湿度条件 • 3.要有成本限制
拉伸强度 /MPa
45~50
50~77
拉伸模量/GPa 3.3
2.4~3.5
断后伸长量
20~40
2~7
抗压强度
—
—
抗弯强度
80~90 84~120
PS 1.04~1.10 0.03~0.30
50~60
2.8~4.2 1.0~3.7
—
69~80
ABS
PA-66
1.03~1.06 1.14~1.15
塑料模具设计中有关金属嵌件的优化设计
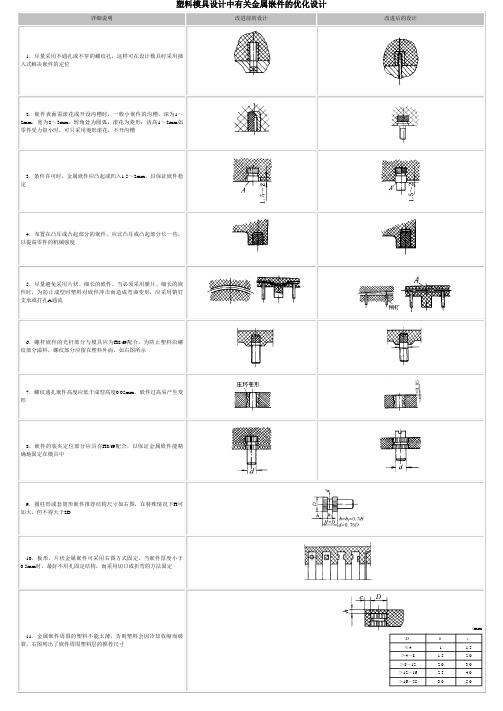
详细说明改进前的设计改进后的设计
1.尽量采用不通孔或不穿的螺纹孔,这样可在设计模具时采用插
入式解决嵌件的定位
2.嵌件表面需滚花或开设沟槽时,一般小嵌件的沟槽,深为1~
2mm,宽为2~3mm,转角处为圆弧,滚花为菱形;齿高1~2mm如
零件受力很小时,可只采用菱形滚花,不开沟槽
3.条件许可时,金属嵌件应凸起或凹入1.5~2mm,以保证嵌件稳
定
4.布置在凸耳或凸起部分的嵌件,应比凸耳或凸起部分长一些,
以提高零件的机械强度
5.尽量避免采用片状、细长的嵌件。
当必须采用膜片、细长的嵌
件时,为防止成型时塑料对嵌件冲击而造成弯曲变形,应采用销钉
支承或打孔A通流
6.螺杆嵌件的光杆部分与模具应为H8/f9配合。
为防止塑料沿螺
纹部分溢料,螺纹部分应留在塑料外面,如右图所示
7.螺纹通孔嵌件高度应低于成型高度0.05mm。
嵌件过高易产生变
形
8.嵌件的装夹定位部分应具有H8/f9配合,以保证金属嵌件能精
确地固定在模具中
9.圆柱形或套筒形嵌件推荐结构尺寸如右图,在特殊情况下H可
加大,但不得大于2D
10.板形、片状金属嵌件可采用右图方式固定。
当嵌件厚度小于
0.5mm时,最好不用孔固定结构,而采用切口或折弯的方法固定
11.金属嵌件周围的塑料不能太薄,否则塑料会因冷却收缩而破
裂。
右图列出了嵌件周围塑料层的推荐尺寸
/mm
D h c
≤41 1.5
>4~8 1.5 2.0
>8~12 2.0 3.0
>12~16 2.5 4.0
>16~25 3.0 5.0
塑料模具设计中有关金属嵌件的优化设计。
8塑料制品螺纹结构的设计(精)

否则模具结构复杂,须采用两次脱模装置,如图2-8-2所示。
THANKS!!!
8
塑料制品螺纹结构的设计
塑料制品螺纹结构的设计要点
(1)塑料螺纹与金属螺纹的配合长度,不应大于螺纹直径的1.5倍。 (2)外螺纹与内螺纹塑件应分别设计成图2-8-1所示的结构,以便于装配并提高螺
牙强度。螺纹始末长度L由表2-8-2选取。
(3)同一塑件上前后两段螺纹,应尽可能使其螺距相等、旋向相同,以便脱模。
X
标 记 与 图 案 的 设 计
Ⅺ
支 承 面 结 构 设 计
目
塑 件 的 尺 寸 及 精 度
tttl
的 设 计
孔 结 构
录
8
塑料制品螺纹结构的设计
塑料制品螺纹结构的加工方法
(1)直接成型 采用螺纹型芯(成型内螺纹)和螺纹型环(成型外螺纹)成型, 成型后使制件与型芯(环)间相对旋转脱出制品。对外螺纹也可采用哈夫模成型。
塑料制品及模具设计 tt
主讲人:王红春
塑料制品设计原则
材料选择、成型方法、模具总体结构
结构合理、造型美观、便于制造
1
2
壁 厚 的 设 计
3
脱 模 斜 度
的 设 计
4
加 强 筋 的 设 计
5 构
的 设 计
8
螺 纹 结 构
的 设 计
9
嵌 件 结 构 的 设 计
对要求不高的软塑料成型的内螺纹,可强制脱螺纹。
(2)机械加工 对生产批量不大的塑件,采用后加工的方法加工螺纹。
(3)采用金属螺纹嵌件 该结构用于经常拆装、精度要求较高和受力较大的场合。
(4)自攻螺纹。
8
塑料制品螺纹结构的设计
塑料嵌件设计简介
塑料嵌件的设计在很多塑件中,为了安装,联结等的需要,常常要在塑件中放置一些金属件或其他材质的零件,这些零件,统称为塑料制品中的嵌件。
图所示就是一些嵌件的典型形状(1) 嵌件的特点1) 嵌件多用金属制成,它可以增加塑件整体或某一部位的强度和刚度,如在手柄、箱攀上使用的金属骨杆嵌件,见图所示。
2) 壳以提高联结强度塑料的强度很低,要想把两个塑件联结在一起,如用螺钉联接,其强度要受到影响,而在塑件中事先安放带螺纹的嵌件,可使联结强度大为提高,且经久耐川,见图中所示。
3) 塑料是很好的绝缘体,而在塑件中安放一些金属片、线、板等,使得在电子、电器、电力元器件上大有用途,如图中等。
4) 塑料的硬度较低,抵抗外力的能力较差,在需要提高硬度和耐磨性的位置安放合适的金属嵌件,将有效地提高嵌件的硬度和耐磨性。
(2) 嵌件的材料制作嵌件的材料很多,金属材料和非金属材料均可制作嵌件,但多数以金属材料为主。
常用的金属材料有钢、铜、铝等。
其中,铜合金机械强度高,不生锈、易加工,是制作嵌件的常用材料;但是铜与塑料的热胀系数相差较大,结合牢固性较义;而铝,的热胀系数最大,与塑料的结合最牢固,也是常用材料,但强度较低。
(3) 嵌件的设计要点1) 金属嵌件嵌人塑料部分不能为尖角,应适当倒圆,以减少嵌件周围塑料冷却时产生的应力集中对塑件的影响,提高塑件强度2) 如嵌件设泎塑件上的凸起部位时,其嵌入深度应大于凸起部位的高度,以保证嵌入塑件的机械强度,见图所示3) 嵌件与塑件侧壁的间距一般不得小于0.6mm如塑件相对面都有嵌件, 则两嵌件间所隔塑料层厚不得少于3. 5mmo4) 对于内、外螺纹嵌件,其高度应稍低于型腔的成型高度0.05mm 左右,以免压坏嵌件和模腔,见图所示。
1) 嵌件底面距塑件底面间的塑料层应有一定厚度,一般不小于嵌件外径的1/6,若厚度过小,塑件在此位置易产生凹痕和裂纹等缺陷。
2) 外螺纹嵌件,应设置一段无螺纹区,以防止熔料渗入模具内,见图所示。
塑胶件自攻和BOSS柱设计
Screw & boss design guide line常用螺釘緊固件產品在手機應用上大致分爲兩類:1.自攻絲螺釘和塑膠件緊固方式。
2.機牙螺釘和内嵌螺母(insert nut)緊固方式。
自攻螺釘機牙螺釘内嵌螺母緊固方式1緊固方式2Screw & boss design guide line 下面介紹方式1中的自攻螺釘設計首先,螺釘頂頭形狀可以參照下表選擇:Screw & boss design guide line 自攻螺釘設計然後,螺釘頭驅動系統有如下幾類:Screw & boss design guide line自攻螺釘設計這些螺釘頭驅動系統都是國際通用的規格和標準,他們優缺點如下:Cruciform Drives Hex Drive TORX® Drive•裝配時容易打滑和脫出•需要過多的軸向壓力•限制了扭矩的轉遞•點接觸容易導致應力集中•容易損傷螺絲刀和螺釘頭•60º的驅動角傳遞力矩效率不高•15º 的驅動角仍然有少量徑向應力•傾斜會導致接觸不充分0° 驅動角橢圓輪廓形狀六個突出部分增大了橫斷面積垂直的内邊墻•最優化的扭矩傳遞•消除徑向應力0 °DriveAngle Elliptically-based Geometry Large Cross-SectionalAreas at Lobes BroadContactSurface •擴大接觸面到最大的接合位置•增大了扭力極限•限制了螺絲刀脫出•減小了螺絲刀軸向所需要的壓力Screw & boss design guide line自攻螺釘設計TORX PLUS ®TORX ® 的螺絲刀仍然可以用於TORX PLUS ®螺絲釘的裝配。
只是效率不是很高,容易發生脫出情況。
兼容性標準螺牙•螺紋綫輪廓夾角(60º)•螺紋綫比較淺•主要設計用於鈑金件緊固新型快速裝配螺牙•更窄的螺紋綫輪廓夾角 (30º to 48º)•更深的螺紋•更小的徑向應力•應用在更小的boss設計中•提供更大的拉拔力Boss for standard screwBoss forspecial fastener screwScrew & boss design guide line 自攻螺釘設計螺絲釘的螺牙選擇:Screw & boss design guide line 自攻螺釘裝配扭矩控制•因爲隨著螺釘擰入boss的距離增加,摩擦力也會增加,因此螺絲刀的扭矩就必須要大於螺釘完全擰入的扭矩,但是如果扭矩過大,就會損壞boss柱。
塑料螺纹设计标准
塑料螺纹设计标准随着现代工业的发展,塑料制品在各行各业中得到广泛应用。
塑料螺纹是一种特殊的设计结构,在机械结构中具有重要作用。
由于其特殊的性质,其设计标准也相对比较严格。
下面我们来分步骤介绍一些关键要点。
1.螺纹几何设计塑料螺纹的设计各个方面与金属螺纹大致相同,比如螺旋线的高和宽、螺距、牙型、楔角等等。
制作时要根据设计的尺寸、工作环境和承受载荷的大小来确定螺纹的参数。
2.原材料选择选择塑料材料是要考虑到所面临的应用环境,并选择与应用环境相适应的高强度、高温度耐受性、化学耐受性强的塑料。
塑料的选择是制造塑料螺纹的最重要因素。
这关系到螺纹的性能和使用寿命。
比如,聚酰亚胺(Polyimide)是一种在高温,高压,极低耗材的要求下,具有超强力的特性。
而聚酯(Fluropolyester)塑料可在手动和自动工具中使用,具有优异的力学性能和化学耐受性,适用于多种环境。
3.加工过程设计塑料螺纹加工的解决方案根据所得到的塑料材料而不同。
连续模压成型技术提供了一个相对简单,在制作中精度较差的方法。
同时,塑料螺纹的设计也需要建议在此基础上加上粘合支撑或增强。
4.测试标准一般测试时,我们应该将螺纹的使用性能逐一检测试验。
包括强度、硬度等物理量,再通过阻力、扭力、压缩、弯曲、引伸等加载标准对塑料螺纹的使用性能进行全面的评估。
在这项测试中还应该尽可能地考虑到相似的使用场景和环境,以确保测试的准确性和可靠性。
总之,在设计塑料螺纹时,需要准确的几何计算和材料的理解,完善的工艺流程和不断的测试和优化,才能确保螺纹在使用过程中的高质量的表现。
作为塑料螺纹的生产商,必须要熟知相关的标准,抓住市场需求,不断提高塑料螺纹的性能和制造质量。
9塑料制品嵌件结构的设计(精)
(3)使用嵌件的缺点 :嵌件的设置往往使模具结构复杂化,成型周期延长,制造
成本增加,难于实现自动化生产等问题。
9
塑料制品嵌件结构的设计
塑料制品嵌件结构的设计
嵌件周围覆盖的塑料层,有其最低要求,以防止冷却过程中收缩破裂。嵌件周围塑 料层厚度的推荐值如表2-9-1所示。常见金属嵌件的形式如表2-9-2所示。
Ⅺ
支 承 面 结 构 设 计
目
塑 件 的 尺 寸 及 精 度
tttl
的 设 计
孔 结 构
录
9
塑料制品嵌件结构的设计
塑料制品嵌件结构的设计
塑件内部镶嵌有金属、玻璃、木材、纤维、纸张、橡胶或已
(1)什么是嵌件?
成型的塑件等称为嵌件。
(2)使用嵌件的目的: 在于提高塑件的强度,满足塑件某些特殊要求,如导电、
2.0mm的凸环,有利于嵌件在模具中的固定,图2-9-3(b)是将嵌件突出塑件外,
用模具定位孔保证嵌件定位的结构,图2-9-3(c)所示为确保嵌件能精确地固定于 模腔中的结构,嵌件的定位部分不应低于IT8级精度,图2-9-3(d)为外形呈六角形 或其它形状的嵌件,须将其定位部分设计成圆形,以利于模具制造。对细长杆状 嵌件,须用销轴支承,以防止料流冲弯嵌件,如图2-9-3(e)所示。
9
塑料制品嵌件结构的设计
塑料制品嵌件结构的设计要点
图d板形嵌件,切开、孔眼、局部弯曲;
图f 针状嵌件,折弯、砸扁其中一段来固定。
THANKS!!!
型嵌件受力很小时,可采用菱形滚花,而不需开槽,其结构如图2-9-1(a)所示。对板
片状嵌件,可采用图2-9-1 (b)所示的嵌合方法。圆杆形嵌件,可将其中间压扁起嵌合
- 1、下载文档前请自行甄别文档内容的完整性,平台不提供额外的编辑、内容补充、找答案等附加服务。
- 2、"仅部分预览"的文档,不可在线预览部分如存在完整性等问题,可反馈申请退款(可完整预览的文档不适用该条件!)。
- 3、如文档侵犯您的权益,请联系客服反馈,我们会尽快为您处理(人工客服工作时间:9:00-18:30)。
2Our objective is to provide our customers with the best value;for optimum performance at the lowest installed cost. To achieve this objective, our sales strategy focuses on the application engineering approach.Starting with an analysis of your needs and objectives, our application engineers determine the best Spirol ® COMPRESSION LIMITER for the application. Consideration is not only given to the compression limiter but also to the specifications of the components to be assembled and potential assembly problems.Recommendations and samples are provided for your evaluation.The versatility of the Spirol ® COMPRESSION LIMITER makes it the ideal component part to meet the specific engineering and economic objectives of plastic assemblies. Our range of standard compression limiters is designed to meet most requirements. If a special diameter, length, duty, material, tolerance or configurationis needed, we are ready to assist you.Challenge us!THE SPIROL CONCEPTTHE FUNCTION OF A COMPRESSION LIMITERCompression Limiters are designed to protect the plastic components of an assembly from the compressive loads generated by the tightening of bolts.The objective is to keep the compressive stresses below the elastic limit of the plastic. In practice, as the bolt is tightened the plastic compresses and the stress in the plastic increases until the head of the bolt, or washer if one is used, comes into contact with the compression limiter. Thereafter, the compression limiter and plastic will compress at the same rate. The compression limiter will absorb additional clamping loads without further significant compression and increased stress in the plastic material.A properly designed bolted joint must meet the following criteria:•The head of the bolt, or washer if one is used, shouldalways seat against the compression limiter under load.This will prevent deterioration of the bolted joint resultingfrom diminished clamping load due to plastic creep.•The compression in the plastic component should notexceed its elastic limit, when compressed to seat the boltagainst the compression limiter in the worst-case tolerancecondition of the assembly.•The proof load of the compression limiter should be equalto or greater than the proof load of the bolt to assure thatthe compression limiter will not yield prior to the bolt underexcessive clamping loads.•The clearance between the maximum bolt diameter andthe minimum installed inside diameter of the compressionlimiter should be sufficient to compensate for normalmisalignment.Standard Spirol® COMPRESSION LIMITERS meet these criteria. The clearance between the bolt and the inside diameter of the installed compression limiters is adequate to meet normal misalignment. The length and length tolerance is application dependent. The standard tolerance is sufficient to meet most needs, but verification is recommended. Spirol engineering is available to assist in this process. If it is determined that a special compression limiter is required, a documented recommendation will be provided.The Spirol range of compression limiters includes both the split seam and solid knurled designs.The split seam type is produced from carbon steel in heat-treated and non-heat-treated versions. The solid knurled type is produced from brass. Since these compression limiters are designed to meet specified proof loads, the dimensional specifications are different. The split seam design has a lead to facilitate insertion. The solid design has a pilot, allowing it to stand freely in the hole prior to completeinstallation.34DETERMINING LENGTHAND TOLERANCEThe recommended maximum length of the compressionlimiter is the minimum thickness of the plastic component.The compression of the compression limiter at the recommendedtightening torque assures that there will always be somecompression on the plastic component.The recommended minimum length of the compression limiteris the maximum thickness of the plastic component, minusthe maximum allowable compression of the plasticcomponent, plus the compression of the compression limiterat the proof load.Stated in formula mode:Lc min = Lp max – d + cWhere:Lc min is the minimum length of the compressionlimiterLp max is the maximum thickness of the plasticcomponentd is the maximum allowable compression of theplastic component determined as follows:σ x Lp maxEpWhere:σis the allowable compressive stress, andEp is the modulus of elasticity, of the plasticspecifiedc is the compression of the compression limiterat the proof load, as noted in the SpirolspecificationsA further determination needs to be made to verify that at therecommended clamping load, the head of the bolt, or washer ifone is used, will seat itself against the compression limiter at themaximum tolerance condition. Stated in formula mode:Pclamp x Lp maxAp x EpWhere:Lc min is the minimum length of the compressionlimiterLp max is the maximum thickness of the plasticcomponentPclamp is the recommended clamping loadAp is the stress area of the plastic componentcalculated as follows:π4Where:D1is the minimum hole in the plasticcomponentD2is the maximum bearing surface diameterof the bolt head, compression limiterhead, or washerEp is the elastic modulus of the plasticd =Lc min = Lp max -Ap = x ( D22 - D12 )5VERIFICATION OF BOLT SEATING AT RECOMMENDED CLAMPING LOADVerification of the seating of the bolt head or washer against the compression limiter at the recommended clamping load is the final assurance that the minimum length tolerance for the compression limiter will meet the recommended bolted joint requirements.Stated in formula mode:Tmax x Ap x EpLp maxWhere:Pc is the load required to assure contact betweenthe bolt head or washer and the compression limiterTmax is the maximum tolerance condition of theassembly, calculated as the maximum thickness of the plastic component (Lp max) minus the minimum length of the compression limiter (Lc min)Ap is the stress area of the plastic component ascalculated in the previous elementEp is the elastic modulus of the plastic Lp max is the maximum thickness of the plasticcomponentPc =6Hole DesignAlthough the split seam compression limiters have a broken edge,this is kept to a minimum in order to maintain the maximum bearing surface area. Accordingly, it is recommended that a radius be molded as a lead-in to the hole in the plastic component to facilitate insertion. This radius is not necessary for solid compression limiters, as the pilot is smaller than the hole. When a draft angle is required, the hole should taper within the recommended hole sizefor the length of the compression limiter.OTHER DESIGNCONSIDERATIONSMating Component MaterialThe clamping load of the bolt is transferred to the mating component through the compression limiter. It must be evaluated whether the material of the mating component is strong enough to withstand the clamping force of the bolt. The stress imparted onto the mating component can be calculated by dividing the clamping load applied to the compression limiter by the cross sectional area of the compression limiter. If this stress exceeds the yield strength of the mating component material, localized permanent deformation may occur, resulting in a loss in clamping load.Recommended Tightening TorqueThe integrity of the bolted joint requires that none of the components, including the bolt, be stressed beyond the elastic limit. We recommend a clamping load equal to 75% of the proof load of the bolt. The recommended torque values to produce this clamping load are provided in the supplemental data.7Headed Compression LimitersIn addition to providing a larger contact area, headed compression limiters eliminate the need for a washer. The length and length tolerance under the head needs to be determined following these design guidelines for compression limiters to avoid the risk of exceeding the elastic limit of the plastic component. Headedcompression limiters are only available as solid components.Use of GasketsWhen gaskets are used, the length tolerance of the compression limiter is dependent on the minimum and maximum specified gasket compression. Stated in formula mode:Lc max = Lp min + max gasket thickness - max gasket compression Lc min = Lp min + min gasket thickness - min gasket compressionWhere:Lc is the length of the compression limiter Lpis the thickness of the plastic componentThis is based on the assumption that the plastic component is significantly stiffer than the gasket material, having an elastic modulus at least 15 times greater than the gasket material.Use of O-RingsO-rings can be used to provide a sealed joint but the length and length tolerance of the compression limiter is still application-dependent and needs to be determined following these design guidelines in order to achieve a properly tensioned and secure bolted joint.8COMPRESSION LIMITER SPECIFICATIONSTo Order:BUSH, Nominal Bolt Diameter, Length, Material, Finish, Series Example:BUSH 6 X 14 BK CL250Spirol® Standard Split Seam Compression Limiters can be installed with Spirol pin inserters, pin driving chucks, or simply pressed in.SERIES CL250Heat treatedSERIES CL200Not heat treatedMATERIAL HARDNESS FINISHB Carbon Steel SAE 1070-1080CL200 HV 120 to 245K Plain, OiledCL250 HV 420 to 545T Zinc PlatedRPhosphate Coated * Longer and shorter lengths on request.STANDARD SPLIT SEAMDIMENSIONAL DATADIN 177222 WkNr 1.1248 CK75 andWkNr 1.1231 CK67Compression at Proof Load:CL200 c = Lc x .0018CL250 c = Lc x .00479To Order:BUSH, Nominal Bolt Diameter, Length, Material, Finish, Series Example:BUSH 6 X 14 EK CL100Spirol ® Standard Solid Compression Limiters can be installed withconventional ultrasonic welders, Spirol Heat Insert Drivers, or simply pressed in.SERIES CL110SERIES CL100MATERIALFINISHE BrassK PlainDIMENSIONAL DATASeries CL110 Flanged Compression Limiters provide a larger load bearing surface and can eliminate the need fora washer.* Longer and shorter lengths on request.STANDARD SOLID Compression at Proof Load:c = Lc x .001710SUPPLEMENTAL DATABOLT SPECIFICATIONS*Note: The recommended clamping load is 75% of the proof load.11TORQUE SPECIFICATIONSTypical tightening torque values to achieve recommended clamping loads based on the following formula:T = K x D x PWhere:K = torque-friction coefficient D = nominal bolt diameter P = bolt clamping loadPHYSICAL PROPERTIES OF COMMON PLASTICS© 2003 Spirol International Corporation 10M 03/03 Printed in U.S.A.ISO9001:2000 Certificate No. 11168QS-9000 Certificate No. 5981ISO 9002 Certificate No. Q 09419BS 5750EnglandCanadae-mail: information@CanadaMexicoEuropeU.S.A.Spirol International Corporation 30 Rock AvenueDanielson, Connecticut 06239Tel.] 860.774.8571 Fax.] Spirol West645 East Harrison Street, Suite 100Corona, California 92879-1347Tel.] 909.473.5900 or 800.776.9528Fax.] Spirol International Corporation Shim Division 321 Remington Road Stow, Ohio 44224Tel.] 330.920.3655 Fax.] Ascutney Metal Products 2637 US Route 5 North Windsor, Vermont 05089Tel.] 802.674.6721 Fax.] Spirol Distribution (Distributor Customers)30 Rock AvenueDanielson, Connecticut 06239Tel.] 800.321.4679 Fax.] Spirol Industries, Ltd.3103 St. Etienne Boulevard Windsor, Ontario Canada N8W 5B1Tel.] 519.974.3334 Fax.] Spirol México, S.A. de C.V.Carretera a Laredo KM 16.5 Interior E Col. Moises SaenzApodaca, N.L. Mexico C.P . 66605Tel.] (81) 8385 4390 Fax.] (81) 8385 .mxSpirol Industries, Ltd.Princewood RoadCorby, Northants NN17 4ET EnglandTel.] 44 (0) 1536 444800Fax.] 44 (0) 1536 203415Tel.] 44 (0) 8003 890034 (Distributor Customers) Spirol SAS21 rue de Baconnes 51430 Bezannes FranceTel.] 33 (0)3 26 36 31 42Fax.] 33 (0)3 26 09 19 。