MotoC266DIY之EMS超级宝典静态图像篇
HS-2850中文产品操作手册
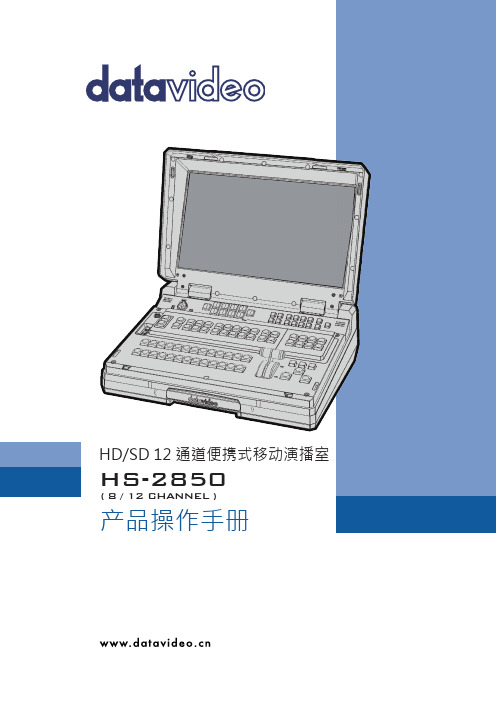
HD/SD 12 通道便携式移动演播室
HS-2850
( 8 / 12 CHANNEL )
产品操作手册
目录
FCC 声明......................................................................................................................... 6 安装注意事项 .................................................................................................................. 6 产品保修 ......................................................................................................................... 7
ELMO驱动器调试方法.

以色列ELMO 驱动器调试过程双击compose 嗽件的快捷方式,进入composer 软件界面,点击“Create a NewApplication 。
'进入下一界面,P 匕出^ E nl^ N =w jCtjpl I Hd( H -Anzlciiicr M JIPGnesra -----L ®' 5 uCMSzf.l ConmniGshfln r-apeHe*P EMiiMrIril : US yq 出 COUl;内汕叩叫水吐 內rip N OHLKrlrct Cnnkmimicntrnn lypr /incl vyniiiecHuiiii will auitwiMlical^ Ibepmccfeficd a 匚cording Ihc p sramrrrri flhrvT when ihc (INnxtJ hirtinn is vlliiied.II) Lrdifr hj Jiflvru ill enimmiinknliod pnr 叢euNu.爭 uat thr fPmnertifiA...} hiittnn.输入一个应用文件名(如:Application1,在选择“Select Communication Type 选择“ RS 2321讯方式,点开“Propertie 对话框,5eeciCr »h-ur*icacnTi »e dipF I JletH 、 I Cmral在“Motor Manufacturer Name 选择电机的制造厂商,在“Motor P/N 对话框里选 择相应型号的电机,接着选择“Motor type 女如果没有该电机的制造厂商,则选择“Myr-Afflicatcr Naira白 |泞|1|[LJ scDniicdril :1 WliU|bi|/5ComiTiuiiicDtiDn Type anrlvuniniedlviiii will jiulufTiuIItally b= procHEECil 』匚curding ihc pBraiaerer^ ahrvr wunn ms iNuxn ihimon iw clldied.<SIn Lr Jttr Id (jvl dlflurtml选择C0M1、19200波特率,无寄偶校验。
EMS-API-303

IEC 61970系列标准IEC 61970能量管理系统应用程序接口(EMS-API)第303篇:公用信息模型(CIM)SCADADraft 1.0烟台东方电子信息产业股份有限公司电力调度自动化事业部DF8003项目组译1999年8月18日目录IEC 前言 (1)IEC 引言 (2)1、范围 (3)2、标准引用 (3)3、定义及缩写 (3)3.1 能量管理系统(EMS) (3)3.2 应用程序接口(API) (3)4、公用信息模型(CIM)说明 (3)4.1 CIM建模表示法 (3)4.2 CIM软件包 (4)4.2.1 SCADA (4)A.1 逻辑结构 (5)A.1.1 概述 (5)A.1.2 前后关系(Context) (5)A.2 包结构 (6)A.2.1 SCADA包 (6)A.2.1.1 AccumulatorInput Class 累计量输入类 (7)A.2.1.2 AlarmGroup Class 报警组类 (8)A.2.1.3 AnalogInput Class 模拟量输入类 (8)A.2.1.4 CalculationParameter Class 计算参数类 (9)A.2.1.5 CommunicationLink Class 通信链路类 (9)A.2.1.6 Control Class 控制类 (10)A.2.1.7 CurrentTransformer Class 电流互感器类 (11)A.2.1.8 RTU Class RTU类 (12)A.2.1.9 ScanBlock Class 扫描块类 (13)A.2.1.10 Setpoint Class 设定点类 (13)A.2.1.11 StatusInput Class 状态量输入类 (14)A.2.1.12 Telemetry Class 遥测类 (15)A.2.1.13 VoltageTransformer Class 电压互感器类 (16)1IEC 前言1)IEC(国际电工委员会)是一个全球性的标准化组织,由各国电工委员会组成(IEC国家委员会)。
Moxa UC-7112 Plus 7112 7110 快速安装指南(第五版,2014年1月)说明书

– 1 –– 2 – – 3 –P/N: 1802071100114UC-7112 Plus/7112/7110 Quick Installation GuideFifth Edition, January 20141. OverviewThe Moxa UC-7112 Plus, UC-7112, and UC-7110 are mini size RISC-based ready-to-run embedded computers that feature dual 10/100 Mbps Ethernet ports and two RS-232/422/485 serial ports in a built-in µClinux ARM9 box. In addition, the UC-7112 provides an internal SD socket for storage expansion, to offer highperformance communication and unlimited storage in a super compact, palm-size box. The UC-7112 Plus, UC-7112, andUC-7110 are the right solutions for embedded applications that use a lot of memory, but that must be housed in a small physical space without sacrificing performance.2. Package ChecklistBefore installing the UC-7112 Plus/7112/7110, verify that the package contains the following items: • 1 UC-7112 Plus, UC-7112,or UC-7110 • Quick Installation Guide • Document & Software CD• Cross-over Ethernet cable: RJ45 to RJ45, 100 cm • Console port cable: CBL-4PINDB9F-100(4-pin header to female DB9 cable, 100 cm) • Universal Power Adaptor•Product Warranty StatementOptional Accessories •DK-35ADIN-Rail Mounting Kit (35 mm)NOTE: Please notify your sales representative if any of the above items are missing or damaged.3. Hardware IntroductionLED IndicatorsThe following LED indicators are located on the top panel of the UC-7112 Plus/7112/7110.UC-7112 Plus/7112/7110 Top ViewThe top view of the UC-7112 is shown in the following figure. The UC-7112 Plus and UC-7110 look similar, except that the UC-7110 does not have an internal SD slot.UC-7112 Plus/7112/7110 DimensionsThe dimensions of the three products are shown in the following figure.4. Hardware Installation ProcedureSTEP 1: Remove the UC from the box and attach the poweradaptor.STEP 2: Connect the UC’s serial console cable to your PC’s RS-232COM port for initial setup through the console terminal.STEP 3: Connect the UC to a network. Use a standardstraight-through Ethernet cable to connect to a hub or switch. When setting up or testing the UC, you might find it convenient to connect directly to your computer’s Ethernet port. In this case, use a cross-over Ethernet cable.STEP 4: Install Secure Digital (SD) Memory Card (UC-7112and UC-7112 Plus only)To install an additional SD card, you must first remove the UC-7112’s outer cover to access the slot. The internal SD socket is located at the back side of the UC-7112 on the bottom board; you can find the SD socket on the right, a little lower than the cover screw. Plug the SD card directly into the socket. To remove the card, press it in first, and then remove your finger. The card will pop out enough to allow you to remove it.STEP 5: Placement OptionsIn addition to placing the UC on a desktop or other horizontal surface, you may also make use of the DIN-Rail or Wall Mount options, as illustrated here.Wall MountDIN-Rail5. Software Installation ProcedureSTEP 1: Insert the UC’s CD-ROM into your Windows or Linux PC,and then use Acrobat Reader to read the UC-7112/7110 Series User’s Manual.STEP 2: Install the UC’s tool chain, which is on the CD-ROM. Thetool chain consists of the following components:1. UC Finder: Broadcast search for the UC’s IP address on your LAN. The UC supports both Windows and Linux environments.2. Cross Compiler: Arm-elf-gcc for µClinux platforms (UC-7112/7110), and Arm-linux-gcc for embedded Linux platform (UC-7112 Plus). Both options are C/C++ PC cross compilers, which are gcc compilers that run on an x86 PC, but create an execution file for Arm-based platforms, such as the UC-7112/7110.– 4 – – 5 – – 6 –/supportThe Americas: +1-714-528-6777 (toll-free: 1-888-669-2872)Europe: +49-89-3 70 03 99-0 Asia-Pacific: +886-2-8919-1230China: +86-21-5258-9955 (toll-free: 800-820-5036)2014 Moxa Inc. All rights reserved.3. GNU C Library: The GNU standard POSIX C Library is supported for both the UC-7112 Plus’s Linux platform, and the UC-7112/7110’s uClinux platform. Glibc is for Linux and µClibc is for uClinux, which is an abbreviation for “microcontroller C library.” µClibc was created to support µClinux, a Linux port for MMU-lessmicrocontrollers, such as the ARM9 installed in the UC-7112/7110. For more information, visit .STEP 3: Edit source code on a Linux PC.STEP 4: Use the Cross Compiler to compile the source code, andthen use FTP to download the program to the UC.STEP 5: Run your program.6. System Commandsbusybox: Linux / µClinux normal command utility collection File manager cpcopy file ls list filelnmake symbolic link filemount mount and check file system rmdelete filechmod change file owner & group & user chown change file owner chgrp change file groupsync sync file system; save system file buffer to hardware mv move filepwd display active file directly df list active file system space du estimate file space usage mkdir make new directory rmdir delete directoryhead print the first 10 lines of each file to standard outputtail print the last 10 lines of each file to standard outputtouch update the access and modification times of each file to the current timeEditor vi text editorcat dump file contextgrep print lines matching a patterncut remove sections from each line of files find search for files in a directory hierarchy more dump file by one page test test if file exists or not echo echo stringProcess kill kill processkillall kill process by name ps report process statussleep suspend command on time (seconds)Networkping ping to test network route routing table manager netstat display network status ifconfig set network IP address tftp tftp protocoltelnet user interface to TELNET protocol ftpfile transfer protocoliptables-restore restore iptables configuration file to network iptablesiptables commandiptables-save save recent iptables configuration to file Otherdmesg dump kernel log message stty set serial portmknod make device nodefree display system memory usagedate print or set the system date and timeenv run a program in a modified environment clear clear the terminal screenreboot reboot / power off/on the server halthalt the servergzip, gunzip, zcatcompress or expand files hostname show system’s host name tartar archiving utilityMoxa special utilities cat /etc/version show user directory version upramdisk mount ramdisk downramdisk unmount ramdisk kversion show kernel versionfsversion show the root file system (firmware) version setinterface set UART interfaces program7. Pin AssignmentsDB9 MaleSerial Console Port*NC=Not Connected8. Environmental SpecificationsPower requirements 12 to 48 VDCOperating temp.-10 to 60°C (14 to 140°F), 5 to 95% RH Storage Temperature -20 to 80°C (-4 to 176°F), 5 to 95% RH Serial protection 15 KV ESD for serial port Magnetic isolation 1.5 KV for EthernetRegulatory approvals FCC Class A, CE Class A, UL, cUL, TÜV Warranty 5 years。
3DHobbyShop 雅克-55 46英寸级飞机 装配指南说明书

Yak-55 46” - Assembly ManualThank you for purchasing this 3DHobbyShop aircraft.If you have any issues, questions, concerns or problems during assembly, please contact our tech department at: ********************or 1-717-814-5316 10am-4pm Eastern Time, Monday-Thursday. We highly recommend as a good source for RC tips, tricks, and information.SAFETY NOTICE: AssemblyDuring assembly of this aircraft, you will be asked to use sharp knives and hobby adhesives. Please follow allsafety procedures recommended by the manufacturers of the products you use, and always follow these important guidelines:ALWAYS protect your eyes when working with adhesives, knives, or tools, especially power tools. Safety glasses are the best way to protect your eyes.ALWAYS protect your body, especially your hands and fingers when using adhesives, knives, or tools, especially power tools. Do not cut toward exposed skin with hobby knives. Do not place hobby knives on tables or benches where they can roll off or be knocked off.ALWAYS have a first-aid kit handy when working with adhesives, knives, or tools, especially power tools.ALWAYS keep hobby equipment and supplies out of the reach of children.IMPORTANT NOTE – We strive to provide the absolute best-quality ARF aircraft on the planet. However, the ultimate success or failure of this aircraft is dependent upon proper assembly by you. If you have questions about an assembly step, please contact us, or read the assembly thread for your airplane on before proceeding. It is always better to slow down and be sure of your assembly than to rush through it and make a mistake which can cause a crash.SAFETY NOTICE: FlyingThis is NOT a toy! It is a very high-performance RC airplane capable of high speeds and extreme maneuvers. It should only be operated by a competent pilot in a safe area with proper supervision.ONLY fly your aircraft in a safe, open area, away from spectators and vehicles–and where it is legal to fly. NEVER fly over an unsafe area, such as a road or street. NEVER fly near overhead power or utility lines. If your airplane ever becomes stuck in a line or a tree DO NOT attempt to retrieve it yourself. Contact the authorities for assistance in retrieving your aircraft. Power lines are DANGEROUS and falls from ladders and trees CAN KILL! Never fly too close to yourself or spectators. Spinning propellers are DANGEROUS! Never run your motor inside a house or building with the propeller attached – Remove the prop for safety. Always fly within your control. Always follow manufacturer’s instructions for your radio system. Always obtain proper insurance before flying – contact the AMA at-- READ ALL ASSEMBLY INSTRUCTIONS COMPLETELY BEFORE STARTING ASSEMBLY! -- REQUIRED ITEMSCA Glue (thin and thick) - Hobby Knife - Small Phillips Screwdriver Set - Metric Allen Wrenches - Scissors - Small Pliers - Wire Cutters - Masking Tape. Heat gun is optional.UNPACKINGUnpack your airplane and examine the components. Check for damage of any kind. If you have damage, please contact 3DHobbyShop to discuss.WRINKLESYour airplane was packed in plastic at the factory without any wrinkles in the covering. You may notice some wrinkles now; more likely, you will notice a few in a day or two or the first time you take the plane out to the flying field. These wrinkles are the result of wood shrinkage and/or expansion. Balsa wood changes size and shape slightly as it is exposed to varying humidity in the air. This is a natural property of balsa wood. As your airplane adjusts to the weather in your part of the world, wrinkles may appear and disappear. Wrinkles may be removed with the gentle application of heat to the covering material on your airplane. The best tool to use is a hobby heat gun. Apply the heat gently: the covering material will shrink as you apply the heat, and this will remove the wrinkles. BE CAREFUL! Too much heat applied too quickly can damage the covering, either by causing it to pull away from the wood at seams and corners or even by melting it. The covering will shrink at low temperature with patient application of heat.Wrinkles in the covering DO NOT affect flight performance.IMPORTANT: Remove the canopy before attempting to use heat on your covering! The canopy is made ofthermo-activated plastic and WILL deform with the application of heat. Do not apply heat to the canopy.CLEANINGIf you need to clean your airplane, we recommend using a damp towel. The paint used on the canopy and cowl is not safe for all cleaners. In particular, DO NOT use alcohol on these parts, it will remove the paint.ASSEMBLY-- Locate the wheels, wheel axles and axle nuts, wheel collars, and wheel pants. Fit the wheel onto the axle. Install the wheel collar to retain the wheel onto the axle, as shown. Use the axle nut to affix the wheel/axle/pant assembly onto the gear leg, as shown, use included wrench to hold axle.-- Install the landing gear legs into the fuselage with the shorter of the provided 3mm screws as shown below.-- Using a sharp hobby knife, remove the covering on both sides of the fuselage as shown below, for the wing spar tube, the aileron servo wire access, anti-rotation pin and wing retaining screw.-- Remove the covering over the horizontal stabilizer slot, on both sides with a sharp hobby knife.-- Slide the horizontal stabilizer into the fuselage slot. Use a ruler to measure each side to make sure that it is centered. -- Locate the carbon wing-spar tube and slide it into the fuselage. Measure each of the rear corners of the stabilizer to the wing tube as shown. Adjust the stabilizer until each side measures exactly the same to correctly align the stabilizer.-- Apply thin CA glue to the joint of the horizontal stabilizer and fuselage as shown. Allow the thin CA to run along the joint and wick into the joint. NOTE: it is not necessary to remove any covering on the stabilizer.-- Locate the elevator half that has the joiner rod attached-- Slide the elevator onto the stabilizer, inserting the elevator joiner rod through the fuselage cutout as shown.DO NOT GLUE THE HINGES YET-- Make sure the elevator can flex up 45 degrees and down 45 degrees easily. You can easily make a tool to measure 45 degrees by folding a piece of paper as shown.-- Once you are satisfied that your elevator can move easily 45 degrees up and 45 degrees down, put two drops of thin CA glue on each hinge to glue the elevator permanently to the stabilizer as shown.-- Next place a small piece of tape on the elevator and stab as shown to hold the elevator perfectly straight and level to the stabilizer.-- Now install the other side elevator without glue. Make sure that the elevator is straight and level to the stabilizer like the first elevator. If not, if the elevator shows a slight twist, you can take a little time and sand or trim the slot that the elevator joiner rod fits into to correct this. A slight twist in the elevators will not affect flight performance, but it may bother you, so this is the right time to correct it if necessary.-- Once you are satisfied with the alignment of the elevator, remove it and put thick CA glue in the joiner slot as shown. Re-install it onto the stab and joiner rod, and put two drops of thin CA glue on each hinge.-- Using THIN CA glue, go over the motor box assembly, applying a small amount of glue to all the seams. This is the highest-stress area of the airframe, and we want to make it as strong as possible.-- Your airplane includes a pre-drilled firewall with pre-installed blind nuts that fit Omega, Torque, Hacker, and other popular brands of brushless motors. If your brand of motor uses a different bolt pattern, use your hobby knife to carefully remove the blind nuts and plywood circle spacers from the back of the firewall, and then re-drill the firewall for your motor.-- Assemble brushless outrunner motor as shown below for mounting in front of the firewall surface. The prop adaptor should be on the OPPOSITE side of the motor from the mount. Install motor with the longer 3mm screws as shown. Please note that the motor is installed IN FRONT of the firewall.NOTE: Your kit contains 4 plastic motor mount spacers. They may be used to space the motor away from the firewall as needed for cowl clearance. Short motors, such as the Omega 103g1030KV, Hacker A30-16M, or Torque 2818-T900 require the spacers. Longer motors, such as the Omega 130g870KV, Torque 2814-T820 do not require the spacers.-- Install speed control to fuselage with short velcro strip or zip ties.-- Install the canopy hatch onto the model and seat it in place. Place some tape across the front of the hatch.-- Tape small strips of paper over the cowl-mounting tabs as shown below and mark with pen or hobby knife the location of the cowl mounting screws over the ply mounting tabs.-- Making sure to slide the cowling underneath the taped pieces of paper, slide the cowling onto the front of the plane as shown below.-- Holding the cowling in place with tape, take your time to align the cowling on the fuselage. Measure vertically and horizontally from the edge of the front of the cowling to the motor to ensure that the cowling is centered as shown.-- When the cowling is aligned and centered, using a hobby knife or fine drill, start the holes in the cowling to the locations indicated by the pieces of paper. Install the wood screws.-- Remove the cowling, and soak the newly created cowling screw holes with thin CA and allow to cure to strengthen the cowling mounts.-- Remove the tape from the canopy hatch and sides of the fuselage and reinstall the cowling. Everything should align properly and the canopy hatch fitting nicely under the cowling.---- On the base of the rudder, using a sharp knife open the covering the slot for the tail wheel wire. Add some thick CA to the slot and insert the wire as shown below.-- Insert the rudder into the fuselage, make sure it swings 45 degrees in both directions, and glue the hinges with a couple of drops of thin CA from each side as shown.-- Slide the tail wheel bracket over the wire and screw the wood screws into place through the bracket as shown below. Make sure that the rudder swings freely.-- Remove the screws to apply thin CA to the screw holes.-- Screw the bracket back into place after the thin CA has cured.-- Install the tail wheel onto the wire, making sure the wheel rotates freely tighten the set screw with a 1.5mm hex tool as shown below.-- Insert aileron into wing panel making sure to align the end of the aileron with the wing tip.-- Making sure that the aileron can deflect 45 degrees in each direction freely and glue the hinges with a couple of drops of thin CA on each side. NOTE: it is recommended to glue the inside hinge, re-check the aileron motion, and then glue the hinge near the wingtip followed by the hinges in the middle.-- With a sharp knife, clear the covering over the slot for the control horn in the aileron as shown.-- Test fit the control horn into the slot. Remove the horn and add a bead of thick CA into the control horn slot. Apply some thick CA to each side of the lower portion of the control horn and insert the horn into the aileron as shown.-- Install the aileron servo into the wing as shown below. Inside the servo hole there is a piece of string added for convenience to attach your servo wire with tape to help guide the servo wire to the wing root.-- The pushrods for the Yak are assembled as shown below. At the control horn the ball link is screwed onto the threaded end of the pushrod 5-6 turns. With the 2mm screw, washer and nut, the ball link is then bolted to the control horn and tightened fully tight.-- Use a drop of thick CA on the nut to lock it in place.NOTE: the longest pushrod is for the elevator, and the two smaller equal length pushrods are for the ailerons.-- The pushrod connectors for the servo arms are also shown in the photo above. The hole in the servo arm is enlarged to accept the connector, and making sure there is a washer either side the nut is added although not tightened all the way. The nut should only be made to be a snug fit so that the connector can still rotate. Add a drop of thick CA to the bottom of the nut to secure it in place and allow to cure.-- Use a 1.5mm hex tool to secure the set screw on top to hold the pushrod.-- Repeat this process for the opposite wing.-- Using a sharp knife, open the slot for the pull-pull rudder control horn as shown.-- Slide the horn through and center it to get an idea as to where it sits, slide out, add thick CA to the center of the horn (make sure to get CA into the holes) on both sides and slide back in making sure it’s centered properly before the glue cures. Once in place, put a few drops of thin CA around the horn on each side.-- Please examine the following pull-pull diagram closely-- When attaching the servo connectors to the arm, do not tighten the nut fully, but leave it a bit loose so the connectors can rotate freely. Use a drop of CA glue on the nut to prevent it from loosening in flight.-- Start by attaching the cables to the pull-wire end. Crimp well, preferably by making creases in the crimp tube with sharp pliers or cutters, rather than smashing it completely flat. Apply a drop of thin ca to the completed crimp to prevent it from sliding on the cable.-- Mount the rudder servo as shown below.-- Insert the pull-wire ends into the servo connectors on the rudder servo as shown, just barely poking through the servo connectors, and tighten down the set screws with a 1.5mm hex wrench. Note that the cables cross each other once inside the fuselage, making an “X” shape.-- Spend time to find the exact correct length of the pull-pull wires before attaching the pull wire ends at the front. The system provides approximately .25 inch of adjustment on each wire when completed, so your assembly must be accurate. NOTE: it is helpful to tape the rudder in the center position to get the correct length on the pull-pull wires.-- When you are certain your wire length is correct, crimp the wire to the ends and use the adjustor to properly tension the wires as a final adjustment. We want the wires to be snug, without sag, but not springy-tight.NOTE: Proper adjustment of the pull-pull wires is critical. Too-loose wires allow the rudder to flop back and forth in flight, ruining precision flight. Too-tight wires cause the servo to drag and lose power, leading to a lack of rudder authority.-- In a fashion similar to the ailerons described above, clear the covering over the control horn slot for the elevator with a sharp knife and glue the control horn into place with thick CA.-- With a sharp knife clear the elevator servo hole and mount the elevator servo as shown. Assemble the pushrod and bolt to the elevator control horn. Install the servo connector to link up the servo.-- With a sharp knife, remove a panel of covering underneath the fuselage as shown to allow cooling air a place to exit the aircraft.-- Mount your receiver and radio equipment into the fuselage. An example of final setup is shown below. A balsa plate is also provided to glue into the plane where convenient to mount your receiver with velcro or your preferred technique.OPTIONAL ASSEMBLYSide Force GeneratorsSide force generators (SFG) are optional on this airframe and simple to install and remove.-- Locate the small rectangular holes near the tip of the wings and clear the covering with a sharp hobby knife as shown.-- On the ends of the wingtips, clear the covering over the two screw holes as shown.-- Slide the tabs on the Side Force Generators into the holes above and below the wing, so that the taper of the SFGleading edge is pointing forward as shown.-- Insert the nylon bolts into the holes and tighten until snug with a flat head screwdriver.Cowling DetailAnother optional feature of this kit is the cowling detail that resembles the radial cooling vanes seen on the full scale Yak-55. Note that the use of the plate does restrict some cooling air entering the cowling to cool the motor, ESC and batteries. So depending on your climate you may need to open just a panel or two for cool climates, or for hot climates it may be best to leave it off the plane for maximum cooling.-- Cut out some cooling air holes from the cowling detail using a pair of scissors or a sharp hobby knife.-- Center the cowling detail plate in the cowling and glue with CA by running a bead of medium or thick CA around the inside edge of the cowling as shown. Allow to fully cure before continued handling of the cowling as the flexing of the cowling can prevent good adhesion.SETUP INFORMATIONCenter of GravityThe recommended Center of Gravity range is 2.75 to 3.25 inches from the leading edge of the wing root. For maiden flight, the plane should ideally have the Center of Gravity at the designer recommended 2.75 inches. After several flights, you can and should adjust to find your perfect, personal CG location.Control throwsLow / Precision Rates (in degrees and inches) and Corresponding ExponentialAileron 15 degrees 20% expoElevator 10 degrees 20% expoRudder 20 degrees 30% expoHigh / 3D Rates (in degrees and inches) and Corresponding ExponentialAileron 35 degrees 75% expoElevator 45 degrees or more 75% expoRudder 45 degrees 75% expoNote: that Hitec and Futaba radios require NEGATIVE exponential, while JR and Spektrum use POSITIVE exponential. Servo arm length:Most servo arms have multiple locations in which you can install your pushrod adjustors into, giving different effective servo arm lengths. The method to determine the correct hole is as follows:Set your high-rate throws as indicated above using the endpoint adjustment for each channel in your transmitter. If your endpoint adjustment is near maximum (a value of 140-150 on most transmitters) then you are using the correct hole. However, if your endpoint adjustment is much lower, under 125 for example, you may need to use a hole that gives a shorter effective arm length. If your endpoint adjustment for correct high-rate throws is excessively low, you will notice very poor servo performance.To put it simply, use the shortest arm length that still allows proper high rate throws. Once you are certain of the correct arm length, be sure to use thick CA to lock all of your adjustor nuts on all servo arms.Enjoy Your 3DHS Yak55!Again, if you have any issues, questions, concerns or problems during assembly, please contact our tech department at: ********************or 1-717-814-5316 10am-4pm Eastern Time, Monday-Thursday. We highly recommend as a good source for RC tips, tricks, and information.。
EMS系统外围器件课件资料

EMS外围器件介绍-TMAP
安装位置:安装在进气歧管稳压箱安装孔内,选取位置尽量考虑 压力和温度的稳定区域 ; 安装时,先摸上润滑油轻轻压入,再按规定要求拧紧螺钉。 对螺钉扭矩有较高要求,应小心操作。 长期使用由于进气中尘垢的堵塞或污燃可能引起传感器失效,应 经常注意检查空气滤清器工作是否正常。 压力接管应向下倾斜安装,与竖直方向的夹角为0~60°,以确保 冷凝水不会进入压敏元件和电路板
EMS系统组成
油轨带喷油器总称-FDP(油轨、喷油器) 氧传感器-O2S 点火线圈总称-IGCA 碳罐电磁阀-PCV 线束
EMS外围器件介绍-TMAP
进气压力温度传感器-TMAP
概述:该传感器用于监测进气歧管的压力(或压力与温度),ECU利用 其输出信号结合转速信号确定进气空气密度与质量。 我公司的TMAP可同时可监测进气温度。
为1.5~N.
EMS外围器件介绍-节气门体总称
EMS外围器件介绍-节气门体总称
怠速执行器步进电机DLA:带步进电机的怠速执行器同样提供一 个旁通的进气通道。当节气门关闭时,空气通过这个旁通通道进 入发动机。ECU可以通过一台步进电机调节这个旁通通道的截面 积,进而调节进入发动机的空气量,并根据空气量调节喷油量。 发动机工作的时候,ECU根据发动机的不同工况控制步进电机动 作,进而改变了发动机的工作状态。 步进电机是一台微型电机,它由围成一圈的多个钢质定子和一个 转子组成,每个钢质定子上都绕着一个线圈;转子是一个永久磁 铁,永久磁铁的中心是一个螺母。所有的定子线圈都始终通电。 只要改变其中某一个线圈的电流方向,转子就转过一个角度。当 各个定子线圈按恰当的顺序改变电流方向时,就形成一个旋转磁 场,使永久磁铁制成的转子按一定的方向旋转。
恩智网络数字录像机(NVR)用户手册说明书
请在 0℃-50℃的温度环境下放置和使用本产品; 设备安装与使用时应水平放置,尽量避免倾斜或倒置; 避免放置或安装在高温、潮湿、有灰尘或煤烟的场所。 设备不应遭受水滴或水溅,设备上不应放置诸如花瓶一类的装满液体的物品,
勿将其他设备放置于本产品上面。 为保证设备的正常散热,在设备中设计装有散热风扇,应尽量将设备安装在通
3.1.3 断电恢复.......................................................................................7 3.2 登录系统......................................................................................... 7 3.3 菜单操作.......................................................................................户使用手册
武汉恩智电子科技有限公司 2019 年 9 月
-1-
网络数字录像机(NVR)用户手册
前言
注意事项: 欢迎您使用本公司网络数字录像机(NVR)产品,为保障你安全稳定的使用,请
务必仔细阅读本使用手册,下面是关于产品的正确使用方法以及预防危险、防止财 产受到损失等内容,使用时请务必遵守。
3.3.5 文件备份......................................................................................16
3.3.6 通道配置......................................................................................17
EPM240T100C5中文资料(Altera)中文数据手册「EasyDatasheet - 矽搜」
–3
–4
–5
–6
–7
–8
v
v
v
—
—
—
v
v
v
—
—
—
v
v
v
—
—
—
v
v
v
—Байду номын сангаас
—
—
—
—
—
v
v
v
—
—
—
v
v
v
芯片中文手册,看全文,戳
MAX II器件采用节省空间FineLine BGA,微型BGAFineLine可用,
和薄型四方扁平封装(TQFP)封装(参见
表1-3 and 表1-4).
器件支持垂直迁移同一封装内(例如,你可以
特点
EPM240G EPM570G EPM1270G
LEs
240
570
1,270
典型等效宏单元
192
440
980
等效宏单元范围
128至240 240至570 570至1270
UFM大小(位) 最大用户I / O引脚
8,192 80
8,192 160
8,192 212
t (ns) (1)
4.7
5.4
6.2
EPM 2210 EPM 2210G
2,210 1,700 1,270 to 2,210 8,192 272
7.0 304 1.2 4.6
EPM 240Z 240 192
128至240 8,192 80 7.5 152 2.3 6.5
EPM 570Z 570 440
240至570 8,192 160 9.0 152 2.2 6.7
IRSoft PC-Software 指导手册说明书
说明
使用
IRSoft 软件用于分析、处理和存放 testo 880 热成像仪 (下称“ 仪器” )所记录的图像。它还集成了清晰的数据表达报告 功能。 可通过仪器控制器对连接好的热成像仪进行设置。
系统要求
操作系统 软件可以在以下操作系统中运行: • Windows® XP ServicePack 2 (SP2) • Windows Vista 有限功能范围: • Windows® 2000 SP4(无仪器控制器) • Windows® XP,无 SP2 计算机 要使软件顺畅工作,应满足以下要求: • 1.2 GHz 以上的 Pentium 处理器或同等性能的处理器 • 256 MB RAM • 100 MB 硬盘剩余空间 • CD-ROM 驱动器 • USB 2.0 接口 • Internet Explorer 5.5 Service Pack 1 或更高版本
6.7.1. 用户界面 .................................................................................................33 6.7.2. 功能和命令..............................................................................................34 6.7.3. 编辑报告模板 ..........................................................................................34
3 说明 ...................................................................................................6 3.1. 使用 ........................................................................................ 6 3.2. 系统要求 .................................................................................... 6
AEG说明书
7.1 启动准备 (单机) ......................................................................29
几点说明 ..............................................................................................2
1
安全规章...................................................................................6
版权声明 没有经过 AEG 的书面许可,任何单位或个人不得以任何电子或机械的 手段,对此操作指导说明书进行传播、转载或拷贝。
© AEG Power Solutions GmbH 20016206 AEG, 简体中文
目录
Protect 5. 31/xxx-S05 10 to 120 kVA
干扰抑制装置32ups的运行和操作部件1211x1x2x3x4off远程信号主板和扩展板can总线串行通讯控制器ccc端子排x12远程信号和其它可选功能q29手动旁路开关可选连接到整流器静态旁路电池和负载的端子10q1整流器输入开关11内部控制单元和风扇的保险a9112显示和操作单元douprotect31xxxs0510120kva第1454页8000016206aeg简体中文运输存贮和安装41ups将被包装和打包适合铁路和公路运输
5 5.1 5.1.1 5.1.2 5.1.3 5.1.4 5.2 5.3 5.4 5.5 5.6 5.6.1 5.6.2
功 能 .......................................................................................18 运行模式.................................................................................18 市电正常供电运行模式 ...........................................................18 市电失败的运行模式...............................................................19 逆变失败的运行模式...............................................................19 手动旁路运行模式 ..................................................................20 操作开关的功能 ......................................................................20 静态旁路 (SBS) ......................................................................21 电池充电.................................................................................22 充电特性曲线手动转换 ...........................................................22 电池测试.................................................................................22 容量检查.................................................................................23 容量测试.................................................................................23
- 1、下载文档前请自行甄别文档内容的完整性,平台不提供额外的编辑、内容补充、找答案等附加服务。
- 2、"仅部分预览"的文档,不可在线预览部分如存在完整性等问题,可反馈申请退款(可完整预览的文档不适用该条件!)。
- 3、如文档侵犯您的权益,请联系客服反馈,我们会尽快为您处理(人工客服工作时间:9:00-18:30)。
计费的。但实际情况是这样的:见下图(右键单击 EMS 文件,选择查看属性即可) 上面制作的 QQ 图像大小为 * 像素,保存名称为 ems 后 的文件实际大小是 字
节,占用空间是 字节(这个不用管它)。 ★ EMS 图片费用计算方法: 实际大小除以 (即每条短 信的实际长度,单位字节) ×当地短信每条短信费用。 例如,实际大
etfiles 五、 EMS 图像高级篇——彩色图像制作 、点击“颜色设置”,选择“ clr ”,如下图 选择后弹出“ Palette ”色彩选择面板
,用鼠标选择合适的颜色绘制图像或者给导入的黑白图 像上色。 完成后保存为 EMS 文件,然后用 PST 写入手机内存。 六、关于 EMS 的发送以及相关费用问题
二、
图片制作手绘篇: 、软件打开后默认就是新建了一个文档,所以不用再新 建了。默认文档是 BW 即黑白位图。 用鼠标点击或者拖动的方法绘制图形。我们来绘制一个 可爱的
QQ 图像。 ★ 技巧提示:左键上色,右键去色! 绘制完成,如下图
二、 EMS 图像制作之拿来主义――图像导入篇 ★ 互联网提供了无比丰富的资
otoC 使用 MiniUSB 线下载图片铃声详细 [ 图 ] bibleyounetfiles 关于使用 MiniUSB 线下载的补充 [ 图
老秦头 -
] 老秦头 bibleyounetfiles 如果 XP 系统安装 PST 无法成功,请修改注册表,参见, zhuiyue bibleyoun
名字就可以了。 ★注意如果使用中文名称可能导致 PST 识别文件错误! 四、 EMS 写入手机篇 打开 PST 软件,选择打开 M - Service Ba
ckup ,然后写入即可。 ★写入后的图片在“媒体中心-图片浏览器”中查看。 发信息时选择插入图片,然后浏览选择插入。 ★ PST 软件操作的相关文章链接 M
紧要、挑逗、大笑、爱你、悲伤、怀疑、鬼脸、眨眼、 喔!; Moto 内置 EMS 声音:高音钟声、低音钟声、高和弦音、 低和弦音、鼓掌、叮声、鼓声、喇叭、通报声、嗒嗒。
小六子 K 的内存岂不浪费了吗?俺老秦头拖着脂肪肝的 强壮身体,在网上寻寻觅觅,黄天不负俺对小六子的痴 心,经过数日摸爬滚打,终于被俺机缘巧合找到下面这 款软件,终于可
并且调整了自己界面大小——变形金刚!(好老的动画片 了,估计好多小六子的朋友都不知道了) 、如需调整图像尺寸,点击“ Resize ”(调整大小)按钮, 选择 Wid
ቤተ መጻሕፍቲ ባይዱ
th (宽度)值,输入 Hight (高度)值,点击“ OK ”,完 成尺寸调整。 三、 EMS 图像保存篇 点击保存按钮,选择保存为 EMS 格式,随便起个英文
、发送篇:信息-新信息-插入-图片-插入即可。经 实际测试:不可以发送给不支持 EMS 的手机。切记!不 支持 EMS 的手机收到后均为乱码,而且是 条短信乱 码!!!
黑白图片可以发送给任何支持 EMS 的手机,但彩色图片 如果发送给非彩屏手机会导致图片无法完全显示或者完 全无法显示! 、本来以为信息中插入的图片是按照实际字节数
小 字节,则发送费用为:( ) * 元= * = * = 元 注:不足一条同样按一条计算! 乐趣又增加了许多,但 注意费用问题,否则……地球人都知道! 七、老秦
头不变的祝福:祝天天快乐。
sacfdlkv 手机游戏
源保护,要是不用简直浪费! 、在网上寻找 Moto 或者 Nokia 的标准待机、待机大图、 经典大图、……皆可,图像格式(扩展名)为 BMP ( Windows
标准位图)。“另存为”保存在自己电脑中待命! 、点击“导入”按钮,将刚才保存的 BMP 图像导入 EMS Creator 中,软件马上按导入图像实际尺寸进行显示
以自己制作 EMS 图片了……哈哈哈…嘻…(不好意思,太 兴奋了,口水都流出来了)。 一、相关软件: EMS Creator 下载链接: motclubdown
appsEMS_Creator_zip 下载后解压缩,程序名成为: EMScreatorexe ,无需安装直接运行即可。 运行后界面如下图
小六子支持音画短信( EMS ) ,功能强大,但购机一个 月来仍然用的不爽,因为发信息时可以插入的图片、动 画、铃音仅仅局限在 Moto 内置的那几个。见下表: Mo
to 内置 EMS 图片:气球、蝴蝶、糕点、饮品、爱心、唇、 餐桌摆设、手提箱、阳光、雨伞; Moto 内置 EMS 动画:愤怒、困惑、哭泣、捣蛋鬼、高兴、 眼睛、无关