Redhat Sendmail配置详解
如何在MID上设置163之类的邮箱参数?
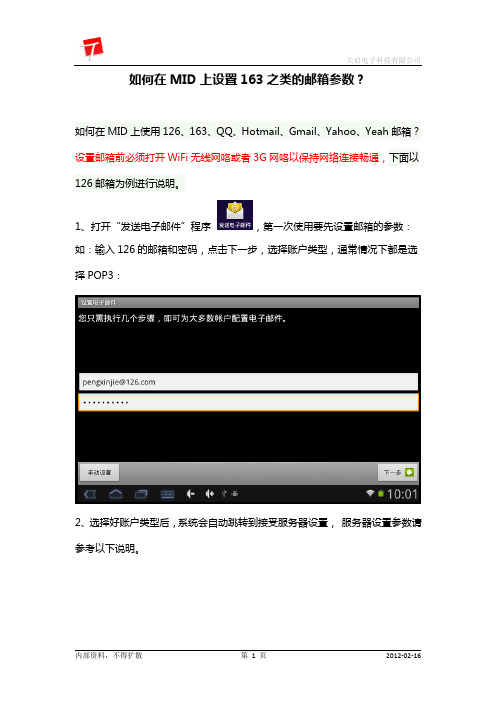
如何在MID上设置163之类的邮箱参数?如何在MID上使用126、163、QQ、Hotmail、Gmail、Yahoo、Yeah邮箱?设置邮箱前必须打开WiFi无线网咯或者3G网咯以保持网络连接畅通,下面以126邮箱为例进行说明。
1、打开“发送电子邮件”程序,第一次使用要先设置邮箱的参数:如:输入126的邮箱和密码,点击下一步,选择账户类型,通常情况下都是选择POP3:2、选择好账户类型后,系统会自动跳转到接受服务器设置,服务器设置参数请参考以下说明。
特别注意“SMTP服务器”的端口设置为你的邮箱账户取个名称,如工作或者私人方便以后区分。
并填上自己的昵称或姓名,此名称将显示在发送出去的邮件姓名一栏。
点击完成,此时邮箱设置就完成了,系统自动搜索该邮箱的未读邮件。
其他邮箱设置的步骤与上面步骤一致,具体设置参数可参考下面的数据。
126邮箱配置方法:类型:POP3接收邮件服务器:接收端口:110 SSL 否发送邮件服务器:发送端口:25 SSL 否163邮箱配置方法:类型:POP3接收邮件服务器:接收端口:110 SSL 否发送邮件服务器:发送端口:25 SSL 否配置方法:类型:POP3接收邮件服务器接收端口:110 SSL 否发送邮件服务器:smtp. 发送端口:25 SSL 否QQ邮箱配置方法及介绍:QQ邮箱需要通过手动的方式开启pop功能,方法如下:登陆您的QQ邮箱页面后点击页面上方的“设置”-“账号”-“POP3/SMTP服务”勾选“开启POP3/SMTP服务”后“保存修改”,如图所示服务器配置方法:类型:POP3接收邮件服务器:接收端口:110 SSL 否发送邮件服务器:发送端口:25 SSL 否Hotmail邮箱配置方法及介绍:Hotmail邮箱目前已全面支持pop功能,无需手动开启。
服务器配置方法如下:类型:POP3接收邮件服务器:接收端口:995 SSL 是发送邮件服务器:发送端口:25 TLS/SSL 是补充说明:Hotmail的邮箱用户名一定要填写地址全称,否则无法成功绑定。
Linux redhat 9.0 apache服务器配置
Apache服务器配置
操作步骤
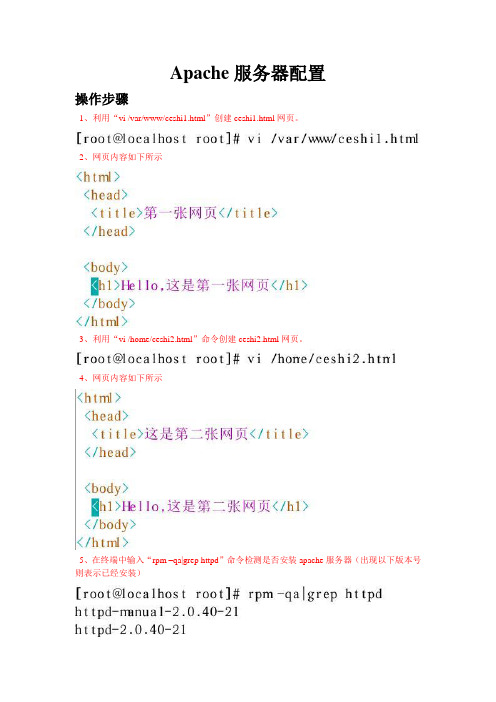
1、利用“vi /var/www/ceshi1.html”创建ceshi1.html网页。
2、网页内容如下所示
3、利用“vi /home/ceshi2.html”命令创建ceshi2.html网页。
4、网页内容如下所示
5、在终端中输入“rpm –qa|grep httpd”命令检测是否安装apache服务器(出现以下版本号则表示已经安装)
6、用vi命令打开httpd.conf配置文件。
7、在157行的位置添加2个端口号,如下图所示
在410行的位置中添加默认的启动网页。
在774行的位置设置默认的中文编码。
在文档最后配置好不同的端口和启动文件。
8、在终端中输入“service httpd start”命令开启apache服务。
9、在xp系统中,打开浏览器输入“http://192.168.0.5:8888”,则可打开第一张网页。
输入http://192.168.0.5:6666则可打开第二张网页。
REDHAT5配置教程
生活其实很精彩~~本文版权保留,任何人不得利用本文获取利益!!!
hanbim520@,欢迎交流,交流才能进步!!
[root@localhost etc]# cd .. [root@localhost chroot]# cd var/named/ [root@localhost named]# ls data localhost.zone named.ca named.local slaves localdomain.zone named.broadcast named.ip6.local named.zero [root@localhost named]# cp -p named.zero .zone [root@localhost named]# cp -p named.local 192.168.1.local //切记如果不加-p 要在配置后改属性 [root@localhost named]# ll total 88 -rw-r----- 1 root named 426 Jul 29 2009 192.168.1.local -rw-r----- 1 root named 427 Jul 29 2009 .zone drwxrwx--- 2 named named 4096 Aug 25 2004 data -rw-r----- 1 root named 198 Jul 29 2009 localdomain.zone -rw-r----- 1 root named 195 Jul 29 2009 localhost.zone -rw-r----- 1 root named 427 Jul 29 2009 named.broadcast -rw-r----- 1 root named 1892 Jul 29 2009 named.ca -rw-r----- 1 root named 424 Jul 29 2009 named.ip6.local -rw-r----- 1 root named 426 Jul 29 2009 named.local -rw-r----- 1 root named 427 Jul 29 2009 named.zero drwxrwx--- 2 named named 4096 Jul 27 2004 slaves .zone 配置内容如下: $TTL @ 86400 IN SOA . . ( 42 ; serial (d. adams) 3H ; refresh 15M ; retry 1W ; expiry 1D ) ; minimum IN NS . www IN A 192.168.1.10 ftp IN A 192.168.1.10 192.168.1.1.local 配置内容如下: $TTL 86400 @ IN SOA . . ( 1997022700 ; Serial 28800 ; Refresh 14400 ; Retry 3600000 ; Expire 86400 ) ; Minimum IN NS . 10 IN PTR . 10 IN PTR . [root@localhost /]# vi /etc/resolv.conf
RHEL6下DNS服务器各种配置

RHEL6下DNS服务器各种配置目录一. 环境模拟 (2)二. 日志查看 (2)三. DNS初步配置: (2)1. 下载caching-nameserver....rpm(). (2)2. 安装yum –y install bind.x86_64 (2)3. rpm –ivh caching-nameserver....rpm –nodeps –force .. (2)4. named.caching-nameserver.conf, named.conf, named.rfc1912.zones移到/var/named/chroot/etc/,并创建软连接 (2)5. 把/var/named/移到/var/named/chroot/var/named/,并创建软连接 (3)6. 配置named.conf (4)7. 测试: (5)四. 添加新域 (6)1. 添加正向和反向域 (6)2. 创建.zone 和31.168.192.in-addr.arpa (7)3. 检验.zone 和31.168.192.in-addr.arpa (8)4. 测试: (9)五. Master/Slave架构 (9)1. Master设置 (9)2. Slave设置 (10)3. 测试 (11)六. DNS cache服务器 (12)七. 子域名授权 (13)1. 上层主机端设置 (13)2. 下游主机设置 (13)3. 测试 (14)八. RNDC管理DNS服务器 (14)/view/5f0b7ceb102de2bd96058840.html一.环境模拟二.日志查看tail -n 30 /var/log/messages | grep named可以跟踪配置后的效果。
三.DNS初步配置:1.下载caching-nameserver….rpm()2.安装yum –y install bind.x86_643.rpm –ivh caching-nameserver….rpm –nod eps –forced.caching-nameserver.conf, named.conf,named.rfc1912.zones移到/var/named/chroot/etc/,并创建软连接[root@station200 ~]# ll /etc/na*lrwxrwxrwx. 1 root root 51 Aug 8 05:13 /etc/named.caching-nameserver.conf -> /var/named/chroot/etc/named.caching-nameserver.conflrwxrwxrwx. 1 root root 32 Aug 8 05:13 /etc/named.conf -> /var/named/chroot/etc/named.conf-rw-r--r--. 1 root named 2544 Mar 28 2011 /etc/named.iscdlv.keylrwxrwxrwx. 1 root root 41 Aug 8 05:13 /etc/named.rfc1912.zones -> /var/named/chroot/etc/named.rfc1912.zones-rw-r--r--. 1 root named 487 Mar 28 2011 /etc/named.root.key-rw-r--r--. 1 root root 7846 Aug 12 2010 /etc/nanorc/etc/named:total 05.把/var/named/移到/var/named/chroot/var/named/,并创建软连接[root@station200 etc]# cd /var/named/[root@station200 named]# lschroot localdomain.zone named.ca named.local named.zerodata localhost.zone named.empty named.localhost slavesdynamic named.broadcast named.ip6.local named.loopback[root@station200 named]# mv *.* ./chroot/var/named/[root@station200 named]# lschroot data dynamic slaves[root@station200 named]# cd chroot/var/named/[root@station200 named]# lslocaldomain.zone named.ca named.local named.zerolocalhost.zone named.empty named.localhostnamed.broadcast named.ip6.local named.loopback[root@station200 named]# cd -/var/named[root@station200 named]# ln -s /var/named/chroot/var/named/*.* ./[root@station200 named]# lltotal 16drwxr-x---. 5 root named 4096 Aug 8 05:07 chrootdrwxrwx---. 2 named named 4096 Aug 8 04:34 datadrwxrwx---. 2 named named 4096 Aug 8 04:35 dynamiclrwxrwxrwx. 1 root root 44 Aug 8 05:16 localdomain.zone -> /var/named/chroot/var/named/localdomain.zonelrwxrwxrwx. 1 root root 42 Aug 8 05:16 localhost.zone -> /var/named/chroot/var/named/localhost.zonelrwxrwxrwx. 1 root root 43 Aug 8 05:16 named.broadcast -> /var/named/chroot/var/named/named.broadcastlrwxrwxrwx. 1 root root 36 Aug 8 05:16 named.ca -> /var/named/chroot/var/named/named.calrwxrwxrwx. 1 root root 39 Aug 8 05:16 named.empty -> /var/named/chroot/var/named/named.emptylrwxrwxrwx. 1 root root 43 Aug 8 05:16 named.ip6.local -> /var/named/chroot/var/named/named.ip6.locallrwxrwxrwx. 1 root root 39 Aug 8 05:16 named.local -> /var/named/chroot/var/named/named.locallrwxrwxrwx. 1 root root 43 Aug 8 05:16 named.localhost -> /var/named/chroot/var/named/named.localhostlrwxrwxrwx. 1 root root 42 Aug 8 05:16 named.loopback -> /var/named/chroot/var/named/named.loopbacklrwxrwxrwx. 1 root root 38 Aug 8 05:16 named.zero -> /var/named/chroot/var/named/named.zerodrwxrwx---. 2 named named 4096 Mar 28 2011 slaves6.配置named.conf[root@station200 named]# vim /etc/named.confoptions {listen-on port 53 { 192.168.31.200; };listen-on-v6 port 53 { ::1; };directory "/var/named";dump-file "/var/named/data/cache_dump.db";statistics-file "/var/named/data/named_stats.txt";memstatistics-file "/var/named/data/named_mem_stats.txt";allow-query { 192.168.31.0/24; };recursion yes;dnssec-enable yes;dnssec-validation yes;#这个不知什么原因,要注释掉,不然dig会出错# dnssec-lookaside auto;/* Path to ISC DLV key */# bindkeys-file "/etc/named.iscdlv.key";};logging {channel default_debug {file "data/named.run";severity dynamic;};};#zone "." IN {# type hint;# file "named.ca";#};#以上与下边包含里重复。
MIME协议及邮件格式分析
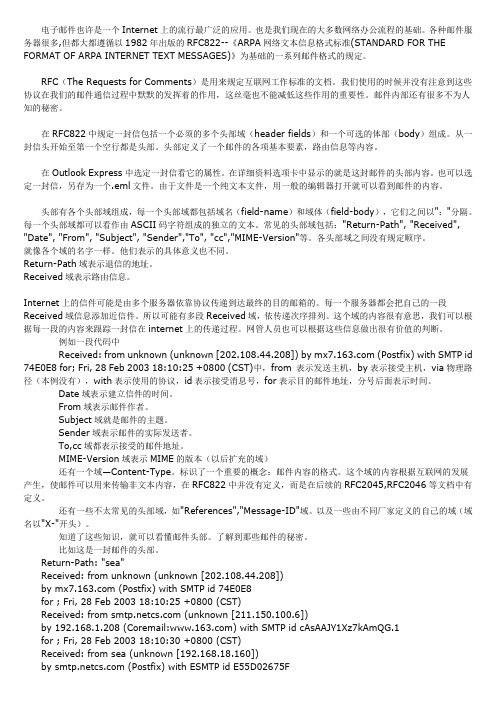
电子邮件也许是一个Internet上的流行最广泛的应用。
也是我们现在的大多数网络办公流程的基础。
各种邮件服务器很多,但都大都遵循以1982年出版的RFC822--《ARPA网络文本信息格式标准(STANDARD FOR THE FORMAT OF ARPA INTERNET TEXT MESSAGES)》为基础的一系列邮件格式的规定。
RFC(The Requests for Comments)是用来规定互联网工作标准的文档。
我们使用的时候并没有注意到这些协议在我们的邮件通信过程中默默的发挥着的作用,这丝毫也不能减低这些作用的重要性。
邮件内部还有很多不为人知的秘密。
在RFC822中规定一封信包括一个必须的多个头部域(header fields)和一个可选的体部(body)组成。
从一封信头开始至第一个空行都是头部。
头部定义了一个邮件的各项基本要素,路由信息等内容。
在Outlook Express中选定一封信看它的属性。
在详细资料选项卡中显示的就是这封邮件的头部内容。
也可以选定一封信,另存为一个.eml文件。
由于文件是一个纯文本文件,用一般的编辑器打开就可以看到邮件的内容。
头部有各个头部域组成,每一个头部域都包括域名(field-name)和域体(field-body),它们之间以":"分隔。
每一个头部域都可以看作由ASCII码字符组成的独立的文本。
常见的头部域包括:"Return-Path", "Received", "Date", "From", "Subject", "Sender","To", "cc","MIME-Version"等。
各头部域之间没有规定顺序。
就像各个域的名字一样。
他们表示的具体意义也不同。
邮箱配置

我们为所有126邮箱增值服务用户提供POP收信功能。
你可以使用支持POP 的客户端或者设备(例如Microsoft Outlook 或Foxmail )收发你的邮件。
请配置你的电子邮件客户端,以下载126 免费邮邮件。
要了解如何进行配置,请单击你的电子邮件客户端名称:Outlook Express 设置Foxmail 设置Microsoft Office Outlook 设置Netscape 设置Outlook Express 设置以中文版Outlook Express 6 为例,请按以下步骤,手动配置你的客户端:1、打开Outlook Express 后,单击窗口中的“工具”菜单,选择“帐户”;2、点击“邮件”标签,点击右侧的“添加”按钮,在弹出的菜单中选择“邮件”;3、弹出的对话框中,根据提示,输入你的“显示名”,然后点击“下一步”;4、输入你的电子邮件地址,点击“下一步”5、输入你邮箱的POP 和SMTP 服务器地址:pop: smtp:再点击“下一步”;6、输入你的帐号及密码(此帐号为登录此邮箱时用的帐号,仅输入@ 前面的部分),再点击“下一步”;7、单击“完成”按钮保存你的设置;8、设置SMTP 服务器身份验证:在“邮件”标签中,双击刚才添加的帐号,弹出此帐号的属性框;9、请点击“服务器”标签,然后在“发送邮件服务器”处,选中“我的服务器要求身份验证”选项,并点击右边“设置”标签,选中“使用与接收邮件服务器相同的设置”。
10、点击“确定”,然后“关闭”帐户框。
现在你已设置成功,点击主窗口中的“发送接收”按钮即可进行邮件收发。
Foxmail 设置以中文版Foxmail 5.0 为例:1、打开foxmail 后,单击窗口中的“帐户”菜单,选择“新建”;2、在弹出的菜单中选择“下一步”;3、接着根据提示,输入在foxmail 中管理帐号的“用户名”,如:“网易 126 免费邮”,然后点击“下一步”;4、输入“发送者姓名”和你的“电子邮件地址”,点击“下一步”;5、输入你邮箱的POP 服务器和SMTP 服务器地址:pop:smtp:以及“ pop 帐户名”和“密码”,然后点击“下一步”;6、设置SMTP 服务器身份验证:选中“ SMTP 服务器需要身份验证”选项(此处一定要选中,否则将不能发信成功);单击“完成”按钮保存你的设置。
James邮件服务器简单介绍及配置发送外网邮件
一、简介Apache James(Java Apache Mail Enterprise Server)是Apache组织的子项目之一,完全采用纯Java技术开发,实现了SMTP、POP3与NNTP等多种邮件相关协议。
James也是一个邮件应用平台,可以通过Mailet扩充其功能,如Mail2SMS、Mail2Fax等。
James提供了比较完善的配置方案,尤其是关于邮件内容存储和用户信息存储部分,可以选择在文件、数据库或其他介质中保存。
本文将以James2.3.2版本作为介绍二、安装与配置James的安装配置过程非常简单。
第一步:安装JDK请使用JDK1.3以上版本(推荐使用JDK1.5),假设安装在c:/jdk1.5。
第二步:下载James,并解压可以到Apache网站上下载Jamesjames-2.3.2,下载将得到一个压缩文件james-2.3.2.zip,大小为7.30M,将此包解压到c:/james。
下载地址:官方地址:/下载地址:/apache/james/server/binaries/james-binary-2.3.1.zip第三步:直接运行或需要配置JAVA_HOME这时,可以尝试直接双击c:/james/bin/run.bat,若启动无误,将提示如下:Using PHOENIX_HOME: C:/jamesUsing PHOENIX_TMPDIR: C:/james/tempUsing JAVA_HOME:Phoenix 4.0.1James 2.3.2Remote Manager Service started plain:4555POP3 Service started plain:110SMTP Service started plain:25NNTP Service DisabledFetch POP Disabled也有可能启动不了,并报JAVA_HOME找不到,这时,需要指定JAVA_HOME,比较简单的方法是在c:/james/bin/run.bat中指定JAVA_HOME,修改后的run.bat如下:……remrem Determine if JAVA_HOME is set and if so then use itremset JAVA_HOME= c:/jdk1.5if not "%JAVA_HOME%"=="" goto found_java……修改完后再运行run.bat,应该就可以正常启动了第四步:服务器配置首先找出专用服务器的名字,假设叫weimao。
JavaMailJavaMail配置属性
JavaMailJavaMail配置属性属性名含义er SMTP的缺省⽤户名。
mail.smtp.host要连接的SMTP服务器。
mail.smtp.port要连接的SMTP服务器的端⼝号,如果connect没有指明端⼝号就使⽤它,缺省值25。
mail.smtp.auth缺省是false,如果为true,尝试使⽤AUTH命令认证⽤户。
mail.transport.protocol要装⼊session的协议(smtp、pop3、imap、nntp)。
mail.smtp.connectiontimeout Socket连接超时值,单位毫秒,缺省值不超时。
mail.smtp.timeout Socket I/O超时值,单位毫秒,缺省值不超时。
mail.smtp.from SMTP MAIL使⽤的Email地址,⽤来设置邮件的return地址。
缺省是Message.getFrom()或InternetAddress.getLocalAddress()。
注意:er优先使⽤mail.smtp.localhost localhost名,缺省是 InetAddress.getLocalHost().getHostName()。
如果JDK和name service正确配置,⼀般不需设置。
mail.host邮件交互的主机。
mail.smtp.ehlo如果为false,那么不会尝试使⽤EHLO命令登录,缺省是true。
通常EHLO命令失败,会倒退到HELO命令。
这个属性只有在服务器没有fail EHLO属性或没有实现EHLO属性。
er登录邮件服务器的⽤户名(发送邮件时需要)。
mail.from发件⼈地址(发送邮件时需要)。
SMTP协议⽀持的所有属性:Name Type Descriptioner String Default user name for SMTP.mail.smtp.host String The SMTP server to connect to.mail.smtp.port int The SMTP server port to connect to, if the connect() method doesn’t explicitly specify one. Defaults to 25.mail.smtp.connectiontimeout int Socket connection timeout value in milliseconds. This timeout is implemented by .Socket. Default is infinite timeout.mail.smtp.timeout int Socket read timeout value in milliseconds. This timeout is implemented by .Socket. Default is infinite timeout.mail.smtp.writetimeout int Socket write timeout value in milliseconds. This timeout is implemented by using a java.util.concurrent.ScheduledExecutorService per connection that schedules a thread to close the socket if the timeout expires. Thus, the overhead of using this timeout is one thread per connection. Default is infinite timeout.mail.smtp.from String Email address to use for SMTP MAIL command. This sets the envelope return address. Defaults to msg.getFrom() or InternetAddress.getLocalAddress(). NOTE: er was previously used for this.mail.smtp.localhost String Local host name used in the SMTP HELO or EHLO command. Defaultsto InetAddress.getLocalHost().getHostName(). Should not normally need to be set if your JDK and your name service are configured properly.mail.smtp.localaddress String Local address (host name) to bind to when creating the SMTP socket. Defaults to the address picked by the Socket class. Should not normally need to be set, but useful with multi-homed hosts where it’s important to pick a particular local address to bind to.mail.smtp.localport int Local port number to bind to when creating the SMTP socket. Defaults to the port number picked by the Socket class.mail.smtp.ehlo boolean If false, do not attempt to sign on with the EHLO command. Defaults to true. Normally failure of the EHLO command will fallback to the HELO command; this property exists only for servers that don’t fail EHLO properly or don’t implement EHLO properly.mail.smtp.auth boolean If true, attempt to authenticate the user using the AUTH command. Defaults to false.mail.smtp.auth.mechanisms String If set, lists the authentication mechanisms to consider, and the order in which to consider them. Only mechanisms supported by the server and supported by the current implementation will be used. The default is “LOGIN PLAIN DIGEST-MD5 NTLM”, which includes all the authentication mechanisms supported by the current implementation except XOAUTH2.mail.smtp.auth.login.disable boolean If true, prevents use of the AUTH LOGIN command. Default is false. mail.smtp.auth.plain.disable boolean If true, prevents use of the AUTH PLAIN command. Default is false. mail.smtp.auth.digest-md5.disable boolean If true, prevents use of the AUTH DIGEST-MD5 command. Default is false.mail.smtp.auth.digest-md5.disable boolean If true, prevents use of the AUTH DIGEST-MD5 command. Default is false. mail.smtp.auth.ntlm.disable boolean If true, prevents use of the AUTH NTLM command. Default is false. mail.smtp.auth.ntlm.domain String The NTLM authentication domain.mail.smtp.auth.ntlm.flags int NTLM protocol-specific flags. See for details.mail.smtp.auth.xoauth2.disable boolean If true, prevents use of the AUTHENTICATE XOAUTH2 command. Because the OAuth 2.0 protocol requires a special access token instead of a password, this mechanism is disabled by default. Enable it by explicitly setting this property to “false” or by setting the “mail.smtp.auth.mechanisms” property to “XOAUTH2”.mail.smtp.submitter String The submitter to use in the AUTH tag in the MAIL FROM command. Typically used by a mail relay to pass along information about the original submitter of the message. See also the method of . Mail clients typically do not use this.mail.smtp.dsn.notify String The NOTIFY option to the RCPT command. Either NEVER, or some combination of SUCCESS, FAILURE, and DELAY (separated by commas).mail.smtp.dsn.ret String The RET option to the MAIL command. Either FULL or HDRS.mail.smtp.allow8bitmime boolean If set to true, and the server supports the 8BITMIME extension, text parts of messages that use the “quoted-printable” or “base64” encodings are converted to use “8bit” encoding if they follow the RFC2045 rules for 8bit text.mail.smtp.sendpartial boolean If set to true, and a message has some valid and some invalid addresses, send the message anyway, reporting the partial failure with a SendFailedException. If set to false (the default), the message is not sent to any of the recipients if there is an invalid recipient address.mail.smtp.sasl.enable boolean If set to true, attempt to use the javax.security.sasl package to choose an authentication mechanism for login. Defaults to false.mail.smtp.sasl.mechanisms String A space or comma separated list of SASL mechanism names to try to use.mail.smtp.sasl.authorizationid String The authorization ID to use in the SASL authentication. If not set, the authentication ID (user name) is used.mail.smtp.sasl.realm String The realm to use with DIGEST-MD5 authentication.ecanonicalhostname boolean If set to true, the canonical host name returned by is passed to the SASL mechanism, instead of the host name used to connect. Defaults to false.mail.smtp.quitwait boolean If set to false, the QUIT command is sent and the connection is immediately closed. If set to true (the default), causes the transport to wait for the response to the QUIT command.mail.smtp.reportsuccess boolean If set to true, causes the transport to include an for each address that is successful. Note also that this will cause a to be thrown from the methodof even if all addresses were correct and the message was sent successfully.mail.smtp.socketFactory SocketFactory If set to a class that implements the .SocketFactory interface, this class will be used to create SMTP sockets. Note that this is an instance of a class, not a name, and must be set using the putmethod, not the setProperty method.mail.smtp.socketFactory.class String If set, specifies the name of a class that implementsthe .SocketFactory interface. This class will be used to create SMTP sockets.mail.smtp.socketFactory.fallback boolean If set to true, failure to create a socket using the specified socket factory class will cause the socket to be created using the .Socket class. Defaults to true.mail.smtp.socketFactory.port int Specifies the port to connect to when using the specified socket factory. If not set, the default port will be used.mail.smtp.ssl.enable boolean If set to true, use SSL to connect and use the SSL port by default. Defaults to false for the “smtp” protocol and true for the “smtps” protocol.mail.smtp.ssl.checkserveridentity boolean If set to true, check the server identity as specified by . These additional checks based on the content of the server’s certificate are intended to prevent man-in-the-middle attacks. Defaults to false.mail.smtp.ssl.trust String If set, and a socket factory hasn’t been specified, enables use of a . If set to “*”, all hosts are trusted. If set to a whitespace separated list of hosts, those hosts are trusted. Otherwise, trust depends on the certificate the server presents.mail.smtp.ssl.socketFactory SSLSocketFactory If set to a class that extends the .ssl.SSLSocketFactory class, this class will be used to create SMTP SSL sockets. Note that this is an instance of a class, not a name, and must be set using theput method, notthe setProperty method.mail.smtp.ssl.socketFactory.class String If set, specifies the name of a class that extendsthe .ssl.SSLSocketFactory class. This class will be used to create SMTP SSL sockets.mail.smtp.ssl.socketFactory.port int Specifies the port to connect to when using the specified socket factory. If not set, the default port will be used.Name Type Descriptionset, the default port will be used.mail.smtp.ssl.protocols string Specifies the SSL protocols that will be enabled for SSL connections. The property value is a whitespace separated list of tokens acceptable tothe .ssl.SSLSocket.setEnabledProtocolsmethod.mail.smtp.ssl.ciphersuites string Specifies the SSL cipher suites that will be enabled for SSL connections. The property value is a whitespace separated list of tokens acceptable tothe .ssl.SSLSocket.setEnabledCipherSuitesmethod.mail.smtp.starttls.enable boolean If true, enables the use of the STARTTLS command (if supported by the server) to switch the connection to a TLS-protected connection before issuing any login commands. Note that an appropriate trust store must configured so that the client will trust the server’s certificate. Defaults to false.mail.smtp.starttls.required boolean If true, requires the use of the STARTTLS command. If the server doesn’t support the STARTTLS command, or the command fails, the connect method will fail. Defaults to false.mail.smtp.socks.host string Specifies the host name of a SOCKS5 proxy server that will be used for connections to the mail server. (Note that this only works on JDK 1.5 or newer.)mail.smtp.socks.port string Specifies the port number for the SOCKS5 proxy server. This should only need to be used if the proxy server is not using the standard port number of 1080.mail.smtp.mailextension String Extension string to append to the MAIL command. The extension string can be used to specify standard SMTP service extensions as well as vendor-specific extensions. Typically the application should use the method to verify that the server supports the desired service extension. See and other RFCs that define specific extensions.erset boolean If set to true, use the RSET command instead of the NOOP command in the method. In some cases sendmail will respond slowly after many NOOP commands; use of RSET avoids this sendmail issue. Defaults to false.mail.smtp.noop.strict boolean If set to true (the default), insist on a 250 response code from the NOOP command to indicate success. The NOOP command is used by the method to determine if the connection is still alive. Some older servers return the wrong response code on success, some servers don’t implement the NOOP command at all and so always return a failure code. Set this property to false to handle servers that are broken in this way. Normally, when a server times out a connection, it will send a 421 response code, which the client will see as the response to the next command it issues. Some servers send the wrong failure response code when timing out a connection. Do not set this property to false when dealing with servers that are broken in this way.Name Type Description。
Coremail XT V3.0 管理使用手册
Coremail XT V2.1管理使用手册版权声明本文档版权归盈世信息科技(北京)有限公司所有,并保留一切权利。
未经书面许可,任何公司和个人不得将此文档中的任何部分公开、转载或以其他方式散发给第三方。
否则,必将追究其法律责任。
免责声明本文档仅提供阶段性信息,所含内容可根据产品的实际情况随时更新,恕不另行通知。
如因文档使用不当造成的直接或间接损失,本公司不承担任何责任。
文档更新本文档由盈世信息科技(北京)有限公司于2013年4月最后修订。
公司网站销售咨询热线800-830-7652技术支持热线800-830-5422A、文档修改记录版本修改日期修改人员修改记录XT2.1.5 2011-10-31 Hugo 文档创建XT2.1.6 2012-1-18 Vicky 文档更新XT2.1.7 2012-3-28 Vicky 文档更新B、文档审核记录版本审核日期审核人员审核记录XT2.1.6XT2.1.7目录1 前言 (1)2 使用说明 (1)2.1 管理员角色 (1)2.2 管理内容概述 (1)3 管理界面 (2)3.1 登录界面 (2)3.2 管理界面结构 (3)3.3 退出登录 (3)4 系统管理 (4)4.1 基本配置情况 (4)4.1.1 页面定制 (4)4.1.2 用户服务等级 (6)4.1.3 域名管理 (9)4.1.4 全局设定 (11)4.2 工具 (16)4.2.1 日志查看 (16)4.2.2 邮件备份 (19)4.2.3 海外转发设置 (22)4.3 统计 (23)4.3.1 邮件收发量 (23)4.3.2 邮件大小分布 (25)4.3.3 邮箱访问情况 (26)4.3.4 中转站上传/下载 (27)4.3.5 中转站文件大小分布 (28)4.3.6 中转站文件类型统计 (28)4.3.7 用户活跃度 (29)4.3.8 邮件加速效果 (31)4.3.9 用户增长统计 (31)4.3.10 4.3.10登录访问查询 (31)4.4 许可证 (31)5 组织管理 (32)5.1 新建组织 (32)5.2 管理组织 (33)5.3 组织排序 (34)5.4 组织搜索 (34)5.5 统计 (35)5.5.1 组织注册情况统计 (35)5.5.2 按邮箱数分段统计 (36)5.5.3 服务等级统计 (36)5.5.4 资源情况统计 (37)6 用户管理 (38)6.1 部门 (38)6.1.1 新建部门 (38)6.1.2 管理部门 (39)6.1.3 删除部门 (39)6.2 邮箱用户 (40)6.2.1 新建邮箱用户 (40)6.2.2 管理邮箱用户 (41)6.2.3 删除邮箱用户 (44)6.3 邮件列表 (45)6.3.1 邮件列表概述 (45)6.3.2 邮件列表管理 (46)6.4 联系人 (49)6.5 工具箱 (51)6.5.1 导出用户 (51)6.5.2 管理员管理 (51)6.5.3 发送通知信 (53)6.5.4 组织管理员通知信 (53)6.5.5 用户批量删除 (54)6.5.6 恢复已删除用户 (55)6.6 组织内排序 (55)6.7 搜索 (56)6.8 可选显示功能 (57)6.9 用户高级功能 (58)7 Webadmin FQA (61)7.1 管理员常用帮助 (61)7.1.1 系统默认提供哪些服务和管理界面? (61)7.1.2 系统服务链接的命令? (61)7.1.3 管理员忘记密码怎么办? (62)7.1.4 为何不能发送邮件? (62)7.1.5 为何不能接收邮件? (63)7.1.6 为何不能从服务器上pop邮件下来? (65)7.1.7 Webmail登录出错怎么办? (65)7.1.8 管理界面无法正常登录,提示:“系统繁忙,请联系管理员”怎么办? (66)7.1.9 为何系统收到很多垃圾邮件? (66)7.1.10 如何识别疑似病毒的邮件? (67)7.1.11 我收到退信了,可是看不懂里面的信息? (67)7.2 系统管理 (69)7.2.1 如何添加域别名? (69)7.2.2 什么是服务等级管理? (69)7.2.3 为什么我新建好了一个服务等级之后,不能分配给用户使用呢? (69)7.2.4 怎么样设置邮箱空间、收发附件大小? (69)7.2.5 怎么样设置邮件只能在本站内收发? (70)7.2.6 怎么样查看邮箱空间使用情况 (71)7.2.7 系统空间满的时候,可以删掉哪些文件? (71)7.2.8 如何查询日志? (71)7.2.9 如何导出邮件和备份邮件? (73)7.2.10 Coremail退信,如何查日志? (73)7.2.11 如何修改欢迎信? (74)7.2.12 如何修改Webmail登录界面的LOGO? (74)7.2.13 如何设置登录session超时时间? (75)7.2.14 如何进行API访问? (75)7.2.15 怎么样设置禁止用户在Webmail上传的附件类型 (75)7.2.16 我们购买了监控功能,但是怎么在管理界面没有找到呢? (76)7.3 用户管理 (76)7.3.1 组织标识是用来做什么的?要怎么填呢? (76)7.3.2 "停用"跟"锁定"状态有什么区别呢?对用户的影响是怎么样的? (76)7.3.3 什么是外部联系人 (76)7.3.4 邮箱容量和网络硬盘容量的新增附加容量是什么? (77)7.3.5 如何创建一个系统管理员并分配部分权限 (77)7.3.6 如何查看用户邮件信息和使用记录? (78)7.3.7 如何批量删除用户 (79)7.3.8 如何批量导入和导出用户 (79)7.3.9 批量导入用户的CSV格式是怎么样的? (80)7.3.10 如何向全站或部门群发邮件? (82)7.3.11 我们改变一个用户所在的组织,要怎么操作? (82)7.3.12 用户管理界面的"发送通知信"是能给全站的用户群发邮件吗? (82)7.3.13 我给用户增加附加容量的时候,提示:附加容量超出限制,但是我的磁盘是有空间的?827.4 反垃圾管理 (83)7.4.1 如何创建一条发信人规则 (83)7.4.2 如何添加黑白名单? (84)7.4.3 如何创建一条关键字规则 (84)7.4.4 “全局设置”中部分参数说明 (85)7.4.5 什么是邮件日志跟踪 (90)7.4.6 在邮件日志跟踪那里看到,每隔一段时间就会有ip127.0.0.1的发信记录,但是没有发件人也没有收件人,结果是:连接被中断。
《网络服务器搭建、配置与管理-Linux(第二版)》课后习题答案
《网络服务器搭建、配置与管理-Linux版(第二版)》课后习题答案1.6 练习题一、选择题1. Linux最早是由计算机爱好者 B 开发的。
A. Richard PetersenB. Linus TorvaldsC. Rob PickD. Linux Sarwar2. 下列 C 是自由软件。
A. Windows XPB. UNIXC. LinuxD. Windows 20003. 下列 B 不是Linux的特点。
A. 多任务B. 单用户C. 设备独立性D. 开放性4. Linux的内核版本2.3.20是 A 的版本。
A. 不稳定B. 稳定的C. 第三次修订D. 第二次修订5. Linux安装过程中的硬盘分区工具是 D 。
A. PQmagicB. FDISKC. FIPSD. Disk Druid6. Linux的根分区系统类型是 C 。
A. FATl6B. FAT32C. ext4D. NTFS二、填空题1. GUN的含义是:GNU's Not UNIX。
2. Linux一般有3个主要部分:内核(kernel)、命令解释层(Shell或其他操作环境)、实用工具。
3. 安装Linux最少需要两个分区,分别是swap交换分区和/(根)分区。
4. Linux默认的系统管理员账号是root 。
三、简答题(略)1.简述Red Hat Linux系统的特点,简述一些较为知名的Linux发行版本。
2.Linux有哪些安装方式?安装Red Hat Linux系统要做哪些准备工作?3.安装Red Hat Linux系统的基本磁盘分区有哪些?4.Red Hat Linux系统支持的文件类型有哪些?2.6 练习题一、填空题1.SMB Server Message Block2.4453.nmbd smbd4.yum 源文件repo /etc/yum.repos.d/5./etc/samba smb.conf6.share user server domain ads user二、选择题1. (C )2. (C )3.(B )4. (AD )5.(B)6. (C )7.(A )8.(D )三、简答题(略)1.简述samba服务器的应用环境。
- 1、下载文档前请自行甄别文档内容的完整性,平台不提供额外的编辑、内容补充、找答案等附加服务。
- 2、"仅部分预览"的文档,不可在线预览部分如存在完整性等问题,可反馈申请退款(可完整预览的文档不适用该条件!)。
- 3、如文档侵犯您的权益,请联系客服反馈,我们会尽快为您处理(人工客服工作时间:9:00-18:30)。
Redhat Sendmail配置详解 一、软件包 1. dovecot-1.2.12.tar.gz 2. Sendmail 二、安装步骤 1. 安装dovecot
一、RPM格式 1。安装RPM包; 2。编辑/etc/dovecot.conf 其中,修改 protocols = imap pop3 passdb passwd { } passdb shadow { } 3。启动 #service dovecot start
二、tar.gz包的安装 1。下载地址:(目前最新版本)http://www.dovecot.org/releases/dovecot-1.2.12.tar.gz 2。安装: #tar zxvf dovecot-1.2.12.tar.gz #cd dovecot-1.2.12 #./configure --prefix=/usr/local/dovecot --sysconfdir=/usr/local/etc --with-mysql --without-ssl --disable-ipv6 #make #make install # cp /usr/local/etc/dovecot-example.conf /usr/local/etc/dovecot.conf
3。建立启动进程所依赖的用户 # useradd -s /bin/false -d /dev/null dovecot
4。修改配置文件 编辑/usr/local/etc/dovecot.conf 其中,修改 protocols = imap pop3 ssl_disable = yes passdb passwd { } passdb shadow { } 5。启动 #/usr/local/dovecot/sbin/dovecot
6。可以把启动命令写进/etc/rc.d/rc.local文件,以使得系统启动时能自动启动服务。 #echo "/usr/local/dovecot/sbin/dovecot" >> /etc/rc.d/rc.local
7。验正 (1)验正POP3 #telnet localhost 110 Trying 127.0.0.1... Connected to localhost.localdomain (127.0.0.1). Escape character is '^]'. +OK Dovecot ready.
(2)验正imap #telnet localhost 143 Trying 127.0.0.1... Connected to localhost.localdomain (127.0.0.1). Escape character is '^]'. * OK Dovecot ready.
Yum –y install sendmail Chkconfig sendmail on Service sendmail restart 修改 /etc/mail/sendmail.mc. divert(-1)dnl dnl # dnl # This is the sendmail macro config file for m4. If you make changes to dnl # /etc/mail/sendmail.mc, you will need to regenerate the dnl # /etc/mail/sendmail.cf file by confirming that the sendmail-cf package is dnl # installed and then performing a dnl # dnl # make -C /etc/mail dnl # include(`/usr/share/sendmail-cf/m4/cf.m4')dnl VERSIONID(`setup for Red Hat Linux')dnl OSTYPE(`linux')dnl dnl # dnl # Uncomment and edit the following line if your outgoing mail needs to dnl # be sent out through an external mail server: dnl # dnl define(`SMART_HOST',`smtp.your.provider') dnl # define(`confDEF_USER_ID',``8:12'')dnl define(`confTRUSTED_USER', `smmsp')dnl dnl define(`confAUTO_REBUILD')dnl define(`confTO_CONNECT', `1m')dnl define(`confTRY_NULL_MX_LIST',true)dnl define(`confDONT_PROBE_INTERFACES',true)dnl define(`PROCMAIL_MAILER_PATH',`/usr/bin/procmail')dnl define(`ALIAS_FILE', `/etc/aliases')dnl dnl define(`STATUS_FILE', `/etc/mail/statistics')dnl define(`UUCP_MAILER_MAX', `2000000')dnl define(`confUSERDB_SPEC', `/etc/mail/userdb.db')dnl define(`confPRIVACY_FLAGS', `authwarnings,novrfy,noexpn,restrictqrun')dnl define(`confAUTH_OPTIONS', `A')dnl dnl # dnl # The following allows relaying if the user authenticates, and disallows dnl # plaintext authentication (PLAIN/LOGIN) on non-TLS links dnl # dnl define(`confAUTH_OPTIONS', `A p')dnl dnl # dnl # PLAIN is the preferred plaintext authentication method and used by dnl # Mozilla Mail and Evolution, though Outlook Express and other MUAs do dnl # use LOGIN. Other mechanisms should be used if the connection is not dnl # guaranteed secure. dnl # TRUST_AUTH_MECH(`EXTERNAL DIGEST-MD5 CRAM-MD5 LOGIN PLAIN')dnl define(`confAUTH_MECHANISMS', `EXTERNAL GSSAPI DIGEST-MD5 CRAM-MD5 LOGIN PLAIN')dnl dnl # dnl # Rudimentary information on creating certificates for sendmail TLS: dnl # make -C /usr/share/ssl/certs usage dnl # dnl define(`confCACERT_PATH',`/usr/share/ssl/certs') dnl define(`confCACERT',`/usr/share/ssl/certs/ca-bundle.crt') dnl define(`confSERVER_CERT',`/usr/share/ssl/certs/sendmail.pem') dnl define(`confSERVER_KEY',`/usr/share/ssl/certs/sendmail.pem') dnl # dnl # This allows sendmail to use a keyfile that is shared with OpenLDAP's dnl # slapd, which requires the file to be readble by group ldap dnl # dnl define(`confDONT_BLAME_SENDMAIL',`groupreadablekeyfile')dnl dnl # dnl define(`confTO_QUEUEWARN', `4h')dnl dnl define(`confTO_QUEUERETURN', `5d')dnl dnl define(`confQUEUE_LA', `12')dnl dnl define(`confREFUSE_LA', `18')dnl define(`confTO_IDENT', `0')dnl dnl FEATURE(delay_checks)dnl FEATURE(`no_default_msa',`dnl')dnl FEATURE(`smrsh',`/usr/sbin/smrsh')dnl FEATURE(`mailertable',`hash -o /etc/mail/mailertable.db')dnl FEATURE(`virtusertable',`hash -o /etc/mail/virtusertable.db')dnl FEATURE(redirect)dnl FEATURE(always_add_domain)dnl FEATURE(use_cw_file)dnl FEATURE(use_ct_file)dnl dnl # dnl # The -t option will retry delivery if e.g. the user runs over his quota. dnl # FEATURE(local_procmail,`',`procmail -t -Y -a $h -d $u')dnl FEATURE(`access_db',`hash -T; -o /etc/mail/access.db')dnl FEATURE(`blacklist_recipients')dnl EXPOSED_USER(`root')dnl dnl # dnl # The following causes sendmail to only listen on the IPv4 loopback address dnl # 127.0.0.1 and not on any other network devices. Remove the loopback dnl # address restriction to accept email from the internet or intranet. dnl # DAEMON_OPTIONS(`Port=smtp,Addr=0.0.0.0, Name=MTA')dnl dnl # dnl # The following causes sendmail to additionally listen to port 587 for dnl # mail from MUAs that authenticate. Roaming users who can't reach their dnl # preferred sendmail daemon due to port 25 being blocked or redirected find