New Microsoft Word Document
新建 Microsoft Word 97 - 2003 Document
新建 Microsoft Word 97 - 2003 Document7-2003 Document欢迎使用 Microsoft Word 97-2003 Document,这是一个用于创建文档、文章、报告和其他文本材料的常用工具。
使用Word,您可以轻松地编辑、格式化、插入图片和表格,并保存您的作品,以便在任何设备上查看和使用。
在开始使用 Word 97-2003 Document 之前,请确保您已经安装了 Microsoft Office 软件,并了解 Word 的基本功能和操作方法。
如果您是初次使用 Word,建议您参考 Office 帮助文档或相关教程,以了解更多关于 Word 的信息和使用技巧。
现在,让我们创建一个简单的 Word 文档。
1. 打开 Microsoft Word 97-2003 Document,点击 "File"(文件)菜单,选择 "New"(新建)选项,然后选择"Document"(文档)。
2. 在新文档中输入您的文本。
您可以使用键盘上的字母、数字和符号,或者复制和粘贴其他文本。
3. 编辑您的文本。
您可以使用 "Edit"(编辑)菜单中的选项来修改文本,例如更改字体、大小、颜色和对齐方式。
您还可以插入图片、表格、图表和其他元素。
4. 格式化您的文档。
使用 "Format"(格式)菜单中的选项来调整文档的外观。
例如,您可以设置页边距、插入页码、添加页眉和页脚等。
5. 保存您的文档。
点击 "File"(文件)菜单,选择"Save"(保存)选项。
输入文件名和文件类型,然后点击"Save"(保存)按钮。
现在,您已经成功创建了一个简单的 Word 97-2003 Document 文档。
如果您需要进一步了解 Word 的功能和使用方法,请参考 Office 帮助文档或相关教程。
Word操作类

using System;using System.Collections.Generic;using System.Text;using System.Drawing;using System.Windows.Forms;using System.IO;namespace WordApplication{public class WordHelp{private Microsoft.Office.Interop.Word.ApplicationClass oWordApplic; // a reference to Word applicationprivate Microsoft.Office.Interop.Word.Document oDoc; // a reference to the documentobject missing = System.Reflection.Missing.Value;public Microsoft.Office.Interop.Word.ApplicationClass WordApplication{get { return oWordApplic; }}public WordHelp(){// activate the interface with the COM object of Microsoft WordoWordApplic = new Microsoft.Office.Interop.Word.ApplicationClass();}public WordHelp(Microsoft.Office.Interop.Word.ApplicationClass wordapp){oWordApplic = wordapp;}#region文件操作// Open a file (the file must exists) and activate itpublic void Open(string strFileName){object fileName = strFileName;object readOnly = false;object isVisible = true;oDoc = oWordApplic.Documents.Open(ref fileName, ref missing, ref readOnly, ref missing, ref missing, ref missing, ref missing, ref missing, ref missing,ref missing, ref missing, ref isVisible, ref missing, ref missing, ref missing, ref missing);oDoc.Activate();}// Open a new documentpublic void Open(){oDoc = oWordApplic.Documents.Add(ref missing, ref missing, ref missing, ref missing);oDoc.Activate();}public void Quit(){oWordApplic.Application.Quit(ref missing, ref missing, ref missing);}///<summary>///附加dot模版文件///</summary>private void LoadDotFile(string strDotFile){if (!string.IsNullOrEmpty(strDotFile)){Microsoft.Office.Interop.Word.Document wDot = null;if (oWordApplic != null){oDoc = oWordApplic.ActiveDocument;oWordApplic.Selection.WholeStory();//string strContent = oWordApplic.Selection.Text;oWordApplic.Selection.Copy();wDot = CreateWordDocument(strDotFile, true);object bkmC = "Content";if (oWordApplic.ActiveDocument.Bookmarks.Exists("Content") == true){oWordApplic.ActiveDocument.Bookmarks.get_Item(ref bkmC).Select();}//对标签"Content"进行填充//直接写入内容不能识别表格什么的//oWordApplic.Selection.TypeText(strContent);oWordApplic.Selection.Paste();oWordApplic.Selection.WholeStory();oWordApplic.Selection.Copy();wDot.Close(ref missing, ref missing, ref missing);oDoc.Activate();oWordApplic.Selection.Paste();}}}//////打开Word文档,并且返回对象oDoc///完整Word文件路径+名称///返回的Word.Document oDoc对象public Microsoft.Office.Interop.Word.Document CreateWordDocument(string FileName, bool HideWin){if (FileName == "") return null;oWordApplic.Visible = HideWin;oWordApplic.Caption = "";oWordApplic.Options.CheckSpellingAsYouType = false;oWordApplic.Options.CheckGrammarAsYouType = false;Object filename = FileName;Object ConfirmConversions = false;Object ReadOnly = true;Object AddToRecentFiles = false;Object PasswordDocument = System.Type.Missing;Object PasswordTemplate = System.Type.Missing;Object Revert = System.Type.Missing;Object WritePasswordDocument = System.Type.Missing;Object WritePasswordTemplate = System.Type.Missing;Object Format = System.Type.Missing;Object Encoding = System.Type.Missing;Object Visible = System.Type.Missing;Object OpenAndRepair = System.Type.Missing;Object DocumentDirection = System.Type.Missing;Object NoEncodingDialog = System.Type.Missing;Object XMLTransform = System.Type.Missing;try{Microsoft.Office.Interop.Word.Document wordDoc =oWordApplic.Documents.Open(ref filename, ref ConfirmConversions,ref ReadOnly, ref AddToRecentFiles, ref PasswordDocument, ref PasswordTemplate,ref Revert, ref WritePasswordDocument, ref WritePasswordTemplate, ref Format,ref Encoding, ref Visible, ref OpenAndRepair, ref DocumentDirection,ref NoEncodingDialog, ref XMLTransform);return wordDoc;}catch (Exception ex){MessageBox.Show(ex.Message);return null;}}public void SaveAs(Microsoft.Office.Interop.Word.Document oDoc, string strFileName){object fileName = strFileName;if (File.Exists(strFileName)){if (MessageBox.Show("文件'" + strFileName + "'已经存在,选确定覆盖原文件,选取消退出操作!", "警告", MessageBoxButtons.OKCancel) == DialogResult.OK){oDoc.SaveAs(ref fileName, ref missing, ref missing, ref missing, ref missing, ref missing, ref missing,ref missing, ref missing, ref missing, ref missing, ref missing, ref missing, ref missing, ref missing, ref missing);}else{Clipboard.Clear();}}else{oDoc.SaveAs(ref fileName, ref missing, ref missing, ref missing, ref missing,ref missing, ref missing,ref missing, ref missing, ref missing, ref missing, ref missing, ref missing, ref missing, ref missing, ref missing);}}public void SaveAsHtml(Microsoft.Office.Interop.Word.Document oDoc, string strFileName){object fileName = strFileName;//wdFormatWebArchive保存为单个网页文件//wdFormatFilteredHTML保存为过滤掉word标签的htm文件,缺点是有图片的话会产生网页文件夹if (File.Exists(strFileName)){if (MessageBox.Show("文件'" + strFileName + "'已经存在,选确定覆盖原文件,选取消退出操作!", "警告", MessageBoxButtons.OKCancel) == DialogResult.OK){object Format =(int)Microsoft.Office.Interop.Word.WdSaveFormat.wdFormatWebArchive;oDoc.SaveAs(ref fileName, ref Format, ref missing, ref missing, ref missing, ref missing, ref missing,ref missing, ref missing, ref missing, ref missing, ref missing, ref missing, ref missing, ref missing, ref missing);}else{Clipboard.Clear();}}else{object Format =(int)Microsoft.Office.Interop.Word.WdSaveFormat.wdFormatWebArchive;oDoc.SaveAs(ref fileName, ref Format, ref missing, ref missing, ref missing, ref missing, ref missing,ref missing, ref missing, ref missing, ref missing, ref missing, ref missing, ref missing, ref missing, ref missing);}}public void Save(){oDoc.Save();}public void SaveAs(string strFileName){object fileName = strFileName;oDoc.SaveAs(ref fileName, ref missing, ref missing, ref missing, ref missing, ref missing, ref missing,ref missing, ref missing, ref missing, ref missing, ref missing, ref missing, ref missing, ref missing, ref missing);}// Save the document in HTML formatpublic void SaveAsHtml(string strFileName){object fileName = strFileName;object Format = (int)Microsoft.Office.Interop.Word.WdSaveFormat.wdFormatHTML;oDoc.SaveAs(ref fileName, ref Format, ref missing, ref missing, ref missing, ref missing, ref missing,ref missing, ref missing, ref missing, ref missing, ref missing, ref missing, ref missing, ref missing, ref missing);}#endregion#region添加菜单(工具栏)项//添加单独的菜单项public void AddMenu(mandBarPopup popuBar){mandBar menuBar = null;menuBar = mandBars["Menu Bar"];popuBar =(mandBarPopup)mandBars.FindControl(Microsoft.Of fice.Core.MsoControlType.msoControlPopup, missing, popuBar.Tag, true);if (popuBar == null){popuBar =(mandBarPopup)menuBar.Controls.Add(Microsoft.Office.Core.MsoControl Type.msoControlPopup, missing, missing, missing, missing);}}//添加单独工具栏public void AddToolItem(string strBarName,string strBtnName){mandBar toolBar = null;toolBar =(mandBar)mandBars.FindControl(Microsoft.Office. Core.MsoControlType.msoControlButton, missing, strBarName, true);if (toolBar == null){toolBar = (mandBar)mandBars.Add( Microsoft.Office.Core.MsoControlType.msoControlButton,missing, missing, missing); = strBtnName;toolBar.Visible = true;}}#endregion#region移动光标位置// Go to a predefined bookmark, if the bookmark doesn't exists the application will raise an errorpublic void GotoBookMark(string strBookMarkName){// VB : Selection.GoTo What:=wdGoToBookmark, Name:="nome"object Bookmark = (int)Microsoft.Office.Interop.Word.WdGoToItem.wdGoToBookmark;object NameBookMark = strBookMarkName;oWordApplic.Selection.GoTo(ref Bookmark, ref missing, ref missing, ref NameBookMark);}public void GoToTheEnd(){// VB : Selection.EndKey Unit:=wdStoryobject unit;unit = Microsoft.Office.Interop.Word.WdUnits.wdStory;oWordApplic.Selection.EndKey(ref unit, ref missing);}public void GoToLineEnd(){object unit = Microsoft.Office.Interop.Word.WdUnits.wdLine;object ext = Microsoft.Office.Interop.Word.WdMovementType.wdExtend;oWordApplic.Selection.EndKey(ref unit, ref ext);}public void GoToTheBeginning(){// VB : Selection.HomeKey Unit:=wdStoryobject unit;unit = Microsoft.Office.Interop.Word.WdUnits.wdStory;oWordApplic.Selection.HomeKey(ref unit, ref missing);}public void GoToTheTable(int ntable){// Selection.GoTo What:=wdGoToTable, Which:=wdGoToFirst, Count:=1, Name:=""// Selection.Find.ClearFormatting// With Selection.Find// .Text = ""// .Replacement.Text = ""// .Forward = True// .Wrap = wdFindContinue// .Format = False// .MatchCase = False// .MatchWholeWord = False// .MatchWildcards = False// .MatchSoundsLike = False// .MatchAllWordForms = False// End Withobject what;what = Microsoft.Office.Interop.Word.WdUnits.wdTable;object which;which = Microsoft.Office.Interop.Word.WdGoToDirection.wdGoToFirst;object count;count = 1;oWordApplic.Selection.GoTo(ref what, ref which, ref count, ref missing);oWordApplic.Selection.Find.ClearFormatting();oWordApplic.Selection.Text = "";}public void GoToRightCell(){// Selection.MoveRight Unit:=wdCellobject direction;direction = Microsoft.Office.Interop.Word.WdUnits.wdCell;oWordApplic.Selection.MoveRight(ref direction, ref missing, ref missing); }public void GoToLeftCell(){// Selection.MoveRight Unit:=wdCellobject direction;direction = Microsoft.Office.Interop.Word.WdUnits.wdCell;oWordApplic.Selection.MoveLeft(ref direction, ref missing, ref missing); }public void GoToDownCell(){// Selection.MoveRight Unit:=wdCellobject direction;direction = Microsoft.Office.Interop.Word.WdUnits.wdLine;oWordApplic.Selection.MoveDown(ref direction, ref missing, ref missing); }public void GoToUpCell(){// Selection.MoveRight Unit:=wdCellobject direction;direction = Microsoft.Office.Interop.Word.WdUnits.wdLine;oWordApplic.Selection.MoveUp(ref direction, ref missing, ref missing);}#endregion#region插入操作public void InsertText(string strText){oWordApplic.Selection.TypeText(strText);}public void InsertLineBreak(){oWordApplic.Selection.TypeParagraph();}///<summary>///插入多个空行///</summary>///<param name="nline"></param>public void InsertLineBreak(int nline){for (int i = 0; i < nline; i++)oWordApplic.Selection.TypeParagraph();}public void InsertPagebreak(){// VB : Selection.InsertBreak Type:=wdPageBreakobject pBreak = (int)Microsoft.Office.Interop.Word.WdBreakType.wdPageBreak;oWordApplic.Selection.InsertBreak(ref pBreak);}// 插入页码public void InsertPageNumber(){object wdFieldPage = Microsoft.Office.Interop.Word.WdFieldType.wdFieldPage;object preserveFormatting = true;oWordApplic.Selection.Fields.Add(oWordApplic.Selection.Range, ref wdFieldPage, ref missing, ref preserveFormatting);}// 插入页码public void InsertPageNumber(string strAlign){object wdFieldPage = Microsoft.Office.Interop.Word.WdFieldType.wdFieldPage;object preserveFormatting = true;oWordApplic.Selection.Fields.Add(oWordApplic.Selection.Range, ref wdFieldPage, ref missing, ref preserveFormatting);SetAlignment(strAlign);}public void InsertImage(string strPicPath, float picWidth, float picHeight){string FileName = strPicPath;object LinkToFile = false;object SaveWithDocument = true;object Anchor = oWordApplic.Selection.Range;oWordApplic.ActiveDocument.InlineShapes.AddPicture(FileName, ref LinkToFile, ref SaveWithDocument, ref Anchor).Select();oWordApplic.Selection.InlineShapes[1].Width = picWidth; // 图片宽度oWordApplic.Selection.InlineShapes[1].Height = picHeight; // 图片高度// 将图片设置为四面环绕型Microsoft.Office.Interop.Word.Shape s =oWordApplic.Selection.InlineShapes[1].ConvertToShape();s.WrapFormat.Type = Microsoft.Office.Interop.Word.WdWrapType.wdWrapSquare;}public void InsertLine(float left, float top, float width, float weight, int r, int g, int b){//SetFontColor("red");//SetAlignment("Center");object Anchor = oWordApplic.Selection.Range;//int pLeft = 0, pTop = 0, pWidth = 0, pHeight = 0;//oWordApplic.ActiveWindow.GetPoint(out pLeft, out pTop, out pWidth, out pHeight,missing);//MessageBox.Show(pLeft + "," + pTop + "," + pWidth + "," + pHeight);object rep = false;//left += oWordApplic.ActiveDocument.PageSetup.LeftMargin;left = oWordApplic.CentimetersToPoints(left);top = oWordApplic.CentimetersToPoints(top);width = oWordApplic.CentimetersToPoints(width);Microsoft.Office.Interop.Word.Shape s =oWordApplic.ActiveDocument.Shapes.AddLine(0, top, width, top, ref Anchor);s.Line.ForeColor.RGB = RGB(r, g, b);s.Line.Visible = Microsoft.Office.Core.MsoTriState.msoTrue;s.Line.Style = Microsoft.Office.Core.MsoLineStyle.msoLineSingle;s.Line.Weight = weight;}#endregion#region设置样式///<summary>/// Change the paragraph alignement///</summary>///<param name="strType"></param>public void SetAlignment(string strType){switch (strType.ToLower()){case"center":oWordApplic.Selection.ParagraphFormat.Alignment =Microsoft.Office.Interop.Word.WdParagraphAlignment.wdAlignParagraphCenter;break;case"left":oWordApplic.Selection.ParagraphFormat.Alignment =Microsoft.Office.Interop.Word.WdParagraphAlignment.wdAlignParagraphLeft;break;case"right":oWordApplic.Selection.ParagraphFormat.Alignment =Microsoft.Office.Interop.Word.WdParagraphAlignment.wdAlignParagraphRight;break;case"justify":oWordApplic.Selection.ParagraphFormat.Alignment =Microsoft.Office.Interop.Word.WdParagraphAlignment.wdAlignParagraphJustify;break;}}// if you use thif function to change the font you should call it again with // no parameter in order to set the font without a particular formatpublic void SetFont(string strType){switch (strType){case"Bold":oWordApplic.Selection.Font.Bold = 1;break;case"Italic":oWordApplic.Selection.Font.Italic = 1;break;case"Underlined":oWordApplic.Selection.Font.Subscript = 0;break;}}// disable all the stylepublic void SetFont(){oWordApplic.Selection.Font.Bold = 0;oWordApplic.Selection.Font.Italic = 0;oWordApplic.Selection.Font.Subscript = 0;}public void SetFontName(string strType){ = strType;}public void SetFontSize(float nSize){SetFontSize(nSize, 100);}public void SetFontSize(float nSize, int scaling){if (nSize > 0f)oWordApplic.Selection.Font.Size = nSize;if (scaling > 0)oWordApplic.Selection.Font.Scaling = scaling; }public void SetFontColor(string strFontColor){switch (strFontColor.ToLower()){case"blue":oWordApplic.Selection.Font.Color = Microsoft.Office.Interop.Word.WdColor.wdColorBlue;break;case"gold":oWordApplic.Selection.Font.Color = Microsoft.Office.Interop.Word.WdColor.wdColorGold;break;case"gray":oWordApplic.Selection.Font.Color = Microsoft.Office.Interop.Word.WdColor.wdColorGray875;break;case"green":oWordApplic.Selection.Font.Color = Microsoft.Office.Interop.Word.WdColor.wdColorGreen;break;case"lightblue":oWordApplic.Selection.Font.Color = Microsoft.Office.Interop.Word.WdColor.wdColorLightBlue;break;oWordApplic.Selection.Font.Color =Microsoft.Office.Interop.Word.WdColor.wdColorOrange;break;case"pink":oWordApplic.Selection.Font.Color =Microsoft.Office.Interop.Word.WdColor.wdColorPink;break;case"red":oWordApplic.Selection.Font.Color =Microsoft.Office.Interop.Word.WdColor.wdColorRed;break;case"yellow":oWordApplic.Selection.Font.Color =Microsoft.Office.Interop.Word.WdColor.wdColorYellow;break;}}public void SetPageNumberAlign(string strType, bool bHeader){object alignment;object bFirstPage = false;object bF = true;//if (bHeader == true)//WordApplic.Selection.HeaderFooter.PageNumbers.ShowFirstPageNumber = bF;switch (strType){case"Center":alignment =Microsoft.Office.Interop.Word.WdPageNumberAlignment.wdAlignPageNumberCenter;//WordApplic.Selection.HeaderFooter.PageNumbers.Add(ref alignment,ref bFirstPage);//Microsoft.Office.Interop.Word.Selection objSelection = WordApplic.pSelection;oWordApplic.Selection.HeaderFooter.PageNumbers[1].Alignment = Microsoft.Office.Interop.Word.WdPageNumberAlignment.wdAlignPageNumberCenter;break;case"Right":alignment =Microsoft.Office.Interop.Word.WdPageNumberAlignment.wdAlignPageNumberRight;oWordApplic.Selection.HeaderFooter.PageNumbers[1].Alignment = Microsoft.Office.Interop.Word.WdPageNumberAlignment.wdAlignPageNumberRight;break;alignment =Microsoft.Office.Interop.Word.WdPageNumberAlignment.wdAlignPageNumberLeft;oWordApplic.Selection.HeaderFooter.PageNumbers.Add(ref alignment, ref bFirstPage);break;}}///<summary>///设置页面为标准A4公文样式///</summary>private void SetA4PageSetup(){oWordApplic.ActiveDocument.PageSetup.TopMargin =oWordApplic.CentimetersToPoints(3.7f);//oWordApplic.ActiveDocument.PageSetup.BottomMargin =oWordApplic.CentimetersToPoints(1f);oWordApplic.ActiveDocument.PageSetup.LeftMargin =oWordApplic.CentimetersToPoints(2.8f);oWordApplic.ActiveDocument.PageSetup.RightMargin =oWordApplic.CentimetersToPoints(2.6f);//oWordApplic.ActiveDocument.PageSetup.HeaderDistance =oWordApplic.CentimetersToPoints(2.5f);//oWordApplic.ActiveDocument.PageSetup.FooterDistance =oWordApplic.CentimetersToPoints(1f);oWordApplic.ActiveDocument.PageSetup.PageWidth =oWordApplic.CentimetersToPoints(21f);oWordApplic.ActiveDocument.PageSetup.PageHeight =oWordApplic.CentimetersToPoints(29.7f);}#endregion#region替换///<summary>///在word 中查找一个字符串直接替换所需要的文本///</summary>///<param name="strOldText">原文本</param>///<param name="strNewText">新文本</param>///<returns></returns>public bool Replace(string strOldText, string strNewText){if (oDoc == null)oDoc = oWordApplic.ActiveDocument;this.oDoc.Content.Find.Text = strOldText;object FindText, ReplaceWith, Replace;//FindText = strOldText;//要查找的文本ReplaceWith = strNewText;//替换文本Replace = Microsoft.Office.Interop.Word.WdReplace.wdReplaceAll;/**//*wdReplaceAll - 替换找到的所有项。
C#通过Microsoft.Office.Interop.Word操作Word
C#通过Microsoft.Office.Interop.Word操作Word1、安装可以通过NuGet搜索Office,安装Microsoft.Office.Interop.Word;⽐如我的机器是Office2019,没有对应的Microsoft.Office.Interop.Word,则可以通过Nuget⽅式进⾏安装。
2、具体代码操作,找到,但实际测试页眉部分会出问题,注释掉就可以了。
转载如下:创建Word;插⼊⽂字,选择⽂字,编辑⽂字的字号、粗细、颜⾊、下划线等;设置段落的⾸⾏缩进、⾏距;设置页⾯页边距和纸张⼤⼩;设置页眉、页码;插⼊图⽚,设置图⽚宽⾼以及给图⽚添加标题;插⼊表格,格式化表格,往表格中插⼊数据;保存Word,打印Word;重新打开Word等。
Visual studio版本:Visual Studio 2012(2010应该也可以)准备⼯作:/*1. 添加引⽤COM⾥⾯的 Microsoft Word 12.0 Object. Library 引⽤(12.0表⽰Word 2007版本)2. 导命名空间using MSWord =Microsoft.Office.Interop.Word;using System.IO;using System.Reflection;3. 把引⽤中的Microsoft.Office.Interop.Word的“属性”中的嵌⼊互操作设为False*/以下是全部代码:(代码有点长,但请不要有压⼒,直接复制进去就能直接成功运⾏)using System;using System.Collections.Generic;using ponentModel;using System.Data;using System.Drawing;using System.Linq;using System.Text;using System.Threading.Tasks;using System.Windows.Forms;using MSWord = Microsoft.Office.Interop.Word;using System.IO;using System.Reflection;namespace WindowsFormsCom{public partial class Form1 : Form{public Form1(){InitializeComponent();}private void button1_Click(object sender, EventArgs e){object path; //⽂件路径变量string strContent; //⽂本内容变量MSWord.Application wordApp; //Word应⽤程序变量MSWord.Document wordDoc; //Word⽂档变量path = Path.GetFullPath("../../") + "\\MyWord_Print.doc";wordApp = new MSWord.ApplicationClass(); //初始化wordApp.Visible = true;//使⽂档可见//如果已存在,则删除if (File.Exists((string)path)){File.Delete((string)path);}//由于使⽤的是COM库,因此有许多变量需要⽤Missing.Value代替Object Nothing = Missing.Value;wordDoc = wordApp.Documents.Add(ref Nothing, ref Nothing, ref Nothing, ref Nothing);#region页⾯设置、页眉图⽚和⽂字设置,最后跳出页眉设置//页⾯设置wordDoc.PageSetup.PaperSize = MSWord.WdPaperSize.wdPaperA4;//设置纸张样式为A4纸wordDoc.PageSetup.Orientation = MSWord.WdOrientation.wdOrientPortrait;//排列⽅式为垂直⽅向wordDoc.PageSetup.TopMargin = 57.0f;wordDoc.PageSetup.BottomMargin = 57.0f;wordDoc.PageSetup.LeftMargin = 57.0f;wordDoc.PageSetup.RightMargin = 57.0f;wordDoc.PageSetup.HeaderDistance = 30.0f;//页眉位置#endregion#region页码设置并添加页码//为当前页添加页码MSWord.PageNumbers pns = wordApp.Selection.Sections[1].Headers[MSWord.WdHeaderFooterIndex.wdHeaderFooterEvenPages].PageNumbers;//获取当前页的号码 pns.NumberStyle = MSWord.WdPageNumberStyle.wdPageNumberStyleNumberInDash;//设置页码的风格,是Dash形还是圆形的pns.HeadingLevelForChapter = 0;pns.IncludeChapterNumber = false;pns.RestartNumberingAtSection = false;pns.StartingNumber = 0; //开始页页码?object pagenmbetal = MSWord.WdPageNumberAlignment.wdAlignPageNumberCenter;//将号码设置在中间object first = true;wordApp.Selection.Sections[1].Footers[MSWord.WdHeaderFooterIndex.wdHeaderFooterEvenPages].PageNumbers.Add(ref pagenmbetal, ref first);#endregion#region⾏间距与缩进、⽂本字体、字号、加粗、斜体、颜⾊、下划线、下划线颜⾊设置wordApp.Selection.ParagraphFormat.LineSpacing = 16f;//设置⽂档的⾏间距wordApp.Selection.ParagraphFormat.FirstLineIndent = 30;//⾸⾏缩进的长度//写⼊普通⽂本strContent = "我是普通⽂本\n";st.Range.Text = strContent;st.Range.Text = "我再加⼀⾏试试,这⾥不加'\\n'";//直接添加段,不是覆盖( += )st.Range.Text += "不会覆盖的,";//添加在此段的⽂字后⾯,不是新段落st.Range.InsertAfter("这是后⾯的内容\n");//将⽂档的前4个字替换成"哥是替换⽂字",并将其颜⾊设为红⾊object start = 0;object end = 4;MSWord.Range rang = wordDoc.Range(ref start, ref end);rang.Font.Color = MSWord.WdColor.wdColorRed;rang.Text = "哥是替换⽂字";wordDoc.Range(ref start, ref end);//写⼊⿊体⽂本object unite = MSWord.WdUnits.wdStory;wordApp.Selection.EndKey(ref unite, ref Nothing);//将光标移到⽂本末尾wordApp.Selection.ParagraphFormat.FirstLineIndent = 0;//取消⾸⾏缩进的长度strContent = "这是⿊体⽂本\n"; = "⿊体";st.Range.Text = strContent;//写⼊加粗⽂本strContent = "这是粗体⽂本\n"; //wordApp.Selection.EndKey(ref unite, ref Nothing);//这⼀句不加,有时候好像也不出问题,不过还是加了安全st.Range.Font.Bold = 1;st.Range.Text = strContent;//写⼊15号字体⽂本strContent = "我这个⽂本的字号是15号,⽽且是宋体\n";wordApp.Selection.EndKey(ref unite, ref Nothing);st.Range.Font.Size = 15; = "宋体";st.Range.Text = strContent;//写⼊斜体⽂本strContent = "我是斜体字⽂本\n";wordApp.Selection.EndKey(ref unite, ref Nothing);st.Range.Font.Italic = 1;st.Range.Text = strContent;//写⼊蓝⾊⽂本strContent = "我是蓝⾊的⽂本\n";wordApp.Selection.EndKey(ref unite, ref Nothing);st.Range.Font.Color = MSWord.WdColor.wdColorBlue;st.Range.Text = strContent;//写⼊下划线⽂本strContent = "我是下划线⽂本\n";wordApp.Selection.EndKey(ref unite, ref Nothing);st.Range.Font.Underline = MSWord.WdUnderline.wdUnderlineThick;st.Range.Text = strContent;//写⼊红⾊下画线⽂本strContent = "我是点线下划线,并且下划线是红⾊的\n";wordApp.Selection.EndKey(ref unite, ref Nothing);st.Range.Font.Underline = MSWord.WdUnderline.wdUnderlineDottedHeavy;st.Range.Font.UnderlineColor = MSWord.WdColor.wdColorRed;st.Range.Text = strContent;//取消下划线,并且将字号调整为12号strContent = "我他妈不要下划线了,并且设置字号为12号,⿊⾊不要斜体\n";wordApp.Selection.EndKey(ref unite, ref Nothing);st.Range.Font.Size = 12;st.Range.Font.Underline = MSWord.WdUnderline.wdUnderlineNone;st.Range.Font.Color = MSWord.WdColor.wdColorBlack;st.Range.Font.Italic = 0;st.Range.Text = strContent;#endregion#region插⼊图⽚、居中显⽰,设置图⽚的绝对尺⼨和缩放尺⼨,并给图⽚添加标题wordApp.Selection.EndKey(ref unite, ref Nothing); //将光标移动到⽂档末尾//图⽚⽂件的路径string filename = Path.GetFullPath("../../") + "\\6.jpg";//要向Word⽂档中插⼊图⽚的位置Object range = st.Range;//定义该插⼊的图⽚是否为外部链接Object linkToFile = false; //默认,这⾥貌似设置为bool类型更清晰⼀些//定义要插⼊的图⽚是否随Word⽂档⼀起保存Object saveWithDocument = true; //默认//使⽤InlineShapes.AddPicture⽅法(【即“嵌⼊型”】)插⼊图⽚wordDoc.InlineShapes.AddPicture(filename, ref linkToFile, ref saveWithDocument, ref range);wordApp.Selection.ParagraphFormat.Alignment = MSWord.WdParagraphAlignment.wdAlignParagraphCenter;//居中显⽰图⽚//设置图⽚宽⾼的绝对⼤⼩//wordDoc.InlineShapes[1].Width = 200;//wordDoc.InlineShapes[1].Height = 150;//按⽐例缩放⼤⼩wordDoc.InlineShapes[1].ScaleWidth = 20;//缩⼩到20% ?wordDoc.InlineShapes[1].ScaleHeight = 20;//在图下⽅居中添加图⽚标题wordDoc.Content.InsertAfter("\n");//这⼀句与下⼀句的顺序不能颠倒,原因还没搞透wordApp.Selection.EndKey(ref unite, ref Nothing);wordApp.Selection.ParagraphFormat.Alignment = MSWord.WdParagraphAlignment.wdAlignParagraphCenter;wordApp.Selection.Font.Size = 10;//字体⼤⼩wordApp.Selection.TypeText("图1 测试图⽚\n");#endregion#region添加表格、填充数据、设置表格⾏列宽⾼、合并单元格、添加表头斜线、给单元格添加图⽚wordDoc.Content.InsertAfter("\n");//这⼀句与下⼀句的顺序不能颠倒,原因还没搞透wordApp.Selection.EndKey(ref unite, ref Nothing); //将光标移动到⽂档末尾wordApp.Selection.ParagraphFormat.Alignment = MSWord.WdParagraphAlignment.wdAlignParagraphLeft;//object WdLine2 = MSWord.WdUnits.wdLine;//换⼀⾏;//wordApp.Selection.MoveDown(ref WdLine2, 6, ref Nothing);//向下跨15⾏输⼊表格,这样表格就在⽂字下⽅了,不过这是⾮主流的⽅法 //设置表格的⾏数和列数int tableRow = 6;int tableColumn = 6;//定义⼀个Word中的表格对象MSWord.Table table = wordDoc.Tables.Add(wordApp.Selection.Range,tableRow, tableColumn, ref Nothing, ref Nothing);//默认创建的表格没有边框,这⾥修改其属性,使得创建的表格带有边框table.Borders.Enable = 1;//这个值可以设置得很⼤,例如5、13等等//表格的索引是从1开始的。
New Microsoft Office Word 文档 (2)

What to do when a device isn't installed properlyIn this article∙Make sure your computer is connected to the Internet and automatic updating is turned on∙Manually check for drivers using Windows Update∙Install software for the device∙Manually add older hardware that doesn't support Plug and Play∙Run the Hardware and Devices troubleshooterWhen you connect a new device to your computer, Windows automatically tries to install it for you and will notify you if a driver for the device can't be found. There are several things you can try if this happens:Make sure your computer is connected to the Internet and automatic updating is turned onYour computer must be connected to the Internet for Windows to be able to search online for a device driver. To see if your computer is connected to the Internet, open your web browser and try accessing a website. If you're temporarily disconnected, such as when you're traveling with a laptop, wait until you're online again, and then try reinstalling your device.Windows can't check for the latest drivers unless automatic updating is turned on. Most people turn on automatic updating the first time they use Windows, but if you're not sure you did, you should check to make sure it's turned on. Be sure to select the option to include recommended updates, or Windows will install important updates only. Important updates provide significant benefits, such as improved security and reliability, but recommended updates might include drivers for some of your devices. For more information, see Turn automatic updating on or off and Automatically get recommended drivers and updates for your hardware.Manually check for drivers using Windows UpdateIf you didn't have automatic updating turned on, or you weren't connected to the Internet when you connected a new device to your computer, you should check to see if Windows can now find a driver for your device. Even if your computer is always connected to the Internet, you should still check Windows Updates for optional updates if some of your hardware isn't working properly. Optional updates often contain new driver updates. Windows Update does not install optional updates automatically, but it will notify you when it finds some and let you choose whether to install them.To check Windows Update for drivers1.Click to open Windows Update.2.In the left pane, click Check for updates, and then wait while Windows looks for thelatest updates for your computer.3.If there are any available updates, click the link in the box under Windows Update tosee more information about each update. Each type of update might include drivers.4.On the Select the updates you want to install page, look for updates for your hardwaredevices, select the check box for each driver that you want to install, and then clickOK. There might not be any driver updates available.5.On the Windows Update page, click Install updates If you're prompted for anadministrator password or confirmation, type the password or provide confirmation..Noteso Windows Update tells you if an update is important, recommended, or optional. For more information, see Understanding Windows automaticupdating.o Some updates require you to restart your computer.o Windows Update will tell you if the updates were successfully installed.Install software for the deviceIf Windows Update can't find a driver for your device, go to the Windows 7 Compatibility Center website, which lists thousands of devices, and has direct links to driver downloads. Also, try checking the manufacturer's website for a driver or other software for the device. If your device came with a disc, that disc might contain software needed to make your device work properly, but first check the manufacturer's website for the latest software and drivers.If you don't find any new software or drivers for your device on the manufacturer's website, try inserting the disc that came with the device, and then follow the instructions for installing the software.Note∙Many drivers come with software that installs the driver for you (often called a self-installing package), but you might have to install some drivers manually as well. For more information, see Update a driver for hardware that isn't working properly.Manually add older hardware that doesn't support Plug and PlayIf you have an older piece of hardware or a device that doesn't support Plug and Play, Windows won't automatically recognize it when you connect the hardware or device to your computer. You can try to manually add it to your computer using the Add Hardware Wizard.Note∙The Add Hardware Wizard is recommended only for advanced users.Follow these steps:1.Click the Start button . In the search box, type run, and then, in the list of results,click Run.2.In the Run dialog box, type hdwwiz, and then click OK.3.Follow the instructions in the wizard, and then click Next.Run the Hardware and Devices troubleshooterIf your computer is having problems with a recently installed device or other hardware, try using the Hardware and Devices troubleshooter to fix the problem. It checks for common issues and makes sure that any new device or hardware attached to your computer was installed correctly.Click to open the Hardware and Devices troubleshooter.If you're prompted for an administrator password or confirmation, type the password or provide confirmation.NoteTo make sure you have the most up-to-date troubleshooters from the Windows Online Troubleshooting Service, your computer should be connected to the Internet. Formore information, see Troubleshooting in Windows.If your device still doesn't work properly after trying these suggestions, a driver might not be available for your device. In this case, try contacting the device manufacturer.Was this helpful?。
xwpfdocument使用手册
[文章标题]深度解读:探秘xwpfdocument使用手册[介绍]在本文中,我们将全面解读xwpfdocument的使用手册,帮助你更好地理解和运用这一工具,让你的文档处理变得更加高效和便捷。
[1. 简介]xwpfdocument是Apache POI库中的一部分,它提供了在Java中处理Word文档的功能。
它支持创建、读取、修改和保存Word文档,为我们的文档处理工作提供了强大的支持。
[2. 使用指南]2.1 创建文档使用xwpfdocument,我们可以轻松地创建一个新的Word文档。
我们需要创建一个XWPFDocument对象,然后添加段落、表格、图片等元素到文档中。
我们还可以设置文档的标题、作者等属性。
2.2 读取文档通过xwpfdocument,我们可以读取已存在的Word文档。
我们可以获取文档中的段落、表格、图片等内容,并对其进行操作,比如修改文本、插入新内容等。
2.3 修改文档xwpfdocument也提供了丰富的方法来修改Word文档。
我们可以对文档中的段落、表格进行编辑,比如设置样式、插入新内容等。
这使得我们可以自由地对文档进行定制化处理。
2.4 保存文档通过xwpfdocument,我们可以将修改后的文档保存到本地文件系统中,或者直接输出到流中。
这为我们的文档处理提供了便捷的保存和共享方式。
[3. 总结与回顾]通过本文的介绍,我们全面了解了xwpfdocument的使用手册。
我们学会了如何创建、读取、修改和保存Word文档,以及如何充分利用这一工具来提升我们的文档处理效率。
[4. 个人观点与理解]个人觉得,xwpfdocument是一个非常强大且实用的工具,它为Java 开发者提供了处理Word文档的便捷方式。
通过学习和掌握xwpfdocument的使用手册,我们可以更加高效地进行文档处理,为我们的工作和学习带来更多便利和效益。
[结束语]希望本文对大家有所帮助,让大家对xwpfdocument的使用手册有了更深入的了解。
java解析world 文件 修改内容

java解析world 文件修改内容Java解析World文件是一种常见的操作,可以通过读取并修改World文档中的内容。
World文件是一种二进制文件格式,通常用于Microsoft Office中的Word软件。
在Java中,我们可以使用一些库来实现这个功能,例如Apache POI。
首先,我们需要导入Apache POI的相关依赖。
可以在Maven项目的pom.xml 文件中添加以下代码:```xml<dependency><groupId>org.apache.poi</groupId><artifactId>poi</artifactId><version>4.1.2</version></dependency>```接下来,我们可以通过以下步骤来解析并修改World文件的内容:1. 创建一个`FileInputStream`对象,用于打开World文件:```javaFileInputStream file = new FileInputStream("path/to/your/world.doc");```2. 创建一个`XWPFDocument`对象,用于表示整个解析后的文档:```javaXWPFDocument document = new XWPFDocument(file);```3. 遍历文档中的段落,并修改需要修改的内容:```javafor (XWPFParagraph paragraph : document.getParagraphs()) {String text = paragraph.getText();// 进行内容修改,例如替换指定文本text = text.replace("需要修改的内容", "替换后的内容");// 将修改后的文本重新设置回段落中paragraph.setText(text);}```4. 保存修改后的文档到新的文件中:```javaFileOutputStream outputStream = newFileOutputStream("path/to/your/modified_world.doc");document.write(outputStream);outputStream.close();```通过以上步骤,我们可以实现Java解析并修改World文件的功能。
Microsoft word 文档 →新建 Microsoft word Document 解决办法
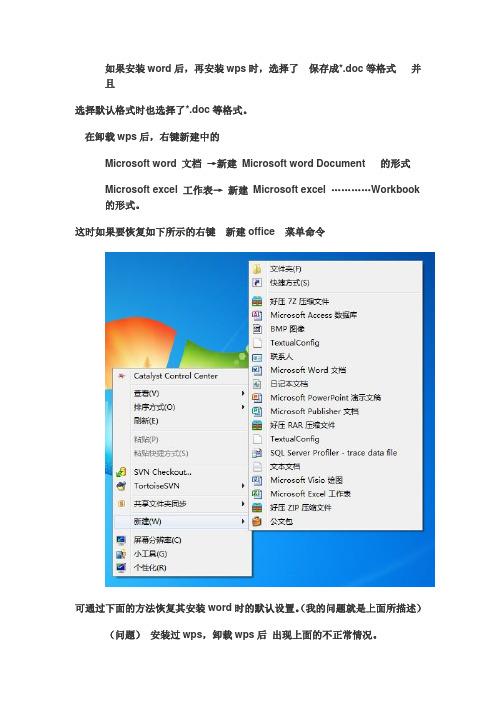
如果安装word后,再安装wps时,选择了保存成*.doc等格式并且选择默认格式时也选择了*.doc等格式。
在卸载wps后,右键新建中的Microsoft word 文档→新建Microsoft word Document 的形式Microsoft excel 工作表→新建Microsoft excel …………Workbook 的形式。
这时如果要恢复如下所示的右键新建office 菜单命令可通过下面的方法恢复其安装word时的默认设置。
(我的问题就是上面所描述)(问题)安装过wps,卸载wps后出现上面的不正常情况。
我是win7+office 2010,我的解决方法是1. 在注册表HKEY_CLASSES_ROOT和HKEY_LOCAL_MACHINE\SOFTWARE\Classes下分别找到Word.Document,Word.Document.12,Word.Document.6,Word.Document.8,Excel.Sheet,Excel.Sheet.12,Excel.Sheet.5,Excel.Sheet.8这几项(就是跟文件夹一样的图标),两个目录下都有,一共16处,全部删除。
(office2003的话,可能没这么多,有对应的话就删除)2.3.4. 控制面板→程序卸载→找到Microsoft Office Standard2010或者professional plus,右键选择“更改”--“修复”--“继续”等待修复完成即可。
如果你是绿色版或者精简版没有这个选项的话请卸载后重新安装。
5. 还有有可能需要在安装的过程中需要暂时退出电脑管家软件,因为电脑管家软件在office软件安装过程中会禁止某些注册表而不能成功安装。
所以也许需要禁止管家软件。
word无法创建工作文件
word无法创建工作文件English Response:Microsoft Word: Unable to Create Working File。
When attempting to create a new document in Microsoft Word, you may encounter an error message stating "Unable to create working file." This issue can be caused by various factors, including:Insufficient disk space。
Corrupt Word installation。
Antivirus software interference。
Third-party add-ins。
Corrupt user profile。
To resolve this issue, you can try the following steps:1. Check Disk Space: Ensure that your computer has sufficient free disk space to create a new Word document.2. Repair Word Installation: Open the Control Panel > Programs and Features > Microsoft Office > Change > Repair.3. Disable Antivirus Software: Temporarily disable your antivirus software and try to create a new Word document.4. Disable Third-Party Add-Ins: Open Word in Safe Mode (hold the "Ctrl" key while launching Word) and disable any third-party add-ins.5. Create a New User Profile: Log out of your current user profile and create a new one.6. Reinstall Microsoft Word: If all else fails, you may need to reinstall Microsoft Word.Chinese Response:Word 无法创建工作文件。
- 1、下载文档前请自行甄别文档内容的完整性,平台不提供额外的编辑、内容补充、找答案等附加服务。
- 2、"仅部分预览"的文档,不可在线预览部分如存在完整性等问题,可反馈申请退款(可完整预览的文档不适用该条件!)。
- 3、如文档侵犯您的权益,请联系客服反馈,我们会尽快为您处理(人工客服工作时间:9:00-18:30)。
客户驱动的改进导致了我们的发展智商,ih和il泵。
在最苛刻的条件下证明性能和高可靠性
智能监控
专利的转子配置提供了高的体积效率和低的。
功率输入
短,简单的气体路径最大限度地内部电导和最大限度地减少死亡空间
不需要等
业务费用低---已消除的消耗品
更安全的气体处理
清洁真空无返流
专为低维护而设计
本质上无污染
这些特点使DryStar泵的理想选择:
半导体加工
反应溅射法
清洁在冷冻干燥、真空沉积和特殊研发中的应用
装载闭锁室
真空炉
化学过程
2002年4月,中银爱德华兹收购了涡轮分子。
精工仪器有限公司泵业务。
由爱德华兹在全球范围内分布和支持近20个年
通过不断改进现有经验证而设计技术
先进材料和设计提供:
一流的性能
低振动
保证可靠性
低所有权成本
广泛的产品范围涵盖所有潜在的涡轮泵应用。
所有主要的半导体代工的资格
适用于所有主要半导体制造工厂。
安装基地超过70000台,半导体工业85%台。
TPU units on a CVD application exhaust (Photograph courtesy of TI, Dallas, USA)
BOC Edwards are unique in offering the broadest range of exhaust management
technologies, demonstrated in a series of products and systems
designed to meet all customer requirements, from low-cost facility management
to full environmental protection.
在CVD应用排气上的TPU部件(由美国达拉斯的TI提供的照片)中国银行爱德华兹在提供最广泛的废气管理方面是独一无二的在一系列产品和系统中演示的技术旨在满足所有客户的需求,从低成本的设施管理全面保护环境。
Automatic balancing system (ABS) ABS is a unique patented development
of 5-axis technology. If any rotor imbalance is introduced (by deposition
of process by-products, for example), sensors in the pump detect
changes in the rotor motion and compensate the magnetic bearing fields
to allow the rotor to spin on its natural inertial axis. This minimizes the
vibration transmitted to the inlet flange. ABS works at all pump rotational
speeds.
自动平衡系统(ABS)ABS是一个独特的专利发展五轴技术。
如果引入转子不平衡(通过沉积例如,过程中的副产品)泵中的传感器检测转子运动的变化与磁轴承磁场的补偿使转子在其自然惯性轴上旋转。
这最大限度地减少传递到进口法兰的振动。
ABS工作在所有泵旋转。
速度。