VITA 1036C-快速全瓷操作手册-09.01
VITA-3T烤瓷炉操作说明书

一本操作说明
1 支用于控制单元的尖笔
可根据要求提供专用附件: 管理程序 FDS (见第 4 节)
7
7 安装与启动
7.1 安装位置
烤瓷炉应安放在干燥的室内, 离墙壁的距离 应不少于 25 厘米 当温度低于 °15 C 时(比如搬运后), 应在室 温下放置 30 分钟再启动 应注意该设备放置台面的抗热性. 该设备释 放的热辐射和热效应均在无损伤范围内,但 也不排除由于设备长期使用而引起的家具表 面及贴面的的轻微色变 避免阳光直射 该系统周围严禁放置易燃物品 请勿将控制部件直接放在炉膛热辐射范围内
选择焙烧程序 13
……………………………………………………………………………………………………20
修改程序值 14
……………………………………………………………………………………………..………..22
应用程序 15
…………………………………………………………………………………….…………………...24
17.3 VITA In-Ceram Classic ZIRCONIA..................................................................................................................35
烤瓷炉 软件概述 15.1
/
………………………………………………………………………………….….……24
语言选择 15.2
…………………………………………………………………………………………….…......25
屏幕设置 15.3
……………………………………………………………………………………………...........26
维斯曼Vitotronic 100 KW10型号锅炉控制器操作说明和用户信息手册说明书

VITOTRONIC 100Operating Instructionsand User’s Information ManualVitotronic 100Model KW10Boiler control unitfor modulating temperature heating systems Part No.7133375Certified as a component part of Viessmann boilers onlyRead and save these instructions for future reference.IMPORTANT5167484v1.109/2007P l e a s e f i l e i n S e r v i c e B i n d e rSafety,Installation and Warranty Requirements2Please ensure that this manual is read and understood before commencing installation.Failure to comply with the issues listed below and details printed in this manual can cause product/property damage ,severe personal injury ,and/or loss of life .Ensure all requirements below are understood and fulfilled (including detailed information found in manual subsections).H Licensed professional heatingcontractorThe installation,adjustment,service,and maintenance of this equipment must be performed by a licensed professional heating contractor."Please see sections entitled “Safety”and“Important Regulatory and Installation Requirements”in the Installation,Start-up and Service Instructions.H Product documentationRead all applicable documentation before commencing installation.Store documentation near boiler in a readily accessible location for reference in the future by service personnel."For a listing of applicable literature,please seesection entitled “Important Regulatory and Installation Requirements”in theInstallation,Start-up and Service Instructions.H Advice to ownerOnce the installation work is complete,the heating contractor must familiarize the system operator/ultimate owner with all equipment,as well as safety precautions/requirements,shut-down procedure,and the need forprofessional service annually before the heating season begins.H WarrantyInformation contained in this andrelated product documentation must be read and followed.Failure to do so renders warranty null and void.H Safety requirementsFor safety information on carbon monoxide and frozen water pipe hazards,please refer to page 11in these instructions.Take note of all symbols and notations intended to draw attention to potential hazards or important productinformation.These include ”WARNING”,”CAUTION”,and ”IMPORTANT”.See below.Warnings draw your attention to the presence of potential hazards or important product information.Cautions draw your attention to the presence of potential hazards or important product information.Helpful hints for installation,operation or maintenance which pertain to the product.This symbol indicates that additional,pertinent information is to be found in column three.This symbol indicates that other instructions must be referenced.5167484v 1.1Indicates situation result substantial Indicates situation result product/property IMPORTANT3Operation4The initial start-up and set-up of the control must be done by a licensed professional heating contractor.We strongly recommend a service visit if reactivating the heating system after an extended shut-down.1.Check the pressure of the heating system on the pressure gage .An operating pressure of 15psi is typical -consult your heatingcontractor.Take corrective actions if necessary.2.Ensure proper/adequate fuel supply exists;open oil or gas shut-off valve.3.Activate power to heating system (from,for example,a switch located external to the mechanical room).4.Activate power on boiler control “.“The green power indicator illuminates.5.Set room thermostat (or other heat demand control)to desired temperature.A call for heat causes the red burner status indicator to illuminate.Your heating system is now ready for operation.Shutting-Down the Heating SystemIf it is likely that the heating system will not be used for an extended period of time,we recommend a full shut-down.We strongly recommend a service visit if deactivating the heating system after an extended operating period.This ensures preventative service measures such as heat exchanger cleaning and burner calibration are undertaken.1.Deactivate power on boiler control “.“The green power indicator deactivates.2.Close oil or gas shut-off valve on the tank (if applicable)and near the burner.3.Deactivate power to heating system (from,for example,a switch located external to the mechanical room).5167484v 1.1In this completely will not weatherOperation5The adjustable high limit (AHL)limits the maximum boiler water temperature when a call for heat is made.The call for heat is typically made by a room thermostat.Select an appropriate boiler water temperature (based upon advice from your heating contractor).The factory default setting is between 104and 167°F /40and 75°C.An elevated setting between 104and 212°F /40and 100°C is possible if an adjustment has been made by the heatingcontractor.Turn selector to the right (clockwise)orTurn selector to the left (counter-clockwise)Boiler water temperature limit increases.Boiler water temperature limit decreases.Space Heating Circuit SwitchThe space heating circuit switch is only operational if a ViessmannDHW Pump Module (Accessory)is installed and connected to the control.For heating systems with domestic hot water production:H Winter operation:for space heating and DHWset space heating circuit switch to “.”H Summer operation:for DHW production set space heating circuit switch to “5167484v 1.1Space will not conditions.Operation6The adjustable high limit determines the maximum available boiler (supply)temperature.Therefore,it functions as a high limit.The room thermostat (if used)enables and disables the outdoor reset processor in order to add indoor control (fine tuning)to the outdoor reset function.The curve for the outdoor reset function can be adjusted by opening the front flip-down cover.Factory settings Heating curve slope ““selection =1.2Warm weather shut-down (WWSD)““selection =70°F /21°CIf there is no call for heat from the room thermostat,the burner will not be activated,even if the heating curve setting calls for a higher temperature.Slope adjustmentAs outdoor temperatures drop,heatlosses from a space become greater and the heating system supply watertemperature must be raised to maintain a constant room temperature.The heating curve value describes how many degrees the supply water temperature is raised for a one degree drop in outdoortemperature.The supply temperature starts to increase when the outdoor temperature falls below the warm weather shut-down (WWSD)setting.To calculate the correct setting for the heating curve,use the following formula:heating curve slope =design supply temp.-WWSD temp.WWSD temp.-design outdoor temp.Example:design outdoor temp.:5˚F /-15˚C WWSD temperature:70˚F /21˚C design supply temp.:160˚F /71˚Cheating curve slope =160˚F -70˚F90˚F==1.470˚F -5˚F65˚FFor further assistance,please see section entitled “Helpful hints.”5167484v 1.1IMPORTANTAdditional Safety Requirements7Warm weather shut-down adjustmentThe reset function starts at the warm weather shut-down (WWSD)point and supplies increasingly more heat to a building to make up for the greater heat loss as outdoor temperatures get colder.When the outdoor temperature rises above the setting of the WWSD dial,no more heat is required by the control,and the boiler will be shut down.The WWSD dial setting shifts the heating curve up or down in parallel,increasing or decreasing the system supply water temperature (and consequently,the indoor airtemperature)at all outdoor temperatures.If the indoor air temperature is too hot or too cold at all outdoor temperatures,the WWSD setting is probably incorrect and should be checked and adjusted to suit your requirements.For further assistance,please see section entitled “Helpful hints.”5167484v 1.1Operation8Helpful hints5167484v 1.1Operation9Failure,Cause,CorrectionRedLED does not flash when Honeywell S8600ignition control module is used with boiler.5167484v 1.1Operation10We strongly recommend that you have your heating system checked and serviced by a qualified heating contractor on an annual basis to ensure a safe and energy efficient operation.A service contract is advisable.BoilerEvery boiler must be cleaned withincertain time frames.A lack of cleaningcauses soot build-up in the combustionchamber which raises the flue gastemperature and reduces the efficiencyof your heating system.SystemEnsure that a qualified heatingcontractor checks all systemcomponents such as the expansiontank,the pressure relief valve,thepump(s),the zone valves,the lowwater cut-off and all other systemcomponentry regularly.5167484v1.1Ensurehot waterclean.The arecomponentscontrolContactcontractorAdditional Safety Requirements11Carbon monoxideThe U.S.Consumer Product Safety Commission strongly recommends the installation of carbon monoxide detectors in buildings in which gas-burningequipment is installed.Carbon monoxide (CO)is a colorless,odorless gas,which may be produced during incomplete combustion of fuel and/or when the flame does not receive an adequate supply of combustion air.Carbon monoxide can cause severe personal injury or loss of life.Therefore,carbon monoxide detectors that are in compliance with a nationally recognized standard (e.g.ANSI/UL 2034-2002,CSA 6.19-01)should be installed and maintained in buildings that contain gas-burning equipment.Note:Viessmann does not test any detectors and makes no representation regarding any brand or type of detector.Frozen water pipe hazardYour heating boiler is designed to provide a warm and comfortable livingenvironment.It is NOT designed to ensure against freezing of water pipes.The boiler is equipped with several safety devices that are designed to shut down the boiler and to prevent it fromrestarting in the event of various unsafe conditions.If your boiler remains off for an extended period of time during cold weather,water pipes may freeze and burst,resulting in extensive water damage and conditions in which mold could grow.Certain molds are known to cause respiratory problems,as well as to pose other serious health risks.In case of water damage,immediate measures should be taken to dry out affected areas as quickly aspossible to prevent mold from developing.If your home will be unattended for an extended period of time during cold weather,you should...Shut off the water supply to the building,drain the water pipes and add anantifreeze for potable water to drain traps and toilet tanks.Open faucets where appropriate.Or..Have someone check the buildingfrequently during cold weather and call a qualified service agency if required.Or...Install a reliable remote temperature sensor that will notify somebody of freezing conditions within the home.5167484v 1.1Failure could serious personal Do not long periods weather the water pipes the riskSaving EnergyViessmann Manufacturing Company Inc.750McMurray RoadWaterloo,Ontario •N2V 2G5•Canada Tel.(519)885-6300•Fax (519)885-0887www.viessmann.ca •*****************Viessmann Manufacturing Company (U.S.)Inc.45Access RoadWarwick,Rhode Island •02886•USATel.(401)732-0667•Fax (401)732-0590 •*********************12...with a modern heating system By purchasing a “modern”heatingsystem,you have taken a decisive step towards saving energy.Viessmann boilers operate optimally to ensure minimum fuel consumption for maximum heating value -efficient,environmentally friendly and comfortable.Your new heating system provides the following alternatives to save energy:-a well insulated hot water heating boiler and domestic hot water tank -clean combustion and high energy extraction...with properheatingAdditional energy can be saved by considering the following measures in addition to the above technical improvements:-properbriefly open the windows while turningoff or radiator valves -avoid excess space heating;for a room temperature of 68ºF /20ºC since every 2ºF /1ºC of lower room temperature can save up to 5%inheating costs.-proper control settings -properlytemperature for the DHWtank -zone valves properly-notblock heat or thermostatic zone valves -control use of warm a shower generally requires less water than a bath-close window shutters (if applicable)during night time hours....withregular servicingof your heating system by a qualified heatingensures energy-efficient and environmentally friendly operation....with goodinsulationIf still searching for additionalpossibilities to save energy,review the insulation installed-on the heating system pipes and DHW supply pipes,-the outside walls and on the roof -heated (shaded and unheated (whiterooms -around windows 5167484v 1.1T e c h n i c a l i n f o r m a t i o nt i c e .P r i n t e d o n e n v i r o n m e n t a l l y f r i e n d l y (r e c y c l e d a n d r e c y c l a b l e )p a p e r .Ensure combustion burning water Tightly duct or allow Refer。
博世欧洲精英使用手册
博世欧洲精英使用手册一、设备打开1.按下锅炉控制面板左上角的电源开关,运行设备;2.控制面板下方的运行指示灯亮,温度指示灯显示采暖或生活热水温度。
燃烧过程中,燃烧器指示灯亮。
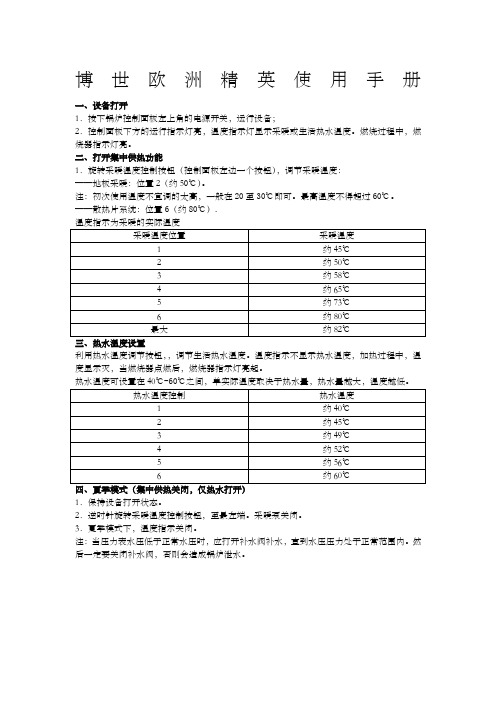
二、打开集中供热功能1.旋转采暖温度控制按钮(控制面板左边一个按钮),调节采暖温度:——地板采暖:位置2(约50℃)。
注:初次使用温度不宜调的太高,一般在20至30℃即可。
最高温度不得超过60℃。
——散热片系统:位置6(约80℃).利用热水温度调节按钮,,调节生活热水温度。
温度指示不显示热水温度,加热过程中,温度显示灭,当燃烧器点燃后,燃烧器指示灯亮起。
热水温度可设置在40℃-60℃之间,单实际温度取决于热水量,热水量越大,温度越低。
1.保持设备打开状态。
2.逆时针旋转采暖温度控制按钮,至最左端。
采暖泵关闭。
3.夏季模式下,温度指示关闭。
注:当压力表水压低于正常水压时,应打开补水阀补水,直到水压压力处于正常范围内。
然后一定要关闭补水阀,否则会造成锅炉泄水。
五、故障代码博世欧洲之星操作手册一、设备打开1.首先确认燃气阀门已经打开,锅炉电源插头已插上;2.按下锅炉控制面板左上角的电源开关,运行设备;3.显示屏上显示采暖的出水温度二、试运行:1.打开系统散热片的所有阀门;2.打开补水阀,生活冷水阀,注水至1到2巴的压力,然后关闭冷水阀3.散热片排气;4.打开冷水阀,将系统压力重新充注到1-2巴5.打开燃气阀三、打开集中供热功能1.热水温度可设置在45℃至82℃之间;2.若为地板采暖系统,采暖温度不得高于60℃;3.旋转控制面板左下角的采暖控制旋钮,调节采暖温度;(初次使用时不宜调太高)4.采暖类型不同,最大采暖出水温度设置不同:——地板采暖系统:2档(约50℃)1.调节锅炉控制面板右下角的生活热水温度调节旋钮来设置生活热水温度;2.显示屏上显示的仍是采暖出水温度3.生活热水温度可在40℃和60℃之间设置。
但水龙头的世界出水温度取决于进水量的大小,进水量越大,温度越低。
BOSCH CMG636B.1嵌入式微波烤箱 使用手冊和安裝說明说明书

t e r y o u rn e w d e v i c eo nM y B o s c h no w a n dg e t f r e e b en e f i t s:b o sc h-h o me.c o m/w e l c o m e 嵌入式電烤箱CMG636B.1[zh-tw]使用手冊與安裝說明zh-tw 安全性2更多訊息,請參考《用戶指南電子版》。
目錄使用手冊1安全性 (2)2避免財物損失 (5)3環境保護和節省能源 (5)4深入瞭解 (6)5操作模式 (7)6配件 (9)7第一次使用前 (10)8基本操作 (10)9快速加熱 (11)10時間功能 (11)11微波 (12)12Assist (14)13兒童安全鎖 (15)14安息日模式 (15)15基本設定 (15)16清潔和保養 (16)17清潔輔助程序 (18)18乾燥 (18)19層架 (18)20電器門 (19)21排除故障 (21)22廢棄處理 (22)23客戶服務 (22)24大功告成 (23)25安裝說明 (29)25.1一般安裝注意說明................................................291 安全性請注意以下的安全須知。
1.1 一般提示說明¡請仔細閱讀本說明書。
¡請妥善保管本說明書和產品資訊,以備日後查閱或提供給下一位使用者。
¡如本電器於運送途中受損,切勿安裝。
1.2 使用須知本電器僅供妥善安裝使用。
請注意專用的安裝說明書。
只有具備相關證照的專業人員才能在不使用插頭的情況下連接本電器。
保固範圍不包括因錯誤安裝造成的損壞。
本機只能用於以下用途:¡準備食物和飲料。
¡在家中和類似的用途,例如:在商店、辦公室和其他商業區域的員工廚房中;在農業區;客戶在旅館和其他住宅場所使用;民宿。
¡最高可在海拔 4000 公尺以下使用本電器符合 EN 55011 或 CISPR 11 標準。
台式 三屏16键操作手册

数字键:0~9,在计数和检重状态时输入数据用 功能键: 1)取消键:取消当前输入,取消当前操作 2)个数设定键:用于待计数产品单重未知的过程 3)警示:设定警示值,包括个数和质量 4)确定键:对输入的个数或者单重确定并进行采样 5)单重设定键:用于待计数产品单重已知的过程 6)去皮:在置零范围外将当前秤盘上的物质作为皮重处
设的报警范围内的话,单重显示“—PASS—”,并又警示声。 注意: 设定的上限值必须大于下限值,否则在输入下限值之后,按【警 示】不能退出警示预设操作,总重窗显示“—H—” ,提示您重新 输入上下限值。
/
请不要加载超过天平最大量程的物品,当显示“—OL—” 并有蜂鸣器叫时请立即卸下天平秤盘上的物品,避免传感 器受损。 8 5
主要功能及特点
1.LCD显示,带LED背光,清晰易读 2.具有单重设定和个数设定两种取样方式 3.具有检重警示功能 警 示
按键功能说明
按键图
个数 设定
清 除
5
4
3
2
1
操作之前
1.打开电源时,秤盘上请勿放置任何东西 2.如长期不使用,请擦拭干净,放入干燥剂后用塑料袋包好 确 定
单重 设 定
去 皮
ቤተ መጻሕፍቲ ባይዱ
0
9
8
存放和运输条件 请勿将仪器放置于温度过高或过低、易碰
撞、剧烈震动、湿度较大、气流较大的环境中。 — — —
境中使用 不要将仪器置于由于门窗打开而形成空气对流的通道上 在测量时避免出现剧烈震动现象 采用保护措施,防止仪器遭受腐蚀性气体的侵蚀 不要将仪器长期放置在潮湿的环境中 严禁撞击、重压(勿超过其最大称量) 长期不使用时,请将干电池取出。可充电电池每三个月充电一 次,以保护电池 如何使台秤适应温度变化: 不要将仪器长期置于湿度较大的环境里。当把一台放在较低环境温度 中的仪器搬到环境温度较高的工作间后, 应将仪器在工作间里静放约 2 小时,并切断电源。2 小时后,接通电源,仪器内部与外部环境之间持
VITA全瓷系统临床操作手册-08.09_图文(精)

�VITA 全瓷系统�临床操作手册 2008 / 09VITA全瓷指示表ὋVITA 临床操作手册VITA 玻璃渗透氧化物全瓷系列VITA In-Ceram® SPINELL 渗透尖晶石VITA渗透全瓷尖晶石(MgAl2O4是所有氧化物陶瓷中半透明性最高的,这使它非常适合于制作全瓷前牙单冠,尤其是进行残根牙和年轻恒牙的冠修复。
(VITA ZYrcomat以高达1500℃以上的温度进行致密化烧结。
致密化烧结前预烧结的瓷块可以用来制作高强度的基底冠,三单位前牙桥支架,以及套筒冠的内冠部分。
VITA In-Ceram® ALUMINA 渗透氧化铝VITA渗透全瓷氧化铝(Al2O3将美观性和强度完美结合。
该材料用途广泛,适合于制作单冠和前牙三单位的桥体。
VITA In-Ceram® YZ 氧化钇部分稳定氧化锆VITA全瓷YZ纯氧化锆瓷块被喻为氧化物陶瓷中的“钢铁陶瓷”。
工业上预烧结后的瓷块由氧化钇部分稳定的四方氧化锆组成,这使得其挠曲强度高达900Mpa 以上,以及高于一般的断裂韧性(5.9 MPa *m1/2,适合于制作单冠基底冠和多个单位的前牙及后牙桥体支架,可以进行高精致设计并保证效果的高度稳定性。
VITA In-Ceram® ZIRCONIA 渗透氧化锆VITA渗透全瓷氧化锆(Al2O3-ZrO2是具有很强遮色能力的氧化陶瓷。
尤其适用于变色严重的残根牙,它有机结合了氧化锆的高韧度和氧化铝的挠曲强度,尤其适合于制作单冠和三单位的前牙及后牙桥。
VITABLOCS ® TriLuxe forte和Mark II配合CEREC和inLab系统使用的全瓷瓷块,无需在其表面添加染色剂,就能再现天然牙的半透明性、荧光性及亮度。
不同瓷层间颜色细微过渡,牙颈部饱和度和荧光性的增强,使TriLuxe forte--成为 CAD/CAM系统最佳选择的瓷块,具有更卓越的自然美学效果。
按摩床快速入门指南

第二步:选择按摩的身体位置 你可以选择按摩身体的某一个地方或者多个地方。按“1” 按摩肩部区域。按“2” 按摩腰部区域。按“3” 按摩大腿区域。你可以按任意组合去按摩更多位置。按下全部三个按钮供几近全身按摩。取消某个区域, 简单地再按一下按钮。
第三步:选择按摩类型 这个床垫带来五种不同的按摩形态供选择。你只能即时运行一个形态。第一个形态是轻揉。第二个形态是 波动,这产生一种起伏的按摩感。接下来的三种按摩产生不同的指压形态的震动感。1 类震动有一种快速 捶打的感觉。2 类震动有一种更快的连续震动。3 类震动有一种更强的震动伴随着渐强感。体验并寻找一种 让你觉得最舒适的类型。
包括(两个单独的箱子) 床垫箱内 – 一个打卷的床垫(被压缩的带床套的床垫并密封在一个真空袋)。 部件箱内 – 按摩马达,按摩控制器,无线手持遥控器装置,交流电线和用户手册。
Vivon Riser 床垫基座如图(不包括在内,分开销售)
安装 第一步 为你的床垫准备一个地方(床平台,box spring 或者 vivon riser) 确保你的床垫平稳支撑良好,且与接地的墙插座接近。
安装 第六步
右边金属孔眼固定
左边金属孔眼固定
(当床套拉起来的时候)
(当床套拉起来的时候)
在床套拉起来之前,插入电源线来自左边按摩控制器穿过眼孔如图。
翻过来你的床垫。(这可能要两个人的工作)
安装 第七步 现在你的床垫正面向上,连接按摩控制器电源线到交流电源线,确保连接牢固,确保电源线不挤压,不然 会受到限制。 对于 Queen/King 型号,床两边各有两个分离交流电源线。对于 Twin/Full 型号,只有一个电源线。 每个电源线应当插入接地插座或者浪涌保护接线板。 按下您遥控器的电源按钮,打开开按摩功能。 提示:Queen/King 型号的模型有两个分离的遥控器。Twin/Full 型号只有一个遥控器。
vtech3合1投影床铃 用户手册说明书

版权声明:
VTech® ,伟易达®均属伟易达集团注册商标。未 经授权,不得使用。
3合1投影床铃的布料及成分
名称
面料:印花边伦 面料:印花超柔 面料:羊羔线 面料:印花色丁 面料:唛头 面料:尼龙绳 橙色织带帶 填充物:棉花 车缝线:
用户手册
3合1投影床铃
Lullaby Lambs Mobile
© 2018 VTech 91-003494-009
亲爱的家长、小朋友:
作为享誉全球的电子学习产品制造商, 伟易达®深知每个孩子身上都蕴藏着很大的潜能。 秉着这一信念,通过不断的研究和测试,我们开 发出一系列高科技智能学习教育产品。无论是注 重启蒙教育的“成长第一步®”系列,或是着眼于 学前教育的“成长第一课®”系列,还是源于课本 而又超前于课本的“成长一百分®”系列,伟易达® 所有产品都确保其乐趣。当然,重要的是其教育 作用,可以更大限度地激发孩子的潜能。
注意: 如在玩机过程中常遇到突然关机,则表明其电
池电量耗至低电压状态不足以供电正常玩机, 请更换新电池玩机
游戏说明:
1.开/关机键 滑动开/关机键到开机( )位置开
机,您将听到4首轻柔的主题歌和20首 伴有大自然音效的舒缓音乐。 2.定时器
滑动定时器,可根据需求自由设 定播放时长(5分钟、15分钟、30分钟 3档)。到达设定时间,床铃会自动进 入休眠状态。 3.灯效和旋转模式选择键
警告: 包装包含四颗螺丝,为了保证您孩子的安全,
请让成年人组装此产品。组装完成前,请切勿 让 您孩子碰触玩具零件。当您孩子试图起身 时,请先将床铃移走,避免缠绕造成伤害。
503303 IM R2 .indd 3
- 1、下载文档前请自行甄别文档内容的完整性,平台不提供额外的编辑、内容补充、找答案等附加服务。
- 2、"仅部分预览"的文档,不可在线预览部分如存在完整性等问题,可反馈申请退款(可完整预览的文档不适用该条件!)。
- 3、如文档侵犯您的权益,请联系客服反馈,我们会尽快为您处理(人工客服工作时间:9:00-18:30)。
全瓷系列快 速 全 瓷现可用VITA VM®7操作说明VITA 全瓷氧化铝底冠的制作VITA 全瓷氧化锆底冠的制作出版日期:2008/09Page 优点及特点 (3)介绍和编号 (4)操作步骤 (5)模型/代型准备 (6)模型复制 (7)粉浆材料准备与混合 (9)粉浆涂塑 (10)烧制 (11)烧制后底层(冠)的修整 (11)使用VITA全瓷氧化铝/氧化锆修补材料 OPTIMILER (12)玻璃渗透 (13)玻璃控制烧制 (14)工作时间与混合比率汇总 (15)玻璃粉颜色选择表 (16)烧制程序表格 (17)技术问题解答表 (18)产品安全建议 .............................................................................................19目 录页 码VITA 全瓷适用范围推荐的可行的Page VITA In-Ceram ® Sprint - 节省时间的全瓷系统使用VITA In-Ceram sprint技术可以快速完成VITA全瓷氧化铝和氧化锆底冠单冠的制作。
其烧制时间较传统工艺有了极大的缩短。
采用高效的sprint技术也能制作VITA全瓷氧化锆的前牙和后牙底冠单冠,且其稳定性不受影响。
但要求底冠必须在烤瓷炉以1180℃连续烧制40分钟。
粉浆材料的涂覆一定要按照常规In-Ceram氧化锆的操作方法(见VITA In-Ceram氧化锆操作说明)VITA In-Ceram ® 是基于多年的临床应用经验的全瓷系统,并具有如下优点:卓越的美学特性和生物相容性- 无边缘黑线- 良好半透明外观- 无牙龈刺激现象- 完美密合的边缘(图1)良好的物理特性可承受极端功能下的应力低的热传导特性可传统粘固或化学粘结法粘接X光透射客户满意度高低成本/高收益(无合金的附加费用)技工可用传统操作方法系统可扩展临床使用已超过17年VITA In-Ceram ® sprint不能用于以下情况:桥体结构牙体预备不能保证修复体适当的功能性设计如:牙体预备/去除不足牙体预备不当有夜磨牙症有关牙体预备和粘接操作的资料,请向VITA经销商索取“临床问题解析手册(第808E号)”图1:VITA氧化铝冠边缘间隙量的测量(卡波尔特教授,弗雷堡大学)die copingPage*套装中不包含的材料**单独包装仅为400克***单独包装,只有20包20克的设备:VITASONIC II 超声波震荡器和VITA VACUMAT烤瓷炉或类似的烤瓷炉。
制作VITA In-Ceram sprint 单冠制作需要在此类炉中最终到达温度下保持恒温40分钟PagePage模型制作使用高质量的石膏灌制活动的代型工作模型另外再做一个未作代型分割的模型,用于试戴、转移和最终检查完成后的底冠牙体预备必须满足全瓷修复的要求。
有关的牙体预备临床操作和粘接的信息请参见“临床问题解析”手册(第808E号)复模前准备代型修整填平代型上的缺损和倒凹牙预备体代型必须没有任何倒凹使用间隙漆(代型隙料):在代型上涂布两到三层(约45微米厚)的VITA间隙漆,必须用VITA In-Ceram间隙漆在石膏模型上应涂两到三层(约45微米厚)间隙漆,环氧树脂或电镀模型代型需要四层(约60微米厚)间隙漆特别注意:将代型隙料一直涂覆到达肩台或深凹型的内弯曲处,但不要覆盖肩台每次涂覆间隔5分钟,最后一次涂覆应等待20分钟,要均匀且光滑特别注意:请遵守VITA In-Ceram间隙漆的正确使用方法Page复制采用加成聚合硅橡胶复制代型(参见所用硅橡胶的操作说明),或使用VITA 复模圈和VITA复模材料灌制代型脱模脱模后,将印模放置约30分钟(依据不同的材料而不同-请先阅读产商操作说明),以便有充足的弹性回复时间喷涂表面张力去除剂(如KKD张力去除剂)于印模上,(在往印模内倒入代型材料即前去除)Page调拌VITA In-Ceram ® sprint特制石膏混合比率:蒸馏水4.6ml:20g VITA In-Ceram ® sprint特制石膏将4.6ml蒸馏水倒入真空搅拌缺罐中,加入VITA In-Ceram sprint特制石膏,搅拌几秒钟,真空下混合约20秒注意:使用干燥、洁净的搅拌罐,使用加冰蒸馏水可延长操作时间将石膏倒入阴模,使用振荡器以避免产生气泡脱模-准备进行粉浆涂塑用VITA In-Ceram ® sprint特制石膏灌模并放置1小时后就可以脱模,脱模后用红色高聚体铅笔标记出预备体边缘线注意:该石膏模型不可重复使用修整代型底部取出代型后,可进行基底修整应避免沾水一旦沾水,石膏模型的膨胀特性就会受干扰涂覆VITA In-Ceram分离凝胶用毛刷在模型上均匀地涂一薄层的VITA In-Ceram分离凝胶,应盖过预备体边缘线之外涂好分离凝胶,干燥10分钟后,才能进行粉浆涂塑In-Ceram氧化铝粉浆准备称取38g VITA In-Ceram ALUMINA 粉剂称取45g VITA In-Ceram ZIRCONIA 粉剂在玻璃烧杯中,倒入一安瓿VITA In-Ceram ALUMINA /ZIRCONIA混合液,并添加一滴ALUMINA添加剂,在VITASONIC II中混合5-8秒在玻璃烧杯中,倒入一安瓿VITA In-Ceram ALUMINA /ZIRCONIA混合液,并添加4滴ZIRCONIA添加剂,在VITASONIC II中混合5-8秒将玻璃烧杯放在振荡器上,逐渐加入38g VITA In-Ceram ALUMINA粉剂在调合过程中至少应间断3次,每次间断加粉后应将烧杯放在VITASONIC II中超声混合2分钟,再将玻璃烧杯放在振荡器上,逐渐加入45g VITA In-Ceram ZIRCONIA 粉剂在混合过程中至少间断3次,每次间断加粉后应将烧杯放在VITASONIC II中超声混合4分钟混合仪器中的水不能升温,可加入冰块抑制其升温加入所有粉剂后,将玻璃烧杯中放入VITASONIC II内最后混合7分钟在混合粉浆时不可使用金属调刀,要使用玻璃或玛瑙;Page 10 在代型上涂塑粉浆整个代型表面必须用VITA In-Ceram ALUMINA粉浆均匀涂布注意:进行该项操作的时候动作必须迅速,第一层要迅速完全覆盖整个内冠;这样可以防止出现断层。
否则会出现“洋葱皮”样外观。
底冠结构设计在VITA In-Ceram sprint技术中,底冠应该做拟修复的牙体最终形态缩小的外形(微缩的形态)前牙底冠的厚度至少为0.5mm,舌面至少为0.7mm后牙咬合面的厚度至少为0.7m m ,其它区域厚度至少为0.5mm重要提示:为确保底冠从模型上取下时不会损坏,底冠不应做得过薄使用手术刀仔细修刮颈缘直至能看见所画的标记线(如果需要请使用显微镜)注意:应在烧制完成后再对底冠结构进行最终修整预干燥烧制并取下底冠(内冠)将底冠涂塑好底层冠的代型放在去蜡炉中或在红外灯下,以130℃-160℃温度加热20-30分钟冷却代型,然后底冠小心地从代型上取下放在高温棉上烧结;Page 11烧制VITA In-Ceram氧化铝底冠在VITA VACUMAT烤瓷炉内1120℃烧制40分钟烧制VITA In-Ceram氧化锆底冠在VITA VACUMAT烤瓷炉内1180℃烧制40分钟重要信息:不能使用被银或铜的残留物所污染的烤瓷炉在工作模型上试戴首先去除间隙漆(代型隙料)然后小心地将烧制好的ALUMINA底冠内冠放在模型上注意不要施加任何力量/压力如果必要,可使用唇膏来检查底冠的内部高点特别注意:在打磨烧结烤瓷时会产生大量粉尘,所以操作时间一定要戴面罩打磨。
请在玻璃挡板后操作,使用吸尘装置使用精细磨料的钻石车针低速修改外形和高点,注意不要加力。
使用圆头弹簧力量轻柔的蜡型厚度卡尺轻轻测量各处厚度注意:在修磨边缘区域尤其要小心应使用精细磨料的钻石车针或橡皮轮,放在手上打磨,不可在模型上调磨;转数小于5000转;重要信息:此时必须检查外形及功能咬合,如果有需要可进行适当的修改,因为在玻璃粉渗透后就不能再进行修改了任何边缘部位小的缺陷在此阶段都可以使用VITA In-CeramALUMINA OPTIMIZER来进行修补Page 1In-Ceram ® ALUMINA OPTIMIZERVITA In-Ceram ALUMINA OPTIMIZER是一种三氧化二铝和蜡的混合物,可用于填补烧制后的VITA In-Ceram ALUMINA底冠及桥体支架的微小缺陷I.边缘小缺陷的修补在石膏模型上涂布石膏/蜡分离剂,彻底干燥后将底冠放在模型上使用电蜡刀将VITA In-Ceram ALUMINA OPTIMIZER添加在冠的边缘电蜡刀的温度必须合适,即混合物应充分液化,同时也能保证其中的蜡成分不会过热挥发。
在涂上VITA In-Ceram ALUMINA OPTIMIZER/ZIRCONIA OPTIMIZER的底冠上放一张棉纸,隔着棉纸用热的蜡刀吸走多余的蜡。
多余的VITA In-Ceram ALUMINA OPTIMIZER必须去净从模型上取下底冠。
然后,再把其放在模型上检查VITA In-Ceram ALUMINA OPTIMIZER材料的修补是否满意。
II.烧制使用烧制用的铂金针或烧制垫作为支撑VITA In-Ceram ALUMINA OPTIMIZER不能与支撑的材料接触在VITA VACUMAT烤瓷炉里烧制在工作模型上检查所有研磨产生的粉尘都应从底冠上去除,因为它们会阻碍玻璃的渗透裂纹检测使用VITA In-Ceram测试液来检查烧制好的底冠是否有微小的缺陷如果发现有小的缺陷,请放弃并重新制作注意:左边的底冠:o.k.没问题右边的底冠:必须丢弃并重新制作Page 1涂覆玻璃粉将In-Ceram玻璃粉与蒸馏水混合成较稀至中等黏稠度使用毛笔,只在底冠的外表面进行玻璃粉涂覆底冠的边缘不能涂覆在VITA VACUMAT烤瓷炉中进行玻璃渗透烧制在烧制中用铂金针支撑特别注意:铂金针不能与底冠的外面边缘接触,因为玻璃会沿着铂金针流到底冠的内面当渗透不完全时(如有能看见的白色斑点),则需要重复渗透过程另调拌玻璃粉涂覆在底冠未完全渗透区相应的外表面处(白色区域),然后重复烧制去除多余的玻璃粉可使用粗金刚石车针或不产热的砂石磨除底冠表面多余的玻璃料打磨时注意避免产热调磨深度不要到达底层冠表面然后使用50微米的氧化铝颗粒喷砂处理去除打磨后仍残余的玻璃粉-压力为6bar注意:在边缘区域应减少压力至2.5~3bar并以45°角度进行喷砂然后在主模型上试戴玻璃粉尘含有尖锐的颗粒,对健康十分有害,请佩戴防护眼镜和面罩使用吸尘设备并在玻璃挡板后工作Page 1玻璃控制烧制将待烧制修复体放在有纤维垫的VITA烧制托盘上,然后依照以下步骤进行烧制用VITA VACUMAT烤瓷炉进行玻璃控制烧制的程序完成用30-50微米的三氧化二铝对底冠进行喷砂处理去除残余氧化铝粉,压力为6bar(颈部:3bar)用30-50微米的三氧化二铝对底冠进行喷砂处理去除残余氧化锆粉,压力为4bar(颈部:2.5bar)重要信息:至少进行两次玻璃控制烧制以保证去除多余的玻璃粉,而且应保证玻璃控制烧制完成后表面完全没有多余的玻璃料,如果表面有玻璃残留可以看到表面闪亮,用喷砂的方法去除。