6声道
钟神ma-1000使用说明
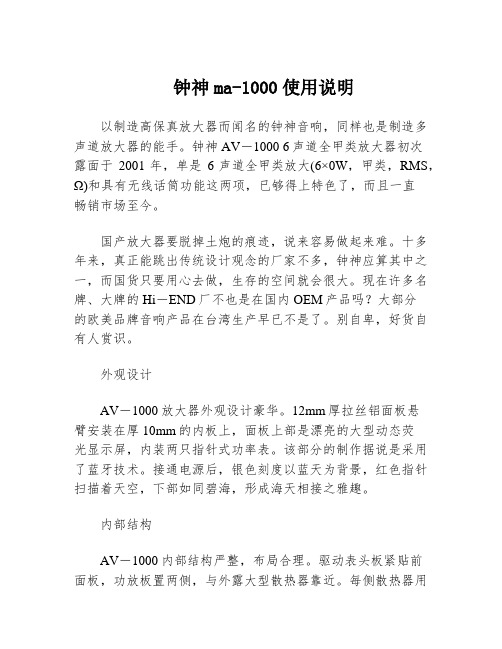
钟神ma-1000使用说明以制造高保真放大器而闻名的钟神音响,同样也是制造多声道放大器的能手。
钟神AV-1000 6声道全甲类放大器初次露面于2001年,单是6声道全甲类放大(6×0W,甲类,RMS,Ω)和具有无线话筒功能这两项,已够得上特色了,而且一直畅销市场至今。
国产放大器要脱掉土炮的痕迹,说来容易做起来难。
十多年来,真正能跳出传统设计观念的厂家不多,钟神应算其中之一,而国货只要用心去做,生存的空间就会很大。
现在许多名牌、大牌的Hi-END厂不也是在国内OEM产品吗?大部分的欧美品牌音响产品在台湾生产早已不是了。
别自卑,好货自有人赏识。
外观设计AV-1000放大器外观设计豪华。
12mm厚拉丝铝面板悬臂安装在厚10mm的内板上,面板上部是漂亮的大型动态荧光显示屏,内装两只指针式功率表。
该部分的制作据说是采用了蓝牙技术。
接通电源后,银色刻度以蓝天为背景,红色指针扫描着天空,下部如同碧海,形成海天相接之雅趣。
内部结构AV-1000内部结构严整,布局合理。
驱动表头板紧贴前面板,功放板置两侧,与外露大型散热器靠近。
每侧散热器用两块厚角铝包边,既便于散热又便于搬移。
机内两层滤波电下方为一可拉出的小抽屉,上装卡拉OK板、解码板、号转换板等,便于检修。
整体看来,设计很到位,注重了实用性及美观性。
加工精度理想,板与板的衔接位、螺丝孔位都十分精准,称得上是国产放大器中的上品。
电路特点从AV-1000放大器的电路原理中可见,6个声道的电路基本相同,只是用的功放管型号有差异。
主声道的推动管和功率放大管都选用日本三肯对管,推动管分别是2SA159和2SC43,3对功率管则为2SA129264。
6声道的全甲类设计,不仅保证了主声道有甜美的声音,而且也保证了环绕声道和中置声道的高音质。
这种极端的设计目前在国内外也许是独一无二的。
多功能解码与双路无线数码卡拉OK机器内置杜比定向逻辑、杜比数字、DTS、LPCM、EX6.1等解码器,此部分置于一铁盒内,以抽屉的装配方式居于放大器的底部(箱内)且安装在后面板上,并通过连线插与放大器连接,工作十分可靠。
HeadAmp 6 Pro 6 声道耳机放大器系统用户手册说明书

HeadAmp 6 Pro6 CHANNEL HEADPHONE AMPLIFIER SYSTEMUSER’S GUIDEIMPORTANT SAFETY INSTRUCTIONS – READ FIRSTThis symbol, wherever it appears, This symbol, wherever it appears, alerts alerts you to the presence of uninsulated you to important operating and maintenance dangerous voltage inside the enclosure. Voltage instructions in the accompanying literature.that may be sufficient to constitute a risk of shock. Please read manual.Read Instructions:Retain these safety and operating instructions for future reference. Heed all warnings printed here and on the equipment. Follow the operating instructions printed in this user guide.Do Not Open:There are no user serviceable parts inside. Refer any service work to qualified technical personnel only.Power Sources:Only connect the unit to mains power of the type marked on the rear panel. The power source must provide a good ground connection.Power Cord:Use the power cord with sealed mains plug appropriate for your local mains supply as provided with the equipment. If the provided plug does not fit into your outlet consult your service agent. Route the power cord so that it is not likely to be walked on, stretched or pinched by items placed upon or against.Grounding:Do not defeat the grounding and polarization means of the power cord plug. Do not remove or tamper with the ground connection on the power cord.Ventilation:Do not obstruct the ventilation slots or position the unit where the air required for ventilation is impeded. If the unit is to be operated in a rack, case or other furniture, ensure that it is constructed to allow adequate ventilation.Moisture:To reduce the risk of fire or electrical shock do not expose the unit to rain, moisture or use in damp or wet conditions. Do not place a container of liquid on it, which may spill into any openings.Heat:Do not locate the unit in a place close to excessive heat or direct sunlight, as this could be a fire hazard. Locate the unit away from any equipment, which produces heat such as: power supplies, power amplifiers and heaters. Environment:Protect from excessive dirt, dust, heat, and vibration when operating and storing. Avoid tobacco ash, drink spillage and smoke, especially that associated with smoke machines.Handling:To prevent damage to the controls and cosmetics avoid rough handling and excessive vibration. Protect the controls from damage during transit. Use adequate padding if you need to ship the unit. To avoid injury to yourself or damage to the equipment take care when lifting, moving or carrying the unit.Servicing:Switch off the equipment and unplug the power cord immediately if it is exposed to moisture, spilled liquid, objects fallen into opening, or the power cord or plug becomes damaged during a lightning storm or if smoke odor or noise is noted. Refer servicing to qualified technical personnel only.Installation:Install the unit in accordance with the instructions printed in the user guide.The ART HeadAmp 6 Pro6 Channel Headphone Amplifier SystemIMPORTANT SAFETY INSTRUCTIONS – READ FIRST (3)INTRODUCTION (5)INSTALLATION (5)AC Power Hookup (5)Analog Audio Connections (5)CONTROLS and JACKS (6)Front Panel (6)Direct In Jack (6)Master Volume Control (6)Mono L and Mono R Switches (6)Out Jack (6)Bass Control (7)Treble Control (7)Balance Control (7)Level Control (7)Power Switch (7)Rear Panel (7)Balanced Main Inputs (8)Balanced Main Thru (8)Stereo Headphone Outputs (8)Stereo Aux Inputs (8)HEADAMP 6 PRO OPERATION (9)APPLICATIONS (10)WARRANTY INFORMATION (12)SERVICE (13)HEADAMP 6 PRO SPECIFICATIONS (14)List of FiguresFIGURE 1 - Master Input and Channel One (6)FIGURE 2 - Rear Panel Inputs (7)FIGURE 3 - Rear Panel Headphone Outputs and Aux Inputs (8)FIGURE 4 - Headphone Distribution Application (10)FIGURE 5 - “More Me” Foldback Application (11)INTRODUCTIONThe ART HeadAmp 6 Pro is a six-channel stereo headphone amplifier that includes a six-channel auxiliary input section that can be used to provide the popular “More-Me” function on each headphone mix. Each output channel also features a dual function BALANCE control which will pan between LEFT & RIGHT sides of the main signal bus, or vary the MIX between the main signal bus and the AUXILIARY input for that respective channel.Bass and treble controls are included on each output channel for fine-tuning the tone. Outputs include both front and rear panel stereo 1/4-inch TRS jacks for ease of installation and quick patching capability. Two MONO select buttons on each channel select between four operating modes; 1) Stereo, 2) Mono Left, 3) Mono Right, 4) Mono Both (Left & Right) for versatile monitoring solutions.Input options include XLR and 1/4-inch TRS balanced inputs with matching “Thru” jacks for bridging multiple HeadAmp 6 Pro units. An additional front panel stereo 1/4-inch TRS jack for quick patch override of the rear panel inputs is included for quick insertion of any stereo source. Eight-segment LED level indicators provide visual feedback of the signal level on all channels as well as the main signal bus. INSTALLATIONThe HeadAmp 6 Pro may be used in a wide variety of applications and environments. Its rack-mountable steel and aluminum enclosure is both attractive and designed for continuous professional use. Mounting location is not critical. However, for greater performance reliability we recommend that you not place the unit on top of power amps or other sources of extreme heat, or strong magnetic fields.AC Power HookupThe HeadAmp 6 Pro has an internal power supply. Only connect the unit to mains power of the type marked on the rear panel. The power source must provide a good ground connection, and the ground pin on the mains plug should never be defeated.Analog Audio ConnectionsAudio connections to and from the HeadAmp 6 Pro are:Rear Balanced Inputs and Outputs: [XLR] Pin 2 = Pos(+), Pin 3 = Neg (-), Pin 1 = Ground[1/4-inch] Tip = Pos (+), Ring = Neg (-), Sleeve = Ground Rear Stereo Aux 1/4-inch Inputs: Tip = Left, Ring = Right, Sleeve = GroundFront Direct 1/4-inch Input: Tip = Left, Ring = Right, Sleeve = GroundFront and Rear Stereo Headphone 1/4-inch Outputs: Tip = Left, Ring = Right, Sleeve = GroundCONTROLS and JACKSFront PanelFIGURE 1 - Master Input and Channel OneDirect In JackThe 1/4-inch TRS (Tip, Ring, Sleeve) jack on the front panel provides a stereo unbalanced input which when used will override the rear panel balanced inputs. This input is useful for when you want to temporarily insert a different main input signal from what is connected to the rear inputs, or simply make an unbalanced TRS style connection to another headphone output source.Master Volume ControlThis control adjusts the level of the main signal bus. The audio level on the main signal bus is displayed by the eight-segment LED level meter located just to the left of the MASTER VOLUME control.Mono L and Mono R SwitchesThese switches set the stereo headphone outputs to one of four operating modes. (This affects only the headphone outputs and occurs post (after) the mixing, level, and tone control sections.)1) Both Switches Out = Stereo2) Mono L In & Mono R Out = Mono Left Channel Only3) Mono R In & Mono L Out = Mono Right Channel Only4) Mono L In & Mono R In = Mono Left & Right Channels TogetherOut JackThis stereo TRS 1/4-inch jack provides a connection for each of six output channels to stereo headphones or to additional headphone distribution amplifiers. A second identical output jack is provided on the rear panel for each channel as well.Bass ControlThis control can be used to boost or cut the low frequencies in each respective channel. The bass response is flat when the control is set to the 12 o’clock position.Treble ControlThis control can be used to boost or cut the high frequencies in each respective channel. The treble response is flat when the control is set to the 12 o’clock position.Balance ControlThis control provides one of two functions depending on whether there is a plug inserted into the rear panel STEREO AUX INPUT for a particular channel.With no plug inserted into the rear panel jack, the control will vary the Left / Right balance of the main signal bus.With a plug inserted into the rear panel jack, the control changes function to vary the balance between the stereo signals coming from the main signal bus and the stereo signals coming from the rear panel STEREO AUX INPUT for that respective channel. (By feeding a return signal for only the vocal microphone of a particular musician they can use the BALANCE control as a ‘More Me” control by varying the mix between their microphone signal alone, and the main signal bus audio. This effect is heard only in that individual headphone channel.)Level ControlThis control varies the audio output level coming from the front and rear panel 1/4-inch stereo output jacks for each respective channel. The audio level for each channel output is displayed by the eight-segment LED level meter located just to the left of the front panel 1/4-inch output jack.Power SwitchThis rocker switch turns the AC power On and Off. A small LED indicator in the rocker button illuminates to indicate that the power is on.Rear PanelFIGURE 2 - Rear Panel InputsBalanced Main InputsThese XLR and 1/4-inch TRS jacks are active balanced and are used for line level signals. The gain sensitivity is identical for both the XLR and 1/4-inch TRS jacks. (NOTE: the front panel DIRECT IN jack overrides these inputs when it is used.)Balanced Main ThruThese XLR and 1/4-inch TRS jacks are hardwired in parallel with the corresponding BALANCED MAIN INPUT jacks. The BALANCED MAIN THRU jacks are useful for daisy chaining multiple HeadAmp 6 Pro units together.FIGURE 3 - Rear Panel Headphone Outputs and Aux InputsStereo Headphone OutputsThese stereo TRS jacks are the main outputs for each channel of the headphone amplifier. They are wired in parallel with the corresponding output jacks on the front panel. Either front panel, rear panel, or both front and rear panel outputs can be used simultaneously to drive headphones or they can be used as feeds to additional headphone amplifiers in a distributed audio network. (NOTE: The HeadAmp 6 Pro is optimized to drive typical headphone load impedances of 32 to 600 Ohms. It is not recommended to drive total impedances lower than 16 Ohms however it can be done and will result in limited maximum output power, and possible clipping distortion depending on the output level and load. When driving multiple headphones from an individual output channel of the HeadAmp 6 Pro (paralleling), the available output power is split among the various headphones, and due to the combined load impedances the output may also become limited by premature clipping of the output signal. Most modern headphones are mid to high impedance and require only milliwatts to achieve full acoustic output so this should rarely be a problem. If it is a problem simply lower the total count of headphones on a particular channel in order to raise to total load impedance as seen by the channel output.)There is no direct relationship between headphone load impedance and SPL output. The relevant specification that determines acoustic output is the sensitivity spec of the headphone, i.e. how much SPL it will put out for a given level of input signal, usually rated at 1 mW. Sensitivity is determined by the overall design and construction of the transducer. Typically the power required is about 1/1000th of the equivalent amplifier power required to drive a speaker. Therefore typical headphone amplifiers provide power levels in the 10 to 20 mW range in order to achieve a very reasonable SPL output. Even an 8 Ohm headphone (if you can find one since they are rare) can be driven to full SPL output by the HeadAmp 6 Pro if it has a high enough sensitivity, regardless of the fact that the output voltage swing will be limited due to the overload protection circuitry. Stereo Aux InputsThese stereo TRS jacks provide a means of inserting a direct stereo signal into an individual headphone channel. When a plug is inserted into an AUX INPUT jack the BALANCE control for that particular channel changes function to become a balance (or mix) control adjusting the mix between the signal coming into the STEREO AUX INPUT and the main signal bus.HEADAMP 6 PRO OPERATIONStart with the MASTER VOLUME and LEVEL controls on all channels set fully counter-clockwise. Set the BASS, TREBLE, and BALANCE controls to their 12 o’clock positions. Set all mono switches to their “OUT” position.Using the appropriate balanced or unbalanced cables, (unbalanced cables will work in the rear panel inputs as well, but with the remote possibility of increased noise), connect the rear panel BALANCED MAIN INPUTs to the audio monitor signal source to be distributed to the headphones. Alternatively connect the audio signal source to the front panel DIRECT IN jack using a stereo TRS 1/4-inch plug.If connecting more than one HeadAmp 6 Pro to the same audio monitor signal source, simply daisy-chain the units by connecting from the BALANCED MAIN THRU connectors of the first unit to the BALANCED MAIN INPUT connectors of the next unit, etc. (NOTE: Daisy chaining only works with the rear panel connectors. The front panel DIRECT IN jack only feeds its respective HeadAmp 6 Pro unit directly.)Connect headphones, or leads to additional headphone amps, (like the ART HeadAmp 4) to either the front or rear panel HEADPHONE OUTPUT jacks (or both) using stereo 1/4-inch TRS plugs.If using the HeadAmp 6 Pro Auxiliary Mixer function, connect the stereo signals that are to be mixed into individual output channels to the appropriate rear panel STEREO AUX INPUT jacks using a stereo 1/4-inch TRS plug. (NOTE: For a mono signal use a TRS plug with the Tip and Ring tied together, or use one of the front panel MONO buttons to create a mono output to the headphones.) The AUX INPUT signal will only be heard in that individual channel depending on the position of the BALANCE and LEVEL controls for that particular channel.Turn on the POWER switch and with the audio monitor signal active and playing increase the MASTER VOLUME control to achieve a reading on the MASTER LED bar-graph level indicator which is high enough to light the green and yellow LEDs yet avoid lighting the RED CLIP LED on loud passages and audio peaks. Doing this will assure that a strong signal is available to drive each of the six individual channel amplifiers, and subsequently each channel amplifier will be able to run with less gain (a lower setting of the LEVEL control), thereby helping to optimize the signal-to-noise ratio at the outputs.Next set the LEVEL control on each channel to a comfortable listening level for the particular headphones being used.Set the BASS, TREBLE, and BALANCE controls to listening preference.NOTE: When using the Auxiliary Mixer to add a signal such as a direct vocal into an individual headphone channel in order to enhance that particular vocal in the mix (providing “More Me”) for the person listening to that headphone channel, the relative phase of the signal coming into the STEREO AUX INPUT will determine whether the STEREO AUX INPUT signal sums or subtracts from the main signal bus. The “More Me” effect will only result if the two signals add together in phase. If they are antiphase (180 degrees out of phase), the STEREO AUX INPUT signal will actually subtract the vocal out of the mix in the headphones for that one channel. Most consoles and microphone preamps will have a phase invert switch with which to set the desired operating mode.APPLICATIONSFIGURE 4 - Headphone Distribution ApplicationFIGURE 5 - “More Me” Foldback ApplicationWARRANTY INFORMATIONLimited Warranty:Applied Research and Technology will provide warranty and service for this unit in accordance with the following warrants:Applied Research and Technology, (A R T) warrants to the original purchaser that this product and the components thereof will be free from defects in workmanship and materials for a period of three years from the date of purchase. Applied Research and Technology will, without charge, repair or replace, at its option, defective product or component parts upon prepaid delivery to the factory service department or authorized service center, accompanied by proof of purchase date in the form of a valid sales receipt.Exclusions:This warranty does not apply in the event of misuse or abuse of the product or as a result of unauthorized alterations or repairs. This warranty is void if the serial number is altered, defaced, or removed.A R T reserves the right to make changes in design or make additions to or improvements upon this product without any obligation to install the same on products previously manufactured.A R T shall not be liable for any consequential damages, including without limitation damages resulting from loss of use. Some states do not allow limitations of incidental or consequential damages, so the above limitation or exclusion may not apply to you. This warranty gives you specific rights and you may have other rights, which vary, from state to state.For units purchased outside the United States, an authorized distributor of Applied Research and Technology will provide service.SERVICEThe following information is provided in the unlikely event that your unit requires service.1) Be sure that the unit is the cause of the problem. Check to make sure the unit has power, all cables are connected correctly, and the cables themselves are in working condition. You may want to consult with your dealer for assistance in troubleshooting or testing your particular configuration.2) If you believe the ART unit is at fault, go to . You may contact Customer Service for more assistance, or directly request a Return Authorization for service in the “resources” area of the website.3) If you are returning the unit for service, pack the unit in its original carton or a reasonable substitute. The original packaging may not be suitable as a shipping carton, so consider putting the packaged unit in another box for shipping. Print the RA number clearly on the outside of the shipping box.4) Include, with your unit, a note with the RA number and your contact information including a daytime phone number, preferably attached to the top of the unit.Fill in the following information for your reference:Date of purchase ______________________________________fromPurchasedSerial number ___________________HEADAMP 6 PRO SPECIFICATIONSInput ImpedanceBalanced Main Input XLR and 1/4-inch TRS Jacks....................40K Ohm BalancedDirect In TRS Jack.....................................................................9.9K OhmStereo Aux Input TRS Jacks......................................................≤ 21K to ≥ 15K OhmCMRR @ 1KHz..........................................................................≥ 40dBOutput ImpedanceHeadphone output......................................................................≤ 12 OhmsFrequency ResponseWith Tone Controls Set Flat.......................................................20 Hz – 50 KHz +0, -2dBHigh Frequency EQ....................................................................± 12dB @ 10 KHz ShelvingLow Frequency EQ.....................................................................± 12dB @ 100 Hz ShelvingMaximum Input Level ...................................................................................................+21.5dBuDynamic RangeRef: 130mW @ 600 Ohms (unit set to max gain).......................≥101 dB (typical)Maximum Gain@ 1KHz With Tone Controls Set To Flat....................................25.6 dBMaximum Output Level600 Ohm Headphones @ 1 KHz................................................150 mW32 Ohm Headphones @ 1 KHz..................................................500 mW8 Ohm Headphones @ 1 KHz....................................................150 mWDimensions (H x W x D) ...................................................................................................1.75 Inches x 19.0 Inches x 7.55 Inches ...................................................................................................44.5 mm x 482.6 mm x 190.5 mmWeight ...................................................................................................6.8 lbs. 3.1 kg.Power Requirements A – 105-125 VAC AC 60 Hz Consumption..............................................................................60 Watts Maximum - 18 Watts Idle ..................................................................................Export units configured for country of destination.Ref: 0 dBu = 0.775VAC RMSART maintains a policy of constant product improvement. ART reserves the right to make changes in design or make additions to or improvements upon this product without any obligation to install the same on products previously manufactured. Therefore, specifications are subject to change without notice.E-mail:***********************© 2008 Applied Research & Technology806-5004-101。
影音专业知识

销售实战手册影音部分目录一、发烧部分二、碟机部分发烧部分一、声音的三要素:音调、音色、响度是声音的三要素,分别与声波的频率、频幅和振幅相关。
人耳对中频的灵敏度最高,而识别高、低频的灵敏感较低。
二、影响音质的主要因素:人耳的听音范围为20HZ—22KHZ,可大致分成四个频段,即低频段(20—150HZ),中频段(150—500HZ),中高频段(5000—22000HZ),各频段要均匀,过强、过弱,都会使音质受到破坏。
其中低频是基础、是厚度;中、低音是力度,决定音乐的气势;中、高音是亮度、清晰度;高音是层次、是透明度。
中、低频过强时,声音变得混浊、清晰度差。
相反中、低频过弱时,声音则显得单薄、乏力、不丰满,音响设备可能存在的谐波失真,互调失真,削波失真,会使声音发毛、发尖、发沙、发浑。
声源的直射声与近次反射声、多次反射声的综合作用,会使声源停止时,声音不能立即停止,通常用“混响时间”来量度。
重放语言及轻音乐时,混响时间宜短,重放古典音乐时,混响时间宜长一些。
三、什么是高保真音响及AV音响:HI-FI即高保真,是指音响设备能真实地反映声音信号的原貌。
高保真音响即要求音响设备失真度要小,及要求放音场所应当符合声学要求,能够再现录音棚的声场效果,有真实感、临场感。
A V简称视听,即高品质画面。
A V器材是指由HI-FI与HI-VI组成的完美视听系统,由优质音像信号源、AV 放大器及声像重放设备组成。
HI-FI音响系统有双声道功放和两只主音箱,而A V系统音频部分包括3-6路功放和多个音箱。
与HI-FI不同,A V系统除了处理音频信号外还要处理视频信号。
四、什么是杜比定向逻辑:这里的杜比定向逻辑,是指专业的意思,是目前最普遍的影院编码、译码系统。
采用4-2-4编/译码技术,将左、前右、中置和环绕4个声道的原始音频信号编码成两路声音信号,存储在载体上,重放时译码还原成四声道信号,杜比定向逻辑技术首次实现了较完整意义上的环绕场,设置了中置音箱,可以提高对话的清晰度,能满足大部分情况下对电影音响效果的要求。
数字电影流动放映系统技术标准
数字电影流动放映系统技术要求(一)1 范围本技术要求规定了用于数字电影流动放映系统的源母版和发行版制作、放映系统等环节的技术要求。
当数字电影流动放映系统用于农村公益电影放映时,在符合本技术要求正文的要求外,还必须符合本技术文件附录的要求。
2规范性引用文件下列文件中的条款通过本技术要求的引用而成为本技术要求的条款。
凡是注日期的引用文件,其随后所有的修改单(不包括勘误的内容)或修订版均不适用于本技术要求,然而,鼓励根据本技术要求达成协议的各方研究是否可使用这些文件的最新版本。
凡是不注日期的引用文件,其最新版本适用于本技术要求。
GB/T 17975.2—2000信息技术—运动图像及其伴音信息的通用编码第2部分:视频GB/T19949.3—1996识别卡带触点的集成电路卡第3 部分:电信号和传输协议GB/T9813-2000微型计算机通用规范GB2312汉语字符集编码标准ISO/IEC14496-2 Information technology - Coding of audio—visualobjectsITU-RBS1196—1Annex2Audio coding fordigital terrestrial television broadcasting Annex 2 Digital Audio Compression(AC 3)Standard IEC 61937—3 Digital audio-Interface fornon-linear PCMencodedaudio bitstreamsapplying IEC 60958—Part3:Non-linear PCMbitstreams acc ording totheAC-3formatIEEE 802。
3UCSMA/CD Access Method (802。
3)USB ImplementersForum Inc.Universal Serial Bus Specification Revision2。
创新旗下声卡分类详解

创新旗下声卡分类详解创新声卡产品介绍,创新旗下声卡分类详解创新声卡又重现江湖了,据可靠消息称最近市场又涌现出大量的散装SBLIVE!(创新),4/6声道的都有,价格在130-260之间。
很多人看着稀罕想弄一块,但又不知道哪个好哪个不好?而且SBLIVE分好多版本和型号,外行很容易听完晕倒。
下面的内容希望能让你心里有数。
首先在购买SBLIVE的时候不要问是什么版本,也不要听别人说的什么版本好什么不好。
因为同样型号的卡放在不同的包装里就成了不同的版本,很多卡有好几个版本和包装。
而现在的散装SBLIVE是没包装的,没了包装和附件的很多型号你根本无法判断它具体是什么版本的。
所以2手或散装SBLIVE不看版本,只看型号论价格,讨论具体产地也无任何意义。
4声道SBLIVE型号以CT打头早期的4声道LIVE:CT4620:现在能买到的最老的就是这个型号,音质如何我没听过,不过这个声卡适合用来听音乐或游戏,没有3.5mm数字输出口,具有比较高的收藏价值,不适合看DVD仅适合玩EAX游戏,这个版本中镀金接口的很多。
现在市场上只有2手没有工包,主卡价格150-200可以接受。
可以连接传统创新光纤子卡。
CT4670:是4620的简化版本,区别在于去掉了一部分元件和接口,输出换成了彩色塑料口不镀金。
这个卡从使用和收藏的价值看来都不大,现在市场上只有2手没有工包,主卡价格130以内可以接受。
不可以连接传统创新光纤子卡。
现在比较多的是CT4760、CT4780、CT4830。
CT4760:是SBLIVE版本最多的型号,不同版本区分主要在附件和软件上,是什么版本现在不重要。
这个型号是4声道SBLIVE中最好的型号,部分带有镀金接口,有较高的收藏价值和游戏应用价值,也很适合音乐欣赏。
现在市场上只有2手没有工包,主卡价格150-200可以接受。
可以连接传统创新光纤子卡。
CT4780:是SBLIVE国外市场销售的一个数码版本,早期中国市场没有,现在大量涌入国内市场,创新把它当做MIDI键盘等产品的赠品进行促销,可见这个型号已经没落。
凤之声AV—333A六声道四解码高保真放大器

质 。人声 和各种独奏 乐器都能有 较好的质感 和音乐感 。播放 大 型管弦乐 曲所营造的声 场 、宏 伟气势 以及 各种乐器展现 的 色彩 ,系统 都能较好地 重现 。播放 电影大片 ,主声道重放 的 背 景音乐和主题 歌有上佳 的表现 ,五 声道所营造 的空间感 、 声像移动 等给我们提供 了身临其境 的感觉 。当接上风之 声超 低音时 ,声场 更加宽广 ,声音更加厚 实 ,一些音响效果 更具 真实感 。总之 ,这 是一套很 超值 的系统 ,值得 经济型 Hi—Fi 与 AV 双 重 发 烧 友 注 意 。
:姊 妹 机 虽 是 AV 999C的 下价 机 ,却 显 得 更 超 值 , 齐型 发烧 友 选 择 。 妹 的 姐 姐 AV 333A 整 体 外 观 继 续 延 用 与 AV
是符 合杜 比数 字和 EX6.1要 求的 。这 意味着 当广阔的空 间 (例如 天空 、远方 )有 巨大的声 响需要视 听系统营造这种 现 场气氛时 ,放 大器的各声 道有足够 的功率储备 以满足要求 。
430ram X 436mm X l57ram
AV一333A 主 要 技 术 参 数 见 表 l。 作 为 AV一333A放 大 器 的 配 套 音 箱 ,厂 家 推 荐 同 一 品 牌 的凤之声 世纪一号或 世纪二号 影院音箱系统 。它们 的主音箱 都是大 中型 落地 箱 。其 中世纪一 号主音箱为双 6.5英寸三单 元后倒相 式设计 。世纪二 号主音箱 则是三单 元侧置 l0英寸 低音 后倒相式设计 。 在 风之声双娇 DVD机 、AV-333A与世纪 二号的连接 下我 们进行 了视 听。由于 双娇 DVD机 的设 计特 别注重音质 , 因而在这 套系统上 播放 CD的音 质明显好于 人们想象 中的音
功放

Stereo 立体声
Cinema电影
DTS Neo:6也叫DTS新6声道即使是普通的立体声信号,也能产生环绕6声场的效果。
也就是说DTS Neo:6并不是一种针对DTS录音而来,它是一种解码技术,它是利用矩阵编解码原理,将传统的不论是模拟方式还是数字方式的两声道音频信号,转换成6声道环绕声。
当AV功放有此技术后,便可在欣赏立体声录音的电影或聆听音乐时,把CD音源信号或立体声电影的伴音信号转换成6声道的环绕声,以此充分利用使用者的6.1声道环绕系统。
Multi ch stereo多ch立体声
Mono movie单声道放音电影
Vietual虚拟,虚的,实际上的 Direct直接的播放
按 PURE 键选择“Auto”自动环绕播放开始。
Restorer MP3、WMA(Windows Media Audio)和 MPEG-4 AAC 等压缩音
频格式通过消除人耳难以听到的信号成分来减少数据量。
“Restorer”
功能生成压缩时消除的信号,将声音还原到接近压缩前的原声状
态。
还可还原富式和延长音调范围内的原始低音特性。
震撼的效果至上的享受——听力高组建的豪华多声道SACD声频系统

震撼的效果至上的享受——听力高组建的豪华多声道SACD声频系统霞撼的效果至上的享受力高组建的豪华多声道SACD声频系统陈星恒多声道SACD模式下的效果,更可以用"震撼"来形容,播《星球大战》的有关乐段,就可以说明这一点.眨第9声轨《DayattheRaces~时,可以清晰地感觉到太空飞车从身后飞驶而来,在身边掠过,在不远处几个"8"字后,飞上头顶继续耀武扬威地再绕了几个"8"字后呼啸着疾驰而去,整个过程动作十分连轨迹十分清晰,极之震撼.最近几年,由于SACD阵营主力厂商的努力发展和用心,SACD挟着I~LCD具有更大的信息量,更高的保真度之优势,逐步走进了发烧友们的Hj—Fi生活.现在双声道D播放机已有很多厂牌和型号可供发烧友们选择,双声道D的节目品种已经十分丰富,双声道SACD碟片的价格也走低,直逼CD碟片,双声道SACD初步成熟了SACD阵营显然没有因此满足而停滞不前,反而乘胜追击,加大了研发和推广力度,曾几何时高高在上的多声道SACD,对发烧友日渐亲近起来,并陆续进驻了他们的发烧房.力高公司最近绢建的豪华多声道SACD声频系统,对如何制造身临其境的多声道震撼效果和取得心满意足的双声道至上享受,作了一次绝好的示范】高奉上的多声道SACD豪华组合先看看力高组建这套多声道SACD声频系统的阵容和处理I程:用SACD转盘emmLabsCDSDSE读取SACD碟片的信通过AT&T光纤传送到6声道SACD解码器emmLabs AC6eSE中,对多声道SACD信号进行解码,产生6路多声道拟信号.这6路多声道模拟信号通过6条平衡信号线,送到声道前级放大器emmLabsSWM一3中进行放大.放大后的路模拟信号分配如下:第1路和第2路模拟信号被送到两个TCSCM一100TASL有源音箱中,用以构建前方主声场:第路模拟信号被送到EARTHQUAKESuperNovaMK~V有源超音音箱中,以产生有震撼人心的超低音;第4路模拟信号被到中置后级放大器PassLabsX600.5中,推动一个ATCCM一100TSL无源音箱,以构建前方中置声场;第5路和第路模拟信号被送到两个ATCSCM一50TASL有源音箱中,用【构建后方环绕声场.所有的平衡信号线和电源线,均采用MBERCABLE(美国金宝)的线材.这是一个高素质的豪华组合,每一款器材的制造厂商,:音响界无不声名显赫且处于领导地位.如由工程师Edleitner(埃德?迈特纳)所创立的emmLabs公司,自上世纪:十年代就开始设计和制造电台和录音室中使用的模拟混音l控台,其后有发明了多项的专门技术并拥有相关的专利,中包括最着名的,广大发烧友都十分熟悉的时基误差理论其控制方法.该公司后来与PHILIPS,SONY成为合作伙,共同制定了SACD和DSD(DirectStreamDigital,以ait/2.8MHz的精度和速率传送数字信号)标准并使之实用::其设计并制成的第一台SACD的DA/AD转换器,被广泛地盘和解码器通过光纤相连,解码器和前级放大器,前级放大器其他器材通过平衡线相连.应用于包括PHILIPS,SONY等录音室之中.又如ATC,它是全球最着名的专业监听音箱制造商之~,很多着名的唱片公司的录音室都采用ATC的音箱作为监听设备,不少天碟级录音和经典电影音乐在制作时,都采用声音平衡自然,中性透明,细致逼真的ATC音箱作为参考标准.特别是在ATC的中高端产品中,都装有ATC的独门秘器,着名的15Omm直径软球顶中音单元ATCSM一150s,其质感纯净淳厚,韵味浓淡宜人的中频更是一绝,叫人一听难忘.再如PassLabs,也是这近十多年来新进的Hi—End厂商,以制造A类和单端A类大功率放大器而闻名于世;还有就是KIMBERCABLE(美国金宝),着名的线材专家…有了如此素质超群的器材,就为获得卓越不凡的效果打下了坚实的基础.理想的效果来自精心的调试有了素质超群的器材只是开始,要真正获得预期的,卓越不凡的效果,还需要进行认真细致的调整.器材的素质越高,调整就需要越加认真仔细,否则再高级的器材也难以发挥其内在的潜力而达致应有的效果.大家可能听闻许多发烧前辈调整器材时,经常是日以继夜,通宵达旦,废寝忘食,穷尽认真细致与执着耐心.对于LP唱盘的针压是以O.O1g为单位进行调整,对于音箱的摆位是以1mm为单位进行调整与,认真细致得使发烧门外之人觉得不可思议,耐心执着得有时WWW.avfline.cornI75点播兵兵连发烧友也难以效仿,为的是使效果得到哪怕是一点点的提升.力高的工程师们何尝又不是这样?为了充分发挥这套多声道SACD系统的内在素质,在确定主要器材和皇帝位之后,就进行了认真细致的调整.尽管力高的工程师们对自己经销的器材实际上已十分熟悉,但他们从更好地为顾客服务的角度出发,在《视听前线》的试音室中组建了这套豪华的多声道SACD声频系统时,仍反复进行试听和调整,以期对这些器材的脾性更加了然于心.他们对各个音箱到皇帝位的距离,前方主声场两个主音箱到皇帝位连线之间的夹角,前方主声场两个主音箱的内拗角度,后方环绕声场两个辅助音箱到皇帝位的距离,后方环绕声场两个辅助音箱到皇帝位之间连线的夹角,超低音的摆放位置等要素,进行了为时两天的尝试与调整,进一步了解每一件器材的特性以及它们之间的相互影响.力高公司为广大发烧友所盛赞称道的,除了所经销之素质超群的器材外,还有就是力高工程师们那认真严谨的态度,专业敬业的精神,耐心细致的服务.调整后各个参数如下:前方主声场两个主音箱到皇帝位连线之间的夹角为6O.内拗角度为2O.,相距同样为5m,与后墙相距约3mi中置音箱在皇帝位正前方5m处:后方环绕辅助音箱间相距同样为5m.与皇帝位连线之间的夹角为140.,内拗角度为3O.,与后墙相距约2m:有源超低音放在前声场左方主音箱之后约1l5m处.这些数据来之不易,与试听时所领略到卓越不凡的效果一样,无不凝聚了力高工程师们的经验与心血.灵活而随意的工作模式现在,我们就来亲身体验这套豪华的多声道SACD声频系统吧.将碟片放进转盘,如果是多声76J硼斤前睦道SACD碟片,转盘和解码器会首先自动进入多声道SACD模式,此时转盘上的"SACDM—CH"指示符号会亮起,所有音箱都工作并发声,如果是双声道SACD碟片,转盘和解码器会首先自动进入双声道SACD模式,此时转盘上的"SACD2一CH"指示符号会亮起,只有前方主声场的两个主音箱会工作并发声:如果是双声道CD碟片,转盘和解码器会首先自动进入双声道CD模式,此时转盘上的"CD2一CH"指示符号会亮起,只有前方主声场的两个主音箱会工作并发声.因为转盘和解码器是向低级模式兼容的,对于多声道SACD碟片,可以通过操作转盘前面板上的按键,或操作遥控器,自如地在多声道SACD模式,双声道SACD模式,双声道CD模式之间随意转换:同样,对于双声道SACD碟片,可以通过操作转盘前面板上的按键,或操作遥控器,自如地在双声道SACD模式与双声道CD模式之间随意转换.心满意足的享受先看看这套系统在双声道SACD模式下的表现.选来IsoMike公司出品的《TMINUS5?PURITY》双声道SACD,播放其中的第6声轨《APOORW AYFAR}NGMANOFGRIEF.一如片名,五位歌手的歌声纯净圆厚,衔接顺畅自后方环绕声场的音箱:AT0S0M一50ASL前方的中置音箱:AT0SCM一100SL然;五位歌手的位置分布以及他们与伴奏钢琴的位置关系,因结像定位准确而一目了然,来自后方和两侧的回音则清楚地反映了录音室的空间大小和声学特性.选来同是lSOMike公司出品的《THEFRYSTREETQUARTET》多声道SACD(编号:FSQCD3),播放第一张碟片的第1至第4声轨《LUDWIGVANBEETHOVEN:String QuartetlnAMajor,Op.18no.5》.先以双声道SACD模式播放,此时只有前方声场两个主音箱在工作并发声.我们已经可以明显地听到,第一/J,提琴,第二小提琴,中提琴,大提琴在前方三个音箱之后按圆弧线依次排列,四件乐器结像定位清晰,形体轮廓准确,声音平衡自然;小提琴纤细飘逸,中提琴圆润朴实,大提琴柔韧华美,三种乐器质感真实而各有不同;琴腔的木味,琴弦的金属味或牛筋味,琴弓的松香味是提琴类乐器应有之味,在这里三味俱全,比例恰当,浓淡相宜.在双声道SACD模式下,这套器材给予我们的是坐在观众席第三排正中的感觉,可以用"观看"来概括.身临其境的震撼再看看这套系统在多声道SACD模式下的表现.转回到读碟后转盘和解码器曾经自动进入的多声道SACD模式,所有音箱都在工作并发声:四件乐器的结像,定位,形体,音色,质感和味道一如双声道模式下的表现,但是这四件乐器的位置衔接得更自然,声场中部更为充实了;音乐的空间感和包围感明显强烈,与演奏者和乐器的距离仿佛拉近了.选来SONY出品的《SACDTwo-channel&Multi-channel DemonstrationDisc》多声道SACD(编号:GRV1013—3),在读碟后转盘和解码器自动进入的多声道SACD模式下,播放第1声轨《TheRobe~HohnerPercussionEnsemb1e—Ogoun Badagris》.曲中的主要乐器是大小不同的鼓,其音逼真,其韵传神,其位清晰,力度强横,干净利落而富于冲击力.此起彼伏,富于质感的鼓音将整个舞台的空间勾勒了出来,从而使得乐曲传出了极为浓烈的现场气氛.在多声道SACD模式下,这套器材给予我们的是站在指挥席上的感觉,可以用"参与"作总结.多声道SACD模式下的效果,更可以用"震撼"来形容, TELARC出品的《MEGAMOVIES》多声道SACD(编号: SACD一60535)中《星球大战》的有关乐段,就可以说明这一点.播放第9声轨《DayattheRaces》时,可以清晰地感觉到太空飞车从身后飞驶而来,在身边掠过,在不远处绕了几个"8"宇后,飞上头顶继续耀武扬威地再绕了几个"8"宇后呼啸着疾驰而去,整个过程动作十分连贯,轨迹十分清晰,极之震撼.第10声轨的主题音乐《MainTitlefromStarWars/TheFlagParade》中,那有大型管弦乐团编织出的宏大音乐画面,辉煌壮丽:那整齐划一亳不紊乱的节奏,那贴地涌来的低频,更如远方的滚雷,干净低沉,震撼心底.力高的工程师尽管对器材了然干心,调试时仍是那样地认真细致充满了专业敬业的精神还要什么力高组建的这套豪华多声道SACD声频系统,其较为全面和趋于完美的表现,既可让人得到至上的享受;也可使人体验震撼的效果.有了这套系统,我们还要什么?硒鸣谢力高音响提供器材f020—83848220器材参考价格:SACD转盘emmLabsCDSDSE6声道SACD解码器emmLabsDAC6eSE6声道前级放大器emmLabsSWM一3后级放大器PassLabsX600.5无源音箱(玫瑰木皮外饰)A TCSCM1OOTSL有源音箱(玫瑰木皮外饰)A TCSCM1OOTASL有源音箱(樱桃木皮外饰)A TCSCM50TASLI77台台台对对对对///////OOOOOOOOOOOOOOOOOO8OO,,,,,,,853O4OOO7O495j2122。
- 1、下载文档前请自行甄别文档内容的完整性,平台不提供额外的编辑、内容补充、找答案等附加服务。
- 2、"仅部分预览"的文档,不可在线预览部分如存在完整性等问题,可反馈申请退款(可完整预览的文档不适用该条件!)。
- 3、如文档侵犯您的权益,请联系客服反馈,我们会尽快为您处理(人工客服工作时间:9:00-18:30)。
5.1声道的声音用英文怎么表示??
FL、FR、CEN、RL(SL)、RR(SR)、SW
以上的几个字母我知道是5.1声道的各自表示法,但不知道是那些英文的缩写,有哪位高手知道的,指教指教!!
谢了!!
我擦qweront left前置左
FR、Front right前置右
CEN、Center中置
RL(SL)、Surround left环绕左
RR(SR)、Surround right环绕右
SW、Subwoofer低音炮
stereo是立体声输入(就是一根线一个通道)parallel单声道输入(就是接一根线两个通道同时响)bridge桥接只插一根信号线(只接A-B通道的正极功率增大一倍)