日产 奇骏 T30维修手册-AV
2014日产奇骏全车电路图维修手册36 加热器和空调控制

通风、加热器和空调CDEFGHJKLM章节HACABNOP目录加热器和空调控制系统自动空调注意事项 (5)注意事项 (5)辅助约束系统 (SRS)“安全气囊”和“安全带预张紧器”的注意事项 ..................................................5拆卸蓄电池端子的注意事项 (5)系统说明 (7)零部件 (7)零部件位置 ................................................................7A/C 单元总成 . (8)A/C 单元总成:抽吸器 ..............................................9A/C 单元总成:进气传感器 .......................................9A/C 单元总成:空气混合风门电机 (驾驶员侧) .........9A/C 单元总成:空气混合风门电机 (乘客侧) ..........10A/C 单元总成:模式风门电机 ..................................10A/C 单元总成:进气风门电机 ..................................11A/C 单元总成:鼓风机电机 .....................................12A/C 单元总成:功率晶体管 .....................................12压缩机 (13)压缩机:电磁离合器 ................................................13压缩机:ECV (电气控制阀) .. (13)空调控制 ..................................................................13A/C 自动放大器 .......................................................14环境温度传感器 .......................................................14车内传感器 ..............................................................14日照传感器 ..............................................................14制冷剂压力传感器 (15)系统 (16)自动空调系统 (16)自动空调系统:系统说明 .........................................16自动空调系统:温度控制 .........................................17自动空调系统:出风口控制 . (18)自动空调系统:气流控制 (18)自动空调系统:进气控制 .........................................19自动空调系统:压缩机控制 .....................................19自动空调系统:风门控制 .........................................21自动空调系统:冷却风扇控制 ..................................25自动空调系统:风门电机启动位置重置控制 ............26自动空调系统:电路图 .............................................27自动空调系统:失效-保护 ......................................30操作 ....................................................................31开关名称和功能 .......................................................31诊断系统 (A/C 自动放大器) . (35)说明 .........................................................................35CONSULT 功能 . (35)诊断系统 (空调控制) (37)诊断说明 (37)ECU 诊断信息 (38)A/C 自动放大器 (38)参考值 (38)失效-保护 ...............................................................42DTC 索引 .. (43)ECM 、IPDM E/R (44)ECU 参考列表 (44)电路图 (45)自动空调系统 (45)电路图 (45)基本检查 (54)诊断和维修工作流程 (54)工作流程 (54)操作检查 (57)工作步骤 .............................................................. (57)系统设置 (59)温度设定调整器 (59)进气口记忆功能 (REC) (59)进气口记忆功能 (FRE) (60)目标蒸发器温度上限值设定 (60)风门电机起动位置重置 (61)说明 (61)工作步骤 (61)DTC/电路诊断 (62)U1000 CAN 通信电路 (62)DTC 说明 (62)诊断步骤 (62)B24A0 空调自动放大器 (63)DTC 说明 (63)诊断步骤 (63)B24A1 空调自动放大器电源 (64)DTC 说明 (64)诊断步骤 (64)B24A4 进气传感器 (65)DTC 说明 (65)诊断步骤 (65)部件检查 (69)B24A6 车内传感器 (71)DTC 说明 (71)诊断步骤 (72)部件检查 (74)B24A9 日照强度传感器 (75)DTC 说明 (75)诊断步骤 (76)B24B4 空调控制 (78)DTC 说明 (78)诊断步骤 (78)B24B7 进气风门电机 (79)DTC 说明 (79)诊断步骤 (79)部件检查 (81)B24B9 模式风门电机 (82)DTC 说明 (82)诊断步骤 (82)部件检查 (84)B24BB 左侧空气混合风门电机 (85)DTC 说明 (85)诊断步骤 (85)部件检查 (87)B24BD 右侧空气混合风门电机 (88)DTC 说明 (88)诊断步骤 (88)部件检查 (90)B24D4 空调控制通信 (91)DTC 说明 (91)诊断步骤 (91)电源和接地电路 (93)A/C 自动放大器 (93)A/C 自动放大器:诊断步骤 (93)A/C 控制 (94)A/C 控制:诊断步骤 (94)鼓风机电机 (95)诊断步骤 (95)部件检查 (鼓风机电机) (99)部件检查 (鼓风机继电器) (99)电磁离合器 (100)部件功能检查 (100)诊断步骤 (100)ECV (电动控制阀) (102)诊断步骤 (102)部件检查 (103)症状诊断 (104)自动空调系统 (104)症状表 (104)制冷不足 (106)说明 (106)诊断步骤 (106)制热不足 (108)说明 (108)诊断步骤 (108)压缩机不工作 (109)说明 (109)诊断步骤 (109)拆卸和安装 (110)A/C 控制 (110)分解图 (110)拆卸和安装 (110)A/C 自动放大器 (111)拆卸和安装 (111)环境温度传感器 (112)拆卸和安装 (112)车内传感器 (113)拆卸和安装 (113)CDEFGHJKLMABNOP日照强度传感器 .................................................114拆卸和安装 (114)进气传感器 ........................................................115分解图 (115)拆卸和安装 (115)制冷剂压力传感器 .............................................116分解图 ...................................................................116拆卸和安装 (116)功率晶体管 (117)分解图 (117)拆卸和安装 (117)风门电机 ............................................................118分解图 ...................................................................118空气混合风门电机 . (120)空气混合风门电机:拆卸和安装 ............................120进气风门电机 (122)进气风门电机:拆卸和安装 ...................................122模式风门电机 (123)模式风门电机:拆卸和安装 (123)手动空调注意事项 (124)注意事项 ............................................................124辅助约束系统 (SRS)“安全气囊”和“安全带预张紧器”的注意事项 ..............................................124拆卸蓄电池端子的注意事项 .. (124)系统说明 (126)零部件 ...............................................................126零部件位置 ............................................................126A/C 单元总成 ............................................................128A/C 单元总成:进气传感器 ...................................128A/C 单元总成:空气混合风门电机 ........................128A/C 单元总成:模式风门电机 ................................128A/C 单元总成:进气风门电机 ................................129A/C 单元总成:鼓风机电机 ...................................130A/C 单元总成:风扇控制放大器 ............................130A/C 单元总成:功率晶体管 ...................................130压缩机 . (131)压缩机:电磁离合器 ..............................................131压缩机:ECV (电气控制阀) .................................131空调控制 (空调放大器) .........................................131环境温度传感器 .....................................................132制冷剂压力传感器 . (132)系统 ...................................................................133手动空调系统 (133)手动空调系统:系统说明 (133)手动空调系统:进气口控制 ...................................134手动空调系统:压缩机控制 ...................................135手动空调系统:风门控制 .......................................136手动空调系统:冷却风扇控制 ................................139手动空调系统:风门电机起动位置重置控制 ..........140手动空调系统:电路图 . (141)操作 (145)开关名称和功能 (145)诊断系统 (空调放大器) (147)说明 (147)CONSULT 功能 (147)ECU 诊断信息 (149)空调放大器 (149)参考值 (149)DTC 索引 (152)ECM 、IPDM E/R (153)ECU 参考列表 ........................................................153电路图 (154)手动空调系统 (154)电路图 (154)基本检查 (162)诊断和维修工作流程 (162)工作流程 (162)操作检查 (165)工作步骤 (165)系统设置 (167)目标蒸发器温度上限值设定 (167)风门电机起动位置重置 (168)说明 (168)工作步骤 (168)DTC/电路诊断 (169)U1000 CAN 通信电路 (169)DTC 说明 ...............................................................169诊断步骤 . (169)U1010 控制单元 (CAN) (170)DTC 说明 (170)诊断步骤 ................................................................170B24A4 进气传感器 (171)DTC 说明 (171)诊断步骤 ................................................................171部件检查 . (175)B24B7 进气风门电机 (177)DTC 说明 (177)诊断步骤 (177)部件检查 (179)B24B9 模式风门电机 (180)DTC 说明 (180)诊断步骤 (180)部件检查 (182)B24BB 左侧空气混合风门电机 (183)DTC 说明 (183)诊断步骤 (183)部件检查 (185)电源和接地电路 (186)空调放大器 (186)空调放大器:诊断步骤 (186)鼓风机电机 (187)诊断步骤 (187)部件检查 (鼓风机电机) (193)部件检查 (鼓风机继电器) (193)部件检查 (风扇控制放大器) (194)电磁离合器 (195)部件功能检查 (195)诊断步骤 (195)ECV (电动控制阀) (197)诊断步骤 (197)部件检查 (198)症状诊断 (199)手动空调系统 (199)症状表 (199)制冷不足 (201)说明 (201)诊断步骤 ................................................................201制热不足 (202)说明 (202)诊断步骤 (202)压缩机不工作 (203)说明 (203)诊断步骤 (203)拆卸和安装 (204)空调控制 (空调放大器) (204)分解图 (204)拆卸和安装 (204)环境温度传感器 (205)拆卸和安装 (205)进气传感器 (206)分解图 (206)拆卸和安装 (206)制冷剂压力传感器 (207)分解图 (207)拆卸和安装 (207)功率晶体管 (208)拆卸和安装 (208)风扇控制放大器 (209)分解图 (209)拆卸和安装 (209)风门电机 (210)分解图 (210)空气混合风门电机 (213)空气混合风门电机:拆卸和安装 (213)进气风门电机 (214)进气风门电机:拆卸和安装 (214)模式风门电机 (215)模式风门电机:拆卸和安装 (215)CDEFGHJKLMABNOP注意事项注意事项辅助约束系统 (SRS)“安全气囊”和“安全带预张紧器”的注意事项INFOID:0000000010623448辅助约束系统如“安全气囊”和“安全带预张紧器”与前排座椅安全带一起使用,有助于减少车辆碰撞时驾驶员和前排乘客受伤的危险性或严重程度。
日产维修
4079 日产尼桑技师培训 解压密码:512647
4225 东风日产 风神阳光维修手册 03 原厂 解压密码:971451
3230 轩逸G11培训 解压密码:782174
3243 NISSAN R51 (June 2005) 维修手册 解压密码:693878
3245 350ZNISSAN Z33 解压密码:418462
3039 东风日产NISSAN 天籁 解压密码:745347
3040 日产佳奔 密码空缺 点击帮助
3041 日产A32 解压密码:259785
201035-5653-221731
日产汽车全系维修手册下载地址,请使用电驴下载! 下的人越多越快。
感谢各位逍友的支持,现已获得足够积分,不敢怠慢特将获取的解压密码一并发送,只有两个密码未获知请知道的朋友补充!
若您想支持一下我的积分请点击捐助
其他密码请
点此获取
本帖申请加精
压缩文件解压密码请点击获取,需要到论坛获取,不太麻烦。手册明细如下!
3341 日产阳光电路图-原厂(新) 解压密码:294310
3342 风神(NISSAN) 新蓝鸟维修手册-原厂 解压密码:963829
3343 东风日产NISSAN 颐达电子维修手册-原厂2005.4 解压密码:671096
4226 东风日产 逍客培训资料 解压密码:427853
4227 东风日产 逍客维修手册 SM8C-0J10P0 解压密码:519477
3036 日产Y61(途乐)原场维修资料 解压密码:684259
3037 日产T30奇骏 解压密码:323091
日产天籁维修手册四:发动机润滑系统

通用维修工具 ........................................................... 3
安装后检查 ......................................................... 11
润滑系统 ..................................................................... 4 机油泵 ....................................................................... 12 H
拆卸后检查 ......................................................... 11 G
专用维修工具 [SST] ................................................ 3
安装 .................................................................... 11
拆卸 .................................................................... 12 安装 .................................................................... 12 I
拆卸 .................................................................... 10
准备工作 ..................................................................... 3
日产天籁发动机维修手册()

ECM利用上止点前(BTDC)110度的相位信号来计算下一个到达上止点的气缸。例如,当ECM读到左侧的相位刻度数为1以及右侧相应的相位刻度数为2时,则判断下一个达到压缩上止点的气缸是第3缸。
优点是使怠速时振动不会传到车身,而在加减速时发动机的运动又受到限制。
发动机后支承
怠速时状态 加速、高速时状态
13.日产直接点火系统(NDIS)
J31发动机采用日产直接点火系统(NDIS),共有六个单独的点火线圈;每一个点火线圈又有一个单独的功率晶体管;在点火线圈连接杆内,串联有一个附加电阻,用于消除电器噪音的干扰,这种设计在现在日产所生产的汽油车上是常见的。火花塞是铂金NGK型,使用寿命可达90,000公里。
3.电子节气门(ETC)
J31采用电子节气门来控制发动机转速,已取消AAC阀及其它怠速控制装置。在TCS(牵引力控制系统)或VDC(车辆动态控制系统)要求发动机限制扭矩和防止车轮打滑时,ECM会控制电子节气门(ETC)工作。
电子节气门与节气门位置传感器协调工作,节气门位置传感器将节气门当前的位置信号传给ECM,作为反馈信号。电子节气门在没有电负荷时的自由位置,节气门稍为打开,可以为发动机提供了故障失效保护功能。因此当电子节气门(ETC)出现故障时,汽车可以20Km/H左右的车速行驶。
为了防止在起动过程中将燃油喷入缸内,先拔下油泵保险丝。油泵保险丝在仪表保险丝盒内,其位置在保险丝盒盖上已标明。
6.曲轴位置(POS)及凸轮轴相位(PHASE)传感器
J31发动机有两个凸轮轴相位传感器,它分别装在靠近两进气凸轮轴的缸盖尾端;曲轴位置传感器装在油底壳的后端。曲轴位置传感器和凸轮轴相位传感器均为霍尔型传感器。
日产综合维修指南说明书
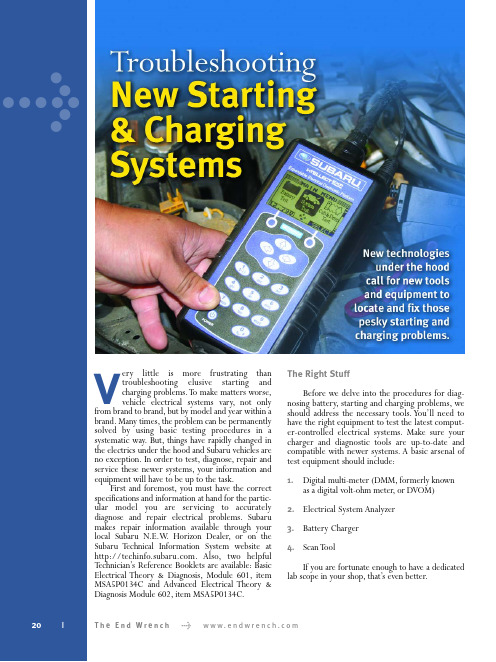
>Very little is more frustrating than troubleshooting elusive starting and charging problems.T o make matters worse,vehicle electrical systems vary,not only from brand to brand,but by model and year within a brand.Many times,the problem can be permanently solved by using basic testing procedures in a systematic way.But,things have rapidly changed in the electrics under the hood and Subaru vehicles are no exception.In order to test,diagnose,repair and service these newer systems,your information and equipment will have to be up to the task.First and foremost,you must have the correct specifications and information at hand for the partic-ular model you are servicing to accurately diagnose and repair electrical problems.Subaru makes repair information available through your local Subaru N.E.W .Horizon Dealer,or on the Subaru T echnical I nformation System website at .Also,two helpful T echnician’s Reference Booklets are available:Basic Electrical Theory & Diagnosis,Module 601,item MSA5P0134C and Advanced Electrical Theory &Diagnosis Module 602,item MSA5P0134C.The Right StuffBefore we delve into the procedures for diag-nosing battery,starting and charging problems,we should address the necessary tools.You’ll need to have the right equipment to test the latest comput-er-controlled electrical systems.Make sure your charger and diagnostic tools are up-to-date and compatible with newer systems.A basic arsenal of test equipment should include:1.Digital multi-meter (DMM,formerly known as a digital volt-ohm meter,or DVOM)2.Electrical System Analyzer3.Battery Charger4.Scan T oolIf you are fortunate enough to have a dedicated lab scope in your shop,that’s even better.20T h e E n d W r e n c h > w w w.e n d w r e n c h.c omDigital Multi-MeterLong gone are the days when checking a battery or elec-trical charging system could be performed with a simple voltmeter and test light.The sophisticated electronically-controlled systems on late model vehicles require the diag-nostic capabilities of a digital multi-meter.The most accept-able method for checking battery draw is with the use of an ammeter with an inductive pickup.DMMs usually have a DC ammeter function that will read from a few milliamps (mA) up to 10 amps.Make sure your DMM is internally fused for protection against high amperage.With the use of an induction clamp,or “amp clamp,”you can observe the ampere variance as accessory loads are applied.Electrical System AnalyzerMany new electrical system diagnostic tools are on the market today.These dedicated analyzers read the conditions existing in the electrical system and signal malfunctions or weaknesses.They also direct corrective measures and verify that the problem was eliminated by the repair.Many of these tools not only test the condition of the battery,but also monitor alternator output,check diodeA good quality multi-fun ction digital multi-meter (DMM) is essen tial for diagnosing electrical problems.Be sure to learn how to use all of its features.22|T h e E n d W r e n c h > w w w.e n d w r e n c h.c o mcondition,and find short circuits.Rate of discharge is meas-ured by internal microprocessors and compared against known standards to establish “rate of decay”and recovery ability to predict the power-holding potential and life expectancy of the battery.Another approach is to measure the conductance quality of the battery by sending a fre-quency signal through it to estimate the usable plate area,thereby determining the power retention life.Cold crank-ing capacity (CCA) is also measured,both without and under load.The end result is more accurate decisions on borderline batteries,and the identification of battery defects even at extremely low voltages,thus eliminating the time-consum-ing need to charge and retest the battery.A good example of the latest technologies for analyzing and testing the starting and charging systems is the inTELLECT EXP -1000,made by Midtronics.This handheld analyzer allows a technician to diagnose every part of the electrical system,from the battery to the starter and alter-nator.T est results can be printed out via an optional printer.The tool’s expandable platform combines the full functions of an advanced analyzer,digital multimeter (with scope mode),and data management tool.t’s upgradeable for future applications and features.Modern ChargersThe newest types of battery chargers have also been integrated with computerized logic and databases to deter-mine the quality of the battery,its life expectancy and to pro-vide optimum charging.Many can measure over 1,000 amps of starter draw using inductive amp probes,and voltage drop at connections and cables with test leads.These units can also test alternator output with carbon pile load,and detect bad diodes and faulty stators with an automatic ripple indicator.Some units even have battery decay logic programs to deter-mine battery life expectancy.The Midtronics GR-1 features “diagnostic conductance controlled charging”for solving battery problems.It tests the battery at the beginning,during and after charging.This unit effectively controls the charging process using the optimal charging voltage and current to quickly charge even weak batteries.New electrical system an alyzers,such as the Midtron ics in TELLECT EXP-1000,have made diagnosing electric system problems much easier.A n ew con ductan ce-based diagn ostics battery charger can provide quick,accurate battery testing and charging.New Starting & Charging SystemsScan ToolWhile a scan tool isn’t the first tool you may think to grab when troubleshooting a starting and charging problem, it can give you insight into any malfunctions in other areas of the vehicle that could have a bearing on the electrical prob-lem.Be sure to check the ECM for any diagnostic trouble codes (DTCs) prior to tackling the problem.It can save you a great deal of time and effort.Battery TestingBegin your troubleshooting efforts with the battery. You’ll need to determine the state of charge,the battery’s condition and its ability to hold a charge.If the battery is in good condition,it will hold a charge and deliver its rated amperage as needed.If the battery is in poor condition,it won’t deliver on demand.Use a voltmeter or DMM to check the charge level. Don’t trust the battery’s integrated charge indicator as it may only be reading one cell,not all.When fully charged,a battery should read 12.6 volts at room temperature.At 75% charged, the reading will be 12.4 volts.Lower readings indicate the need for recharging.T est the battery with an analyzer to deter-mine its condition and ability to hold a charge.If you don’t have an analyzer,recharge the battery,then retest it.The following steps can be taken to checkthe battery:O Check the battery for physical damage.O Check the positive and negative leads for corrosion and proper installation.O Check that the electrolyte is at the full level.O Check the color of the electrolyte to assess plate deterioration:•Clear means there’s no damage or deterioration.•Red means there’s positive plate deterioration.•Gray means there’s negative plate deterioration.O Check the specific gravity.It should be at least 1.230 at room temperature to test the battery.There should be no more than a .050 point differential among the cells.O On sealed maintenance-free batteries,check the open circuit voltage and compare its value with the manufac-turer’s specifications.If the specific gravity is below 1.230 or the open circuit voltage is below the recom-mended value,charge the battery and recheck the specific gravity or open circuit voltage.A u g u s t2006•N u m b e r35|23Adding JuiceBefore recharging (or replacing) a battery,check the operating condition of the charging system.Refer to the vehicle’s service manual for correct specifications.As a rule,it should read 14 volts during idle,with all acces-sories off,but may vary according the battery’s condition, charge level,load,ambient temperature and design.Cold weather will normally raise the charging level,while hot weather will normally lower it.If you have a tester with an adjustable carbon pile,you can check the charging output while the engine is operating at 2,000 rpm.AlternatorBefore testing the alternator (or installing a new one), make sure the battery is fully charged and in good condi-tion.Remember that the alternator’s job is to maintain the battery’s charge,not to recharge a faulty e a DMM or system analyzer to test the alternator output.Make sure the belt is in good condition and the tension is correct. Most electrical system analyzers and testers can also detect a faulty diode.StarterJust because a starter spins when power is applied is not an indicator that it is free from problems.In order to get an accurate reading,you’ll need to check how many amps it is drawing and measure the spin speed.It may be necessary to use a bench tester if your equipment in not capable of meas-uring the starter’s rotating rpm.Check the OE specs for the starter and compare to the unit you’re testing.Starter malfunctions can be caused by a faulty solenoid,shorts or opens in the field coil or armature, worn brushes,shaft damage or corrosion – internally or on the connections.Subaru recommends a starter performance test under these conditions:O No-load test (free spin).O Load test (under applied load).O Stall test (armature locked).While specifications will vary,we’ll use a 2000 Legacy with an automatic transmission as a typical example. Measured values must meet the following standards:O No-load test @ 11V/90 A,or more,and the rotating speed must be 3,350 rpm,or more.O Load test @ 8V/13.7 Nm (10.1 ft-lb),370 A or less, and the speed must be 880 rpms,or more.O Stall test @ 5V/1,050 A,or less,and the torque must be 27.5 Nm (20.3 ft-lb),or more.Of course,remember to consult the Subaru Service Manual for the vehicle you are diagnosing for the correct specifications.How’s the Weather?The local temperature and weather play a big part in starting and charging problems.People who live in the northern part of the country know that cold temps wreak havoc on batteries,alternators and starters — and expose any weaknesses in the system.When the mercury dips,the battery’s power is reduced by significant numbers.A fully-charged,battery is essential to spin the starter at speeds necessary to turn over the engine.Meanwhile,the engine oil has thickened and engine metal has contracted,making the job of moving the pistons,valves and the viscous oil much harder on the starter.More cranking amps are required to handle the load.At the same time,the driver may have turned on his heater/defroster,windshield wipers,rear window defog-ger,seat heaters and radio.The demand on the charging system has just maxed out!Not only does the power demand tax the system,but in many cases the electrical accessories may be the cause of elec-trical problems.When searching for elusive electrical grem-lins,first check the starting and charging system with all accessories off.If the problem is not found,one by one,turn each electrical accessory on,until the problem is isolated.Those of you who live in areas that use salt to de-ice roads need to check for salt corrosion on exposed terminals, grounds and connections.Hot climates can cause electrical system problems,too. For one thing,batteries don’t like excessive heat.Electrolyte evaporation and high temps promote battery deterioration. Also,the radiator and A/C cooling fans,blowers and the compressor clutch all add to the electrical demand.In short,extreme temperatures place high demands on the battery,starter and charger,so always take the climate into consideration during diagnosis.We’ll conclude with one crucially important,yet often overlooked,point that applies to all electrical trou-bleshooting:Always check for good grounds before you condemn any components.ONew Starting & Charging Systems24|T h e E n d W r e n c h>w w w.e n d w r e n c h.c o m。
汽车维修手册资料电路图
汽车维修手册资料电路图淘宝店:本田车系2009广州本田CITY锋范原厂维修手册 2007本田Acura讴歌RL中文原厂维修手册 2009本田Acura讴歌TL中文原厂维修手册 2002至2004本田stream时韵维修手册 2004本田stream原厂维修手册增补版 2007东风本田新CR-V原厂维修手册 2004东风本田CR-V原厂维修手册 2009东风本田思域原厂维修手册 2007东风本田思域原厂维修手册 2006东风本田思域原厂维修手册 2006本田思域混合动力技术培训手册2005广州本田奥德赛原厂维修手册 2006广州本田奥德赛维修手册2002广州本田奥德赛原厂维修手册 2004广州本田飞度原厂维修手册2006广州本田飞度原厂维修手册增补版 2008广州本田飞度原厂维修手册2009广州本田飞度原厂维修手册2006广州本田思迪CITY维修手册 2008广州本田思迪维修手册增补版2008广州本田新雅阁原厂维修手册2008广州本田雅阁原厂培训资料2008广州本田雅阁原厂维修手册增补版 2008广州本田雅阁音响导航原厂培训2006广州本田雅阁原厂维修手册2003广州本田2.3雅阁原厂维修手册2001广州本田雅阁原厂维修手册丰田车系2010广汽丰田凯美瑞油电混合动力维修手册第一册2010广汽丰田凯美瑞油电混合动力维修手册第二册 2010广汽丰田凯美瑞油电混合动力维修手册第三册 2010广汽丰田凯美瑞油电混合动力维修手册第四册2010广汽丰田凯美瑞油电混合动力全车电路图 2010广汽丰田凯美瑞油电混合动力损伤维修手册 2010广汽丰田凯美瑞油电混合动力新车特性 2010广汽丰田凯美瑞油电混合动力新车培训2010广汽丰田凯美瑞油电混合动力用户手册+应急指南2008广汽丰田凯美瑞原厂维修手册 2009广汽丰田汉兰达原厂维修手册第一册2009广汽丰田汉兰达原厂维修手册第二册 2009广汽丰田汉兰达原厂维修手册第三册 2009广汽丰田汉兰达原厂维修手册第四册 2009广汽丰田汉兰达原厂维修手册第五册 2009广汽丰田汉兰达原厂新车特性 2007丰田汉兰达原厂维修手册 2010一汽丰田皇冠原厂培训手册2010一汽丰田皇冠原厂全车电路图 2004一汽丰田皇冠原厂维修手册 2006一汽丰田皇冠彩色电路图2006一汽丰田皇冠原厂维修手册增补篇 2007一汽丰田卡罗拉原厂维修手册2007丰田FJ酷路泽原厂维修手册2007丰田FJ酷路泽原厂技术培训 2008广州丰田雅力士原厂维修手册 2000一汽丰田花冠原厂维修手册 2004一汽丰田花冠原厂电路图2003一汽丰田花冠轿车维修手册2005丰田雷克萨斯GS430原厂中文培训资料 2005丰田雷克萨斯GS430.GS300原厂中文培训资料 2005丰田雷克萨斯GS430.GS300维修手册(英文版) 丰田雷克萨斯LS430电器维修手册中文版雷克萨斯A761E波箱原厂维修手册丰田雷克萨斯IS200维修手册丰田凌志LS400原厂中文维修手册丰田陆地巡洋舰维修手册一汽丰田特锐原厂维修手册2006一汽丰田威驰电路图(增补版) 一汽丰田威驰原厂维修手册一汽丰田威姿原厂维修手册丰田系列发动机原厂维修手册2005一汽丰田锐志原厂维修手册日产车系2008东风日产天籁原厂维修手册 2006东风日产天籁原厂维修手册 2004东风日产天籁原厂维修手册东风日产新天籁原厂技术培训 2006东风日产轩逸维修资料2008东风日产奇骏原厂维修手册2008东风日产新奇骏T31原厂培训教材 2003日产奇骏T30维修手册2001日产奇骏T30维修手册2008郑州日产御轩原厂维修手册 2006东风日产轩逸原厂维修手册 2006东风日产轩逸G11原厂技术培训 2006日产淑女跑车350Z原厂维修手册 2006日产风雅原厂维修手册 1999日产碧莲W41原厂维修手册 2001日产佳奔E25原厂维修手册2005东风日产骐达原厂维修手册 2005东风日产颐达原厂维修手册 2007东风日产骊威原厂维修手册 2006东风日产骏逸原厂维修手册 94-98日产风度A32原厂维修手册 2001日产风度A33原厂维修手册 2001风神蓝鸟全车维修手册 2002日产风神蓝鸟二代原厂维修手册 2004日产风神蓝鸟智尊原厂维修手册 2005日产尼桑贵仕V42原厂维修手册 2007日产尼桑贵仕维修手册 1997日产途乐Y61原厂维修手册 1999日产途乐Y61原厂维修手册 2001日产途乐Y61原厂维修手册 2004日产西玛F50原厂维修手册 2005日产西玛F50原厂维修手册 94-97日产阳光B14原厂维修手册 2002日产阳光N16原厂维修手册 2003东风日产阳光EQ7202原厂维修手册 2005东风日产阳光EQ7202原厂维修手册 2005郑州日产皮卡P27原厂维修手册2006郑州日产皮卡P31原厂维修手册 2007郑州日产SUV奥丁原厂维修手册 2004郑州日产帕拉丁原厂维修手册 2001日产皮卡D22原厂维修手册 94-99日产皮卡D22原厂维修手册马自达车系2008一汽马自达M5原厂维修手册 2008长安马自达2原厂维修手册 2008长安马自达2原厂技术培训 2010长安马自达M3原厂维修手册 2010长安马自达M3原厂技术培训手册2006长安马自达M3原厂维修手册 2008马自达RX-8维修手册 2009马自达M6睿翼维修手册2009一汽马自达M6睿翼原厂技术培训 2007一汽马自达M6原厂维修手册2006一汽马自达M6原厂维修手册 2005马自达M6自动变速器原厂维修手册 2005马自达M6维修车间操作手册 2010新一代普利马维修技术原厂培训 2005海南马自达普利马原厂维修手册 2004海南普利马原厂维修手册2003海南马自达福美来原厂维修手册 2006海南马自达福美来二代原厂维修手册 2009海马VT2无级变速器维修手册 2004马自达MPV自变速驱动桥维修手册2001马自达MPV原厂维修手册三菱车系2007长丰猎豹CS6原厂维修手册 2009长丰猎豹CS7原厂维修手册长丰猎豹吉普汽车维修手册长丰猎豹汽车原厂技术培训东南得利卡原厂维修手册东南富利卡原厂维修手册东南戈蓝汽车原厂维修手册东南菱帅原厂维修手册东南菱绅原厂维修手册东南系列发动机变速器原厂维修资料三菱戈蓝原厂维修手册2008三菱格蓝迪原厂维修手册2007三菱格蓝迪原厂维修手册 2006三菱格蓝迪原厂维修手册(中国版补充) 2004三菱格蓝迪原厂维修手册2007三菱蓝瑟原厂维修手册三菱戈蓝蓝瑟维修手册2008北京欧蓝德原厂维修手册2006北京欧蓝德原厂维修手册 2004北京欧蓝德原厂维修手册2002三菱帕杰罗速跑原厂维修手册 2004三菱帕杰罗速跑P45维修手册 2008三菱帕杰罗原厂维修手册三菱帕杰罗V73全车原厂车间检修手册三菱帕杰罗V73原厂维修手册三菱帕杰罗原厂维修手册三菱系列发动机变速器维修手册铃木车系2007铃木吉姆尼原厂维修手册 2009长安铃木新天语SX4自动变速器维修手册2009长安铃木新天语SX4原厂维修手册 2007长安铃木天语SX4维修手册长安铃木天语SX4轿车CNG系统维修手册 2006铃木超级维特拉原厂维修手册长安铃木羚羊原厂维修手册 2005长安铃木燕雨原厂维修手册昌河铃木北斗星微型客车原厂维修手册 2006昌河爱迪尔原厂维修手册铃木SOLIO所力歐(1.3L)维修手册斯巴鲁车系2008斯巴鲁森林人原厂维修手册2006斯巴鲁森林人原厂维修手册 2005斯巴鲁森林人原厂维修手册 2004斯巴鲁森林人原厂维修手册 2006斯巴鲁翼豹原厂维修手册 2005斯巴鲁翼豹原厂维修手册 2007斯巴鲁力狮原厂维修手册2006斯巴鲁力狮原厂维修手册 2005斯巴鲁力狮原厂维修手册现代车系2009北京现代索纳塔领翔NFC维修手册 2009北京现代索纳塔领翔NFC培训手册 2009北京现代索纳塔EF名驭电路图 2007北京现代索纳塔自动波电路图北京现代现代索纳塔维修手册北京现代索纳塔发动机培训2005北京现代索纳塔NF御翔原厂维修手册 2008北京现代索纳塔NF御翔原厂全车电路图北京现代索纳塔御翔NFC培训手册 2009北京现代伊兰特原厂维修手册 2008北京现代伊兰特悦动原厂维修手册北京现代伊兰特原厂技术培训手册2007北京现代伊兰特原厂全车电路图 2004北京现代伊兰特原厂维修手册2008北京现代途胜原厂全车电路图 2009北京现代途胜原厂全车电路图 2009北京现代途胜原厂维修手册北京现代途胜原厂技术培训教材2004北京现代途胜原厂维修手册 2009北京现代雅申特原厂维修手册 2008北京现代雅绅特原厂全车电路图 2006北京现代雅绅特原厂维修手册 2006华泰现代圣达菲原厂维修手册 2008华泰现代新圣达V6原厂维修手册华泰现代圣特菲原厂技术培训教材华泰现代特拉卡原厂维修手册现代特拉卡柴油发动机原厂维修手册现代酷派跑车原厂全车电路图现代XG君爵原厂维修手册 2004现代雅科仕原厂维修手册起亚车系2005东风起亚赛拉图原厂维修手册 2005东风悦达起亚千里马原厂维修手册东风悦达千里马原厂维修手册东风悦达起亚千里马原厂维修培训手册 2009东风悦达起亚福瑞迪原厂技术培训 2009起亚狮跑20DOHCVVT维修手册 2007起亚狮跑原厂维修手册2006起亚狮跑原厂全车电路图2003东风悦达起亚远舰维修手册东风悦达起亚远舰新车技术培训教材起亚嘉华原厂维修手册东风悦达起亚嘉华原厂培训资料东风悦达起亚嘉华原厂全车电路图 2003东风起亚悦达嘉华3.5维修手册大宇车系大宇希望原厂维修手册大宇(DAEWOO)LEGANZA典雅轿车全车线路图大宇(DAEWOO)兰龙轿车原厂全车线路图大宇蓝龙新巧龙旅行家典雅维修手册大宇王子超级沙龙轿车电控燃油喷射系统维修手册大宇Daewoo贵族希望ESPERO轿车电喷系统维修手册大宇蓝龙电器系统维修手册大宇蓝龙发动机电控系统检修大宇系列汽车电气元件位置及电路图全集通用车系2009上海通用别克新君威原厂维修手册 2003上海通用别克君威原厂维修手册2009上海通用别克新君越原厂维修手册 2008上海通用别克君越原厂维修手册2008上海通用别克君越混合动力维修手册 2008通用别克君越6T40自动变速箱维修手册 2006上海通用别克君越原厂维修手册 2006上海通用别克GL8原厂维修手册 2006上海通用别克GL8陆尊原厂维修手册 2005上海通用别克GL8陆尊原厂维修手册 2003上海通用别克GL8原厂维修手册增补本 2001上海通用别克GL8原厂维修手册上海通用别克GL8陆尊原厂维修手册 2005通用别克荣御原厂维修手册2005上海通用荣御原厂技术培训资料上海别克新世纪原厂维修手册2000通用别克新世纪GL GLX GS维修手册 2003上海通用别克世纪维修手册2008通用凯迪拉克CTS原厂维修手册 2007凯迪拉克(ESCALADE)凯雷德维修手册 2006通用凯迪拉克SGM980原厂维修手册 2005通用凯迪拉克XLR原厂维修手册2005通用凯迪拉克SRX原厂维修手册 2005通用凯迪拉克CTS原厂维修手册 2005通用凯迪拉克CRX原厂维修手册上海通用凯迪拉克原厂技术培训教材 2010上海通用别克凯越原厂全车电路图 2008上海通用别克凯越原厂维修手册 2008上海通用别克新凯越培训手册 2004上海通用别克凯越原厂维修手册上海通用别克凯越HRV维修手册2010上海通用林荫大道原厂维修手册 2007上海通用林荫大道原厂维修手册2010雪佛兰新赛欧原厂技术培训手册 2005上海通用赛欧原厂维修手册2003上海通用赛欧维修手册上海别克赛欧轿车维修手册全车电路图 2007上海通用雪佛兰乐骋原厂维修手册 2007上海通用雪佛兰景程原厂维修手册 2006上海通用雪佛兰景程维修手册2005上海通用雪佛兰景程原厂维修手册 2007上海通用雪佛兰乐风原厂维修手册 2009上海通用雪佛兰科鲁兹原厂维修手册 2007通用雪佛兰科帕奇C100原厂维修手册上海通用五菱SPARK原厂维修手册福特车系2008长安福特福克斯原厂维修手册 2005长安福特福克斯原厂维修手册 2007长安福特蒙迪欧智胜原厂维修手册长安福特蒙迪欧原厂维修手册长安福特蒙迪欧维修手册增补版福特蒙迪欧5速变速箱原厂维修手册长安福特蒙迪欧原厂技术培训手册 2009长安福特嘉年华电气原厂维修手册 2008长安福特嘉年华原厂维修手册 2005长安福特嘉年华电气维修手册 2003长安福特嘉年华原厂维修手册 2005福特领航员原厂维修手册 2005福特翼虎原厂维修手册2007福特S-MAX原厂维修手册2007长安福特S-MAX原厂技术培训资料道奇车系道奇大捷龙中文维修手册道奇捷龙汽车维修手册克莱期勒300C维修技术培训手册 Chrysler Neon 2000 彩虹原厂维修手册STRATUS 2000道奇原厂维修手册克莱斯勒倪虹原厂维修手册克莱斯勒土星原厂手册克莱斯勒北京切诺基维修手册雪铁龙车系2006东风雪铁龙凯旋维修手册东风雪铁龙凯旋原厂培训与电路图东风雪铁龙雪铁龙C2维修手册 2007东风雪铁龙毕加索原厂维修手册东风雪铁龙毕加索全车原厂电路图东风雪铁龙毕加索轿车结构与维修东风雪铁龙毕加索原厂维修手册东风雪铁龙塞纳维修手册东风雪铁龙爱丽舍原厂维修手册东风雪铁龙爱丽舍全车电路图东风雪铁龙爱丽舍轿车维修手册神龙富康988EX维修手册神龙富康ZX维修手册富康988轿车电气元件位置与电路图神龙富康自动变速器维修手册神龙富康全车电路图神龙富康电喷发动机修理手册标致车系东风标致307原厂维修手册2008东风标致307二厢2.0原厂电路图 2007东风标致307CMS 2.0 原厂电路图东风标致307 1.6自动档VAN+CAN全车电路图东风标致307多路传输系统培训东风标致307原厂技术培训手册东风标致206原厂电气维修手册东风标致206原厂技术培训手册 2010东风标致408原厂技术培训手册菲亚特车系菲亚特维修手册南京菲亚特派力奥维修手册南京菲亚特西耶那维修手册新雅途EPS维修资料英国车系路虎汽车维修手册南京名爵原厂维修手册上汽荣威原厂维修手册大众车系2010一汽大众CC原厂维修手册 2010一汽大众CC原厂技术培训手册 2010一汽大众CC原厂保养手册 2009一汽大众高尔夫A6原厂维修手册 2009上海大众途观原厂培训手册 2009上海大众朗逸原厂维修手册2009上海大众朗逸原厂全车电路图 2005一汽大众开迪Caddy原厂维修手册2005一汽大众开迪Caddy原厂技术培训手册 2005一汽大众开迪Caddy原厂全车电路图 2009一汽大众速腾原厂维修手册2009一汽大众速腾1.4T原厂技术培训一汽大众速腾09G波箱阀体分解图2006一汽大众速腾原厂维修手册2010一汽大众迈腾原厂电路维修手册 2009一汽大众迈腾原厂电路维修手册2009一汽大众迈腾新技术原厂培训 2009一汽大众迈腾1.4T原厂维修手册 2007一汽大众迈腾原厂维修手册 2009大众辉腾原厂技术培训手册 2009上海大众帕萨特新领驭电路图 2007上海大众帕萨特领驭原厂维修手册 2005帕萨特GLI原厂全车电路图上海大众PASSAT领驭售后技术培训上海大众帕萨特B5原厂维修手册2001-2003波罗1.4中文原厂维修手册 2007上海大众波罗劲情劲取原厂维修手册上海大众POLO 维修手册2005POLO GP上海大众内部培训资料 2004上海大众桑塔纳3000维修手册上海大众桑塔纳2000维修手册桑塔纳01N自动变速箱维修手册2008上海大众新桑塔纳全车电路图上海大众斯柯达法比亚原厂维修手册 2003上海大众途安原厂维修手册2004上海大众途安原厂维修手册上海大众途安内部技术培训教材上海大众途锐维修手册一汽大众宝来原厂维修手册 2004一汽大众宝来原厂技术培训教材一汽大众宝来全车电路图2008一汽大众新宝来原厂维修手册 2006一汽大众宝来维修手册2004一汽捷达原厂维修手册2006一汽大众捷达原厂全车电路图 2005一汽大众捷达原厂全车电路图一汽大众捷达柴油车维修手册一汽捷达都市先锋维修手册一汽捷达电喷系列轿车维修手册 2003上海大众高尔维修手册奥迪车系一汽大众奥迪A6L C6原厂维修手册一汽大众奥迪A6原厂维修手册一汽大众奥迪A6原厂技术培训一汽大众奥迪A4原厂维修手册一汽大众奥迪A4原厂技术培训奥迪A6维修手册奥迪Q7原厂全车电路图奥迪Q7原厂车间维修手册奥迪Q7原厂自学培训手册奥迪TT原厂自学手册2008奥迪TT原厂电路维修手册奥迪A8原厂维修手册奥迪A8原厂技术培训资料欧洲车系绅宝系列车型中文维修资料欧宝系列车型中文维修资料沃尔沃系列车型中文维修资料奔驰系列车型中文维修资料宝马系列车型中文维修资料比亚迪车系2008比亚迪F0原厂维修手册2008比亚迪F0电喷系统维修手册 2008比亚迪F1厂家技术培训手册 2007比亚迪F3 F3-R原厂维修手册 2007比亚迪F3发动机电喷系统维修手册2007比亚迪F3维修站培训教材 2006比亚迪F3原厂维修手册2009比亚迪F6原厂维修手册2009比亚迪S8原厂维修手册 2009比亚迪S8厂家内部培训教材奇瑞车系2008奇瑞A520原厂维修手册 2009奇瑞A3原厂维修手册 2011奇瑞新A3原厂维修手册 2009奇瑞威麟V5原厂维修手册奇瑞东方之子原厂维修手册奇瑞风云系列车型原厂维修手册奇瑞旗云A15原厂维修手册 2007奇瑞新A15旗云维修手册奇瑞瑞虎原厂维修手册 2010奇瑞瑞麒G6原厂维修手册 2010奇瑞瑞麒G5原厂维修手册 2008奇瑞瑞麒2原厂维修手册奇瑞QQ原厂维修手册长城车系长城风骏原厂维修手册长城哈弗原厂维修手册长城嘉誉原厂维修手册长城酷熊原厂维修手册长城精灵原厂维修手册长城赛铃原厂维修手册长城赛弗原厂维修手册长城炫丽原厂维修手册长城赛影原厂维修手册吉利车系2010吉利帝豪原厂维修手册 2007吉利金刚原厂维修手册吉利美人豹跑车维修手册2010吉利熊猫原厂电气维修手册 2009吉利远景原厂技术培训手册 2006吉利远景原厂维修手册吉利自由舰维修手册吉利FC-1全自动汽车空调维修手册吉利优利欧汽车电路图册中兴汽车中兴皮卡原厂维修手册中兴汽车无限原厂维修手册中兴威虎发动机原厂维修手册江铃汽车江铃陆风风华原厂维修手册江铃陆风风尚原厂维修手册江铃陆风原厂维修手册江铃宝典皮卡原厂维修手册江铃全顺原厂维修手册力帆汽车重庆力帆520原厂维修手册重庆力帆620原厂维修手册江淮汽车江淮宾悦原厂维修手册江淮瑞风原厂维修手册华晨汽车华晨中华轿车原厂维修手册华晨中华骏捷原厂维修手册华晨金杯海狮维修手册丰田海狮面包车维修手册华普汽车华普海锋原厂维修手册华普海尚原厂维修手册华普海迅原厂维修手册华普海域原厂维修手册华普海悦原厂维修手册哈飞汽车哈飞民意原厂维修手册哈飞赛马原厂维修手册哈飞赛豹电控维修手册长安汽车长安CM8原厂维修手册长安奔奔原厂维修手册长安之星原厂维修手册长安志翔原厂维修手册福田汽车北汽福田原厂维修手册福田蒙派克原厂维修手册双环汽车双环CEO原厂维修手册双环小贵族原厂维修手册一汽汽车天津夏利汽车维修手册一汽华利维修手册一汽佳宝原厂维修手册。
2008款东风日产奇骏发动机(MR20DE)机械维修手册(可编辑)
2008款东风日产奇骏发动机(MR20DE)机械维修手册(可编辑)2008款东风日产奇骏发动机(MR20DE)机械维修手册NVH 故障排除表1.确认噪音产生的区域。
2.确认噪音类型。
3.详细说明发动机的运行状况。
4.检查规定的噪音源。
若有必要,修理或更换这些零部件。
发动机的运行状况噪音位置噪音类型暖机暖机起动怠速空转行驶噪音源检查项目参考页前后时时时时滴答声或咔检查和调C A ― A B ― 挺杆噪音气门间隙发动机前端哒声整摇臂盖凸轮轴轴颈油层间缸盖喀喀声C A ― A B C 凸轮轴轴承噪音隙凸轮轴凸轮轴凸轮轴跳动量活塞到活塞销的油劈啪声或爆缸体― A ― B B ― 活塞销噪音层间隙震声缸体连杆衬套油层间隙活塞到缸套的油层缸体曲轴皮带轮劈啪声或叩间隙缸体缸体发动机击声 A ― ― B B A 活塞敲缸噪音活塞环侧间隙缸体侧活塞环开口间隙缸体油底壳连杆弯曲和扭曲连杆衬套油层间隙缸体爆震 A B C B B B 连杆轴承噪音连杆轴承油层间隙连杆轴承主轴承油层间隙主轴承爆震A B ― A B C 主轴承噪音曲轴跳动量缸体正时链条裂纹和磨检查发动机前端敲击声或滴正时链条和链条张紧损A A ―B B B拆卸和安前盖答声器噪音正时链条张紧器操装作吱吱声或嘶A B ― B ― C 驱动皮带粘住或打驱动皮带挠度嘶声滑分解图发动机前面嘎嘎声 A B A B A B 驱动皮带打滑惰轮轴承操作刺耳声A B ― B A B 水泵噪音水泵操作检查嘎嘎声A :密切相关 B:相关 C:有时相关―:无关在无前围上盖板盖的情况下操作的注意事项在卸下前围上盖板盖的情况下进行操作时,要用聚氨脂等盖住挡风玻璃的下端。
断开蓄电池后转动方向盘的注意事项注:此步骤仅用于有智能钥匙系统和 NATS 日产防盗系统的车型。
当点火旋钮在〃LOCK〃位置时,断开蓄电池电缆,然后拆卸和安装所有控制单元。
每次工作完成后都要使用 CONSULT-III 进行自诊断,使其成为各个功能检测的例行程序。
2014日产奇骏全车电路图维修手册49 车身控制系统

多功能遥控进入 : CONSULT 功能 (BCM - 多功能 遥控进入 ) ( 配备智能钥匙 ) ..................................... 22
H
多功能遥控进入 : CONSULT 功能 (BCM - 多功能
遥控进入 ) ( 不配备智能钥匙 ) .................................. 23 I
车门锁 ........................................................................20
车门锁 : CONSULT 功能 (BCM - 车门锁 ) ( 配备智
F
能钥匙 ) .................................................................... 20
拆卸蓄电池端子的注意事项 ...................................... 3 断开蓄电池后转动方向盘的注意事项 ........................ 4 辅助约束系统 (SRS) “安全气囊”和 “安全带预 张紧器”的注意事项 ................................................. 4
BCM ............................................................................ 42 BCM: CONSULT 功能 (BCM - BCM) ......................42
IMMU .......................................................................... 42 IMMU: CONSULT 功能 (BCM - IMMU) ( 配备智能 钥匙系统 ) ...............................................................42 IMMU: CONSULT 功能 (BCM - IMMU) ( 不配备智 能钥匙系统 ) ............................................................42