
1.5SMC250A中文资料
Surface Mount T RANS Z ORB ®Transient Voltage SuppressorsV (BR)Unidirectional6.8 to 540VV (BR)Bidirectional6.8 to 220VPeak Pulse Power 1500WDevices for Bidirectional ApplicationsFor bi-directional devices, use suffix CA (e.g. 1.5SMC10CA). Electrical characteristics apply in both directions.Maximum Ratings & Thermal CharacteristicsRatings at 25°C ambient temperature unless otherwise specified.ParameterSymbol Value Unit Peak power dissipation with a 10/1000µs waveform (1)(2)(Fig. 1)P PPM 1500W Peak pulse current with a 10/1000µs waveform (1) (Fig. 3)I PPM See Next TableAPower dissipation on infinite heatsink, T A = 50°C P M(AV) 6.5W Peak forward surge current 8.3ms single half sine-wave I FSM 200A uni-directional only (2)Thermal resistance junction to ambient air (3)R θJA 75°C/W Thermal resistance junction to leadsR θJL 15°C/W Operating junction and storage temperature rangeT J , T STG–65 to +150°CNotes:(1) Non-repetitive current pulse, per Fig.3 and derated above T A = 25°C per Fig. 2(2) Mounted on 0.31 x 0.31” (8.0 x 8.0mm) copper pads to each terminal (3) Mounted on minimum recommended pad layoutFeatures• Low profile package with built-in strain relief for surface mounted applications • Glass passivated junction• Low incremental surge resistance • Low inductance• Excellent clamping capability• 1500W peak pulse power capability with a 10/1000µs waveform, repetition rate (duty cycle): 0.01%• Very fast response time• Plastic package has Underwriters Laboratory Flammability Classification 94V-0Mechanical DataCase:JEDEC DO-214AB (SMC) molded plastic over passivated junctionTerminals:Solder plated, solderable per MIL-STD-750,Method 2026. High temperature soldering: 250°C/10seconds at terminals.Polarity:For uni-directional types the band denotes the cathode, which is positive with respect to the anode under normal TVS operation.Standard Packaging:16mm tape (EIA STD RS-481)Weight:0.007 oz., 0.21 gPackaging Codes – Options (Antistatic):51 – 1K per Bulk box, 10K/carton57 – 850 per 7" plastic Reel (16mm tape), 8.5K/carton 9A – 3.5K per 13" plastic Reel (16mm tape), 35K/cartonMounting Pad LayoutE x t e n d e d Vo l t a g e R a n g e 1.5SMC SeriesVishay Semiconductorsformerly General SemiconductorDocument Number Electrical Characteristics Ratings at 25°C ambient temperature unless otherwise specified. VF= 3.5V at I F = 100A (uni-directional only)Breakdown VoltageMaximum Maximum Maximum Maximum GeneralDevice MarkingV (BR) at I T (1)Test Stand-off Reverse Peak Pulse Clamping Temp.Semiconductor Code (V)Current Voltage Leakage Current Voltage at Coefficient Part Number I T V WM at V WM I PPM (2)I PPM of V (BR)UNI BI MIN MAX (mA)(V)I D (4) (µA)(A)V C (V)(% / °C)1.5SMC6.8A 6V8A 6V8C 6.457.1410 5.80100014310.50.0571.5SMC7.5A 7V5A 7V5C 7.137.8810 6.4050013311.30.0611.5SMC8.2A 8V2A 8V2C 7.798.61107.022*******.10.0651.5SMC9.1A 9V1A 9V1C 8.659.55 1.07.785011213.40.0681.5SMC10A 10A 10C 9.5010.5 1.08.551010314.50.0731.5SMC11A 11A 11C 10.511.6 1.09.40 5.096.215.60.0751.5SMC12A 12A 12C 11.412.6 1.010.2 5.089.816.70.0781.5SMC13A 13A 13C 12.413.7 1.011.1 5.082.418.20.0811.5SMC15A 15A 15C 14.315.8 1.012.8 1.070.821.20.0841.5SMC16A 16A 16C 15.216.8 1.013.6 1.066.722.50.0861.5SMC18A 18A 18C 17.118.9 1.015.3 1.059.525.20.0891.5SMC20A 20A 20C 19.021.0 1.017.1 1.054.227.70.0901.5SMC22A 22A 22C 20.923.1 1.018.8 1.049.030.60.0921.5SMC24A 24A 24C 22.825.2 1.020.5 1.045.233.20.091.5SMC27A 27A 27C 25.728.4 1.023.1 1.040.037.50.0961.5SMC30A 30A 30C 28.531.5 1.025.6 1.036.241.40.0971.5SMC33A 33A 33C 31.434.7 1.028.2 1.032.845.70.0981.5SMC36A 36A 36C 34.237.8 1.030.8 1.030.149.90.0991.5SMC39A 39A 39C 37.141.0 1.033.3 1.027.853.90.1001.5SMC43A 43A 43C 40.945.2 1.036.8 1.025.359.30.1011.5SMC47A 47A 47C 44.749.4 1.040.2 1.023.164.80.1011.5SMC51A 51A 51C 48.553.6 1.043.6 1.021.470.10.1021.5SMC56A 56A 56C 53.258.8 1.047.8 1.019.577.00.1031.5SMC62A 62A 62C 58.965.1 1.053.0 1.017.685.00.1041.5SMC68A 68A 68C 64.671.4 1.058.1 1.016.392.00.1041.5SMC75A 75A 75C 71.378.8 1.064.1 1.014.61040.1051.5SMC82A 82A 82C 77.986.1 1.070.1 1.013.31130.1051.5SMC91A 91A 91C 86.595.5 1.077.8 1.012.01250.1061.5SMC100A 100A 100C 95.0105 1.085.5 1.010.91370.1061.5SMC110A 110A 110C 105116 1.094.0 1.09.91520.1071.5SMC120A 120A 120C 114126 1.0102 1.09.11650.1071.5SMC130A 130A 130C 124137 1.0111 1.08.41790.1071.5SMC150A 150A 150C 143158 1.0128 1.07.22070.1061.5SMC160A 160A 160C 152168 1.0136 1.0 6.82190.1081.5SMC170A 170A 170C 162179 1.0145 1.0 6.42340.1081.5SMC180A 180A 180C 171189 1.0154 1.0 6.12460.1081.5SMC200A 200A 200C 190210 1.0171 1.0 5.52740.1081.5SMC220A 220A 220C 209231 1.0185 1.0 4.63280.1081.5SMC250A 250A —237263 1.0214 1.0 4.43440.1101.5SMC300A 300A —285315 1.0256 1.0 3.64140.1101.5SMC350A 350A —333368 1.0300 1.0 3.14820.1101.5SMC400A 400A —380420 1.0342 1.0 2.75480.1101.5SMC440A 440A —418462 1.0376 1.0 2.56020.1101.5SMC480A 480A —456504 1.0408 1.0 2.286580.1101.5SMC510A 510A —485535 1.0434 1.0 2.156980.1101.5SMC540A540A—5135671.04591.02.037400.110Notes: (1) Pulse test: t p ≤50ms(2) Surge current waveform per Fig. 3 and derate per Fig. 2(3) All terms and symbols are consistent with ANSI/IEEE CA62.35(4) For bidirectional types with V R 10 volts and less, the I D limit is doubled1.5SMC SeriesVishay Semiconductorsformerly General Semiconductor Document Number 88303101100400V WM — Reverse Stand-Off Voltage (V)Fig. 2 – Pulse Derating CurveP P P M — P e a k P u l s e P o w e r (k W )Fig. 1 – Peak Pulse Power Rating CurveFig. 6 - Maximum Non-Repetitive Forward Surge Current Uni-Directional Use Only11010010100200P e a k F o r w a r d S u r g e C u r r e n t , A m p e r e sNumber of Cycles at 60Hzt p — Pulse Duration (sec)T r a n s i e n t T h e r m a l I m p e d a n c e (°C /W )Fig. 5 – Typical Transient ThermalImpedance0.11.0101000.0010.010.11101001000I P P M — P e a k P u l s e C u r r e n t , % I R S M1.02.03.04.0t — Time (ms)Ratings andCharacteristic Curves (T A = 25°C unless otherwise noted)1.5SMC SeriesVishay Semiconductorsformerly General SemiconductorDocument Number 。
杭州SMC中文资料

产品名称:SMC气动产品说明书
气动是利用撞击作用或转动作用产生的空气压力使其运动或作功,气动就是以压缩空气为动力源,带动机械完成伸缩或旋转动作。
因为是利用空气具有压缩性的特点,吸入空气压缩储存,空气便像弹簧一样具有了弹力,然后用控制元件控制其方向,带动执行元件的旋转与伸缩。
从大气中吸入多少空气就会排出多少到大气中,不会产生任何化学反应,也不会消耗污染空气的任何成分,另外气体的粘性较液体要小,所以说流动速度快,也很环保。
普通整流管模块 MDA250A

特点
1). 芯片与底板电气绝缘,2500V交流电压 2). 全压接结构,优良的温度特性和功率循环能力 3). 体积小,重量轻
典型应用
1). 交直流电机控制 2). 各种整流电源 3). 变频器
IF(AV) VRRM IFSM I2t
250A 600~1800V 11 A×103 617 A2S*103
ℷᑇഛ⬉⌕ IF(AV),A
ℷᑇഛ⬉⌕ IF(AV),A
Fig.3᳔ℷࡳ㗫Ϣᑇഛ⬉⌕ⱘ݇㋏᳆㒓
0'& Max. Power Dissipation Vs.Mean forward Current
MDA250A
外形尺寸图
401F
乐清市柳晶整流器有限公司(编 PT(AV),(max),W
Fig.2 ⶀᗕ⛁䰏ᡫ᳆㒓
0'& Max. case Temperature Vs.Mean forward Current ऩⳌ
ㅵ⏽ᑺTc(max),e C
ℷᓺ
ℷᓺ
3Ⳍ 6Ⳍ
6Ⳍ 3Ⳍ ऩⳌ
Tj=150e C
ⶀᗕ⛁䰏ᡫZ th,e C/W
ℷዄؐ⬉⌕ IFM,A
ᯊ䯈t,S
Fig.1 ℷӣᅝ⡍ᗻ᳆㒓
0'&Vs.Mean forward Current Max. Power Dissipation
᳔䗮ᗕࡳ㗫 PF(AV)(max),W
DC
Fig.4ㅵ⏽ᑺϢℷᑇഛ⬉⌕ⱘ݇㋏᳆㒓
Max. case Temperature Vs.Mean forward Current 0'&
EX250-SCA1A安全说明书
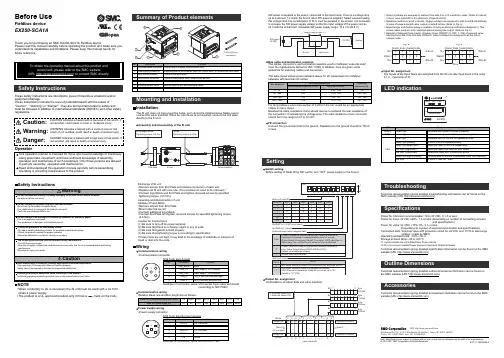
Before UseFieldbus deviceEX250-SCA1ASafety InstructionsThese safety instructions are intended to prevent hazardous situations and/or equipment damage.These instructions indicate the level of potential hazard with the labels of"Caution", " Warning" or "Danger". They are all important notes for safety and must be followed in addition to International standards (ISO/IEC) and other safety regulations.Thank you for purchasing an SMC EX250-SCA1A Fieldbus device.Please read this manual carefully before operating the product and make sure you understand its capabilities and limitations. Please keep this manual handy for future reference.Mounting and InstallationInstallationThe SI unit does not have mounting holes, so it cannot be installed alone. Make sure to connect the valve manifold. When an input block is not required, connect the end plate directly to the SI unit.SettingTroubleshootingTechnical documentation giving detailed troubleshooting information can be found on the SMC website (URL ).SpecificationsPower for CANopen communication: 18 to 30 VDC, 0.1 A or lessPower for input: 24 VDC ±20%, 1 A or less (Depending on number of connecting sensorsand specifications)Power for valve: 24 VDC +10%/-5%, 2 A or less(Depending on number of solenoid valve station and specifications)Connection load: Solenoid valve with protection circuit for 24 VDC and 1.5 W or less surgevoltage. (made by SMC)Operating ambient temp: -10 to +50 C Storage ambient temp: -20 to +60 C∗1: Input terminal are not isolated from Power source.∗2: Do not connect outside Power source to Input and Output terminals.Technical documentation giving detailed specification information can be found on the SMC website (URL ).Outline DimensionsTechnical documentation giving detailed outline dimensions information can be found on the SMC website (URL ).Assembly and disassembly of the SI unitWiringCommunication wiring SW power is supplied to the sensor connected to the input block. There is a voltage drop up to maximum 1 V inside the SI unit when SW power is supplied. Select a sensor taking this voltage drop into consideration. If 24 V must be supplied to the sensor, it is necessary to increase the SW power supply voltage so that the input voltage of the sensor will be 24 V with the actual load. (Allowable SW power supply range: 19.2 V to 28.8 V)Bus cable and termination resistorsThe cables, connectors, and termination resistors used in CANopen networks shall meet the requirements defined in ISO 11898. In addition, here are given some guidelines for selecting cables and connectors.The table below shows some standard values for DC parameters for CANopen Switch settingBefore setting of Node-ID by DIP switch, turn “OFF” power supply to the SI unit.Output No. assignmentCombinations of output data and valve manifoldNote: Specifications are subject to change without prior notice and any obligation on the part of the manufacturer.© 2011-2017 SMC Corporation All Rights Reserved.Akihabara UDX 15F, 4-14-1, Sotokanda, Chiyoda-ku, Tokyo 101-0021, JAPAN Phone: +81 3-5207-8249 Fax: +81 3-5298-5362URL ∗: Output numbers are assigned to stations from side D to U of manifold in order. (Refer to manual of each valve manifold for the directions of side D and U).∗: Standard manifold is wired in double. Output numbers are assigned to side A and B alternatively.In case of single solenoid valve, output on side B is free. (Refer to Fig. a)∗: Mixed (single and double) wiring is available as long as wiring specifications designate it. This allows output numbers to be specified without having free output. (Refer to Fig. b)∗: Each bit of data sent from master (4 bytes) shows ON/OFF (0: OFF, 1: ON) of solenoid valve.Starting from LSB of the first byte (Offset 0), output numbers are assigned to all the bits in numeric order.Input No. assignmentThe inputs of the Input block are assigned from the SI unit side Input block in the order 0,1,2…maximum of 31.AccessoriesTechnical documentation giving detailed accessories information can be found on the SMC website (URL ).•Communication connectorCommunication wiringRelation Baud rate and Bus length are as follows.(according to ISO11898)Power supply wiring •Power supply connectorLED indicationFE connectionConnect the ground terminal to the ground. Resistance to the ground should be 100 Ωor less.For drop cables a wire cross-section of 0.25 to 0.34 mm would be an appropriate choice in many cases.Besides the cable resistance, there should also be considered the real resistance of the connectors, if calculating the voltage drop. The read resistance of one connector should be in the range of 2.5 to 10 mΩ.NOTE•When conformity to UL is necessary the SI unit must be used with a UL1310Class 2 power supply.•The product is a UL approved product only if it has a mark on the body.Safety InstructionsExchange of SI unit•Remove screws from End Plate and release connection of each unit.•Replace old SI unit with new one. (Tie-rod does not need to be removed.)•Connect Input Block and End Plate and tighten removed screws by specified tightening torque. (0.6 Nm)Assembly and disconnection of unit Addition of Input Block•Remove screws from End Plate.•Mount attached tie-rod.•Connect additional Input Block.•Connect End Plate and tighten removed screws by specified tightening torque.(0.6 Nm)Caution for maintenance(1) Be sure to turn-off all power supplies.(2) Be sure that there is no foreign object in any of units.(3) Be sure that gasket is lined properly.(4) Be sure that tightening torque is according to specification.If these items are not kept, it may lead to the breakage of substrate or intrusion of liquid or dust into the units.EX ※※-OMP0009-A。
SMC书本资料
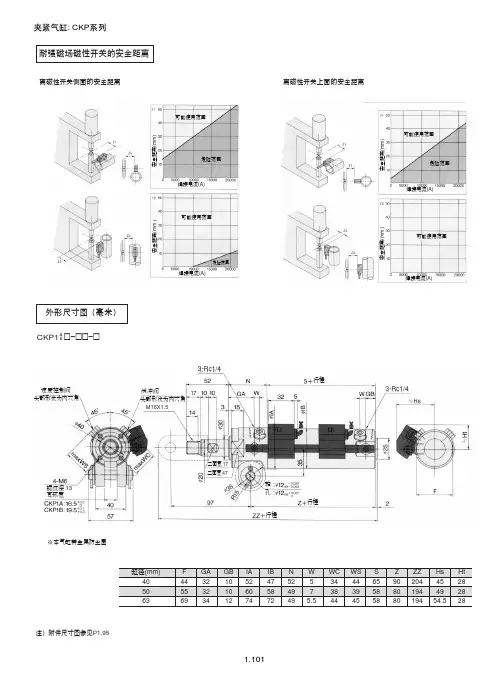
标准型(通孔):CDQ2BP□-□DM-□□
二面宽 K
通孔 沉孔
±0.2
行程 行程
※气缸带金属防尘圈
两端螺孔的场合 缸径 O (mm) 50 63 80 标准型 缸径 (mm) 50 63 80 A B C D E F H M8X1.25 M10X1.5 M12X1.75
两端螺孔 CDQ2AP □ - □ DM- □□
IB 47 58 72
N 52 49 49
W 5 7 5.5
WC 34 38 44
WS 44 39 45
S 65 58 58
Z 90 80 80
ZZ 204 194 194
Hs 45 49 54.5
Ht 28 28 28
注)附件尺寸图参见P1.95
1.101
!: CDQ2 !"=E
P F
2-RcP
行程
无杆侧法兰型:CDA1GP□-□□-□□
杆侧法兰型 缸径 40 50 63 80
B 71 81 101 119
FV 60 70 86 102
FD 9.0 9.0 11.5 13.5
FT 12 12 15 18
FX 80 90 105 130
FY 42 50 59 76
FZ 100 110 130 160
ZZ 190 210 227 270
中间耳轴型:CDA1TP□-□□-□□
Z+1/2 行程
行程
中间耳轴型 缸径 40 50 63 80
行程范围
带 1 个、 带2个
TDe8 15 15 18 25
-0.032 -0.059 -0.032 -0.059 -0.032 -0.059 -0.040 -0.073
ZH ZX 系例SMC真空阀资料

喷嘴直径 05 07 10 13 15 18 20 0.5mm 0.7mm 1.0mm 1.3mm 1.5mm 1.8mm 2.0mm 最高真空度 S L +88kPa +48kPa
构造图
排气口 主体 扩压管
外形尺寸图 (毫米) ZU05S, ZU05L
进口
真空口
ZU07S, ZU07L
快换接头 快换接头
排气特性/流量特性图表 ZU05S
排气特性
( 供给压力在 0.45MPa 的情况下 )
最高真空度: 85kPa
ZU05L
排气特性
空气消耗量
最高真空度: 48kPa
流量特性
流量特性
真空用数字式压力开关规格(可选项)
型号 ZSE4-00-□□-□-X105 ZSE4B-00-□□-□-X105 ZSE4E-00-□□-□-X105 带辅助照明LCD 显示 LCD LED -101~10kPa 压力设定范围 -101~0kPa -101~10kPa 200kPa 最高使用压力 动作指示灯 OUT1:绿色 绿色 (ON时亮) OUT2:红色 200Hz(5ms) 响应频率 可变(3digit以上) 可变(可从0设定) 迟 迟滞模式 固定(3digit) 滞 上下限比较模式 空气·非腐蚀性气体 使用流体 ±3%F.S.以下 温度特性 ±1%F.S.以下 重复精度 DC12~24V(波动±10%以内) 使用电压 -26、-27:50mA以下 25mA以下 45mA以下 消耗电流 -67:60mA以下 31 2位数(文字高8mm) 压力指示 过电流*、过压力、数值错误、置0时的压力的有无 自己诊断功能 0~50℃(但未结露) 使用温度范围 50V P-P 脉冲宽1µs 能持续1ns(毫微秒) 耐噪声 外部端子一起与外壳间AC1000V 1分钟 耐电压 外部端子一起与外壳间2M‰(DC500V兆欧表) 绝缘阻抗 10~500Hz振幅1.5mm和加速度10G中的小者在X、Y、Z方向各2小时 耐振动 100G X、Y、Z 方向各3次 耐冲击 *模拟输出型没有
SMC系列产品使用说明书

5.3对于1-PC和牙嵌式驱动空心轴的电动装置其安装方法是:起吊电动装置使1-PC空心轴孔与阀杆和键配合装入,牙嵌驱式空心轴上的牙嵌与阀门上阀杆螺母的牙嵌对准。用螺栓将电动装置与阀门紧固可靠。
4.1专用电动机:适合阀门的载荷特性和使用工况,型号YLT。
4.2减速机构:用于传递和增大电动机的动力。每个机座产品均有3~5种速比的蜗轮副和若干电机齿轮与蜗杆轴齿轮传动比的齿轮副,因而可获得较大的输出转速范围。
4.3驱动空心轴:它是电动装置的动力输出部件,有2-PC、1-PC、牙嵌式三种型式,结构可见(图10)~(图12)
2.基本技术参数
产品符合JB/T8528-1997《普通型阀门电动装置技术条件》
2.1动力电源:380V、50Hz三相正弦交流电(根据用户要求,某些规格可提供使用单相220V电源的电动机)。
2.2外壳防护等级:SMC-04、03 IP67
SMC-00~5 IP65
2.3使用环境温度:-20℃~40℃;-20℃~60℃(根据用户订货要求)
G·L·SW各列转体上触点的相对位置可任意布置,即同一列上的触点可以全部为“OFF”型式或为“OFF”“ON”两种型式。(最常用的是“OFF”“ON”的布置型式)。
G·L·SW中间的两列转体触点开关可做为阀门某两个中间位置的信号输出,也可将其调整到与两边的转体同步动作。
(图17)为典型控制原理时触点开关的布置型式。
电气接线程序及注意事项:
7.1确认电源电压与电动机使用电压相同。
焊王 WS-125A、160A、180A、200A、250A、315A 可控硅直流氩弧焊机 说明书
WS-160A WS-160A
两用 单相 220
单相 220/380
50
WS-180A WS-180A
两用 单相 220
单相 220/380
50
WS-200A WS-200A
两用 单相 220
单相 220/380
50
6.0
7.0
8.5
35
35
35
10-16
10-17.7
10-18
● 确认焊机正常后,按照电气连接示意图接好焊枪、焊接电缆线、气体减压流量表(简 称气压表)、气瓶等。将气压表与气瓶可靠连接,并用φ8 的耐热聚氯乙烯软管把气 压表和焊机的进气咀接好;焊机的输出负极接焊枪,正极通过焊接电缆线接到工件。
5-160
5-180
5-200
10-100
10-125
10-130
100
100
100
0.2
0.2
0.2
防护等级
IP23
WS-250A 两用 单相
220/380 50 11 35
10-20
5-250
10-200 95 0.2
WS-315A 单相 380 50 15 35
10-22.5 5-315
10-250 100 0.2
WS-160A 后面板
10.气体保护指示灯 11.电流调节开关 12.保险丝 13.风扇
14.电源线 15.进气口
-5-
3、 WS-160A(双用)、180A(双用)、200A(双用)面板示意图
1
11 12
2
10 13
3
9
16
4
8 14
SMC气缸分类
MSQB 双齿条 MSQA 双齿条
0.09 0.18 0.29 0.56 0.89 1.84 2.73 4.64 6.79 10.1 19.8 0.09 0.18 0.29 0.56 0.89 1.84 2.73 4.64
~190°
(带角度调节机能)
气爪
系列
MHZ2 MHL2 MHF2 MHK2 MHS2 MHR2 MHS3 MHR3 MHS4
-
12 16
250
150 200
20
400
250
25
500
300
32
600
-
40
800
-
50
1000
-
63
1100
-
80
1200
-
100
1300
-
*最大行程依型号而异。
叶片式
轴
轴
叶片
摆台
摆台
齿轮齿条式
轴轴
摆台
摆台
平行开闭型
方形
2爪
圆柱形
2爪
3爪
4爪
支点开闭型
方形 2爪
高速,高频,低速,低摩擦 夹紧
行走8000km (往复次数1600万次) *试验条件请参照下表 动作状态 : 良好
外泄漏 : 5cc/min (ANR)以下 密封件 : 使用时有微小摩擦没有问题
活塞杆 : 无异常变化
测试条件 试验的气缸 缸径 行程 动作方向 使用压力 气缸速度 动作频率 环境温度 杆端负载 使用气源 给油
气缸/CA2系列 ø50 250mm 水平 0.7MPa 650mm/s 65次往返/min 室内温度 23N 空气过滤器/AF+油雾分离器/AM 不给油(润滑脂初次润滑)
AM 250高压调节器操作和维护手册说明书
Operating & Maintenance Manual AM 250 High Pressure Regulatorw w w.a m i c o.c o m2 Amico CorporationUser ResponsibilityThe information contained in this Installation, Operation and Maintenance Manual pertains only to the AM 250 High Pressure Regulator. This product will perform as described in this manual when assembled, operated, maintained and serviced in accordance with the installation instructions provided.The regulator must be checked periodically. Parts that are broken, missing, worn, distorted or contaminated must be replaced immediately. Should such repair or replacement become necessary, please contact Amico Corporation or their distributors.All regulators should not be repaired or altered without prior written or verbal approval from Amico Corporation or its distributors. Failure to comply will void all warranty on the regulator.Statements in this manual preceded by the words WARNING , CAUTION , DANGER and NOTE are of special significance. Please read these sections carefully.WARNING: Denotes steps which can prevent injury.CAUTION: Denotes steps which can prevent damage to equipment.DANGER: Denotes steps which can prevent electrical shock to equipment or to prevent serious injuryand/or death. 3Application and Uses for AM 250 SeriesDescription of the Regulator• Medium to high duty capacity• Ideal for welding and cutting applications• Compact, single stage constructionDIMENSIONS6-3/8" W x 5-1/8" H x 4-1/4" D (16.5 cm x 13 cm x 11 cm)WEIGHT2 lb. 15 oz. (1.4 kg)DESIGN/CONSTRUCTION• Ignition tested according to ENISO 10524-2• Forged brass body and housing cap• 2" (5.1 cm) gauges• Stem type seat mechanism• 2" (5.1 cm) diaphragm• External self reseating relief valve not designed to protect downstream apparatus• Sintered inlet filterPERFORMANCE• Maximum Inlet - 3000 PSIG• Maximum Delivery Range - 350 PSIG• Delivery Range - See ChartSPECIFICATION OF MATERIALS• Body - Forged Brass• Diaphragm Fabric - Reinforced Neoprene• Housing Cap - Forged Brass• Inlet Filter -BronzeAM 250 Regulator Flow Data4 Amico CorporationEquipment Set-UpFor filled or refilled cylinder set-up, the following steps should be followed:i. Support the cylinder in some manner to keep it from falling over.ii. Remove the protective dust cover (if present) from the cylinder valve.iii. Inspect the inlet and outlet of the regulator for traces of dirt, dust, oil or grease. Dirt or dust can be removed safely with a lint free cloth.Keep cylinder, cylinder valve, all equipment and connections free of oil and grease to avoid violent combustion. Use only equipment cleaned for gas service. When filled, contents will be under pressure and can vigorously accelerate combustion.If oil or grease is visible or suspected, do not use the cylinder. Inform the gas supplier of thisIf any leakage of a cylinder bottle is detected, turn the valve stem or handle clockwise until iv. Inspect the regulator for dirt, dust, oil or grease, especially in the area of the inlet connection.CONNECTING THE REGULATOR TO THE CYLINDER BOTTLEThe regulators are generally supplied with gas specific CGA nut and nipple combination that threads onto a cylinder valve or a CGA yoke type connection, which is secured to the valve by tightening of a “T” handle.FOR REGULATORS HAVING A CGA NUT AND NIPPLE INLET CONNECTIONi. Remove the protective dust cover from the inlet nut.ii. With the valve outlet facing away from you, slightly open the cylinder valve to purge any undetectable debris from the valve seat, then close the valve.iii. Thread the regulator inlet connection nut onto the cylinder valve in a clockwise direction.iv. Tighten the nut with a suitable wrench until snug to provide a leak proof connection.v. Attach accessories to regulator outlet connection as required.Use and Care When Opening the Cylinder Valvei. Before opening the cylinder bottle valve, be sure that the adjusting knob of the regulator is in the off position.This can be accomplished by turning the adjusting knob all the way out (counter-clockwise).ii. Position yourself so that the cylinder valve is between you and the regulator.IMPORTANT: For safety, never be directly in front or in back of the regulator when opening the cylinder valve.iii. SLOWLY turn the cylinder valve handle or wrench counter-clockwise to open the valve. When using the system, the cylinder valve should be open approximately one turn (360°).iv. If any hissing sound can be heard, there is a leak in the cylinder valve, regulator to cylinder connection, or in the regulator. Close the cylinder valve and open the regulator momentarily to relieve all pressure. Returnregulator to the off position. Re-tighten the regulator to cylinder and repeat the test. Should the hissingsound, continue one or more of the following conditions exist:a. The sealing washer is leaking and should be replaced. Make sure the cylinder valve is fully turned offbefore removing the regulator.b. The cylinder valve is leaking. Place the cylinder outdoors and notify the gas supplier immediately. Donot attempt to use the cylinder.c. The regulator is leaking and must be removed from service and returned for repair. Remember toalways turn the cylinder valve fully off before removing or loosening the regulator connection.FOR PRESET REGULATORSThe outlet pressure of the preset regulator has been factory preset. Do not attempt to re-adjust this setting.Note: Always verify the flow with the patient’s end of the tubing before applying. Make sure that the tubing is never folded, kinked or crushed.TURNING THE SYSTEM OFFi. With the gas still flowing, turn the cylinder valve knob or wrench off clockwise until snug.ii. Allow the gas pressure in the regulator to completely escape. The delivery gauge and high pressure gauge needle should come to rest against the stop pin when all gas has escaped from the regulator.iii. After all pressure has been relieved, turn the regulator to the off position. 5Cylinder ReplacementREMOVING THE REGULATOR FROM THE CYLINDERIt is not necessary to remove the regulator unless the cylinder is being exchanged for a new one.Note: A cylinder with less than 300 PSI showing on the high pressure gauge should be exchanged for a full cylinder to ensure an adequate supply of gas.i. Be sure the cylinder valve is closed.ii. Open the regulator momentarily to relieve all pressure before removing it from the cylinder.iii. Remove the regulator from the cylinder, loosening the inlet connection counter-clockwise.iv. Once the regulator has been removed, a replacement cylinder from your gas supplier can be put into service.Refer to the section covering EQUIPMENT SET-UP for the proper procedure to attach the regulator to thereplacement cylinder.REGULATOR CLEANINGIf cleaning of the regulator is desired, the exterior surfaces can safely be wiped off with a clean, lint-free cloth and alcohol.• Do not use or store near heat or flame.• Do not puncture the cylinder in any way.• Do not attempt to remove the cylinder valve.• Never throw the cylinder into fire or incinerate.• Keep out of reach of children.• Use only with pressure reducing equipment and apparatus designed for use with appropriategas supply.• Do not attempt to operate this equipment unless you have been trained in its proper use or areunder competent supervision.• Never change the inlet or outlet connection as these are gas specific. Interchanging is inviolation of CGA standards.Never attempt to repair any part of the regulator or cylinder valve. This equipment should be6Amico CorporationNotes 7Amico Corporation | 85 Fulton Way, Richmond HillOntario, L4B 2N4, CanadaToll Free Tel: 1.877.462.6426Toll Free Fax: 1.866.440.4986Tel: 905.764.0800Fax: 905.764.0862Email:**************APE-MANUAL-AM250-REG 08.21.2015。
SMC 产品说明书
Other SettingsSummary of Product partsSimple Setting ModeTroubleshootingNote: Specifications are subject to change without prior notice and any obligation on the part of the manufacturer.© 2015 SMC Corporation All Rights ReservedAkihabara UDX 15F, 4-14-1, Sotokanda, Chiyoda-ku, Tokyo 101-0021, JAPANPhone: +81 3-5207-8249 Fax: +81 3-5298-5362URL Specifications/Outline with Dimensions (in mm)Refer to the product catalogue or SMC website (URL ) formore information about the product specifications and outline dimensions.PS※※-OMS0008-A InstallationMounting with bracketMount the bracket to the body with mounting screws (Self tapping screws:Nominal size 3 x 8L (2 pcs)), then set the body to the specified position.∗: Tighten the bracket mounting screws to a torque of 0.5±0.05 Nm.Self tapping screws are used, and should not be re-used several times.∗: The panel mount adapter can be rotated through 90 degrees for mounting.•Bracket A (Part No.: ZS-46-A1)•Bracket B (Part No.: ZS-46-A2)Mounting with panel mount adapterMount part (a) to the front of the body and fix it. Then insert the body with (a)into the panel until (a) comes into contact with the panel front surface. Next,WiringWiring connectionsConnections should be made with the power supply turned off.Use a separate route for the product wiring and any power or high voltagewiring. Otherwise, malfunction may result due to noise.If a commercially available switching power supply is used, be sure toground the frame ground (FG) terminal. If the switching power supply isconnected for use, switching noise will be superimposed and it will not beable to meet the product specifications. In that case, insert a noise filtersuch as a line noise filter/ferrite between the switching power supplies orchange the switching power supply to the series power supply.How to use connectorstraight out.OUT1NCNCDC(-)PipingTightening the connection threadFor connecting to the body (piping specification: -M5)After hand tightening, apply a spanner of the correctsize to the spanner flats of the piping body, and tightenwith a 1/6 to 1/4 rotation.As a reference, the tightening torque is 1 to 1.5 Nm.(When replacing the piping adapter ZS-39-N∗, tighten itusing the same method.)Piping specification: -01, -N01After hand tightening, hold the hexagonal spanner flatsof the pressure port with a spanner, and tighten with 2 to3 rotations.As a reference, the tightening torque is 3 to 5 Nm.When tightening, do not hold the Z/ISE20 body with aspanner.Default settingsWhen the pressure exceedsthe set value, the switch will beturned on. When the pressurefalls below the set value by theamount of hysteresis or more,the switch will be turned off.The default setting is to turn onthe pressure switch when thepressure reaches the centre of the atmospheric pressure and upper limit of therated pressure range. If this condition, shown to the right, is acceptable, then keepthese settings.Error indication functionThis function is to display error location and content when a problem or error has occurred.than above are displayed, please contact SMC.Refer to the SMC website (URL ) for more informationabout troubleshooting.button between1 and 3 sec.button between3 and 5 sec.∗:The outputs will continue to operate during setting.∗:If a button operation is not performed for 3 seconds during the setting, the display will flash.(This is to prevent the setting from remaining incomplete if, for instance, an operator were to leaveduring setting.)∗:3 step setting mode, simple setting mode and function selection mode settings are reflected eachother.[3 step setting mode (hysteresis mode)]orsetting can be changed in the same way.button once when the item toThe set value on the sub display (right) willstart flashing.orbutton and can be reduced withbutton.buttons are pressed and held simultaneously for 1second or longer, the set value is displayed as [- - -], and the set value will bethe same as the current pressure value automatically (snap shot function).button.button to complete the setting.The Pressure switch turns on within a set pressure range (from P1L to P1H) duringwindow comparator mode.Set P1L, the lower limit of the switch operation, and P1H, the upper limit of theswitch operation and WH1 (hysteresis) following the instructions given above.(When reversed output is selected, the sub display (left) shows [n1L] and [n1H].)∗:Setting of the normal/reverse output switching and hysteresis/window comparator modeswitching are performed with the function selection mode [F 1] OUT1 setting.valuePeak/bottom value indicationbutton inmeasurement mode.Snap shot functionbuttons for 1second or longer simultaneously. Then, the set value of the sub display (right)shows [- - -], and the values corresponding to the current pressure values areautomatically displayed.Zero-clear functionbuttons are pressed for 1 secondor longer simultaneously, the main display shows [- - -], and the reset to zero.The display returns to measurement mode automatically.Key-lock functionTo set each of these functions, refer to the SMC website(URL ) for more detailed information, or contact SMC.button between 1 and 3 seconds inmeasurement mode. [SEt] is displayed on the main display. Whenthe button is released while in the [SEt] display, the current pressurevalue is displayed on the main display, [P_1] or [n_1] is displayed onthe sub display (left), and the set value is displayed on the subdisplay (right) (Flashing).or button to set the(The snap shot function can be used.)or button to set the(The snap shot function can be used.)or button, the delay time of the switch output can be selected.button for 2 seconds or longer to complete the OUT1 setting.∗:If the button is pressed for less than 2 seconds, the setting will be returned to P_1.In the window comparator mode, set P1L, the lower limit of the switch operation,and P1H, the upper limit of the switch operation, WH1 (hysteresis) and dt1 (delaytime) following the instructions given above.(When reversed output is selected, the sub display (left) shows [n1L] and [n1H].)Function selection modebutton between 3 and 5seconds, to display [F 0]. Select todisplay the function to be changed[F]. Press and hold the buttonfor 2 seconds or longer in functionselection mode to return tomeasurement mode.∗:Some products do not have all the functions. If no function is available or selected due toconfiguration of other functions, [- - -] is displayed on the sub display (right).Names of individual partsRefer to the product catalogue or SMC website (URL )for more information about panel cut-out and mounting hole dimensions.Pressure Setting3 Step Setting Mode(URL ) for more detailed information, or contact SMC.MaintenanceHow to reset the product after a power cut or forcible de-energizingThe setting of the product will be retained as it was before a power cut orde-energizing. The output condition is also basically recovered to that before apower cut or de-energizing, but may change depending on the operatingenvironment. Therefore, check the safety of the whole installation before operatingthe product. If the installation is using accurate control, wait until the product haswarmed up (approximately 10 to 15 minutes).Safety InstructionsBefore UseDigital Pressure SwitchZSE20(F)/ISE20Thank you for purchasing an SMC ZSE20(F)/ISE20 Series Digital PressureSwitch.Please read this manual carefully before operating the product and make sure youunderstand its capabilities and limitations. Please keep this manual handy forfuture reference.Safety InstructionsThese safety instructions are intended to prevent hazardous situations and/orequipment damage.These instructions indicate the level of potential hazard with the labels of"Caution", "Warning" or "Danger". They are all important notes for safety and mustbe followed in addition to International standards (ISO/IEC) and other safetyregulations.OperatorSwitch ONAt normal output Switch OFFSet valueP_1HysteresisH_1TimePressureOther parameter settingsDefault settingThe default setting is as follows.If no problem is caused by thissetting, keep these settings.。