Bluetooth portable RFID reader users Manual
蓝牙4.0技术在智慧图书馆的应用

人类的智慧相互结合,赋予传统图书馆智、大、云和
确定位图书馆内的资源,实现资源整合和精确推送
物的特征,也就是智慧(Artificial Intelligence)、大数
等能力。比如智能图书馆中引进了 RFID 技术,通
李雪虹:
蓝牙 4.0 技术在智慧图书馆的应用
第 2 期
89
南京理工大学建设的图书馆占地面积超过45 000 m2,
的重要性,纷纷开发出微信公众号或者是小程序,
定位 M 点,
其计算方式如式(1)所示。
主动地向读者推荐信息。在智慧图书馆中,只要读
(x
ì - x A)+ (y - y A)= r
ï
2
2
2
(x
í - x B)+ (y - y B)= r b
ï
2
2
2
(x
î - xC)+ (y - yC)= r c
2
3.2
置信息的定位服务,可以帮助使用者实时获取位置
信息、周边环境信息、信息推送和路径导航等信息,
定性的蓝牙 4.0。
在常规情况下,0.6~1.2 ms 蓝牙通讯的方法需
要使用 16~32 个通信通道连接不同的通讯设备,因
此蓝牙设备即便是在待机状态也有非常高的能
耗。对于蓝牙 4.0 来说其通信所需要的信道数量相
势,因此,这类设备开始应用在特殊场景中。另外,
其信号的传递范围可以达到毫米级,
最大可达 50 m。
1.2
BLE 协议介绍
从通讯协议上看,蓝牙 4.0 使用 BLE 协议栈,
其中有控制器和主机 2 个部分。L2CAP 上部主要
是主机端,HCI 层之下的部分被称为控制层。自下
蓝牙便携式读卡器说明书
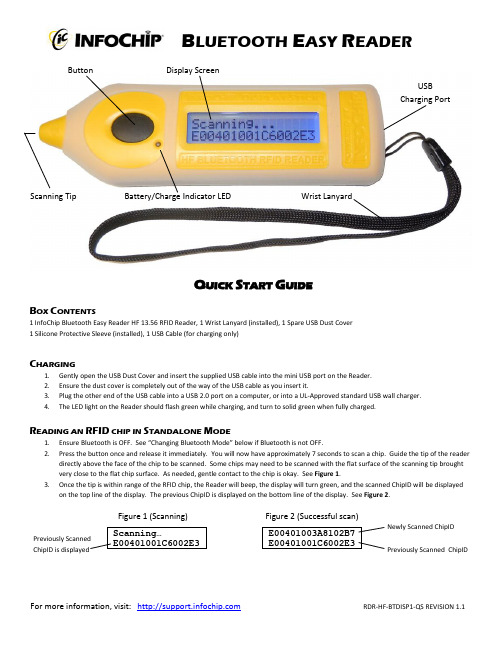
B LUETOOTH E ASY R EADERB OXC ONTENTS1 InfoChip Bluetooth Easy Reader HF 13.56 RFID Reader, 1 Wrist Lanyard (installed), 1 Spare USB Dust Cover 1 Silicone Protective Sleeve (installed), 1 USB Cable (for charging only)C HARGING1. Gently open the USB Dust Cover and insert the supplied USB cable into the mini USB port on the Reader.2. Ensure the dust cover is completely out of the way of the USB cable as you insert it.3. Plug the other end of the USB cable into a USB 2.0 port on a computer, or into a UL-Approved standard USB wall charger.4.The LED light on the Reader should flash green while charging, and turn to solid green when fully charged.R EADING AN RFID CHIP IN S TANDALONE M ODE1. Ensure Bluetooth is OFF. See “Changing Bluetooth Mode” below if Bluetooth is not OFF.2. Press the button once and release it immediately. You will now have approximately 7 seconds to scan a chip. Guide the tip of the readerdirectly above the face of the chip to be scanned. Some chips may need to be scanned with the flat surface of the scanning tip brought very close to the flat chip surface. As needed, gentle contact to the chip is okay. See Figure 1.3. Once the tip is within range of the RFID chip, the Reader will beep, the display will turn green, and the scanned ChipID will be displayedon the top line of the display. The previous ChipID is displayed on the bottom line of the display. See Figure 2.Figure 1 (Scanning)Figure 2 (Successful scan)ButtonBattery/Charge Indicator LED Display ScreenScanning TipWrist LanyardUSB Charging PortQ UICK S TART G UIDENewly Scanned ChipID Previously Scanned ChipIDFor more information, visit: RDR-HF-BTDISP1-QS REVISION 1.1T URNING B LUETOOTH O N AND O FF1. Press and Hold the button until the menu appears, then release the button. See Figure 3.2. Click and Release the button repeatedly until the Bluetooth ON/OFF page is displayed. See Figure 4.3. Now Press and Hold the button to toggle the Bluetooth setting ON or OFF. When Bluetooth is ON, more Bluetooth menu options will beavailable. See Figure 5.Figure 3 (Menu)Figure 4 (Bluetooth OFF) Figure 5 (Bluetooth ON)P RACTICE E NTERING P AIRING C ODES (PIN S )When pairing to a host device, the host device may ask you to enter a pairing code or PIN from 4 to 8 digits in length. Generally you have about 30 seconds to enter this PIN on the Reader. This can be difficult initially, but becomes easy with some practice. We have provided a Practice PIN menu option that will allow you to enter random pairing codes so you can familiarize yourself with the metho d. Let’s practice entering “7654”.1. To get into Practice PIN mode, Press and Hold the button until the menu appears. Then Click and Release the button repeatedly until thePractice PIN menu option is displayed. See Figure 10.2. Press and Hold to enter the Practice Pin mode. (The first digit 0 appears). To change the first digit, click and release the button quicklyand repeatedly (this is called a Short Press) until the desired digit “7” is displayed. See Figure 11.3. To move to the next digit, press and hold the button for more than 0.5 seconds but less than 1 second. This is called a Medium Press.The 2nddigit will show “0”. Short Press until the desired digit “6” is displayed. See Figure 12.4. Medium Press to move to the 3rd digit, then Short Press to until “5” is displayed. Medium Press to move to the 4thdigit, then Short Pressrepeatedly until the desired digit “4” is displayed. See Figure 13.5. Now that your desired “7654” PIN is shown, use a Long Press (press and hold) until the code is accepted. Keep experimenting until youare familiar with the method of entering PINs.Figure 10 (Practice PIN) Figure 11 Figure 12 Figure 13P AIRING TO AH OST D EVICE(P HONE /HANDHELD /L APTOP )The InfoChip Bluetooth Easy RFID Reader appears and acts as a Bluetooth keyboard. It can pair to most devices that accept the Bluetooth keyboard profile without driver software. If you are not in the menu system already, Press and hold the button until the menu appears, then release it.1. Click and Release the button repeatedly to scroll through the menu options. Stop when you arrive at the screen labeled Pair as Keyboard .See Figure 6.2. Press and Hold the button to set the Reader into pairing mode, which should cause the display to flash, indicating the Reader is ready topair. See Figure 7. Now turn on Bluetooth on your host device and begin searching for a device to pair with. Please refer to your device’s manual for instructions on how to turn its B luetooth on and how to place it into pairing mode.3. Once your host device finds the InfoChip keyboard, select it for pairing. Your host device should ask you to enter a pairing code on theReader, which you will have approximately 25 seconds to accomplish. See Figure 8. Please see the section “Practice Entering Pairing Codes ” to successfully accomplish this step. Once you have entered that pairing code successfully on the Reader in the allotted time, the pairing process is complete. See Figure 9. Exit the menu and now your host device should be ready to accept scanned ChipIDs from the Reader. If you did not complete the pairing successfully your device will tell you, and you must repeat steps 1 to 3 above until successful.Figure 6 (Pair as Keyboard) Figure 7 (Pairing) Figure 8 (Pairing PIN) Figure 9 (Pairing Complete)R EADING A C HIP W HILE C ONNECTED TO A H OST D EVICE1. Ensure Bluetooth is turned ON.2. Ensure the Reader has been paired successfully to your host device using the instructions above.3. On your host device, start any application that accepts text input (such as Notes, Email, etc).4.Short Press the button on the Reader. The Reader’s display should read “Bluetooth Trying To Connect” and it should quickly find your host device, at which time the Reader will begin flashing and beeping and trying to scan a chip. You now have approximately 7 seconds to place the tip of the Reader up to the face of the chip to be read. In doing so, the unique ChipID of the scanned chip (which should be similar to E004010014F25431) will be entered at the active cursor location of the host device.For more information, visit: RDR-HF-BTDISP1-QS REVISION 1.1。
远距离蓝牙读卡器说明书

远距离蓝牙读卡器说明书篇一:蓝牙远距离读卡器说明书全部智慧为您所用第共10页1页--智能停车场-- 专用远距离读卡器蓝牙远距离读卡器优势:1. 光激励、CDMA、休眠唤醒、蓝牙通信、CPU自动识别等高新技术结晶2. 读卡速度快,读卡距离远,具有良好的方向性,读卡距离可控制。
10-40公里时速可不停车读卡3. 穿透车辆防护膜(如防暴膜)影响,适用于所有车辆全部智慧为您所用第共10页2页4. 不停车,不开窗读卡;恶劣的天气读卡不受车窗外的风雪雷雨影响5. 不停车读卡,大大提高车流通过量,交通高峰期不再有堵车排长龙现象,为你节省燃油费用。
6. 读写器相互之间无干扰(采用先进的蓝牙通信技术与CDMA技术、CPU自动识别),方向性好,有效解决前后左右车道互扰问题蓝牙电子标签优势1. 抗干扰CPU电子标签,具有自动识别多车道功能(国内首创、技术领先)2. 先进的休眠唤醒、低功耗模式,保证电池使用寿命3年以上(技术领先)3. 电子标签采用CDMA 技术,杜绝进出口干扰问题4. 成熟的IC卡(ISO1433A标准)远距离读写技术设备研发生产商、一卡通远距离识别方案生产商5. 成熟的ID 薄卡,EM厚卡远距离读写技术设备研发生产商、一卡通远距离识别方案生产商6. 技术先进的蓝牙电子标签加密技术,可为客户提供加密服务,保护客户的利益停车近距离刷卡以满足不了生活的节奏,近距离刷卡有那些不足呢?1. 由于施工也现场的因素,造成业主刷卡困难需摆正车位方可刷卡,有时借助保安才能刷到卡。
2. 早晚上下班都是车流的高期,业主需要排队刷卡造成堵车排长龙现象。
全部智慧为您所用第共10页3页3. 排队刷卡,增加汽车尾汽的排放,增加汽车油耗。
4. 排队刷卡需增加保安人员协助,增加了物业的管理费用,无法达到无人值守停车场。
远距离蓝牙概述随着21世纪社会经济的迅速发展,人们生活的节奏更加快,对生活的质量也要要求更高。
近年来,无线移动通信的发展日新月异,新技术也层出不穷。
iHome iDM8 Bluetooth 耳机说明书

co-located or operating in conjunction with any other antenna or transmitter.
This Device complies with RSS-102 of the IC Rules; Operation is subject to the following two conditions: (1) This device may not cause harmful interference and (2) This device must accept any interference received, including interference that may cause undesired operation.
This device complies with Part 15 of the FCC Rules, operation is subject to the following two conditions: (1) This device may not cause harmful interference, and (2) this device must accept any interference received, including interference that may cause undesired operation.
protective material should be placed between it and the furniture. • Clean your unit with a soft cloth moistened only with mild soap and water. Stronger cleaning agents,
倍福RFID读写器手册说明书
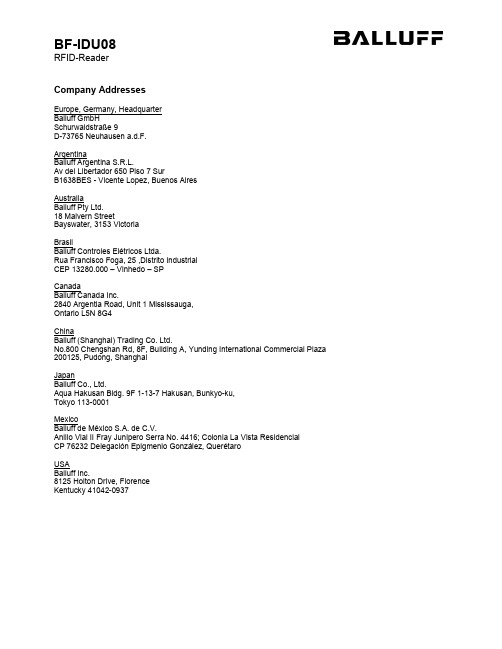
Company AddressesEurope, Germany, HeadquarterBalluff GmbHSchurwaldstraße 9D-73765 Neuhausen a.d.F.ArgentinaBalluff Argentina S.R.L.Av del Libertador 650 Piso 7 SurB1638BES - Vicente Lopez, Buenos AiresAustraliaBalluff Pty Ltd.18 Malvern StreetBayswater, 3153 VictoriaBrasilBalluff Controles Elétricos Ltda.Rua Francisco Foga, 25 ,Distrito IndustrialCEP 13280.000 – Vinhedo – SPCanadaBalluff Canada Inc.2840 Argentia Road, Unit 1 Mississauga,Ontario L5N 8G4ChinaBalluff (Shanghai) Trading Co. Ltd.No.800 Chengshan Rd, 8F, Building A, Yunding International Commercial Plaza 200125, Pudong, ShanghaiJapanBalluff Co., Ltd.Aqua Hakusan Bldg. 9F 1-13-7 Hakusan, Bunkyo-ku,Tokyo 113-0001MexicoBalluff de México S.A. de C.V.Anillo Vial II Fray Junipero Serra No. 4416; Colonia La Vista ResidencialCP 76232 Delegación Epigmenio González, QuerétaroUSABalluff Inc.8125 Holton Drive, FlorenceKentucky 41042-0937Operating GuidePurpose of the DeviceThe BF-IDU08 device is intended to read and write "EPC Global Class 1 Gen2" compliant data carriers (so called tags) via country dependent UHF radio frequencies.Check that you have the right device variantThis UHF system consists of a radio frequency unit and an integrated antenna according to specifications and may only be operated within the specified countries subject to all applicable national legal regulations and standards.Check that the type label contains the correct type of approval symbol for your country.► When using the UHF system in the European Community, the provisions in ETSI standard 302 208 apply.► When using the UHF system in the USA, the directives of the FCC, Part 15 B and 15 C, apply.► When using the UHF system in Canada, the directives of the IC, RSS-210 apply.► When using the UHF system in China, the directives of the RFID National Standard and GB 9254 apply.This device complies with Part 15 of the FCC Rules. Operation is subject to the following two conditions:(1) This device may not cause harmful interference, and(2) This device must accept any interference received, including interference that may cause undesired operation.Connecting the DeviceThe BF-IDU08 device has to be connected to one of the IO-Link-Device ports of an IO-Link-Master unit via standard 4-wire cable with M12 industry connectors (A-coded). The IO-Link-Master unit provides power supply and controls the device over its IO-Link interface connection.Figure 1: System overviewThe IO-Link-Master unit itself needs to be connected to a power supply and the customer's PLC unit. For further information, please refer to the user manual of the used IO-Link-Master unit. MountingBefore operating the device has to be mounted with the provided M30 nuts or other suitable fixtures, Figure 2. Optional mounting fixtures are available at .The BF-IDU08 device may be mounted in any direction, the operating direction of the integrated antenna is towards the length axis of the BF-IDU08 device as displayed in Figure 1 (direction towards the UHF-Tags).Figure 2: BF-IDU08 mounted on metal carrier using 2 x Nut M30The antennas of the identification system BIS U transmit ultra-high frequency electromagnetic waves. People should not remain within the near enclosure of the UHF antenna over long time periods (several hours). The mounting position of the BF-IDU08 should take respect to a clearance area of about 25cm to workplaces.Setup and OperationThe BF-IDU08 device will operate when connected to an IO-Link-Master that provides power supply and implements the BF-IDU08 RFID-Reader protocol.Device behavior e.g. transmission power or operating modes can be setup via different parameters. Protocol description and available parameters are described in the firmware configuration manual.Status IndicatorsThe device will show its status using RGB LEDs located at the M12 plug. Depending on the device state the LED changes color and lighting mode (static, blink slow, blink fast).Electrical DataMechanical Data。
Philips 手持无线麦克风蓝牙音响说明书

PhilipsWireless speaker5 m wireless micsmart Bluetooth pairing6 hours play time105x105x38 mm Array TAS4405NSing it loudLet them take center stage with the colorful Bluetooth speaker that features a wirelessmic! From songs to stories to class presentations, one-touch recording lets kids lay downtracks with ease. You get clear sound and 6 hours play time.The microphone is all yours•Sing it. Say it. Love it!•1.5" full-range driver. Clear sound•Wireless mic. Sing along, and record to micro SD card•6 hours play time. 2.5 hours charge timePerform anywhere•Playtime made easy•Easy to carry. Dimensions: 105x105x38 mm•Play/pause, volume up/down, record, and source buttons•Up to 10 m wireless rangeEasy to pair. Easy to charge.•Smart Bluetooth pairing•Ready to pair with a long press of the play/pause button•USB charging. Micro USB cable includedIssue date 2022-05-09Version: 5.0.212 NC: 8670 001 66208UPC: 8 40063 20083 8© 2022 Koninklijke Philips N.V.All Rights reserved.Specifications are subject to change without notice. Trademarks are the property of Koninklijke Philips N.V. or their respective SpecificationsWireless speaker5 m wireless mic smart Bluetooth pairing,6 hours play time, 105x105x38 mmHighlightsSing it. Say it. Love it!This ultra-portable Bluetooth speaker features a wireless mic. Kids can sing along to their music, tell stories, or even act out made-up movie scenes with their friends! Whatever they choose to perform, one-touch recording makes it easy for them to lay down their tracks on a micro SD card.Playtime made easyYou get 6 hours play time, and a full charge takes 2.5 hours. Charging is via micro USB. Five clearly labeled buttons make it easy for kids to play, pause, control volume, switch source, and record.Smart Bluetooth pairingOne long press of the play/pause button gets this wireless Bluetooth speaker ready to pair. Once paired, the speaker remembers the last device it was paired with. Wireless range of the speaker is 10 m.Compatibility•Android tablets & smartphones: with Android 2.1 and Bluetooth 2.1 or aboveSound•Output power (RMS): 3W •Sound System:Mono•Bass enhancement: Bass reflexLoudspeakers•Speaker driver: 1 x 1.5" full rangeAudio Playback •Playback Media: Micro SD card (not included)Connectivity•Bluetooth profiles: A2DP, AVRCP •Bluetooth range: 10M (free space)•Bluetooth version: 4.2•Microphone: Wireless microphone•supports microSD card: Yes, up to 32GBConvenience•Volume control: Digital up/down•Microphone: External, 2xAAA alkaline (not included), RF range: 5m•Instant one-touch recording: Yes, to micro SD card•Ease of Installation: Automatic pairingPower•Power LED indicator:Green•Battery type: Lithium-ion (built-in)•Battery Capacity: 1500mAh •Operating time on battery: 6 hr •Charging time: 2.5 hr•Recording LED indicator: RedAccessories•Cable: USB charging cable•Included accessories: Quick install guide, Safety warranty sheet, World Wide Warranty leafletDimensions•Main Unit (W x H x D): 105 x 105 x 38 mm •Weight: 0.25 kg•Set dimensions (with mic): 128.8 x 130.7 x 38 mm。
基于蓝牙的手持式RFID读写器设计及智能仓储管理应用
分类号密级公开UDC注1学位论文基于蓝牙的手持式RFID读写器设计及智能仓储管理应用(题名和副题名)张安(作者姓名)指导教师徐军、教授、电子科技大学王磊、高级工程师、创度软件科技有限公司(姓名、职称、单位名称)申请学位级别硕士专业学位类别工程硕士工程领域名称软件工程提交论文日期2014年9月15日论文答辩日期2014年11月28日学位授予单位和日期电子科技大学2015年12月25日答辩委员会主席评阅人、、注1:注明《国际十进分类法UDC》的类号。
Portable RFID Reader&Writer Based on Bluetooth: Design Principles and Practical Applications onIntelligent Storage SystemA Master Thesis Submitted toUniversity of Electronic Science and Technology of ChinaMajor:Master of EngineeringAuthor:An ZHANGAdvisor:Jun XUSchool:School of Physical Electronics独创性声明本人声明所呈交的学位论文是本人在导师指导下进行的研究工作及取得的研究成果。
据我所知,除了文中特别加以标注和致谢的地方外,论文中不包含其他人已经发表或撰写过的研究成果,也不包含为获得电子科技大学或其它教育机构的学位或证书而使用过的材料。
与我一同工作的同志对本研究所做的任何贡献均已在论文中作了明确的说明并表示谢意。
作者签名:日期:年月日论文使用授权本学位论文作者完全了解电子科技大学有关保留、使用学位论文的规定,有权保留并向国家有关部门或机构送交论文的复印件和磁盘,允许论文被查阅和借阅。
本人授权电子科技大学可以将学位论文的全部或部分内容编入有关数据库进行检索,可以采用影印、缩印或扫描等复制手段保存、汇编学位论文。
蓝牙读卡器测试实训报告

一、实训目的本次实训旨在通过对蓝牙读卡器的操作和使用,了解蓝牙读卡器的基本工作原理,掌握其与移动设备连接、数据读取以及在实际应用场景中的表现。
通过本次实训,提升学生对无线通信技术在实际应用中的理解和应用能力。
二、实训器材1. 蓝牙读卡器:HX9816U-BT蓝牙超高频RFID读卡器2. 移动设备:安卓智能手机3. RFID标签:ISO18000-6C /6B 超高频RFID标签4. 测试软件:UHFReader816UBT三、实训步骤1. 准备工作(1)确保HX9816U-BT蓝牙超高频RFID读卡器开机,观察指示灯是否闪烁。
(2)将ISO18000-6C /6B 超高频RFID标签放置在HX9816U-BT蓝牙超高频RFID 读卡器感应范围内。
(3)在安卓智能手机上安装UHFReader816UBT测试软件。
2. 连接设备(1)打开UHFReader816UBT测试软件,进入操作界面。
(2)点击“设备搜索”按键,软件通过手机蓝牙自动搜索周边的蓝牙设备。
(3)在搜索结果中找到HX9816U-BT蓝牙超高频RFID读卡器的蓝牙名称(如HXA032),点击“联机”进入设置界面。
3. 设置参数(1)在设置界面中,根据实际需求设置工作频段、最小频点、最大频点和功率。
(2)注意功率设置,功率越小,感应距离越短。
4. 自动读卡测试(1)点击“EPCC1-G2”进入自动读卡测试界面。
(2)HX9816U-BT蓝牙超高频RFID读卡器自动感应,提交ISO18000-6C /6B 超高频RFID标签的EPC号。
(3)观察软件界面,记录读取次数。
5. 实际应用测试(1)在实名认证场景下,如开卡、联通、电信业务办理等,使用蓝牙读卡器进行身份认证。
(2)测试读卡速度,观察蓝牙读卡器在实际应用中的稳定性。
四、实训结果与分析1. 连接测试通过蓝牙连接,成功将HX9816U-BT蓝牙超高频RFID读卡器与安卓智能手机连接,实现数据读取功能。
- 1、下载文档前请自行甄别文档内容的完整性,平台不提供额外的编辑、内容补充、找答案等附加服务。
- 2、"仅部分预览"的文档,不可在线预览部分如存在完整性等问题,可反馈申请退款(可完整预览的文档不适用该条件!)。
- 3、如文档侵犯您的权益,请联系客服反馈,我们会尽快为您处理(人工客服工作时间:9:00-18:30)。
Bluetooth portable RFID reader users ManualRS-9 Rev.C一.Product introductionThis product is designed to expand read/write operating functions of RFID tags for PDAs, smartphones and other handheld devices. The RFID reader adopts Bluetooth wireless data transmission to transmit data with handheld devices, it can be plugged into any PCs, PDAs or smartphones and other handheld devices with built-in Bluetooth communication without the limitation of wired interface of the equipment. Customizable one-touch scanning feature leads to fast and easy operation, suitable for portable applications. This product fully offers RFID read/write capabilities on HF RFID tags which comply with ISO 15693, ISO 18000-3, ISO 14443A/B/C and other standard protocols. protocols.1.Power LED2.RFID LED LED3.Bluetooth LED4.Recharge LED5.Power switch6.Trigger button7.Mini USB interface8.Buzzer9.Hang rope hole10.Antenna1.Power LED:Power on the device, the LED lights. The LED is red2.RFID Operation LED:When the reader antenna RF signal is opened, you can operate the RFID tagincluding finding cards, reading and writing and other operations, the LED lights, the LED is green.3.Bluetooth State LED:Used to indicate reader Bluetooth wireless working condition. As a portablereader, after the power switch is switched on, the Bluetooth wirelesscommunication of the reader get into the state of looking for networkautomatically, then the Bluetooth LED continuously flashes. When the host binds with the reader, the Bluetooth LED LED continued to LED up. The LED is blue. 4.Charge State LED: When the reader is connected with the host using the USBcable, the battery of the reader is recharged. In the process of recharging, the Charge State LED lights. When the recharging is completed, Charge State LED is turns off. In case of a battery or charging failure, Charge State LED flashes and the LED color is orange5.Power Switch:In the portable use, the switch is used to control the reader power switch. When the reader is connected with the host using USB cable, the reader willautomatically enter open-state and automatically shut down the Bluetoothcommunication function, not affected by this switch control.6.Trigger buttons:When the reader works in one-touch trigger state, the reader waits for the user press the button to trigger the next operation after the command is given. The function of the trigger button on the front of the reader plays the same role with the button on the flank.7.Mini USB interfaceUSB reader provides a interface to connect with a host PC. Not only through it you can recharge but also the reader can be controlled by the host PC as adesktop reader.8.Hang rope hole:This hole can be tied lanyard for easy carrying reader to use.9.Buzzer:Reader built-in buzzer can be show the state of the reader combined with the indicator LED.10.Reader Antenna surface:Internal antenna is designed inside the back shell, in order to achieve better R&W effect.Please close the back shell of the reader to the tag when you read the tag.二.Reader UsingCharging●The reader uses lithium polymer battery which may be charged through the USBinterface of a PC. As long as the reader is connected to a PC through the Mini USB cable, the built-in battery began to charge. When charging, the yellow LED light keeps lighting. Charging end, the yellow LED light goes out.●Whihout a PC as the charging power supplyer for the reader, you can purchase aUSB charging adapter charger of DC5V specifications with the supply current greater than 200mA.●Charging time varies according to the battery status. It’s recommended that thebattery is charged without the reader in use, which is to ensure that the battery is in normal operation condition. It needs close to 1 hour to fully charge the battery.Low-power Instruction●If the battery power is low when the reader is in use, the red LED indicator lightconstantly flashes accompanied by alarm sound “bu, bu, bu”. If this occurs, it is recommended to charge the battery.Some Suggestions for Extending the Using Time of Battery●Built in rechargeable polymer lithium-ion battery, the reader may work for 8hours in the normal state with a single charge. To enable the reader work better continuously, it is recommended to note the following points:●When the reader is not in use, switch off the reader power.●As the Bluetooth communication consumes more power in network searchingstate (the Bluetooth status indicator flashes) than in connecting state (the Bluetooth status indicator keeps lighting), it is recommended to open the Bluetooth bindings generated string mouth on the host as soon as the readerpower is swithed on, which allows the reader enter the Bluetooth connecting state with the host. In the idle interval of using, if it’s inconvenient to switch off the reader power, you can keep the reader in connecting state, which is more energy-efficient compared to disconnect the Bluetooth connection.●When the reader opens the antenna RF field and operations on RFID tag, itproduces the greatest current consumption. Therefore it is recommended to close the antenna RF field after the operation on RFID tag each time, which makes the related RFID units of the eader into sleep state.Some functions provided by this reader SDK can close RF field by themselves after operations.The operations whithout this function can call into the standby function after it is completed. Further details can refere to SDK Programming Guide.Basic Modes of Operation on RFID Tag●Implementing immediately: the reader immediately executes the commandsreceived from the host and returns results of the implementation.●Implementing after button pressed: the reader waits for the operator to pressthe executing button on the reader after receiving the host commands. when the button is pressed, the reader continues executing the commands and returns the response data.●Implementing after the reader closed to tag: received the host commands, thereader begins to wait for the operator to take it near the electronic tag (RFID TAG). When the reader is close enough away from the electronic tags (i.e. tag into the reader antennas field), the reader continues the implementation of commands and returns the response data.Note: In the waiting process, if the reader receives any serial data sent from the host, it immediately breaks off waiting and complets the execution of instructions. Reader Gripping MethodsSchematic Diagram of Vertical Gripping Method Schematic Diagram of HorizontalGripping Method●When Reader is used, the back of fuselage shell should be near to the operatedRFID tag. The two kinds of gripping methods,"vertical gripping" and "horizontal gripping ", may be used as shown in the following diagrams.●In the "vertical gripping" mode, the thumb can be used easily pressing "readertrigger button" on the front of the fuselage; In the "horizontal gripping" mode, the middle finger can be used pressing "reader trigger button." on the side of the fuselage.●In general, the two kinds of gripping have no difference in the use. In theoccasions that the reader needs to be very close to the operated electronic tags, " horizontal gripping" approach is proposed.三.Connect with the Reader and host via Bluetooth wirelessFirst connect this device with the pocket PC, PDA, smart phones and other handheld devices via Bluetooth wireless, it should be binding for Bluetooth operation. Follow these steps:●Open the power sweep of thereader and handheld devices;●Click the "Start" on the handhelddevice and then push the"Settings" to enter the setupinterface;●Click on "Bluetooth" icon to enter the Bluetooth device settings interface;●Click the "Open Bluetooth";●Select "Device" menu and enter tonew device adding interface;●Click the "Add new device" toactivate the Bluetooth devicesearch;●After the completion of the searchappliance, the Bluetooth devicesthat can be found beside the smartphone will be listed in the devicelist; Then, select a device (theBluetooth portable RFID readerdevices) named with "RS-9" at thebeginning in the device list and click the "Next Step";●Type the universal connectionpassword "1234" in the "Enterpassword" text box, and click on"Next Step" (All of the BluetoothRFID readers use the same "1234" asa common connection password, andthis password is only set to confirmthe connecting operation in theprocess of Bluetooth deviceconnection and will not affect thesecurity of Bluetooth datatransmission);●In the interface of the "PartnershipSetting", click on the "Serial Port"and "Finish" to complete theBluetooth device adding;●Select the "COM Port" menu andclick on "New Send Port”;●Select the device name of theBluetooth RFID reader which hasbeen added, and then click the"Next Step";●Select an unoccupied serial portnumber and click the "Finish";● A virtual serial port number willappear in the port list aftercompleting the Bluetooth RFIDreader set up. In the user'sapplication, user can open theserial port to operate reader. Whenopening the serial port, user shoulduse the parameters <57600bps, 8data bits, 2 stop bits, even parity"to set up the serial port.Above process takes the smart phone Dopod D600 as example under the Windows mobile 5.0 operating system. The Bluetooth binding process of other devices may be at variance with this process. Users should refer to the user'smanual of specific equipment.。