libs reflection
hlsl 语法

hlsl 语法HLSL语法简介HLSL(High Level Shading Language)是一种用于编写着色器程序的高级语言,主要用于图形渲染和计算领域。
本文将介绍HLSL 语法的基本概念和用法。
1. 数据类型HLSL支持多种数据类型,包括标量类型(float、int、bool)、向量类型(float2、float3、float4等)、矩阵类型(float2x2、float4x4等)和结构体类型(struct)。
其中,向量类型用于表示二维、三维或四维向量,矩阵类型用于表示变换矩阵,结构体类型用于组织和管理多个变量。
2. 变量声明在HLSL中,可以使用关键字"float"、"int"、"bool"等来声明变量,并通过使用"="来进行初始化。
例如:float radius = 1.0;int numVertices = 6;bool isFinished = false;3. 控制流语句HLSL支持多种控制流语句,如条件语句(if-else语句)、循环语句(for循环、while循环)、跳转语句(break、continue、return)等。
这些语句可以根据条件来执行不同的代码块,或者重复执行一段代码。
4. 函数定义在HLSL中,可以使用关键字"void"、"float"、"int"等来定义函数,并通过参数列表来传递参数。
例如:float add(float a, float b){return a + b;}5. 内置变量和函数HLSL提供了一些内置的变量和函数,用于获取渲染管线的状态信息或执行一些常用操作。
例如,"SV_Position"变量用于表示顶点位置,"mul"函数用于矩阵相乘。
这些内置变量和函数可以在着色器程序中直接使用。
declarative_base参数

declarative_base参数declarative_base是SQLAlchemy中的一个函数,用于创建一个基类(Base class),以便后续的类可以继承该基类。
本文将介绍declarative_base函数的参数以及相关的参考内容。
1. cls:指定继承的基类。
默认情况下,指定为object。
很少需要手动指定。
2. metadata:绑定元数据。
元数据是数据库对象的描述信息,包括表名、列名、数据类型等。
默认为None,如果不指定,则需要在之后手动绑定元数据。
3. name:指定基类的名称。
默认为Base。
可以将其更改为其他名称,以适应项目的需求。
4. kwargs:可选的其他参数,可以用于传递一些配置选项。
在使用declarative_base函数时,可以根据实际需求来使用不同的参数配置。
下面是一些相关参考内容,可以帮助理解和使用declarative_base函数。
1. SQLAlchemy官方文档:SQLAlchemy官方文档对declarative_base函数进行了详细的介绍,包括参数的使用方法和作用。
可以查阅该文档以及示例代码,快速上手declarative_base函数的使用。
2. SQLAlchemy ORM Tutorial:这是一个关于SQLAlchemyORM的教程,对declarative_base函数进行了详细介绍,并提供了示例代码。
通过跟随该教程,可以了解如何使用declarative_base函数来定义ORM模型。
3. SQLAlchemy ORM Tutorial for Python Developers:这是另一个关于SQLAlchemy ORM的教程,对declarative_base函数进行了详细介绍,并提供了示例代码和解释。
通过阅读该教程,可以了解使用declarative_base函数来创建ORM模型的最佳实践。
4. Real Python - Object-Relational Mapping (ORM) in Pythonwith SQLAlchemy:这是一篇关于SQLAlchemy ORM的教程,其中提到了declarative_base函数的用法。
KEIL仿真的AGSI接口
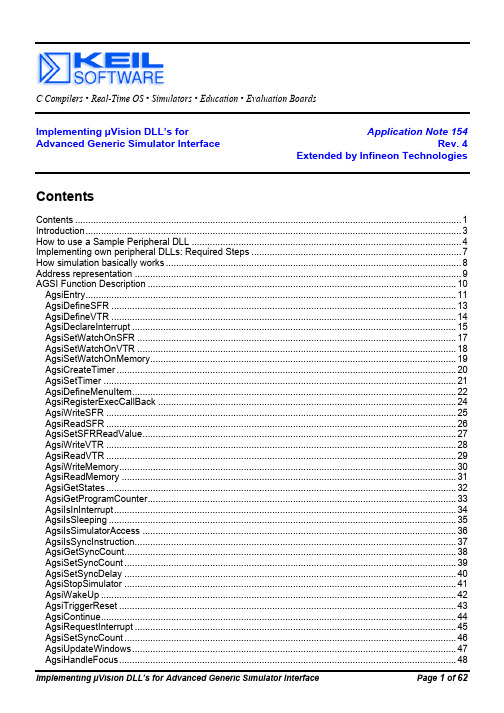
C Compilers • Real-Time OS • Simulators • Education • Evaluation BoardsImplementing µVision DLL’s for Application Note 154 Advanced Generic Simulator Interface Rev. 4Extended by Infineon TechnologiesContents Contents (1)Introduction (3)How to use a Sample Peripheral DLL (4)Implementing own peripheral DLLs: Required Steps (7)How simulation basically works (8)Address representation (9)AGSI Function Description (10)AgsiEntry (11)AgsiDefineSFR (13)AgsiDefineVTR (14)AgsiDeclareInterrupt (15)AgsiSetWatchOnSFR (17)AgsiSetWatchOnVTR (18)AgsiSetWatchOnMemory (19)AgsiCreateTimer (20)AgsiSetTimer (21)AgsiDefineMenuItem (22)AgsiRegisterExecCallBack (24)AgsiWriteSFR (25)AgsiReadSFR (26)AgsiSetSFRReadValue (27)AgsiWriteVTR (28)AgsiReadVTR (29)AgsiWriteMemory (30)AgsiReadMemory (31)AgsiGetStates (32)AgsiGetProgramCounter (33)AgsiIsInInterrupt (34)AgsiIsSleeping (35)AgsiIsSimulatorAccess (36)AgsiIsSyncInstruction (37)AgsiGetSyncCount (38)AgsiSetSyncCount (39)AgsiSetSyncDelay (40)AgsiStopSimulator (41)AgsiWakeUp (42)AgsiTriggerReset (43)AgsiContinue (44)AgsiRequestInterrupt (45)AgsiSetSyncCount (46)AgsiUpdateWindows (47)AgsiHandleFocus (48)AgsiGetExternalClockRate (49)AgsiSetExternalClockRate (50)AgsiGetInternalClockRate (51)AgsiGetClockFactor (52)AgsiMessage (53)AgsiSetTargetKey (54)AgsiGetTargetKey (55)AgsiExecuteCommand (56)AgsiGetLastMemoryAddress (57)AgsiGetSymbolByName (58)AgsiGetSymbolByValue (59)Extensions by Infineon Technologies (61)Index (62)IntroductionThe µVision Debugger supports a simulator interface for implementing user-defined peripherals. This interface is called A dvanced G eneric S imulator I nterface (AGSI). The AGSI introduces a flexible and easy way for adding new user defined peripherals directly to µVision. It provides functions that are necessary to simulate the peripheral’s behavior as well as functions to display peripheral dialogs.To ease the development of a user-defined peripheral, the AGSI and a configuration framework is provided in two example projects. Only µVision version 2.21 or later supports all functions that are described in this document.AGSI Revision 3 is for µVision3 (version 3.00 or higher) and adds the following features: •AgsiEntry has new function codes (nCODE= AGSI_PRE_RESET, AGSI_CMDOUT)•The CALLBACK function for AgsiSetWatchOnSFR, AgsiSetWatchOnVTR, and AgsiSetWatchOnMemory gets now the address and access reason when it is called.AGSI DLL’s that have been developed for µVision2 can still be used with µVision3.SPeriDLLSPeriDLL, is a synonym for ‘Sample Peripheral DLL’. It is a ready to run peripheral DLL which implements a ‘A/D Converter from Analog Devices ADuC812’ as a sample peripheral. It uses most of the AGSI functions to implement this peripheral. The project consists of a MS Visual-C++ (6.0) project file and the following source files:AGSI.h: prototypes for the AGSI functions (do not modify!)SPeriDLL.h: main header file with various prototypes and definitionsSPeriDLL.cpp: main file (created by AppWizard) contains setup code and simulationPeriDialog.h: header file (created by Class Wizard) for a modeless peripheral dialogPeriDialog.cpp: implementation file for a modeless peripheral dialogAlso a simple µVision test project ‘Single A/D conversion with ADuC812’ is included in the fileS812ADC.zip which shows how to include and test the implemented peripheral.STimerDLLSTimerDLL, is a synonym for ‘Sample Timer DLL’. It is a ready to run peripheral DLL which implements a ‘Timer 3’ as a sample peripheral. As regards functionality, ‘Timer 3’ is identical to a standard 8051 Timer 1 but has different SFR addresses so that it can be loaded in addition to a ‘Timer 1’. It uses most of the AGSI functions to implement this peripheral. The project consists of a MS Visual-C++ (6.0) project file and the following source files:AGSI.h: prototypes for the AGSI functions (do not modify!)Common.h: header file with various prototypes and definitionsCommon.cpp: common support functions for AGSI and dialog functionsSTimerDLL.h: header file for STimerDLL classSTimerDLL.cpp: main file provides peripheral setup code and simulationPeriDialog.h: header file (created by Class Wizard) for a modeless peripheral dialogPeriDialog.cpp: implementation file for a modeless peripheral dialogAlso a simple µVision test project is included in the file Timer3.zip which shows how to include and test the implemented peripheral.In order to develop a peripheral, knowledge about C/C++ programming and the MS Visual-C++ 6.00 Programming Environment is required.How to use a Sample Peripheral DLLIn order to use one of the Sample Peripheral DLL’s, you must perform the steps below. The following steps are described for the SPeriDLL but the same applies for the STimerDLL:•Install µVision and the C51 Compiler on your PC.•Create a folder such as D:\Src32\SPeriDLL\•Unzip the file SPeriDLL.zip into the folder. Make sure that the ‘use folder names’ checkbox is checked since SPeriDLL uses some subfolders.•Create a folder such as C:\Keil\C51\Examples\S812ADC\•Unzip the file S812ADC.zip into the folder.•Start Visual-C, select the ‘SPeriDLL.dsw’ project file.•Select ‘Project – Settings’. Click at the ‘Debug’ tab. Browse for the ‘Executable for Debug session’. You need to select the file Uv2.Exe. It is normally in C:\Keil\Uv2 but this depends onwhere you have installed µVision.•Then click at the ‘Custom Build’ tab and write in the ‘Commands’ window the command ‘copy $(InputPath) C:\KEIL\C51\BIN\$(InputName).dll’ and write in the ‘Outputs’ window the outputfile ‘C:\KEIL\C51\BIN\$(InputName).dll’. This step is required to automatically copy the created DLL after building it in the BIN subfolder of µVision which is normally C:\KEIL\C51\BIN butdepends on where you have installed µVision. If everything is right, then the dialog should look like this:•After that, close the dialog.•Select ‘Build – Set active configuration’, choose the SPeriDLL Win32 Debug configuration. •Select ‘Build – Rebuild All’ to create the DLL.•Run µVision by pressing the F5 key. Select ‘Project – Open Project’, the Select Project dialog comes up. Select the ‘S812ADC.uv2’ project. It can be found in the folder that you havecreated and copied the project files into (normally C:\Keil\C51\Examples\S812ADC). •Select ‘Rebuild all target files’ to build the project.•Select ‘Options for Target – Debug’. Enable loading of the SPeriDLL peripheral DLL by simply adding the parameter ‘-dSPeriDLL’ to the parameter list of the ‘Dialog DLL’. The parameter format for peripheral DLL’s is ‘-dDLLName’ (DLL name without extension). Make sure that the ‘Use Simulator’ radio button is checked. If everything is right, then the dialog should look like this:•Close the dialog.•Select ‘Debug – Start/Stop Debug Session’. This will start the µVision Debugger. It initializes and loads also our SPeriDLL.dll. In the ‘Peripherals’ menu a new item should be present withthe label ‘A/D Converter’. Click on this item to open the peripheral dialog which looks like this:•Now you can single step through the code of the ‘Single A/D conversion with ADuC812’ sample and observe the behavior of the ‘A/D Converter’ peripheral and also other peripherals like ‘Port 0’ , ‘Port 2’, ‘Port 3’ and ‘Interrupt’.Note that this sample program demonstrates functionality of only a small part of the A/D Converter.Implementing own peripheral DLLs: Required StepsIn order to develop a peripheral DLL you should perform the following steps:•Start MS Visual-C++ and create a new project ‘MFC AppWizard (dll)’.•Add prototypes and definitions for the AGSI and SFR’s (S pecial F unctions R egisters) and VTR’s (V ir t ual R egisters) definitions to the main header file (*.h).•Write code for the peripheral initialization into the main file (*.cpp). This includes AGSI setup (GetFunctionPointers), declaration of peripheral menu entries and associated dialogs(DefineAllMenuEntries), declaration of SFR’s (DefineAllSFR), VTR’s (DefineAllVTREG),Watches (DefineAllWatches) and Interrupts (DefineAllInterrupts). Write also code for peripheral reset - SFR’s reset values (ResetPripheral). All this functions are called from the functionAgsiEntry() which must be exported by this peripheral DLL.•Write functions for simulation of the peripheral into the main file (these functions are triggered by the defined watches). Include also prototypes of these functions.•Create a peripheral dialog with the Resource Editor (if the dialog is required) and the associated header file (*.h) and implementation file (*.cpp) using the ‘MFC ClassWizard’. Don’tforget to set the ‘Visible’ property of the dialog and include the default buttons ‘OK’ and ‘Cancel’ and make them invisible (required for the behavior of the ESC and Enter keys). Change thedefault constructor for the dialog and add functions PeriDisp() – displays dialog, PeriUpdate() – updates display contents which calls function Update() and PeriKill() – closes the dialog. Addalso a menu definition (AGSIMENU) and a dialog definition (AGSIDLGD).•Write the code for updating the display contents into the Update() function in the dialog implementation file. This function is called automatically when an update is requested and isused to reflect the current state of the peripheral.•Add functions for dialog control item’s messages by using ‘MFC ClassWizard’. Most frequently used messages are: ON_BN_CLICKED for Buttons, ON_EN_KILLFOCUS for Edit Boxes,ON_CBN_SELCHANGE for Combo Boxes …Include also functions for the two invisible buttons ‘OK’ and ‘Cancel’.•Select ‘Project – Settings’. Click at the ‘Debug’ tab. Browse for the ‘Executable for Debug session’ and select the file Uv2.Exe. It is normally in C:\Keil\Uv2 but this depends on where you have installed µVision.•Rebuild your peripheral DLL. Then copy the DLL file to the BIN subfolder of µVision which is normally C:\KEIL\C51\BIN but depends on where you have installed µVision or use the‘Custom Build’ within MS Visual-C++ and write the command that automatically copies the DLL after rebuild (see previous description in the ‘Sample Peripheral DLL’).•Test your peripheral DLL by running µVision (press the F5 key). Select a test project and enable loading of the implemented peripheral DLL by simply adding the parameter‘−dDLLName’ (DLL name without extension) to the parameter list of the peripheral DLL (seeprevious description in the ‘Sample Peripheral DLL’).•If the implemented peripheral is running, switch into Release Mode and rebuild it. Then test the peripheral DLL again (don’t forget to copy the ‘Release DLL’ file to the BIN subfolder ofµVision).How simulation basically worksIf every simulated peripheral would be updated with every simulated CPU instruction, the performance of the simulator would be extremely low. That’s why µVision simulator uses a event driven simulation instead. Events (also called watches) are read or write accesses to special function registers (SFR), virtual register (VTR) or memory areas and when a software timer expires. The following two examples explain this in detail:Analog Digital Converter (see SPeriDLL):Let’s assume that an A/D converter has configuration register (SFR’s ADCCONx), data register (SFR’s ADCDATAx), 8 analog inputs (VTR’s AIN0-7) and one external pin (VTR CONVST) to start a conversion. The A/D converter does nothing until it is started so no functions are called to simulate it and no simulation time is consumed at this time. In order to ‘see’ when the A/D converter is configured and started, so called access watches (AgsiSetWatchOnSFR and AgsiSetWatchOnVTR) need to be set on the configuration register and on the external start pin. This is done in the function ‘DefineAllWatches’. Whenever a new value is written into the ADCCONx register or into the external start pin, the function‘AdcConv’ is called. This function has to check the configuration, reference voltages and the analog inputs in order to calculate the digital value. The digital result cannot be written into the data register at this time. A real A/D converter needs some time to sample and convert an analog voltage. In order to simulate this behavior, a software timer is set (AgsiSetTimer) which calls the function ‘AdcCompleted’ after the specified number of states. This function writes the digital value into the data register, clears the busy flag, and sets the interrupt request bit.16 Bit Timer (see STimerDLL):Even a timer does not need to update (recalculate) its values with every simulated instruction. Typically, the timer values need to be updated when the configuration changes (start/stop, prescaler value) and when the actual timer value is read. Therefore, a write access watch must be set on the configuration register and read access watches must be set on the timer register. The timer calculation function stores the time (states) in a static variable whenever it is called. With the time difference (actual states – last states) the actual timer value can be calculated. With this method, the timer values can be calculated at any time with a minimum of calculation overhead. Only the interrupt on a timer overflow cannot be handled that way. With an additional software timer (AgsiSetTimer) set to this event, the timer is recalculated with every overflow. When a overflow is detected, the interrupt request flag is set and the timer is reloaded with 0 or a specific reload value.Address representationDepending on the microcontroller family, µVision maps the different memory areas (XDATA / DATA / CODE) into one linear address range. These different memory areas are represented with the following values in the most significant byte of a 32 bit address:80166 Microcontroller: This microcontroller has a 16 Mbyte linear address space. The valid address range therefore is from 0 to 0x00FFFFFF. No different memory types are needed.8051 Microcontroller:Define Memory type Address RangeamXDATA XDATA 0x0000 – 0xFFFFamPDATA PDATA 0x0000 – 0x00FF (one page of XDATA)amDATA DATA 0x0000 – 0x00FFamIDATA IDATA 0x0000 – 0x00FF (0x00 – 0x7F = DATA)amCODE CODE 0x0000 – 0xFFFFamBANK0 Bank 0 0x0000 – 0xFFFFamBANK0 + n Bank n 0x0000 – 0xFFFFamBANK31 Bank 31 0x0000 – 0xFFFF80251 Microcontroller: Following types can be used in addition to the memory types of the 8051 Family Define Memory type Address RangeamEDATA EDATA 0x0000 – 0xFFFFamECODE ECODE 0x0000 – 0xFFFFFFamHDATA HDATA 0x0000 – 0xFFFFFFamHCONS HCONST 0x0000 – 0xFFFFFFamCONST CONST 0x0000 – 0xFFFFSLE66 Microcontroller: Following types can be used in addition to the memory types of the 8051 FamilyDefine Memory type Address RangeamPHYS physical 0x0000 – 0xFFFFFFExample:BYTE buffer[10];AgsiReadMemory(0x1000|(amCODE<<24),10,buffer);// read 10 bytes to (CODE) address 0x1000 AgsiReadMemory(0x1000|(amCODE<<16),10,buffer);// the same function but for SLE66 processorAGSI Function DescriptionAgsiEntry is the only function of a peripheral DLL that is called directly from the µVision simulator. All other functions described below are in the µVision simulator and can be called from the peripheral DLL. Functions to define SFR’s, VTR’s, interrupts, timer, menus, dialogs and access watches. These functions can only be called during the initialization.AgsiDefineSFR AgsiDefineVTRAgsiDeclareInterrupt AgsiSetWatchOnSFRAgsiSetWatchOnVTR AgsiSetWatchOnMemoryAgsiCreateTimer AgsiDefineMenuItemAgsiRegisterExecCallBackFunctions to read and write memory, SFR’s and VTR’s:AgsiWriteSFR AgsiReadSFRAgsiWriteVTR AgsiReadVTRAgsiWriteMemory AgsiReadMemoryFunctions to retrieve simulator status information:AgsiGetStates AgsiGetProgramCounterAgsiIsInInterrupt AgsiIsSleepingAgsiIsSimulatorAccess AgsiIsSyncInstructionAgsiGetSyncCount AgsiGetExternalClockRateAgsiGetInternalClockRate AgsiGetClockFactorAgsiGetLastMemoryAddressFunctions to control the simulator:AgsiSetTimer AgsiSetSFRReadValueAgsiStopSimulator AgsiWakeUpAgsiTriggerReset AgsiContinueAgsiRequestInterrupt AgsiSetSyncCountAgsiSetSyncDelay AgsiSetExternalClockRateAgsiUpdateWindows AgsiHandleFocusAgsiMessage AgsiExecuteCommandFunctions to store and retrieve configuration information:AgsiSetTargetKey AgsiGetTargetKeyFunctions to retrieve symbol values or symbol names:AgsiGetSymbolByName AgsiGetSymbolByValueAgsiEntrySummary:extern "C" DWORD AGSIEXPORT AgsiEntry (DWORD nCode, void *vp)Parameter:nCode Function selector. All possible values are listed below.vp Pointer to various objects depending on nCode. In order to use this pointer, itmust be casted to the required data type.Return Value:The function should return TRUE(1) if completed successfully or FALSE(0) if an error occurred.Description:AgsiEntry is the only function of a peripheral DLL that has to be exported. It is called from µVision when a debug session is started to initialize the peripheral simulation as well as during the debugging session to notify events. The meaning of vp depends on the value of nCode. AgsiEntry can be called with the following nCode values:Value of nCode Value of vp FunctionAGSI_CHECK 8051 or 80166 Check CPU TypeAGSI_INIT Pointer to AGSICONFIG Initialize DLLAGSI_TERMINATE Not used TerminateAGSI_RESET Not used ResetAGSI_PREPLL Not used CPU clock is about to be changedAGSI_POSTPLL Not used CPU clock was changedAGSI_PRERESET Not used Called before Reset, but CPU cyclesstill validAGSI_CMDOUT Pointer to Text Command output of 'exec' commands AGSI_ONINTERRUPT Pointer to Interrupt number Interrupt from a deviceAGSI_ONRETI Pointer to Interrupt number Interrupt acknowledgedAGSI_ENTERSLEEP Not used Power down mode enteredAGSI_EXITSLEEP Not used Power down mode exitedAGSI_CHECKThe first call to AgsiEntry is done with nCode=AGSI_CHECK. The pointer vp points to a DWORD which contains either the value 8051 or 80166, or 7 (for ARM) depending on the microcontroller family that is selected in the current project. This call checks if the DLL can be used for the specifiedmicrocontroller family. The function should return TRUE(1) if the DLL supports this microcontroller family or FALSE(0) if not.AGSI_INITThe second call to AgsiEntry is done with nCode=AGSI_INIT. The pointer vp points to the structure AGSICONFIG which contains information about the project and the parameters for this DLL. This information can be used to configure the peripheral DLL. Additional parameters (format: –option) for the DLL can be entered in the µVision dialog ‘Options for Target -> Debug - > Dialog DLL Parameter’. The DLL can analyze the ‘m_pszConfiguration’ string to extract the information. The‘m_pszProjectPath’ can be used to store log files or additional configuration files for the current project.typedef struct {HINSTANCE m_hInstance; // Instance handle to retrieve the function addressesconst char* m_pszProjectPath; // Path to application e.g. C:\KEIL\C51\EXAMPLES\HELLO const char* m_pszDevice; // Simulated Device e.g. 52. This string is extracted// out of the -p option.const char* m_pszConfiguration; // Complete dialog DLL options e.g. -p52 -dmydll ...const char* m_pszAppFile; // Name of loaded OMF file including path e.g.C:\KEIL\C51\EXAMPLES\HELLO\HELLO //HWND m_hwnd; // Mainframe parent window} AGSICONFIG;When AgsiEntry is called with AGSI_INIT, all special function register (SFR), virtual register (VTR), interrupts, watch points and dialogs that need to be simulated must be defined. The function should return FALSE(0) if an error occurs or TRUE(1) if the function has been executed successfully.AGSI_TERMINATEAgsiEntry is called with nCode=AGSI_TERMINATE when the µVision debugger is closed. The pointer vp is not used in this case. When files have been opened during initialization they must be closed and if memory has been allocated, it must be freed.AGSI_RESETAgsiEntry is called with nCode=AGSI_RESET when the simulated CPU is reset. All peripherals (SFR’s) must be set to their reset state. There are several situations where a CPU reset is executed: - When the simulator is started (after AGSI_INIT).- After an application is loaded.- When RESET is entered in the command line or when the reset button is pressed in the toolbar.- When a watchdog timer overflow occurs.The pointer vp is not used in this case.AGSI_PREPLL, AGSI_POSTPLLAgsiEntry is called with nCode=AGSI_PREPLL or AGSI_POSTPLL before and after the CPU clock frequency changes. Some CPU’s have a clock prescaler that can be reprogrammed to save power. In case a peripheral is not connected to the same clock as the CPU, the values for AgsiSetTimer probably need to be recalculated when the CPU clock is modified. This function call notifies a peripheral before and after the CPU clock frequency has changed so that the timer values can be corrected for the new clock. The pointer vp is not used in this case.Summary:BOOL AgsiDefineSFR(const char* pszSfrName, AGSIADDR dwAddress,AGSITYPE eType, BYTE bBitPos);Parameter:pszSfrName Pointer to name of the SFRdwAddress Address of the SFR. Following address ranges are possible:8051/251: 0x80 – 0xFF8051Mx: 0x80 – 0xFF and 0x180 – 0x1FF80166: 0xF000 – 0xF1FE and 0xFE00 – 0xFFFE (even address) eType Type of the SFR.orAGSIBIT8051: AGSIBYTE80166: AGSIWORD or AGSIBITWith AGSIBIT, dwAddress must point to a bit addressable area:8051: 0x80, 0x88, … , 0xF0, 0xF8 every 8th byte80251: 0x80 - 0xFF every byte8051Mx: 0x80 - 0xF8 and 0x180 – 0x1F8 every 8th byte80166: 0xF100 – 0xF1FE and 0xFF00 – 0xFFFE (even address) bBitPos Bit position within SFR (only for eType=AGSIBIT).8051/251/Mx: 0 – 780166: 0 – 15Return Value:TRUE if successful, FALSE in case of wrong address or too many definitions (at least 300 for all loaded DLL’s).Description:This function is used to define a SFR (S pecial F unction R egister) or a SFR bit. These definitions can be listed in the symbol window and can be used in the watch window and command line.Note:This function may only be called during the initialization process.Example:AgsiDefineSFR("IE", 0xA8, AGSIBYTE, 0); // 8051: IEAgsiDefineSFR("EA", 0xA8, AGSIBIT, 7); // 8051: EA bit in IEAgsiDefineSFR("PSW", 0xFF10, AGSIWORD, 0); // 80166: PSWAgsiDefineSFR("IEN", 0xFF10, AGSIBIT, 11); // 80166: IEN bit in PSWSummary:AGSIVTR AgsiDefineVTR(const char* pszVtrName, AGSITYPE eType,DWORD dwValue);Parameter:pszVtrName Name of the VTReType Type of the VTR (AGSIVTRCHAR, AGSIVTRWORD, AGSIVTRLONG orAGSIVTRFLOAT)dwValue Initial Value of the VTR. Initializing float values is a little difficult sincedwValue is defined as DWORD. In this case, the float value can be convertedto a DWORD using a union.Return Value:VTR handle if successful otherwise NULL.Description:This function is used to declare a VTR (V ir t ual R egister). VTR’s are used to display or to set values that are usually set by hardware. With this function, new VTR’s can be defined or the handle of already defined VTR’s can be retrieved.Note:This function may only be called during the initialization process.Example:hXTAL = AgsiDefineVTR("XTAL", AGSIVTRLONG, 0x00B71B00); // 12MHzhVREF = AgsiDefineVTR("VREF", AGSIVTRFLOAT, 0x40200000); // 2.5VhVREF = AgsiDefineVTR("MYPORT", AGSIVTRCHAR, 0x000000FF); // all pins highAgsiDeclareInterruptSummary:BOOL AgsiDeclareInterrupt(AGSIINTERRUPT *pInterrupt);Parameter:PInterrupt Pointer to an AGSIINTERRUPT structure (see below).Return Value:TRUE if successful otherwise FALSE.Description:This function is used to define an interrupt source of an on-chip peripheral. All the information about this interrupt source is passed to the function with a structure. It defines the interrupt vector address as well as all request, enable and priority flags. This information automatically adds another line in the Interrupt Dialog. The structure is different for every microcontroller family and is described in the following AGSIINTERRUPT structure:// 8051/251/8051Mxtypedef struct {AGSIADDR vec; // interrupt vector addresschar *mess; // interrupt name (will be shown in interrupt dialog)// The mode bit is only shown in the interrupt dialog.// It has no influence on interrupt processing.AGSIADDR msfr; // interrupt mode sfr.WORD mmask; // interrupt mode bit mask (only one bit may be set)const char *mname; // name of interrupt mode bitAGSIADDR rsfr; // interrupt request sfrWORD rmask; // interrupt request bit mask (only one bit may be set) const char *rname; // name of interrupt request bitAGSIADDR esfr; // interrupt enable sfrWORD emask; // interrupt enable bit mask (only one bit may be set)const char *ename; // name of interrupt enable bitAGSIADDR p0sfr; // interrupt priority 0 sfrWORD p0mask; // interrupt priority 0 bit mask (only one bit may be set) const char *pname; // name of interrupt priority bitAGSIADDR p1sfr; // interrupt priority 1 sfr. =0 if CPU only supports 2 levels WORD p1mask; // interrupt priority 1 bit mask (only one bit may be set) WORD pwl; // priority within level (1 – lowest priority)WORD auto_reset; // reset interrupt request flag on interrupt entry} AGSIINTERRUPT;// 80166typedef struct {AGSIADDR vec; // interrupt vector address (must be a even address)char *mess; // interrupt name (will be shown in interrupt dialog)AGSIADDR sfr; // interrupt control sfr which contains ILVL, GLVL, IR and IE } AGSIINTERRUPT;// SLE66typedef struct {AGSIADDR vec;char *mess; // Interrupt nameconst char *rname; // name of interrupt request bitconst char *ename; // name of interrupt enable bitconst char *pname; // name of interrupt priority bitDWORD num; // Interrupt NumberDWORD pwl; // priority within level} AGSIINTERRUPT;Note:This function may only be called during the initialization process.Example:// 8051/251/8051Mx#define TCON 0x88#define IE 0xA8#define IP 0xB8#define IPH 0xB7AGSIINTERRUPT ExtInt0 = { // External Interrupt 00x0003, "P3.2/Int0", TCON, 0x01, "IT0", TCON, 0x02, "IE0", IE, 0x01, "EX0", IP, 0x01, "Pri", IPH, 0x01, 8, 1};AGSIINTERRUPT Timer0Int = { // Timer 0 Interrupt0x000B, "Timer 0", 0, 0, "", TCON, 0x20, "TF0", IE, 0x02, "ET0", IP,0x02, "Pri", IPH, 0x02, 6, 1};AgsiDeclareInterrupt(&Timer0Int);AgsiDeclareInterrupt(&ExtInt0);// 80166#define S0TIC 0xFF6CAGSIINTERRUPT SerTransmitInt = { // Serial Transmit Interrupt0x00A8, "S0TINT", S0TIC}AgsiDeclareInterrupt(&SerTransmitInt);Summary:BOOL AgsiSetWatchOnSFR(AGSIADDR SFRAddress, AGSICALLBACKApfnReadWrite,AGSIACCESS eAccess);Parameter:SFRAddress Address of the SFRpfnReadWrite Pointer to a function that is called on SFR access. The function gets asargument the address and the access reason to the memory and does nothave a return value (void function(DWORD adr, AGSICB_REASON r)).eAccess Access type (AGSIREAD, AGSIWRITE, AGSIREADWRITE)Return Value:TRUE if successful otherwise FALSE.Description:This function is used to set a watch on SFR access. Whenever the specified SFR is accessed, the specified function is called.Example:#define TCON 0x88#define TL1 0x8B#define TH1 0x8Dstatic void timer1(DWORD adr, AGSICB_REASON r) {// watch function implementation}AgsiSetWatchOnSFR(TH1, timer1, AGSIREADWRITE); //Call ‘timer1’ when TH1 is written or read AgsiSetWatchOnSFR(TL1, timer1, AGSIREADWRITE); //Call ‘timer1’ when TL1 is written or read AgsiSetWatchOnSFR(TCON, timer1, AGSIWRITE); //Call ‘timer1’ when TCON is written。
Hibernate常见面试题汇总

一. H ibern ate工作使用步骤?1.读取并解析配置文件2. 读取并解析映射信息,创建Ses sionF actor y3.打开Sess sion4. 创建事务Tran satio n5.持久化操作6. 提交事务7.关闭Sess ion 8. 关闭Se sstio nFact ory 二.Hib ernat e的查询方式有几种?(1)导航对象图检索方式。
根据已经加载的对象,导航到其他对象。
(2)OID查询方式。
根据对象的O ID来查询对象。
Se ssion的get()和loa d()方法。
(3)HQL查询方式。
HQ L是面向对象的查询语言,ses sion的find()方法用于执行HQL查询语句。
可以利用Q uery接口。
Q ueryquery = se ssion.crea teQue ry(“f rom C ustom er as c wh ere c.name=: c ustom erNam e”);quer y.set Strin g(“cu stome rName”,”张三”);Listresul tList = qu ery.l ist();(4)QBC查询方式。
这种API封装了基于字符串形式的查询语句。
Crit eriacrite ria = sess ion.c reate Crite ria(U ser.c lass);Cr iteri on cr iteri on1 = Expe ssion.like(“nam e”,”T%”);Crite rioncrite rion2 = Ex pessi on.eq(age,new I ntege r(30));cr iteri a =crite ria.a dd(cr iteri on1);crit eria = cr iteri a.add(crit erion2);L ist r esult List= cri teria.list();这种查询方式使用的较少,主要是在查询中需要用户输入一系列的查询条件,如果采用HQL查询代码会比较烦。
org.reflections接口通过反射获取实现类源码研究

org.reflections接⼝通过反射获取实现类源码研究org.reflections 接⼝通过反射获取实现类源码研究版本 org.reflections reflections 0.9.12Reflections通过扫描classpath使⽤Reflections可以很轻松的获取以下元数据信息:获取某个类型的所有⼦类;⽐如,有⼀个⽗类是Interface,可以获取到Interface的所有⼦类。
1. 获取某个注解的所有类型/字段变量,⽀持注解参数匹配。
2. 使⽤正则表达式获取所有匹配的资源⽂件3. 获取特定签名⽅法。
4. 接⼝通过反射获取实现类步骤和源码解析## 第⼀步: 通过包名称获取Reflections reflections = new Reflections(pageName);new Reflections(pageName) 详细源码解析ConfigurationBuilder.build(params)1.1.将⼊参扁平化处理,加⼊ parameters 列表中if (params != null) {for (Object param : params) {if (param != null) {if (param.getClass().isArray()) { for (Object p : (Object[]) param) if (p != null) parameters.add(p); }else if (param instanceof Iterable) { for (Object p : (Iterable) param) if (p != null) parameters.add(p); }else parameters.add(param);}}}1.2.判断⼊参中是否包含类加载器,如果有类加载器就将其加⼊加载器列表loaders中,如果没有则创建⼀个空的类加载器数组classLoaders List<ClassLoader> loaders = new ArrayList<>();for (Object param : parameters) if (param instanceof ClassLoader) loaders.add((ClassLoader) param);1.3.遍历扁平化处理后的⼊参列表 parameters:如果元素为string,Url类型则将该url加⼊过滤器构造器FilterBuilder中如果是Class信息则将其转换为Url再加⼊过滤器构造器中如果是Scanner则添加到搜索器列表scanners中for (Object param : parameters) {if (param instanceof String) {builder.addUrls(ClasspathHelper.forPackage((String) param, classLoaders));filter.includePackage((String) param);}else if (param instanceof Class) {if (Scanner.class.isAssignableFrom((Class) param)) {try { builder.addScanners(((Scanner) ((Class) param).newInstance())); } catch (Exception e) { /*fallback*/ }}builder.addUrls(ClasspathHelper.forClass((Class) param, classLoaders));filter.includePackage(((Class) param));}else if (param instanceof Scanner) { scanners.add((Scanner) param); }else if (param instanceof URL) { builder.addUrls((URL) param); }else if (param instanceof ClassLoader) { /* already taken care */ }else if (param instanceof Predicate) { filter.add((Predicate<String>) param); }else if (param instanceof ExecutorService) { builder.setExecutorService((ExecutorService) param); }else if (Reflections.log != null) { throw new ReflectionsException("could not use param " + param); }}1.4.当 FilterBuilder 中没有任何⼀个url时,从类加载器中获取URL1.4.1. 判断是否存在有效类加载器,如果不存在有效类加载器,则获取contextClassLoader当前线程的加载器和静态类加载器staticClassLoader(从org.reflections.Reflections依赖中获取加载器)作为默认加载器ClassLoader contextClassLoader = contextClassLoader(), staticClassLoader = staticClassLoader();return contextClassLoader != null ?staticClassLoader != null && contextClassLoader != staticClassLoader ?new ClassLoader[]{contextClassLoader, staticClassLoader} :new ClassLoader[]{contextClassLoader} :new ClassLoader[] {};public static ClassLoader contextClassLoader() {return Thread.currentThread().getContextClassLoader();}public static ClassLoader staticClassLoader() {return Reflections.class.getClassLoader();}1.4.2. 判断类加载器类型,如果是 URLClassLoader 则从中获取URL,如果不是则寻找⽗类加载器(双⼦委派模型)是否是URLClassLoader,如果是则从中获取URLfor (ClassLoader classLoader : loaders) {while (classLoader != null) {if (classLoader instanceof URLClassLoader) {URL[] urls = ((URLClassLoader) classLoader).getURLs();if (urls != null) {result.addAll(Arrays.asList(urls));}}classLoader = classLoader.getParent();}}1.5.将过滤器,类加载器,scanners等添加到 ConfigurationBuilder 环境创造器中builder.filterInputsBy(filter);if (!scanners.isEmpty()) {builder.setScanners(scanners.toArray(new Scanner[scanners.size()]));}if (!loaders.isEmpty()) {builder.addClassLoaders(loaders);}public ConfigurationBuilder filterInputsBy(Predicate<String> inputsFilter) {this.inputsFilter = inputsFilter;return this;}1.6.然后将ConfigurationBuilder(实现了Configuration) 传⼊Reflections的构造⽅法中public Reflections(final Object... params) {this(ConfigurationBuilder.build(params));}public Reflections(final Configuration configuration) {...}1.7.将Store store 清空store = new Store();1.8.如果 configuration 中scanners不为空,遍历scanners将configuration 放到每⼀个scanner中for (Scanner scanner : configuration.getScanners()) {scanner.setConfiguration(configuration);}1.9.执⾏scan()⽅法进⾏扫描如果 configuration 中 URL 为空则直接退出并打印告警获取configuration 中线程池,如果存在线程池则⽤线程池异步运⾏protected void scan(URL url)⽅法,如果不存在线程池则同步运⾏//线程池可以在new Reflections(pageName)时,通过⼊参传递//或者采⽤如下⽅式public ConfigurationBuilder setExecutorService(ExecutorService executorService) {this.executorService = executorService;return this;}1.10.protected void scan(URL url)先对URL进⾏初步格式校验和替换 file:/D:/IdeaProjects/study-netty/target/classes/ -> D:/IdeaProjects/study-netty/target/classes 将⽂件路径进⾏转换String path = file.getRelativePath();String fqn = path.replace('/', '.');根据当前路径递归获取包下所有⽂件(栈的格式)for (final Vfs.File file : dir.getFiles()){...}根据configuration中过滤器inputsFilter,使⽤过滤器对已获取到的⽂件路径进⾏校验Predicate<String> inputsFilter = configuration.getInputsFilter();f (inputsFilter == null || inputsFilter.test(path) || inputsFilter.test(fqn)){...}//校验⽅式为正则校验public boolean test(final String regex) {return pattern.matcher(regex).matches();}找到符合条件的⽂件路径后判断⽂件类型是否正确if (scanner.acceptsInput(path) || scanner.acceptsInput(fqn)) {classObject = scanner.scan(file, classObject, store);}当前Scanner 类型分别为:TypeAnnotationsScanner,SubTypesScanner 的⽗类都是AbstractScanner,都未重写acceptsInput⽅法,其所需⽂件类型都是.class⽂件public boolean acceptsInput(String file) {return file.endsWith(".class");}ResourcesScanner 类重写了acceptsInputpublic boolean acceptsInput(String file) {return !file.endsWith(".class"); //not a class}从⽂件流中获取class⽂件 ClassFile然后进⾏校验Scanner 的校验TypeAnnotationsScanner 扫描运⾏期的注解 ,添加到store 中SubTypesScanner 扫描类的⽗类和接⼝,如果允许⼦类反向查找,最后添加到store 中String className = getMetadataAdapter().getClassName(cls);String superclass = getMetadataAdapter().getSuperclassName(cls);if (acceptResult(superclass)) {//添加到store中put(store, superclass, className);}//获取接⼝,将接⼝和⽗类都放⼊store中for (String anInterface : (List<String>) getMetadataAdapter().getInterfacesNames(cls)) {if (acceptResult(anInterface)) {put(store, anInterface, className);}}//put⽅法如下protected void put(Store store, String key, String value) {store.put(Utils.index(getClass()), key, value);}判断是否需要展开⽗类,默认为true,从store中获取key为SubTypesScanner的map中的数据,获取接⼝的类和实现类信息,向上寻找其未扫描的⽗类,最后添加到store的key为SubTypesScanner的map中例如: A extends B, B extends C 只有A 在⼊参的路径中,上述的⽅法只能找到B接⼝,但是找不到最顶层的C接⼝,此时调⽤下放⽅法,找到最顶层接⼝CString index = index(SubTypesScanner.class);Set<String> keys = store.keys(index);keys.removeAll(store.values(index));for (String key : keys) {final Class<?> type = forName(key, loaders());if (type != null) {expandSupertypes(store, key, type);}}private void expandSupertypes(Store store, String key, Class<?> type) {for (Class<?> supertype : ReflectionUtils.getSuperTypes(type)) {if (store.put(SubTypesScanner.class, supertype.getName(), key)) {if (log != null) log.debug("expanded subtype {} -> {}", supertype.getName(), key);expandSupertypes(store, supertype.getName(), supertype);}}ReflectionUtils.getSuperTypes(type) //⽅法查询到了⽗类创建出⼀个Reflections含有store,filter,sacnners的Reflections## 获取⼦类/*** targetInterface 需要查询⼦类的接⼝,*/Set<Class<?>> implClazz = reflections.getSubTypesOf((Class<Object>) targetInterface);public Set<Class<? extends T>> getSubTypesOf(final Class type)源码解析2.1.从store中获取⽬标接⼝的⼦类store.getAll(SubTypesScanner.class, type.getName())2.2.通过类加载器加载当前⼦类,当前类加载器为null,通过上述1.4.1的⽅法获取默认加载器public static <T> Set<Class<? extends T>> forNames(final Collection<String> classes, ClassLoader... classLoaders) {return classes.stream().map(className -> (Class<? extends T>) forName(className, classLoaders)).filter(Objects::nonNull).collect(Collectors.toCollection(LinkedHashSet::new));}2.3 通过类全路径加载类public static Class<?> forName(String typeName, ClassLoader... classLoaders) {try { return classLoader.loadClass(type); }}2.4 最后获取到了实现类的反射反射对象列表。
反射(reflection)学习整理

反射学习整理【摘要】本文主要通过自己对反射机制的总结编写的文档,主要目的就是为了自己以后能可以参考温习也可以方便刚刚入门的同仁们学习指导,通过doc的编写相信可以在帮助别人的同时提高自己。
反射机制;Reflection API;如何使用反射机制;反射机制的应用举例;第一节反射机制什么是反射机制,说的通俗一些就是在java运行期间动态加载一些不确定的类对象,那么我们如何使用一个类的呢?当然大多数情况下我们是使用一个确定的类,然后通过在内存中的加载再使用之。
其实在一个project中会有很多类,虚拟机并不是在每一次运行时都将所有的类都进行加载然后解析的,是在我们使用的过程中才会被加载,这个大家可以看一下ClassLoader(在后期中我也会编写ClassLoader相关的文章总结)反射机制提供的功能:加载运行时才能确定的数据类型;解析类的结构,获取其内部的信息;能够操作的类型或者实例;1. 访问属性;2. 调用方法;3. 创建新的对象;以上的功能我会在接下来的文字中都进行阐述,然后每一个功能点都会通过代码的形式进行逐一的说明举例;1.1动态加载类Java虚拟机在运行是能加载的类型有如下几种:类接口;数组;枚举;注解(Annotation,可以参见我的另一篇文档,《java Annotation学习文档》);基本数据类型;在类加载的时候,JVM会自动加载上述类型对应的Class对象。
package com.wangwenjun.demo;import java.util.ArrayList;public class ReflectionDemo1 {private final static String LIST_STRING="java.util.ArrayList"; //动态加载java.util.ArrayList的类路径@SuppressWarnings("unchecked")public static void main(String[] args) {try {Class<?> clazz=Class.forName(LIST_STRING);//通过反射获取运行时的ClassArrayList<Object> list=(ArrayList<Object>)clazz.newInstance(); //通过newInstance方法获取Objectlist.add("hello");System.out.println(list.size()+":"+list.get(0));} catch (ClassNotFoundException e) {e.printStackTrace();} catch (InstantiationException e) {// TODO Auto-generated catch blocke.printStackTrace();} catch (IllegalAccessException e) {// TODO Auto-generated catch blocke.printStackTrace();}}}执行结果为:1:hello通过上面的代码我们可以总结出来使用Reflection大致需要如下的几步: 获取目标对象的Class对象;调用Class对象内省方法获取目标对类成员信息;访问目标类的成员属性;1.2解析类的结构通过第一步的操作,我们获取了目标对象的class之后就可以解析出来class对应的内部结构;别不多说直接上代码,来看看如何解析出来目标对象;我们定义一个Teacher类package com.wangwenjun.demo;public class Teacher {private String username;private int age;private static int total;public Teacher(){super();total++;}public Teacher(String username,int age){super();ername = username;this.age = age;total++;}public String getUsername() {return username;}public void setUsername(String username) {ername = username;}public int getAge() {return age;}public void setAge(int age) {this.age = age;}public static int getTotal() {return total;}public static void setTotal(int total) {Teacher.total = total;}@Overridepublic String toString(){return"UserName:"+ername+",age:"+this.age;}}假如说上述的Teacher类是在我们运行时才知道的一个类,也就是说是我们运行时才能确定的一个类,那么我们就可以通过反射的形式将它解析出来,包括它的属性,方法,以及构造函数等等。
透射光栅和反射光栅对比-英文
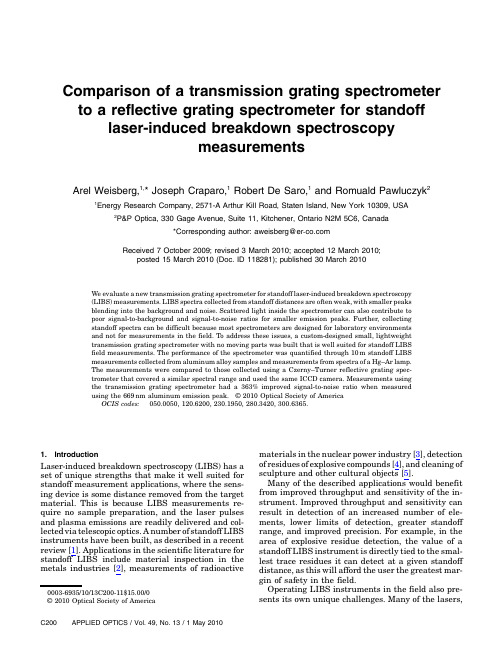
Comparison of a transmission grating spectrometer to a reflective grating spectrometer for standoff laser-induced breakdown spectroscopymeasurementsArel Weisberg,1,*Joseph Craparo,1Robert De Saro,1and Romuald Pawluczyk2 1Energy Research Company,2571-A Arthur Kill Road,Staten Island,New York10309,USA 2P&P Optica,330Gage Avenue,Suite11,Kitchener,Ontario N2M5C6,Canada*Corresponding author:aweisberg@er‑Received7October2009;revised3March2010;accepted12March2010;posted15March2010(Doc.ID118281);published30March2010We evaluate a new transmission grating spectrometer for standoff laser-induced breakdown spectroscopy(LIBS)measurements.LIBS spectra collected from standoff distances are often weak,with smaller peaksblending into the background and noise.Scattered light inside the spectrometer can also contribute topoor signal-to-background and signal-to-noise ratios for smaller emission peaks.Further,collectingstandoff spectra can be difficult because most spectrometers are designed for laboratory environmentsand not for measurements in the field.To address these issues,a custom-designed small,lightweighttransmission grating spectrometer with no moving parts was built that is well suited for standoff LIBSfield measurements.The performance of the spectrometer was quantified through10m standoff LIBSmeasurements collected from aluminum alloy samples and measurements from spectra of a Hg–Ar lamp.The measurements were compared to those collected using a Czerny–Turner reflective grating spec-trometer that covered a similar spectral range and used the same ICCD camera.Measurements usingthe transmission grating spectrometer had a363%improved signal-to-noise ratio when measuredusing the669nm aluminum emission peak.©2010Optical Society of AmericaOCIS codes:050.0050,120.6200,230.1950,280.3420,300.6365.1.IntroductionLaser-induced breakdown spectroscopy(LIBS)has a set of unique strengths that make it well suited for standoff measurement applications,where the sens-ing device is some distance removed from the target material.This is because LIBS measurements re-quire no sample preparation,and the laser pulses and plasma emissions are readily delivered and col-lected via telescopic optics.A number of standoff LIBS instruments have been built,as described in a recent review[1].Applications in the scientific literature for standoff LIBS include material inspection in the metals industries[2],measurements of radioactive materials in the nuclear power industry[3],detection of residues of explosive compounds[4],and cleaning of sculpture and other cultural objects[5].Many of the described applications would benefit from improved throughput and sensitivity of the in-strument.Improved throughput and sensitivity can result in detection of an increased number of ele-ments,lower limits of detection,greater standoff range,and improved precision.For example,in the area of explosive residue detection,the value of a standoff LIBS instrument is directly tied to the smal-lest trace residues it can detect at a given standoff distance,as this will afford the user the greatest mar-gin of safety in the field.Operating LIBS instruments in the field also pre-sents its own unique challenges.Many of the lasers,0003-6935/10/13C200-11$15.00/0spectrometers,optics,and optomechanical compo-nents used in laboratory LIBS instruments are ill suited to field operation due to several factors.First, environmental conditions of temperature,humidity, vibrations,and dust can swing to extremes in the field.Second,robustness is of primary importance because making adjustments and repairs to equip-ment in the field is impractical.Also,the instrument will likely need to be shipped to the location where it will operate,so it must be rugged enough to survive the trip intact.Third,packaging constraints,such as the size and weight of individual components,may dictate limitations on the instrument design.This would be especially true for a standoff LIBS instru-ment that must be transported manually for some distance.In particular,a great deal of potential exists for im-proving the spectrometer systems used in standoff LIBS instruments.This is because most of the spec-trometers described in the applications in[1]are simply laboratory models taken out to the field. Generally,these spectrometers do not adequately meet the operational challenges listed above,which limits the LIBS systems’overall usability and perfor-mance envelope.Furthermore,inherent limitations in optical de-signs of these spectrometers limit their performance. LIBS spectrometer systems are generally of either the Czerny–Turner or echelle configuration[6],as well as some reported Paschen–Runge designs[7].All these configurations generate diffraction patterns by re-flecting light off ruled or etched holographic gratings. These gratings have certain general characteristics that limit the overall system performance.First,their efficiency is usually a strong function of wavelength, diminishing with wavelengths departing from the blaze wavelength.This directly impacts the through-put of the spectrometer,reducing the overall sensitiv-ity and precision and raising the limits of detection for some elements.Second,light throughput generally varies inversely with resolution.Therefore,achieving high-resolution LIBS spectra generally involves the trade-off of diminished throughput.Third,because the reflecting gratings diffract light back along the op-tical path,the potential for stray light to reach the de-tector is increased.Higher levels of stray light reduce signal-to-background levels in LIBS spectra,which results in lower sensitivity and higher limits of detection.We describe here a new LIBS spectrometer that has significant performance advantages over typical spectrometers used for standoff LIBS,both in terms of analytical performance and performance in the field.This spectrometer is based on a transmission grating rather than the more typical reflective grat-ing.Further,rather than a ruled grating,the grating is a volume phase holographic design that further re-duces stray light because it has no ruled ing this type of grating allows for a spectrometer that achieves greater light throughput,higher resolution,package with no moving parts.While other compar-isons between spectrometers[8]and detectors[9–11] for LIBS applications have been reported,there have not been,to our knowledge,any studies on the merits of spectrometer designs based on different grating technologies while using the same detector with both spectrometer systems.This important equalizing factor allows for a more straightforward comparison between the systems.2.Volume Phase Holographic GratingsThe heart of the P&P Optica spectrometers is a vo-lume phase holographic(VPH)diffraction gel grating. Gel gratings work on a different principle from tradi-tional relief reflecting gratings.The manufacturing process of a gel grating begins when a layer of gel or polymer that is able to change refractive index un-der the influence of light is exposed to an optical beam whose intensity periodically changes.After proces-sing,the exposed layer is sandwiched between two transparent plates.The entire assembly then acts as a diffraction grating.For comparison,traditional gratings are usually produced as a result of a highly disruptive mechanical or chemical process,which produces periodic grooves with microscopic cracks on the surface.Efficiency of the grating depends on the profile of the grooves, while microcracks are responsible for severe light scattering.Transmission gel gratings do not have pro-blems with light scattering microcracks.Further-more,the diffracted light propagates at an angle in relation to the transmitted beam;hence,they can be used in optimal working conditions.The result is a more efficient use of available light and dramati-cally lowered scattered light levels.Figure1provides a comparison of efficiency values for a typicalspectral Fig.1.Absolute and average diffraction efficiency(AE)of P&P Optica’s600l=mm gel VPH grating at9°of incidence in compar-ison with holographic relief reflection grating(HRG)and diamond ruled reflective grating(RRG).The AE of the gel grating is mea-sured for a dispersive nonscanning configuration used in all P&P Optica Inc.spectrometers,while the efficiency of the other two gratings is measured under impractical Littrow conditions,as re-ported in the manufacturer’s catalog,corrected to representrange covering a full octave for VPH and ruled gratings.There is a great misunderstanding regarding the measurement of grating performance,including effi-ciency.First,the grating efficiencies of traditional re-flecting gratings provided in catalogs are measured in relation to the intensity of the beam reflected from a mirror coated with the same material used for coat-ing the grating(typically an aluminum layer with a reflectivity of about90%);hence,the absolute diffrac-tion efficiency is about8%–12%lower than that provided in catalogs.Second,for a given grating fre-quency,the efficiency depends on both the angle of incidence of the incoming beam and the groove pro-file of the grating.It is well known that the highest efficiency can be achieved for grating grooves is with a sawtooth profile with a90°angle at the top of the tooth.The efficiency of such gratings is optimized at a particular“blaze”wavelength when the incident beam intersects the grating at a particular“blaze an-gle”such that the diffracted beam propagates in a direction opposite to the incident beam.The efficien-cies at wavelengths other than the blaze wavelength are lower,but can be slightly increased by rotating the grating such that the diffracted beam is back in the direction of the incident beam[12–14].The reported efficiencies for reflective gratings are measured at this optimum incoming beam angle for each individual wavelength(i.e.,the grating is physically rotated between each measurement to op-timize performance).This is commonly referred to as the“Littrow”configuration.While this configuration is optimal from an efficiency point of view,it is im-practical because it can lead to interferences between the delivery and the collection optics.For this reason, typical reflective grating spectrometers(such as the Czerny–Turner system)normally use a single detec-tor and a rotating grating to register one spectral component under the best possible conditions for the chosen geometry.In most LIBS applications,it is impractical to scan every wavelength across a fixed detector.Instead,for a single LIBS measurement,the grating is held in a fixed position and the light is dispersed over an array of detectors(typically the pixels of an ICCD camera). In this case,the efficiency of a reflective grating sys-tem is significantly reduced at those wavelengths that are oriented away from their optimal angle with respect to the incoming light.In some cases,the aver-age absolute efficiency of gratings in spectrometers operating under real conditions can be as low as 10%–20%even though the reported efficiencies are high as measured in the Littrow configuration. Many of the deficiencies of reflective grating spec-trometers can be eliminated by replacing the reflec-tive grating with a transmission VPH diffraction grating and using lenses,rather than focusing mir-rors,to form both the incident and the diffracted beams.In contrast to reflective gratings,VPH grat-ings are most efficient when the diffracted beam pro-in line with,the nondiffracted part of the beam trans-mitted through the grating.This eliminates interfer-ence between the optical systems forming the incident and diffracted beams,allowing VPH grat-ings to be practically implemented in the orientation of maximum efficiency.An additional advantage is that there is less nondiffracted light,which normally contributes to the scattered light background.Appli-cation of lenses in place of mirrors,while potentially reducing the usable spectral range,allows for the construction of more compact spectrometers with better optical performance over larger detector areas,better f-numbers,and higher-quality imaging for longer slits.The increase in grating efficiency has a twofold ef-fect on the performance of a spectrometer system. First,a larger percentage of the incoming light reaches the detector,resulting in an increase in re-corded signal.Second,the number of photons enter-ing the system that do not directly impinge on the detector is reduced.This is important because these stray photons can reach the detector indirectly through multiple reflections resulting in scattered light noise.Typically,the ratio of signal to stray light is of the order of15times greater for a VPH grating than for a similar reflective grating,as shown in Fig.2. The result is a significant increase in photometric dy-namic range.3.ApparatusA.SpectrometersThe spectrometer system used to compare to the P&P Optica Inc.transmission grating spectrometer is an Acton300i Czerny–Turner system(Princeton Instru-ments,Trenton,New Jersey)with a150grooves=mm Fig.2.(Color online)Discharge from a He–Ne laser measured using Czerny–Turner and VPH spectrometers under identical con-ditions with dark signal subtracted.Background levels are propor-tional to stray light,seen here to be approximately150times lower for the VPH system.The graphs are not offset from their actualgrating blazed at 500nm and coupled to a Princeton Instruments PI-Max intensified CCD camera (1024×256pixel CCD array,25mm Gen II intensifier).The grating was mounted to a rotating turret that enables scanning across multiple wavelength ranges.The po-sition of the grating was fixed in this work such that the measured wavelength range was centered at 550nm.A photograph of the system is seen in Fig.3.This system is typical of many described in the LIBS literature,being a fairly compact and flexible design with a fiber optic cable attached to the input slit.The P&P Optica VPH transmission grating spec-trometer system coupled to the same PI-Max ICCD camera is shown in Fig.4.The compact form factor of the spectrometer is evident.A comparison of the spe-cifications of the two systems is seen in Table 1.The laser used for the LIBS experiments was a Quantel USA (Bozeman,Montana,formerly Big Sky Laser)CFR-400Nd:YAG Q -switched laser oper-ating at 1064nm.The laser outputs 330mJ =pulse in ∼7ns pulses,and it was operated in single-shot mode.The laser pulses were delivered to the aluminum alloy targets via a straightforward beam expansion and collimating optical arrangement followed by a Galilean telescope,with a ϕ25mm plano –concave lens and a ϕ50mm plano –convex lens,which,when combined,resulted in a 10m focal length for the telescope.The lenses were antireflection coated for 1064nm.The light from the LIBS plasma was collected with a ϕ200mm,f =4:9,f ¼1000mm,Newtonian tele-scope (SkyView Pro 8)from Orion Telescopes (Watsonville,California)that was modified by repla-cing the viewing eyepiece with a fiber optic cable SMA-905connector.A photograph of the modified telescope is seen in Fig.5,and a view down the barrel of the telescope toward the target samples placed 10m away is shown in Fig.6.A 2m long,600μm core,fiber optic cable was attached to the telescope.The mercury lamp used in some of the experiments was an Ocean Optics (Dunedin,Florida)CAL-2000mercury –argon wavelength calibration source with an SMA-905fiber optic cable connector.The input ends of the fiber optic cables attached to the spectro-meter systems are also fitted with SMA-905connectors.4.SamplesSix different Standard Reference Material (SRM)aluminum alloy samples were used as targets in this study.These SRMs were obtained from Brammer Standard (Houston,Texas).They are in theshapeFig.3.Acton Research 300i Czerny –Turner spectrometer system with PI-Max ICCD Camera and f -number matching fiber optic cable adapter attached.A 30cm ruler is also shown forscale.Fig. 4.P&P Optica transmission grating spectrometer and PI-Max ICCD camera.A 30cm ruler is also shown for scale.Table 1.Comparison of Specifications of Transmission Grating and Czerny –Turner Spectrometer Systems when Coupled to the PI-Max ICCDCamera Used in the ExperimentsP&P Optica Transmission GratingSpectrometerActon 300i Czerny –Turner Spectrometer Spectral range 366–796nm (Δλtotal ¼430nm)266–831nm (Δλtotal ¼565nm)f =#34Entrance slitNone —uses fiber optic bundle for 37μm ×6:6mm effective slit52μm ×1mmOptical fiber cross-section specifications68×50μm fibers arranged in a ϕ600μm circular bundle at the input end and in a vertical line at the spectrometer end 19×200μm fibers arranged in a ϕ1mm circular bundle at the input side and in a vertical line at the spectrometer end Optical fiber length1:5m 3:0m Fiber optic cable f -number matching moduleNoYesof approximately ϕ25–50mm disks.The concentra-tions of the elements examined in the tests reported below are given in Table 2.These alloys were selected to achieve a range of concentration values for each of these elements.5.Experimental Procedure A.Mercury Lamp TestsA mercury –argon line source,described in Section 3,was attached to each spectrometer via a simple col-limating and focusing optical design shown schema-tically in Fig.7.The positions of the fibers relative to the lenses were optimized for maximum throughput.The neutral density filter was needed to avoid satur-ating the ICCD detector.A procedure was also devel-oped that minimized the effects of attaching and removing the fiber optic cables from the optical assembly .Fifty mercury lamp spectra were collected with each spectrometer system using a temporal window of 5ms and an intensifier gain setting of zero.Dark spectra were also collected and automatically subtracted from the mercury lamp spectra by the software supplied by Princeton Instruments (Win-Spec).The resulting corrected spectra were averaged together.Repeatability was checked by collecting 25accu-mulations of 25spectra each,detaching the fibers from the optical assembly between each ing the 435and 579nm Hg emission lines,we measured a relative standard deviation (RSD)of 0.61%in the amplitudes of these lines in the set of spectral accumulations using the transmission grating spectrometer.B.Laser-Induced Breakdown Spectroscopy TestsThe SRM alloy samples were cleaned with acetone,followed by methyl alcohol,followed by isopropanol,prior to testing.The samples were then placed 10m from the telescope (Fig.6)and oriented vertically so that their surface was normal to the laser pulses.Fifty LIBS spectra were collected from each sam-ple by first applying 50laser shots (i.e.,“cleaning shots ”)to the same spot on the sample,followed by an analysis shot when the LIBS spectrum was re-corded.The sample was then rotated slightly for collecting the next spectrum from a new spot.The temporal settings for the ICCD camera relative to the laser shot were a delay of 3μs and a width of 1μs.The gain setting on the camera was 120(out of 255)for the transmission spectrometer and 160for the reflective grating spectrometer so that the peaks would be of roughly the same amplitude.The different gain setting amounts to an increase in absolute intensities (i.e.,counts)by a factor of 3.2and an increase in the RSD of the intensities by a factor of 1.3.These factors were taken into ac-count in the reported data.A PrincetonInstrumentsFig.5.Telescope used to collect the LIBS plasmalight.Fig.6.View from the Newtonian telescope used to collect the LIBS plasma light looking toward the target samples.Table 2.Concentrations of Elements in the Aluminum Alloy Standards Used in TestingStandard Cu (wt.%)Fe (wt.%)Mg (wt.%)Mn (wt.%)HG-40.0950.120.310.39HP-10.480.7220.11HP-2 1.50.5 1.250.25HP-33.520.220.790.42NCSHS53703-40.0330.350.040.055NCSHS53703-50.0791.310.1030.112programmable delay generator,Model ST133A,was used to control the laser –camera timing via the system ’s software package.Dark spectra were also collected with the same camera settings and automa-tically subtracted from the LIBS spectra.The fiber optic cable attached to the LIBS tele-scope (Fig.5)was connected to the fiber optic cables on the spectrometers via a simple SMA-905mating sleeve.This sleeve positions the ends of the two fiber optic cables up against each other to maximize the transmission of light from one fiber to the other.C.Data ComparisonThe procedure for the comparison between the two spectrometer systems was designed to compensate for the different system specifications that are unre-lated to the fundamental strengths and weaknesses of each system.The foremost example of this was the use of the same intensified CCD camera with both spectrometer systems.We also compensated for the difference in wavelength range between the grat-ings (Table 1).This is obviously a function of the par-ticular gratings and is unrelated to any benefits or drawbacks of the respective system optical config-urations.Therefore,the analysis presented below accounts for this difference.For the purpose of comparing the two systems,we did not attempt to compensate for the differences in how the optical fibers couple to their respective spec-trometer units.Each system ’s design has advantages and disadvantages in their fiber coupling method.The advantages of the P&P unit are the lack of an entrance slit and the low f -number of the unit (f =3).The advantages of the Acton unit are its fiber optic f -number matcher and the higher fill factor of its fiber optic cable bundle (the ratio of the total cross-sectional area of all the optical fibers in the bundle to the area of the front face of the fiber tip)as compared to the P&P unit (76%versus 47%).Given the difficulty in modeling and accounting for these differences accurately ,and the fact that the re-spectrometer units during the tests,the comparison presented here will consider the fiber optic cable as an integral part of the spectrometer unit.To compensate for the different spectral ranges of the spectrometers,the intensities of the spectra col-lected by the two units were normalized into counts/nanometer units.The spectral resolutions of the systems are reported in camera pixels rather than nanometers for this reason as well.6.ResultsA.Mercury Lamp TestsA comparison of the measured 435:8nm mercury emission peak for the reflective and transmissive grating spectrometers is presented in Fig.8and on a logarithmic scale in Fig.9.This clearly shows the throughput enhancement achieved by the transmis-sion grating spectrometer.The noise level for the re-flective spectrometer is approximately 13counts =nm ,while for the transmission spectrometer it is approxi-mately 20counts =nm .The peak areas by comparison are 5016and 11,091counts,resulting in signal-to-noise ratios of 394and 568for the reflective and transmission spectrometers,respectively .This is one example of the superior throughput and stray light minimization of the transmission grating spectrometer.Thesuperiorresolutionofthetransmissiondesignis demonstrated by the comparison of peak-normalized signals from the Hg 435:8nm emission line seen in Fig.10.The full width at half-maximum (FWHM)of the peak from the transmission spectrometer is mea-sured to be 2.37pixels,while the FWHM of the peak from the reflection spectrometer is 3.33pixels,or al-most 1pixel wider.The corresponding values for the 546:1nm Hg emission line are 2.67and 3.34pixels for the transmission and reflection grating spectro-meters,respectively .This indicates that theresolutionFig.7.(Color online)Schematic diagram of optical coupling arrangement for the mercurylamp.Fig.8.(Color online)Comparison of signals from the Hg 435:8nm emission line.Solid curve,transmission grating spectrometer;advantage of the transmission grating spectrometer persists across the wavelength range.The peak amplitudes,baseline,and noise levels of a number of Hg emission peaks were measured in all 50of the Hg spectra collected with each spectro-meter.The baseline was calculated as the average in-tensity of two 10nm wide regions on either side of the respective emission peak,and the noise level was calculated as the standard deviation of the intensity values in these two regions.The results are summar-ized in Table 3.In the table,throughput is measured as the peak area (baseline subtracted),the signal-to-background ratio is the peak area divided by the baseline value,and the signal-to-noise ratio is the peak area divided by the noise level.The repeatabil-ity was measured as the standard deviation of the peak heights over the 50Hg spectra divided by the mean amplitude value of the peak.The values in Table 3demonstrate how the perfor-mance advantage of the transmission grating spec-trometer as compared to the reflective grating spectrometer increases across the wavelength range.The signal-to-noise ratio improvement increasing from 6%to 130%highlights this trend especiallywell.This finding is in line with the general charac-teristic of reflection gratings that their efficiency is a strong function of wavelength.B.Laser-Induced Breakdown Spectroscopy TestsThe LIBS experiments were designed to highlight as-pects of spectrometer performance that are of most importance to standoff LIBS applications:through-put and limits of detection.Limits of detection are not only dependent upon how many of the incoming photons reach the detector (i.e.,efficiency),but are also dependent upon the level of scattered light.Since we used the same ICCD camera with both spec-trometers in these experiments,scattered light will be the dominant source of differences in the back-ground intensity levels.Spectral resolution was not evaluated using the LIBS spectra because,typically ,only a fraction of a LIBS spectral line ’s width is due to instrument broadening.LIBS spectral lines are often modeled as Voigt profiles,which are a convolution of a Lorent-zian profile primarily due to the Stark effect,and a Gaussian profile,which is due to a combination of instrument broadening and DopplerbroadeningFig.9.(Color online)Comparison of signals from the Hg 435:8nm emission line on a logarithmic scale.Solid curve,transmission grating spectrometer;dotted curve,reflective grating spectro-meter.Fig.10.(Color online)Comparison of normalized emissions from the Hg 435:8nm line.Solid circles,transmission spectrometer;open squares,reflective spectrometer.Table 3.Improvement of Transmission Spectrometer over Reflection Spectrometer as Measured by Three Hg Emission LinesHg 404:7nmHg 435:8nmHg 546:1nm Refl.Trans.Adv .a Refl.Trans.Adv .Refl.Trans.Adv .Throughput b1817307269%501611091121%350315377339%Signal/background c 647212%1781802%161374133%Signal/noise d 1351436%39456844%296679130%Repeatability e0.0730.04340%f0.0420.02639%0.0570.02066%a Adv .,transmission system advantage ¼ðtransmission value-reflection value)/reflection value.bIntegrated peak area in counts.cPeak area/mean background as described in text.dPeak area/mean noise as described in text.eRelative standard deviation (σ=μ)of peak amplitude over the 50collected spectra.[15].Therefore,quantitatively determining the in-strument broadening from a LIBS spectral line would require deconvolving the Voigt line shape and subtracting the Doppler broadening,which is de-pendent on the plasma temperature,from the total Gaussian width.Because of the potential inaccura-cies in this procedure,we chose to measure the reso-lution advantage of the transmission grating spectrometer using the Hg lamp spectra,as de-scribed in Subsection 6.A and shown in Fig.10,as they are not impacted by the LIBS plasma broaden-ing mechanisms [16].Sample 10m standoff LIBS spectra from the HP-3aluminum alloy is shown in Fig.11,taken at the same ICCD gain setting (120)with both spectro-meters.The figure demonstrates that the raw inten-sities vary from being 1order of magnitude greater in the transmission-grating spectrum to approaching 2orders of magnitude at the longer wavelengths.This is a clear indication that much more light is reaching the ICCD camera when the transmission grating spectrometer is used.While the increase in signal in-tensity is accompanied by an increase in background level,the signal levels of the LIBS peaks are enhanced by a greater amount,as evidenced by the improvements in the signal-to-background levels (see below).Consequently ,the increase in lightthroughput allows us to measure the smaller LIBS peaks in the spectrum without saturating the larger peaks.A comparison of the intensities from single laser shot LIBS spectra taken from the HG-4SRM is shown in Fig.12in the region of the Al I 669nm emis-sion line.This figure also shows the region over which baseline and noise statistics were gathered.As expected,the LIBS results verified the findings of the Hg lamp tests with regard to throughput,back-ground,and noise ing the Al I 669nm emis-sion line,the signal-to-noise ratio and repeatability of each spectrometer was quantified based upon all the single-shot LIBS spectra collected from the six alloys.This aluminum emission line is a nonreso-nance line that is also not self-absorbed.The results are summarized in Table 4.The relatively poor per-formance of the reflective grating system in this wavelength range illustrates one of the drawbacks of such systems for LIBS applications where the grating is fixed and one or more of the measured atomic emission lines is far from the angle at which the grating isoptimized.Fig.11.(Color online)Comparison of single laser shot LIBS spec-tra from the HP-3alloy .The plots are not offset from their actualvalues.Fig.12.(Color online)Comparison of Al 669nm peak from an HG-4alloy spectrum also showing the spectral region over which the baseline and noise statistics were computed.The curves are not artificially offset from each other.Top curve,transmission spec-trometer ICCD gain ¼120;middle curve,reflection spectrometer ICCD gain ¼160;bottom curve,reflection spectrometer ICCD gain ¼120.Table 4.Summary of Spectrometer System Performance as Measured by the Al I 669nm Emission Line StatisticsThroughputaAverage Signal/Background Ratio cAverage Signal/Noise Ratio dRepeatability eTransmission grating spectrometer 10953 3.1037.713%Reflection grating spectrometer 709b 2.888.15f 15%Transmission grating improvement1445%7.5%363%13%a Integrated area under the peak in counts.bCorrected for the 3.2times factor due to the increased gain setting (see text).cPeak area/mean background as described in text.dPeak area/mean noise as described in text.eRelative standard deviation (σ=μ)of peak amplitude over the 50collected spectra from each sample.。
Unityshader实现自由放大缩小效果

Unityshader实现⾃由放⼤缩⼩效果本⽂实例为⼤家分享了Unity shader实现⾃由放⼤缩⼩效果的具体代码,供⼤家参考,具体内容如下代码:以下实现的shader代码:Shader "Hidden/Wave"{Properties{_MainTex ("Texture", 2D) = "white" {}_WaveWidth("Wave Width",float) = 0.5_CenterX("CenterX",float)=0.5_CenterY("CenterY",float)=0.5}SubShader{// No culling or depthCull Off ZWrite Off ZTest AlwaysPass{CGPROGRAM#pragma vertex vert#pragma fragment frag#include "UnityCG.cginc"struct appdata{float4 vertex : POSITION;float2 uv : TEXCOORD0;};struct v2f{float2 uv : TEXCOORD0;float4 vertex : SV_POSITION;};float _WaveWidth;float _CenterX;float _CenterY;v2f vert (appdata v){v2f o;o.vertex = UnityObjectToClipPos(v.vertex);o.uv = v.uv;return o;}sampler2D _MainTex;fixed4 frag (v2f i) : SV_Target{float2 center=float2(_CenterX,_CenterY);float2 distance= center - i.uv;float x=center.x+ center.x*(-distance.x/center.x) *(1-_WaveWidth);float y=center.y+ center.y*(-distance.y/center.y) *(1-_WaveWidth);float2 uv = float2(x,y);return tex2D(_MainTex, uv);}ENDCG}}}主要的内容还是在frag中。
- 1、下载文档前请自行甄别文档内容的完整性,平台不提供额外的编辑、内容补充、找答案等附加服务。
- 2、"仅部分预览"的文档,不可在线预览部分如存在完整性等问题,可反馈申请退款(可完整预览的文档不适用该条件!)。
- 3、如文档侵犯您的权益,请联系客服反馈,我们会尽快为您处理(人工客服工作时间:9:00-18:30)。
Personal Refl ection Essay AssignmentPrepared by: Howard HeStud ent ID: A00688012Instructor: Gene HomelDate: 2012-8-22IntroductionThe movement of European integration has started for fifty years so far. In many ways, Europe has reached a state nobody has yet reached in the past. Perhaps someone will say, this is a result of Worl d War II, the brutality of war makes them to rethink their future path, so the Schuman Decl aration and Coal and Steel Community come out one by one; even until the European Union is est ablished, these all proves that two wars have made a great impact on European. However, another question is raised: before the Schuman Decl aration is approved, how d oes the European think. My focus is that, we are familiar with the EU in the evolutionary process, but we are ignoring the history before the EU is established. Schuman’s Decl aration is not suddenly appeared; Europe has over a period of thinking and brewing before that. As we l ook at the process of European integration shoul d not only st art from 1950, perhaps we shoul d start from the turn of the century. When facing with the conflict, how does European deal with? What they l earn about the Worl d War I and Worl d War II? How and why did this t ransformation come about is the main topic for this essay.What is "European"? This is a probl em pl ague Europeans for a l ong time, and it is not a simpl e probl em. From a geographical perspective, someone will expl ain: is the British and Russian considered part of Europe? Someone from the spirit l evel to expl ain, the root of North American is from Europe, are they considered part of Europe? Others to expl ain the basis for the distinction of race, thescattered Jews in Europe, and wand ering Gypsies in Europe, are they considered part of Europe? More peopl e to judge by the Roman Catholic, if the Japanese believe in the religion of Rome, are they considered part of Europe? I must admit that this is an intractabl e probl em, but yet at the same time it is chall enging and interesting.Impact from Wars19th century Europe is a pure paradise and some have ever call ed this period as a gol den age in Europe. However, the outbreak of the First Worl d War, whol e atmosphere in Europe has been totally changed. Before the war, most countries in Europe seem optimistic about the future. The rise of newspapers, tel egraph, trains and travel s have pull ed peopl e cl oser. More and more peopl e receive compul sory education opportunities, as well as better communication. Peopl e have basic understanding of European geography and political system. However, it is a bad start for the European integration. In the l ate 19th century, the upsurge of nationalism in Europe and the rise of imperialist countries makes the idea of European integration is obsol ete. Peopl e no l onger even talk about Europe. Europe is no l onger a correct proposition. Worl d War I began in 1914 and ended in 1918. This war is not a traditional European war anymore, and it turns into a worl d war of mass destruction. After Worl d War II, the rest in Europe only dil apidated and chaotic, European self-consciousness has l ong gone.Europe (1914-1945)After the Worl d War I, United States get s involved. The principl e of “Fourteen Point s” is mentioned by President Woodrow Wil son. The League of Nations is established in ord er to safeguard the count ries’ freedom and worl d peace. Although the major participating countries mostly from Europe, it just not only provide ideal program for the future, but al so they want to buil d a new gl obal peace. Moreover, some of them have become the content of the Treaty of Versaill es (Versaill es Treaty).However; it is not fair to Germany, which is defeated in Worl d War I. The main goal is to weaken the German force. Therefore, German has to assume all responsibility for the l ost: pay huge compensation, cede many l and to Pol and; set the restrictions to prevent army grow in power. Unfortunately, the Versaill es Treaty only brings the chaos to Germany instead of peace.When communist forces successfully take power in Russia, a new idea is brought to Europe: the war is not existed between countries, but in the cl ass struggl e within each country. As a result, the Soviet system of government will become a direct chall enge to all the liberal democrat s and nationalist s. The communist s think Communism is a modern phenomenon, a solution for the future. Interestingly, in the post-war, Fascism, which is extreme anti-communist ideol ogy, al so believes that he is a modern phenomenon. Neverthel ess, both ideol ogies are malicious toward the democracy because they believe that democracy is outdated and wrong ideol ogy.In Italy, Benito Mussolini came to power in 1922, and his fascist regime woul d take at l east two years to fully form. Unfortunately, the crisis of the l ate 1920s, the European economic disintegrates. Great Depression causes l ot s of unempl oyment; so many European countries have to give up a democratic regime. They do not trust the democracy anymore. As the power of Nazi Germany comes out, peopl e have not recognized that is the beginning of the Worl d War II. In summary, during this period, the major European is competing among the three ideol ogies: communism, fascism and freed om of democracy. Their different ideol ogies not only shaped the different European thinking more deeply, but al so deeply affected with the l ater devel opment of the European integration idea.With the continuation of the war and the brutal campaign, a voice is strongly appeared: peopl e begin to think about what is beyond the war. They need a full expl anation for the war occurrence. The l onger the time is, the stronger the voice is. In these circumstances, the so-call ed "real" Europeanism really exist s, but it is still unabl e to determine. French history schol ar the community rossall (Jean-Baptiste Durosell e) In this regard, it is a simpl e sentence: “From 1914 to 1918, there was no Europe.” But even so, they a re still l ooking for new Europe.The European Postwar Plan (1923-1930)The strength of democracy in post-war Europe start to grow, many optimist s l ooks forward new Europe. They l earn a l esson from ruelty of war and understand the importance of cooperation. After 1923, Europe begin to rebuil d, many devise apl an of integration in Europe. The most important and influential pl an is suggested by Caray Wilkie (Coudenhove Kal ergi). The Caray Wilkie "pan-European" idea, the most import ant function, is to ensure peace. Caray Wilkie believes that, “they shoul d establish a compul sory arbitration and multil ateral cooperation within Europe.”In order to reduce the possibility of bord er conflict, it reduces in the importance of the border. The function of the pan-European Union is to protect the small European country against external threat s, especially the threat from Russia. The ultimate goal, of course, is to unify Europe.Another focus is economic. He believes that those small countries in Europe are self-contained. That makes a very dangerous state to Europe. It is much more difficult to restore the damage caused by the war in Europe too. The concept of “pan-European” significantly reduces the cost of armament s and simul ates the economic growth through a no-tariff b arriers “Common Market”. Therefore, if European integration is successful, the “pan European” occupies an excell ent position for worl d economy.European integration plan - Briand (Aristide Briand)The Briand think European countries shoul d jointly signed a t reat to establish a Union based on the “European spirit” in order to unite all member states. Furthermore, this treaty shoul d provide for the European government s to hol d regul ar meetings to promote the progress of European cooperation. At the same time, he suggest s that, they shoul d set up a small er but permanent politicalcommittee members by the countries in establishment of secret ariat composed. It is aim to deal with the usual General Schedul e. In his point of view, as l ong as being successful in the l evel of political cooperation, the economic cooperation will be fine to move forward. In other words, if there is no political cooperation as premise, it is impossibl e to achieve European Common Market.Nazi propaganda trickHowever, Nazism is essentially contrary to European integration. Before and during the Worl d War II, Nazi Germany is constantly using the concept of Europe as the propaganda tool. In the beginning of the WWII, Germany has created an illusion of high degree of economic cooperation in the European Union; so many peopl e believe that the future woul d be bright if they cooperate with Germany. Therefore, Germany uses such propaganda during war more frequently and effectively than allies. Caray Wikie and other fed eral supporter of the European concept know that, as l ong as the Nazi Germany is here, the so-call ed EU vision is never coming. In 1930s, the public and support are not interested in federalism at all. Until the Worl d War II has broken out, European integration pl an is recovered again. Almost all in European are against Germany, and they begin to ask for the European integration. They al so emphasis that: overcome the narrow concept of the nation-state; and put forward the demand to the maintenance of human right s and freedom.SummaryFrom 1914 to 1945, Europe has experienced two worl d wars. The politics and society have a significant change as well as the daily life in many aspect s. During thirty five years, the characteristics of European change form arrogant and compl acent to discouraged and disheartened. For European concept, as we have seen before, they t ry so hard to attempt different methods in order to solve the serious situation, but the concept of European Union is not accepted by all countries and peopl es. Moreover, we can see that the concept of nation is the common el ement.During that period, the concept of nation decided the d evel opment of all other concept s. Many event s are al so guided due to the rise of the concept of nationlism. Firstly, in the fiel d of European political, nationalism has been the main concerns of the count ries dipl omatic issues, and issues are raised by many politicians. Even the outbreak of the two worl d wars, nationalism al so pl ays an important absolute fuse. Furthermore, the concept of nation in the European has been widely supported. The postwar Treaty of Versaill es is based on the nationalism. Europe can be seen as a combination of different cultures, but why can not be regarded as the combination of the different ethnic groups? As result s of many politicians are shaping for the European integration, of course, they still not jump out of the framework of nationalism. For exampl e, Briand integration pl an still has not deviated from the ethnic principl e eventually.In addition, for some thinkers oppose ethnic principl es, such as Caray Wilkie, although he st ressed that go beyond the concept of the st ate, it is interesting that the context of his ideas still foll ow the national principl e Before Europeans to fully realize the concept of European integration, the idea of the nation may still need to exist. Perhaps we can say that, without the presence of nationalism, the European concept at the time and perhaps impossibl e to shaping out. The same time, due to the progress of science and technol ogy in Europe in the face of external chall enges, the formation of the European concept, more or l ess is al so slightly forced.Although the technol ogy has been tremend ous progress in the early twentieth century, European nationalism has reached the point of ext remely prosperous. At the same time, it is al so a very bl eak time in Europe. Technol ogy and nationalism to a new direction in Europe, but has gradually undermined the value of the 19th century. Nationalism like the French phil osopher Henri Bergson (Henri Bergson) said, although the technol ogy to bring the Europeans a better life, however extreme despotism take this as a favorabl e tool. We can say that nationalism is like the doubl e-edged sword, it is a strong foundation, but it destruct s it self at the same time.This is the plight of Europe at that time, peopl e cannot compl etely abandon the traditional values of the 19th century, but it cannot accept the new despotism either, perhaps just as the German phil osopher Husserl (Edmund Husserl) said, “Europe's l argest dangerous is tired.”Europe realizes that they are no l onger the power center of the worl d, and the situation changes: the so-call ed "European" is only one area of the gl obal map. Perhaps the concept of “European” is gradually formed in a fear. When facing the external chall enges and internal weakness, the immortality of the European spirit has become a best tool to protect Europe. Eventually, the new Europe has been transformed after 1945.。