MX7520JCWE中文资料
Part-V-NETGEAR-WC7520无线控制器配置操课件

•28
WC7520配置
无线策略配置
•Part-V-NETGEAR-WC7520无线控制器配置操
•29
WC7520配置
基本属性配置
1. 在Configuration > Wireless > Basic > Channel Allocation中,将 Automatic Channel allocation选中enable;关闭Prevent Channel Change During的选项;关闭Schedule Channel Allocation的选项:
•Part-V-NETGEAR-WC7520无线控制器配置操
•21
WC7520配置
WC7520的基本配置 AP与WC7520的关联
WC7520会立即搜索网络中可管理的AP并显示在列表中
•Part-V-NETGEAR-WC7520无线控制器配置操
•22
WC7520配置
WC7520的基本配置
AP与WC7520的关联
•24
WC7520配置
WC7520的基本配置 AP与WC7520的关联
•Part-V-NETGEAR-WC7520无线控制器配置操
•25
WC7520配置
WC7520的基本配置 AP与WC7520的关联 4. 当AP的状态Status显示Connected的时候,那么AP就已经成功的关 联到WC7520。
•Part-V-NETGEAR-WC7520无线控制器配置操
•14
WC7520配置
检查WC7520的版本及版本升级
•Part-V-NETGEAR-WC7520无线控制器配置操
•15
WC7520配置
WC7520的基本配置
摩克斯(Moxa)工业以太网解决方案ICS-G7526 G7528系列产品介绍说明书

50 ms @ 250 switches), RSTP/STP, and MSTP for network redundancy • IGMP snooping and GMRP for filtering multicast traffic • IEEE 802.1Q VLAN and GVRP protocol to ease network planning
switches), RSTP/STP, and MSTP for network redundancy
››Isolated redundant power inputs with universal 110/220 VAC
富士通互动白板IW552 IW652 IW752 IW862产品说明书

Data SheetFUJITSU Interactive Panel IW552/ IW652/ IW752/ IW862Interactive Display With 4k Resolution Array•Available In 55”/65"/75"/86”, offers big viewing experienceHigh Accuracy Touch Experience•Intuitive 20 points of touch•Resistant to optical interference (use as usual under direct sunlight)•Resistant to shielding•Rapid response, fluent in writing & demonstrationDurable Whiteboard Surface•AG tempered glass Mohs level 7Multi OS + Multi Modules•Seamless switching between OS•Built-in OS + pluggable PC module•Upgradable built-in WIFI moduleTechnical DetailsHardware FeaturesPicture PerformancePanel and backlit IPS, DLEDScreen surface treatment AG tempered glass Mohs level 7Contrast – typical 55”,65”: 1200:1 // 75”: 1100:1 //86”: 1200:1Viewing angle (h/v) - typical 178oColor performance 1.07 billion colorsBrightness – typical 350 cd/m2(Typ)Flicker-Free technology SupportsAnti-Glare filter SupportsSize and ResolutionAspect ratio 16:9Resolution (native) 3840(H)×2160(V)Picture size (H*V) 55”: 1209.6×680.4mm // 65”: 1428.48mm×803.52mm //75”: 1649.664×927.936mm // 86”: 1895.04×1065.96mmPixel pitch 55”: 0.315mm // 65”: 0.372mm // 75”: 0.4296mm // 86”: 0.4935mm Response time 8ms (Typ)Refreshing frequency 60HzConnectivityVGA/D-SUB IN 1 × D-SUBDVI N/ADP N/AHDMI 1 × HDMI OUT (4K), 3 × HDMI IN (HDMI2.0)USB 3 × USB 2.0 (including 2 USB ports in front)3 × USB 3.0Audio In 1 × 3.5 mm stereo phone jackAudio output 1 × Audio outRS232 control 1 × RS232Built-in speaker Yes, 2 × 12 WLAN 1 × GIGABIT LAN (RJ45)TOUCH OUT 2 × TOUCH OUTSPDIF 1 × SPDIFBuilt-in Wi-Fi Yes, dual bandBluetooth SupportsTouch SystemSensing type Infrared recognitionTouch point 10 points writing, 20 points touchMinimum object size 55”- 86”: 3mmWriting double colors with double penssimultaneously SupportsTouch tool Finger, Finger cover by glove, Opaque objectsResponse time ≤10msAccuracy 55”- 86”: ±1.5mm(over 90% Area)Communication mode Full-speed USB (driver free)Surface hardness Toughened glass with Level 7 of Mohs standardRealtime 4k screen capture and annotation SupportsBuilt-in moderator console YesPower Consumption (typical)Soft switch off ≤0.5WOverall power(nominal power) 55”: 300W // 65”: 350W // 75”: 350W // 86”:550WElectrical ValuesRated voltage range 100 V – 240 VRated frequency range 50 Hz – 60 HzProtection class 1Quality and ReliabilityMTBF 50,000hSystemCPU (Central Processing Unit) Dual core A73+Dual core A53 (up to 1.7Ghz)GPU (Graphics Processing Unit) Quad core Mali G51System memory 55”,65”: 3GB DDR4 // 75”,86”: 4GB DDR4Storage 55”,65”: 16GB // 75”,86”: 32GBOS Android 8.0Dimensions / Weight / EnvironmentalKey location & number Front physical keys, 1Dimension L*H*D 55”: 1269×773×86mm // 65”: 1489×897×86mm // 75”: 1710×1020×86mm // 86”:1957.2×1160×86mmDimension(package) L*W*H 55”: 1428×220×878mm // 65”: 1656×204×1050mm // 75”: 1860×280×1170mm // 86”:2211×280×1370mmNet weight 55”: 26.75kg // 65”: 40.2kg // 75”: 51.75kg // 86”: 64.65kgGross weight 55”: 34.35kg // 65”: 51.3kg // 75”: 70.35kg // 86”: 95.55kgThickness of machine and wall mount 55”, 65”: 116mm(9060G) // 75”: 132mm(9060F)// 86”: 126mm(9060F)Wall-hanging Screw Spec M8×25mmVESA 55”: 400×200mm // 65”: 600×400mm // 75”: 800×400mm // 86”, 98”: 800×600mm MiscellaneousColor BlackPassword Lock SupportsUSB Key Panel Lock SupportsMagnetic Pen Holder YesSmart Shared USB Supports, two front-facing USB portsSwitch sources Supports, manual/ auto switching (while plug-in active signal source)Clock & Time Manual/ automatically synchronize with serverScheduled power up shutdown SupportsAccessoriesAC Power cable British Standard Power Cord (3 meters), EU Power Cord (3 meters)USB cable 5 metersVGA cable 5 metersHDMI cable 3 metersAudio cable 5 metersWriting pen 2Remote control 1Operation instruction 1Order InformationOrder code 55”: HLIWB0009A-01 // 65”: HLIWB0010A-01// 75”:HLIWB0011A-01 // 86”: HLIWB0012A-01 EAN code 55”: 8888551288564 // 65”: 8888551288571// 75”:8888551288588 // 86”: 8888551288595Software FeaturesWhite BoardingMultiple pages note taking SupportsImport files in multiple formats Supports, image files and PDFExport notes in multiple formats SupportsSave notes to OneDrive / Google Drive SupportsBuilt-in background templates YesCustomizable background Supports, 4K resolutionBuilt-in 2D/3D object drawing tools YesExpandable page size SupportsPage management-Add/ remove/ navigate pages SupportsRealtime 4k screen capture and annotation SupportsIntelligent handwriting recognition Supports in Windows ModeSmart objective insertion Supports in Android ModeReal-time whiteboard co-authoring SupportsCloud based whiteboard co-authoring SupportsAnnotation toolbar Left/right/floating/disabledWhiteboard content sharing- via email Supports in Windows ModeWhiteboard content sharing- via QR code Supports in Android / Windows Mode Wireless Screen MirroringWireless screen mirroring SupportsPIN code connection mode Supports both static and dynamic pin codes Maximum number of split screens/ devicesprojecting to the panel simultaneously (PanelStandalone Android Mode)9Maximum number of split screens/ devicesprojecting to the panel simultaneously (PanelConnected to PC or with slot-in PC Windows Mode)Unlimited (depending on network bandwidth)Self-Hotspot screen mirroring SupportsNative AirPlay protocol for screen mirroring SupportsNative Chromecast protocol for screen mirroring SupportsMirroring of panel display to client devices SupportsMax number of client devices Unlimited (depending on network bandwidth)Reversely control Windows / MacOS during Screen Mirroring Supports,client software requiredRemotely annotate the panel from the connecteduser’s deviceSupportsOnScreen Moderator Control Console for managingscreen mirroring connections /users.SupportsOnScreen Moderator Control Icon on/off option SupportsInvite client device to screen mirroring SupportsMulti-Panels Display Synchronization SupportsMulti-Panel Display Synchronization AuthorizationControlSupportsMobile visualizer feature YesAir Mouse/ Keyboard SupportsWireless projection via QR Code SupportsWireless projection across subnet SupportsScreen RecordingScreen Recording SupportsFloating tool menuFloating tool menu Left/right/floating/disabled, position adjustableCentralized Panel Management – (MDM, Optionalmodule)Remotely, batch mode install / uninstallapplicationsSupportsRemote installation of application onto the panel SupportsRemote installation of applications from Googleplay store.SupportsRemote real-time screen control / view SupportsRemote batch process SupportsBroadcast notice (text and image) to all orselected interactive panelsSupportsRemote Power management Supports power on/off, restart, wake on LAN Device-level usage history and reports SupportsLow-blue light ModeLow-blue light Mode Supported in Android modeFile ManagementFile Explorer Yes, preinstalledWeb BrowserWeb Browser Yes, preinstalledMedia PlayerCodec supported*Video:MPEG-1/2, DivX® (1/2/3/4/5/6), MPEG-4 ASP, XviD, 3ivX D4, H.261, H.263 / H.263i, H.264 / MPEG-4 AVC, Cinepak, Theora, Dirac / VC-2, MJPEG (A/B), WMV 1/2, WMV 3 / WMV-9 / VC-1, Sorenson 1/3, DV, On2VP3/VP5/VP6, Indeo Video v3 (IV32), Real Video (1/2/3/4).Audio:MPEG Layer 1/2, MP3 - MPEG Layer 3, AAC - MPEG-4 part3, Vorbis, AC3 - A/52, E-AC-3, MLP / TrueHD>3, DTS, WMA 1/2, WMA 3, FLAC, ALAC, Speex, Musepack / MPC, ATRAC 3, Wavpack, Mod, TrueAudio, APE, Real Audio, Alaw/µlaw, AMR (3GPP), MIDI, LPCM, ADPCM, QCELP, DV Audio, QDM2/QDMC, MACE.* Powered by VLC Player for Android。
惠普 OfficeJet 7510宽幅多功能打印机说明书

DatasheetHP OfficeJet 7510Wide Format All-in-One PrinterEverything your business needs to impressHelp your business stand out with stunning,wide-format colour prints at a price that you can afford.Accelerate productivity and keep business moving with a wide range of tools.Create professional-quality marketing materials –right in theoffice.Highlights●Print Speed:Up to 15ppm ISO black (A4);Up to 8ppm ISO colour (A4)●Connectivity:Standard 1Hi-Speed USB 2.0;1Ethernet;1Wireless 802.11b/g/n;1USB Host;1RJ-11fax●Display:6.73cm (2.65-inch)LCD with IR touch function ●Fax Capability:YesGet whatever you need –as fast as you need it●Scan,copy and fax from one device and print in a wide range of sizes –for virtually anybusiness need.●Easily access,print and share resources on a network with built-in Ethernet and wireless capabilities.1●Scan to your USB drive,PC and email,and fax to your PC for quick and easy access.2●Walk up and print or scan right from a memory device via the easy-access USB port.Enjoy affordable,professional-quality printing●Help your business save with low-cost printing –from photos to borderless marketingmaterials.●Ensure you never throw away useable ink,with Original HP individual ink cartridges.●Count on laser-quality black text and stunning colour graphics and photos –right in theoffice.●Create professional-quality borderless flyers,brochures and more –directly from yourwide-format all-in-one.Get more done in less time●Access time-saving,built-in business apps –just tap and swipe the 6.73cm (2.65-inch)touchscreen.3●Easily print from your mobile device and stay connected on the go –even withoutaccessing a network.4,5●Manage printing tasks and scan on the go with the free HP All-in-One Printer Remote mobile app.6●Easily scan identification cards and other two-sided documents onto a single page.Save energy.Save paper.Save time.●Schedule your printer to turn on when you need it and off when you don’t –and save upto 40%on energy use.7●Conserve resources,using digital fax capabilities that enable you to view and store faxeselectronically.HP OfficeJet7510Wide Format All-in-One Printer Technical specificationsFunctions Print,copy,scan,faxPrint speed Up to15ppm ISO black(A4);Up to8ppm ISO colour(A4)Print resolution Up to600x1200dpi black;Up to4800x1200optimised dpi colour(whenprinting from a computer on selected HP photo papers and1200input dpi) Print technology HP Thermal InkjetPrint Area Print margins:Top:3.3mm;Bottom:3.3mm;Left:3.3mm;Right:3.3mm;Maximum print area:330x482.6mmPrint languages HP PCL3GUI;HP PCL3EnhancedPrint capabilities Borderless printing:Yes(up to A3+)Print cartridges number4(1each black,cyan,magenta,yellow)Mobile printing capability Apple AirPrint™;HP ePrint;Wireless direct printing;Mopria-certified Monthly duty cycle Up to12,000pages(A4);Recommended monthly page volume:200to800 Automatic paper sensor YesDisplay 6.73cm(2.65-inch)LCD with IR touch functionMultitasking supported YesWireless Capability Yes,built-in Wi-Fi802.11b/g/nConnectivity Standard1Hi-Speed USB2.0;1Ethernet;1Wireless802.11b/g/n;1USB Host;1RJ-11faxNetwork Capabilities Standard(built-in Ethernet,Wi-Fi802.11b/g/n)Memory Standard256MB;Maximum256MBCopier settings Media size include10x15cm,A4,A3;Maximum number of copies:Up to99copies;Copy resolution:Up to600x1200dpi;Copy resolution,color text andgraphics:Up to4800x1200optimised dpi colour(when printing from acomputer on selected HP photo papers and1200input dpi);Copier resize:25to400%Copy speed Up to9cpm black ISO(A4),Up to6cpm colour ISO(A4)Scanner specifications Scanner type:Flatbed,ADF;Scan technology:CIS;Scan input modes:Front-panel scan,copy,fax,HP Software,EWS;Twain version:Version1.9;Scansize maximum(flatbed,ADF):216x356mm;Optical scan resolution:Up to1200dpiScan file format Scan file type supported by software:Bitmap(.bmp),JPEG(.jpg),PDF(.pdf),PNG(.png),Rich Text(.rtf),searchable PDF(.pdf),Text(.txt),TIFF(.tif)Scan speed Up to2.0ips(flatbed);Up to1.35ips(ADF)(A4)Scannable area Maximum media size:216x356mm;Scannable area(ADF):Minimum mediasize:127x178mm;Maximum media size:216x356mm ADFBit depth/Greyscale levels24-bit/256Digital sending Standard:Scan to thumb drive/PCFax Yes,colour,Up to33.6kbpsFax specifications Fax memory:Up to100pages;Fax resolution:Standard:203x98dpi;Fine:203x196dpi,256levels of grey;Quick dialing:Up to100numbers;Broadcasting,maximum locations:48locations;Fax speed:4sec per page Media types Plain paper,HP Photo Papers,HP Matte Brochure or Professional Paper,HPMatte Presentation Paper,HP Glossy Brochure or Professional Paper,otherphoto inkjet papers,other matte inkjet papers,other glossy inkjet papers,thickplain paperMedia sizes Supported A3;A4;A5;A6;B4(JIS);B5(JIS);Envelope(A2,C5,C6,DL);Indexcard A4;9x13cm;13x18cmMedia Handling Input capacity:Up to250sheets;Up to30envelopes;Up to80cards cards;Upto60sheets photo paperOutput capacity:Up to75sheets,Up to10envelopesMaximum:Up to75sheetsDuplex printing:ManualADF:Standard,35sheetsPaper weight Supported:34to250g/m²;ADF:60to90g/m²;Recommended:60to105g/m²What's in the box G3J47A:HP OfficeJet7510Wide Format All-in-One Printer;HP932/933cartridges;Getting started guide;One wordless poster;Power cord;Powersupply;Software CD;Phone cordSupplies CN053AE HP932XL High Yield Black Original Ink Cartridge~1,000pagesCN054AE HP933XL High Yield Cyan Original Ink Cartridge~825pagesCN055AE HP933XL High Yield Magenta Original Ink Cartridge~825pagesCN056AE HP933XL High Yield Yellow Original Ink Cartridge~825pagesCN057AE HP932Black Original Ink Cartridge~400pagesCompatible operating systems Microsoft®Windows®8.1(32-bit and64-bit),Windows®8(32-bit and64-bit),Windows®7(32-bit and64-bit),Windows Vista®(32-bit and64-bit);Mac OS Xv10.8,v10.9or v10.10;Linux(for more information,see/hplip-web/index.html)Minimum system requirements Windows:Windows®7,8,8.1:1GHz32-bit(x86)or64-bit(x64)processor,2GB available hard disk space,Internet Explorer,CD-ROM/DVD or Internet,USB;Windows Vista®:800MHz32-bit(x86)or64-bit(x64)processor,2GBavailablehard diskspace,Internet Explorer8,CD-ROM/DVD or Internet,USBMac:Mac OS X v10.8,v10.9or v10.10:1GB available hard disk space,Internet,USBSoftware included HP Printer Software,Google Toolbar,HP Update,Shop for Supplies Online,HPPhoto CreationsPrinter dimensions(W x D x H)Minimum:613x483x366mm;Maximum:613x725x287mm(cleanout andOP tray fully extended)Package dimensions(W x D x H)704x502x406mmPrinter Weight13.02kgPackage weight16.55kgOperating environment Temperature:5to40ºC,Humidity:20%to80%RHStorage Temperature:-40to60ºC,Humidity:Maximum90%RH non-operatingAcoustics Acoustic power emissions:Acoustic pressure emissions:56dB(A)(fast draftblack printing);57dB(A)(fast draft colour printing);54dB(A)(normal blackprinting);52dB(A)(normal colour printing);52dB(A)(ADF copy normal);52dB(A)(flat bed copy normal)Power Requirements:Input voltage:100to240VAC(+/-10%),50/60Hz(+/-3Hz)Consumption:27.7watts(printing);20.87watts(copying);4.57watts(ready);1.89watts(sleep);0.31watts(manual-off);0.31watts(auto-off)Power supply type:External universal power supplyCertifications CISPR22:2008/EN55022:2010Class B;EN55024:2010;EN61000-3-2:2006;EN61000-3-3:2008Energy Star Qualified:YesCountry of origin Made in ChinaWarranty Standard one-year HP limited hardware warranty.Three-year HP limitedhardware warranty after registration within60days of purchase(see/eu/3yearwarranty).Warranty and support options vary byproduct,country and local legal requirements.Service and support UG076E HP3year Care Pack w/Next Day Exchange for OfficeJet Pro PrintersUG199E HP3year Care Pack w/Standard Exchange for OfficeJet Pro Printers(UG076E:only Austria,Belgium,Denmark,Finland,France,Germany,Ireland,Italy,Netherlands,Norway,Portugal,Spain,Sweden,Switzerland,UK,CzechRepublic,Greece,Hungary,Poland,Slovakia,UG199E:all EMEA countries)Footnotes1Wireless performance is dependent on physical environment and distance from access point.;2Requires a wireless access point and an Internet connection to the printer.Services may require registration at .Availability varies by country,language and agreements.;3Requires a wireless access point and an Internet connection to the printer.Services require registration.App availability varies by country,language and agreements.For details,visit.;4Local printing requires mobile device and printer to be on the same network or have a direct wireless connection.Remote printing requires an Internet connection to an HP web-connected printer.For details on how to print,including whether an app is required,see /go/mobileprinting.;5Mobile device needs to be connected directly to the Wi-Fi network of a wireless direct-capable MFP or printer prior to printing.Depending on mobile device,an app or driver may also be required.Wireless performance is dependent on physical environment and distance from the access point in the MFP or printer.For details,see /go/businessmobileprinting.;6Mobile device requires wireless access point and an Internet patible with iPhone®4and later,iPad®4th generation,iPad mini™,iPad Air®,iPod®5G using iOS7or later and mobile devices using Android™4.0.3or later. Features controlled may vary by mobile device operating system.Scan/copy control requires mobile device and printer to be on the same wireless network or through wireless direct connection to printer.For mobile scanning,device camera requires5megapixels or greater with autofocus capability.;7Energy savings calculation assumes the device is scheduled to be off for12hours per weekday and48hours per weekend.Reduced energy use is compared with a typical daily usage model,which assumes devices remain in off mode overnight and on the weekend./ukThe product could differ from the images shown.©Copyright2015Hewlett-Packard Development Company,L.P.The information contained herein is subject to change without notice.The only warranties for HPproducts and services are set forth in the express warranty statements accompanying such products and services.Nothing herein should be construed as constituting an additional warranty.HP shall not be liable fortechnical or editorial errors or omissions contained herein.4AA5-7770EEE,July2015。
WT7520 电源控制芯片

12 DET 13 VCC 14 OPOUT 15 OPNEGIN 16 VADJ
TYPE I I I I P O O O I
O O
I P O I I
FUNCTION
OVP/UVP input FOR 3.3V. OVP/UVP input for 5V. OVP/UVP input for 12V. Extra OVP protection input. Ground. Oscillation frequency set by external resistor. PWM open drain output 1. PWM open drain output 2. Remote on/off input. REM=”low” that means the main SMPS is turned-on. REM=”high”, the main SMPS is turned-off. Soft start function set by external capacitor. Power good signal. PG= ”high” means “power good”. PG= ”low” means “power fail”. Extra protection input. Supply voltage. OP compensation output. OP compensation negative input. OP compensation positive input , feedback voltage sense input.
WC7520 Wireless Access Point 用户指南说明书
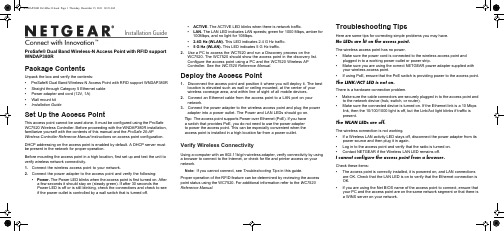
Installation Guide• ACTIVE . The ACTIVE LED blinks when there is network traffic.• LAN. The LAN LED indicates LAN speeds; green for 1000 Mbps, amber for 100Mbps, and no light for 10Mbps.• 2.4G Hz (WLAN). This LED indicates 2.4 G Hz traffic.• 5 G Hz (WLAN). This LED indicates 5 G Hz traffic.2. Use a PC to access the WC7520 and run a Discovery process on theWC7520. The WC7520 should show the access point in the discovery list. Configure the access point using a PC and the WC7520 Wireless AP Controller. See the WC7520 Reference Manual .Deploy the Access Point1. Disconnect the access point and position it where you will deploy it. The bestlocation is elevated such as wall or ceiling mounted, at the center of your wireless coverage area, and within line of sight of all mobile devices.2. Connect an Ethernet cable from the access point to a LAN port on yournetwork.3. Connect the power adapter to the wireless access point and plug the poweradapter into a power outlet. The Power and LAN LEDs should go on.Tip: The access point supports Power over Ethernet (PoE). If you have a switch that provides PoE, you do not need to use the power adapter to power the access point. This can be especially convenient when the access point is installed in a high location far from a power outlet.Verify Wireless ConnectivityUsing a computer with an 802.11b/g/n wireless adapter, verify connectivity by using a browser to connect to the Internet, or check for file and printer access on your network.Note: If you cannot connect, see Troubleshooting Tips in this guide.Proper operation of the RFID feature can be determined by reviewing the access point status using the WC7520. For additional information refer to the WC7520 Reference Manual.Troubleshooting TipsHere are some tips for correcting simple problems you may have.No LEDs are lit on the access point.The wireless access point has no power.• Make sure the power cord is connected to the wireless access point andplugged in to a working power outlet or power strip.• Make sure you are using the correct NETGEAR power adapter supplied withyour wireless access point.• If using PoE, ensure that the PoE switch is providing power to the access point.The LINK/ACT LED is not on.There is a hardware connection problem.• Make sure the cable connectors are securely plugged in to the access point andto the network device (hub, switch, or router).• Make sure the connected device is turned on. If the Ethernet link is a 10 Mbpslink, then the 10/100/1000 light is off, but the Link/Act light blinks if traffic is present.The WLAN LEDs are off.The wireless connection is not working.• If a Wireless LAN activity LED stays off, disconnect the power adapter from itspower source and then plug it in again.• Log in to the access point and verify that the radio is turned on.• Contact NETGEAR if the Wireless LAN LED remains off.I cannot configure the access point from a browser.Check these items:• The access point is correctly installed, it is powered on, and LAN connectionsare OK. Check that the LAN LED is on to verify that the Ethernet connection is OK.• If you are using the Net BIOS name of the access point to connect, ensure thatyour PC and the access point are on the same network segment or that there is a WINS server on your network.ProSafe® Dual Band Wireless-N Access Point with RFID support WNDAP380RPackage ContentsUnpack the box and verify the contents:• ProSafe® Dual Band Wireless-N Access Point with RFID support WNDAP380R • Straight through Category 5 Ethernet cable • Power adapter and cord (12V, 1A)• Wall mount kit • Installation GuideSet Up the Access PointThis access point cannot be used alone. It must be configured using the ProSafe WC7520 Wireless Controller. Before proceeding with the WNDAP380R installation, familiarize yourself with the contents of this manual and the ProSafe 20-APWireless Controller Reference Manual instructions on access point configuration. DHCP addressing on the access point is enabled by default. A DHCP server must be present in the network for proper operation.Before mounting the access point in a high location, first set up and test the unit to verify wireless network connectivity.1. Connect the wireless access point to your network.2. Connect the power adapter to the access point and verify the following:• Power. The Power LED blinks when the access point is first turned on. After a few seconds it should stay on (steady green). If after 30 seconds thePower LED is off or is still blinking, check the connections and check to see if the power outlet is controlled by a wall switch that is turned off.December 2011This symbol was placed in accordance with the European Union Directive 2002/96 on the Waste Electrical and Electronic Equipment (the WEEE Directive). If disposed of within the European Union, this product should be treated and recycled in accordance with the laws of your jurisdiction implementing the WEEE Directive.©2011 by NETGEAR, Inc. All rights reserved. NETGEAR, the NETGEAR logo, and ProSafe® are registered trademarks of NETGEAR, Inc. in the United States and/or other countries. Other brand and product names aretrademarks or registered trademarks of their respective holders. Information is subject to change without notice.I cannot access the Internet or the LAN with a wireless capable computer.There is a configuration problem. Check these items:• You might not have restarted the computer with the wireless adapter to haveTCP/IP changes take effect. Restart the computer.• The computer with the wireless adapter might not have the correct TCP/IPsettings to communicate with the network. Restart the computer and check that TCP/IP is set up correctly for that network. The usual setting for Windows on the Network Properties is set to “Obtain an IP address automatically.”• The wireless access point’s default values might not work with your network.Check the wireless access point default configuration against the configuration of other devices in your network.• For full instructions on changing the default values of the wireless access point,see the WC7520 Reference Manual .Statement of ConditionsIn the interest of improving internal design, operational function, and/operability, NETGEAR reserves the right to make changes to the product described in this document without notice. NETGEAR does not assume any liability that may occur due to the use or application of the product(s) or circuit layout(s) described herein.Technical SupportThank you for selecting NETGEAR products.After installing your device, locate the serial number on the label of your product and use it to register your product at /register . Registration is required before you can use our telephone support service. Registration via our web site is strongly recommended.Go to for product updates and Web support. ForWarranty and Regional Customer Support information, see the Resource CD that came with your product.For complete DoC please visit the NETGEAR EU Declarations of Conformity website at: /app/answers/detail/a_id/11621/。
Dell PN7522W 酷睿笔记本笔用户指南说明书

Dell Premier Rechargeable Active Pen PN7522WUser’s GuideNotes, cautions, and warningsA NOTE indicates important information that helps you make better use of your product.A CAUTION indicates either potential damage to hardware or loss of data and tells you how to avoidA WARNING indicates a potential for property damage, personal injury, or death.© 2021-2022 Dell Inc. or its subsidiaries. All rights reserved. Dell, EMC, and other trademarks are trademarks of Dell Inc. or its subsidiaries. Other trademarks may be trademarks of their respective owners.Chapter 1: What’s in the box (4)Chapter 2: Features (6)Chapter 3: Setting up your PN7522W (8)Connecting and charging your pen (8)Manual Bluetooth pairing (8)Chapter 4: Dell Peripheral Manager (10)Chapter 5: Holding your PN7522W (11)Chapter 6: Specifications (12)Chapter 7: Replacing the pen nib (13)Chapter 8: Tile (14)Chapter 9: Troubleshooting (15)Chapter 10: Statutory information (16)Chapter 11: Regulatory statement (17)Chapter 12: Getting help and contacting Dell (18)Contents3What’s in the box1.Dell Premier Rechargeable Active PenB-C to USB-C cable3.Nib remover4.Pen nib (2)5.DocumentsFor warranty purpose, note down the PPID number located behind the box or retain the box.14What’s in the boxThe PPID number can also be noted down from a secondary location on the pen barrel.What’s in the box5Features Table 1. Features and functionality of your PN7522WFeature Functionality1Tip Move the tip over a touchscreen to move the pointer. Enables you towrite, draw, and select objects.2Bottom barrel button Press and hold the bottom barrel button and move the tip over the areayou want to erase. To change the functionality of this button, see DellPeripheral Manager.3Top barrel button Press the top barrel button to open the context menu or perform aright-click. To change the functionality of this button, see Dell PeripheralManager.4USB Type-C charging port Ensure that your laptop is connected to Internet beforeConnect the USB-C cable to the USB-C port on your pen and your laptopto charge your PN7522W and to establish Bluetooth pairing with yourlaptop, if not yet paired. After your pen is paired with your laptop throughBluetooth, Dell Peripheral Manager is downloaded automatically.5LED indicator Blue●Blinking - Bluetooth pairing enabled●Solid (for three seconds) - Bluetooth succesfully pairedWhite●Blinking - Updating pen firmware●Solid - Pen is chargingAmberBlinking - Pen battery is lowGreenBlinking - Tile is locating the pen6Top button Before pairing your PN7522W with your laptop, press and hold for threeseconds to enable pairing mode.After pairing your PN7522W with your laptop:●Single press — Launch pen menu●Double press — Take a screenshot●Long press (1.5s) — Launch Sticky Notes●Press and hold or press twice in succession to wake your BluetoothThis feature is available only on computers that support2 6FeaturesTable 1. Features and functionality of your PN7522W (continued)Feature FunctionalityThese functions are available only in Windows 10 andThese functions can be changed by re-programmingDell Peripheral Manager.When using Microsoft Powerpoint in Presentation mode:●Press and hold to go to the next slideThese functions in Microsoft Powerpoint are available onlyDell Peripheral Manager.Features7Setting up your PN7522WConnecting and charging your penConnect the pen to your laptop to activate it automatically. The pen will only start working after this activation.Follow these steps to connect and charge your pen:1.To charge your PN7522W, connect one end of the Type-C cable to the charging port and the other end to your laptop ortablet.2.When you connect your PN7522W to your laptop or tablet a pop-up window appears asking you to pair your pen with thelaptop through Bluetooth.3.Connect to confirm the Bluetooth pairing.Do not remove the USB-C cable until the pen is fully charged.Manual Bluetooth pairingAbout this taskPerform the following steps if you are unable to pair your pen automatically through the USB-C cable connection.38Setting up your PN7522WYou can use your PN7522W only with selected Dell laptops. For the list of supported devices, see .If your PN7522W is already listed under Bluetooth devices, remove it from the list before performing the followingSteps1.Press and hold the top button for three seconds to enable pairing mode.The Bluetooth-pairing light starts blinking blue to confirm the pairing mode is enabled.2.In Windows Search, type Bluetooth.3.From the list that appears, tap or click Bluetooth & other devices.4.Ensure that the Bluetooth is enabled.5.From the list of devices under Bluetooth & other devices, tap or click Dell PN7522W→Pair.If your PN7522W is not listed, ensure that the pairing mode is enabled on the pen.6.Confirm the pairing process on both pen and your device.The Bluetooth-pairing light turns solid blue for few seconds to indicate the pairing is complete and then turns off. After successful pairing, your device and pen connect automatically when Bluetooth is enabled and are within the Bluetooth range.Setting up your PN7522W94Dell Peripheral Manager Use Dell Peripheral Manager (DPeM) to customize the pen buttons, change pressure sensitivity, and so on. The latest version of DPeM is automatically installed on your laptop or tablet when you set up your pen. The installation may take approximately 20 minutes to complete. If DPeM is not installed automatically, perform the following steps:1.See the Knowledge Base article Windows Update: FAQ for information about installing the latest version of.Drivers and Downloads FAQs.2.a.Browse to the Dell Peripheral Manager download page.b.Tap or click Download.c.Once the DPeM installer is downloaded, tap or click the installer to start the installation, and then follow the on-screeninstructions.10Dell Peripheral ManagerHolding your PN7522W Hold your PN7522W as you hold a pencil or pen. Adjust the grip so that you can use the barrel buttoneasily. Ensure that you do not accidentally press the barrel buttons while drawing or positioning the pen.Holding your PN7522W11Specifications Table 2. Specifications of your PN7522W12SpecificationsReplacing the pen nib When the pen nib on your PN7522W is worn out or damaged, replace the pen nib using the nib kit as shown in the following image.Replacing the pen nib13Tile You can install Tile on Android or Apple iOS devices. It enables you to locate your PN7522W on the Tile application. For more information, see the Tile application help information on your device.To enable Tile pairing mode on your pen to sync the Tile app to your pen through Bluetooth, press and hold the top and bottom barrel buttons of your pen.14TileTroubleshootingYou can only use your PN7522W with selected Dell laptops. For a list of supported laptops, see . Table 3. Dell Active Pen troubleshootingProblems Possible causes Possible solutionsPen buttons do not work, pen does not write or draw on your ptop does not support the pen.Pen works only with supported Delllaptops.Battery is fully drained.Charge the pen using the USB-C cableincluded in the box.Charge the pen using the USB-C cableincluded in the box.Connect the pen to your laptop using theUSB-C cable included in the box.Pen does not auto-pair with laptop when connected with USB Type-C cable during the first time setup.Swift Pair function is not enabled inWindows.On your laptop, go to WindowsSettings click or tap on Devices, thenBluetooth & other devices, and thenselect notifications to connect usingSwift Pair.USB-C cable is not working.Replace the USB-C cable.Unable to pair the pen with your laptop.Bluetooth driver outdated.Install the latest Bluetooth driver foryour laptop.Bluetooth pairing light does not turn on.Battery is fully drained.Charge the pen with the USB-C cableincluded in the box.Default functions for pen buttons do not work as expected.The default function is changed oroverwritten.Launch DPeM to check the functionassignment of the buttons.Tile app cannot find my pen.The pen may be outside of Tile'sBluetooth range.Ensure to use this feature within Tile's Bluetooth range of 10 meters in an unblocked area.If you have lost your pen in a location farther than 10 meters, follow the Tile app's instructions to view its most recent location.Pen skin peels off.Alcohol based liquid may damage the penskin.Avoid using alcohol based cleaner or sanitiser on the pen directly.Unsuitable stock and operating temperature and humidity may damage the pen body.See Specifications to find more information on the stocking and operating specifications of the pen.Troubleshooting15Statutory information WarrantyLimited warranty and return policiesDell-branded products carry a three year limited hardware warranty. If purchased together with a Dell system, it will follow the system warranty.For U.S. customers:This purchase and your use of this product are subject to Dell’s end user agreement, which you can find at / terms. This document contains a binding arbitration clause.For European, Middle Eastern and African customers:Dell-branded products that are sold and used are subject to applicable national consumer legal rights, the terms of any retailer sale agreement that you have entered into (which will apply between you and the retailer) and Dell’s end user contract terms. Dell may also provide an additional hardware warranty—full details of the Dell end user contract and warranty terms can be found by going to , selecting your country from the list at the bottom of the “home” page and then clicking the “terms and conditions” link for the end user terms or the “support” link for the warranty terms.For non-U.S. customers:Dell-branded products that are sold and used are subject to applicable national consumer legal rights, the terms of any retailer sale agreement that you have entered into (which will apply between you and the retailer) and Dell’s warranty terms. Dell may also provide an additional hardware warranty—full details of Dell’s warranty terms can be found by going to , selecting your country from the list at the bottom of the “home” page and then clicking the “terms and conditions” link or the “support” link for the warranty terms.16Statutory informationRegulatory statement FCC notices (U.S. only) and other regulatory informationFor FCC notices and other regulatory information, see the regulatory compliance website located at / regulatory_compliance.This device complies with Part 15 of the FCC Rules. Operation is subject to the following two conditions:1.This device may not cause harmful interference.2.This device must accept any interference received including interference that may cause undesired operation.Changes or modifications on this unit that are not expressly approved by the party responsible for This equipment has been tested and found to comply with the limits for a class B digital device, pursuant to part 15 of theFCC Rules. These limits are designed to provide reasonable protection against harmful interference in a residential installation. This equipment generates, uses and can radiate radio frequency energy and if not installed and used in accordance with the instructions, may cause harmful interference to radio communications. However, there is no guarantee that interference will not occur in a particular installation. If this equipment does cause harmful interference to radio or television reception, which can be determined by turning the equipment off and on, the user is encouraged to try to correct the interference by one or more of the following measures:●Reorient or relocate the receiving antenna.●Increase the separation between the equipment and receiver.●Connect the equipment into an outlet on a circuit different from that to which the receiver is connected.●Consult the dealer or an experienced radio/TV technician for help.Shielded cables must be used with this unit to ensure compliance with the Class B FCC Limits.Regulatory statement17Getting help and contacting DellContacting Dell/contactdell .Availability varies by country and product, and some services may not be available in your country.If you do not have an active internet connection, you can find contact information on your purchase invoice, packing Self-help resourcesYou can get information and help on Dell products and services using these online self-help resources:Table 4. Getting help and contacting DellInformation about Dell products and services /supportOnline help for operating system/support/windows Troubleshooting information, user manuals, setup instructions,product specifications, technical help blogs, drivers, software updates, and so on./support18Getting help and contacting Dell。
威盛WM8650中文说明书V0.3(7寸)

资料来源:爱购机目录................................................................................................... 错误!未定义书签。
1 外观描述 (2)2 电源键的用法 (3)3 触摸屏 (4)4转接盒 (4)5 SD卡的使用 (5)6开始使用 (5)给设备充电 (5)启动设备 (5)Wi-Fi 网络设置 (5)7桌面 (5)8锁屏界面 (6)9预装程序 (7)10桌面菜单功能 (8)11 程序管理 (10)安装程序 (10)直接从网络上下载程序 (10)卸载程序 (10)12 天气 (10)13 时钟 (11)闹钟 (11)14在线软件安装 (12)菜单功能 (12)15浏览器 (13)16 日历 (13)新建活动 (13)17 相机 (13)拍摄图片 (13)录制视频 (14)18 计算器 (14)19 电子邮件 (14)添加邮件账户 (14)收件箱 (15)编辑邮件账户 (15)删除邮件账户 (16)20 文件浏览器 (16)在电脑和设备之间拷贝文件 (17)删除文件 (17)21 我的音乐 (17)播放音乐 (17)对音乐盒播放列表进行操作 (18)22 我的视频 (18)播放视频 (18)对视频和播放列表进行操作 (19)23 我的相册 (19)涂鸦 (20)24 通讯录 (20)添加新的联系人 (20)添加联系人到收藏 (20)编辑联系人 (20)删除联系人 (20)25 图片截取 (21)26 程序管理器 (21)停止程序 (21)卸载程序 (21)27 YouTube (21)28 土豆视频 (22)29 Wi-Fi设置 (22)30 3G Settings (22)31 连接ADSL上网 (23)32 有线网络 (23)33 设置 (23)常见问题 (25)电池管理 (26)电池充电 (26)重要安全提示 (26)附录.建议可选配件及型号 (27)1 外观描述前视图:右视图:左视图:顶视图:2 电源键的用法开机: 长按电源键2秒。