T+标准版+V12.0上市说明
T+12.0标准版环境配置

1.运行环境本产品使用MSSQL2005及以上版本的数据库,但不能使用MSSQL2008,建议时候用MSSQL2008 R2。
增加环境检测的相关程序,对于造成错误的情况,检测错误原因,能够检测到的信息进行提示,方便用户操作。
软件环境1.单机或服务器操作系统:(简体中文版)Windows XP+SP3(仅支持单机)Windows 2003 Server+SP2(标准版和企业版)x64,x86Windows 7(仅支持单机)不支持家庭版Windows 2008 R2Win2012Win8/8.1运行库:NETFramework4.0+SP1(简体中文)只能运行在中文简体的操作系统下。
2.数据服务器数据库(简体中文版本)MSSQLServer2005+SP2 (企业版以上)MSSQLServer2008R2(Standard、Enterprise) x64,适用于支持的win2003,win7(不推荐),win2008R2、win2012操作系统支持了简版数据库3.客户端WEB浏览器:IE8.0简体中文版IE9.0简体中文版IE10 ,但不支持IE10 64位IE11 ,但不支持IE11 64位操作系统:(简体中文版)Windows XP + SP3Windows 2003 Server+SP1(标准版、企业版)Windows 7Windows2008 Server+SP1(及以上版本补丁)Windows2008 Server R2 (X64)Win2012Win8/8.1Windows Vista(不建议使用)硬件环境1.客户端计算机配置:建议配置要求:2.Web服务器和应用服务器,数据库服务器Web服务器和应用服务器:影响Web服务器和应用服务器的主要因素是CPU计算能力和内存大小,磁盘IO 性能不需要特别考虑。
所以建议配置为两路双核CPU2.0以上。
标配内存4G,如果支持的并发用户较多,可配置到8G以上,提高性能表现。
IT-12D Ver_2.0 IT-12M 用户手册说明书

INTERPRETATIONIT-12D Ver_2.0IT-12M SYSTEMUser’s ManualImportant NoticeAll the safety and instructions for operation and use of the equipment should be read carefully• before the system is operated.Please keep this user manual for future reference.• Please follow all the operation instructions.• Cleaning: Make sure to turn off the power supply before cleaning. Use a dry soft cloth to clean • the equipment.Don’t leave the product in a place with high humidity and temperature.• Do not use any accessory, which is not recommended by the manufacturer .• Do not place the equipment on an unstable stand; Please use appropriate package or original • package by the manufacturer before transport to avoid damage caused by strong shake during transporting.Adequate ventilation is good for the maintenance of the equipment.• Power supply AC 100-240V.• Grounding: 3-wire grounding plug.• Hot swapping is prohibited.• Total 11 sets of IT-12D can be connected in one system. The cumulative cable • length should not exceed 70 meters. For particular requirement, please contact the nearest JTS Service Centre for information.For service, please contact the nearest JTS Service Centre. Do not take the equipment apart by • unauthorized personnel.All JTS products are guaranteed for 1 year except for the cases as follows caused by personal • reasons:A : Damage or malfunction caused by personal factors such as dropping, striking and so on.B : Damage or malfunction caused by improper handling of the operator.C : Parts loss or damage by taking apart by a unauthorized personal.Only use JTS tailor-made cables to connect the system.• Turn off the power supply and unplug the equipment from the power supply in case the • equipment is not in use for a long time.Upon receipt of the product, please fill out the Warranty Card enclosed and post it to JTS • Service Centre nearby in your region.TO REDUCE THE RISK OF ELECTRIC SHOCK,DO NOT EXPOSE THIS EQUIPMENT TO RAIN OR MOISTURE.WARNING:To prevent fire or shock hazard,do not expose units to rain or moistureCAUTION: To reduce the risk of electric shock, DO NOT open covers, no useable serviceable parts inside. Refer servicing to qualified service personnel onlyThis label may appear on the bottom of the unit due to space limitations.The lightning flash with an arrowhead symbol,with an equilateral triangle, is intended to alert the user to the presence of uninsulated dangerous voltage within the products enclosure that may be of sufficient magnitude to constitute a risk of electric shock to persons.The exclamation mark within an equilateral triangle is intended to alert the user to thepresence of imporyant operating and maintenance (servicing)instructions in the literature accompanying the appliance.Attention: Installation should be performed by qualified service personnel only in accordance with the National Electrical or applicable local codes.Power Disconnect: Units with or without ON - OFF switches have power supplied to the unit whenever the power cord is inserted into the power source; however,the unit is operational only when the ON - OFF switch is in the ON position. The power cord is the main power disconnect for all units.1. System Introduction2. Product Introduction2-1 Language Distributor // IT-12M2-2 Interpreter Console // IT-12D2-3 Accessories3. System Installation & Connection3-1 General Description3-2 System Connection // Connection Cables3-3 Connection of Audio Cables3-4 System Mounting Instructions4. System Setup & Operation5. Technical Data 1 2 2 4 7 8 8 9 10 12 13 15INDEXRemark:JTS Company reserves the right to modify any issue without notice in advance.If any detailed information needed, please contact the local agent or JTS distributor in your region. JTS is the registered trademark of JTS Professional Co., Ltd.1The JTS IT-12 interpretation system consists of IT-12M and IT-12D.• The IT-12M works as main unit to provide power, input and output interface, and control.• The IT-12D is an interpreter console allowing two interpreters work together. Interpreters can• choose either floor channel for original language for direct interpretation or relay interpretation available via the relay select key.For small venue crossing interpretation is available here.• The whole system supports 11 interpreter consoles for simultaneous interpretation and delivers • 12 languages to audiences.The product is a stand along system. It is compatible with any conference system. So no matter • a new installation or an existing project needing expansion with interpretation IT-12 can easily meet the requirement.Together with JTS wireless system and any infrared system more audiences can participate in a • conference.INTERPRETATION SYSTEM22-1 Language Distributor // IT-12MCOMBO socket microphone input: This COMBO socket provides +48V Phantom power to a microphone with balanced XLR or unbalanced φ6.3 connector. The input signal will be mixed with the Original (CH0).Gain: Adjust input sensitivity of the COMBO socket. The adjustable range is ±10dB.Interpreter channel indicator: Light-On to indicate the correspondent channel is active. Flashing to indicate the correspondent channel is standby.Signal level indicator: the brightness of this LED indicates the signal level of the cor-respondent channel. Power on indicator (Red).Power Switch: Push the”│” on this switch will be turn system on, and push the”○” on this switch will turn system off.Power supply socket (3-wire grounding plus) with built in fuse, T2A/250V.DC power output: The IT-12M includ 12 outputs of DC power supply (+15V/500mA) to wireless transmitters, like JTS TG-10STX tabletop wireless transmitter.Interpreter console interface (D-sub 25pin socket):11 interpreter consoles can be connected in daisy chain (IT-12D).Record IN connector (RCA): external signal from play back devices will be mixed with the Original (CH0) for recording.Record output connector (RCA): Connect to recording equipment. The original signal (CH0) mixed with REC. IN will be recorded.12345678910113Original (CH0, floor channel) output (RCAx2/symmetrical output) : Original (CH0) balanced output with RCA connecters.12CH audio output interface: #0 to 11 correspond to the Original (CH 0) and 11 sets of Interpreter Consoles. Signals are for distribution to audiences via JTS wireless systems. Notice: any channel not in use will be assigned with CH0 as input.Original (CH0) volume control: This potentiometer adjusts the Original (CH0) sensitivity. Adjustable range is ±10dB.Original (CH0) input socket: This φ6.3mm balanced connecter is connected to an output of a conference system or PA as the original signal of the interpretation system.Alarm sound input:φ6.3mm jack / unbalanced input.Slow output: When a Slow Key on the IT-12D is activated this Slow output will generate an 1 sec. pulse to request the lecturer to slow down.Alarm control input: A short cut of Alarm Ctrl. and GND will activate alarm procedure. All channels will receive alarm signal, and indicator LED will change from Light-On to Flashing.121314151617182-2 Interpreter Console // IT-12DENTER key: To set the active channel of interpreter console. When switch on Switchthe ENTER indicator starts flashing. After push one of the selectable channels (fromCH1 to CH11 with Light On) this active channel can be stored to this interpreterconsole by pushing the ENTER key. Then switch off the Switch to end the procedure.CH1~CH11 Channel Output Key:• MODE switch at LOCK position: Under setting state, press it to select a selectable chan-nel (indicator on) for interpretation output. Only 1 channel can be set in one InterpreterConsole. The indicator of the activate channel is in green.• MODE switch at OPEN position: All of channel indicator are off when power oninitially. All channels are open to interpreter as long as it is not occupied by others. Whenthe channel is activated the Channel Output Key is in green. The indicator flashes in redwhich means this channel is in use by others.Note: MIC. ON/OFF at OFF state, the activate channel will be releasedwhen this channel number on other interpreter console is selected.19282820INTERPRETATION SYSTEM45Relay interpretation monitor (MONITOR): After pressing RELAY key, an interpreter can turn the monitor rotary knob to select an interpreted language he/she can understand to interpret.Headphone volume control (VOLUME A, VOLUME B): To adjust the volume of the headphones.Relay interpretation switch (RELAY): In case the interpreter doesn’t understand the original language, they can press the key and switch Monitor to another interpreted language from other interpreter for further interpretation.Floor Channel Switch (ORIGINAL): When the system start, the setting is by default, press it to listen to the original language (the speech from CH0).Mute Key (COUGH CUT): In case the interpreter coughs. Keep pressing the key to mute the line, meanwhile the indicator is on. When released, the line returns to working status.MIC ON/OFF button (MIC.A ON/OFF, MIC.B ON/OFF): Press it to turn the microphone on, the indicator will be on. Press it again to turn off the MIC.Only one microphone can be on at a time. MIC. A and MIC. B will override each other.Reminder key (SLOW): In case the delegate speaks too fast for the interpreter to follow, press it to request the delegate to slow down.MODE setting switch (OPEN / LOCK): The MODE switch needs be decided before power on. At the OPEN mode an interpreter can activate any channel in any time as long as it is not occupied. All channels are set off at the initial state, then an interpreter must select channel key which he wants. At the LOCK mode the interpreter can choose only one output channel which will not be taken by other users (setting procedure refer tostep and “System and Operation” chapter for more detail).Setting switch (SET): When all Interpreter Console are connected, setting of a channel of each console is needed for first time installation at LOCK mode. First turn the Switch to “ON”, the ENTER key will start flashing. According to above Step No.20 to select onechannel for the console. Then turn the Switch to “OFF” to finish the channel setting.To starting the channel setting procedure just turn the setting switches (SET) from “OFF”to “ON”. Finish the channel setting procedure by turn the setting Switch from “ON”to “OFF”.XLR microphone input: Each interpreter unit including 2 balanced XLR microphone input sockets with +48V Phantom power. These balanced microphones will be mixed with MIC. A/B.Input interface (INPUT): to connect the first Interpreter Unit to the IT-12M and the second one to the Output interface of the first unit (25-pin socket).29292929222123242526272829303132 33 34 35Output interface (OUTPUT): for connection with the next Interpreter Unit (25-pin plug).Recorder interface (REC OUT): φ3.5mm stereo, for connection with a recorder to record the interpretation. (Available on both left and right side of the Interpreter Console).Microphone input (MIC IN): φ3.5mm dummy stereo, for connection with microphone(Available on both left and right side of the Interpreter Console). Earphone output (EARPHONE):φ3.5mm stereo, for connection with interpreter headset (Available on both left and right side of the Interpreter Console).INTERPRETATION SYSTEM 62-3 AccessoriesAccessories are standard parts for a complete system installation, general description are as follow:IT-12-C3: 3 meter cable with D-sub 25-pin M/F on each end.Used to connect Interpreter Console (IT-12D) in daisy chain and to IT-12M.•Connecters: 1 Plug, 1 Socket.•3.System Installation & Connection3-1 General DescriptionIT-12 Interpreter System has a compact dimension and is easy for installation. IT-12Dinterpreter consoles are connected in daisy chain and the first IT-12D is connected to themain unit IT-12M.A detailed description of IT-12 Interpreter System installation and connection will begiven by diagrams and examples in this chapter.3-2 System Connection // Connection CablesAll consoles are connected via D-Sub 25-pin cable. A 25-pin 3 meter cable (with a plugand a socket) is included in each IT-12D Interpreter Console to connect the interpreterunit to Main Unit IT-12M or to each other. On the rear panel of IT-12D there are twoD-Sub connecters, the “INPUT” is a plug and the “OUTPUT” a socket. Connect theplug from the 25-pin cable to the Main unit IT-12M then the socket from the 25-pincable to the plug “INPUT” on the first Interpreter Console. And then connect the plugof the second 25-pin cable to the socket “OUTPUT” of the first Interpreter Console and the socket is connected to the plug “INPUT” of the next Interpreter Console. Then all the interpreter units are connected in daisy chain. As many as 11 interpreter units can beconnected for 12 languages (including floor channel) interpretation. Extension cablescan be used between Interpreter Consoles and Main Unit IT-12M (IT-12-C3/C6/C12/ C18).It is strongly recommended to use JTS tailor-made cables to ensure the best performance.CH113-3 Connection of Audio CablesCable connection plays an important role in the long distance audio transmission. Improper connection will result in interference. For example:(1)Connection for Unbalanced to Balanced transmission cable:Practical example: after the audios from signal source of mono RCA output, they go through to the IT-12M balanced input “LINE IN” (φ6.3mm jack) via unbalanced output.GND(SHIELD)shielded netBAL. + OR UNBAL.HI.BAL. - OR UNBAL.LO.353637* Note: This connection is not applicable to Balanced to Unbalanced transmission. Otherwise, the signal source of balanced output may be damaged.(2)Connection for Balanced to Balanced transmission cable:Practical example: After the audios from wired and/or wireless microphones are mixed via the mixer, they go through to the IT-12M balanced input “LINE IN” (φ6.3mm jack) via balanced output.(3)Connection for Unbalanced to Balanced XLR transmission cable:Practical example: the recording output of IT-12M “REC. OUT” (unbalanced output) to PA system or media recording input XLR interface (balanced input).* Note: This connection is not applicable to Balanced to Unbalanced transmission. Otherwise, the signal source of balanced output may be damaged.3-4 System Mounting InstructionsIT-12M Main unit Installation(1)Dimension (LxWxH):421 x 213 x 44mm (2)Colour: Silvery black (3)Weight:2.65Kg(4)“L” shape rack mount bracket for 1U 19-inch standard cabinet.(5)Mounting InstructionsA pair of rack mount brackets are equipped with the IT-12M , unscrew the screwson both sides firstly , then fasten the brackets with these screws and put the IT-12Min the rack, finally install the unit onto the rack with 4 screws .3839404.System Setup & Operation4-1 General DescriptionThis chapter provides a comprehensive and detailed description on how to setup and op-erate IT-12 Interpreter System Main Unit (IT-12M) and Interpreter Console (IT-12D).(1)OPEN Mode: Interpreter Console Output Channel Select (IT-12D)Select the Console with one of the Channel Output key ‘1, 2… 11”; for example: Ifyou want this unit to be NO. 1; just press “1”. Then the indicator on the key will lighton in green while the channel is not occupied. If the indicator on the key flashes in redthat means the channel is occupied by other units. When the MIC. ON/OFF of theactivated channel is at OFF state, the activate channel could be released when otherinterpreter console selects the same channel number.(2)LOCK Mode: Interpreter Console Output Channel Select (IT-12D)Interpreter Console must be assigned with one unique output channel before beingused. The procedure is as:a.Make sure the connection is correct, and then turn on the IT-12M.b.Turn the “SET” setting switch from “OFF” on the rear panel of the InterpreterConsole to “ON”, the indicators of “ENTER” on the unit starts flashing. The indica-tors of available channels will turn RED. Pay attention only one channel can beactivated.c.Assign the Console with one of the Channel Output key “1,2….11”, for example:If you want this unit to be NO 1, just press “1”. Then the indicator on the key willchange to Green light, press “ ENTER ” key to store, the indicator of “ ENTER ”will keep light on;d.Turn the “SET” setting switch to “OFF”, the “ENTER” indicator will turn off, thatmeans the output channel selecting procedure is completed;e.If cross interpretation is needed OPEN mode should be selected.f.Repeat the same procedure (Steps b~d) to assign all the Interpreter Consoles.(3)To Cancel Selected Output Channel (only for LOCK mode)a.Turn the “SET” from “OFF” to “ON”.b.Push the “ENTER” for 3 seconds. Then all Channel Output Indicators will turn off.c.Turn the “SET” from “ON” to “OFF”. The Console will be of factory setting now.(4)The Operation of IT-12D Interpreter Console:The Interpreter Console is designed with digital technologies and used in conjunction with interpreter headset. Each Console allows two interpreters to work on it. The operation procedures are as follows:a.At LOCK mode, when the output channel is selected an interpreter only needpush the MIC ON/OFF key to activate the microphone or deactivate it.b.At OPEN mode, an interpreter can press any Output Channel key to deliver thecorrespondent language. The available channel will show a green indicator. A flash-ing red indicator means the channel is occupied.c.Put on the headset, adjust the microphone to an appropriate position and controlthe volume (Floor language is “ORIGINAL” as defaulted). Press “MIC. A/B ON/ OFF” to start the interpretation.d.In case the interpreter doesn’t understand the floor language. He/she can select alanguage familiar with from other interpreter for relay interpretation. First press“RELAY” key, the indicator will be on, and then switch the MONITOR to choose a familiar language for interpretation.e.In case the Interpreter wants to cough, keep pressing “COUGH CUT” key to cutoff the language output, release it to continue the interpretation.f.When the speaker speaks too fast for the interpreter to follow, the interpreter canpress “SLOW” key to remind the speaker to slow down. A pulse signal will comeout as remind from the IT-12M to the speaker desk.g.Each Interpreter Console accommodates A/B two interpreters to work, the opera-tion A/B interpreter is the same.5. Technical Data5-1 System environmental Conditions5-2 Main Unit IT-12M Technical DataTransport Temp.: -40○C~+70○C Operational Temp.: 0○C~+45○C Max. Relative humidity: <95%Item..................................................Power supply..............................System consumption...........DC power output..................D-SUB power output.........Line In sensitivity....................Alarm In sensitivity................MIC In sensitivity...................Alarm Ctrl....................................Slow output................................CH0~CH11 output level CH0 balance output level REC OUT output level.....REC IN input level................protocol.........................................Dimension (LxWxH).........Color................................................Weight............................................Specification 110-240Vac 90W+15V/0.3A*12DC+15V/2A-30dB±2dB LEVEL VR at MAX.-20dB±2dB-51dB±2dB Gain VR at MAX.Shorted to GND +12V,Pulse 1sec.180mV±20mV85mV-GND85mV±10mV 170mV±15mV -25dB±2dB RS-485421*213*44mm Silvery Black 2.65KgInterpretation Unit (IT-12D) Technical DataItem.................................................. Unit power................................... Unit power consumption. MIC sensitivity......................... XLR MIC sensitivity............ Earphone output level........ REC OUT output level..... Protocol......................................... In/Out interface...................... Dimension (LxWxH)......... Color................................................ Weight............................................SpecificationDC+15V100mA±10mA-45dB±2dB-45dB±2dB120mV±10mV at 33Ω load, volume MAX. 140mV±10mVRS-485D-Sub 25P plug and socket330*206*57mmSilvery-blue black2.5Kg。
U8+V12.5产品上市说明

U8+V12.5产品上市说明一、产品概述用友U8+是一套企业级的解决方案,满足不同的竞争环境下,不同的制造、商务模式下,以及不同的运营模式下的企业经营,实现从企业日常运营、人力资源管理到办公事务处理等全方位的产品解决方案。
用友U8+是以集成的信息管理为基础,以规范企业运营,改善经营成果为目标,帮助企业“优化资源,提升管理”,实现面向市场的赢利性增长。
用友U8+是一个企业综合运营平台,用以解决不同满足各级管理者对信息化的不同要求:为高层经营管理者提供大量收益与风险的决策信息,辅助企业制定长远发展战略;为中层管理人员提供企业各个运作层面的运作状况,帮助做到各种事件的监控、发现、分析、解决、反馈等处理流程,帮助做到投入产出最优配比;为基层管理人员提供便利的作业环境,易用的操作方式实现工作岗位、工作职能的有效履行。
U8+V12.5是U8+V12.1的升级版本,围绕客户的应用以营销服务为核心实现多项应用突破,同时在优普自身的业务模式方面也有重大升级。
包括以下产品范围:企业门户、财务会计、管理会计、电商管理、供应链管理、生产制造、人力资源管理、决策支持、集团应用、企业应用集成、移动应用、即时通讯等。
U8+ V12.5版本在O2O全面解决方案、营销服务一体化、精细管理控制、互联网应用融合、全面移动应用、以及社交化及公共平台等方面做了改进,改进关键特性如下:1.O2O全面解决方案1)零售、分销与O2O业务的深度融合,线上线下业务无缝集成;2)建立以易联为主体的统一会员营销中心,线上与线下的注册、积分、消费明细全融合;3)会员数据管理与分析、会员交易与运营管理4)电商管理:服务平台增加接口、支持对账单下载2.营销服务一体化1)营销管理:目标管理、我的工作看板、KPI排名;2)服务管理:主动服务、返厂维修与生产集成、U易联服务协同3.精细管理控制1)安装及部署:智能安装客户端、使用云部署与云加密的用友U8+ 部署应用2)用友优普开放平台(OpenAPI)3)库存条码:一码通行、装箱应用完善4)委外管理:支持按入库单立账5)生产制造:产品配置、LRP计划改进;6)财务核算:营改增网报费用申请单、报销单、应收应付其他收款单、其他付款单支持价税分离;7)管理会计:成本卷积系统调整单的对照处理、预算支持无税和含税预算控制;4.互联网应用融合1)移动UU与嘟嘟集成;2)应收应付与畅捷支付集成5.全面移动应用1)移动服务配置:企业互联网服务器(EIS)简化移动配置;2)移动财务:资金日报、管理费用统计、应收账龄分析、收付款预测3)移动UU:单据讨论、发送公司动态消息二、产品形态和产品标识产品名称:用友U8+版本号:V12.5产品加密方式:U8+V12.5产品提供硬加密、软加密、云加密三种加密方式,用户可在三种加密方式中任选其一。
用友畅捷通T+典型业务-审批流

单据审核标志自动取消,制单人重新修改单据保存后重新提交
注意事项
审批流设置
单据由未启用审批流到启用审批流的单据有什么限制? 解决方案:
单据必须全部审核完成或全部未审核
已启用审批流的单据,要修改审批流,有什么限制?
解决方案: 1)不能存在单据状态为“审批中”的单据
审批流单据打印
单据上要打印多个审批人,怎么处理?
消息通知下级审批 人 节点建立成功
审批流-设置
3、总金额超过5000元的采购订单,最后由王总进行审批 建立审批节点同采购主管节点
注:如果通知第一个人进行审批,则需要点击“开始”,修改“开始” 的消息节点规则
审批流-设置
4、确定各个流程顺序
开始到采购主管 采购主管到总经理 总经理到结束 完成
审批流-细节场景1
场景1:采购订单不仅要采购主管审核,而且单据金额超过5000元需要总经 理审核,怎么设置?
场景2:单据存在多级审批的时候,怎样能通过短信和内部通知到下级审批 人员进行审批?
场景3:如果需要多级审批人同时审批通过,才能流转到下一级审批人,怎 么处理?
场景4:具体制作单据的操作员,怎样能方便查询到此单据的审批情况?
审批流-启用
1、系统管理-基本设置-选项设置-公共 选中审批流
注:12.0版开始, 标准版和专业版 都有审批流功能, 普及版没有
审批流-启用
2、系统管理-单据档案设置-单据审核设置 选中具体设置的单据,启用审批流
审批流设置
审批流-设置
3、采购订单保存后先由张经理采购主管审批。
新增审批节点
修改审批节点
T+典型业务处理之 ---审批流
名词解释 业务场景描述
审批流设置 审批流单据应用
DMG12800T070_33WTC数据手册说明书
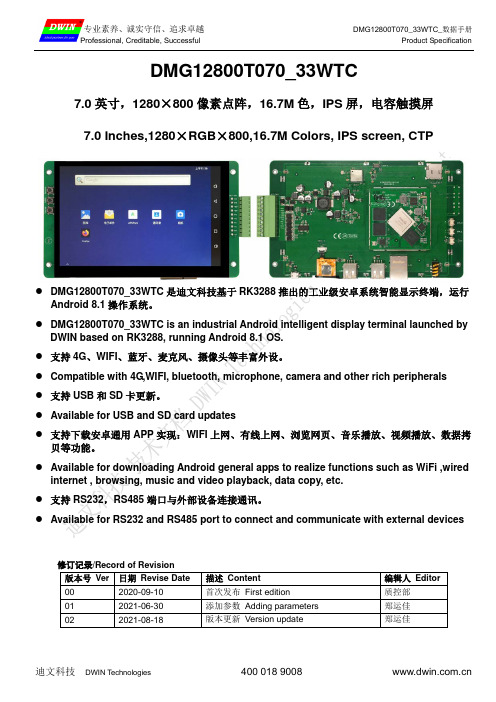
DMG12800T070_33WTC7.0英寸,1280×800像素点阵,16.7M色,IPS屏,电容触摸屏7.0 Inches,1280×RGB×800,16.7M Colors, IPS screen, CTP●DMG12800T070_33WTC是迪文科技基于RK3288推出的工业级安卓系统智能显示终端,运行Android 8.1操作系统。
●DMG12800T070_33WTC is an industrial Android intelligent display terminal launched byDWIN based on RK3288, running Android 8.1 OS.●支持4G、WIFI、蓝牙、麦克风、摄像头等丰富外设。
●Compatible with 4G,WIFI, bluetooth, microphone, camera and other rich peripherals●支持USB和SD卡更新。
●Available for USB and SD card updates●支持下载安卓通用APP实现:WIFI上网、有线上网、浏览网页、音乐播放、视频播放、数据拷贝等功能。
●Available for downloading Android general apps to realize functions such as WiFi ,wiredinternet , browsing, music and video playback, data copy, etc.●支持RS232,RS485端口与外部设备连接通讯。
●Available for RS232 and RS485 port to connect and communicate with external devices修订记录/Record of Revision版本号Ver 日期Revise Date 描述Content 编辑人Editor00 2020-09-10 首次发布First edition 质控部01 2021-06-30 添加参数Adding parameters 郑运佳02 2021-08-18 版本更新Version update 郑运佳●主控性能参数Master control Parameters参数Properties 数据Parameters主板级别Motherboard level 工业级IndustrialCPU处理器CPU 四核1.8GHz ARM Cortex-A17 4 core 1.8GHz ARM Cortex-A17操作系统OSAndroid 8.1FLASH存储器FLASH8Gbytes EMMC5.0 RAM 2Gbytes DDR3●显示性能参数Display Parameters参数Properties数据Parameters说明Description颜色Color16.7M(16777216)colors 24 bit color 8R8G8B液晶类型Panel Type IPSIPS工艺TFT显示屏,宽视角IPS process, TFT LCM with wide viewing angle可视角度Viewing Angle 85/85/85/85 (L/R/U/D)最佳视角:上下左右对称Best View: symmetrical视域尺寸View Area (V.A.)150.76 mm (W)×94.60mm (H) 1280×800 Pixel 显示尺寸Active Area (A.A.)149.76mm (W)×93.60mm (H) 1280×800 Pixel分辨率Resolution 1280×800 Pixel可以设置成0°/90°/180°/270°显示模式Available for 0°/90°/180°/270°rotated display背光模式Backlight LED不低于30000H(以最高亮度连续工作,亮度减半时间)≥30000H(time of the brightness decaying to 50% onthe condition of continuous working with the maximumbrightness)亮度Brightness 300nit可进行100级亮度调节(当亮度调节至最高亮度的1%~30%时,可能出现闪烁现象,不建议在此范围使用)。
T+12.0安装手册

1.1.3 硬件环境 应用\数据库服务器: 硬件参数 CPU 频率: RAM 大小: 磁盘转速: 并发人数: 服务器: 硬件参数 CPU 频率: RAM 大小: 1.1.4 系统库升级 安装过程会对现有系统库进行升级。不对产品的账套进行升级,升级账套需要安装完成后 Windows XP、Windows 7、Windows 8、Windows 8.1 >=Intel 双核 2.0G >=4G Windows 2003 Server、Windows 2008 R2 Server、Windows 2012 Server >=Intel 至强四核 2.0G >=8G SAS 10000 或 15000 RPM 转速 大于 10 人小于 30 人 >=Intel 至强八核 2.0G >=16G SAS 10000 或 15000 RPM 转速 大于 30 人
注意事项: 1、只使用 T+环境检测不需要修复只需要拷贝“T+环境检测”和“bin 目录” 2、系统修复程序都放到“third 目录” ,包括.net、IE、SqlServer、修改 TCP/IP 连接数限 制、WindowsInstall、系统常用补丁 3、不修复 XP 和 2003 系统可以不拷贝“third\WindowsSP 目录” ,此补丁比较大 3.2.2 环境检测 环境检测分三种环境:应用\数据库服务器、客户端、服务器 这里我们以服务器为例,点击“开始检测”对本机进行环境检测
安装类型包括:全部安装、应用服务器安装、数据库服务器安装 分离式部署时必须先安装数据库服务器后才能安装应用服务器, 安装应用服务器前请将 数 据 库 服 务 器 的 机 器 名 和 IP 地 址 添 加 到 系 统 hosts 文 件 中 , 具 体 路 径 位 于 \%Systemroot%\System32\Drivers\Etc 文件夹中,如果系统安装在 C 盘,那么 Hosts 文件就在 C:\Widows\System32\Drvers\Etc 中。通过记事本打开后新输入一行,IP 地 址要放在每段的最前面,映射的 Host name(主机名)在 IP 后面,中间用空格分隔。 例如:192.168.1.100 TplusDBServer 注意事项:支持分离式部署,即一台电脑上安装应用服务器,另外一台电脑安装数据库 服务器,请注意数据库服务器只支持默认实例(MSSQLSERVER),不支持其他实例名。安 装应用服务器时,数据库服务器不能为本机。 版本区分:普及版只能全部安装,不支持分离部署。专业版和标准版安装类型包括:全 部安装、应用服务器安装、数据库服务器安装。 2、安装位置 浏览并指定安装目录,注意安装所在路径的磁盘格式必须为 NTFS,磁盘可用空间必须 大于 1.5G。 注意事项:安装所在路径不能开启压缩,安装所在盘符不能开启磁盘配额。
T-BERD 2207用户指南说明书

198150-15217-01Rev. DT-BERD 2207USER’S GUIDEThis manual applies to all T-BERD 2207 software incorporating software level 3.x.JANUARY 2000Copyright ©1998 TTC®USA 1-800-638-2049 • +1-301-353-1550 • FAX +1-301-353-0234Canada 1-888-689-2165 • +1-905-507-4117 • FAX +1-905-507-4126SECTION 9 - SpecificationsGeneral SpecificationsSECTION 9 SPECIFICATIONS9.1GENERAL SPECIFICATIONS9.1.1Physical Characteristics:Height:7.5" (19 cm)Width:11.5" (29.2 cm)Depth: 2.25" (5.7 cm)Weight: 4.25 lb. (1.93 kg.)9.1.2Environmental Characteristics:Temperature:Operating:32°F to 122°F (0°C to +50°C)Non-Operating:-40°F to 167°F (-40°C to +75°C)Humidity:10% to 90% Relative Humidity, non-condensing9.1.3Electrical Characteristics:Battery Type:10.8 V Nickel-Metal Hydride (NiMH)Operating Time:Typically, up to three hours of continuous operation on a full chargeRecharging Period:Maximum of two hours from full dischargeAC Adaptor:120VAC to 18 VDC 1.2A9.2DS1 SPECIFICATIONS9.2.1Input Specifications9.2.1.1RX JackConnector Type:Bantam jackFrequency:1,544,000 Hz ±5000 HzUser’s Guide T-BERD 22079-1SECTION 9 - SpecificationsDS1 SpecificationsImpedanceBRIDGE:1000 ohms minimumTERM:100 ohms ±5%DSX-MON:100 ohms ±5%RangeBRIDGE:+6 to -35.0 dBdsxTERM:+6 to -35.0 dBdsxDSX-MON:+6 to -24.0 dBdsx of resistive los9.2.1.2Loop Codes Detection CriteriaIn-Band:At least 177 error-free bits of the selected repetitive pattern must be received(loop up or loop down).Out-of-Band:Datalink monitored every 125 ms for loop codes (loop up and loop down).9.2.1.3Pattern Synchronization Detection CriteriaFixed Patterns:30 consecutive error-free bitsPseudo-random:30 + n consecutive error-free bits for a pattern length of 2^n-19.2.2Output Specifications9.2.2.1TX JackConnector Type:Bantam jackLBO Level:Line build-out of 0, -7.5, -15.0, and -22.5 dB of cable loss at 772 HzLBO Tolerance:±2 dB at 772 kHzTiming:±7 ppm internal or recoveredLine Codes:AMI or B8ZSError Insert Type:Logic, BP V, or FramePulse Shape:With output terminated in 100 ohms resistive load and 0 dB line build-outselected, the T-BERD 2207 meets ITU-T Recommendation G.703; AT&TPublications CB113, CB119, CB132, CB143, and PUB62508; and AT&TPUB62411 pulse shape specifications.9-2T-BERD 2207User’s GuideSECTION 9 - SpecificationsDS1 Specifications 9.2.2.2Transmitted Loop CodesIn-BandCSU:Loop-up: 10000; Loop-down: 100Facility 1:Loop-up: 1100; Loop-down: 1110Facility 2:Loop-up: 11000; Loop-down: 11100Facility 3:Loop-up: 100000; Loop-down: 100Out-of-BandLine:Loop up: 1111 1111 0111 0000Loop down: 1111 1111 0001 1100Payload:Loop up: 1111 1111 0010 1000Loop down: 1111 1111 0100 1100Network:Loop up: 1111 1111 0100 1000Loop down: 1111 1111 0010 01009.2.3Measurement SpecificationsFrequencyRange:1,544,000 ±5000 HzAccuracy:± 7 ppmResolution: 1 HzReceived LevelRange:+6 dBdsx to -40 dBdsxAccuracy:±1.0 dB between +6 and -10 dBdsx±2.0 dB between -10 and -20 dBdsx±3.0 dB between -20 and -40 dBdsxResolution:0.1 dBVp-p Range:60 mV to 12.0 VVp-p Resolution:0.05 VSimplex CurrentRange:10 mA to 180 mAccuracy:±5%Resolution: 1 mASimplex path:13.2 ohms (nominal)User’s Guide T-BERD 22079-3SECTION 9 - SpecificationsDS1 Specifications9.2.4Alarm CriteriaSignal Loss:175 ±75 consecutive zerosFrame LossD4: 2 out of 5 Ft bits in errorESF: 2 out of 5 frame bits in errorSLC-96: 2 out of 5 Ft bits in errorPattern Loss:100 errors detected in 1000 or fewer bitsOnes DensityQRSS:Alarm is suppressed.Other Patterns:Received data contains less than n ones in 8(n+1) bits, where n=1 to 23.Excess ZeroAMI:16 or more consecutive zerosB8ZS:8 or more consecutive zerosYellow AlarmD4:Bit 2 is a 0 for 255 consecutive channels.ESF:256 bits ±16 bits of a repetitive (1111 1111 0000 0000) pattern received inthe 4 kb/s datalink.SLC-96:Bit 2 is a 0 for 255 consecutive channels.AIS:Unframed T1 signal has 2048 consecutive ones.Low Battery:Battery has less than 25% energy remaining.9-4T-BERD 2207User’s GuideSECTION 9 - Specifications DS3 Option SpecificationsUser’s Guide T-BERD 22079-59.3DS3 OPTION SPECIFICATIONS9.3.1DS3 Specifications9.3.1.1Framing Formats9.3.1.2Patterns9.3.1.3Line Coding•B3ZS9.3.1.4Connectors•WECO 560A jack9.3.1.5Receiver (Single)Frequency:44,736 Mb/s ±300ppmLevel:HIGH: Accepts Nominal 1.2 Vp, 0 ft. of cable from High sourceDSX: Accepts Nominal 0.6 Vp, 450 ft. of c able from High source or monitor LOW: Accepts Nominal 0.3 Vp, 900 ft. of cable from High source9.3.1.6Transmitter (Single)Frequency:44,736 Mb/s ±20ppmPulse:HIGH: Nominal 1.2 Vp (Signal meets ANSI specification T1.102-1993 and ITU-TG.703 when subjected to 450 feet of cable loss.)•Auto• Muxed M13•Unframed • C-bit•M13• Muxed C-bit•1111• 215-1•1100 (Idle)• 220-1•1010 (AIS)• 223-1•1010• User (3 to 24 bit programmable)SECTION 9 - SpecificationsDS3 Option SpecificationsDSX: Nominal 0.91 Vp (Signal meets ANSI specification T1.102-1993 andITU-TG.703.)LOW: Nominal 0.31 VpTiming:Internal ClockRecovered Clock9.3.2DS3 Measurements9.3.2.1Summary•Bit Errors•Frame Errors•Bipolar Violations•Receive Frequenc•Parity Errors•FEAC Messages•C-bit Errors•DS2 Frame Errors•FEBE•Pattern Slip9.3.2.2Logic•Bit Errors•Pattern Slips•Bit Error Rate•Pattern Loss Seconds•Bit Errored Seconds•Error Free Seconds•Pattern Losses•% Error Free Seconds9.3.2.3Bipolar Violations•BPV•BPV Rate•BPV Errored Seconds9-6T-BERD 2207User’s GuideSECTION 9 - SpecificationsDS3 Option Specifications 9.3.2.4Frame Errors•Frame Error Rate•FEBE Rate•Frame Error Seconds•DS2 Frame Errors•Out of Frame Seconds•DS2 Frame Error Rate•C-bit Errors•Received X-bit•C-bit Error Rate•Transmit X-bit•FEBE•Frame Loss Count9.3.2.5Parity•Parity Errors•Parity Error Rate•Parity Error Seconds9.3.2.6Signal•Signal Loss•Signal Loss Seconds•Receive Frequency•Receive Signal Level•Transmit FrequencyUser’s Guide T-BERD 22079-7。
T+12.0 VS T+11.6版本功能对比

基础设置-销售价格本区别 T+12.0 VS T+11.6版本功能对比
T+12.0版本
所有价格本表体支持条形码录 入功能,且增加查找功能
PK
T+11.6版本
价格本不支持条形码录入
目 录
平台环境 库存核算
系统管理
基础档案
凭证接口
分销管理
财务总账
往来现金 出纳管理 资产管理 采购销售
T+12.0新增功能
—— T+12.0 VS T+11.6版本功能对比
2015年4月
目 录
平台环境 库存核算
系统管理
基础档案
凭证接口
分销管理
财务总账
往来现金 出纳管理 资产管理 采购销售
零售管理
会员管理 促销管理 手机APP 工作圈
平台区别
T+12.0 VS T+11.6版本功能对比
目 录
平台环境 库存核算
系统管理
基础档案
凭证接口
分销管理
财务总账
往来现金 出纳管理 资产管理 采购销售
零售管理
会员管理 促销管理 手机APP 工作圈
往来现金
把现金银行-钱流并入业务往来,改名为往来现金
往来现金
情况类似, 只举了一例
往来现金
收入单、费用单:单结算情况下,单据列表中可以按结算方式、账号进行查 询
费用单类似
往来现金
12.0支持预收冲预收丶支持预付冲预付
往来现金
应收总账丶应付总账:支持单据表头公共自定义项作为查询条件,分组设置 增加了条件
T+11.6版本
- 1、下载文档前请自行甄别文档内容的完整性,平台不提供额外的编辑、内容补充、找答案等附加服务。
- 2、"仅部分预览"的文档,不可在线预览部分如存在完整性等问题,可反馈申请退款(可完整预览的文档不适用该条件!)。
- 3、如文档侵犯您的权益,请联系客服反馈,我们会尽快为您处理(人工客服工作时间:9:00-18:30)。
T+标准版上市说明一、产品概述T+结合畅捷通100多万中小企业的管理经验,采用完全B/S结构及.NET先进开发技术,通过解决中小企业管理现状的重点问题,以及对业务过程主要环节的控制与管理,提升管理水平,为企业带来更多管理价值。
产品应用功能包括:采购管理、库存核算、销售管理、零售管理、促销管理、会员管理、生产管理、往来现金、固定资产、出纳管理、总账、T-UFO;主要应用于中小商贸企业、工业企业与工贸企业一体化管理。
客户应用价值:①、提高工作效率,加强内部管控根据您的企业管理要求,量身定制业务流程和业务单据、业务报表,保证使用效率;通过自动化业务管控(价格、信用、库存)和自动化财务核算(成本、应收应付),加快各个环节处理效率,并提高管控力度;通过有效的信息共享,同时兼顾信息保密性,加快部门间沟通效率;通过预警、待处理业务自动推送,积极应对紧急任务,高效处理日常任务。
②、管好往来,管好资金通过有效的信用管理(业务员信用、客户信用)、信用预警、信用提示,减少坏账损失;灵活确定立账依据,可以更加精准的对应收应付进行预估;通过灵活的结算政策和收付款期限控制,准确预测未来各月资金状况。
③、管理库存,管好成本通过可自定义的可用量查询,准确监控库存未来状况;通过最低库存、最高库存、可用量控制等手段来降低库存水平,提高仓库作业效率;通过灵活的存货核算方法,为经营者提供实时库存成本。
④、提供手机移动管理,加强管理灵活性企业管理人员通过手机,可时时掌控企业日报;业务员通过手机,快速完成销售的各项业务,极大地提升了工作效率。
有自己送货车队的企业,可以通过手机下销货单业务来完成车销业务,实现客户现场‘钱、货’两清,避免了现场手工开单回公司后集中交单补录单,财务一单单对账的问题。
⑤、提供全生命周期的固定资产管理支持固定资产等企业固定资产的管理。
⑥、管好账簿、精细核算通过凭证管理和业务无缝衔接,支持企业财务业务一体化管理。
多辅助核算方式帮助企业从多维度了解企业经营情况。
⑦、提供管理信息,辅助决策通过多维度的管理报表,帮助企业经营者迅速了解经营状况,科学决策。
产品定位:“领先的互联网企业应用”核心应用理念:“实时管理、智慧协同”二、产品名称及版本号产品名称:T+标准版版本号:三、加密方式T+支持硬加密和云加密两种形态:硬加密,产品序列:70******采用全新的智能加密卡(USB接口),产品加密采用远程注册授权方式进行,远程注册网址:订购硬加密需要收300元加密卡工本费。
云加密,产品序列:63******云加密授权,区别硬加密授权,没有物理加密狗,是一种云计算模式的授权,软件运行时需要的授权许可、关键数据必须一定周期内联网从授权服务器“云端”获得信息和鉴权。
激活方式:通过产品登录界面中的“激活”,可进入激活页面注意事项:服务器必须在一定周期(7天)内保证联通互联网,才可以使用云加密。
具体云加密激活流程:打开激活页面进入T+标准版登录界面,点击左上角的“激活”链接进入产品激活界面,显示如下界面。
验证畅捷通帐号输入畅捷通帐号和密码,验证正确后,信息被标示为正确状态。
如果没有畅捷通帐号,则需要注册。
畅捷通帐号是捆绑用户持有所有产品授权的载体,是享用畅捷通服务的通行证,请务必牢记和妥善保存。
验证云加密授权畅捷通帐号验证通过后,打开产品包装盒。
找到云加密卡,将您获得的产品卡号和CDKey输入页面相应的输入框中。
待系统验证卡号和CDKey后,并自动带入以下信息:a、客户企业信息;b、服务商信息;c、产品信息;填写用户信息继续输入或修改客户企业信息后,确认服务商信息、订购产品信息无误,点击激活按钮,若激活成功后,系统提示“产品激活成功”信息。
四、产品主要功能变化普通用户系统管理选项设置最高进价、最低售价控制,不仅支持单据保存控制,而且支持单据审核控制。
增加成本容错处理机制,当出库成本与参考成本差异超过一定比例后,可取参考成本。
财务选项,行业性质增加对“事业单位会计制度、中小学会计制度、高校会计制度、科学事业单位会计制度、福利彩票单位会计制度”的支持。
增加“由业务单据生成的凭证允许修改科目、金额”、“由业务单据生成的凭证允许修改科目、金额”选项,支持业务单据生成的凭证可以修改以及修改规则。
收入成本配比发票立账时,不再提供收入成本配比功能。
功能启用功能启用,增加“票据打印”;“出纳管理”替换原有的“现金银行-出纳”、“往来现金”替换原有的“现金银行-钱流”。
基础档案存货档案优化了存货档案的导入效率。
存货档案在导入时,如果导入文件中无助记码,则系统自动生成。
存货条形码中取消与计量单位对应,条码只代表存货。
存货档案的弹出参照增加“可用量>0”、“现存量>0”和条件,满足只显示有量的存货,此条件支持按“单据+业务类型”记忆。
存货下拉参照中无此条件,但与弹出参照条件同步。
存货参与中的可用量、现存量按明细仓库取值,当明细无仓库时,按表头仓库取值。
存货参照中增加多计量单位的“可用量说明和现存量说明”,对于现存量为65瓶,可显示为“10箱5瓶”。
往来单位为了避免用户对“供应商报价含税”信息忽略,造成后续业务数据错误,将此字段从布尔型改为枚举型,必须让用户确认选择,此字段支持记忆销售价格管理存货价格本、供应商价格本、客户价格本、存货数量档位价价格本表体增加了条形码录入;增加了条形码查找;栏目设置中增加了排序功能,可以按某个字段排序,也可以按几个字段组合排序。
采购销售最高进价、最低售价增加‘保存、审核’控制时点的选择;进销货单的‘票据类型’支持按客户进行记忆,默认带出本客户上次交易的票据类型进销货单执行表的发票号取值,优先从发票上取,再从进销货单本身上取“采购需求分析、进销存对比查询表”由收费改为免费;无需再启用APP,直接挂菜单在采购、销售管理中。
零售管理零售单统计表增加“期间出库平均成本”字段,支持按照导购、班次分组维度查看毛利零售统计类报表增加条形码的查询条件及查询结果零售报表增加劳务费用及新品的查询条件零售单统计表支持会员地区、会员类型、门店地区、部门的查询条件、查询结果及分组维度触摸屏的POS收银模式下,结算操作支持同时录入多结算方式触摸屏的POS收银模式下,双屏显示增加会员储值信息POS端小票打印设计支持上传图片POS端小票打印,格式属性增加储值卡明细,处理多储值卡支付打印POS端销售查询支持按照会员查询POS正常收银支持录入负数的劳务属性存货,处理代金券支付场景POS收银界面增加“会员同步”功能,同步当前录入会员的积分和储值余额会员管理会员管理模块演示期修改为判断会员管理模块单据及消费明细单据的单据日期不超出30天会员档案联查增加操作员信息会员档案增加操作日志,日志管理中查询会员相关的录入、查询支持按照会员姓名简称(拼音首字母)、手机号码模糊查询支持IC卡管理会员去掉对储值卡透支的支持会员档案支持按照会员年龄查询促销管理单品返现、组合满返、整单返现三类单据的阶梯折扣支持折扣设置为0库存核算新增库存状况表。
可以实现查询现存量时按仓库、自由项、品牌等横排可以支持按仓库、存货、自由项、批号等不同纬度查询现存量、库存金额。
注:此表因为查询维度比成本计价的维度更细,库存金额会存在尾差问题,供参考,不能作为财务的依据,要看无尾差的成本,请使用存货总账和存货明细账。
可以同时显示有结存数量的存货、无结存数量的存货可以查看结存数量的零售金额等信息组装拆卸单增加变更、组装重取父件成本、拆卸重算子件成本的功能。
组装拆卸单支持变更功能。
当单据已经生效,此时财务需要对组装拆卸的成本进行调整,可通过变更处理支持组装重取父件成本功能。
主要解决先做组装拆卸单,然后增删插改等造成的子件成本发生变化后,父件成本需要更新的问题。
支持拆卸重算子件成本的功能。
拆卸时,当子件成本的和不等于父件成本时,可以通过此功能把差异金额分摊到子件成本中。
组装重取父件成本、拆卸重取子件成本支持在单据列表上批量操作。
形态转换单增加变更、分摊差异金额的功能。
核算选项增加与参考成本差异超过 %,取参考成本的功能。
此功能主要是为了减少系统按选项或计价法取成本时,有时误差比较大的问题。
场景举例如下:当按计价规则取得成本与参考成本差异超过10%时,取参考成本。
A存货(计价法为移动平均)参考成本5,销售退货时,按照计价法取得成本为20,因20不在的范围,此时取参考成本5作为销售退货的成本,避免跟实际成本误差太大。
盘点单调整:优化盘点单的导入功能,支持按存货编码、批号等从EXCEL导入数据。
盘点单生成的其他出入库单成本发生变化后,会更新盘点单。
解决了用盘点单生凭证时,凭证金额跟其他出入库单金额不一致的问题。
调整菜单的位置,区分库存帐(数量帐)和成本账。
单列批次账的菜单,便于批次管理用户查找批次账,批次账的交互暂未优化。
往来现金收付款单选单时支持按单据表头公共自定义项作为查询条件单结算情况下,核销明细列表中可以按结算方式、账号进行查询,显示结果冲销单预收冲应收,应收选单时支持按单据表头公共自定义项作为查询条件预付冲应付,应付选单时支持按单据表头公共自定义项作为查询条件应收冲应收,选单时支持按单据表头公共自定义项作为查询条件应付冲应付,选单时支持按单据表头公共自定义项作为查询条件应收冲应付,选单时支持按单据表头公共自定义项作为查询条件收入单、费用单单结算情况下,单据列表中可以按结算方式、账号进行查询,显示结果应收冲应收支持预收冲预收应付冲应付支持预付冲预付应收总账支持单据表头公共自定义项作为查询条件、分组条件和显示结果应付总账支持单据表头公共自定义项作为查询条件、分组条件和显示结果应收明细账支持单据表头公共自定义项作为查询条件、分组条件和显示结果默认不显示预收冲应收单据应付明细账支持单据表头公共自定义项作为查询条件、分组条件和显示结果默认不显示预付冲应付单据明细表单结算情况下,收入单明细表支持按结算方式、账号进行查询、分组,显示结果单结算情况下,费用单明细表支持按结算方式、账号进行查询、分组,显示结果统计表单结算情况下,收入单统计表支持按结算方式、账号进行查询、分组,显示结果单结算情况下,费用单统计表支持按结算方式、账号进行查询、分组,显示结果出纳管理现金收入、费用单现金收入、费用单支持录入往来单位银行存取款单银行存取款单支持录入结算方式票据打印可以单独启用,不必须先启用出纳管理总账支持5个会计制度,预置相应科目表、TFUO报表模板、资产分类。
支持2013年事业单位会计制度支持2014科学事业单位会计制度支持2014高等学校会计制度支持2014中小学校会计制度支持2014彩票机构会计制度完善账表查询,提高查询灵活性根据T3账表,在T+中对应增加相应查询方案预置科目总账、科目明细账、科目日记账、科目余额表非套打模板,减轻用户非套打设置工作量。