sysAnalysis-cp04-1.0l
PetroMod_2012_2_Installation_Guide

Installation GuideVersion 2012.2PetroModPetroMod petroleum systems modeling software PetroModPM*Mark of SchlumbergerCopyright © 2012 Schlumberger. All rights reserved.Copyright © 2012 Schlumberger. All rights reserved.This work contains the confidential and proprietary trade secrets of Schlumberger and may not be copied or stored in an information retrieval system, transferred, used, distributed, translated or retransmitted in any form or by any means, electronic or mechanical, in whole or in part, without the express written permission of the copyright owner.Trademarks & Service MarksSchlumberger, the Schlumberger logotype, and other words or symbols used to identify the products and services described herein are either trademarks, trade names or service marks of Schlumberger and its licensors, or are the property of their respective owners. These marks may not be copied, imitated or used, in whole or in part, without the express prior written permission of Schlumberger. In addition, covers, page headers, custom graphics, icons, and other design elements may be service marks, trademarks, and/or trade dress of Schlumberger, and may not be copied, imitated, or used, in whole or in part, without the express prior written permission of Schlumberger. Other company, product, and service names are the properties of their respective owners.An asterisk (*) is used throughout this document to designate a mark of Schlumberger.iv PetroMod 2012.2 Installation GuideContents1 Information Resources . . . . . . . . . . . . . . . . . . . . . . . . . . . . . . . . . . . . . . . . . . . . . . . . . . . . .1-1Schlumberger Product Documentation . . . . . . . . . . . . . . . . . . . . . . . . . . . . . . . . . . . . . . . . . . .1-2 About Schlumberger . . . . . . . . . . . . . . . . . . . . . . . . . . . . . . . . . . . . . . . . . . . . . . . . . . . .1-2 Documentation . . . . . . . . . . . . . . . . . . . . . . . . . . . . . . . . . . . . . . . . . . . . . . . . . . . . . . . .1-2 Typestyle Conventions . . . . . . . . . . . . . . . . . . . . . . . . . . . . . . . . . . . . . . . . . . . . . . . . . . .1-2 Alert Statements . . . . . . . . . . . . . . . . . . . . . . . . . . . . . . . . . . . . . . . . . . . . . . . . . . . . . . .1-2 Contacting Schlumberger . . . . . . . . . . . . . . . . . . . . . . . . . . . . . . . . . . . . . . . . . . . . . . . . . . . .1-3 Technical Support . . . . . . . . . . . . . . . . . . . . . . . . . . . . . . . . . . . . . . . . . . . . . . . . . . . . . .1-32 Getting Started . . . . . . . . . . . . . . . . . . . . . . . . . . . . . . . . . . . . . . . . . . . . . . . . . . . . . . . . . . .2-1Overview . . . . . . . . . . . . . . . . . . . . . . . . . . . . . . . . . . . . . . . . . . . . . . . . . . . . . . . . . . . . . . .2-2 Introduction . . . . . . . . . . . . . . . . . . . . . . . . . . . . . . . . . . . . . . . . . . . . . . . . . . . . . . . . . .2-2 Audience . . . . . . . . . . . . . . . . . . . . . . . . . . . . . . . . . . . . . . . . . . . . . . . . . . . . . . . . . . . .2-2 System Requirements . . . . . . . . . . . . . . . . . . . . . . . . . . . . . . . . . . . . . . . . . . . . . . . . . . .2-2 Licensing . . . . . . . . . . . . . . . . . . . . . . . . . . . . . . . . . . . . . . . . . . . . . . . . . . . . . . . . . . . .2-43 Installation (Windows) . . . . . . . . . . . . . . . . . . . . . . . . . . . . . . . . . . . . . . . . . . . . . . . . . . . . .3-1Downloading the Installation Package . . . . . . . . . . . . . . . . . . . . . . . . . . . . . . . . . . . . . . . . . . .3-2 Installing PetroMod . . . . . . . . . . . . . . . . . . . . . . . . . . . . . . . . . . . . . . . . . . . . . . . . . . . . . . . .3-3 Installing PetroMod . . . . . . . . . . . . . . . . . . . . . . . . . . . . . . . . . . . . . . . . . . . . . . . . . . . . .3-3 Files Installed During Installation . . . . . . . . . . . . . . . . . . . . . . . . . . . . . . . . . . . . . . . . . . .3-6 Optional: Installing Runtime Environment for Parallel Processing . . . . . . . . . . . . . . . . . . . . . . . .3-7 Installing Runtime Environment . . . . . . . . . . . . . . . . . . . . . . . . . . . . . . . . . . . . . . . . . . . .3-7 Activating Parallel Processing in the PetroMod Simulation Interface . . . . . . . . . . . . . . . . . . .3-7 Installing the Licensing Tool . . . . . . . . . . . . . . . . . . . . . . . . . . . . . . . . . . . . . . . . . . . . . . . . . .3-9 CodeMeter . . . . . . . . . . . . . . . . . . . . . . . . . . . . . . . . . . . . . . . . . . . . . . . . . . . . . . . . . . .3-9 Schlumberger Licensing Tool . . . . . . . . . . . . . . . . . . . . . . . . . . . . . . . . . . . . . . . . . . . . . 3-10 Configuring the PetroMod License . . . . . . . . . . . . . . . . . . . . . . . . . . . . . . . . . . . . . . . . . . . . . 3-13 Before you start . . . . . . . . . . . . . . . . . . . . . . . . . . . . . . . . . . . . . . . . . . . . . . . . . . . . . . 3-13 Obtaining the license . . . . . . . . . . . . . . . . . . . . . . . . . . . . . . . . . . . . . . . . . . . . . . . . . . . 3-13 Activating a local license . . . . . . . . . . . . . . . . . . . . . . . . . . . . . . . . . . . . . . . . . . . . . . . . 3-14 Activating an external license server . . . . . . . . . . . . . . . . . . . . . . . . . . . . . . . . . . . . . . . . 3-15 Checking the License Status . . . . . . . . . . . . . . . . . . . . . . . . . . . . . . . . . . . . . . . . . . . . . . 3-16Contents v4 Uninstalling PetroMod (Windows) . . . . . . . . . . . . . . . . . . . . . . . . . . . . . . . . . . . . . . . . . . . .4-1Uninstalling PetroMod (Windows) . . . . . . . . . . . . . . . . . . . . . . . . . . . . . . . . . . . . . . . . . . . . . .4-2 Before You Begin . . . . . . . . . . . . . . . . . . . . . . . . . . . . . . . . . . . . . . . . . . . . . . . . . . . . . . .4-2 Uninstalling PetroMod . . . . . . . . . . . . . . . . . . . . . . . . . . . . . . . . . . . . . . . . . . . . . . . . . . .4-2 Results of the Uninstallation Process . . . . . . . . . . . . . . . . . . . . . . . . . . . . . . . . . . . . . . . . .4-25 Installation (Unix) . . . . . . . . . . . . . . . . . . . . . . . . . . . . . . . . . . . . . . . . . . . . . . . . . . . . . . . . .5-1Downloading the Installation Package . . . . . . . . . . . . . . . . . . . . . . . . . . . . . . . . . . . . . . . . . . .5-2 Installing PetroMod . . . . . . . . . . . . . . . . . . . . . . . . . . . . . . . . . . . . . . . . . . . . . . . . . . . . . . . .5-3 Installing PetroMod . . . . . . . . . . . . . . . . . . . . . . . . . . . . . . . . . . . . . . . . . . . . . . . . . . . . .5-3 Files Installed During Installation . . . . . . . . . . . . . . . . . . . . . . . . . . . . . . . . . . . . . . . . . . .5-4 Parallel Processing Set-up (Systems Admin) . . . . . . . . . . . . . . . . . . . . . . . . . . . . . . . . . . . . . . .5-6 Intel MPI runtime . . . . . . . . . . . . . . . . . . . . . . . . . . . . . . . . . . . . . . . . . . . . . . . . . . . . . .5-6 PetroMod Machine Files . . . . . . . . . . . . . . . . . . . . . . . . . . . . . . . . . . . . . . . . . . . . . . . . . .5-6 Configuring users for ssh . . . . . . . . . . . . . . . . . . . . . . . . . . . . . . . . . . . . . . . . . . . . . . . . .5-7 Configuring users for rsh . . . . . . . . . . . . . . . . . . . . . . . . . . . . . . . . . . . . . . . . . . . . . . . . .5-7 Activating Parallel Processing in PetroMod . . . . . . . . . . . . . . . . . . . . . . . . . . . . . . . . . . . . .5-8 Load Sharing Facility (LSF) in Conjunction with Parallel PetroMod . . . . . . . . . . . . . . . . . . . . . . .5-9 Editing the MPI location . . . . . . . . . . . . . . . . . . . . . . . . . . . . . . . . . . . . . . . . . . . . . . . . . .5-9 Intel MPI Settings . . . . . . . . . . . . . . . . . . . . . . . . . . . . . . . . . . . . . . . . . . . . . . . . . . . . . .5-9 Running Parallel PetroMod with Queuing Systems . . . . . . . . . . . . . . . . . . . . . . . . . . . . . . . 5-10 Running PetroMod Software with LSF . . . . . . . . . . . . . . . . . . . . . . . . . . . . . . . . . . . . . . . 5-10 Configuring the License . . . . . . . . . . . . . . . . . . . . . . . . . . . . . . . . . . . . . . . . . . . . . . . . . . . . 5-12 Setting the Environment . . . . . . . . . . . . . . . . . . . . . . . . . . . . . . . . . . . . . . . . . . . . . . . . . 5-12 Obtaining a License Key . . . . . . . . . . . . . . . . . . . . . . . . . . . . . . . . . . . . . . . . . . . . . . . . . 5-12 Setting up the License Server (Systems Administrator) . . . . . . . . . . . . . . . . . . . . . . . . . . . 5-136 Uninstalling PetroMod (Unix) . . . . . . . . . . . . . . . . . . . . . . . . . . . . . . . . . . . . . . . . . . . . . . . .6-1Uninstalling PetroMod (Unix) . . . . . . . . . . . . . . . . . . . . . . . . . . . . . . . . . . . . . . . . . . . . . . . . .6-2 Before You Begin . . . . . . . . . . . . . . . . . . . . . . . . . . . . . . . . . . . . . . . . . . . . . . . . . . . . . . .6-2 Uninstalling PetroMod . . . . . . . . . . . . . . . . . . . . . . . . . . . . . . . . . . . . . . . . . . . . . . . . . . .6-2 Files Removed During Uninstallation . . . . . . . . . . . . . . . . . . . . . . . . . . . . . . . . . . . . . . . . .6-2vi PetroMod 2012.2 Installation Guide1Information ResourcesIn This SectionSchlumberger Product Documentation.........................................................1-2About Schlumberger.............................................................................1-2Documentation.....................................................................................1-2Typestyle Conventions..........................................................................1-2Alert Statements..................................................................................1-2 Contacting Schlumberger............................................................................1-3Technical Support.................................................................................1-3Information Resources 1-1Schlumberger Product Documentation1-2PetroMod 2012.2 Installation GuideSchlumberger Product DocumentationAbout Schlumberger Schlumberger is the leading oilfield services provider, trusted to deliver superiorresults and improved E&P performance for oil and gas companies around the world.Through our well site operations and in our research and engineering facilities, wedevelop products, services, and solutions that optimize customer performance in asafe and environmentally sound manner.Documentation Documentation is provided in the following electronic formats via the listed location:•PetroMod 2012.2 Installation Guide (Adobe ® Acrobat ® PDF file):https://•PetroMod 2012.2 User Guides (Adobe ® Acrobat ® PDF files):https://•Online help for some applications: PetroMod -> HelpYou must have Adobe ® Reader ® installed to read the PDF files. Adobe Readerinstallation programs for common operating systems are available for a freedownload from the Adobe Web site at .Typestyle Conventions The following conventions are observed throughout this guide:•Bold text is used to designate file and folder names, dialog titles, names ofbuttons, icons, and menus, and terms that are objects of a user selection.•Italic text is used for word emphasis, defined terms, and manual titles.•Monospace text (Courier ) is used to show literal text as you would enter it, or asit would appear onscreen.Alert Statements The alerting statements are Notes, Cautions, and Warnings. These statements areformatted in the following style:• • • • • •Note:Information that is incidental to the main text flow, or to an important pointor tip provided in addition to the previous statement or instruction.• • • • • •Caution:Advises of machine or data error that could occur should the user fail totake or avoid a specified action.• • • • • •Warning:Requires immediate action by the user to prevent actual loss of data orwhere an action is irreversible, or when physical damage to themachine or devices is possible.Contacting SchlumbergerInformation Resources 1-3Contacting SchlumbergerTechnical Support Schlumberger has sales and support offices around the world. For information oncontacting Schlumberger, please refer to the information below.For Technical Support for PetroMod software please contact the Customer CareCenter via the Schlumberger Support Portal at https://Internet Postal Mail SchlumbergerAachen Technology Center (AaTC)Ritterstr . 2352072 Aachen - GermanyContacting Schlumberger1-4PetroMod 2012.2 Installation Guide2Getting StartedIn This ChapterOverview...................................................................................................2-2Introduction.........................................................................................2-2System Requirements...........................................................................2-2System Requirements...........................................................................2-2Licensing.............................................................................................2-4Getting Started 2-1Overview2-2PetroMod 2012.2 Installation GuideOverviewIntroduction This document describes the steps necessary to install PetroMod* 2012.2. Theinstaller includes a full PetroMod installation.•Installing on a workstation using a local license•Installing on a workstation using a license on a central license serverThis guide also explains the procedures required after installation:•Defining your license environmentThis module has been designed by the Schlumberger Aachen Technology Center(AaTC), Germany.Note:The screen shots in this document show PetroMod 2012.1.Audience This guide is useful for the following people:•PetroMod users who install PetroMod on their workstations•System Administrator who installs PetroMod on a network shared diskSystem Requirements Before you install PetroMod 2012.2 your machine must meet the followingrequirements:Hardware Requirements Table 2-1Hardware Requirements for workstation (e.g. Dell T7500)Table 2-2Hardware Requirements for laptop (e.g. Dell M4600)Computer CPU 2 x Intel X5667 (quad core) or X5675 (hexa core)Physical Memory12 GB RAM Hard Disk Space 5 GB of free disk space Graphic CardNvidia Quadro 5000 Network Card 1000 Mbit NicComputerIntel Core i7-2860Q 2.5 GHz Physical Memory 16 GB RAMOverview Getting Started 2-3Table 2-3Hardware Requirements for Linux Cluster • • • • • •Warning:Linux Users - Due to known issues concerning the instability ofOpenGL graphics, PetroMod only supports local rendering on 3Dgraphic cards with stable graphic drivers. Rendering via a networkcould cause stability issues. In particular, we observed problems withthe Mesa OpenGL package that is delivered with RHEL5 and works asa fall-back when no other driver is installed.Software Requirements Table 2-4Software Requirements• • • • • •Caution:It is possible that graphics do not display correctly when using older ATIgraphics cards and drivers. Thus, we recommend the use of Nvidiagraphics cards. We also recommend to install the latest graphicsdrivers available from Nvidia to avoid OpenGL graphic display errors.The driver version that comes with the OS in most cases is quite old oreven generic drivers are used if the graphics hardware is notrecognized correctly during the installation of the OS. These driversonly support basic functionalities and do not offer the OpenGL featuresrequired by PetroMod. Please be aware that most onboard graphicshardware does not support OpenGL at all. A dedicated graphics card isrequired for PetroMod.Hard Disk Space5 GB of free disk space Graphic Card Nvidia Quadro 2000M Computer CPU 2 x Intel X5667 (quad core) or X5675 (hexa core)Physical Memory48GB RAM Network Card1000 Mbit Nic Hard Disk Space 5 GB of free disk spaceMicrosoft Vista64-bit Microsoft Windows 7(recommended)64-bit RedHat EnterpriseLinux 5.3(recommended)64 bit Framework 2.0Overview••••••Note:Software applications created under older operating system versions willrun under newer operating system versions, but not vice versa. Licensing Licenses are required to access PetroMod. Certain functionalities or modules willonly be available with the respective licenses. Contact your Schlumberger SISCustomer Support representative to obtain the necessary licensesMaintenance contracts are usually yearly contracts, renewed at any time during theyear. Prior to 2012.1, PetroMod licenses allowed you to step up to a new PetroModversion based on the PetroMod license expiration date without having a validmaintenance contract. Beginning with 2012.1, upgrades are based on yourmaintenance contract expiration date. This is how you read the new licensingformat:FEATURE petrobuilder3D slbsls <yyyy.mm> <dd-mmm-yyyy> <#>Where• <yyyy.mm> is the maintenance expiration year and month• <dd-mmm-yyyy> is the license expiration day, month, year• <#> is the number of licensesMaintenance renewal is required to run any PetroMod version released after yourmaintenance expiration date. You will be automatically contacted by SchlumbergerInformation Systems before your maintenance expires.2-4PetroMod 2012.2 Installation Guide3Installation (Windows)In This ChapterDownloading the Installation Package..........................................................3-2Installing PetroMod.....................................................................................3-3Installing PetroMod...............................................................................3-3Files Installed During Installation...........................................................3-6 Optional: Installing Runtime Environment for Parallel Processing....................3-7Installing Runtime Environment.............................................................3-7Activating Parallel Processing in the PetroMod Simulation Interface..........3-7 Installing the Licensing Tool........................................................................3-9CodeMeter...........................................................................................3-9Schlumberger Licensing Tool................................................................3-10 Configuring the PetroMod License...............................................................3-13Before you start..................................................................................3-13Obtaining the license...........................................................................3-13Activating a local license......................................................................3-14Activating an external license server.....................................................3-15Checking the License Status.................................................................3-16Installation (Windows)3-1Downloading the Installation PackageDownloading the Installation PackageTo install PetroMod, you need the installation package. If you have a DVD, you canuse it. Otherwise, download PetroMod from the Software Download Center.••••••Note:If you are a new user of the Software Download Center, you must registerbefore you can download PetroMod.To download PetroMod 2012 from the Software Download Center1Go to .2Click SIS Software download center.3Log in to the site.4On the Welcome Message page, click Continue.5In the Product Group Name list (in the upper-left corner), click Geology &Geophysics.6In the table on the right, click PetroMod.7In the table of PetroMod downloads, click the Download icon for the PetroMod2012.2 file you need.You are ready to install PetroMod 2012.3-2PetroMod 2012.2 Installation GuideInstalling PetroModInstallation (Windows)3-3Installing PetroModPerform the following tasks prior to beginning the installation:•Ensure that you have admin privileges on the machine on which you are installing PetroMod and/or install the software together with your systems administrator since superuser passwords are required.•Ensure that the “System Requirements” on page 2-2 are met.PetroMod 2012 is a full installation. If you are already using an earlier PetroMod release, copy the new release into a new directory! Do not install the new version ‘over’ the old version to ensure that all programs and files can be updated and will then be compatible.Installing PetroMod The installation ensures that the files required to run PetroMod are installed on yourcomputer.To Install PetroMod 20121Insert the DVD or navigate to the location where you downloaded theinstallation files.2Double-click PetroMod2012.2.exe to start the installation. The folderPetroMod2012.2.msi will be unpacked, then the InstallShield Wizard will open, see Fig. 3-1. Click Next .Fig. 3-1PetroMod InstallShield Wizard3Fill in your User Name and Organization , see Fig. 3-2, then click Next.Installing PetroMod3-4PetroMod 2012.2 Installation GuideFig. 3-2Filling in user name and organization 4Determine the location of the files, see Fig. 3-3. Default is a folder calledSchlumberger in your Program Files folder. If this is not what you want you need to change that manually by clicking the Change button.When you are content with the location, click Next.Fig. 3-3Determining the location of the files 5 A summary of the settings will be displayed, see Fig. 3-4. Click Install .Installing PetroModInstallation (Windows)3-5Fig. 3-4Summary of settings 6You can follow the progress of the installation in the InstallShield Wizard, seeFig. 3-5.Fig. 3-5Installation progress 7Once the installation is complete the InstallShield Wizard will display the finaldialog, see Fig. 3-6. Click Finish .Installing PetroMod3-6PetroMod 2012.2 Installation Guide Fig. 3-6Installation complete 8The PetroMod 2012.2 icon will appear on your desktop . PetroMod 2012.2 willalso be added to the Schlumberger folder in the Progams list of your Start menu.Proceed with the installation of the .NETruntime environment, the MS HPC runtime for parallel processing and / or with installing Flexnet.Files Installed During Installation The following files / folders are installed during the installation of PetroMod:•one folder: PetroMod 2012.2:-client folder incl. sub folders/files-cult folder incl. sub folders/files-def folder incl. sub folders/files-doc folder incl. sub folders/files-geo folder incl. sub folders/files-well folder incl. sub folders/files-WIN64 folder incl. sub folders/files-PetroMod2012.2.batOptional: Installing Runtime Environment for Parallel Processing Optional: Installing Runtime Environment for Parallel ProcessingPetroMod 2012.2 supports parallel processing on Windows platforms usingMicrosoft HPC Pack 2008 R2 SP3. Using parallel processing from the SimulationInterface Microsoft requires the previous installation of Microsoft HPC runtimeenvironment.Installing Runtime Environment You can find the files in the installation package in the RuntimeEnvironment/ Windows folder:•mpi_x64.exe - MS MPI runtime•HpcClient_x64.exe - MS HPC web interface (optional)Once you have installed the files you need to obtain and activate the necessary licenses.••••••Note:If you want to consolidate your existing MS HPC runtime environments (installed with PM 11 or PetroMod 2011) to the latest version that shipswith PetroMod 2012.2, then you have to uninstall the MS HPC Pack 2008SDK on your system and manually set the required environment variable(called CCP_SDK) to C:\Program Files|Microsoft HPC Pack 2008 R2.Otherwise, PetroMod 2011.1 or PetroMod 11 SP4 will complain about themissing MPI runtime environment.Activating Parallel Processing in the PetroMod Simulation Interface 1After the licenses have been activated open the PetroMod Simulation Interface and select Processors for Parallel Run, see Fig. 3-7.Fig. 3-7Activating parallel processing in the PetroMod Simulation InterfaceOptional: Installing Runtime Environment for Parallel Processing2Increase the number of processors in the Processors Selection dialog.••••••Caution:Parallel processing is only supported on your local machine. Youcannot run a simulation on several nodes (as you could on Linuxclusters).Installing the Licensing Tool Installing the Licensing ToolPetroMod 2012 supports the use of the CodeMeter dongle as well as HOSTIDs forlicense authentication.•If you use CodeMeter, you must install CodeMeter software prior to installing theSchlumberger Licensing tool.•If you use HOSTIDs, you can continue by installing the Schlumberger Licensingtool.CodeMeter PetroMod 2012 uses the CodeMeter dongle for license authentication. Before youinsert your CodeMeter dongle into a USB port on your local workstation or on acentral license server, you must install the CodeMeter software. You should useCodeMeter 4.40 in the following circumstances:•If you use a local license (that is, your local workstation is your local licenseserver), install the CodeMeter dongle, appropriate CodeMeter driver, and theSchlumberger Licensing tool on your computer.•If you use a license on a central license server, the Administrator installs theCodeMeter dongle, CodeMeter driver, and the Schlumberger Licensing tool on theserver. Individual users do not need to install any licensing hardware or softwareon their computers.Installing CodeMeter Follow the steps in this section to uninstall previous versions of CodeMeter, andinstall the version required for this PetroMod release.◆To uninstall previous versions of CodeMeterIf you have an older version of CodeMeter installed on your computer, uninstall itand then install the latest version.1If you want to check the version of CodeMeter you are currently using beforeuninstalling it, on the Windows toolbar right-click the CodeMeter icon and selectAbout to open the About CodeMeter window.2Remove your CodeMeter dongle from the USB port.3Select Start > Control Panel > Programs and Features.4On the list of currently installed programs, select CodeMeter Runtime Kit vx.x.5Click Remove.You are ready to install the latest CodeMeter version.◆To install Codemeter••••••Note:CodeMeter automatically installs in your default Program Files directory:%program files%/Codemeter (usually C:/Program Files).1From the Licensing folder in the PetroMod installation package run the correctprogram (.exe) file:Installing the Licensing Tool•For PetroMod 64-bit, run CodeMeterRuntime64.exeAlternatively, go to the CodeMeter website () anddownload CodeMeter 4.40 from their website.The CodeMeter installation wizard opens.2On the Welcome panel, click Next.3On the License Agreement panel, read the agreement, select I accept thelicense agreement, and then click Next.4On the User Information panel, enter your name, your company’s name, andwho will use CodeMeter on your computer, and then click Next.5On the Select Features panel, select the features you want to install and thenclick Next.Schlumberger recommends that you accept the default settings.6On the Ready to Install panel, click Next to begin the installation.7When the installation is complete, on the last panel click Finish.8Restart your computer.The CodeMeter icon appears in your Windows taskbar. When you insert yourCodeMeter dongle into the USB port, the icon changes to show that your computerrecognizes the dongle. If you double-click the icon, you can view information aboutthe dongle.You are ready to install the Schlumberger Licensing tool.Schlumberger Licensing Tool PetroMod uses FlexNet for licensing. The Schlumberger Licensing tool is a simple interface for FlexNet. Using the Schlumberger Licensing 2012 tool to configure and manage your PetroMod license is recommended, but you may use FlexNet tools instead.If you do not already have the Schlumberger licensing tool on your computer, install the Licensing tool as follows:•If you use a local license (that is, your local workstation is your local license server), install the licensing tool on your computer.•If you use a license on a central license server, the Administrator installs the licensing tool on the server. The Schlumberger Licensing tool is not required for the Administrator to install, configure, and manage the PetroMod license. The Administrator may choose to manage PetroMod licenses with FlexNet native tools.The computer that you use to run the Schlumberger licensing tool is the license server for your PetroMod 2012 installaton.Installing the Schlumberger Licensing Tool Follow the steps in this section to install the Schlumberger Licensing tool. If you have a previous version of the licensing tool and want the latest version (2012), uninstall the older version first, and then install the latest version.。
Analyst software软件操作指南2A-1Tutorial forManual MS_MS
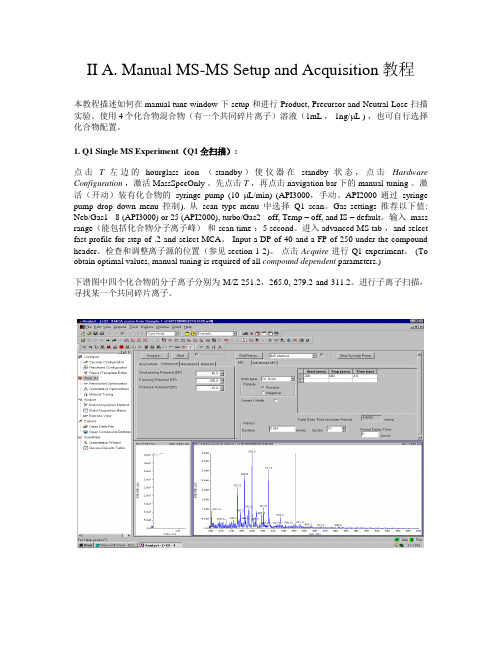
II A. Manual MS-MS Setup and Acquisition教程本教程描述如何在manual tune window 下setup 和进行 Product, Precursor and Neutral Lose 扫描实验。
使用4个化合物混合物(有一个共同碎片离子)溶液(1mL , 1ng/μL ) ,也可自行选择化合物配置。
1. Q1 Single MS Experiment(Q1全扫描):点击T左边的hourglass icon (standby)使仪器在standby状态,点击Hardware Configuration,激活MassSpecOnly 。
先点击T,再点击navigation bar下的 manual-tuning 。
激活(开动)装有化合物的syringe pump (10 μL/min) (API3000,手动、API2000 通过syringe pump drop down menu控制). 从scan type menu中选择Q1 scan。
Gas settings 推荐以下值: Neb/Gas1 - 8 (API3000) or 25 (API2000), turbo/Gas2 - off, Temp – off, and IS – default。
输入 mass range(能包括化合物分子离子峰)和 scan time :5 second。
进入advanced MS tab ,and select fast profile for step of .2 and select MCA。
Input a DP of 40 and a FP of 250 under the compound header。
检查和调整离子源的位置(参见section 1-2)。
点击Acquire进行 Q1 experiment。
(To obtain optimal values, manual tuning is required of all compound dependent parameters.)下谱图中四个化合物的分子离子分别为 M/Z 251.2,265.0, 279.2 and 311.2。
broadcom 驱动 linux 释放说明 14.0.326.25-14.0.326.14说明书
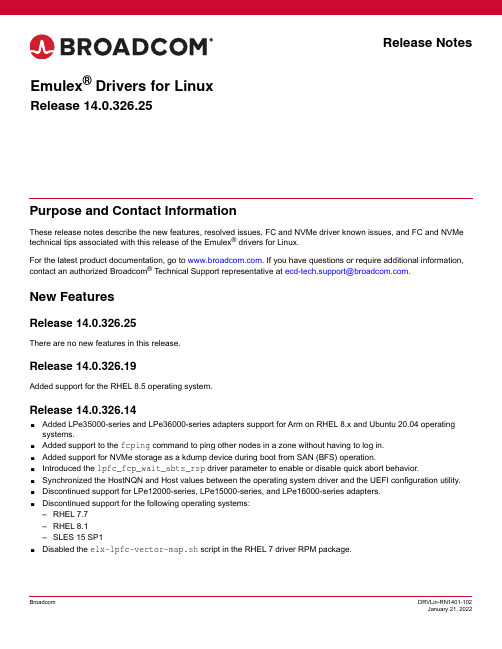
Release NotesPurpose and Contact InformationThese release notes describe the new features, resolved issues, FC and NVMe driver known issues, and FC and NVMe technical tips associated with this release of the Emulex ® drivers for Linux.For the latest product documentation, go to . If you have questions or require additional information, contact an authorized Broadcom ® Technical Support representative at *****************************.New FeaturesRelease 14.0.326.25There are no new features in this release.Release 14.0.326.19Added support for the RHEL 8.5 operating system.Release 14.0.326.14⏹Added LPe35000-series and LPe36000-series adapters support for Arm on RHEL 8.x and Ubuntu 20.04 operating systems. ⏹Added support to the fcping command to ping other nodes in a zone without having to log in. ⏹Added support for NVMe storage as a kdump device during boot from SAN (BFS) operation. ⏹Introduced the lpfc_fcp_wait_abts_rsp driver parameter to enable or disable quick abort behavior. ⏹Synchronized the HostNQN and Host values between the operating system driver and the UEFI configuration utility. ⏹Discontinued support for LPe12000-series, LPe15000-series, and LPe16000-series adapters. ⏹Discontinued support for the following operating systems: –RHEL 7.7–RHEL 8.1 –SLES 15 SP1⏹Disabled the elx-lpfc-vector-map.sh script in the RHEL 7 driver RPM package.Emulex ® Drivers for LinuxRelease 14.0.326.25⏹The following changes were made to NVMe:–Added support to create the HostNQN and HostID using the system UUID.–Discontinued support for creating a HostNQN based on the adapter WWPN.–Added support for reading, writing, and dumping EFI variables NvmeHostNQN and NvmeHostID.–Added support for the NVMe BFS kit on SLES 15 SP3 and RHEL 8.4 operating systems.NOTE:Since the nvmefc-dm features are now inbox in SLES 15 SP3, you do not need to use the NVMe BFS kit on SLES15 SP3 to BFS. However, if the operating system installer determines that the system UUID is not random enoughand silently generates a new UUID, you must use the NVMe BFS kit to resolve the issue.Resolved IssuesRelease 14.0.326.25On the SLES 12 SP2 operating system with a multiport HBA, using FC inbox driver version 12.8.0.10 or FC out-of-box driver 14.0.326.x, the issue of targets being discovered on only one port is resolved.Release 14.0.326.19There are no resolved issues in this release.Release 14.0.326.14⏹On the CentOS 8 operating system, the driver installer script no longer fails to determine the distribution and version.⏹HBA reset no longer causes the congestion buffer to be reset. Both congestion buffer information and statistics arepreserved across reset.FC Driver Known Issues1.On Red Hat Virtualization (RHV) 4.4, dracut does not add the lpfc driver configuration file to initramfs.Workarounda.Edit the /usr/lib/dracut/dracut.conf.d/02-generic-image.conf file.b.Add a # before the hostonly=no string to comment out the entry.c.Rebuild the initramfs using dracut.2.On RHEL 8.4 inbox drivers, diagnostic loopback tests always fail and might result in a timeout error.WorkaroundInstall any RHEL 8.4 supported out-of-box driver version.3.There is a change to the value specified for the driver parameter lpfc_log_verbose in Step 5 in Section 2.5 Updatingthe Firmware. For details, refer to the Emulex Drivers for Linux User Guide4.An unrecoverable operating system fault might occur when generating a crash dump after successful installation of theSLES 15 SP2 operating system on a local device or an FC BFS LUN.WorkaroundInstall the SUSE maintenance update dracut-049.1+suse.183.g7282fe92-3.18.2.x86_64.rpm orlater.Release 14.0.326.25Release 14.0.326.25NVMe Driver Known Issues1.Unloading the Fibre Channel Protocol (FCP) driver using the modprobe -r command might cause issues on the initiatorbefore NVMe devices are disconnected.WorkaroundUnload the driver with rmmod lpfc, or if modprobe –r lpfc is required, wait for the device loss period of 60 seconds before unloading the driver.2.On RHEL 7.8 inbox drivers with NVMe targets connected to the port, when the firmware is upgraded, the No host rebootrequired to activate new firmware feature might not work as intended.WorkaroundIf the new firmware is not activated, reload the driver or reboot the system.3.On the Oracle Linux 7.7 unbreakable enterprise kernel (UEK) R6 operating system, unloading a Linux FCP driver withNVMe connections might fail.WorkaroundDisconnect the NVMe connections before unloading the Linux FCP driver.4.When performing a clean operating system installation of RHEL 8.2 and loading the nvme-cli RPM from the ISO, thedefault hostid and hostnqn values are the same on multiple servers.WorkaroundUpdate the nvme-cli utility to version 1.10.1-1.el8 or later.5.On an NVMe controller, reconnectivity issues may occur during switch port toggles. This issue is an operating systemissue.WorkaroundContact Red Hat or SUSE technical support.6.In the fstab file, when an NVMe namespace mount point entry is included and the defaults option is specified, if theoperating system is rebooted, the operating system might go into emergency mode.WorkaroundsFor SLES15 SP3:Specify nofail as the mount option when creating the NVMe namespace fstab mount point entry.For RHEL7.x, SLES 12 SP5, SLES 15 SP2, and RHEL8.x:–Specify nofail as the mount option when creating the NVMe namespace fstab mount point entry.–Install the nvmf boot dracut module provided in the nvmefc-dm kit.7.The SLES 15 SP3 installer might not discover the NVMe namespace to install the operating system.WorkaroundUse the nvmefc-dm kit to discover the NVMe namespace.8.During RHEL 7.x and RHEL 8.2 installation, the operating system reports an error while attempting to add an UEFI bootentry. This issue is an operating system issue and has been reported to Red Hat.NOTE:This issue is specific to NVMe BFS.WorkaroundIgnore the warning prompt and continue the installation. On the first reboot, use the server UEFI menu to select the adapter port that is attached to the fabric to boot the operating system.9.On SLES 12 SP5, the nvmefc-boot-connections systemd unit is disabled after the operating system is installedusing NVMe BFS. This issue leads to the operating system failing to discover all NVMe subsystems when a large number of NVMe subsystems exist.WorkaroundManually enable the nvmefc-boot-connections systemd unit. See NVMe Driver Technical Tips, Item6, for more information.10.An unrecoverable operating system fault might occur when generating a crash dump after successful installation of theoperating system in the NVMe BFS namespace.WorkaroundFrom the NVMe BFS kit, extract and install the nvmefc-dm RPM that matches the installed operating system.# tar zxf elx-nvmefc-dm-<version>-<release>/nvmefc-dm-<version>-<release>.<OS>.tar.gz11.If the operating system was installed using NVMe over FC BFS, and you are updating the firmware from version12.8.xxx.xx to version 14.0.xxx.xx, NVMe storage might not be found, and the UEFI boot menu might not boot theoperating system.WorkaroundIn the UEFI configuration utility, enable the Generate and use a Port Based HostNQN option. Refer to the Emulex Boot for the Fibre Channel and NVMe over FC Protocols User Guide for details.12.If the operating system was installed using NVMe over FC BFS, and you are updating the firmware from version14.0.xxx.xx to version 12.8.xxx.xx, NVMe storage might not be found, and the UEFI boot menu might not boot theoperating system.WorkaroundUpdate the SAN storage configuration and add an adapter WWPN-based HostNQN to the storage array.FC Driver Technical Tips1.For secure boot of the RHEL operating system, download the public key file for the RHEL operating system from, and place it in the systems key ring before installing the signed lpfc driver for the RHEL operating system. Refer to the Red Hat documentation for instructions on adding a kernel module to the system.2.On Red Hat operating systems, the installer automatically searches for a driver update disk (DUD) on a storage volumelabeled OEMDRV. For details, refer to the Red Hat documentation.3.Out-of-box Linux driver builds are built on, and are intended to be run on, general availability (GA) kernels for theirrespective distributions. If you need an out-of-box Linux driver build for a subsequent distribution’s errata kernel, you might need to recompile the driver from the Linux driver source file on the errata kernel.NVMe Driver Technical Tips1.Creation of N_Port ID Virtualization (NPIV) connections on initiator ports that are configured for NVMe over FC is notsupported. However, initiator ports can connect to FCP and NVMe targets simultaneously.2.NVMe disks might not reconnect after a device timeout greater than 60 seconds has occurred.WorkaroundYou must perform a manual scan or connect using the nvme connect-all CLI command.3.To manually scan for targets or dynamically added subsystems, type the following command (all on one line):nvme connect-all --transport=fc --host-traddr=nn-<initiator_WWNN>:pn-<initiator_WWPN>--traddr=nn-<target_WWNN>:pn-<target_WWPN>where:–<initiator_WWNN> is the WWNN of the initiator, in hexadecimal.–<initiator_WWPN> is the WWPN of the initiator, in hexadecimal.–<target_WWNN> is the WWNN of the target, in hexadecimal.–<target_WWPN> is the WWPN of the target, in hexadecimal.For example:# nvme connect-all --transport=fc --host-traddr=nn-0x20000090fa942779:pn-0x10000090fa942779 --traddr=nn-0x20000090fae39706:pn-0x10000090fae397064.To enable autoconnect on the following operating systems, install nvme-cli from the operating system distributionmedia:–RHEL 8.3–RHEL 8.2–SLES 15 SP2–SLES 12 SP55.If the following files are present on the system after the operating system is installed, the operating system has alreadyinstalled NVMe over FC autoconnect facilities. Do not install the Emulex autoconnect script file for inbox NVMe over FC drivers.–/usr/lib/systemd/system/nvmefc-boot-connections.service–/usr/lib/systemd/system/nvmefc-connect@.service–/usr/lib/udev/rules.d/70-nvmefc-autoconnect.rules6.Enable nvmefc-boot-connections to start during boot.Use systemctl enable to enable the nvmefc-boot-connections systemd unit to start during boot.# systemctl enable nvmefc-boot-connectionsCreated symlink /etc/systemd/system/default.target.wants/nvmefc-boot-connections.service ? /usr/ lib/systemd/system/nvmefc-boot-connections.service.7.Back up the initial ramdisk before upgrading the operating system.During an operating system upgrade, the kernel or nvme-cli might be upgraded. Back up the initial ramdisk before upgrading the operating system to ensure that the operating system is still bootable in the event that NVMe BFS fails due to a change in either the kernel or nvme-cli.Change the directory to /boot, and make a copy of the initial ramdisk.Example for SUSE operating systems:# cd /boot# cp initrd-$(uname -r) initrd-$(uname -r).bakExample for Red Hat operating systems:# cd /boot# cp initramfs-$(uname -r).img initramfs-$(uname -r).img.origCopyright © 2022 Broadcom. All Rights Reserved. The term “Broadcom” refers to Broadcom Inc. and/or its subsidiaries. For more information, go to . All trademarks, trade names, service marks, and logos referenced herein belong to their respective companies.Broadcom reserves the right to make changes without further notice to any products or data herein to improve reliability, function, or design. Information furnished by Broadcom is believed to be accurate and reliable. However, Broadcom does not assume any liability arising out of the application or use of this information, nor the application or use of any product or circuit described herein, neither does it convey any license under its patent rights nor the rights of others.。
岛津LCsolution软件快速参考说明书
8.1 查看和使用 [ 数据管理器 ]................................................................................. 32 8.2 查看数据 ........................................................................................................... 34 8.3 使用 CLASS-Agent 查看数据 ........................................................................... 36
岛津 LCsolution
色谱数据系统 快速参考说明书
使用产品前请仔细阅读本说明书。 请妥善保管本说明书以备今后参考。
岛津企业管理(中国)有限公司 分析仪器事业部 分析中心
1
本页空白。
目录
1 2
3 4 5
6 7 8
索引
在阅读此文档前....................................................................................................1
对羟基苯甲酸酯混合物
1.2
LCsolution 的数据结构
本节简要描述了 LCsolution 的数据结构。 各种 LCsolution 数据参数保存在数据文件中,例如在数据采集和数据分析 (元数据)中的仪器和分析条 件。由于可以从数据文件本身参照分析条件和参数,这样就确保了数据的可跟踪性。此外,仅使用数据文 件即可重新分析数据。
Moxa ioLogik 4000 Series模块化远程I O系统说明书

ioLogik4000SeriesModular remote I/OFeatures and Benefits•I/O expansion without a backplane•Active communication with MX-AOPC UA Server•Supports SNMP v1/v2c•Easy configuration with Modular ioAdmin utility•Friendly configuration via web browser•Simplifies I/O management with MXIO library for Windows or LinuxCertificationsIntroductionThe ioLogik4000Series is suitable for remote monitoring and alarm systems,such as those used for water treatment systems,water supply systems,wastewater treatment systems,and power monitoring systems.These kinds of applications need more I/O points and a variety of I/O types,including temperature sensors,gas detectors,and water quality detectors,all of which can benefit from the versatile mixture of I/O features supported by the ioLogik4000Series.Slice Form Factor and Flexible I/O VarietyThe unique modular construction of the ioLogik4000Series allows for mixing and matching of modules to achieve the best combination of I/O modules to meet the needs of a wide range of remote automation applications.An industrial modular housing enables I/O modules to be added to the base unit without a backplane.The ioLogik4000Series is perfect for space-limited applications,and high-density I/O points are provided for greater flexibility and expandability.Modules can connect to virtually any type of sensor,including but not limited to those for temperature, pressure,flow,voltage,current,and contact closure.Easy MaintenanceThe ioLogik4000Series comes with removable spring-type terminal blocks(RTBs)that allow you to conserve field wiring for future use.SpecificationsInput/Output InterfaceButtons Reset buttonControl LogicLanguage ioLogik E4200:Click&Go,NA-4010/4020/4021:NoneEthernet Interface10/100BaseT(X)Ports(RJ45connector)NA-4010:1ioLogik E4200:2,2MAC addressesEthernet Software FeaturesConfiguration Options NA-4010/ioLogik E4200:Web Console(HTTP)NA-4010/4020/4021:Windows Utility(ioAdmin)ioLogik E4200:Windows Utility(Modular-ioAdmin)Industrial Protocols NA-4010:Modbus TCP Server(Slave),MXIO LibraryNA-4020/4021:MXIO LibraryioLogik E4200:Modbus TCP Server(Slave),Moxa AOPC(Active Tag),MXIO Library,SNMPv1/v2c,SNMPv1TrapManagement NA-4010/ioLogik E4200:DHCP Client,HTTP,IPv4,TCP/IP,UDPNA-4010/4020/4021:ioAdminioLogik E4200:Modular-ioAdminSerial InterfaceConnector NA-4021:DB9femaleNA-4020:Terminal blockData Bits7,8No.of Ports1Parity None,Even,OddSerial Standards NA-4021:RS-232NA-4020:RS-485Stop Bits1,2Baudrate NA-4020/4021:1200,2400,4800,9600,19200,38400,57600,115200bpsSerial Software FeaturesIndustrial Protocols NA-4020/4021:Modbus RTU/ASCII SlaveSerial SignalsRS-232NA-4021:TxD,RxD,GNDRS-485-2w NA-4020:Data+,Data-,GNDDIP Switch ConfigurationSerial Interface Fixed baudrateModbus TCPMax.No.of Client Connections8Mode Client(Master)Power ParametersNo.of Power Inputs1System Power ParametersPower Connector Spring-type Euroblock terminalNo.of Power Inputs1Input Voltage11to28.8VDCPower Consumption NA-4010:60mA@24VDCNA-4020/4021:70mA@24VDCioLogik E4200:175mA@24VDCField Power ParametersPower Connector Spring-type Euroblock terminalNo.of Power Inputs1Input Voltage11to28.8VDCCurrent in Field Power Contact10A(max.)Physical CharacteristicsHousing PlasticDimensions45x99x70mm(1.77x3.90x2.76in)Weight NA-4010/4020/4021:150g(0.33lb)ioLogik E4200:180g(0.396lb)Installation DIN-rail mountingEnvironmental LimitsOperating Temperature-10to60°C(14to140°F)Storage Temperature(package included)-40to85°C(-40to185°F)Ambient Relative Humidity5to95%(non-condensing)Altitude2000m1Standards and CertificationsEMC EN61000-6-2/-6-4EMI CISPR22,FCC Part15B Class AEMS IEC61000-4-2ESD:Contact:4kV;Air:8kVIEC61000-4-3RS:80MHz to1GHz:10V/mIEC61000-4-4EFT:Power:2kV;Signal:1kVIEC61000-4-5Surge:Power:2kV;Signal:1kVIEC61000-4-6CS:10VIEC61000-4-8PFMFSafety UL508Shock IEC60068-2-27Vibration IEC60068-2-6DeclarationGreen Product RoHS,CRoHS,WEEEMTBFTime NA-4010:4,739,300hrsNA-4020:4,721,640hrsNA-4021:4,695,360hrsioLogik E4200:357,000hrsStandards Telcordia SR332WarrantyWarranty Period2yearsDetails See /warranty1.Please contact Moxa if you require products guaranteed to function properly at higher altitudes.Package ContentsDevice1x ioLogik4000Series remote I/OInstallation Kit1x terminal block,8-pin,3.81mmDocumentation1x quick installation guide(ioLogik E4200)1x warranty cardNote This product requires additional modules(sold separately)to function.DimensionsI/O Network Adapter I/O ModuleOrdering InformationModel Name Control Logic Ethernet Interface Serial Interface No.of Support I/O Modules ioLogik E4200Click&Go2x RJ45–16NA-4010–1x RJ45–32NA-4020––RS-48532NA-4021––RS-23232 Accessories(sold separately)I/O ModulesM-1450For the ioLogik4000Series,4DIs,110VACM-1451For the ioLogik4000Series,4DIs,220VACM-1600For the ioLogik4000Series,16DIs,24VDC,sink typeM-1601For the ioLogik4000Series,16DIs,24VDC,source typeM-1800For the ioLogik4000Series,8DIs,24VDC,sink typeM-1801For the ioLogik4000Series,8DIs,24VDC,source typeM-2450For the ioLogik4000Series,4relays,24VDC/230VAC,2AM-2600For the ioLogik4000Series,16DOs,24VDC,0.5A,sink typeM-2601For the ioLogik4000Series,16DOs,24VDC,0.5A,source typeM-2800For the ioLogik4000Series,8DOs,24VDC,0.5A,sink typeM-2801For the ioLogik4000Series,8DOs,24VDC,0.5A,source typeM-3802For the ioLogik4000Series,8AIs,4to20mA,12bitsM-3810For the ioLogik4000Series,8AIs,0to10V,12bitsM-4402For the ioLogik4000Series,4AOs,4to20mA,12bitsM-4410For the ioLogik4000Series,4AOs,0to10V,12bitsM-6200For the ioLogik4000Series,2AIs,RTD:PT100,JPT100M-6201For the ioLogik4000Series,2AIs,TCPower ModulesM-7001For the ioLogik4000Series,system power moduleM-7002For the ioLogik4000Series,field power moduleM-7804For the ioLogik4000Series,potential distributor module,0VDC8channelM-7805For the ioLogik4000Series,potential distributor module,24VDC,8channelSoftwareMX-AOPC UA Server OPC UA Server software for converting fieldbus to the OPC UA standard©Moxa Inc.All rights reserved.Updated Dec09,2020.This document and any portion thereof may not be reproduced or used in any manner whatsoever without the express written permission of Moxa Inc.Product specifications subject to change without notice.Visit our website for the most up-to-date product information.。
patran错误日志及解决方法

2. USER WARNING MESSAGE 4124 (IFS3P)
THE SPCADD OR MPCADD UNION CONSISTS OF A SINGLE SET 在图中用了 RB3 的 MPC,其中 dependent node (ux,uy,uz), independent(ux,uy,uz,rx,ry,rz),有可 能是这里的问题。不过这个倒不影响计算结果。
^^^ RUN TERMINATED DUE TO EXCESSIVE PIVOT RATIOS IN MATRIX KLL. ^^^ USER ACTION: CONSTRAIN MECHANISMS WITH SPCI OR SUPORTI ENTRIES OR SPECIFY PARAM,BAILOUT,-1 TO CONTINUE THE RUN WITH MECHANISMS. 以前也遇到这种情况,这次遇到后,又在一节点加载了位移约束,就解决了。看来这 种错误主要是由于约束不够,线性方程组无解造成的。 还有可能是没有 equivalence,This should solve your problem or reduce the number of failed ratios.有一次就遇到此情况。
7. 常用材料定义对比表
MAT1 MAT2 MAT3 MAT8 MAT9
isotropic anisotropic(2) orthotropic(3) orthotropic(2) anisotropic(3) • Use a FORCE entry if you want to define a static, concentrated force at a grid point by 一个点的力 specifying a vector. • Use a FORCE1 entry if the direction is determined by a vector connecting two grid points. 两个点的力 • Use a FORCE2 entry if the direction is specified by the cross product of two such vectors. 以上的乘积
_NCCP1H010_MoveAbsolute_REAL
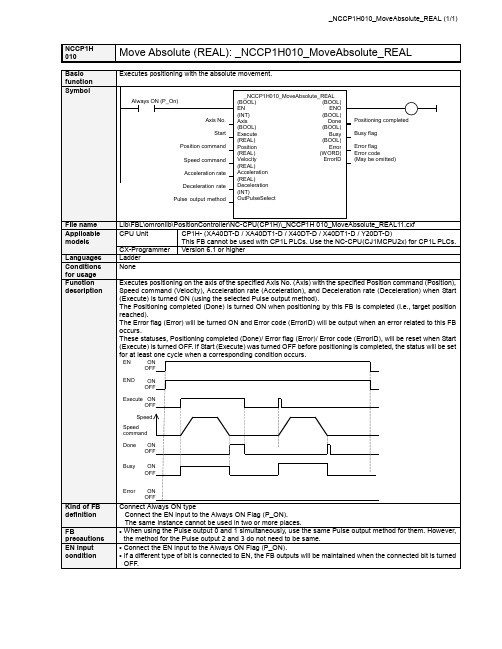
NCCP1HMove Absolute (REAL): _NCCP1H010_MoveAbsolute_REAL 010■ Variable TableOutput Variables Name Variable name Data type Range DescriptionENO ENO BOOL 1(ON): FB operating normally0(OFF): FB not operating normallyPositioning completed Done BOOL 1 (ON) indicates that positioning is completed.Busy flag Busy BOOL 1 (ON) indicates that the FB is in pregress.Error flag Error BOOL 1 (ON) indicates that an error has occurred in the FB. Error code(May be omitted)ErrorIDWORDThe error code of the error occurred in the FB will be output. For details of the errors, refer to the sections of the manual listed in the Related manuals above. When Unit No. or Axis. No. is out of the range, #0000 will be output.Limitation of Function block by Combination of CPU type and Unit Version CPU Type Unit Version Axis No. Range of Frequency Description 1.1 &0 to &3 +1.0 to +100000.0 &0 to &1 +1.0 to +100000.0XA / X 1.0 &2 to &3 +1.0 to +30000.0Please use Function Block Version1.10 or higher whenyou set values that are larger than 30000.0Hz to Axis. No.2 or No.3. &0 to &1 +1.0 to +1000000.0 Y 1.1 &2 to &3 +1.0 to +100000.0Please use Function Block Version1.10 or higher forCP1H-Y20DT-D.■ Revision History Version Date Contents 1.10 2006.5. Addition of CP1H CPU Unit unit version 1.1 1.00 2005.9. Original productionNoteThis document explains the function of the function block.It does not provide information of restrictions on the use of Units and Components or combination of them. For actual applications, make sure to read the operation manuals of the applicable products.。
CPX-4AE-T CPX-4AE-I 分析模块说明书

Terminal CPXMódulos de E/S analógicas CPX-4AE-T/CPX-4AE-IAmplio margen•CPX-4AE-T: menores costes del sistema y de almacenamiento mediante conexión directa de detectores de temperatura,termómetros de resistencia eléctrica tipos PT y N•Prescindir de costosos detecto-res con convertidores integra-dosSoluciones específicasConexiones en función de la apli-cación, de las características del módulo electrónico y del están-dar válido en la empresa.Menos es másTecnología avanzada para reducir costos y ahorrar tiempo y espa-cio.•Menores costos por canal con cuatro canales por módulo •Menos tiempos improductivos mediante diagnóstico por cana-les e indicación de fallos con LED por canal, unidad manual CPX-MMI o bus de campo /Ethernet•Terminales más compactos gra-cias a la gran cantidad de cana-les por móduloLos nuevos módulos de E/S son óptimos para una gran cantidad de canales analógicos o detectores de temperatura en la automatización de procesos. CPX-4AE-T para la detección de temperaturas desde -200°C hasta 850 °C; CPX-4AE-I para señales desde 4 hasta 20 mA.Medir temperaturas,captar señales,ahorrar espacio.210.8.PSIProduct Short InformationFesto AG &Co.KGRuiter Strasse 8273734 EsslingenInternet Tel. ++49 (0)711 347-0 Fax ++49 (0)711 347-2144E-mail service_international@270406R e s e r v a d o e l d e r e c h o d e m o d i f i c a c i ónTerminal CPXMódulos de E/S analógicas CPX-4AE-T / CPX-4AE-IAmplia modularidadMás economía mediante la utili-zación de módulos electrónicos.Medir temperaturas, caudales,presiones y distancias.CPX: diversidad de conexiones Gran cantidad de funciones eléc-tricas. El encadenamiento de la placa de alimentación, módulo electrónico y placa de alimenta-ción permite numerosas combi-naciones. Elección rápida y man-tenimiento sencillo gracias a la sustitución de módulos electróni-cos sin modificar el cableado.TipoCPX-4AE-ICPX-4AE-TMódulos de entradas analógicas Captación de señales Detección de temperaturas Cantidad de entradas 44Cantidad de salidas ––Línea característica ––Resolución12 Bit16 BitNivel de conm./Margen señales 0 ... 20 mA, 4 ... 20 mA Fuente de intensidad constante Alim. máx. de corr. por canal 40 mA En función del detector Alim. máx. de corr. por módulo 0,7 A0,7 A Detectores P . ej. sensor de presión y vacío SDE–DetectoresSensores de presión, detectores de caudal PT 100, PT 200, PT 500, PT 1000y medidores de distancias Ni 100, Ni 120, Ni 500, Ni 1000Margen de temperatura –PT estándar: -200 °C ... 850 °C DetectoresPT entorno: -120 °C ... 130 °C NI estándar: -60 °C ... 180 °CConexiones para detectores 2, 3, 4 hilos 2, 3, 4 hilos ParametrizaciónFormato de datos, valores límite, factor de escala Formato de datos, valores límite, factor de escala,detector de temperatura, comportamiento de la fuente de corriente en caso de sobrecargaDiagnóstico 4 LED para errores de canal y 1 LED para error de móduloFuncionesParametrización y diagnóstico por canal, señales del canal defectuoso a través de la red o en CPX-MMIMPA1 y MPA2Bloque de enlace CPX-GE-7/8" 5 cont.CPX-4AE-ISensor de presión SDE1Medidor de distancias SOELDetector de caudal SFE1Módulo electrónico CPX-4AE-TDetector de temperatura PT 100Datos técnicos。
- 1、下载文档前请自行甄别文档内容的完整性,平台不提供额外的编辑、内容补充、找答案等附加服务。
- 2、"仅部分预览"的文档,不可在线预览部分如存在完整性等问题,可反馈申请退款(可完整预览的文档不适用该条件!)。
- 3、如文档侵犯您的权益,请联系客服反馈,我们会尽快为您处理(人工客服工作时间:9:00-18:30)。
系统分析与设计第4章:信息收集-交互式方法2信息需求一系列问题意见运用技术1. 面谈41. 面谈在和别人面谈之前,必须先同自己进行有效的面谈。
不仅需要知道自己的倾向,还要知道如何影响自己的理解。
教育,智力,素养,情感和道德标准都会对面谈时听到的内容起着强大的过滤作用。
5发现问题:系统输出的结果?丰富多彩更多的专业知识发现问题:系统内部人员状态?外部环境对系统的影响?定义问题陈述:议题(当前情况):目标(期望情况):1. 面谈为什么要进行面谈?要提什么问题?如何才能使面谈成功?如何是面谈对象也感到满意?大连理工大学软件学院9“大学生校园生活辅助系统”为什么要进行面谈?发现需求明确功能改善要提什么问题?系统输出要提什么问题?系统内部状态外部环境如何才能使面谈成功?如何是面谈对象也感到满意?面谈要求:目标明确,一般采用问与答的形式。
获取的信息:获取面谈对象的观点当前系统的状态组织和个人的目标非正规过程的感受大连理工大学软件学院141. 调查面谈对象的观点观点有时比事实更重要,更有启发性。
2. 获悉面谈对象的感受3. 目标是面谈时可以收集的重要信息。
从硬数据中得到的事实可以解释过去的成绩。
目标能够反映组织的未来。
4. 考察关键的HCI(人-机交互)问题人类工程系统的可用性系统的令人满意性系统在支持个人任务上有多大用处151. 阅读背景材料2.4.5. 决定问题的类型和结构大连理工大学软件学院161. 阅读背景材料通过公司Web站点,年度报告,事实通信,介绍组织的出版物。
特别留意组织成员用来描述自己及组织的语言:设法统一一种共同词汇。
大连理工大学软件学院172. 确定面谈目标提出的问题,4 -6个问题涉及HCI,信息处理,决策行为。
涉及:HCI方面:系统的有用性和可用性如何适应物理方面的如何适应用户的认知能力是否迷人的,美观的外表使用该系统是否得到了回报,预期的结果信息资源,信息格式,信息的性质决策频度决策样式大连理工大学软件学院18“大学生校园生活辅助系统”面谈目标1.1 面谈准备的5个步骤3. 决定面谈对象所有层次上载某些方面受到系统影响的关键人物。
力争尽可能多地收集用户的需求。
4. 准备面谈的对象提前通知,使面谈人有时间去思考面谈事宜。
面谈要控制在45分钟之内,最多不要超过1小时。
大连理工大学软件学院20“大学生校园生活辅助系统”N = 2 X 5 X 6 X 2 X 20 = 2400 人1.1 面谈准备的5个步骤5. 决定问题的类型和结构写下在确定面谈目标是发现的涵盖HCI和决策等关键领域的问题。
正确的提问技巧是面谈的核心。
问题的基本形式:开放式问题,封闭式问题。
面谈的3种组织模式:金字塔结构,漏斗结构,菱形结构。
大连理工大学软件学院221.2 问题类型开放式问题:面谈对象答复问题的选择不受限制。
答复可以是2个词,也可以是2段话。
有何看法?目标是什么?如何处理?最大的挫折是什么?大连理工大学软件学院23“大学生校园生活辅助系统”开放式问题的优势:让面谈对象感到自在可以收集面谈对象的词汇,放映他们的教育程度,价值标准,态度和信念提供丰富的细节对未采用的进一步提问方法有启迪作用让面谈对象更感兴趣允许更多的自发性会见者更容易措词会见者没有准备的紧急关头采用这种类型大连理工大学软件学院25开放式问题的缺点:提此类问题可能会产生太多不相干的细节面谈可能失控开放式的回答会花费大量的时间才能获得有用的信息量可能会使会见者看上去没有准备可能产生这样的现象:会见者在对面谈做没有实际目标的调查大连理工大学软件学院26封闭式问题面谈对象可能的回答是受到限制的。
回答只能用限定的数字:0,1或者n类似“多选题”有多少个XXX?是否XXX?谁能够XXX?大连理工大学软件学院27“大学生校园生活辅助系统”封闭式问题的优势节省时间容易对比面谈切中要点保持对面谈的控制权快速探讨大范围的问题可到贴切的数据大连理工大学软件学院29封闭式问题的缺点是面谈对象厌烦得不到丰富的细节处于上述原因,失去主要思想不能建立会见者和面谈对象的友好关系大连理工大学软件学院30大连理工大学软件学院31时间的使用效率数据的精度广度和深度需要面谈的技能分析的难易度数据的可靠性开放式问题封闭式问题底底底广多难高高高窄少易调查问题目的是深究答复得到面谈对象要表达的更多意思澄清面谈对象的观点既可以是开放问题,也可以是封闭式问题为什么?举个例子?更详细的说明?大连理工大学软件学院32“大学生校园生活辅助系统”调查问题1.3 按逻辑顺序安排问题1. 使用金字塔结构采用归纳组织方式。
会见者以很具体的问题(封闭式问题)开始然后,使用开放式问题允许面谈对象用更一般的回答来扩展这个话题。
面谈对象需要对这个话题预热,就采用金字塔结构。
想结束谈话的时候,使用:请概括一下你的想法。
大连理工大学软件学院34“大学生校园生活辅助系统”你参加学校的社团了么?你们社团主要在做什么?你期望你们社团应该在什么方面有所改进?你认为社团对你们的大学生活的重要性?351.3 按逻辑顺序安排问题2. 使用漏斗结构采用演绎的方法以一般的开放式问题开始然后,用封闭式问题缩小可能的答复。
开始一场面谈提供了一种容易而轻松的途径当面谈对象对这个话题有情绪,需要自由表达这些情绪的时候,才能采用漏斗形提问顺序大连理工大学软件学院36“大学生校园生活辅助系统”如果提供学习这些知识的条件,你能够很好的自学这些知识么?在学习方面,除了学校所授的课程外,你还想学些什么?你认为什么样的大学生活才是丰富多彩的?1.3 按逻辑顺序安排问题3. 使用菱形结构金字塔结构和漏斗结构的结合以一种非常明确的问题开始然后,考察一般的问题最后,得出一个明确的结论首先提出一些简单的封闭式问题,为面谈过程做好铺垫。
中间阶段,询问对明显没有“正确”答案的一般话题的看法。
然后,会见者再次限制问题以获得明确的答案。
缺点:花费的时间比其他2个要长。
大连理工大学软件学院38“大学生校园生活辅助系统”你最近一次去开发区是什么时候?你经常去开发区么去开发区一般要做些什么?大连理工大学软件学院在购物方面,什么东西你觉得需要到开发区来买?你需要到开发区购物是价格的原因,还是因为样式的原因?你觉得如果网站可以提供代买你想要的商品,你会选择在网上购买么?1.4 撰写面谈报告面谈本身结束了,但是处理面谈的数据工作才刚刚开始。
撰写面谈报告来获取面谈的实质。
尽可能在面谈结束后马上写出面谈报告。
保证面谈数据质量初步总结后,就要深究细节标出面谈的要点,和自己的观点与面谈对象一起评审面谈报告让面谈对象知道,我们非常愿意花时间了解他们的观点和感受。
大连理工大学软件学院40“大学生校园生活辅助系统”观点感觉目标2. 联合应用程序设计422. 联合应用程序设计面谈:不可避免出现没有想象中有用的情况。
不仅耗时,容易出错,数据容易被误解。
联合应用程序设计:Joint Application Design: JAD节省个人面谈的时间(减少成本)改善信息需求评估结果的质量通过多方一起参加的过程,获得用户对新系统的更多认可大连理工大学软件学院432.1 支持使用JAD的条件用户想有新东西,不希望用常规的方法解决典型的问题。
公司文化支持不同层次的职员间联合问题求解。
分析员预测,通过一对一面谈获得的观点没有通过广泛的分组练习获得的丰富。
组织工作流允许关键职员离职2 –4 天。
大连理工大学软件学院44主办者:以为地位较高的人来主办JAD会议负责开始和结束JAD会议这个人将是组织对系统项目承诺的重要的,显著的象征。
大连理工大学软件学院45系统分析员通常是被动角色全程参加JAD会议,倾听用户谈话和他们的需求。
如果JAD会议中提出了与成本不相称的解决方法,应给出内行的观点。
避免事后因成本过高而舍弃系统开发。
大连理工大学软件学院46会议主持人不应该是系统分析员一个具有优秀沟通能力的人以便会议顺利的进展他能够使小组集中关注重要的系统问题,能够使小组满意的协商,解决冲突帮助小组达成一致意见大连理工大学软件学院478 –12 位不同阶层的用户他们清楚工作需要的信息在新的,或改进的系统中,他们想要什么。
1 –2 位系统观察员来自其他职能单位的分析员,技术专家提供技术上的解释,和忠告。
1位抄写员正式记下已完成的所有事情。
大连理工大学软件学院482.3 召开JAD会议地点建议召开2 –4 天的脱产会议选择一个远离单位的,舒服的环境不让参与者分心,使参与者日常工作的责任最少会议室应该很大,足以容纳邀请人。
安排好JAD会议日程确保所有被邀人都能够出席JAD会议提前一个星期左右,用半天时间召开研究会议大连理工大学软件学院492.4 完成项目活动的结构化分析检查系统中如下要点:计划,接受,收据处理/跟踪,监视和指派,处理,记录,发送和评估每一个主题:一下方式提问和回答:对谁,什么,怎样,何处,为什么JAD会议的分析员应该得到抄写员的笔记准备一份基于会议上发生的事情的规范文档提出管理目标,项目范围和边界包括系统特性大连理工大学软件学院50。