Oracle_RAC_数据库集群12C_安装文档
WindowsServer2016虚拟机安装Oracle12c_RAC

WindowsServer2016虚拟机安装Oracle12c_RAC群集磁盘2:ASM第1章安装环境确认1.1 硬件平台(Hyper-V)RAC-A 1G内存双网卡RAC-B 1G内存双网卡iscsi服务器1G内存1.2 软件环境操作系统:Windows Server 2016Oracle软件:Oracle Database 12c Release 1 (12.1.0.2.0)集群工具:Oracle Database Grid Infrastructure (12.1.0.2.0)磁盘管理工具:ASM1.3 安装平台信息第2章环境准备2.1 修改主机名在两台主机上分别执行,计算机——右键(属性),主机名设置为RAC-A和RAC-B。
2.2 关闭防火墙关闭所有防火墙。
停止Windows Firewall系统服务。
在主机1和主机2上ping对方的公用和私用地址,要求都能ping通。
2.3 配置DEP在两台主机上,计算机——右键(属性)——更改设置——高级(设置)——数据执行保护(DEP),选择仅为基本windows程序和服务启用(重启后才能生效)。
2.4 关闭UAC在两台主机上,控制面板(小图标方式查看)——用户账户——更改用户账户控制设置,改为从不通知,确定(重启后生效)。
2.5 禁用媒体感知功能因为在网络调试时,Windows 的“媒体感知”功能会检测出本机和局域网设备没有正常连通,接着可能就会禁用捆绑在网卡上的某些网络协议,其中就包括TCP/IP 协议。
由于TCP/IP 协议被禁用了,这样该TCP/IP 应用程序就无法进行调试了。
(该设置重启生效)在HKEY_LOCAL_MACHINE\System\CurrentControlSet\Services\Tcpip\Parameters中添加键值如下:Value Name: DisableDHCPMediaSense Data Type: REG_DWORD -Boolean Value: 12.6 停止MSDTC服务2.7 修改虚拟内存按照Oracle的官方文档,虚拟内存至少为实际内存的2倍。
Centos7Oracle12C超详细安装
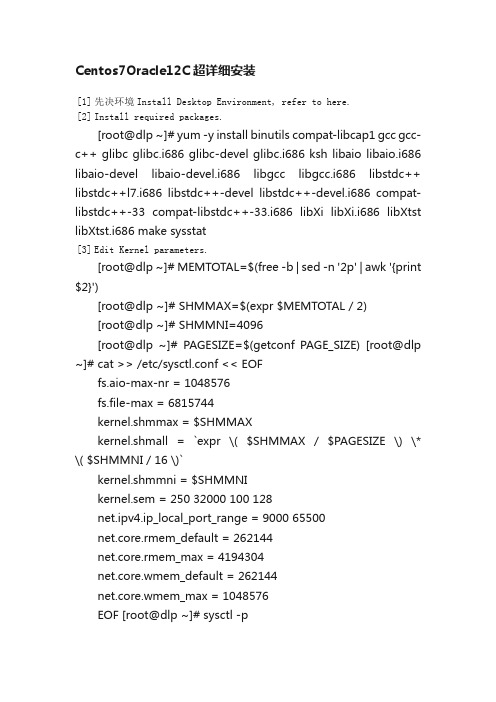
Centos7Oracle12C超详细安装[1] 先决环境Install Desktop Environment, refer to here.[2] Install required packages.[root@dlp ~]# yum -y install binutils compat-libcap1 gcc gcc-c++ glibc glibc.i686 glibc-devel glibc.i686 ksh libaio libaio.i686 libaio-devel libaio-devel.i686 libgcc libgcc.i686 libstdc++ libstdc++l7.i686 libstdc++-devel libstdc++-devel.i686 compat-libstdc++-33 compat-libstdc++-33.i686 libXi libXi.i686 libXtst libXtst.i686 make sysstat[3] Edit Kernel parameters.[root@dlp ~]# MEMTOTAL=$(free -b | sed -n '2p' | awk '{print $2}')[root@dlp ~]# SHMMAX=$(expr $MEMTOTAL / 2)[root@dlp ~]# SHMMNI=4096[root@dlp ~]# PAGESIZE=$(getconf PAGE_SIZE) [root@dlp ~]# cat >> /etc/sysctl.conf << EOFfs.aio-max-nr = 1048576fs.file-max = 6815744kernel.shmmax = $SHMMAXkernel.shmall = `expr \( $SHMMAX / $PAGESIZE \) \* \( $SHMMNI / 16 \)`kernel.shmmni = $SHMMNIkernel.sem = 250 32000 100 128net.ipv4.ip_local_port_range = 9000 65500net.core.rmem_default = 262144net.core.rmem_max = 4194304net.core.wmem_default = 262144net.core.wmem_max = 1048576EOF [root@dlp ~]# sysctl -pfs.aio-max-nr = 1048576 fs.file-max = 6815744 kernel.shmmax = 6274715648 kernel.shmall = 392169728 kernel.shmmni = 4096kernel.sem = 250 32000 100 128net.ipv4.ip_local_port_range = 9000 65500 net.core.rmem_default = 262144 net.core.rmem_max = 4194304 net.core.wmem_default = 262144 net.core.wmem_max = 1048576[4] Create user and groups for Oracle Database service.[root@dlp ~]# i=54321; for group in oinstall dba backupdba oper dgdba kmdba; dogroupadd -g $i $group; i=`expr $i + 1` done [root@dlp~]#useradd-u1200-goinstall-Gdba,oper,backupdba,dgdba,kmdba -d /home/oracle oracle[root@dlp ~]# passwd oracle Changing password for user oracle. New password: Retype new password:passwd: all authentication tokens updated successfully. [root@dlp ~]# mkdir -p /u01/app/oracle [root@dlp ~]# chown -R oracle:oinstall /u01/app [root@dlp ~]# chmod -R 775 /u01[root@dlp ~]# vi /etc/pam.d/login # near line 14: add1 2 session required pam_selinux.so open session required pam_namespace.so1 s ession required pam_limits.so1 2 3 session optional pam_keyinit.so force revoke session include system-auth -session optional pam_ck_connector.so[root@dlp ~]# vi /etc/security/limits.conf # add to the end1 2 3 4 5 6 oracle softnproc 2047 oracle hard nproc 16384 oracle soft nofile 1024 oracle hard nofile 65536 oracle soft stack 10240 oraclehardstack 32768[5]图形化安装Oracle 12C Login with the user "oracle" and set environment variables.dlp login: oracle Password:[oracle@dlp ~]$ vi ~/.bash_profile # add to the end umask 022export ORACLE_BASE=/u01/app/oracle # create a temporary directory for installation[oracle@dlp ~]$ mkdir tmp[1]Login and work with oracle admin user which you create in pre-requirements settings.[2] Download Oracle Databse 12c for Linux and upload on your server. ?/technology/software/products/database/index.html [3] After uploading Oracle files, move to a tmp directory and run an Installer like follows.[oracle@dlp ~]$ cd tmp [oracle@dlp tmp]$ unzip linuxamd64_12102_database_1of2.zip [oracle@dlptmp]$unziplinuxamd64_12102_database_2of2.zip[oracle@dlp tmp]$ ./database/runInstaller[4] Oracle Installer starts like follows. First, Set your email address and password for receiving some infomation from Oracle likesecurity issues and so on.[5] On this example, Select "Install database software only".[6] On this example, Select "Single Instance Database ***".[7] Select your language.[8] Select which edition you install.[9]Specify the base directory and files for Oracle. On this example, keep default and proceed to next.[10]Specify the installed directory. On this example, keep default and proceed to next.[11]Specify the priviledged group. On this example, keep default and proceed to next.[12] Pre-requirements are checked. If some settings are not configuredfor recomendations, notification is displayed likefollows.Confirm them again.[13]The summary is shown for configuration. Click "Install" if it's OK all.[14] Installation starts.[15]Following screen is shown, then open a terminal and execute follwong commands with the root user.[root@dlp ~]# /u01/app/oraInventory/orainstRoot.sh1 2 Changing permissions of /u01/app/oraInventory. Adding read,write permissions for group.3 4 5 6 7Removing read,write,execute permissions for world. Changing groupname of /u01/app/oraInventory to oinstall. The execution of the script is complete. [root@dlp ~]# [root@dlp~]#/u01/app/oracle/product/12.1.0/dbhome_1/root.sh12345Performing root user operation. The following environment variables are set as: ORACLE_OWNER= oracle ORACLE_HOME= /u01/app/oracle/product/12.1.0/dbhome_1 Enter the full pathname of the local bin directory: [/usr/local/bin]: # Enter12 3 4 5 6 7 8 9 10Copying dbhome to /usr/local/bin ... Copying oraenv to /usr/local/bin ... Copying coraenv to /usr/local/bin ... Creating /etc/oratab file...Entries will be added to the /etc/oratab file as needed by Database Configuration Assistant when a database is created Finished running generic part of root script.Now product-specific root actions will be performed.[16] Installation completed. Click "Close" button.[17] Set Environment variables for Oracle user.[oracle@dlp ~]$ vi ~/.bash_profile # add to the end exportORACLE_HOME=/u01/app/oracle/product/12.1.0/dbhome_1exportPATH=$PATH:$ORACLE_HOME/bin[oracle@dlp~]$ source ~/.bash_profile[oracle@dlp ~]$ rm -rf tmp创建监听Create Oracle Net Listener that is the network service onOracle.[1]Login with the oracle admin user and input a command "netca" like follows.[oracle@dlp ~]$ netca[2] Check a box "Listener Configuration" and go next.[3] Go next.[4] Set Listner's name. Input any one you like.[5] This example goes next with keeping default "TCP".[6] Set a port. This example goes next with keeping default.[7]If you'd like to create more Listeners, Answer "Yes". This example selects "No".[8] Configuration completed.[9]After creating Listener, tnslsnr listens on the port you configured like follows.[oracle@dlp ~]$ ss -napt123456789StateRecv-QSend-QLocalAddress:Port Peer Address:Port LISTEN 0 128 *:22 *:* LISTEN 0 128 127.0.0.1:631 *:* LISTEN 0 100 127.0.0.1:25 *:* ESTAB 0 52 10.0.0.30:22 10.0.0.5:50113 LISTEN 0 128 :::1521 :::* users:(("tnslsnr",3988,9)) LISTEN 0 128 :::22 :::* LISTEN 0 128 ::1:631 :::*LISTEN 0 100 ::1:25 :::* [oracle@dlp ~]$ tnsping localhost 12TNS Ping Utility for Linux: Version 12.1.0.2.0 - Productionon 04-JUL-2015 01:03:0734567891 0 Copyright (c) 1997, 2014, Oracle. All rights reserved. Used parameter files:Used HOSTNAME adapter to resolve the alias Attempting to contact(DESCRIPTION=(CONNECT_DATA=(SERVICE_NAME=))(ADD RESS=(PROTOCOL=TCP)(HOST=127.0.0.1)(PORT=1521)))OK (0 msec)创建数据库 Create a Database.[1] Login with the oracle admin user and input acommand "dbca" like follows.[oracle@dlp ~]$ dbc[2] Select "Create Database" and go next.[3] On this example, select "Advanced Mode" and go next.[4] This example selects "General Purpose ***" and go next.[5]Set Grobal Database name and SID like follows. Input any one you like.[6] This example goes next with keeping default.[7] Set passwords. Please set a password for a user for security.[8] Configure Listener. On this example, keep default and go next.[9]Configure Storage settings. On this example, keep default and go next.[10]Configure sample schema and scripts. If you'd like to add them, Set them.[11] Configure memory settings. After setting, go to next tab.[12] Specify max processes.[13] Set Character setting.[14] Select a connection mode. If your server does not have many clients, Select Dedicated server mode. If your server has manyclients, Select Shared server mode.[15] Go next.[16] Configuration completed. Click "Finish" button to finish.[17] Database creation starts.[18] After completing to create a database, Click "Close" to finish.[19] Add Database SID to the environment variables.[oracle@dlp ~]$ vi /etc/oratab # change like followsdlp:/u01/app/oracle/product/12.1.0/dbhome_1: Y [oracle@dlp ~]$ vi ~/.bash_profile # add to the endexport ORACLE_SID=dlpTo access to the Enterprise Manager, it's possible to manage Database on Web GUI.[1] After creating database, database service is running and it'spossible to access to Enterprise Manager, too. Access to the URL which was displayed when database creation finished, then Login form is shown and it's possible to login with a database user.[2] Just logined. It's possible to manage Database on here.Create Systemd file for Oracle Database services.[1] Login as root user and create Systemd files.[root@dlp ~]# vi /etc/sysconfig/dlp.oracledb # create new : define environment variablesORACLE_BASE=/u01/app/oracleORACLE_HOME=/u01/app/oracle/product/12.1.0/dbhome_1ORACLE_SID=dlp # configure listener service[root@dlp~]#vi/usr/lib/systemd/system/*******************#thisis an example, modify for free12 3 4 5 6 7 8 9 10 11 12 13[Unit]Description=oracle net listener After=network.target [Service] Type=forkingEnvironmentFile=/etc/sysconfig/dlp.oracledbExecStart=/u01/app/oracle/product/12.1.0/dbhome_1/bin/lsnrctl start ExecStop=/u01/app/oracle/product/12.1.0/dbhome_1/bin/lsnrctl stop User=oracle [Install] WantedBy=multi-user.target # configure database service[root@dlp~]#vi/usr/lib/systemd/system/********************#this is an example, modify for free1 2 3 4 5 6 7 8 9 10 11 12 13 [Unit]Description=oracle net listenerAfter=network.target lsnrctl.service [Service] Type=forkingEnvironmentFile=/etc/sysconfig/dlp.oracledbExecStart=/u01/app/oracle/product/12.1.0/dbhome_1/bin/dbstart /u01/app/oracle/product/12.1.0/dbhome_1ExecStop=/u01/app/oracle/product/12.1.0/dbhome_1/bin/dbshut /u01/app/oracle/product/12.1.0/dbhome_1 User=oracle [Install] WantedBy=multi-user.target[root@dlp ~]# systemctl daemon-reload[root@dlp ~]# systemctl enable dlp@lsnrctl dlp@oracledb。
oracle12c安装教程linux

oracle12c安装教程linux一、安装环境准备1、操作系统:Oracle 12c 支持的操作系统:(1)Linux x86-64 (Red Hat Enterprise Linux 5、6、7、Oracle Linux 5、6、7、Suse Linux Enterprise Server 11 SP2)(2)Solaris x86-64 (Solaris 11.2)(3)AIX 7.12、硬件环境:(1)CPU:双核或更多(2)内存:2GB以上(3)硬盘:至少有4GB的空闲空间二、安装步骤1、下载安装文件从官网下载Oracle 12c的安装文件,本文以linux x86-64为例,安装文件名为linuxx64_12201_database.zip。
2、解压安装文件将下载的安装文件解压到指定的安装目录,本文以/opt/oracle/product/12.2/dbhome_1为例,解压后的文件如下:[oracle@localhost ~]$ ls -l /opt/oracle/product/12.2/dbhome_1total 20drwxr-xr-x 4 oracle oinstall 4096 Apr 24 17:43 cdrom-rwxr-xr-x 1 oracle oinstall 1219 Apr 24 17:43 .ouidrwxr-xr-x 2 oracle oinstall 4096 Apr 24 17:43 installdrwxr-xr-x 2 oracle oinstall 4096 Apr 24 17:43 response-rwxr-xr-x 1 oracle oinstall 735 Apr 24 17:43 runInstaller3、添加用户为了安装Oracle 12c,需要添加一个用户,本文以oracle为例:[oracle@localhost ~]$ groupadd oinstall[oracle@localhost ~]$ groupadd dba[oracle@localhost ~]$ useradd -g oinstall -G dba oracle[oracle@localhost ~]$ passwd oracle4、设置环境变量为了方便使用,需要设置环境变量,本文以oracle为例:[oracle@localhost ~]$ vi .bash_profile# Oracle Settingsexport ORACLE_HOME=/opt/oracle/product/12.2/dbhome_1 export ORACLE_SID=orclexport ORACLE_BASE=/opt/oracleexport ORACLE_TERM=xtermexport PATH=$ORACLE_HOME/bin:$PATHexport LD_LIBRARY_PATH=$ORACLE_HOME/lib:/lib:/usr/lib exportCLASSPATH=$ORACLE_HOME/jlib:$ORACLE_HOME/rdbms /jlib5、安装Oracle 12c使用root用户登录,进入安装目录,执行安装程序:[oracle@localhost ~]$ su - root[root@localhost ~]。
Oracle12C安装实例
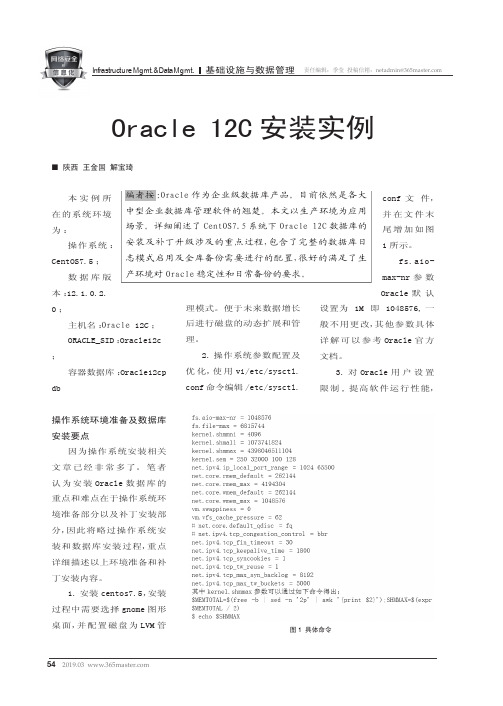
Oracle 12C 安装实例■ 陕西 王金国 解宝琦本实例所在的系统环境为:操作系统:CentOS7.5;数据库版本:12.1.0.2.0;主机名:Oracle 12C ;ORACLE_SID :Oracle12c ;容器数据库:Oracle12cp db操作系统环境准备及数据库安装要点因为操作系统安装相关文章已经非常多了。
笔者认为安装Oracle 数据库的重点和难点在于操作系统环境准备部分以及补丁安装部分,因此将略过操作系统安装和数据库安装过程,重点详细描述以上环境准备和补丁安装内容。
1.安装centos7.5,安装过程中需要选择gnome 图形桌面,并配置磁盘为LVM 管编者按:Oracle 作为企业级数据库产品。
目前依然是各大中型企业数据库管理软件的翘楚。
本文以生产环境为应用场景。
详细阐述了CentOS7.5系统下Oracle 12C 数据库的安装及补丁升级涉及的重点过程,包含了完整的数据库日志模式启用及全库备份需要进行的配置,很好的满足了生产环境对Oracle 稳定性和日常备份的要求。
理模式。
便于未来数据增长后进行磁盘的动态扩展和管理。
2.操作系统参数配置及优化,使用vi/etc/sysctl.conf 命令编辑/etc/sysctl.conf 文件,并在文件末尾增加如图1所示。
fs.aio-max-nr 参数Oracle 默认设置为 1M 即 1048576,一般不用更改,其他参数具体详解可以参考Oracle 官方文档。
3.对Oracle 用户设置限制,提高软件运行性能,图1 具体命令通过命令vi etc/security/limits.conf 编辑该文件,并加入如下内容:oracle soft nofile 1024oracle hard nofile 65536o r a c l e s o f t n p r o c 2047o r a c l e h a r d n p r o c 16384o r a c l e s o f t s t a c k 10240o r a c l e h a r d s t a c k 327684.关联设置,通过命令vi /etc/pam.d/login,添加如下内容:s e s s i o n r e q u i r e d /l i b 64/s e c u r i t y /p a m _limits.sosession required pam_limits.so5.设置环境变量,通过命令vi etc/profile 添加如图2所示。
第1章Oracle 12c数据库安装与配置[46页]
![第1章Oracle 12c数据库安装与配置[46页]](https://img.taocdn.com/s3/m/fcdeebdab9d528ea81c779f6.png)
• 检查服务器系统是否满足软、硬件要求。若要为系 统添加一个CPU,则必须在安装数据库服务器之前 进行,否则数据库服务器无法识别新的CPU。
• 如果服务器上运行有其他Oracle服务,必须在安装 前将它们全部停止。
• 决定数据库服务器的安装类型、安装位置及数据库 的创建方式。
1.1.1软件与硬件需求
• CPU:最小550MHz; • 操作系统:Windows 7 x64 或Windows 8 x64或Windows 10
x64的专业版(Professional)或企业版(Enterprise) • 系统架构:ADM 64T处理器或 Intel EM64T处理器 • 物理内存(RAM):最低4GB。 • 虚拟内存(swap):如果物理内存大小在2GB-16GB的范围
小结
• Oracle 12c数据库服务器安装准备 • 安装Oracle 12c数据库服务器 • 检查数据库服务器的安装结果 • Oracle 12c客户端的安装与配置 • 卸载Oracle 12c产品
内,则虚拟内存大小设置为一倍的RAM;如果物理内存大于 16GB,则虚拟内存设置为16GB。 • 硬盘空间(NTFS格式):10GB。 • 监视器:256色。 • 分辨率:最小为1024×768像素。 • 网络协议:TCP/IP、支持SSL的TCP/IP、Named Pipes。
1.1.2注意事项
• 准备好要安装的Oracle 12c数据库服务器软件产品 。
1.2 安装Oracle 12c数据库服务器
• 系统软硬件先决条件检查
1.3 检查数据库服务器的安装结果
• 已安装的Oracle产品 • 系统服务.1已安装的Oracle产品
oracle官方文档-OracleRAC安装
RAC Assurance Support Team: RAC and Oracle Clusterware Starter Kit and Best Practices (Generic) [ID 810394.1]修改时间09-FEB-2011 类型BULLETIN 状态PUBLISHEDIn this DocumentPurposeScope and ApplicationRAC Assurance Support Team: RAC and Oracle Clusterware Starter Kit and Best Practices (Generic) RAC Platform Specific Starter Kits and Best PracticesRAC Platform Generic Load Testing and System Test Plan OutlineRAC Platform Generic Highlighted RecommendationsRAC Platform Generic Best PracticesGetting Started - Preinstallation and Design ConsiderationsClusterware ConsiderationsNetworking ConsiderationsStorage ConsiderationsInstallation ConsiderationsPatching ConsiderationsUpgrade ConsiderationsOracle VM ConsiderationsDatabase Initialization Parameter ConsiderationsPerformance Tuning ConsiderationsGeneral Configuration ConsiderationsE-Business Suite (with RAC) ConsiderationsPeoplesoft (with RAC) ConsiderationsTools/Utilities for Diagnosing and Working with Oracle Support11gR2 Specific Considerations11.2.0.2 Specific ConsiderationsCRS / RAC Related ReferencesRAC / RDBMS Related ReferencesVIP ReferencesASM References11.2 ReferencesInfiniband ReferencesMAA / Standby ReferencesPatching ReferencesUpgrade ReferencesE-Business ReferencesUnix ReferencesWeblogic/RAC ReferencesReferences Related to Working with Oracle SupportModification HistoryApplies to:Oracle Server - Enterprise Edition - Version: 10.2.0.1 to 11.2.0.1.0 - Release: 10.2 to 11.2 Oracle Server - Enterprise Edition - Version: 10.2.0.1 to 11.1.0.7 [Release: 10.2 to 11.1] Information in this document applies to any platform.PurposeThe goal of the Oracle Real Application Clusters (RAC) Starter Kit is to provide you with the latest information on generic and platform specific best practices for implementing an Oracle RAC cluster. This document is compiled and maintained based on Oracle's experience with its global RAC customer base.This Starter Kit is not meant to replace or supplant the Oracle Documentation set, but rather, it is meant as a supplement to the same. It is imperative that the Oracle Documentation be read, understood, and referenced to provide answers to any questions that may not be clearly addressed by this Starter Kit.All recommendations should be carefully reviewed by your own operations group and should only be implemented if the potential gain as measured against the associated risk warrants implementation. Risk assessments can only be made with a detailed knowledge of the system, application, and business environment.As every customer environment is unique, the success of any Oracle Database implementation, including implementations of Oracle RAC, is predicated on a successful test environment. It is thus imperative that any recommendations from this Starter Kit are thoroughly tested and validated using a testing environment that is a replica of the target production environment before being implemented in the production environment to ensure that there is no negative impact associated with the recommendations that are made.Scope and ApplicationThis article is intended for use by all new (and existing) Oracle RAC implementers.RAC Assurance Support Team: RAC and Oracle Clusterware Starter Kit and Best Practices (Generic)RAC Platform Specific Starter Kits and Best PracticesWhile this note focuses on platform generic RAC Best Practices, the following notes contain detailed platform specific best practices including Step-By-Step installation cookbooks.Document 811306.1 RAC Assurance Support Team: RAC Starter Kit and Best Practices (Linux)Document 811280.1 RAC Assurance Support Team: RAC Starter Kit and Best Practices (Solaris)Document 811271.1 RAC Assurance Support Team: RAC Starter Kit and Best Practices (Windows)Document 811293.1 RAC Assurance Support Team: RAC Starter Kit and Best Practices (AIX)Document 811303.1 RAC Assurance Support Team: RAC Starter Kit and Best Practices (HP-UX)RAC Platform Generic Load Testing and System Test Plan OutlineA critical component of any successful implementation, particularly in the High Availability arena, is testing. For a RAC environment, testing should include both load generation, to monitor and measure how the system works under heavy load, and a system test plan,to understand how the system reacts to certain types of failures. To assist with this type of testing, this document contains links to documents to get you started in both of these areas.Click here for a White Paper on available RAC System Load Testing ToolsClick here for a platform generic RAC System Test Plan Outline for 10gR2 and 11gR1Click here for a platform generic RAC System Test Plan Outline for 11gR2Use these documents to validate your system setup and configuration, and also as a means to practice responses and establish procedures in case of certain types of failures.RAC Platform Generic Highlighted RecommendationsHighlighted Recommendations are recommendations that are thought to have the greatest impact, or answer most commonly addressed questions or issues. In this case, Generic Highlighted Recommendations talk about commonly asked or encountered issues that are generic to RAC implementations across all platforms.Having a step-by-step plan for your RAC project implementation is invaluable. The following OTN article contains a sample projectoutline: /technetwork/articles/haskins-rac-project-guide-099429.html∙To simplify the stack and simplify vendor interactions, Oracle recommends avoiding 3rd party clusterware, unless absolutely necessary.∙Automatic Storage Management (ASM) is recommended for datafile storage. This link references the ASM Overview and Technical Best Practices White Paper.Reference: /technetwork/database/asm-10gr2-bestpractices.pdf∙The RAC Assurance Team recommends placement of Oracle Homes on local drives whenever possible. The following white paper contains an analysis of the pros andcons of shared versus local OracleHomes: /technetwork/database/clustering/overview/oh-rac-133684.pdf∙Having a system test plan to help plan for and practice unplanned outages is crucial.The following paper discusses Best Practices for Optimizing Availability DuringUnplanned Outages Using Oracle Clusterware and Oracle Real Application Clusters: /technology/deploy/availability/pdf/MAA_WP_10gR2_FastReco veryOracleClusterwareandRAC.pdfIn addition, this note has an attached sample System Test Plan Outline, to guide your system testing to help prepare for potential unplanned failures.∙Develop a proactive patching strategy, to stay ahead of the latest known issues. Keep current with the latest Patch Set Updates (as documented in Document 850471.1) and be aware of the most current recommended patches (as documentedin Document 756671.1). Plan for periodic (for example: quarterly) maintenancewindows to keep current with the latest recommended patch (set) updates andpatches.∙Understanding how to minimize downtime while patching is a key piece of this strategy. The following paper discusses patching strategies geared towardsminimizing downtime in a RAC/Clusterwareenvironment: /technetwork/database/asm.pdf ∙For all Unix platforms running Oracle version 11.1.0.6 or 11.1.0.7: Take note / implement the solution explained in Document 858279.1.∙When patching, be sure to use the latest version of OPATCH. Available for download from My Oracle Support under Patch 6880880.RAC Platform Generic Best PracticesBeyond the Highlighted Recommendations above, the RAC Assurance Team has recommendations for various different parts/components of your RAC setup. These additional recommendations are broken into categories and listed below.Getting Started - Preinstallation and Design Considerations∙Check with the Disk Vendor that the Number of Nodes, OS version, RAC version, CRS version, Network fabric, and Patches are certified, as some Storage/San vendors may require special certification for a certain number of nodes.∙Check the support matrix to ensure supportability of product, version and platform combinations or for understanding any specific steps which need to be completed which are extra in the case of some such combinations. Document 337737.1∙Avoid SSH and XAUTH warning before RAC 10G installation. Reference Document 285070.1∙Consider configuring the system logger to log messages to one central server.∙For CRS, ASM, and Oracle ensure one unique User ID with a single name, is in use across the cluster. Problems can occur accessing OCR keys when multiple O/S users share the same UID. Also this results in logical corruptions and permission problems which are hard to diagnose.∙Make sure machine clocks are synchronized on all nodes to the same NTP source.Implementing NTP (Network Time Protocol) on all nodes prevents evictions and helps to facilitate problem diagnosis. Use the -x option (ie. ntpd -x, xntp -x) ifavailable. Running ntp or ntpd with the '-x' flag (ie. ntpd -x, xntp -x) will call for gradual time changes (known as slewing). Large time changes (which are the default if the -x flag is not used) could result in (what could be) unnecessary node evictions Document 759143.1∙Eliminate any single points of failure in the architecture. Examples include (but are not limited to): Cluster interconnect redundancy (NIC bonding etc), multiple access paths to storage, using 2 or more HBA's or initiators and multipathing software, and Disk mirroring/RAID∙Plan and document capacity requirements. Work with server vendor to produce detailed capacity plan and system configuration, but consider: Use normal capacity planning process to estimate number of CPUs required to run workload. Both SMP and RAC clusters have synchronization costs as the number of CPUs increase. SMPs normally scale well for small number of CPUs, RAC clusters normally scale better than SMPs for large number of CPUs. Typical synchronization cost: 5-20%∙Use proven high availability strategies. RAC is one component in a high availability architecture. Make sure all parts are covered. Review Oracle's MaximimumAvailability Architecture recommendations and references further down in thisdocument.∙It is strongly advised that a production RAC instance does not share a node with a DEV, TEST, QA or TRAINING instance. These extra instances can often introduce unexpected performance changes into a production environment.∙Configure Servers to boot from SAN disk, rather than local disk for easier repair, quick provisioning and consistency.∙For Oracle 10g and 11gR1 it is recommended to utilize Oracle redundancy for the OCR and Voting Disks. These files should be stored on RAW or block devices(depending on the OS and Oracle Version). Voting Disks should always be created in odd numbers (1,3,5,etc). This is because losing 1/2 or more of all of your voting disks will cause nodes to get evicted from the cluster, or nodes to evict themselves out of the cluster. Document 428681.1 explains how to add OCR mirror and how to add additional voting disks.∙For Oracle 11gR2 it is a best practice to store the OCR and Voting Disk within ASM and to maintain the ASM best practice of having no more than 2 diskgroups (FlashRecovery Area and Database Area). This means that the OCR and Voting disk will be stored along with the database related files. If you are utilizing external redundancy for your disk groups this means you will have 1 Voting Disk and 1 OCR.For those who wish to utilize Oracle supplied redundancy for the OCR and Votingdisks one could create a separate (3rd) ASM Diskgroup having a minimum of 2 failgroups (total of 3 disks). This configuration will provide 3 Voting Disks and a singleOCR which takes on the redundancy of that disk group (mirrored within ASM). Theminimum size of the 3 disks that make up this normal redundancy diskgroup is 1GB.∙If you are planning to use T-Series servers in a RAC environment, review Document 1181315.1 'Important Considerations for Operating Oracle RAC on T-Series Servers'Clusterware Considerations∙For versions prior to 11gR2, configure three or more voting disks (always an odd number). This is because losing 1/2 or more of all of your voting disks will causenodes to get evicted from the cluster, or nodes to evict themselves out of the cluster. Networking Considerations∙Underscores should not be used in a host or domainname according to RFC952 - DoD Internet host table specification. The same applies for Net, Host, Gateway, or Domain name. Reference: /rfcs/rfc952.html∙Ensure the default gateway is on the same subnet as the VIP. Otherwise this can cause problems with racgvip and cause the vip and listener to keep restarting.∙Make sure network interfaces have the same name on all nodes. This is required. To check - use ifconfig (on Unix) or ipconfig (on Windows).∙Use Jumbo Frames if supported and possible in the system. Reference: Document 341788.1∙Use non-routable network addresses for private interconnect; Class A: 10.0.0.0 to10.255.255.255, Class B: 172.16.0.0 to 172.31.255.255, Class C: 192.168.0.0 to192.168.255.255. Reference: /rfcs/rfc1918.html and Document338924.1∙Make sure network interfaces are configured correctly in terms of speed, duplex, etc.Various tools exist to monitor and test network: ethtool, iperf, netperf, spray and tcp.Document 563566.1∙Configure nics for fault tolerance (bonding/link aggregation). Document 787420.1.∙Performance: check for faulty switches, bad hba's or ports which drop packets. Most cases we see with network related evictions is when either there is too much traffic on the interconnect (so the interconnect capacity is exhausted which is whereaggregation or some other hardware solution helps) or the switch, network card is not configured properly and this is evident from the "netstat -s | grep udp" settings (if usingUDP protocol for IPC for RAC) where this will register underflows (buffer sizeconfiguration for UDP) or errors due to bad ports, switches, network card, network card settings. Please review the same in the context of errors reported from packets sent through the interface.∙For more predictable hardware discovery, place hba and nic cards in the same corresponding slot on each server in the Grid.∙Ensure that all network cables are terminated in a grounded socket. A switch is required for the private network. Use dedicated redundant switches for privateinterconnect and VLAN considerations. RAC and Clusterware deployment bestpractices recommend that the interconnection be deployed on a stand-alone,physically separate, dedicated switch.∙Deploying the RAC/Clusterware interconnect on a shared switch, segmented VLAN may expose the interconnect links to congestion and instability in the larger IP network topology. If deploying the interconnect on a VLAN, there should be a 1:1 mapping of VLAN to non-routable subnet and the VLAN should not span multiple VLANs (tagged) or multiple switches. Deployment concerns in this environment include Spanning Tree loops when the larger IP network topology changes, Asymmetric routing that may cause packet flooding, and lack of fine grained monitoring of theVLAN/port. Reference Bug 9761210.∙Consider using Infiniband on the interconnect for workloads that have high volume requirements. Infiniband can also improve performance by lowering latency,particularly with Oracle 11g, with the RDS protocol. See Document 751343.1.∙Configure IPC address first in listener.ora address list. For databases upgraded from earlier versions to 10gR2 the netca did not configure the IPC address first in thelistener.ora file. In 10gR2 this is the default but if you upgrade this isn't changed unless you do it manually. Failure to do so can adversely impact the amount of time it takes the VIP to fail over if the public network interface should fail. Therefore, check the 10gR1 and 10gR2 listener.ora file. Not only should the IPC address be contained in the address list but it should be FIRST. Document 403743.1∙Increase the SDU (and in older versions the TDU as well) to a higher value (e.g. 4KB 8KB, up to 32KB), thus reducing round trips on the network, possibly decreasingresponse time and over all perceived user responsiveness of the system. Document 44694.1∙To avoid ORA-12545 errors, ensure that client HOSTS files and/or DNS are furnished with both VIP and Public hostnames.∙Starting with Oracle 10g the TNSListener is secure out of the box. The 10g listener uses local OS authentication. If you want to allow a secondary user to administer the listener you have to set a listener password as described in Document 260986.1.∙Please note that IPv6 addressing is currently not yet supported with RAC. For more information, reference:/content/dav/oracle/Users/Users-K/kant.patel/IPv6/OracleD atabase_IPv6_SOD.pdf∙Network Interface Card (NIC) names must not contain " . "∙For version 11.2.0.2 multicast traffic must be allowed on the private network for the 230.0.1.0 subnet. Reference: Document 1212703.1.Storage Considerations∙Ensure Correct Mount Options for NFS Disks when RAC is used with NFS.The documented mount options are detailed in Document 359515.1 for each platform.∙Implement multiple access paths to storage array using two or more HBAs or initiators with multi-pathing software over these HBAs. Where possible, use the pseudo devices (multi-path I/O) as the diskstring for ASM. Examples are: EMC PowerPath, VeritasDMP, Sun Traffic Manager, Hitachi HDLM, IBM SDDPC, Linux 2.6 Device Mapper.This is useful for I/O loadbalancing and failover. Reference: Document 294869.1 and Document 394956.1. See also our Multipathing Best Practicespaper: /technetwork/database/asm.pdf∙Adhere to ASM best practices. Reference: Document 265633.1 ASM Technical Best Practices∙ORA-15196 (ASM block corruption) can occur, if LUNs larger than 2TB are presented to an ASM diskgroup. As a result of the fix, ORA-15099 will be raised if a disk largerthan 2TB is specified. This is irrespective of the presence of asmlib. Workaround: Do not add more than 2 TB size disk to a diskgroup. Reference: Document 6453944.8∙On some platforms repeat warnings about AIO limits may be seen in the alert log: "WARNING:Oracle process running out of OS kernel I/O resources." Apply Patch6687381, available on many platforms. This issue affects 10.2.0.3, 10.2.0.4, and11.1.0.6. It is fixed in 11.1.0.7. Document 6687381.8∙Create two ASM disk groups, one for database area and one for flash recovery area, on separate physical disks. RAID storage array LUNs can be used as ASM disks tominimize the number of LUNs presented to the OS . Place database and redo log files in database area.∙The occurrence of Bug 5100163 (possible metadata corruption) has being identified during an ASM upgrade from release 10.2 to release 11.1 or 11.2, this bug could only occur having ASM diskgroups with an AU > 1 MB (before the ASM upgrade isperformed). This bug is not encountered with brand new diskgroups created directlyon release 11.1 or 11.2.In order to prevent any occurrence of Bug 5100163, a public alert has been generated and it is visible through My Oracle Support. Reference: Document 1145365.1 Alert:Querying v$asm_file Gives ORA-15196 After ASM Was Upgraded From 10gR2 To11gR2. In short, you would want to run an "alter diskgroup <DG_NAME> check allrepair" to validate and repair any upgraded diskgroups.Installation Considerations∙Check Cluster Prequisites Using cluvfy (Cluster Verification Utility). Use cluvfy at all stages prior to and during installation of Oracle software. Also, rather than using theversion on the installation media, it is crucial to download the latest version of cluvfyOTN:/technetwork/database/clustering/downloads/cvu-download-homepage-099973.html. Document 339939.1 and Document 316817.1 contain morerelevant information on this topic.∙It is recommended to patch the Clusterware Home to the desired level before doing any RDBMS or ASM home install.For example, install clusterware 10.2.0.1 and patch to 10.2.0.4 before installing10.2.0.1 RDBMS.∙Install ASM in a separate ORACLE_HOME from the database for maintenance and availability reasons (eg., to independently patch and upgrade).∙If you are installing Oracle Clusterware as a user that is a member of multiple operating system groups, the installer installs files on all nodes of the cluster withgroup ownership set to that of the user's current active or primarygroup. Therefore: ensure that the first group listed in the file /etc/ group is thecurrent active group OR invoke the Oracle Clusterware installation using the following additional command line option, to force the installer to use the proper group whensetting group ownership on all files: runInstaller s_usergroup=current_active_group(Bug 4433140)Patching ConsiderationsThis section is targeted towards customers beginning a new implementation of Oracle Real Application Clusters, or customers who are developing a proactive patching strategy for an existing implementation. For new implementations, it is strongly recommended that the latest available patchset for your platform be applied at the outset of your testing. In cases where that latest version of the RDBMS cannot be used because of lags in internal or 3rd party application certification or due to other limitations, it is still supported to have the CRS Home and ASM Homes running at a later patch level than the RDBMS Home, therefore, it may still be possible to run either the CRS or ASM Home at the latest patchset level. As a best practice (with some exceptions, see the Note in the references section below), Oracle Support recommends that the following be true:∙The CRS_HOME must be at a patch level or version that is greater than or equal to the patch level or version of the ASM Home. The CRS_HOME must be a patch levelor version that is greater than or equal to the patch level or version of the RDBMShome.∙The ASM_HOME must be at a patch level or version that is greater than or equal to the patch level or version of the RDBMS Home. The ASM_HOME must be a patchlevel or version that is equal to but not greater than the patch level or version of theCRS_HOME.∙Before patching the database, ASM or clusterware homes using opatch check the available space on the filesystem and use Document 550522.1 in order to estimatehow much space will be needed and how to handle the situation if the filesystemshould fill up during the patching process.∙Document 557934.1 provides a basic overview of patching Oracle Clusterware and clarifies how the Oracle Clusterware components are updated through patching ∙Develop a proactive patching strategy, to stay ahead of the latest known issues. Keep current with the latest Patch Set Updates (as documented in Document 850471.1) and be aware of the most current recommended patches (as documented in Document756671.1). Plan for periodic (for example: quarterly) maintenance windows to keepcurrent with the latest recommended patch (set) updates and patches.For more detailed notes and references on patching in a RAC environment, see the patching section below, in the "RAC Platform Generic References" sectionat the end of this note.Upgrade Considerations∙Begin with minimum version 10.2.0.3 when upgrading 10.2.0.X to 11.X in accordance with the following Oracle documentation(/docs/cd/B28359_01/server.111/b28300/upgrade.htm#BA BCEGBC) where it is stated:Note: A new prerequisite check has been added to ensure that Oracle Clusterware release 10.2.0.x is at release 10.2.0.3 (or higher), before you attempt to upgrade it to Oracle Clusterware 11g release 1 (11.1). If this check fails, then you are instructed to apply Oracle Clusterware patch set release 10.2.0.3.0 or later to your existing release 10.2.0.1 or 10.2.0.2 before it can be upgraded. All other upgrade paths and fresh install cycles are unaffected by this prerequisite check.∙Use rolling upgrades where appropriate for Oracle Clusterware (CRS) Document 338706.1. For detailed upgrade assistance, refer to the appropriate UpgradeCompanion for your release: Document 466181.1 10g Upgrade Companion andDocument 601807.1 Oracle 11gR1 Upgrade Companion∙For information about upgrading a database using a transient logical standby, refer to: Document 949322.1 : Oracle11g Data Guard: Database Rolling Upgrade ShellScript∙If upgrading ASM to 11.X run an "alter diskgroup <DG_NAME> check all repair" to validate and repair any upgraded diskgroups.Oracle VM Considerations∙Oracle Real Application Clusters in Oracle VM Environments:/technetwork/database/clustering/oracle-rac-in-oracle-vm-environment-131948.pdfDatabase Initialization Parameter Considerations∙Set PRE_PAGE_SGA=false. If set to true, it can significantly increase the time required to establish database connections. In cases where clients might complainthat connections to the database are very slow then consider setting this parameter to false, doing so avoids mapping the whole SGA and process startup and thus savesconnection time.∙Be sure to monitor the number of active servers and calculate the average value to be applied for PARALLEL_MIN_SERVERS. This can be done by:Select * from v$pq_syssstat;Then: Get/save the value for row "Servers Highwater"∙Tune PARALLEL_MAX_SERVERS to your hardware. Start with (2 * ( 2 threads ) *(CPU_COUNT)) = 4 x CPU count and repeat test for higher values with test data.∙Consider setting FAST_START_PARALLEL_ROLLBACK. This parameter determines how many processes are used for transaction recovery, which is doneafter redo application. Optimizing transaction recovery is important to ensure anefficient workload after an unplanned failure. As long as the system is not CPU bound, setting this to a value of HIGH is a best practice. This causes Oracle to use four times the CPU count (4 X cpu_count) parallel processes for transaction recovery. Thedefault for this parameter is LOW, or two times the CPU count (2 X cpu_count).∙Set FAST_START_MTTR_TARGET to a non-zero value in seconds. Crash recovery will complete within this desired time frame.∙In 10g and 11g databases, init parameter ACTIVE_INSTANCE_COUNT should no longer be set. This is because the RACG layer doesn't take this parameter intoaccount. As an alternative, you should create a service with one preferred instance.∙For versions prior to 11gR2, increase PARALLEL_EXECUTION_MESSAGE_SIZE from default (normallly 2048) to 8192. This can be set higher for datawarehousingbased systems where there is a lot of data transferred through PQ. In version 11gR2, the default for PARALLEL_EXECUTION_MESSAGE_SIZE is 16K, which shouldprove sufficient in most cases.∙Set OPTIMIZER_DYNAMIC_SAMPLING = 1 or simply analyze your objects because 10g Dynamic sampling can generate extra CR buffers during execution of SQLstatements.∙Tune DataGuard to avoid cluster related waits. Improperly tuned DataGuard settings can cause high LOG FILE SYNC WAIT and GLOBAL CACHE LOG FLUSH TIME.Reference:/technetwork/database/features/availability/maa-wp-10gr2-data guardnetworkbestpr-134557.pdf,/technetwork/database/features/availability/maa-wp-10gr2-reco verybestpractices-131010.pdfPerformance Tuning Considerations。
oracle12c操作手册

oracle12c操作手册摘要:一、前言二、安装准备1.确保系统满足安装要求2.下载所需的安装文件三、安装过程1.配置DNS2.创建必要的用户和组3.安装Oracle 数据库服务器4.设置密码5.完成安装四、安装后的操作1.验证安装是否成功2.创建数据库实例3.管理数据库五、总结正文:一、前言Oracle 12c 是甲骨文公司推出的一款强大的数据库管理系统,适用于各种规模的企业和组织。
本操作手册将为您提供在Linux 系统上安装和配置Oracle 12c 数据库的详细步骤。
二、安装准备1.确保系统满足安装要求在安装Oracle 12c 之前,请确保您的Linux 系统满足以下要求:- 64 位处理器- 16 核CPU- 384G 内存- 16T 硬盘- CentOS 7.4 及以上版本2.下载所需的安装文件请从Oracle 官方网站下载Oracle 12c 数据库安装包和预安装脚本。
三、安装过程1.配置DNS为了确保安装过程中网络连接的稳定性,需要先配置DNS。
2.创建必要的用户和组由于Oracle 不允许root 用户进行安装,因此需要创建三个用户组,并将Oracle 添加到这些组中。
```bashgroupadd -g 54321 oinstallgroupadd -g 54322 dbagroupadd -g 54323 operuseradd -u 54321 -g oins```3.安装Oracle 数据库服务器接下来,使用root 用户执行以下命令安装Oracle 数据库服务器:```bashsudo yum install -y oracle-rdbms-server-12cr1-preinstallpasswd ```4.设置密码根据提示设置Oracle 数据库的初始密码。
5.完成安装安装完成后,可以使用以下命令启动Oracle 数据库服务:```bashsudo service oracle- Database start```四、安装后的操作1.验证安装是否成功登录到Oracle 数据库,查看数据库实例是否已经创建成功:```sqlSELECT * FROM v$instance;```2.创建数据库实例使用以下命令创建一个名为"mydb"的数据库实例:```bashsudo oracle-dbca -S -d mydb```3.管理数据库使用Oracle 提供的工具,如sql*plus、sql*developer 等,对数据库进行管理。
Linux-Oracle-12c-RAC安装配置v1.0

L i n u x+O r a c l e12c R A C 安装配置详细记录过程(V1.0)图文并茂目录1 Oracle12c RAC 数据库安装准备工作 (3)1.1 安装环境介绍 (4)1.2 数据库安装软件下载 (4)2 Oracle12c RAC 数据库安装环境配置 (4)2.1 安装主机或虚拟机 (4)2.2 安装操作系统 (4)2.3 hosts 文件配置 (7)2.4 添加组与用户 (7)2.5 添加文件系统 (8)2.6 修改操作系统参数 (8)2.7 禁止NTP (11)2.8 配置grid 和oracle 用户的环境变量 (11)2.9 配置SSH 信任关系 (15)2.10 调整页面交换空间 (16)2.11 配置磁盘 (16)2.12 使用Xmanager 远程桌面到Linux (18)3 安装12c Grid Infrastructure 组件 (19)3.1 解压安装文件 (19)3.2 开始安装GRID (19)3.3 指定安装和配置Grid Cluster (20)3.4 选择产品语言,添加简体中文 (22)3.5 配置SCAN (23)3.6 配置节点IP 与SSH 测试 (23)3.7 选择网卡 (24)3.8 选择是否配置GRID Management Repository (24)3.9 配置存储选项选择asm (25)3.10 输入asm 密码 (26)3.11 选择操作系统组 (27)3.12 选择ORACLE_BASE 和ORACLE_HOME (27)3.13 Root 脚本执行 (28)3.14 操作系统环境检测 (29)3.15 安装程序汇总 (29)3.16 开始安装 (30)3.17 按照提示在主机上运行orainstRoot.sh 和root.sh (31)3.18 安装完成后检查状态 (37)4 创建ASM 磁盘组 (38)5 安装ORACLE 12c RAC 数据库软件 (40)5.1 运行安装命令 (40)5.2 配置安装选项,选择install database software only (42)5.3 选择安装语言 (43)5.4 选择企业版安装 (43)5.5 选择安装路径 (44)5.6 默认指定相关组 (44)5.7 安装检查 (45)5.8 开始安装 (46)5.9 安装完成后,主机运行root.sh 文件 (47)6 创建Oracle 12c RAC 数据库实例 (48)6.1 运行dbca 创建数据库实例 (48)6.2 选择“Cluster database” (48)6.3 选择“Create database” (49)6.4 选择Advanced Mode (50)6.5 选择自定义数据库 (50)6.6 输入“Global Database Name”和“Sid Prefix” (51)6.7 选择集群节点 (52)6.8 配置EM (52)6.9 选择“Use the Same Password for all Accounts” (53)6.10 选择“Automatic Storage Management (ASM)” (53)6.11 配置数据库选项 (54)6.12 配置数据库参数 (55)6.13 数据库创建选项建议 (57)6.14 开始创建数据库 (58)6.15 数据库创建完成 (58)6.16 查看资源组状态 (59)1 Oracle12c RAC 数据库安装准备工作1.1 安装环境介绍Red H a t E n t e r p r i s e L i nu x S e r v e r r e l ea s e6.3X86_64两台内存至少4GO r a c l e D a t a b a s e12.1.0.1采用A S M存储方式备注:o r a c l e12c 不支持32 位的环境1.2 数据库安装软件下载请在O r a c l e官方网站下载:li nu x a m d64_12c_g r i d_1o f2;li nu x a m d64_12c_g r i d_2o f2;li nu x a m d64_12c_d a t a b a s e_1o f2li nu x a m d64_12c_d a t a b a s e_2o f2下载地址:h tt p://www.o r a c l e.c o m/t e c hn e t w o r k/d a t a b a s e/e n t e r p r i s e-e d i t i o n/do w n l o a d s/i n d e x.h t m l2 Oracle12c RAC 数据库安装环境配置2.1 安装主机或虚拟机安装步骤略。
- 1、下载文档前请自行甄别文档内容的完整性,平台不提供额外的编辑、内容补充、找答案等附加服务。
- 2、"仅部分预览"的文档,不可在线预览部分如存在完整性等问题,可反馈申请退款(可完整预览的文档不适用该条件!)。
- 3、如文档侵犯您的权益,请联系客服反馈,我们会尽快为您处理(人工客服工作时间:9:00-18:30)。
Oracle RAC 12C安装文档目录Oracle RAC 12C安装文档 (1)1 Rac 安装 (2)1.1 规划介绍 (2)1.1.1 集群示意图(内部和外部交换机为同一交换机) (2)1.1.2 硬件环境: (2)1.1.3 软件列表: (3)1.1.4 集群规划 (3)1.2 环境搭建配置 (5)1.2.1 多路径设置 (5)1.2.2 关闭iptables (6)1.2.3 关闭Selinux (6)1.2.4 删除DNS数据 (6)1.2.5 必须的安装包利用yum安装 (6)1.2.6 上传软件包 (7)1.2.7 配置安装环境 (7)1.3 Cluster软件安装 (13)1.3.1 解压软件包 (13)1.3.2 安装图示 (14)1.3.3 安装失败解决 (31)1.4 ASM磁盘组分为两大部分一个用于数据文件存储一个用于闪回空间 (31)1.4.1 ASMCA调起 (31)1.4.2 安装图示 (31)1.5 数据库软件安装 (33)1.5.1 解压数据库安装包,运行runInstaller (33)1.5.2 安装图示 (34)1.6 数据库安装 (40)1.6.1 运行dbca (40)1.6.2 安装图示 (40)1.7 查看集群是否正常 (48)1.8 redo 在线日志信息 (49)1.8.1 日志设置列表(实际生产环境时填写位置,以下设置都按照填写中配置)491.8.2 查看目前日志情况确认在共享存储放置位置执行节点:rac1 (49)1.8.3 删,添加在线日志。
执行节点:rac1、rac2、rac3、rac4 (49)1.8.4 查看目前日志情况确认建立成功执行节点:rac1 (51)1.9 多控制文件设置 (51)1.10 设置归档 (51)1.10.1 归档日志路径 (51)1.10.2 目录建立 ......................................................................................................... 51 1.10.3 设置方式 ......................................................................................................... 52 1.11 备份 . (52)1.11.1 备份规划表 ..................................................................................................... 52 1.11.2 磁盘备份 ......................................................................................................... 53 1.11.3 磁带库备份 ..................................................................................................... 58 1.12 监控脚本 ................................................................................................................. 59 1.13 设置DG . (63)1.13.1 DataGuard 规划 .............................................................................................. 63 1.13.2 配置 ................................................................................................................. 63 1.13.3 故障处理 (71)1 Rac 安装1.1规划介绍1.1.1 集群示意图(内部和外部交换机为同一交换机)应用程序Oracle集群管理软件操作系统应用程序Oracle集群管理软件操作系统H2H2H1H1H5H4H4H6H1 硬件服务器H4 硬件多网卡H5 硬件内部交换机H3 硬件共享存储H6 硬件外部交换机APP ServerH3H2 硬件HBA 卡H4H1H2应用程序Oracle集群管理软件操作系统Node1Node2Node3应用程序Oracle集群管理软件操作系统H2H1H4Node4集群环境上图为数据库集群示意图,四节点,一存储。
存储与节点间两台光纤交换机连接。
1.1.2硬件环境:服务器信息HP存储RAID:5磁盘:SSDvolumn分组:10组,每组200G1.1.3软件列表:1.1.4集群规划1.1.4.1数据库ID1.1.4.2节点用途划分此用途只是为了更方便使用,其实各节点功能相同,都可以实现对应用途。
1.1.4.3ASM规划1.1.4.4集群信息1.1.4.5表空间信息1.1.4.6业务用户信息1.2环境搭建配置1.2.1多路径设置Linux需要重启才可认到划分的存储。
root#yum install device-mapper-multipathmodprobe dm-multipathmodprobe dm-round-robinservice multipathd startservice multipath reloadmultipath -ll1.2.2关闭iptables1.2.3关闭Selinux1.2.4删除DNS数据1.2.5必须的安装包利用yum安装以下包:binutilscompat-db(i386)compat-db(x86-64)package compat-libstdc++control-center (x86_64)gcc (x86_64)gcc-c++-(x86_64)glibc(i686)glibc(x86_64)glic-common(x86_64)gnome-libs(x86_64)libstdc++-(i386)libstdc++(x86_64)libstdc++-devel-(x86_64)make(x86_64)pdksh(x86_64)sysstat(x86_64)xscreensaver(x86_64)setarch(x86_64)glibc-devel(x86_64)glib-devel(i386)libaio(i386)libaio(x86_64)libXp*xorg*安装:yum install binutils* compat-db* compat-db* compat-libstdc++* control-center* gcc* gcc-c++-* glibc* glibc* glibc-common* gnome-libs* libstdc++-* libstdc++* libstdc++-devel-* make* pdksh* sysstat* xscreensaver* setarch* glibc-devel* libaio* libXp* xorg* elfutils-libelf-devel* compat-libcap1* elfutils-libelf-devel* libaio-devel* libgcc* libstdc++* unixODBC* unixODBC-devel* ksh*1.2.6上传软件包将软件列表中软件上传到dbrac1的/download目录下。
利用ftp。
1.2.7配置安装环境1.2.7.1配置IP地址各节点配置1.2.7.2编辑hosts文件root#vi /etc/hosts IP后接的名称需与主机名对应添加以下内容1.2.7.3修改主机名vi /etc/sysconfig/network配置HOSTNAME=主机名1.2.7.4禁用动态配置协议vi /etc/sysconfig/networkNOZEROCONF=yes #禁用动态配置协议此项是在grid安装前检查时发出警告再配置1.2.7.5创建组、用户1.2.7.6环境变量配置1.2.7.7配置内核参数1.2.7.8安装cvuqdisk包此软件包位于解压后的grid/rpm目录下。
如不安装,集群验证程序无法发现共享磁盘。
安装过程如下(每个节点都执行):1.2.7.9创建目录赋予权限1.2.7.10提高用户的shell限制修改安全限制1.2.7.11删除NTP服务1.2.7.12安装OracleASMlib程序包Redhat 6后oracleasm包为RHEL支持,Oracle不再支持。
利用uname –a查看内核参数选择对应的包。
上为redhat6.7 x86_64所支持的。
利用rmp –ivh安装。
每个节点都要安装。
kmod-oracleasm-2.0.8-5.el6_7.x86_64.rpmoracleasmlib-2.0.4-1.el6.x86_64.rpmoracleasm-support-2.1.8-1.el6.x86_64.rpm安装时出现的问题:1、ERROR:ld.so:object‘/lib/libcwait.so’64为系统没有这个文件导致报错。
2、oracleasm包下载问题进入Oracle官方搜索3、缺少包根据提示安装4、Package openmotif21-2.1.30-11.EL5.i386.rpm is not signed更改/etc/yum.conf中的gpgcheck=0取消检查5、oracleasmlib oracleasm-support 文件版本根据平台确认oracleasm 文件版本根据系统内核版本确认1.2.7.13配置ASM两种方式,使用哪种依据现场情况定。
优先使用第一种。
1.2.7.13.1利用ASMLIB配置ASM2、创建asm磁盘1.3Cluster软件安装1.3.1解压软件包1.3.2安装图示1、选择安装类型,选择第一项install and configure Oracle Grid Infrastructure for a Cluster2、选择集群类型,第一项标准安装3、选择安装方式,自定义安装4、选择安装语言,英语5、定义集群的名字、SCAN名字及监听端口和GNS。