戴尔说明书最新版
戴尔打印机使用说明书
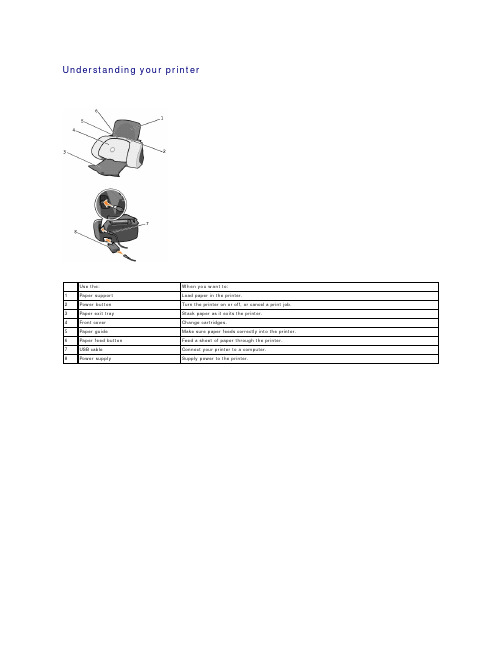
Use the:1 Paper support2 Power button3 Paper exit tray4 Front cover5 Paper guideAppendixDell technical support policyContacting DellWarranty and return policyDell technical support policyTechnician-assisted technical support requires the cooperation and participation of the customer in the troubleshooting process and provides for restoration of the Operating System, application software and hardware drivers to the original default configuration as shipped from Dell, as well as the verification of appropriate functionality of the computer unit and all Dell-installed hardware. In addition to this technician assisted technical support, online technical support is available at Dell Support. Additional technical support options may be available for purchase.Dell provides limited technical support for the printer and any Dell-installed software and peripherals. Support for third-party software and peripherals is provided by the original manufacturer, including those purchased and/or installed through Software & Peripherals (DellWare), ReadyWare, and Custom Factory Integration (CFI/DellPlus).Contacting DellYou can access Dell Support at . Select your region on the WELCOME TO DELL SUPPORT page, and fill in the requested details to access help tools and information.You can contact Dell electronically using the following addresses:l World Wide Web//ap/ (for Asian/Pacific countries only) (for Europe only)/la/ (for Latin American countries)l Anonymous file transfer protocol (FTP)/Log in as user: anonymous, and use your e-mail address as your password.l Electronic Support Service**********************.com***************.com******************(forAsian/Pacificcountriesonly) (for Europe only)l Electronic Quote Service**********************************(forAsian/Pacificcountriesonly)l Electronic Information Service*************Warranty and return policyDell Computer corporation ("Dell") manufactures its hardware products from parts and components that are new or equivalent to new in accordance with industry-standard practices. For information about the Dell warranty for your printer, refer to your Owner's Manual.Drivers and Utilities CDOwner's ManualExpress Service Code and ServiceTag numberOnline tools, including:l Solutions — Troubleshooting hints and tips, articles from technicians, and online coursesDell™ Personal Inkjet Printer J740 User's GuideClick the links to the left for information on the features and operation of your printer. For information on other documentation included with your printer, see Finding information .To order ink or supplies from Dell:1.Double-click the icon on your desktop.2.Visit Dell's cartridge ordering Web site at /supplies or order Dell printer supplies by phone.For best service, have your Dell printer Service Tag available.For help locating your Service Tag number, see Express Service Code and Service Tag number .Notes, Notices, and Cautions____________________Information in this document is subject to change without notice.© 2003 Dell Computer Corporation. All rights reserved.Reproduction in any manner whatsoever without the written permission of Dell Computer Corporation is strictly forbidden.Trademarks used in this text: Dell and DELL logo are trademarks of Dell Computer Corporation; Microsoft and Windows are registered trademarks of Microsoft Corporation.Other trademarks and trade names may be used in this document to refer to either the entities claiming the marks and names of their products. Dell Computer Corporation disclaims any proprietary interest in trademarks and trade names other than its own.____________________UNITED STATES GOVERNMENT RESTRICTED RIGHTSThis software and documentation are provided with RESTRICTED RIGHTS. Use, duplication or disclosure by the Government is subject to restrictions as set forth in subparagraph (c)(1)(ii) of the Rights in Technical Data and Computer Software clause at DFARS 252.227-7013 and in applicable FAR provisions: Dell Computer Corporation, One Dell Way, Round Rock, Texas, 78682, USA.April 2003 SRV T0669 Rev. A00NOTE: A NOTE indicates important information that helps you make better use of your printer.NOTICE: A NOTICE indicates either potential damage to hardware or loss of data and tells you how to avoid the problem.CAUTION: A CAUTION indicates a potential for property damage, personal injury, or death.Your printer has been designed to print using the following cartridges.The ink cartridge carrier moves and stops at the loading position unless the printer is busy.3.Press the cartridge carrier tab down, and then lift the cartridge carrier lid.4.Remove the old cartridge. Store it in an air-tight container or dispose of it by placing it inside the recycling bag that came with your new ink cartridge andmailing the recycling bag to Dell.5.If you are installing a new cartridge, remove the sticker and tape from the bottom of the cartridge.6.Insert the new cartridge. Make sure the color ink cartridge is secure in the right carrier and the black ink cartridge is secure in the left carrier, and thensnap the lid closed .7.Close the front cover.Aligning the ink cartridgesThere are two instances when you will align your ink cartridges.l After installing cartridgeslTo improve print qualityTo align the ink cartridges:1.Load plain paper in the printer. For help, see Loading paper .2.Open the Dell Printer Solution Center. Click Start ® Programs ® Dell Printers ® Dell Inkjet Printer J740 ® Dell Printer Solution Center .3.From the Maintenance tab, click Align to fix blurry edges .4.Click Print .An alignment page prints, automatically aligning the cartridges.Cleaning ink cartridge nozzles and contactsNOTICE: Do not touch the gold contact area on the cartridge.NOTE: If the alignment page does not print, make sure you have completely removed the stickers and transparent tape from both ink cartridges, andthen try to align the cartridges again.If you are not satisfied with the print quality of your document, make sure you:l Use the appropriate paper for the document. For example, use photo paper if you are printing photos.l Use paper that is bright white or coated.lSelect a higher print quality.a. From your program, click File ® Print .The Print dialog box appears.b.From the Print dialog box, click Properties, Preferences , or Options .c. From the Quality/Speed area on the Quality/Copies tab, select Better or Best .If your document still does not have the print quality you expect, follow these steps:1.Reinsert the ink cartridges:a. Remove the ink cartridges. For help, see Replacing an ink cartridge .b. Insert the ink cartridges. For help, see Replacing an ink cartridge .c. Print your document again.d. If print quality has not improved, continue with step 2.2.Clean the print nozzles:a. Load paper. For help, see Loading paper .b. Click Start ® Programs ® Dell Printers ® Dell Inkjet Printer J740 ® Dell Printer Solution Center .c. Click the Maintenance tab.d. From the Maintenance tab, click Clean to fix horizontal streaks .e. Click Print .A nozzle page prints, forcing ink through the nozzles to clean the clogged nozzles.f.Print your document again to verfiy that your print quality has improved. g. If you are not satisfied with the print quality, continue with step 3, and then print your document again.3.Wipe the ink cartridge nozzles and contacts:a. Remove the ink cartridges. For help, see Replacing an ink cartridge .b. Dampen a clean, lint-free cloth with water and place it on a flat surface, such as a table.c.With the nozzles pointing down, gently hold the cartridge against the cloth for about three seconds. d.Slowly wipe the nozzles in the direction shown.e.With another clean section of the cloth, repeat steps c through d. f.Gently hold another clean section of the cloth against the contacts for about three seconds, and then wipe in the direction shown.g. With another clean section of the cloth, repeat step f.NOTE: To avoid getting ink on the flat surface, place two sheets of paper under the cloth.h. Let the nozzles and contacts dry completely.i. Reinsert the ink cartridges and wait five minutes before printing.j. Clean the ink nozzles. For help see step 2.k. Print your document again.l. If the print quality does not improve, repeat step 3 up to two more times.m. If print quality is still not satisfactory, replace the ink cartridges. For information on ordering supplies, refer to the Owner's Manual, or open the Dell Printer Solution Center.Regulatory noticesFederal Communications Commission (FCC) compliance information statementThe Dell Personal Inkjet Printer J740 has been tested and found to comply with the limits for a Class B digital device, pursuant to Part 15 of the FCC Rules. Operation is subject to the following two conditions: (1) this device may not cause harmful interference, and (2) this device must accept any interference received, including interference that may cause undesired operation.The FCC Class B limits are designed to provide reasonable protection against harmful interference in a residential installation. This equipment generates, uses and can radiate radio frequency energy and, if not installed and used in accordance with the instructions, may cause harmful interference to radio communications. However, there is no guarantee that interference will not occur in a particular installation. If this equipment does cause harmful interference to radio or television reception, which can be determined by turning the equipment off and on, the user is encouraged to try to correct the interference by one or more of the following measures:Reorient or relocate the receiving antenna.Increase the separation between the equipment and receiver.Connect the equipment into an outlet on a circuit different from that to which the receiver is connected.Consult your point of purchase or service representative for additional suggestions.The manufacturer is not responsible for any radio or television interference caused by using other than recommended cables or by unauthorized changes or modifications to this equipment. Unauthorized changes or modifications could void the user's authority to operate this equipment.To assure compliance with FCC regulations on electromagnetic interference for a Class B computing device, use a properly shielded and grounded cable. Use of a substitute cable not properly shielded and grounded may result in a violation of FCC regulations.Any questions regarding this compliance information statement should be directed to:Dell Products, L.P.One Dell WayRound Rock, Texas, USA 78682Industry Canada compliance statementThis Class B digital apparatus meets all requirements of the Canadian Interference-Causing Equipment Regulations.Avis de conformité aux normes d'Industrie CanadaCet appareil numérique de la classe B respecte toutes les exigences du Règlement sur le matériel brouilleur du Canada.European Community (EC) directives conformity2.Squeeze and slide the paper guide to the left edge of the paper.NOTE: Do not force paper into the printer.NOTE: To avoid smearing ink, remove each transparency or photo from the paper exit tray before the next one exits the printer. Transparencies and photos may require up to 15 minutes to dry.envelopeslabelscard stockYour Dell Personal Inkjet Printer J740 uses a Universal Serial Bus (USB) cable.TroubleshootingUnderstanding error messages and flashing lightsResolving unsuccessful or slow printingClearing paper misfeeds or jamsSolving print quality problemsSolving specialty media problemsIf your printer has a problem, make sure:l Your printer is on.l You removed the stickers and tape from the bottom of the ink cartridges. For help, see Replacing an ink cartridge.l The paper is loaded correctly. For help, see Loading paper.l You installed both of the ink cartridges. The Dell Personal Inkjet Printer J740 will only work if you have both cartridges installed.If you experience other problems not found in the User's Guide, refer to your Owner's Manual, or open the Dell Printer Solution Center.Understanding error messages and flashing lightsUse this section to understand printer software error messages on your computer screen and blinking lights on your printer.Paper Jam messageFor help clearing a paper jam, see Printer has a paper jam.Ink Low messageInk Low messages appear as the ink levels in your cartridges decrease.When this message appears, you can:l Click OK.l Order a new cartridge by contacting the Dell Web site at /supplies.For more help, refer to the Owner's Manual, or open the Dell Printer Solution Center.The paper feed button is blinkingThe ink cartridge carrier is stalled.The following topics can help you clear misfeeds or jams.Paper misfeeds or multiple sheets feedMake sure:lYour paper is recommended for inkjet printers.lThe edges of your paper are not curled.lA piece of paper from a previous print job is not jammed.lYou do not load too many sheets of paper. Depending on the weight of the paper, you can load up to:¡150 sheets of plain paper¡10 transparencies, envelopes, or cards¡25 labelslYou do not force the paper into printer.lThe paper guide does not cause the paper to bow.lThe printer is on a flat, level surface.lThe printer settings you have chosen are correct for the type of document you are printing.lThe paper is against the right side of the paper tray.Printer does not feed envelopes or specialty mediaMake sure:lYour printer feeds paper without problems. Load the envelopes or specialty media vertically against the right side of the paper tray. Squeeze and slide the paper guide to the left edge of the envelopes or specialty media.lYou select the appropriate envelope or specialty media size and the appropriate paper type from the Paper Setup tab of Print Properties.lYou are using a specialty media or envelope size supported by your printer. For help, see Loading paper .lYour software is designed to print envelopes. For help, check your software documentation.lThe envelope or specialty media is not jammed.Printer has a paper jamIf the paper is lodged too far into printer and cannot be removed: 1.Turn the printer off.2.Turn the printer back on.If the printer does not automatically eject the page:a. Turn the printer off.b.Pull firmly on the paper to remove it.If you cannot reach the paper, raise the front cover, pull the paper out, and then close the front cover. c.Turn the printer on.Solving print quality problemsNOTE: Do not force the paper into the printer.c. Select the document you want to cancel.d. From the Document menu, click Cancel.l Repeat steps c through d for each document.l Align the ink cartridges. For help, see Aligning the ink cartridges.l Clean the ink cartridge nozzles and contacts. For help, see Cleaning ink cartridge nozzles and contacts.Colors on the printout differ from the colors on the screenl A cartridge may be low on ink. Check the ink levels in the Dell Printer Solution Center.l Use a different paper brand. Each paper brand accepts ink differently and prints with color variations.Select Natural Color as the document color:1.With your document open, click File ®Print.The Print dialog box appears.2.From the Print dialog box, click Properties, Preferences, or Options.3.From the I Want To menu, click Options ®Quality Options.4.Click Select color settings manually.5.Select Natural Color.Colors on the printout are fadedTry the suggestions listed in Colors on the printout differ from the colors on the screen. If the colors still seem faded, clean the ink cartridge nozzles and contacts. For help, see Cleaning ink cartridge nozzles and contacts.Photos do not print as expectedl Use a photo paper designed for inkjet printers.l Select a higher print quality from the Quality/Copies tab of Print Properties.l Select Photo paper as the paper type.l Print a borderless photo:a. From the Print Properties dialog box, select the Paper Setup tab.b. From the Paper Size area, select Borderless.c. From the Paper Size menu, select the correct size.Solving specialty media problemsThe following topics can help solve problems with specialty media.Glossy/photo papers or transparencies stick togetherl Load one sheet of photo paper or transparency at a time.l Use a photo paper or transparency designed for inkjet printers.l Remove each page as it exits the printer and let it dry completely before stacking.Photo papers or transparencies contain white linesl Make sure the Dell J740 printer is selected as the default printer.l Select a higher printer quality from the Quality/Copies tab of Print Properties.l Clean the ink cartridge nozzles and contacts. For help, see Cleaning ink cartridge nozzles and contacts.。
戴尔电脑使用说明书
Microsoft Windows 7: Getting Started GuideSet Up Windows 7Your Dell computer is preconfigured with the Microsoft® Windows® 7 operating system if you selected it at the time of purchase. To set up Windows for the first time, follow the instructionson the screen. These steps are mandatory and may take some time to complete. The Windows setup screens will take you through several procedures including accepting license agreements, setting preferences, and setting up an Internet connection.CAUTION: Do not interrupt the operatingsystem’s setup process. Doing so may renderyour computer unusable and you will need toreinstall the operating system.NOTE: For optimal performance of yourcomputer, it is recommended that youdownload and install the latest BIOS anddrivers for your computer available at.Connect to the Internet (Optional) To connect to the Internet, you need an external modem or network connection and an Internet service provider (ISP).If an external USB modem or WLAN adapter is not a part of your original order, you can purchase one at .October 2009Setting Up a Wired Connection•If you are using a dial-up connection, connectthe telephone line to the optional external USB modem and to the telephone wall connectorbefore you set up your Internet connection. •If you are using a DSL or cable/satellite modem connection, contact your ISP or cellulartelephone service for setup instructions.To complete setting up your wired Internet connection, follow the instructions in “Setting Up Your Internet Connection.”Setting Up a Wireless Connection Before you can use your wireless Internet connection, you need to connect to your wireless router.To set up your connection to a wireless router:1Ensure that wireless is enabled on yourcomputer.2Save and close any open files, and exit any open programs.3Click Start→ Control Panel→Network and Sharing Center→Connect to a network.4Follow the instructions on the screen tocomplete the setup.Setting Up Your Internet Connection ISPs and ISP offerings vary by country. Contact your ISP for offerings available in your country.If you cannot connect to the Internet but have successfully connected in the past, the ISP might have a service outage. Contact your ISP to check the service status, or try connecting again later. Have your ISP information ready. If you do not have an ISP, the Connect to the Internet wizard can help you get one.To set up your Internet connection:1Save and close any open files, and exit any open programs.2Click Start→Control Panel3Click Network and Sharing Center→Set up a new connection or network→Connect to the Internet.23The Connect to the Internet window appears. NOTE: If you do not know which type ofconnection to select, click Help me choose or contact your ISP .4Follow the instructions on the screen and use the setup information provided by your ISP to complete the setup.Windows 7 Basic FeaturesCustomizing the DesktopYou can customize your desktop to change the appearance, resolution, wallpaper, screensaver, or other features of your desktop.To customize your desktop:1Right-click an open area of the desktop.2Click Personalize , to open the Change the visuals and sounds on your computer window and learn more about your customization options.Transferring Information to a New ComputerTo transfer information to a new computer:1Click Start→ Control Panel.2In the search box, type Transfer and then click Transfer files from another computer .3Follow the instructions on the Windows Easy Transfer wizard.Backing Up Your DataIt is recommended that you periodically back up files and folders on your computer.To back up files:1Click Start → Control Panel → System and Security → Backup and Restore.2Click Set up backup....3Follow the instructions on the Configure Backup wizard.4Reinstalling Windows 7The reinstallation process may take about 1 to 2hours to complete. After you reinstall the operating system, you must also reinstall thedevice drivers, virus protection program, and other software.To reinstall Windows 7:1Save and close any open files and exit any open programs.2Insert the Operating System disc.3Click Exit if the Install Windows message appears.4Restart the computer.5When the DELL logo appears, press <F12> immediately. NOTE: If you wait too long and the operating system logo appears, continue to wait until you see the Microsoft Windows desktop; then, shut down your computer and try again.NOTE: The next steps change the boot sequence for one time only. On the nextstart-up, the computer boots according to the devices specified in the system setup program.6When the boot device list appears, highlight CD/DVD/CD-RW Drive and press <Enter>.7Press any key to Boot from CD-ROM .Follow the instructions on the screen to complete the installation.__________________Information in this document is subject to change without notice.©2009Dell Inc.All rights reserved. Printed in the U.S.A.Reproduction of these materials in any manner whatsoever without the written permission of Dell Inc. is strictly forbidden.Trademarks used in this text: Dell and the DELL logo are trademarks of Dell Inc; Microsoft , and Windows are either trademarks or registered trademarks of Microsoft Corporation in the United States and/or other countries.Other trademarks and trade names may be used in this document to refer to either the entities claiming the marks and names or their products. Dell Inc. disclaims any proprietary interest in trademarks and trade names other than its own.。
戴尔 Inspiron 7500 说明书
Inspiron 7500設定和規格4 2021註、警示與警告:「註」表示可以幫助您更有效地使用產品的重要資訊。
:「警示」表示有可能會損壞硬體或導致資料遺失,並告訴您如何避免發生此類問題。
:「警告」表示可能的財產損失、人身傷害或死亡。
© 2020-2021 Dell Inc. 或其子公司。
版權所有,翻印必究。
Dell、EMC 與其他商標均為 Dell Inc.或其子公司的商標。
其他商標可能為其各自擁有者的商標。
章1: 設定 Inspiron 7500 (4)章2: Inspiron 7500檢視 (6)右側 (6)左側 (6)僅限配備 NVIDIA GeForce GTX 1650 Ti 的電腦 (7)頂端 (8)正面 (9)底部 (10)章3: Inspiron 7500電腦規格 (11)尺寸和重量 (11)處理器 (11)晶片組 (12)作業系統 (12)記憶體 (12)外接式連接埠 (13)內部插槽 (13)無線模組 (14)音效 (14)存放時 (15)配備固態儲存的 Intel Optane 記憶體 H10 (選配) (15)媒體讀卡機 (15)鍵盤 (16)攝影機 (16)觸控墊 (17)電源變壓器 (17)電池 (18)顯示器 (18)指紋辨識器 (19)GPU — 獨立式 (19)作業與存放環境 (20)章4: 鍵盤快速鍵 (21)章5: 獲得幫助和聯絡 Dell 公司 (23)目錄3設定 Inspiron 7500: 根據您所訂購的組態而定,本文件中的圖片可能和您的電腦不同。
1.連接電源變壓器,然後按下電源按鈕: 出貨時,電池會進入省電模式,以節省電力。
首次開啟電腦時,請務必將電源變壓器連接至電腦。
2.完成 Windows 設定。
依畫面上的說明完成設定。
進行設定時,Dell 建議您 :●Windows 更新。
: 如果您要連線至安全的無線網路,請依提示輸入密碼以存取無線網路。
戴尔笔记本电脑说明书.pdf_1701115644.4817057
正面视图左侧视图右侧视图背面视图底部视图1 显示屏7 扬声器(2)2 电源按钮8 定点杆/触摸板按钮3 设备状态指示灯9 定点杆4 键盘10 音量控制按钮5 触摸板11 静音按钮6 显示屏闩锁12 键盘和无线状态指示灯在计算机打开时亮起,在计算机处于电源管理模式时闪烁。
在计算机读取或写入数据时亮起。
注意:为避免数据丢失,切勿在 指示灯闪烁时关闭计算机电源。
如果计算机已连接至电源插座,则 指示灯的状态包括:如果计算机使用电池电量运行,则 指示灯的状态包括:键盘上方的绿色指示灯表示以下信息:启用数字小键盘时亮起。
启用无线设备时亮起。
启用大写字母功能时亮起。
蓝牙无线技术是计算机上的可选功能,因此仅当您随计算机一起订购了蓝牙无线技术,系统才会显示 图标。
有关详情,请参阅蓝牙无线技术附带的说明文件。
1 安全缆线孔 4 PC 卡插槽2 音频连接器(2) 5 智能卡插槽3 红外线传感器注:计算机在变热时会打开风扇。
风扇噪音是正常现象,并不表示风扇或计算机有问题。
连接器用于连接耳机或扬声器。
连接器用于连接麦克风。
右侧视图1 网络连接器 (RJ-45) 6 串行连接器视频连接器交流适配器将交流电源转换为计算机所需的直流电源。
无论计算机处于打开或关闭状态,您均可以连接交流适配器。
警告:此交流适配器可以与世界各地的电源插座配合使用。
但是,电源连接器和配电电盘或电源插座可能会引起火灾或损坏设备。
注意:从计算机上断开交流适配器电缆的连接时,请握住连接器(而不是电缆本身),并稳而轻地将其拔出,以免损坏电缆。
1 内存模块护盖 5 对接设备插槽2 电池槽释放闩锁 6 风扇3 电池电量表7 小型 PCI 卡/调制解调器护盖4 电池8 硬盘驱动器内存模块护盖—用于保护安装内存模块的凹槽。
请参阅“添加和更换部件返回目录页面附录Dell Precision™ M20 移动工作站用户指南Macrovision 产品通告Macrovision 产品通告本产品采用了版权保护技术,它通过申请属于 Macrovision Corporation 和其他产权所有者的美国专利权以及其它知识产权来进行保护。
戴尔商用笔记本说明书
Introducing the world’s most secure laptops designed for ultimate productivity and flexibility.Experience scalability in performance and flexibility all in one series ofcommercial laptops that will thrive in your work environment. Powered by the latest Intel ® processors, NVIDIA graphics and a range of storage options from HDD to PCIe NVMe to ignite your workforce productivity.New features to the series include optional Windows Hello and an infrared camera which facilitates logon using facial recognition. Docking is now also a breeze with multiple options including DisplayPort™ over USB Type C, Thunderbolt3™ and Dell Wireless dock.Relax knowing that this series of laptops is the world’s most secure featuring optional multi-factor authentication including touch finger print reader, contacted FIPS 201 Smart Card Reader, contactless smart card reader with Control Vault 2™ FIPS 140-2 Level 3 certification.For more information visit: High-powered. Impressively agile.Sharply TITUDE 5000 SERIES 5280 | 5480 | 5580Features & Technical SpecificationsFeature Technical SpecificationsModel Number¹528054805580Processor Options17th Gen Intel® Core Processors, UDual Core 7th Gen Intel® CoreProcessors, U DualCore7th Gen Intel® CoreProcessors, H QuadCore7th Gen Intel® CoreProcessors, U DualCore7th Gen Intel® CoreProcessors, H QuadCoreOperating System1Microsoft® Windows 10 Pro 64 bitMircosoft® Windows 10 Home 64 bitUbuntu 16.04 LTS 64 bitNeoKylin 6.0 64 bit Microsoft® Windows 10 Pro 64 bitMircosoft® Windows 10 Home 64 bitUbuntu 16.04 LTS 64 bitNeoKylin 6.0 64 bitMicrosoft® Windows 10 Pro 64 bitMircosoft® Windows 10 Home 64 bitUbuntu 16.04 LTS 64 bitNeoKylin 6.0 64 bitMemory Options1,2,3DDR4 2133 MHz; 2 slots supportingup to 32GB DDR4 2133 MHz; 2slots supporting upto 32GBDDR4 2400 MHz; 2slots supporting upto 32GBDDR4 2133 MHz; 2slots supporting upto 32GBDDR4 2400 MHz; 2slots supporting upto 32GBChipset1Integrated with the Processor Integrated with theProcessor CM238Integrated with theProcessorCM238IntelResponsivenessTechnologies1,7Intel® Rapid Storage Technology Intel® Rapid Storage Technology Intel® Rapid Storage TechnologyGraphics1,13Intel® HD Graphics 620Intel® HD Graphics620NVIDIA® GeForce930MX 64 Bit Intel® HD Graphics630NVIDIA® GeForce930MX 64 BitIntel® HD Graphics620NVIDIA® GeForce930MX 64 BitIntel® HD Graphics630NVIDIA® GeForce940MX 64 BitDisplay112.5” HD (1366 x 768) Anti-glare (16:9)WLED, 200 nits, Carbon Fiber ReinforcedPolymer LCD Back12.5” FHD WVA (1920 x 1080) Anti-glare(16:9) WLED, 300 nits, Carbon FiberReinforced Polymer LCD Back12.5” FHD WVA Anti-Reflective Touch withCorning® Gorilla® Glass (1920 x 1080), Anti-Finger Print, (16:9), 360 nits, Carbon FiberReinforced Polymer LCD Back 14.0” HD (1366 x 768) Anti-glare (16:9)WLED, 200 nits, Carbon Fiber ReinforcedPolymer LCD Back14.0” FHD WVA (1920 x 1080) Anti-glare(16:9) WLED, 220 nits, Carbon FiberReinforced Polymer LCD Back14.0” FHD WVA (1920 x 1080) On-cell TouchDisplay with Truelife, 220 nits, Carbon FiberReinforced Polymer LCD Back15.6” HD (1366 x 768) Anti-glare (16:9)WLED, 200 nits, Carbon Fiber ReinforcedPolymer LCD Back15.6” FHD WVA (1920 x 1080) Anti-glare(16:9) WLED, 220 nits, Carbon FiberReinforced Polymer LCD Back15.6” FHD WVA (1920 x 1080) On-cell TouchDisplay with Truelife, 220 nits, Carbon FiberReinforced Polymer LCD BackStorage Options1,3HDD: up to 1TB, Hybrid, OPAL SED optionsSSD M.2 2280 SATA: up to 512GB, OPALSED optionsSSD M.2 2280 PCIe/NVMe: up to 512GB,OPAL SED optionsSSD M.2 2242 64GB Cache (in WWAN slot)Dell Fast Response Free Fall Sensor andHDD Isolation (standard feature)HDD: up to 1TB, Hybrid, OPAL SED optionsSSD M.2 2280 SATA: up to 512GB, OPALSED optionsSSD M.2 2280 PCIe/NVMe: up to 512GB,OPAL SED optionsSSD M.2 64GB Cache (in WWAN slot)Dell Fast Response Free Fall Sensor andHDD Isolation (standard feature)HDD: up to 1TB, Hybrid, OPAL SED optionsSSD M.2 2280 SATA: up to 512GB, OPALSED optionsSSD M.2 2280 PCIe/NVMe: up to 512GB,OPAL SED optionsSSD M.2 64GB Cache (in WWAN slot)Dell Fast Response Free Fall Sensor andHDD Isolation (standard feature)Security¹TPM 2.0 FIPS 140-2 Certified, TCG CertifiedOptional Hardware Authentication Bundle 1:FIPS 201 Contacted Smart Card with ControlVault 2.0 Advanced Authentication with FIPS140-2 Level 3 CertificationOptional Hardware Authentication Bundle2: Touch Fingerprint Reader, FIPS 201Contacted Smart Card, ContactlessSmart Card, Control Vault 2.0 AdvancedAuthentication with FIPS 140-2 Level 3Certification TPM 2.0 FIPS 140-2 Certified, TCG CertifiedOptional Hardware Authentication Bundle 1:FIPS 201 Contacted Smart Card with ControlVault 2.0 Advanced Authentication with FIPS140-2 Level 3 CertificationOptional Hardware Authentication Bundle2: Touch Fingerprint Reader, FIPS 201Contacted Smart Card, ContactlessSmart Card, Control Vault 2.0 AdvancedAuthentication with FIPS 140-2 Level 3CertificationOptional Hardware Authentication Bundle 4:Touch Fingerprint Reader, Control Vault 2.0Advanced Authentication with FIPS 140-2Level 3 CertificationTPM 2.0 FIPS 140-2 Certified, TCGCertifiedOptional Hardware Authentication Bundle 1:FIPS 201 Contacted Smart Card with ControlVault 2.0 Advanced Authentication with FIPS140-2 Level 3 CertificationOptional Hardware Authentication Bundle2: Touch Fingerprint Reader, FIPS 201Contacted Smart Card, Contactless SmartCard, NFC, Control Vault 2.0 AdvancedAuthentication with FIPS 140-2 Level 3CertificationOptional Hardware Authentication Bundle 3:Touch FIPS 201 Fingerprint Reader, FIPS201 Contacted Smart Card, ContactlessSmart Card, NFC, Control Vault 2.0Advanced Authentication with FIPS 140-2Level 3 Certification (15” only)Dell Client Command SuiteOptional Dell Data Security and Management SoftwareDell Data Protection | Endpoint Security Suite EnterpriseDell Data Protection | Encryption (Enterprise or Personal Edition)MozyPro®, MozyEnterprise®Dell Data Protection | Threat DefenseDell Data Protection | Protected Workspace Dell Data Protection | Secure LifecycleRSA NetWitness® Endpoint17VMware Airwatch® 17Absolute Data & Device SecurityRSA SecurID Access17Dell Client Command SuiteOptional Dell Data Security andManagement SoftwareDell Data Protection | Endpoint SecuritySuite EnterpriseDell Data Protection | Encryption (Enterpriseor Personal Edition)MozyPro®, MozyEnterprise®Dell Data Protection | Threat DefenseDell Data Protection | Protected WorkspaceDell Data Protection | Secure LifecycleRSA NetWitness® Endpoint17VMware Airwatch® 17Absolute Data & Device SecurityRSA SecurID Access17Dell Client Command SuiteOptional Dell Data Security andManagement SoftwareDell Data Protection | Endpoint SecuritySuite EnterpriseDell Data Protection | Encryption (Enterpriseor Personal Edition)MozyPro®, MozyEnterprise®Dell Data Protection | Threat DefenseDell Data Protection | Protected WorkspaceDell Data Protection | Secure LifecycleRSA NetWitness® Endpoint17VMware Airwatch® 17Absolute Data & Device SecurityRSA SecurID Access17Docking¹Dell Dock WD15 (optional, soldseparately)Dell Wireless Dock WLD15 (Optional,sold separately, requires optionalinstalled Intel® Tri-Band Wireless-AC18265 WiGig + Wi-Fi + BT4.28)Dell Dock WD15 (optional, soldseparately)Dell Wireless Dock WLD15 (Optional,sold separately, requires optionalinstalled Intel® Tri-Band Wireless-AC18265 WiGig + Wi-Fi + BT4.28)Dell Thunderbolt™ Dock TB 16 (optional,sold separately)Dell Dock WD15 (optional, soldseparately)Dell Wireless Dock WLD15 (Optional,sold separately, requires optionalinstalled Intel® Tri-Band Wireless-AC18265 WiGig + Wi-Fi + BT4.28)Dell Thunderbolt™ Dock TB 16 (optional,sold separately)Optical DriveOptionsExternal Options Only External Options Only External Options OnlyMultimedia¹High Quality SpeakersHeadset/mic combo jackNoise reducing array microphonesOptional HD, IR or no camera High Quality SpeakersHeadset/mic combo jackNoise reducing array microphonesOptional HD, IR or no cameraHigh Quality SpeakersHeadset/mic combo jackNoise reducing array microphonesOptional HD, IR or no cameraBattery Options1,542 WHr Prismatic, ExpressCharge™capable51 WHr Polymer, ExpressCharge™capable68 WHr Polymer, ExpressCharge™capable68 WHr Long Life Cycle Polymer(Summer 2017)42 WHr Prismatic,ExpressCharge™capable51 WHr Polymer,ExpressCharge™capable68 WHr Polymer,ExpressCharge™capable68 WHr Long LifeCycle Polymer(Summer 2017)51 WHr Polymer,ExpressCharge™capable (UMAOnly)68 WHr Polymer,ExpressCharge™capable68 WHr Long LifeCycle Polymer(Summer 2017)42 WHr Prismatic,ExpressCharge™capable51 WHr Polymer,ExpressCharge™capable68 WHr Polymer,ExpressCharge™capable68 WHr Long LifeCycle Polymer(Summer 2017)51 WHr Polymer,ExpressCharge™capable (UMAOnly)68 WHr Polymer,ExpressCharge™capable68 WHr Long LifeCycle Polymer(Summer 2017)92 WHr Polymer,ExpressCharge™capablePower Options¹65W adapter, 7.4mm barrel65W BFR/PVC Halogen Free adapter,7.4mm barrel 65W adapter,7.4mm barrel65W BFR/PVCHalogen Freeadapter, 7.4mmbarrel65W adapter,7.4mm barrel65W BFR/PVCHalogen Freeadapter, 7.4mmbarrel90W adapter,7.4mm barrel65W adapter,7.4mm barrel65W BFR/PVCHalogen Freeadapter, 7.4mmbarrel65W adapter,7.4mm barrel65W BFR/PVCHalogen Freeadapter, 7.4mmbarrel90W adapter,7.4mm barrelConnectivity options1,1410/100/1000 EthernetWireless LAN Options:Qualcomm QCA61x4A 802.11ac DualBand (2x2) Wireless Adapter+ Bluetooth4.1Intel® Dual-Band Wireless-AC 8265 Wi-Fi + BT 4.2 Wireless Card (2x2).Bluetooth OptionalOptional Mobile Broadband Options:8, 10Qualcomm® Snapdragon™ X7 LTE-A(DW5811e) (EMEA/APJ/ROW)Qualcomm® Snapdragon™ X7 LTE-A(DW5811e) for AT&T, Verizon & Sprint,US (Spring 2017)Qualcomm® Snapdragon™ X7 HSPA+(DW5811e) (China/Indonesia/India)Dell Wireless™ Telit Intel Ln-930 AP LTECAT4 (DW5814e for Japan)Optional WiGig Option:⁸Intel® Tri-Band Wireless-AC 18265WiGig + Wi-Fi + BT4.2 Wireless Card10/100/1000 EthernetWireless LAN Options:Qualcomm QCA61x4A 802.11ac DualBand (2x2) Wireless Adapter+ Bluetooth4.1Intel® Dual-Band Wireless-AC 8265 Wi-Fi+ BT 4.1 Wireless Card (2x2). BluetoothOptionalOptional Mobile Broadband Options:8, 10Qualcomm® Snapdragon™ X7 LTE-A(DW5811e) (EMEA/APJ/ROW)Qualcomm® Snapdragon™ X7 LTE-A(DW5811e) for AT&T, Verizon & Sprint,US (Spring 2017)Qualcomm® Snapdragon™ X7 HSPA+(DW5811e) (China/Indonesia/India)Dell Wireless™ Telit Intel Ln-930 AP LTECAT4 (DW5814e for Japan)Optional WiGig Option:⁸Intel® Tri-Band Wireless-AC 18265 WiGig+ Wi-Fi + BT4.2 Wireless Card10/100/1000 EthernetWireless LAN Options:Qualcomm QCA61x4A 802.11ac DualBand (2x2) Wireless Adapter+ Bluetooth4.1Intel® Dual-Band Wireless-AC 8265 Wi-Fi+ BT 4.1 Wireless Card (2x2). BluetoothOptionalOptional Mobile Broadband Options:8, 10Qualcomm® Snapdragon™ X7 LTE-A(DW5811e) (EMEA/APJ/ROW)Qualcomm® Snapdragon™ X7 LTE-A(DW5811e) for AT&T, Verizon & Sprint,US (Spring 2017)Qualcomm® Snapdragon™ X7 HSPA+(DW5811e) (China/Indonesia/India)Dell Wireless™ Telit Intel Ln-930 AP LTECAT4 (DW5814e for Japan)Optional WiGig Option:⁸Intel® Tri-Band Wireless-AC 18265 WiGig+ Wi-Fi + BT4.2 Wireless CardPorts, Slots & Chassis¹2 USB 3.0 (one with PowerShare),HDMI, VGARJ-45, external uSIM card tray optionuSD 4.0 Memory card readerHeadset/mic combo jackOptional Contacted SmartCard Readerand touch Fingerprint ReaderDisplay Port over USB Type-C™Noble Wedge Lock slot3 USB 3.0 (one with PowerShare),HDMI, VGARJ-45, external uSIM card tray optionSD 4.0 Memory card readerHeadset/mic combo jackOptional Contacted SmartCard Readerand touch Fingerprint Reader3 USB 3.0 (one with PowerShare),HDMI, VGARJ-45, external uSIM card tray optionSD 4.0 Memory card readerHeadset/mic combo jackOptional Contacted SmartCard Readerand touch Fingerprint ReaderDisplay Port overUSB Type C™Display Port overUSB Type C™with optionalThunderbolt™ 3Display Port overUSB Type C™Display Port overUSB Type C™with optionalThunderbolt™ 3Noble Wedge Lock slot Noble Wedge Lock slotDimensions & Weight1,15Width: 12.0” / 305.1mmHeight (front): 0.8“ / 21.4mmDepth: 8.3” / 211.3mmStarting weight: 3.00 lbs. / 1.36 kgWidth: 13.1” /333.4mmHeight (front): 0.9“/ 22.45mmDepth: 9.0” /228.9mmStarting weight:3.52 lbs. / 1.60 kgWidth: 13.1” /333.4mmHeight (front): 0.9“/ 22.45mmDepth: 9.0” /228.9mmStarting weight:3.63 lbs. / 1.64 kgWidth: 14.8” /376.0mmHeight (front): 0.9“/ 23.25mmDepth: 9.9” /250.7mmStarting weight:4.19 lbs. / 1.90 kgWidth: 14.8” /376.0mmHeight (front): 1.0“/ 24.3mmDepth: 9.9” /250.7mmStarting weight:4.26 lbs. / 1.93 kg (42Whr battery, M.2 SSD, non touchFHD LCD, UMA)(42Whr battery,M.2 SSD, nontouch FHD LCD,UMA)(51Whr battery,M.2 SSD, nontouch, FHD LCD,UMA)(42Whr battery,M.2 SSD, nontouch FHD LCD,UMA)(51Whr battery,M.2 SSD, nontouch, FHD LCD,UMA)Regulatory and Environmental Compliance¹Regulatory Model: P72SRegulatory Type: P72S001ENERGY STAR 6.1¹EPEAT Gold Registered. For specificcountry participation and rating, pleasesee BFR/PVC free9TAA configurations availableRegulatory Model: P72GRegulatory Type: P72G001ENERGY STAR 6.1¹EPEAT Gold Registered. For specificcountry participation and rating, pleasesee BFR/PVC free9TAA configurations availableRegulatory Model: P60FRegulatory Type: P60F001ENERGY STAR 6.1¹EPEAT Gold Registered. For specificcountry participation and rating, pleasesee BFR/PVC free9TAA configurations availableInput¹Single Pointing non-backlit KeyboardSingle Pointing backlit KeyboardMulti-touch Touchpad Single Pointing non-backlit KeyboardDual Pointing backlit KeyboardMulti-touch TouchpadDual Pointing non-backlit KeyboardDual Pointing backlit KeyboardMulti-touch TouchpadSystems Management¹Intel® vPro™ Technology (iAMT 11.6)(optional, requires Intel WiFi® Link WLANand a vPro compatible processor),Dell Client Command Suite available(/command), Factory InstalledDell Client Command | Update, DellCommand | Power ManagerIntel® vPro™ Technology (iAMT 11.6)(optional, requires Intel WiFi® Link WLANand a vPro compatible processor),Dell Client Command Suite available(/command), Factory InstalledDell Client Command | Update, DellCommand | Power ManagerIntel® vPro™ Technology (iAMT 11.6)(optional, requires Intel WiFi® Link WLANand a vPro compatible processor),Dell Client Command Suite available(/command), Factory InstalledDell Client Command | Update, DellCommand | Power ManagerWarranty and Service¹Limited Hardware Warranty4 Standard1 year Mail-in Service after RemoteDiagnosis11 optional 3, 4 and 5 yearhardware warranty extensions and3-5 year Dell ProSupport contractsavailable12Limited Hardware Warranty4 Standard1 year Mail-in Service after RemoteDiagnosis11 optional 3, 4 and 5 yearhardware warranty extensions and3-5 year Dell ProSupport contractsavailable12Limited Hardware Warranty4 Standard1 year Mail-in Service after RemoteDiagnosis11 optional 3, 4 and 5 yearhardware warranty extensions and3-5 year Dell ProSupport contractsavailable12Peripheral Ecosystem¹Purpose built ecosystem to enableproductivity on the go or at the desk.Includes Dell Dock, Dell WirelessDock, Dell Power Companions, DellProfessional Briefcases, Dell 24” & 27”Monitors and Dell Wireless Keyboardand MousePurpose built ecosystem to enableproductivity on the go or at the desk.Includes Dell Dock, Dell WirelessDock, Dell Power Companions, DellProfessional Briefcases, Dell 24” & 27”Monitors and Dell Wireless Keyboardand MousePurpose built ecosystem to enableproductivity on the go or at the desk.Includes Dell Dock, Dell WirelessDock, Dell Power Companions, DellProfessional Briefcases, Dell 24” & 27”Monitors and Dell Wireless Keyboardand MouseA t T h e D e s kDell UltraSharp DellDock – WD15Dell Multimedia Dell UltraSharp 24 InfinityEdge Monitor –U2417H WOSTDell Hybrid Adapter +Power Bank - PH45W17-BA (12”, available spring 2017)Dell Wireless Mouse – WM3261 Offering may vary by country and by configuration2 A 64-bit operating system is required to support 4GB or more of system memory.3 GB means 1 billion bytes and TB equals 1 trillion bytes; actual capacity varies with preloaded material and operating environment and will be less.4 Limited Hardware Warranty: For copy of Limited Hardware Warranty, write Dell USA LP , Attn: Warranties, One Dell Way, Round Rock, TX 78682 or see www.dell com/warranty5 Battery support is dependent upon graphics support. Check technical guides for detailed support6 COMPUTRACE Not a Dell offer. Certain conditions apply. For full details, see terms and conditions at /en/about/legal/agreements.7 Intel Rapid Storage Technology requires a HDD, mSATA, or an SSD, as primary storage device and Windows OS required8 Wireless antenna available only at time of system purchase9 Dell Latitude 5000 Series are brominated flame retardant free (BFR-free) and polyvinyl chloride free (PVC-free); meeting the definition of BFR-/PVC-free as set forth in the iNEMI Position Statement on the ‘Definition of Low-Halogen Electronics (BFR-/CFR-/PVC-free)’. Plastic parts contain less than 1,000 ppm (0.1%) of bromine (if the Br source is from BFRs) and less than 1,000 ppm (0.1%) of chlorine (if the Cl source is from CFRs or PVC or PVC copolymers). All printed circuit board (PCB) and substrate laminates contain bromine/chlorine total less than 1,500 ppm (0.15%) with a maximum chlorine of 900 ppm (0.09%) and maximum bromine being 900 ppm (0.09%).10 Mobile Broadband Subject to service provider’s broadband subscription and coverage area; additional charges apply.11 Onsite Service after Remote Diagnosis: Remote Diagnosis is determination by online/phone technician of cause of issue; may involve customer access to inside of system and multiple or extended sessions. If issue is covered by Limited Hardware Warranty (/warranty) and not resolved remotely, technician and/or part will be dispatched, usually within 1 business day following completion of Remote Diagnosis. Availability varies. Other conditions apply. 12 Dell Services: Availability and terms of Dell Services vary by region. For more information, visit /servicedescriptions. 13 GB means 1 billion bytes and TB equals 1 trillion bytes; significant system memory may be used to support graphics, depending on system memory size and other factors.14 Miracast Wireless Technology: Requires a compatible media adapter (sold separately) and an HDMI-enabled display. 15 Weights vary depending on configuration and manufacturing variability.16 Intel 7th Gen Core 15W (U) CPUs support 2133MHz memory, Intel 7th Gen Core 35W (H) supports 2400MHz Memory 17US only. WW availability in 2017 High-powered. Impressively agile.Sharply dressed.LATITUDE 5000 SERIES LAPTOPS (5280 | 5480 | 5580)。
戴尔 Latitude 3570 用户手册说明书
Dell Latitude 3570用户手册管制型号: P50F管制类型: P50F001注、小心和警告注: “注”表示可以帮助您更好地使用计算机的重要信息。
小心: “小心”表示可能会损坏硬件或导致数据丢失,并说明如何避免此类问题。
警告: “警告”表示可能会造成财产损失、人身伤害甚至死亡。
版权所有© 2015 Dell Inc. 保留所有权利。
本产品受美国、国际版权和知识产权法律保护。
Dell™和 Dell 徽标是 Dell Inc. 在美国和 / 或其他管辖区域的商标。
所有此处提及的其他商标和产品名称可能是其各自所属公司的商标。
2016 - 01Rev. A00目录1 拆装计算机内部组件 (6)安全说明 (6)拆装计算机内部组件之前 (6)关闭计算机 (7)拆装计算机内部组件之后 (7)2 卸下和安装组件 (8)建议工具 (8)取出电池 (8)安装电池 (8)卸下基座盖 (9)安装基座盖 (9)卸下键盘 (9)安装键盘 (10)卸下硬盘驱动器部件 (10)安装硬盘驱动器部件 (11)卸下硬盘驱动器支架 (11)安装硬盘驱动器支架 (11)卸下 WLAN 卡 (12)安装 WLAN 卡 (12)卸下内存模块 (12)安装内存模块 (13)卸下掌垫 (13)安装掌垫 (14)卸下币形电池 (14)安装币形电池 (15)卸下 USB 板 (15)安装 USB 板 (16)卸下 VGA 板 (16)安装 VGA 板 (17)卸下扬声器 (17)安装扬声器 (18)卸下系统风扇 (18)安装系统风扇 (19)卸下显示屏电缆 (19)安装显示屏电缆 (20)卸下电源连接器端口 (20)3安装电源连接器端口 (21)卸下系统板 (21)安装系统板 (22)卸下散热器 (22)安装散热器 (23)卸下显示屏部件 (23)安装显示屏部件 (24)卸下显示屏挡板 (24)安装显示屏挡板 (25)卸下摄像头 (26)安装摄像头 (26)卸下显示屏面板 (27)安装显示屏面板 (28)3 系统设置程序 (29)Boot Sequence (29)导航键 (29)系统设置程序概览 (30)访问系统设置程序 (30)常规屏幕选项 (30)系统配置屏幕选项 (31)视频屏幕选项 (33)安全性屏幕选项 (33)安全引导屏幕选项 (35)性能屏幕选项 (35)电源管理屏幕选项 (36)POST 行为屏幕选项 (37)虚拟化支持屏幕选项 (38)无线屏幕选项 (38)维护屏幕选项 (39)系统日志屏幕选项 (39)更新 BIOS (39)系统密码和设置密码 (40)分配系统密码和设置密码 (40)删除或更改现有系统密码和/或设置密码 (41)4 Diagnostics(诊断程序) (42)增强型预引导系统评估 (ePSA) 诊断程序 (42)设备状态指示灯 (43)电池状态指示灯 (43)5 技术规格 (44)4系统规格 (44)处理器规格 (44)内存规格 (44)音频规格 (45)视频规格 (45)摄像头规格 (45)通信规格 (45)端口和连接器规格 (46)显示屏规格 (46)键盘规格 (47)触摸板规格 (47)电池规格 (47)交流适配器规格 (48)物理规格 (48)环境规格 (48)6 联系 Dell (50)51拆装计算机内部组件安全说明遵循以下安全原则有助于防止您的计算机受到潜在损坏,并有助于确保您的人身安全。
戴尔笔记本电脑使用说明书
Microsoft Windows 7: Guide de mise en routeConfiguration de Windows 7Votre ordinateur Dell est préconfiguré avec lesystème d'exploitation Microsoft® Windows® 7si vous l'avez sélectionné au moment de l'achat.Pour installer Windows la première fois, suivezles instructions qui s'affichent. Ces étapes sontobligatoires et peuvent prendre un certain temps.Les écrans de configuration Windows vous guidentdans différentes procédures, notammentl'acceptation des contrats de licence, la définitiondes préférences et la configuration d'uneconnexion Internet.PRÉCAUTION: N'interrompez pas leprocessus d'installation du systèmed'exploitation. Cela pourrait rendre votreordinateur inutilisable, vous devriez alorsréinstaller le système d'exploitation.REMARQUE: Pour des performancesoptimales de votre ordinateur, il estrecommandé de télécharger et d'installer lesdernières versions du BIOS et des pilotespour votre ordinateur, disponibles à l'adresse.Connexion à l'Internet (facultatif)Pour vous connecter à Internet, vous devezdisposer d'un modem externe ou d'une connexionréseau et d'un fournisseur d'accès Internet (FAI).Si votre commande ne comportait pas de modemUSB ou adaptateur de réseau sans fil externe, vouspouvez en acheter un à l'adresse .Octobre 2009Configuration d'une connexion filaire•Si vous utilisez une connexion d'accèsàdistance, branchez une ligne téléphonique au modem externe USB en option sur votreordinateur et à la prise téléphonique muraleavant de configurer la connexion Internet. •Si vous utilisez une connexion DSL ou modemcâble/satellite, contactez fournisseur d'accèsInternet (FAI) ou opérateur téléphonique mobile pour obtenir des instructions de configuration. Pour terminer la configuration de votre connexion Internet filaire, suivez les instructions de la section «Configuration de votre connexion Internet». Configuration d'une connexion sans filAvant de pouvoir utiliser votre connexionàl'Internet sans fil, vous devez vous connecteràvotre routeur sans fil.Pour configurer votre connexion à un routeur sans fil:1Assurez-vous que le réseau sans fil est activé sur votre ordinateur.2Enregistrez et fermez tous les fichiers ouverts et quittez tous les programmes en coursd'exécution.3Cliquez sur Démarrer → Panneau deconfiguration→Centre Réseau et partage→Connexion à un réseau.4Pour effectuer la configuration, suivez les instructions qui s'affichent à l'écran. Configuration de la connexion Internet Les fournisseurs d'accès Internet (FAI) et leurs offres varient selon les pays. Prenez contact avec votre fournisseur d'accès Internet pour connaître les offres disponibles dans votre pays.Si vous ne pouvez pas vous connecter à Internet alors que vous l'avez déjà fait auparavant, il est possible que le fournisseur d'accès Internet subisse une interruption de services. Contactez votre FAI pour vérifier l'état du service ou essayez de vous connecter ultérieurement.2Assurez-vous de disposer des informations fournies par votre fournisseur d'accès Internet (FAI). Si vous ne disposez pas d'un FAI, l'assistant ConnexionàInternet peut vous aider à en trouver un.Pour configurer votre connexion Internet:1Enregistrez et fermez tous les fichiers ouverts et quittez tous les programmes en coursd'exécution.2Cliquez sur Démarrer→Panneau deconfiguration.3Cliquez sur Centre Réseau et partage→Configurer une connexion ou un réseau→ConnecteràInternet.La fenêtre Connexion à Internet s'affiche.REMARQUE: Si vous ne savez pas quel typede connexion choisir, cliquez sur Commentchoisir ou prenez contact avec votre FAI.4Suivez les instructions à l'écran pour utiliser les informations de configuration fournies par votre FAI et terminez la configuration.Fonctionnalités de base de Windows 7Personnalisation du bureauVous pouvez personnaliser votre bureau pour en modifier la présentation, la résolution, l'arrière-plan, l'écran de veille ou d'autres fonctions.Pour personnaliser votre bureau:1Cliquez avec le bouton droit sur une zone vide du bureau.2Cliquez sur Personnaliser, pour ouvrir la fenêtre Modifier les effets visuels et les sons de votre ordinateur et en savoir plus sur les options depersonnalisation.Transfert d'informations vers un nouvel ordinateurPour transférer des informations vers un nouvel ordinateur1Cliquez sur Démarrer→Panneau deconfiguration.342Tapez dans la case de rechercher Transfert puis cliquez sur Transférer des fichiers d'un autre ordinateur .3Suivez les instructions de l'assistantWindows Easy Transfer .Sauvegarde de vos donnéesNous vous conseillons de régulièrementsauvegarder les fichiers et dossiers qui figurent sur votre ordinateur.Pour sauvegarder des fichiers :1Cliquez sur Démarrer → Panneau de configuration → Système et sécurité→ Sauvegarde et restauration .2Cliquez sur Sauvegarder et restaurer....3Suivez les instructions de l'assistant Configurer la sauvegarde .Réinstallation de Windows 7Le processus de réinstallation peut prendre de 1à2heures. Après avoir réinstallé le système d'exploitation, vous devez réinstaller les pilotes de périphériques, le programme antivirus ainsi que d'autres logiciels.Pour réinstaller Windows 7:1Enregistrez et fermez tout fichier ouvert et quittez tous les programmes d'application en cours d'exécution.2Insérez le disque Operating System .3Cliquez sur Quitter si le message Installer Windows apparaît.4Redémarrez l'ordinateur.5Lorsque le logo DELL apparaît, appuyez immédiatement sur <F12>. REMARQUE : Si vous attendez trop longtemps et que le logo du système d'exploitation apparaît, patientez jusqu'à ce que le bureau de Microsoft Windows s'affiche ; éteignez alors votre ordinateur et faites une nouvelle tentative.REMARQUE: La procédure ci-dessousmodifie la séquence de démarrage pour unseul démarrage. Au démarrage suivant,l'ordinateur démarre en fonction despériphériques définis dans le programme deconfiguration du système.6Lorsque la liste des périphériques d'amorçages'affiche, sélectionnez Lecteur CD/DVD/CD-RWet appuyez sur <Entrée>.7Appuyez sur une touche pour sélectionner Bootfrom CD-ROM (Démarrer sur CD-ROM).Suivez les instructions qui s'affichent pourterminer l'installation.__________________Les informations de ce document sont sujettes à modification sanspréavis.©2009Dell Inc.Tous droits réservés. Imprimé en Irlande.La reproduction de ce document de quelque manière que ce soit sansl'autorisation écrite de Dell Inc. est strictement interdite.Marques utilisées dans ce document: Dell et le logo DELL sont desmarques de Dell Inc; Microsoft et Windows sont des marques ou desmarques déposées de Microsoft Corporation aux Etats-Unis et dansd'autres pays.Les autres marques et noms de produits pouvant être utilisés dans cedocument sont reconnus comme appartenant à leurs propriétairesrespectifs. Dell Inc. rejette tout intérêt dans l'utilisation des marqueset des noms commerciaux ne lui appartenant pas.56。
戴尔计算机使用手册说明书
Me and My Dell面向 Inspiron、G 系列、XPS 和 Alienware 计算机1 月 2021 年Rev. A08注意、小心和警告:“注意”表示帮助您更好地使用该产品的重要信息。
: “小心”表示可能会损坏硬件或导致数据丢失,并告诉您如何避免此类问题。
: “警告”表示可能会导致财产损失、人身伤害甚至死亡。
© 2011-2021 Dell Inc. 或其子公司。
保留所有权利。
Dell、EMC 和其他商标是 Dell Inc. 或其附属机构的商标。
其他商标可能是其各自所有者的商标。
目录章 1: 设置计算机 (7)连接到互联网 (7)使用 LAN 连接互联网 (7)使用 WLAN 连接互联网 (7)使用 WWAN 连接互联网 (8)设置音频 (8)配置 5.1 和 7.1 音频 (9)连接 5.1 扬声器 (9)连接 7.1 扬声器 (10)设置打印机 (10)Windows 10 和 8.1 (10)Windows 7 (10)设置网络摄像头 (11)集成网络摄像头 (11)外部网络摄像头 (11)设置蓝牙 (11)连接多个显示器 (11)Windows 10 (11)Windows 8 (12)Windows 7 (12)章 2: 关于您的计算机 (13)电源适配器 (13)电池 (13)币形电池 (13)触摸板 (14)显示器 (14)触摸屏 (14)3D (14)无线显示 (14)摄像头 (15)网络摄像头 (15)3D 摄像头 (15)Intel RealSense 3D 摄像头 (15)无线显示 (15)键盘 (15)物理键盘 (15)屏幕键盘 (16)键盘连接类型 (17)服务标签和快速服务代码 (17)找到您计算机上的标签 (17)存储设备 (17)内部存储设备 (18)可移除存储设备 (18)3芯片组 (20)处理器 (20)计算机风扇 (21)散热器 (21)散热膏 (21)视频卡 (21)电视调谐器 (22)扬声器 (22)2.1 音频 (23)5.1 音频 (23)7.1 音频 (23)网络摄像头 (23)网络 (23)局域网 (23)无线局域网 (23)无线广域网 (24)无线个人局域网 (24)调制解调器 (24)路由器 (24)网络接口控制器 (24)无线局域网适配器 (24)无线广域网适配器 (24)蓝牙 (24)近场通信 (25)章 3: 使用计算机 (26)为电池充电 (26)使用键盘 (26)键盘快捷方式 (26)Windows 8.1 和 Windows RT 的键盘快捷方式 (27)自定义键盘 (28)在笔记本电脑上使用数字键盘 (29)使用触摸板 (29)触摸板手势 (29)使用触摸屏 (30)触摸屏手势 (31)使用蓝牙 (32)将蓝牙设备与您的计算机配对 (33)使用网络摄像头 (33)章 4: 端口和接口 (35)音频 (35)音频端口类型 (35)USB (36)USB 端口 (36)USB 标准 (36)eSATA (37)4DisplayPort (37)HDMI (38)SPDIF (38)章 5: 软件和应用程序 (39)Absolute (39)Dell SupportAssist (39)PC 检查 (39)Quickset (40)NVIDIA 3D 应用程序 (40)章 6: 还原操作系统 (42)系统恢复选项 (42)Dell Backup and Recovery (42)Dell Backup and Recovery Basic (43)Dell Backup and Recovery premium (43)Dell Factory Image Restore (44)系统还原 (45)Windows 10 (45)Windows 8.1 (46)Windows 7 (46)操作系统光盘 (46)系统重装介质 (47)章 7: 故障排除 (48)基本故障排除步骤 (48)诊断程序 (48)预引导系统评估 (48)增强型 PSA (48)LCD BIST (49)哔声代码 (49)章 8: BIOS (51)更改 BIOS 设置 (51)进入 BIOS 设置程序 (51)重设 BIOS 密码 (51)Boot Sequence (52)章 9: 获取帮助和联系戴尔 (53)章 10: 参考资料 (54)计算机维护 (54)Power management(电源管理) (54)配置电源设置 (54)配置电源按钮行为 (55)Dell Power Manager (55)5人机工程学说明 (56)Dell 与环境 (57)法规合规性政策 (58)6设置计算机设置程序根据您的计算机而有所不同。
- 1、下载文档前请自行甄别文档内容的完整性,平台不提供额外的编辑、内容补充、找答案等附加服务。
- 2、"仅部分预览"的文档,不可在线预览部分如存在完整性等问题,可反馈申请退款(可完整预览的文档不适用该条件!)。
- 3、如文档侵犯您的权益,请联系客服反馈,我们会尽快为您处理(人工客服工作时间:9:00-18:30)。
16
機能
1. セキュリティケーブルスロット 2. 電源ボタン 3. ファンクションキー 4. ネットワークコネクタ 5. VGA コネクタ 6. HDMI コネクタ 7. USB 2.0 コネクタ 8. タッチパッドボタン(2) 9. タッチパッド 10. キーボード 11. 電源インジケータライト 12. ハードドライブアクティビティライト 13. バッテリーステータスライト 14. ワイヤレスステータスライト 15. 3-in-1 メモリカードリーダー 16. マイク 17. オーディオ出力/ヘッドフォンコネクタ 18. オーディオ入力/マイクコネクタ 19. オプティカルドライブ取り出しボタン 20. オプティカルドライブ 21. USB 2.0 コネクタ(2) 22. AC アダプタコネクタ 23. カメラ 24. カメラインジケータライト 25. ディスプレイ
11 12 13 14
15
配件
1. 安全纜線插槽 2. 電源按鈕 3. 功能鍵列 4. 網路連接器 5. VGA 連接器 6. HDMI 連接器 7. USB 2.0 連接器 8. 觸控墊按鈕 (2 個) 9. 觸控墊 10. 鍵盤 11. 電源指示燈 12. 硬碟機活動指示燈 13. 電池狀態指示燈 14. 無線狀態指示燈 15. 三合一記憶體卡讀卡器 16. 麥克風 17. 音效輸出/耳機連接器 18. 音效輸入/麥克風連接器 19. 光碟機退出按鈕 20. 光碟機 21. USB 2.0 連接器 (2 個) 22. 交流電變壓器連接器 23. 相機 24. 相機指示燈 25. 顯示幕
更多資訊
• 若要瞭解您的攜帶型電腦上提供的配件和進階選項,請按 一下開始 → 所有程式 → Dell Help Documentation (Dell 說明文件),或訪問 /manuals。
• 若因銷售、技術支援或客戶服務問題要與 Dell 公司聯 絡,請訪問 /ContactDell。美國的客戶可撥打 800-WWW-DELL (800-999-3355)。
More Information
• To learn about the features and advanced options available on your laptop, click Start→ All Programs→ Dell Help Documentation or go to /manuals.
本文中的信息如有更改,恕不另行通知。 © 2011 Dell Inc. 版权所有,翻印必究。 本文中使用的商标:Dell™、DELL 徽标和 Inspiron™ 是 Dell Inc. 的 商标。 2011–03 法规型号:P22G 法规类型:P22G001 和 P22G002 计算机型号:Dell Inspiron M4040/14-N4050
Information in this document is subject to change without notice. © 2011 Dell Inc. All rights reserved. Trademarks used in this text: Dell™, the DELL logo, and Inspiron™ are trademarks of Dell Inc. 2011–03 Regulatory model: P22G Regulatory type: P22G001 and P22G002 Computer model: Dell Inspiron M4040/14-N4050
15. 3-in-1 Media Card Reader
21
16. Microphone
17. Audio-out/Headphone connector
20
18. Audio-in/Microphone connector
19. Optical-drive eject button
19
20. Optical drive
本文件中的資訊如有變更,恕不另行通知。 © 2011 Dell Inc. 版權所有,翻印必究。 本文中使用的商標:Dell™、DELL 徽標 和 Inspiron™ 是 Dell Inc. 的 商標。 2011–03 法規型號:P22G 法規類型:P22G001 和 P22G002 電腦型號:Dell Inspiron M4040/14-N4050
Views
视图 | 視圖 | 本体図 | 모습
25
24 23
1
2 3
4 5 6 7
8
9
10
Features
1. Security cable slot
2. Power button
3. Function key row
4. Network connector
5. VGA connector
22
6. HDMI connector
La información que se proporciona a continuación aparecerá en el dispositivo que se describe en este documento, en conformidad con los requisitos de la Norma Oficial Mexicana (NOM):
Uniquely Dell
/manuals |
Printed in China
Connect the network cable (optional)
连接网络电缆(可选) | 連接網路纜線 (可選)
ネットワークケーブルを接続します(オプション) | 네트워크 케이블 연결(선택사양)
• To contact Dell for sales, tech support, or customer service issues, go to /ContactDell. Customers in the United States, can call 800-WWW-DELL (800-999-3355).
その他の情報
• ご使用のラップトップで利用できる機能と詳細なオプショ ンを確認するには、スタート → すべてのプログラム → Dell Help Documentation (Dell ヘルプ文書)をクリッ クするか、/manuals にアクセスし てください。
Importador: Dell México S.A. de C.V. Paseo de la Reforma 2620 - Piso 11° Col. Lomas Altas 11950 México, D.F.
Número de modelo reglamentario: P22G Voltaje de entrada: 100 a 240 VCA Corriente de entrada (máxima): 1,5 A/1,6 A/1,7 A Frecuencia de entrada: 50 a 60 Hz Corriente nominal de salida: 3,34 A/4,62 A Voltaje nominal de salida: 19,5 VCC Para obtener información detallada, lea la información sobre seguridad que se envió con el equipo. Para obtener información adicional sobre prácticas recomendadas de seguridad, visite /regulatory_compliance.
Connect the power cable
连接电源电缆 | 連接電源線
電源ケーブルを接続します | 전원 케이블 연결
Quick Start
快速入门 பைடு நூலகம் 快速入門 クイックスタート | 빠른 시작
Press the power button
按电源按钮 | 按下電源按鈕
電源ボタンを押します | 전원 단추 누르기
기능
1. 보안 케이블 슬롯 2. 전원 단추 3. 기능 키 행 4. 네트워크 커넥터 5. VGA 커넥터 6. HDMI 커넥터 7. USB 2.0 커넥터 8. 터치패드 단추(2개) 9. 터치패드 10. 키보드 11. 전원 표시등 12. 하드 드라이브 작동 표시등 13. 전지 상태 표시등 14. 무선 상태 표시등 15. 3-in-1 매체 카드 판독기 16. 마이크로폰 17. 오디오 출력/헤드폰 커넥터 18. 오디오 입력/마이크로폰 커넥터 19. 광학 드라이브 꺼내기 단추 20. 광학 드라이브 21. USB 2.0 커넥터(2개) 22. AC 어댑터 커넥터 23. 카메라 24. 카메라 표시등 25. 디스플레이
7. USB 2.0 connector
8. Touchpad buttons (2)
9. Touchpad
10. Keyboard
11. Power indicator light
12. Hard-drive activity light
13. Battery status light
14. Wireless status light
• デルのセールス、テクニカルサポート、またはカスタマー サービスへのお問い合わせは、/ContactDell に アクセスしてください。米国にお住まいの方は、 800-WWW-DELL(800-999-3355)までお電話くださ い。
자세한 정보
• 해당 랩톱에서 사용 가능한 기능 및 고급 옵션에 대한 자세한 내용을 보려면 시작→ 모든 프로그램→ Dell Help Documentation(Dell 도움말 설명서)을 클릭하거나 /manuals로 이동합니다.