在线练习环境配置说明 - 畅捷通创学云平台
畅捷通T+体验中心操作手册
畅捷通 T+体验中心操作手捷通 T+体验中心操作手册
7、如点击生管委外
8、如点击会计
畅捷通 T+体验中心操作手册
畅捷通 T+体验中心操作手册
9、如点击出纳
北京天龙用友实施服务部
2019 年 4 月 19 日
畅捷通 T+体验中心操作手册
畅捷通 T+体验中心操作手册
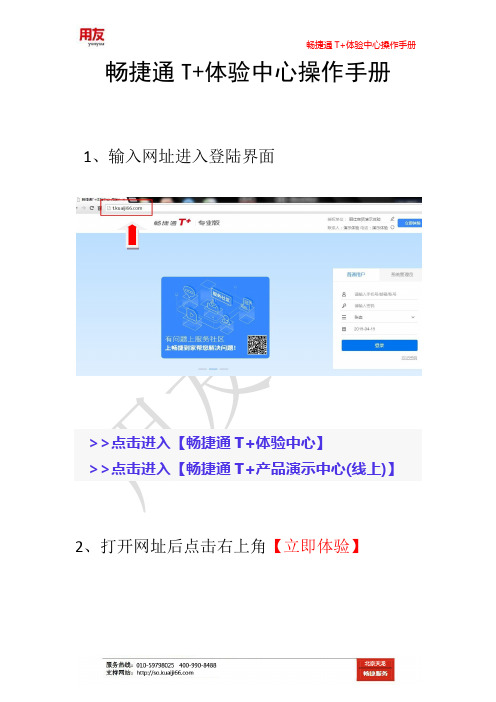
1、输入网址进入登陆界面
>>点击进入【畅捷通 T+体验中心】 >>点击进入【畅捷通 T+产品演示中心(线上)】
2、打开网址后点击右上角【立即体验】
畅捷通 T+体验中心操作手册
3、请选择体验的角色: 系统预置“账套主管”、“采购主管”、“销售主 管”、“生管委外”、“会计”、“出纳”等六种不同 体验角色,按不同角色登录体验 T+不同的功能。
CCTR-E 在线练习测试系统使用手册(学生端)

平台操作使用说明(考生端)系统考生端可实现考生在线测试和练习功能。
考生在指定时间到指定的考场机房,通过个人学号和密码登录系统参加在线测试(若系统管理员取消IP限制,学生可在任意能访问服务器的网络中登录系统参加测试)。
或下载安装学生练习操作端,通过个人学号和密码登录系统参加在线练习。
初始密码由管理员统一设定,学生用户登录后,可自行修改,密码只能录入数字,字母及下划线。
学生在指定时间和考场登录平台后,点击【在线测试】按钮进入考试界面,或点击【在线练习】按钮开始在线学习。
1.在线练习学生用户点击【在线练习】后,界面中显示课程任课教师开放上传的课程试题库,点击要学习的课程包,进入课程。
进入课程后,系统会提示学生选择将要进入的练习模式:选择开始新练习后,课程界面显示任课教师当前开放给学生的章节和题型信息以及各章节题型对应的试题量。
学生自行选择要练习的章节和题型,点击【开始】进入练习界面。
右上角为学生信息和课程信息。
左侧为试题导航区,右侧为答题区,考生可点击左侧题目列表进行试题的切换,系统会根据当前题型加载适当的答题控件,单项选择为单选按钮,多项选择为多选按钮,判断题为单选按钮,其他题型为文本框,主观题支持数学公式以及图形的在线编辑。
学生完成答题后,点击【结束练习】,系统会将试题答案加载到试题题目区,用户检查自己的答题情况。
学生的练习情况也会实时统计到任课教师的客户端中,让老师及时掌握学生的学习情况。
2.在线测试学生以学号登录后,点击【在线考试】,核对考试课程名称,学号及姓名无误后,点击确定进入选择试卷界面。
选择试卷主界面显示考场管理员给考场添加的试卷,考生可查看所有试卷的题型以及题量,考生可任意选择一套试卷开始答题(注:选择试卷不能超过5分钟,如超过5分钟考生仍没有选择试卷的话系统将会随机为考生选择一套试卷并强制开始倒计时答题),当确定要答的试卷后,点击【开始答题】按钮即可。
系统设定每套试卷在学生端电脑上的试卷编号是随机显示的,且考场内相邻两考生的试卷安排顺序不同,这样可保证考生抽取同一试卷编号,试题内容是不同的。
Studentnet Cloudwork Dashboard 用户手册说明书

STUDENTNETCloudwork Dashboard User ManualMake the Cloud Yours!Studentnet Technical Support 10/28/2015Contact :*******************+61 2 2981 1626User manual for the Cloudwork Dashboard introduced in January 2015 and updated in October 2015 with the new reporting capabilities.Cloudwork User ManualTable of ContentsLogging In and Out (3)User Management (4)Creating a New User (4)Editing Users (6)Change Password (6)Silent Inspection (6)Recovery Info (7)Delete User (7)Bulk User Add (7)Bulk User Add – Encrypted Passwords (8)Organisational Units (9)Creating a new Organisational Unit (9)Google Apps Domains (11)Adding a Google Apps Domain (11)Groups (12)Adding Groups (12)Bulk Group Upload (12)Sync Profiles (14)Base Settings (14)User Settings (16)Group Settings (17)Advanced Settings (19)Reports (20)Summary (20)User Activity Report (21)Admin Activity Report (22)Appendix A - Google Apps API Access (24)Logging In and OutLogging into your dashboard is the first step that needs to be done to be able to administer your domain.The URL for your dashboard will be issued to you when the setup if completed. Going to this URL will take you to your own SSO login page or if you are already logged in you will go straight to the dashboard. If you need to login then your normal login will now suffice.If you do not have access please contact Cloudwork to be given appropriate access to the system.Upon successfully logging in you should be presented with the following options.Figure 1 - Dashboard OverviewUser ManagementUsers can be accessed through the front panel or via the side menuFigure 2 - User MenuClicking on the active users link or the Users side menu will give a listing of all of the users in the system.Creating a New UserYou should only need to manually create users for administrative purposes to this dashboard or to create special users that are not synchronised by normal processes.To create a new user simply click on the “Add new user” link either on the home page or on the top menu after clicking on Users in the side menu.Figure 3 - User Top MenuYou will then be presented with the User Creation screen.Figure 4 - New User FormEmail-Thismustbeavalidemailaddress,********************************.Ifyouwiththis use to be available in a Google apps domain then it must have the same domain as the google apps domain you with to synchronise withUser Name - This will be the user name that the user will use to log in with.Role - This will indicate what role this user will have. This will be sent to service providers, some service providers will give different access levels based on what this value is. Default dropdown values areTeacherStudentAlumParentPlease note: Currently all users that are marked at Alum or Parent are not considered chargeable in Cloudwork.Status - By default there are three possible statusesActive: Ordinary user.Administrator: Can access this control panel .Suspended: Prevented from logging in to any serviceAfter filling in these details you will be prompted to give the user a password. Once you do that the new user will be ready.Editing UsersEditing users in this interface is not recommended if you have synchronisation running. Any changes made on the directory will be reflected automatically. This will remain the place to make changes to manual users or special users that are not automatically synchronised. The options on the form remain the same as the Create user form which is described in detail above.There are, however other options that are available to use, some of these will depend on the options that are available to your institution.Figure 5 - Edit User menuChange PasswordThis will allow you to change the password of a user. If the user is being synchronised then this will force the password change back to the directory. If this user is not being synchronised it will only be reflected for this system.Silent InspectionSilent inspection will allow an administrator to set a temporary password that will also work for that user’s account. This will work for one login or 1 hour (configurable) whichever comes first. This is designed to let an administrator to login as a user without having to change a user’s password.This feature is not on by default and needs to be specifically requested to be activated.Recovery InfoThis is the information that the user has listed for their password recovery. You can view and edit what they entered so they can recover a lost password without need of administrative intervention.This option will only be enabled if Password recovery is enabled for your domain.Delete UserThis will delete the user from the Cloudwork system. It will also delete the user from any service provider that Cloudwork is provisioning accounts in (eg Google Apps), if it is supported. It will not delete the user from the directory.If this user is synchronising with a directory then it will remain deleted. If you wish to prevent someone from logging in through the Identity provider then it is better to set the status of the user to Suspended.You will be presented with a confirmation screen before the delete is actioned. Use this function with care.Currently the ability to undelete users is under development.Bulk User AddUnder the user menu is ability to add a bulk list of users. This is generally for users that will not exist in the directory such as parents.To use this facility it will require a csv of the users in a format so that the system can use it.Your CSV file should contain the following headings:Email, User Name, First Name, Last Name, Password, RoleFor exampleEmail, User Name, First Name, Last Name, Password, Role*********************.au,principal,School,Principal,pri2009,teacher********************.au,joeblogs,joe,blogs,joe2009,teacher*********************.au,SN1234,Alfred,Student,as2010,studentThe following email accounts will be created:*********************.auwithapasswordofpri2009********************.auwithapasswordofjoe2009*********************.auwithapasswordofas2010,andaSSOusernameofSN12345678Valid roles must be chosen from the following list:∙Student∙Alum∙Teacher∙ParentBulk User Add – Encrypted PasswordsAs a new feature you can now do a bulk user upload with the password being already encrypted. Currently supported encryption formats are BCrypt, SHA1 and MySQL Passwords.To enable the Encrypted Password feature simply adjust the headings to beEmail, User Name, First Name, Last Name, Encrypted Password, RoleThis will tell the upload facility that the password is already encrypted and it does not need to do any further encryption.Organisational UnitsOrganisational Units (OU’s) are used to keep distinct groups inside the same institution into separate containers so they can be more easily administered. This can be illustrated by an example structure in the image below.Figure 6 - Organisational Unit Side MenuYou can create OU’s to for manually created users to live in. Most OU’s will be created by the automated synchronisation process.Clicking on any OU in the side menu will give you a list of the users that are contained inside that OU.Creating a new Organisational UnitTo create a new OU simply click on the Organisational Unit link on the sidebar. This will give you a new link in the top menu to Add New.Once in the “add new” screen it will look something like the below.Figure 7 - New Organisational Unit FormName - This is the name of the OU that will be displayed.Parent - This will determine which OU this new OU will live within. For example in Figure 6 above the Administration OU’s Parent is the Staff OU.Description - This is a description for reference of the user to be able to know what the OU is being used for.Google Apps DomainsThis menu item allows you to view and edit your Google Apps Domains.Adding a Google Apps DomainThe add screen will require some details about your Google Apps domain. Once this is completed there is an additional step that needs to be done for it to correctly be able to communicate with your Google Apps Domain. This is a manual Step required by Google to complete that we need to do at the server side end. You can request we do this for you or you can follow the instructions in Appendix A.Figure 8 - Google Apps Domain AddDomain Name - This is the Google Apps domainAdministrator Account - This needs to be a Super Administrator account no password details are required, just the full email address of the account name.GroupsGroups can represent Security or Distribution Groups that exists in your directory or School Management System. They can also be manually created groups. The can serve as email groups or attributes for use by service providers or any number of other purposes.Adding GroupsGroups can be added in the normal process of synchronising users in Sync Profiles or they can be added manually inside the dashboard.Adding a new group Manually will show the following form.Group Name - This is the full name of the group. If this is intended to be an email distribution group this needs to be a full email address.Friendly Name - This is the name that will be displayed when using the group.Description - This is a description that will only be visible to this dashboard for reference of administratorsEmail Permission - This is the permissions that apply to email groups as to who can send email to them. The options available are listed below.∙Anyone can send to group∙Anyone within the domain can send to the group∙Only group members can post∙Only Teachers can postBulk Group UploadThe other option for creating groups manually is through the bulk upload facilityYou can create a CSV file with the user account information using spreadsheet programs like Microsoft Excel or OpenOffice Calc. Your CSV file should contain the following headings:Group Email Address, Member Email AddressFor exampleGroup Email Address, Member Email Address*******************.au,*********************.au*******************.au,********************.au*******************.au,*********************.auThe following groups will be created or added to:class-1*********************.auclass-2*********************.au********************.auValid roles must be chosen from the following list:∙Student∙Alum∙ Teacher∙ParentSync ProfilesSync profiles are the profiles used to connect to a directory and automatically synchronise users. They are setup to collect both users and groups automatically every 3 minutes to collect anything that has changed in the period since the last time it synchronised.To setup a sync profile it is recommended you consult with Cloudwork to make sure you will be adding the correct information.Base SettingsBase settings will determines what server we are connecting to and what authentication we are using to do the synchronisation with.Figure 9 - Sync Profile Base SettingsDescription - This is only for the administrator’s reference.Sync Type - Determines what objects are being synchronised. Options available are∙Accounts∙Groups∙BothIt is recommended that Sync Profiles are setup to do either accounts or groups only. Using the “Both” option is a more advanced option.Role - This will be the default user type that anyone inside this profile will be imported with. Available options are:∙Student∙Alum∙ Teacher∙ParentLDAP Server - The is the address of the LDAP server it can be in the form of an IP address or a domain name. To use a non standard port simply put the port on the end of the domain/IP eg to connect to the server on port 1234 you would enter ldaps://.au:1234If you do not put ldaps:// at the start we will assume ldaps:// for the protocol.If you wish to use ldap:// you must include that in the domain/IP that you put into this field. While we support it we do not recommend it.NB for Password Reset to work LDAPS MUST be in use.LDAP User - This is the user that has permission to be able to connect to the server. It is recommended that this be a user specifically designed for this connection. This is in the form of the distinguished name of the user, and will look something like the below example.CN=St Ldap,CN=Users,DC=schooltest,DC=studentnet,DC=edu,DC=auThis user will need read access to the domain that it will be connecting to, and if Password Reset is enabled it will need the “Reset Password” permission on the domain also.LDAP Password - This is the password of the previously entered user.User SettingsUser settings are required if the sync is set to pick up Accounts, this will give us the container that we are looking for users to synchronise. And the attributes that we will be looking at to be correctly set users up.Most of the attribute fields will be pre filled in with defaults for Active Directory. Unless you have a differing configuration then it recommended to leave them as they are. In which case the only setting required will be the Search Container.Figure 10 - Sync Profiles User SettingsSearch Container - This is the base OU that we will search in for user accounts. This is always presented in the form of a distinguished name. All OU’s below this will also be searched.If this is being setup for a Group Sync then this field needs to be added so we know where to collect the user that belong to that Group.Mail Field - This is the Attribute that contains the email address of the user. Default: mailUsername Field - This is the username attribute that a user will use to log in to most systems with. Default: sAMAccountNamePassword Field - This is the hashed password field that is saved via ADI. Default: hashedpasswordGUID Field - This is the immutable ID of the user. Default: objectGUIDFirst Name Field - This is the field containing the first (given) name of the user. Default: givennameLast Name Field - This is the field containing the last name (surname) of the user. Default: snGroup SettingsThese are the settings that will allow the synchronisation of group out of the directory.Figure 11 - Sync Profiles Group SettingsSearch Container - This is the base OU that we will search in for groups. This is always presented in the form of a distinguished name. All OU’s below this will also be searched.Friendly Name Field - This is the friendly name of the group that users will see when it is presented to them. Default: cnWhile this default is appropriate for things like email groups, if you are using groups for permissions in service providers like ClickView or Complispace then it is recommended to change this to “dn”Group Email Field - This will be the full email address of the group. If the field is not in the form of an email address it will have the default domain attached to it. So if it is set to samaccountname then it *****************************************.au.If all of the groups that require synchronisation have their own mail attribute then you can set this to mail.NB if this attribute is blank on the group in the directory then it will not be synchronised.Default Group Type - This is the default group settings that will apply to email groups when they are created. Options that are available are.∙Anyone can send to group∙Anyone within the domain can send to the group ∙Only group members can post∙Only Teachers can postAdvanced SettingsAdvanced settings revolve around the setup of email domains and other such issues that arise from mail attributes that may not have enough information.It is recommended that you consult with Cloudwork about making adjustments to these settings.Figure 12 - Sync Profiles Advanced SettingsDomain - This will be the default domain of any email addresses that need to be created for either users or groups. This will be used if the group does not have a proper email address in it’s set “Group Email Field”Force Mail Domain - This option will force all users to have the set domain as their email domain. This is mainly used of the mail attribute of user does not contain a valid email address.Eg for a domain all users at school (.au) have the mail attribute in the***************************.Whilethisisintheformatofanemailaddressitwillnotworkasan email address. In this case if “Force Mail Domain” is checked then it will import that email address as ******************************.edu.auinstead.Care needs to be taken when using this flag.ReportsReports are designed to give you as an administrator an overview as to what systems are being most frequently used and what activity has been going on in the system.SummaryThis is the graphical representation of the activity that has been happening over the past 7 days. You can see trends of when people are logging in and when. Synchronisation stats are included to show you what has been updated for each Sync Profile. An example of this page is below:User Activity ReportThis report you can customise to show the information that you are interested in the format is below:The Report includes:Event – This outlines what the user did, either Authentication (Logging in for the first time), Authorisation (Logging into a service) or Authentication Failed (Bad username and/or Password)IP Address – The IP that the user logged in from.The date and time is also shown.You can filter this search with the following options:From and To: These are the date fields that allow you to choose a date range for your events toshow for. Clicking on the brings up a calendar to allow you to pick a date, clicking on thewill allow you to choose a time. You can also adjust the values in the box directly.For User: This will narrow the search down to a single user. As you begin to type it will show you options that match what you are currently typing.For SSO Service: This is a dropdown which will allow you to choose the Service that you are interested in.For Event: Allows you to choose what the user did, either Authentication (Logging in for the first time), Authorisation (Logging into a service) or Authentication Failed (Bad username and/or Password)Admin Activity ReportThis option shows a report on activity inside this administration console. It looks as per the belowThe Report includes:Event – This outlines what the user did, from creating users, editing users, deleting users, changing passwords, or silent inspection etc.IP Address – The IP that the user logged in from.The date and time is also shown.Options for filtering the report as below:From and To: These are the date fields that allow you to choose a date range for your events toshow for. Clicking on the brings up a calendar to allow you to pick a date, clicking on the will allow you to choose a time. You can also adjust the values in the box directly.For User: This will narrow the search down to a single user. As you begin to type it will show you options that match what you are currently typing.For Event: This allows you to choose an administration event, the options are show above.Appendix A - Google Apps API Accesshttps:///auth/admin.directory.group,https:///auth/admin unit,https:///auth/er,https://www.googleapis. com/auth/admin.reports.audit.readonly,https:///auth/age.re adonly,https:///auth/drive,https:///auth/spreadsheets,ht tps:///auth/apps.groups.settings,https:///feeds/,http :///m8/feeds/。
平台使用手册说明书

平台使用手册2020年7月目录1.文档概述 (1)1.1.编写目的 (1)1.2.浏览器推荐 (1)2.操作说明 (1)2.1.平台注册 (2)2.2.平台登录 (3)2.3.选课——课程中心 (4)2.4.选班——网络班级 (8)2.5.个人中心——学习 (11)2.5.1.我的课程 (11)2.5.2.我的网络班级 (13)2.5.3.课程在线学习 (15)2.5.4.我的证书 (26)2.5.5.调查问卷 (27)2.6.个人中心——动态 (28)2.7.个人中心——消息 (29)2.7.1.通知公告 (29)2.8.个人设置 (30)2.8.1.个人基本信息修改 (30)2.8.2.更换头像 (31)2.8.3.密码修改 (32)1.文档概述1.1.编写目的本手册旨在为国家卫生健康委干部培训中心远程教育培训平台学员提供关于系统的使用说明和注意事项,以使各位学员可以更高效、安全的在平台中进行操作及查询等。
1.2.浏览器推荐为了能更好的访问平台,建议您使用谷歌浏览器、360浏览器极速模式、极速浏览器极速模板等谷歌内核浏览器。
2.操作说明学员在浏览器下输入地址:/cms/,即可打开网站门户页面。
通过该门户系统可以查看管理员发布的新闻公告、培训通知等内容。
同时还可以通过门户系统查看报名管理员推荐的课程资源以及培训班级资源等。
除此之外,还可以在该门户页面中登录到学员工作室,进行在线课程学习,交流互动,如果没有相应账号可以通过点击“注册”按钮,在线立即完成账号注册,账号注册无须管理员审核。
2.1.平台注册点击门户页面的上方的注册按钮,进入到以下注册页面。
根据页面提示输入相应内容,点击注册。
注册成功后,无须管理员审核直接生效。
点击登录,输入用户名密码进行登录操作即可。
2.2.平台登录在用户登录区内输入用户名、密码、验证码,点击登录按钮,即可完成登录操作,登录后显示该学员报名的课程、班级数据,点击“进入个人中心”可跳转到个人工作室。
平台用户手册目录
平台用户手册目录1.网站前台1-1.注册登录1-2.学习中心模块(学员)1-3.我的教学(教师)1-4.笔记模块1-5.私信管理1-6.搜索1-7.加入课程学习、评价1-8.讨论模块2.网站后台2-1.用户模块2-2.课程模块2-3.运营模块2-4.教育云模块2-5.系统模块3.分校功能3-1.加入分校3-2.我的学习(学员)3-3.我的教学(教师)3-4.管理员权限前台:注册登录模块:所有用户的登录注册是一样的进入网站首先注册官网注册登录地址:登录注册,用户可以通过手机或者邮箱、或者qq和微信进行登录注册,注册完成后用户需完善信息后方可进入网站观看视频用户在注册成功后,可以在个人设置中修改自己的信息个人设置:学习中心模块学习中心(学员):我的教学(教师)笔记模块:学员在可以在观看课程的同时记录下自己的当时的想法,以便随时能翻阅私信管理搜索加入课程学习、评价讨论模块后台用户模块用户管理:管理平台所有用户的权限如上图所示,查看用户登录日志教师管理:显示所有教师,可以设置为推荐教师,设置完推荐教师后,该教师会在平台首页显示实名认证:审核用户的真是身份,如果用户提交的身份为真则通过审核,否则不通过,通过审核后,将给与认证过的用户一些优惠私信管理:前台有私信模块,这块的私信管理,就是对每个用户发的私信进行管理,查看是否有违规内容分校管理:平台首页有院校,此处是管理院校,添加院校,添加院校的管理员,添加院校的分类,和分校的操作日志课程管理模块课程管理:可以设置推荐课程,设置完推荐课程,这么课程讲优先显示在平台首页,也可以发布和删除课程话题管理:可以查看和删除话题问答管理:若有未回答的问题,可以提醒该课教师去回答,若此问答有不文明词汇也可以删除此问答笔记管理:对平台所有的笔记管理,若笔记中有不文明词汇也可删除此笔记评价管理:平台所有的评价将在此处显示,在此处进行管理分类管理:针对于不同的课程属于不用的类别,此处添加分校和子分类,修改,删除,添加分类后可以设置是否显示,设置为显示则到平台首页课程分类中显示运营模块资讯管理:对平台资讯的发布,取消发布进行管理,可以移到回收站后不显示此条资讯小组管理:可以查看小组,关闭小组,转移小组,转移小组是把小组转给某个人邀请管理:查看用户邀请的人数,并给与一定得奖励网站公告管理:发布一些通知编辑区管理:对象站首页进行改版,可以添加模块,图片等内容,改完之后会到首页显示移动端管理:设置移动端的轮播图,设置移动端的精选课程,设置移动端的发现栏目中,添加分类:这些设置完成后将在移动端显示教育云模块系统模块站点设置:对平台的基本信息进行设置,选择网站首页显示所用的主题,邮件服务器的设置,邮件服务器设置成功,就可以发邮件给用户,也可以自检。
畅捷通T+标准版发版说明

支持销售预测业务。
支持会员积分。
支持销售单品促销业务。
支持按发票总额来选销货单开票业务。
支持按月结、现结、订金、固定期限等多种客户结算账期管理方法,并对客户交货期控
制与延期预警,精准预测未来资金流入量。
按需(客户代理等级、客户协议、部门、计量单位)定制灵活的销售价格策略,提供实
时价格、多成本下毛利参考与最低售价控制,支持特殊折扣处理要求。
严格对销售全程按客户信用额度、期限和业务员信用额度内控管理与预警。
提供不同销售岗位要求的各种多维度统计分析报表,支持销售订单全程业务环节追踪查
询。
最低售价可设置控制时点是保存还是审核;当有审核流时,只在第一个审批环节进行控
制;
24采购管理
灵活、方便处理各种采购业务,关注价格、结算账期、到货期等关键环节管控与业 务全程跟踪,实时参考多种价格与自动采购成本计算,形成应付账往来管理,提供不同 采购岗位的多角度统计分析报表。
丰富的存货、客户档案信息灵活自定义。
支持按需自定义业务流、单据编码、内容、格式、审核环节、常用功能和“我的工作台”。 提供强大的管理报表自定义统计分析方案。
支持按用户组与用户的功能、数据、字段细致的权限控制。
同时提供文档帮助,帮助您迅速了解产品应用。
待审批业务与风险信息的集中预警。
提供根据档案、表头、表体数值型字段计算数量的机制,可实现客户更多个性化需求,
存货参与中的可用量、 现存量按明细仓库取值,当明细无仓库时,按表头仓库
取值。
存货参照中增加多计量单位的“可用量说明和现存量说明”,对于现存量为65
瓶,可显示为“10箱5瓶”。
往来单位:
为了避免用户对“供应商报价含税”信息忽略,造成后续业务数据错误,将此 字段从布尔型改为枚举型,必须让用户确认选择,此字段支持记忆
高校邦平台使用手册说明书
高校邦平台使用手册【老师PC端】目录目录 (2)一、平台概述 (3)二、课程中心 (5)1.新建课程 (5)2.课程信息 (5)3.课程资源库 (7)4.课程章节内容 (8)5.课程教学管理 (28)6.课程考试 (35)7.班级成员 (38)8.教学辅助工具 (39)9.成绩管理 (43)三、校管中心 (44)1.用户管理 (44)四、数据中心 (50)1.学校总览 (50)2.课程分析 (50)3.老师分析 (51)4.学生分析 (51)5.导学-学生分析 (52)五、云应用中心 (53)1.精益实训 (53)2.跟随式编程 (54)23一、 平台概述学生可通过首页浏览学校风采、名师风采、公告等咨询信息,通过课程广场浏览学校的所有课程,通过我的学习开始课程学习。
老师端需要管理员进行权限配置,如果管理员已经为您的账号配置了老师权限,在页面右上角可以看到“去老师端”按钮,点击即可切至老师端。
老师端主要包含三大子系统:“课程中心”、“数据中心”、“校管中心”,只有拥有相关权限的账号才能看到相应模块。
45 二、 课程中心1. 新建课程课程创建方式主要有两种,一种是点击“创建”按钮直接新建一门课程,一种是点击“复制”按钮复用一门已有的课程。
可根据自身需要自由选择建课的方式。
2. 课程信息点击编辑可修改课程信息,课程信息主要包括:课程的名称、封面、起止时间、介绍、授课老师、学分、可试学章节数量、成绩考核权重、课程授权设置等。
673. 课程资源库点击教学管理,点击左栏课程资源,即可进入该课程的资源库。
主要包括视频库、习题库、文档库、编程题库、幻灯库等。
其中视频库支持批量上传、断点续传等;文档库支持图片、文档等多种常见文件格式; 习题库支持批量管理,支持单选多选判断题。
84. 课程章节内容点击教学管理,点击左栏章节内容,即可进入该课程的章节内容建设。
还可在此修改教学模式,分开放学习、传统学习、顺序学习、条件闯关。
Teamcenter环境定制和设置
Teamcenter环境定制和设置1.查看Teamcenter培训需要的环境变量步骤1:选择开始→所有程序→Teamcenter8→命令提示符。
步骤2:在Teamcenter的命令提示符窗口中,键入以下命令:set TC|more 步骤3:确定下列环境变量的值TC_BINTC_DATATC_INCLUDETC_ROOT修改tcCustEnvVars.bat文件以匹配您的环境步骤1:编辑STUDENT_HOME\ COMMAND\ tcCustEnvVar.bat文件。
步骤2:根据需要更新任何环境变量:TC_ROOT= TC_ROOTTC_DATA= TC_DATAJAVA_HOME= JAVA_HOME步骤3:保存文件并退出编辑器。
2.创建tcCustDev命令行快捷方式步骤1:右击我的计算机选择属性。
步骤2:选择高级选项卡,然后选择环境变量。
步骤3:在用户变量部分,选择新建,弹出新建用户变量对话框。
步骤4:在变量名中输入ES_DEV_HOME。
在变量值中输入STUDENT_HOME。
步骤5:选择确定并关闭三个对话框。
步骤6:在STUDENT_HOME\ setup_files\command下找到tcCustDev.bat 。
步骤7:右键单击tcCustDev.bat并选择发送到- >桌面(创建快捷方式)。
重命名和测试快捷方式第1步:重命名该快捷方式tcCustDev。
第2步:双击tcCustDev快捷方式。
第3步:在tcCustDev命令提示符窗口中,设置MS型。
第4步:验证以下环境变量设置:MSDEV_HOMEMSVCDir3.创建Teamcenter新的用户账号启动Teamcenter的胖客户端第1步:选择开始 - >所有程序 - >Teamcenter 8 - >Teamcenter 8 。
第2步:输入infodba到用户ID框中。
第3步:输入infodba到密码框。
畅捷通 T+连接器安装及使用手册说明书
畅捷通T+连接器安装及使用手册百望股份有限公司变更记录:版本作者修改明细日期V1.0 郭凯畅捷通T+连接器初稿2020-06-30目录1.概述 (4)1.1.编写目的 (4)1.2.适用人员 (4)1.3.业务术语 (4)2.安装部署 (4)2.1.部署清单 (4)2.2.部署环境 (5)2.3.安装步骤 (5)3.系统操作使用 (8)3.1.登录界面 (8)3.2.配置数据源 (9)3.3.流水单及发票查询 (10)3.4.删除流水单 (11)4.服务操作说明 (11)4.1.服务信息说明 (11)1.概述1.1.编写目的本文档是为项目涉及的系统与服务部署提供指导。
通过阅读文档运维人员可以明确项目所涉及的系统、服务的部署方式和具体操作流程。
1.2.适用人员本文档的阅读对象是甲乙双方的运维人员。
1.3.业务术语序号术语名称术语含义1 畅捷通T+ 是指用友网络科技股份有限公司的畅捷通T+系列ERP软件系统,适用于13.0和15.0版本2百望云是指百望股份有限公司的电子发票云平台3 连接器是指将畅捷通T+与百望云数据进行连接的相关程序45672.安装部署2.1.部署清单部署清单包括:百望云桌面安装;畅捷通T+连接器安装;2.2.部署环境部署环境是指百望开票助手和畅捷通T+连接器的安装部署环境,目前百望开票助手只支持windows操作系统。
因为畅捷通T+是定时从畅捷通T+系统获取开票单据信息并自动上传百望云,故要求其部署的环境须处于长时间开机状态,并能对接外网,连接云端百望云平台,建议选择一台windows专用开票服务器。
2.3.安装步骤1、下载百望云桌面下载地址:/mainsite-new/resourceLibrary/documentCenter找到百望云桌面,点击立即下载双击安装2、安装畅捷通T+连接器在百望云桌面首页点击应用市场点击应用市场找到畅捷通T+连接器点击后在弹窗上点击我要使用安装完成后将自动弹出登录页面3.系统操作使用3.1.登录界面在百望云桌面首页点击畅捷通T+连接器弹出连接器登录界面填写数据库的服务器ip和用户名、密码,然后点击【测试连接】连上数据库,即可带出账套数据库,选择账套数据库后进行【登录】后进入下述配置数据源界面。
用友畅捷通T-CRM安装说明
T-CRM安装说明一、安装步骤 (2)第一步、安装配置 (2)第二步、数据库安装 (3)第三步、系统文件安装 (5)二、安装注意事项 (6)三、安装常见问题 (7)1.启动服务时不能正常启动 (7)2.不能通过HTTP访问系统 (7)3.HTTP静态页面可以访问,但不能访问系统 (7)4.登录后没有报错立即回到登录页面 (7)5.登录后除首页以外不显示任何对象 (7)6.第一次进入到系统时,用户名和密码什么? (7)7.如果用户忘记密码应该怎么办? (8)一、安装步骤T-CRM采用了向导式安装,分为三个步骤:1.安装配置:包括许可协议确认,用户信息填写,安装路径选择及安装端口确认。
2.根据本地数据库服务器情况,选择数据库安装方式。
3.等待系统文件安装完毕后,即完成安装。
完成以上三个步骤,成功安装T-CRM后,请参考《T-CRM使用手册》开始使用T-CRM系统。
第一步、安装配置●首先,请您了解T-CRM推荐配置,如下:●当您拿到T-CRM安装光盘后,请在安装引导界面点击“安装T-CRM”按钮或者在安装目录下双击安装文件setup.exe。
●开始T-CRM安装过程,顺序点击“下一步”,然后选择“我接受许可证协议中的条款”,填写您的用户名和公司名称,浏览“目的地文件夹”,如果需要,请修改T-CRM安装目录路径,参考安装页面提示信息,填写符合要求的端口号,点击“下一步”。
注意:●系统默认的端口号为8000,此处建议客户采用系统默认值。
如果端口号被占用,请修改端口号为1024—65535之间。
第二步、数据库安装安装文件可自动检测本地数据库服务器配置情况。
●首次安装如果本地没有安装过Mysql数据库,安装文件将安装Mysql数据库,默认登录密码为root。
非首次安装如果安装文件检测到安装目录下的Mysql服务器,首先请输入连接信息,登录到Mysql 服务器。
然后系统会检测是否存在T-CRM数据库,如果存在,提示是否覆盖。
- 1、下载文档前请自行甄别文档内容的完整性,平台不提供额外的编辑、内容补充、找答案等附加服务。
- 2、"仅部分预览"的文档,不可在线预览部分如存在完整性等问题,可反馈申请退款(可完整预览的文档不适用该条件!)。
- 3、如文档侵犯您的权益,请联系客服反馈,我们会尽快为您处理(人工客服工作时间:9:00-18:30)。
考试机环境配置说明
一、操作系统及内存
1.Windows XP sp3
2.内存1GB及以上
二、IE8浏览器
注意,此考试平台只支持IE8浏览器(不支持360、火狐等浏览器),且只能是IE8。
如果不是IE8请下载。
下载链接如下:
IE8浏览器的安装过程如下:
三、设置IE属性
1.IE浏览器升级为IE8后,还需要做一些属性设置,双击IE图标,系统启动IE向导
界面:
2.在帮助菜单下,查看IE版本,应为如下界面:
3.设置安全级别:设置可信站点的自定义级别为低
1)先单击“可信站点”按钮,再单击“默认级别”按钮,左侧出现级别滑块;
2)向下拖动级别滑块至“低”,单击“确定”按钮退出。
4.添加受信任站点:
1)先点击“可信站点”图标,再点击“站点”按钮,弹出可信站点添加框:
2)增加4个可信站点:
http://219.141.185.120
http://1.202.248.59
如下图所示
3)右下角的(https)的复选框不选。
5.高级选项设置:单击“高级”标签,勾选如图所示的选项。
6.检查常规选项设置
7.在“帮助”菜单右侧空白处右击鼠标,弹出快捷菜单如图,将“兼容性视图按钮”
前的对勾取消:
然后点击工具--兼容性视图设置
将下图中红框内的√去掉
8.主题设置:在桌面上右键单击鼠标,选择“属性”,设置主题为“经典”
四、按照要求设置好后,务必清空浏览器缓存后再进行同传操作。
点击删除按钮出现以下界面:
按上图勾选,然后点击删除按钮,关闭该窗口
最后点击确定即可。
五、考生机时间设置
同传之前将母机计算机时间调整为 2014年2月28日。
注意:考试期间母机时间不要随意改动,因为学生机会同步母机的时间,这个要注意。
六、检查显示分辩率是否为1024*768及以上。
七、下载安装报表控件
双击运行CellWeb5.exe文件,正确安装报表控件,否则无法操作报表题。
八、输入法除了系统自带的输入法,请安装“搜狗拼音输入法”等常用输入法;。