
交换机路由器命令
帧中继命令:
router(config)#frame-relay switching ;使能帧中继交换
router(config-s0)#encapsulation frame-relay ;使能帧中继
router(config-s0)#fram-relay lmi-type cisco ;设置管理类型
router(config-s0)#frame-relay intf-type DCE ;设置为DCE
router(config-s0)#frame-relay dlci 16 ;
router(config-s0)#frame-relay local-dlci 20 ;设置虚电路号
router(config-s0)#frame-relay interface-dlci 16 ;
router(config)#log-adjacency-changes ;记录邻接变化
router(config)#int s0/0.1 point-to-point ;设置子接口点对点
router#show frame pvc ;显示永久虚电路
router#show frame map ;显示映射
基本访问控制列表:
router(config)#access-list permit|deny
router(config)#interface ;default:deny any
router(config-if)#ip access-group in|out ;default:out
例1:
router(config)#access-list 4 permit 10.8.1.1
router(config)#access-list 4 deny 10.8.1.0 0.0.0.255
router(config)#access-list 4 permit 10.8.0.0 0.0.255.255
router(config)#access-list 4 deny 10.0.0.0 0.255.255.255
router(config)#access-list 4 permit any
router(config)#int f0/0
router(config-if)#ip access-group 4 in
扩展访问控制列表:
access-list permit|deny icmp <DESTINATIONIP
wild>[type]
access-list permit|deny tcp <DESTINATIONIP
wild>[port]
例3:
router(config)#access-list 101 deny icmp any 10.64.0.2 0.0.0.0 echo
router(config)#access-list 101 permit ip any any
router(config)#int s0/0
router(config-if)#ip access-group 101 in
例3:
router(config)#access-list 102 deny tcp any 10.65.0.2 0.0.0.0 eq 80
router(config)#access-list 102 permit ip any any
router(config)#interface s0/1
router(config-if)#ip access-group 102 out
删除访问控制例表:
router(config)#no access-list 102
router(config-if)#no ip access-group 101 in
路由器的nat配置
Router(config-if)#ip nat inside ;当前接口指定为内部接口
Router(config-if)#ip nat outside ;当前接口指定为外部接口
Router(config)#ip nat inside source static [p] <私有IP><公网IP> [port]
Router(config)#ip nat inside source static 10.65.1.2 60.1.1.1 Router(config)#ip nat inside source static tcp 10.65.1.3 80 60.1.1.1 80
Router(config)#ip nat pool p1 60.1.1.1 60.1.1.20 255.255.255.0 Router(config)#ip nat inside source list 1 pool p1
Router(config)#ip nat inside destination list 2 pool p2
Router(config)#ip nat inside source list 2 interface s0/0 overload Router(config)#ip nat pool p2 10.65.1.2 10.65.1.4 255.255.255.0 type rotary
Router#show ip nat translation
rotary 参数是轮流的意思,地址池中的IP轮流与NAT分配的地址匹配。
overload参数用于PAT 将内部IP映射到一个公网IP不同的端口上。
外部网关协议配置:
routerA(config)#router bgp 100
routerA(config-router)#network 19.0.0.0
routerA(config-router)#neighbor 8.1.1.2 remote-as 200
配置PPP验证:
RouterA(config)#username password
RouterA(config)#int s0
RouterA(config-if)#ppp authentication {chap|pap}
3.PIX防火墙命令
Pix525(config)#nameif ethernet0 outside security0 ;命名接口和级别
Pix525(config)#interface ethernet0 auto ;设置接口方式
Pix525(config)#interface ethernet1 100full ;设置接口方式
Pix525(config)#interface ethernet1 100full shutdown
Pix525(config)#ip address inside 192.168.0.1 255.255.255.0
Pix525(config)#ip address outside 133.0.0.1 255.255.255.252
交换机路由器命令
Pix525(config)#global (if_name) natid ip-ip ;定义公网IP区间
Pix525(config)#global (outside) 1 7.0.0.1-7.0.0.15 ;例句
Pix525(config)#global (outside) 1 133.0.0.1 ;例句
Pix525(config)#no global (outside) 1 133.0.0.1 ;去掉设置
Pix525(config)#nat (if_name) nat_id local_ip [netmark]
Pix525(config)#nat (inside) 1 0 0
内网所有主机(0代表0.0.0.0)可以访问global 1指定的外网。
Pix525(config)#nat (inside) 1 172.16.5.0 255.255.0.0
内网172.16.5.0/16网段的主机可以访问global 1指定的外网。
Pix525(config)#route if_name 0 0 gateway_ip [metric] ;命令格式Pix525(config)#route outside 0 0 133.0.0.1 1 ;例句
Pix525(config)#route inside 10.1.0.0 255.255.0.0 10.8.0.1 1 ;例句Pix525(config)#static (inside, outside) 133.0.0.1 192.168.0.8
表示内部ip地址192.168.0.8,访问外部时被翻译成133.0.0.1全局地址。
Pix525(config)#static (dmz, outside) 133.0.0.1 172.16.0.8
中间区域ip地址172.16.0.8,访问外部时被翻译成133.0.0.1全局地址。
交换机路由器配置命令
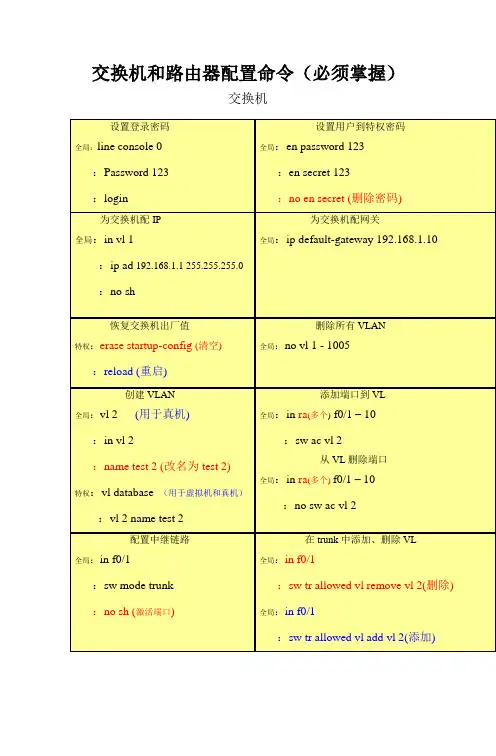
交换机和路由器配置命令(必须掌握)交换机设置登录密码全局:line console 0:Password 123:login设置用户到特权密码全局:en password 123:en secret 123:no en secret (删除密码)为交换机配IP全局:in vl 1:ip ad 192.168.1.1 255.255.255.0:no sh为交换机配网关全局:ip default-gateway 192.168.1.10恢复交换机出厂值特权:erase startup-config (清空):reload (重启)删除所有VLAN 全局:no vl 1 - 1005创建VLAN全局:vl 2 (用于真机):in vl 2:name test 2 (改名为test 2)特权:vl database (用于虚拟机和真机):vl 2 name test 2添加端口到VL 全局:in ra(多个) f0/1 – 10:sw ac vl 2从VL删除端口全局:in ra(多个)f0/1 – 10:no sw ac vl 2配置中继链路全局:in f0/1:sw mode trunk:no sh (激活端口)在trunk中添加、删除VL全局:in f0/1:sw tr allowed vl remove vl 2(删除) 全局:in f0/1:sw tr allowed vl add vl 2(添加)路由器以上命令是我认为学交换机和路由器必须要掌握的。
先就为大家收集这么多了,希望大家能好好学习。
当中可能会存在错误,如果大家发现请及时通知我。
谢谢~!SIT806——无敌精英班 班长留给路由器接口配IP全局:in f0/1:ip ad 192.168.2.2 255.255.255.0 :no sh配置单臂路由全局:in f0/0.1:encapsulation dot1q 1(VL1) :ip ad 192.168.1.1 255.255.255.0查看路由表特权:sh ip route关闭路由全局:no ip routing添加逻辑端口全局:int loopback 0配置默认路由全局:ip route 0.0.0.0 0.0.0.0 address(下一跳IP)配置静态路由 全局:ip route 192.168.1.0 255.255.255.0 192.168.2.1配置动态路由全局:router rip:network 172.25.0.0(所有直连网段)RIP V2的配置全局:router rip:version 2:no auto-summary (关闭汇总)设置远程管理全局:line vty 0 4(允许0到4,五个用户登录):login:pawwword 123全局:enable password 123。
华为路由器交换机配置命令大全

华为路由器交换机配置命令大全华为路由器交换机配置大全本文提供XXX路由器交换机的配置命令,包括计算机命令和交换机命令。
一、计算机命令以下是一些常用的计算机命令:shutdown-hnow;关机init 0;关机logout;用户注销login;用户登录ifconfig;显示IP地址ifconfig eth0 netmask;设置IP地址ifconfig eht0 netmask down;禁用IP地址route add 0.0.0.0 gw;设置网关route del 0.0.0.0 gw;删除网关route add default gw;设置网关route del default gw;删除网关route;显示网关ping;发ECHO包;远程登录二、XXX路由器交换机配置命令以下是一些常用的XXX路由器交换机配置命令:Quidway]dis cur;显示当前配置Quidway]display n;显示当前配置Quidway]display interfaces;显示接口信息Quidway]display vlan;显示vlan信息Quidway]display n;显示版本信息Quidway]super password;修改特权用户密码Quidway]sysname;交换机命名Quidway]XXX;进入接口视图Quidway]interface vlan x;进入接口视图Quidway-Vlan-interface x]ip address 10.65.1.1 255.255.0.0;配置VLAN的IP地址Quidway]Ip route-static 0.0.0.0 0.0.0.0 10.65.1.2;静态路由=网关Quidway]rip;rip协议Quidway]local-user ftpQuidway]user-interface vty 0 4;进入虚拟终端S3026-ui-vty0-4]n-mode password;设置口令模式首先,这篇文章需要进行重新排版和编辑,以便更清晰地传达信息。
路由与交换的配置命令

1、switch>:用户模式——能查看版本信息2、在用户模式下输入enable会进特权模式——它能保存、修改、删除这一系列的配置switch>enable→switch#:特权模式,下面有一些命令就在此命令下完成:①、删除vlan的文件配置:delete flash:vlan.dat②、删除vlan中的配置文件:erase startup-config③、查看vlan配置文件是否被删除及vlan的是否创建:show vlan④、重新启动交换机:reload⑤、查看当前交换机的配置:show running-config⑥、保存对交换机所配置的内容,即是保存在Nvram:copy running-configstartup-config⑦、检查Nvram的内容:show startup-config⑧、检查虚拟接口 vlan的特征:show interface vlan 1⑨、查看接口IP的属性:show ip interface vlan 1⑩、查看cisco的信息:show version⑪、查看交换机所用快速以太网接口的默认属性:show interface fastethernet 0/18⑫、查看闪存目录中的内容:show flash 或dir flash3、在特权模式下输入configure terninal后会进入全局模式,一切的配置必须在此模式中进行配置Switch#configure terninal→switchp(config)#:全局模式①、配置路由器设备的名字:switch(config)#hostname + 交换机的名字②、配置进入特权模式的密码,即使能密码:switch(config)#enable password +密码③、配置非明文密码:switch(config)#enable secret + 密码4、为交换机配置console口①、进入现成配置模式,即进入console口:switch(config)# line console 0②、设置密码(重新启动时需要此密码):switch(config-line)#password + 密码③、允许登录:switch(config-line)#login5、配置远程登录的密码:①、首先要配置使能密码②、允许让几个人登录:switch(config)#line vty 0 4(即允许五个登录)③、设置密码:switch(config-line)#password + 密码④、允许远程登录:switchp(config-line)#login6、在全局模式下的有关命令①对所有密码进行加密:switch(config)#service password-encryption②、不解析错误的命令:switch(config)#no ip domain-lookup7、创建vlan(2—1001,注vlan 1既不可以创建,也不可以删除)①、创建vlan :vlan + 要创建vlan的值②、给vlan取名:switch(config-vlan)#name + 名字(此步可以不要)③、把PC与交换机相连的端口添加到相应的vlan中:a、Switch(config)#interface + 端口b、Switch(config-if)#switchport access vlan + 相应vlan的值④、需要传递多个vlan信息就要打中继口,即trunka、switch(config)#interface + 交换机另一端口b、switch(config-if)#switchport mode trunk8、传统vlan 的通信(1)、router的配置①、为接口配置IP地址(该IP是相应vlan的PC网关)②、激活端口:no shutdown(2)、switch的配置①、创建vlan,将PC端口划入相应vlan②、将switch与router相连的端口划入相应的vlan(3) 、PC的配置:就是给PC配置IP,注PC的默认网关与router的IP相同,网关相同9、单臂路由实现vlan的通信(1)router配置①、添加子接口:interface f0/0.1(此处有多少个vlan就添加多少个子接口)②、将子接口封装到相应的vlan:encapsulation dot + 相应vlan的值③、将子接口配置IP:ip add +ip地址 + 子网掩码④、激活物理接口:no shutdown(2)、switch的配置①、创建 vlan,交PC的端口划入到相应vlan②、与router相连的端口打trunk(3)、配置PC的IP9、三层交换(1)、配置三层交换①、启用三层交换:(config)#ip routing②、创建vlan:(config)# vlan + 要创建vlan的值③、把相应的vlan配置IPa、指定一个vlan:(config)#interface vlan + vlan相应的值c、配置IP:(config-if)#ip add + ip + 子网掩码(2)、配置switch①、每个交换机创建vlan②、把端口划分到相应的vlan中③、打中继口(trunk)Show命令1、show version 这个命令可以查看IOS版本号,已启动时间,Flash中的IOS 的文件名,router里面共有什么端口,寄存器的值等等。
华为路由器交换机常用命令

华为路由器交换机常用命令一、设备管理命令1.登录管理命令- ssh [ip地质] -p [端口号]:通过SSH协议登录设备。
- telnet [ip地质]:通过Telnet协议登录设备。
- logout:退出设备。
2.用户管理命令- display current-configuration:显示当前设备配置信息。
- save:保存当前配置。
- undo save:取消保存的配置。
- super:切换到超级用户模式。
- user-interface console 0:配置控制台终端的参数。
- user-interface vty 0 4:配置远程登录终端的参数。
3.设备操作命令- reboot:重启设备。
- reset saved-configuration:恢复出厂配置。
- display version:显示设备的硬件和软件版本信息。
- display device:显示设备的基本信息。
- display interface[接口名称]:显示指定接口信息。
- display ip routing-table:显示IP路由表信息。
二、网络配置命令1.IP配置命令- interface [接口名称]:进入指定接口。
- ip address [IP地质] [子网掩码]:配置接口IP地质。
- undo ip address:取消接口IP地质配置。
- ip route-static [目标网络] [子网掩码] [下一跳地质]:配置静态路由。
- undo ip route-static [目标网络] [子网掩码] [下一跳地质]:取消静态路由配置。
2.VLAN配置命令- vlan [VLAN ID]:创建指定VLAN。
- quit:退出VLAN配置模式。
- interface vlan [VLAN ID]:进入指定VLAN接口。
- ip address [IP地质] [子网掩码]:为VLAN接口配置IP地质。
交换机路由器基本命令大全
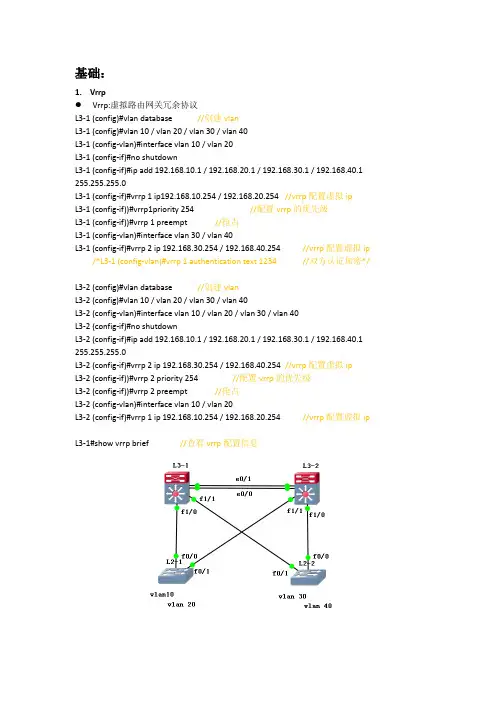
基础:1.VrrpVrrp:虚拟路由网关冗余协议L3-1 (config)#vlan database //创建vlanL3-1 (config)#vlan 10 / vlan 20 / vlan 30 / vlan 40L3-1 (config-vlan)#interface vlan 10 / vlan 20L3-1 (config-if)#no shutdownL3-1 (config-if)#ip add 192.168.10.1 / 192.168.20.1 / 192.168.30.1 / 192.168.40.1 255.255.255.0L3-1 (config-if)#vrrp 1 ip192.168.10.254 / 192.168.20.254 //vrrp配置虚拟ipL3-1 (config-if))#vrrp1priority 254 //配置vrrp的优先级L3-1 (config-if))#vrrp 1 preempt //抢占L3-1 (config-vlan)#interface vlan 30 / vlan 40L3-1 (config-if)#vrrp 2 ip 192.168.30.254 / 192.168.40.254 //vrrp配置虚拟ip /*L3-1 (config-vlan)#vrrp 1 authentication text 1234 //双方认证加密*/L3-2 (config)#vlan database //创建vlanL3-2 (config)#vlan 10 / vlan 20 / vlan 30 / vlan 40L3-2 (config-vlan)#interface vlan 10 / vlan 20 / vlan 30 / vlan 40L3-2 (config-if)#no shutdownL3-2 (config-if)#ip add 192.168.10.1 / 192.168.20.1 / 192.168.30.1 / 192.168.40.1 255.255.255.0L3-2 (config-if)#vrrp 2 ip 192.168.30.254 / 192.168.40.254 //vrrp配置虚拟ipL3-2 (config-if))#vrrp 2 priority 254 //配置vrrp的优先级L3-2 (config-if))#vrrp 2 preempt //抢占L3-2 (config-vlan)#interface vlan 10 / vlan 20L3-2 (config-if)#vrrp 1 ip 192.168.10.254 / 192.168.20.254 //vrrp配置虚拟ipL3-1#show vrrp brief //查看vrrp配置信息HsrpRouter (config)#interface fa0/1 ip 192.168.1.3 255.255.255.0 //进入端口配置ipRouter (config-if)#standby 2 //创建组Router (config-if)#standby 2 ip 192.168.1.254 //组添加ipRouter (config-if)#standby priority 200 //设置优先级,默认优先级100Router (config-if)#standby 2 preempt //抢占Router (config-if)#standby timers 3-10 //虚拟报文时间间隔Router (config-if)#standby 2 tranck fa0/0 //跟踪上行端口Router#show standby brief //查看热备份配置信息2.Mstp:多生成树协议Switch (config)#spanning-tree //启动生成树协议Switch (config)#spanning-tree mode mstp //设置生成树模式是mstpSwitch (config)#vlan 10Switch (config-vlan)#exitSwitch (config)#vlan 20Switch (config-vlan)#exitSwitch (config)#spanning-tree mst 1 priority 4096 //生成树组1的优先级设为4096 Switch (config)#spanning-tree mstconfigwration //进入生成树配置模式Switch (config)#instance 1 vlan 10,20 //把vlan10,20添加到组13.链路聚合L3-1 (config)#interface port-channel 1 //创建组L3-1 (config-if)#no shutdownL3-1(config-if)#switchport mode trunkL3-1(config-if)#interface fa1/13 //进入三层交换机间相连接口L3-1(config-if)#channel-group 1 mode on //添加到组中L3-1 (config-if)#switchport mode trunkL3-1 (config-if)#no shutdownL3-1 (config-if)#interface fa1/14L3-1 (config-if)#channel-group 1 mode onL3-1 (config-if)#switchport mode trunkL3-1 (config-if)#no shutdownL3-2(config)#interface port-channel 1 //创建组L3-2(config-if)#no shutdownL3-2(config-if)#switchport mode trunkL3-2(config-if)#interface fa1/13 //进入三层交换机间相连接口L3-2(config-if)#channel-group 1 mode on //添加到组中L3-2(config-if)#switchport mode trunkL3-2(config-if)#no shutdownL3-2(config-if)#interface fa1/14L3-2(config-if)#channel-group 1 mode onL3-2(config-if)#switchport mode trunkL3-2(config-if)#no shutdown4.VLAN(vtp)●Vtp(truch接口):Switch(config)#Vtpnamezjq //vtp命名zjqSwitch(config)#vtp password 123456 //设置vtp密码Switch(config)#vtp mode server(client) //vtp的模式设置为服务器或者客户端Switch(config)#interface FastEthernet0/1Switch(config)#switchport mode trunk //接口模式设置为trunk●配置vlanSwitch(config)#Vlan databaseSwitch(config)#Vlan 10 name xingzhengbuSwitch(config)#Switchport access vlan 10Switch(config)#Ip address 192.168.80.254 255.255.255.05.Tftp//打开tftp服务器,获取ip地址L2-1>enL2-1#copy startup-configtftp //Address of remote host []?172.16.25.0Destination filename [config.text]?zhangjq.txt6.telnet:远程登录Switch(config)#hostname silence //修改设备名称Switch(config)#intvlan 1Switch(config-if)#ip add 192.168.1.1 255.255.255.0 //设置管理交换机的IP地址Switch(config-if)#no shutdown //启用接口Switch(config)#enable secret 123456 //配置进入特权模式的密码为123456 Switch(config)#line vty 0 15//进入VTY端口,允许16台电脑同时远程登录Switch(config-line)#pass cisoco //设置Telnet的登录密码为ciscoSwitch(config-line)#login //允许Telnet登录7.管理VLAN扩展:1.路由引入(ospf)●静态路由配置(Static):要到达的网段Nwtwork:192.168.3.0/24设置下一跳Next Hop:192.168.1.2Router(config)#ip route 0.0.0.0 0.0.0.0 fa0/1●动态路由RIP:公布自己有的网段192.168.2.0/192.168.3.0OSPF:开放式最短路径协议Router(config)#router ospf 1 //启动OSPF协议,进程号Router(config)#network 192.168.1.0 0.0.0.255 area 0 //公布自己有的网段,划分区域Router(config)#do show iproute //查看路由表修改链路的开销1.Router(config-if)#bandwidth bamdwidth-kbps //修改接口的带宽参数2.Router(config-if)#ipospf cost “加数字”//命令则直接将链路开销设置为特定值并免除了计算过程2.DHCP的配置:动态主机配置协议L3-1(config)#vlan 10 //创建vlanL3-1(config-if)#intvlan 10L3-1(config-if)#ip add 192.168.10.1 255.255.255.0L3-1(config-if)#no shutdownL3-1 (config)#service dhcp //启动dhcpL3-1 (config)#ipdhcp pool <name> //建立地址池L3-1 (config)#network <network-number><mask> //动态分配ip的网段和MAC地址L3-1 (config)#default-router <ip-address> //为dhcp客户设置默认网关L2-1 (config)#interface fa0/0L2-1 (config-if)#sw mode trunkL2-1 (config-if)no shutdownL2-1 (config)#interface fa0/15L2-1 (config-if)#switchport mode accessL2-1 (config-if)#switchport access vlan 10 //绑定vlan 10L2-1 (config-if)no shutdownPC(config)#no ip routing //取消路由功能PC(config)#interface fa0/0PC(config-if)#ip add dhcpPC(config)#default gateway <ip-address>PC#show interface fa0/03.无线路由器AP>ap-mode fatAP>enAP#config tAP(config)#vlan 10AP(config-vlan)#exitAP(config)#service dhcpAP(config)#ipdhcp pool zhangjqAP(dhcp-config)#network 192.168.10.0 255.255.255.0AP(dhcp-config)#dns-server 10.20.5.1AP(dhcp-config)#default-router 192.168.10.254AP(dhcp-config)#interface gigabitEthernet0/1AP(config-if-GigabitEthernet 0/1)#encapsulation dot1Q 10 //封装vlan10AP(config-if-GigabitEthernet 0/1)#interface BVI 10AP(config-if-BVI 6)#ip add 192.168.10.254 255.255.255.0AP(config-if-BVI 6)#exitAP(config)#dot11 wlan10AP(dot11-wlan-config)#vlan10AP(dot11-wlan-config)#broadcast-ssidAP(dot11-wlan-config)#ssidzhangjqAP(dot11-wlan-config)#exitAP(config)#interface dot11radio 1/0AP(config-if-Dot11radio 1/0)#encaosulation dot1Q 10AP(config-if-Dot11radio 1/0)#mac-mode fatAP(config-if-Dot11radio 1/0)#channel 1AP(config-if-Dot11radio 1/0)#wlan-id 1AP(config-if-Dot11radio 1/0)#ip router 0.0.0.0 0.0.0.0 192.168.1.254AP(config)#intwlansec 10AP(config-if-wlansec 10)#security wpa enableAP(config-if-wlansec 10)#security wpa ciphers aes enableAP(config-if-wlansec 10)#4.ACL:访问控制列表标准控制列表:Router(config)#access-list 1 permit 192.168.2.0 0.0.0.255 //创建控制列表允许2网段可以访问,<1-99>标准访问控制列表;<100-199>扩展访问控制列表Router(config)#access-list 1 permit 192.168.1.0 0.0.0.255Router(config)#access-list 1 deny 192.168.0.0 0.0.0.255 //创建控制列表拒绝0网段可以访问,反向子网掩码Router(config)#interface se3/0 //进入se3/0Router(config-if)#ip access-group 1 out //把访问控制列表应用到接口Se3/0扩展控制列表:<才需要填写目标ip>Router(config)#access-list 101 permit ip 192.168.2.0 0.0.0.255 10.0.0.0 0.255.255.255 //创建控制列表允许源ip访问目标ip,能访问web和ping通Router(config)#access-list 101 permit tcp 192.168.1.0 0.0.0.255 10.0.0.0 0.255.255.255 eq www //创建控制列表允许源ip访问目标ip的80端口,能访问web不能ping通Router(config)#access-list 101 permit icmp 192.168.0.0 0.0.0.255 10.0.0.0 0.255.255.255 //创建控制列表允许源ip访问目标ipRouter(config)#interface se3/0Router(config-if)#ip access-group 101 outSe3/0●使用ACL保护路由安全Router(config)#access-list 1 permit 192.168.1.0 0.0.0.255Router(config)#line vty 0 15Router(config)#access-class 1 inRouter(config)#password hanlg5.NAT:地址转换●静态NAT(出口路由配置,私网地址转换成公网地址)Router(config)#ipnat inside source static【静态】私网ip公网(外)ip //内部网转换为外部网地址Router(config)#interface f0/1Router(config-if)#ipnat outside //绑定对外接口Router(config)#interface f0/2Router(config-if)#ipnat inside //绑定对内接口●动态NATRouter>enRouter#config tRouter(config)#access-list 10 permit 10.0.0.0 0.0.0.255Router(config)#ipnat pool zhangjq 131.107.0.1 131.107.0.6 netmask 255.255.255.0 Router(config)#ipnat inside source list 10 pool zhangjqRouter(config)#interface se0/0Router(config-if)#ipnat outsideRouter(config-if)#interface fa0/1Router(config-if)#ipnat insideRouter(config-if)#endRouter(config-if)#show ipnat translations●超载NAT(PAT)Router>enRouter#config tRouter(config)#access-list 10 permit 10.0.0.0 0.0.0.255Router(config)#ipnat pool zhangjq 131.107.0.1 131.107.0.1netmask 255.255.255.0 Router(config)#ipnat inside source list 10 pool zhangjqoverloadRouter(config)#interface se0/0Router(config-if)#ipnat outsideRouter(config-if)#interface fa0/1Router(config-if)#ipnat insideRouter(config-if)#endRouter(config-if)#show ipnat translations6.802.1xL2-1 (config)#aaa new-model //启动aaa服务L2-1 (config)#aaa authentication dot1x default group radius //认证802.1x,启用默认列表default,采用radius认证方式L2-1 (config)#dot1x authentication default //启用default列表应用L2-1 (config)#radius-server host 172.16.32.2 //配置radius服务器地址L2-1 (config)#radius-server key 123456 //设置交换机和服务器之间的密码L2-1 (config)#dot1x auth-mode chap //身份验证的加密方式改为chapL2-1 (config)#interface range fa0/1 - 22 //进入交换机的下行接口L2-1 (config-if)#dot1x port-control auto //在端口启用802.1x绑定vlanL2-1(config)#interface fa0/0L2-1(config)#switchport mode accessL2-1(config)#switchport access vlan10●打错Switch(config)#no ip domain-lookup●配置单臂路由Router(config)#inter fa0/0.10 //创建虚拟接口Router(config-subif)#encapsulation dot1Q 10 //封装(vlan)协议Router(config-subif)#ip address 192.168.1.1 255.255.255.0 //添加网关Router(config-subif)#no shutdown●路由引入Router(config-if)#default-information originate●回环路由(虚构一条路)Router(config)#int loopback 回环路由号Ip route 0.0.0.0 0.0.0.0 loopback 0●交换机端口安全配置Switch (config)#interface fastsernet0/1 //进入端口配置模式Switch (config-if)#speed 10 //设置端口速率为10Mbit/s,{10|100|auto}Switch (config-if)#duplex half //设置端口为半双工,{half|full|auto}Switch (config-if)#no shutdown //启用端口Switch (config-if)#switchport mode access //设置当前端口为access,交换机端口安全功能只能在access接口进行配置Switch (config-if)#switchport port-security //打开当前端口安全功能,默认关闭端口安全功能Switch (config-if)#switchportport-security maximum 10 //设置端口安全地址的最大个数,最大安全地址个数是128个Switch (config-if)#switchport port-security violation shutdown //配置处理违例的方式,默认处理方式为protectSwitch (config-if)#switchport port-security mac-address 0007.EC56.5906 //配置安全地址Switch (config-if)#endSwitch#show port-security interface fastethernet0/1 //查看0/1的端口安全配置信息,<Half-duplex,10Mb/s //已设置为半双工,10Mbit/s>Switch#show port-security //查看所有安全端口的统计信息●光电复用口L3-1 (config)#interface gi0/26L3-1 (config-GigabitEthernet 0/26) #medium-type fiberL3-2 (config)#interface gi0/26L3-2 (configGigabitEthernet 0/26)#medium-type fiber●防火墙设置步骤1.路由模式(安全)下设置2.接口IP地址设置3.路由(默认路由)4.安全策略、安全规则(nat、包过滤、ip映射、端口映射)端口映射:nat的一种,把内网端口转换成外网端口(内网的服务器ip加上端口号映射到外网ip地址)Ip映射:静态natNat:防火墙上做nat,就是要使内网用户可以访问外网QOS(服务质量)路由器的CBWFQ配置Router(config)#class-map http_ftp //创建一个分类表,并进入分类表模式Router(config-cmap)#match protocol httpRouter(config-cmap)#match protocol ftpRouter(config-cmap)#exitRouter(config)#policy-map zhangjq //创建一个策略表,并进入策略表模式Router(config-pmap)#class http_ftp //建立一个分类表,并进入策略分类表模式Router(config-pmap-c)#bandwidth 512Router(config-pmap-c)#exitRouter(config-pmap)#class class-defaultRouter(config-pmap-c)#endRouter(config)#interface fa0/1Router(config-if)#service-policy output zhangjq //在端口上应用一个策略表Router(config-if)#endRouter#show policy-mapIPSec配置R1(config)#ip route 0.0.0.0 0.0.0.0 10.1.1.1 //添加默认路由,设置下一条R1(config)#crypto isakmp policy 11 //设置IKE策略的优先级R1(config-isakmp)#encryption 3des //配置加密方式[des,3des,aes]R1(config-isakmp)#hash md5 //检验完整性,数字签名方法[md5,sha]R1(config-isakmp)#authentiaction pre-share //采用预共享密钥的认证方式R1(config)#crypto isakmp key passwd address 10.1.14.60 //协商的共享密码R1(config)#crypto ipsec transform-set one esp-3des esp-md5-hmac //配置转换集[ike配置参数转换成IPSec]R1(config)#access-list 101 permit ip 172.16.0.0 0.0.255.255 192.168.0.0 0.0.255.255//创建访问控制列表R1(config)#access-list 111 deny ip 192.168.10.0 0.0.0.255 192.168.20.0 0.0.0.255R1(config)#access-list 111 permit ip any anyR1(config)#ip nat inside source list 111 interface fa0/1R1(config)#cryptomap my 10 ipsec-isakmp //创建加密图my,序号10R1(config-crypto-map)#set peer 10.1.14.60 //标识对方路由器IP地址R1(config-crypto-map)#set transform-set one //启用转换集R1(config-crypto-map)#match address 101 //启用ACLR1(config-crypto-map)#interface FastEthernet0/0R1(config-if)#crypto map my //启用映射R1#show crypto isakmp sa //查看配置结果IKE配置配置映射Show crypto isakmpPpp:由被验方发起单向:被验证方:Route0r#config tRouter0(config)#interface Serial0/0/0Router0(config-if)#ip address 192.168.1.1 255.255.255.0 Router0(config-if)#no shutdownRouter0(config-if)#encapsulation pppRouter0(config-if)#ppp pap sent-username r0 password 123456验证方:Router1>enableRouter1#configure terminalRouter1(config)#interface Serial0/0/0Router1(config-if)#ip address 192.168.1.2 255.255.255.0 Router1(config-if)#no shutdownRouter1(config)#username r0 password 0 123456Router1(config-if)#encapsulation ppp双向:Router3>enRouter3#config tRouter3(config)#username r4 password 0 123456Router3(config)#int se2/0Router3(config-if)#encapsulation pppRouter3(config-if)#ppp pap sent-username r3 password 123456Router4>enRouter4#config tRouter4(config)#username r3 password 0 123456Router4(config)#int se3/0Router4(config-if)#encapsulation pppRouter4(config-if)#ppp pap sent-username r4 password 123456Chap(密码要求一致):chap是由验方发起,发送随机数报文查找数据库密码,随机数+密码返回验方单向:被验证方:Router>enableRouter#configure terminalRouter(config)#hostname R1R0(config)#interface Serial0/0/0R0(config-if)#no shutdownR0(config-if)#ip address 192.168.1.1 255.255.255.0R0(config-if)#encapsulation ppp //封装pppR0(config)#username R1 password 0 123456 //建立本地用户组验证方:Router>enableRouter#configure terminalRouter(config)#hostname R1R1(config)#interface Serial0/0/0R1(config-if)#no shutdownR1(config-if)#ip address 192.168.1.2 255.255.255.0R1(config-if)#encapsulation ppp //封装pppR1(config-if)#ppp authentication chapR1(config)#username R0 password 0 123456 //建立本地用户组双向:被验证方:Router>enableRouter#configure terminalRouter(config)#hostname R1R0(config)#interface Serial0/0/0R0(config-if)#no shutdownR0(config-if)#ip address 192.168.1.1 255.255.255.0R0(config-if)#encapsulation pppR1(config-if)#ppp authentication chapR0(config)#username R1 password 0 123456验证方:Router>enableRouter#configure terminalRouter(config)#hostname R1R1(config)#interface Serial0/0/0R1(config-if)#no shutdownR1(config-if)#ip address 192.168.1.2 255.255.255.0R1(config-if)#encapsulation pppR1(config-if)#ppp authentication chapR1(config)#username R0 password 0 123456Ospf ppp模式配置:Router0>enableRouter0#configure terminalRouter0(config)#interface Serial0/0/0Router0(config-if)#encapsulation pppRouter0(config-if)#ip ospf network point-to-point Router0(config-if)#no shutdownRouter0(config-if)#exitRouter0(config)#router ospf 1Router0(config-router)#net 10.1.1.0 0.0.0.255 area 0 Router0(config-router)#endRouter1>enableRouter1#configure terminalRouter1(config)#interface Serial0/0/0Router1(config-if)#no shutdownRouter1(config-if)#encapsulation pppRouter1(config-if)#ip ospf network point-to-point Router1(config-if)#no shutdownRouter1(config-if)#exitRouter1(config)#router ospf 1Router1(config-router)#network 20.1.1.0 0.0.0.255 area 0 Router1(config-router)#endRouter1#Show ip ospf neighbor帧中继Router3>enableRouter3#configure terminalRouter3(config)#interface Serial2/0Router3(config-if)#no shutdownRouter3(config-if)#encapsulation frame-relayRouter3(config-if)#frame-relay lmi-type ciscoRouter3(config-if)#exitRouter3(config)#int s2/0.1 point-to-pointRouter3(config-subif)#ip add 192.168.2.3 255.255.255.0 Router3(config-subif)#frame-relay interface-dlci 302 Router3(config)#int se2/0.2 point-to-pointRouter3(config-subif)#ip add 192.168.3.3 255.255.255.0 Router3(config-subif)#frame-relay interface-dlci 301Router1>enableRouter1#configure terminalRouter1(config)#interface Serial2/0Router1(config-if)#no shutdownRouter1(config-if)#encapsulation frame-relayRouter1(config-if)#frame-relay lmi-type ciscoRouter1(config-if)#exitRouter1(config)#int s2/0.1 point-to-pointRouter1(config-subif)#ip add 192.168.1.1 255.255.255.0 Router1(config-subif)#frame-relay interface-dlci 102 Router1(config)#int se2/0.2 point-to-pointRouter1(config-subif)#ip add 192.168.3.1 255.255.255.0 Router1(config-subif)#frame-relay interface-dlci 103Router2>enableRouter2#configure terminalRouter2(config)#interface Serial2/0Router2(config-if)#no shutdownRouter2(config-if)#encapsulation frame-relayRouter2(config-if)#frame-relay lmi-type ciscoRouter2(config-if)#exitRouter2(config)#int s2/0.1 point-to-pointRouter2(config-subif)#ip add 192.168.1.2 255.255.255.0Router2(config-subif)#frame-relay interface-dlci 201Router2(config)#int se2/0.2 point-to-pointRouter2(config-subif)#ip add 192.168.2.2 255.255.255.0Router2(config-subif)#frame-relay interface-dlci 203Dhcp:DHCP(Dynamic Host Configuration Protocol,动态主机配置协议),基于Client/Server工作模式,DHCP服务器为需要动态获取IP地址的客户端分配IP地址及网关、dns等其它参数开启dhcp服务R1(config)#service dhcp //开启dhcp功能配置dhcp地址池R1(dhcp-config)#network 192.168.1.0 255.255.255.0 //可以分配的地址范围192.168.1.1~192.168.1.254R1(dhcp-config)#dns-server 10.2.50.1 //配置DNSR1(dhcp-config)#default-router 192.168.1.1 //配置网关地址/*R1(config)#ip dhcp excluded-address 192.168.1.1 192.168.1.10//192.168.1.1~192.168.1.10不被dhcp分配*/静态路由就是手工配置的路由,使得数据包能够按照预定的路径传送到指定的目标网络R1(config)#ip route 192.168.2.0 255.255.255.0 192.168.3.2 //目标地址是192.168.2.0/24的数据包,转发给192.168.3.2R2(config)#ip route 192.168.1.0 255.255.255.0 192.168.3.1 //目标地址是192.168.1.0/24的数据包,转发给192.168.3.1R1#show ip route //查看路由R2#show ip route //查看路由RIP(Routing Information Protocol)路由协议采用距离向量算法,是一种距离向量协议。
交换机和路由器常用命令大全
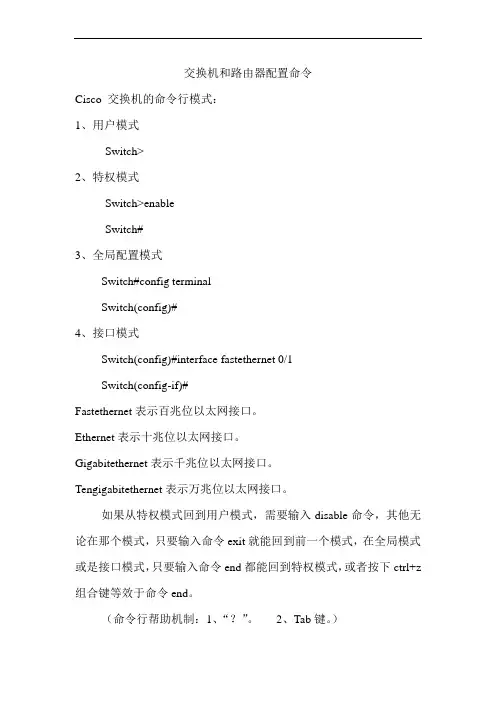
交换机和路由器配置命令Cisco 交换机的命令行模式:1、用户模式Switch>2、特权模式Switch>enableSwitch#3、全局配置模式Switch#config terminalSwitch(config)#4、接口模式Switch(config)#interface fastethernet 0/1Switch(config-if)#Fastethernet表示百兆位以太网接口。
Ethernet表示十兆位以太网接口。
Gigabitethernet表示千兆位以太网接口。
Tengigabitethernet表示万兆位以太网接口。
如果从特权模式回到用户模式,需要输入disable命令,其他无论在那个模式,只要输入命令exit就能回到前一个模式,在全局模式或是接口模式,只要输入命令end都能回到特权模式,或者按下ctrl+z 组合键等效于命令end。
(命令行帮助机制:1、“?”。
2、Tab键。
)常用快捷组合键:Ctrl+A 光标移动到命令行的开始位置。
Ctrl+E 光标移动到命令行的结束位置。
一、常用命令介绍:1、hostname 用于配置主机名,可简写为host.Switch(config)#host sw1Sw1(config)#2、show version 显示系统IOS名称以及版本信息,可简写为sh ver.3、Show running-config 查看交换机当前配置信息,可简写为shrun.4、Show startup-config 显示已保存的配置信息,可简写为sh star.5、Copy running-config startup-config 保存当前配置信息,可简写为copy run star。
这个命令还等效于write(简写为wr)。
保存当前配置如下:Switch#wr 或者switch#copy run star6、erase nvram 删除已保存的配置信息,这命令等效于erasestartup-config.(擦除)。
交换机路由器命令
交换机路由器命令交换机和路由器是构建网络的重要设备,掌握它们的命令对于网络管理和维护至关重要。
接下来,让我们深入了解一些常见且实用的交换机路由器命令。
首先,我们来谈谈交换机的命令。
“show interfaces”命令用于查看交换机的接口状态,包括接口的速率、双工模式、是否连接以及有无错误等信息。
这对于排查接口连接问题非常有用。
“show vlan”命令可以展示交换机上创建的 VLAN 配置情况,包括VLAN ID、VLAN 名称以及每个 VLAN 中包含的端口。
“interface”命令用于进入特定的接口配置模式,比如“interface GigabitEthernet 0/1”就可以进入编号为0/1 的千兆以太网接口配置模式,然后可以在这个模式下进行诸如设置速率、双工模式、VLAN 归属等具体的配置。
“vlan”命令用于创建、删除和修改 VLAN 。
比如“vlan 10”创建一个VLAN 10 ,“no vlan 10”则删除 VLAN 10 。
“ip defaultgateway”命令用于为交换机设置默认网关,这在需要通过网络远程管理交换机时是必需的。
接下来,我们转向路由器的命令。
“show ip interface brief”能快速查看路由器接口的 IP 地址配置以及接口的状态,是了解路由器网络连接的重要命令。
“show ip route”命令用于查看路由器的路由表,从中可以知道路由器如何转发数据包到不同的网络。
“router ospf”命令用于启动 OSPF 路由协议,并进入 OSPF 配置模式,然后可以在其中设置区域、宣告网络等参数。
“ip route”命令用于手动添加静态路由,比如“ip route 19216820 2552552550 10002”表示将目标网络 19216820/24 的数据包通过下一跳10002 进行转发。
“accesslist”命令用于创建访问控制列表(ACL),以控制网络流量的访问权限。
交换机和路由器命令
Router(config)#int f 端口 进入端口模式
Router(config-if)#:ip address ip+子网掩码 配置IP和子网掩码
Switch(config-if)#:switchport trunk allowed vlan remove vlan-id Trunk中删除VLAN
Switch(vlan)#:exit 退出和保存
全局模式下创建VLAN
Switch(config)#:vlan vlan-id 创建vlanID
Switch(config-vlan)#:name 名字 设置vlan名称
address or name of remote host[] ? 填写FTP服务器IP地址
Destination filename [c2600-i-mz.122-28.bin]? 填写目标文件名
FTP升级或还原路由器镜像
Trunk配置
Switch(config)#:interface {FastEthernet GigabitEthernet} slot/port 进入端口
Switch(config-if)#:switchport trunk encapsulation {isl dot1q negotiate} 选择封装类型
Source filename[]? 填写FTP服务器上路由镜像
Destination filename (IOS文件名) 确认回车
FTP备份路由器镜像
Router(config)#:ip ftp username 用户名 在路由器上配置ftp的用户名
扩展知识:(config)#:username 设备用户名 password 设备密码
路由器和交换机命令大全
路由器和交换机命令大全不论是路由器也好,还是交换机也好,终归都是要依靠命令进行设备控制,因此你是否知道全部的命令呢?何不抓紧时间补全自己所缺失的命令,以便更好的进行工作开展。
「基础配置」进入console口进行本地配置用户模式xx>enable n特权模式xx#configure terminal全局配置模式 xx(config)#interface [f|s] n/m 进入接口配置模式xx(config-if)#进入(子)接口模式后配置IP(config-if)#ip addr A.B.C.D 子网掩码激活接口(config-if)#no shutdown配置速度(config-if)#speed {auto|10|100}配置接口工作模式(config-if)#duplex {auto|half|full}配置时钟(串行口DCE端)(config-if)#clock rate n反向操作(删除配置)no + 命令在换回接口上配多个ip(config-if)#ip addr A.B.C.D 子网掩码(config-if)#ip addr A.B.C.D 子网掩码 secondary查看所有配置#show running-config路由器关闭路由功能充当主机(config)#no ip routing为路由器设置网关(config)#ip default-gateway ip地址改机器名字(config)#hostname yy控制线路超时(config)#line n(config-line)#exec-timeout 0 0关闭域名解析功能(config)#no ip domain-lookup开启路由器http功能(config)#ip http server(config)#username xxx password yyy(config)#username xxx secret yyy(config)#enable secret yyy启用密码加密服务(config)#service password-encryption yyy开启路由器https功能(config)#ip http secure-server开启路由器远程登录功能(config)#line vty 0 4(config)#login local或者(config)#no login(config)#enable n登录时使用命令 telnet A.B.C.D「交换机」查看mac地址表#show mac-address-table绑定静态mac地址(config)#mac-address-table static H.H.H vlan n interface fx/x #show arp在主机上使用arp -a查看arp信息开启交换机端口安全(防止连接主机恶意发送随机mac填满mac地址表)(conifg)#switchport port-security(conifg)#switchport ?#show port-security int fx/x恢复(config)#errdisable recovery 为交换机vlan1配置管理ip(conifg)#int vlan 1(config-if)#ip addr A.B.C.D 子网掩码(config-if)#no shut「交换机vlan」查看vlan #show vlan-switch或是#show vlan创建vlan #vlan database(vlan)#vlan n将端口加入到vlan中(config-if)#switchport access vlan n给允许多个vlan的接口打trunk(config-if)#switchport mode trunk「单臂路由vlan」路由器上配置子接口实现不同vlan之间通信,先必须激活其父接口,另外IP不允许重复(config)#interface fx/x.x(config-subif)#encapsulation dot1q vlan-id(config-subif)#ip addr A.C.D.E 子网掩码(config-subif)#no shut「使用三层交换机交换虚拟接口」交换机上配置虚拟交换接口实现不同vlan之间通信,先必须在交换机上添加对应vlan(config)#int vlan n(config-if)#ip addr A.B.C.D 子网掩码(config-if)#no shut在删除时,务必先删除交换虚拟接口,再删对应vlan「VTP」配置VTP模式#vlan database(vlan)#vtp {server|client|transparent}只有域名和密码完全一样的路由器之间才能同步vlan信息(vlan)#vtp domain <域名>(vlan)#vtp password <密码>打开VTP裁剪(vlan)#vtp pruning退出激活(vlan)#exit 「端口聚合」创建R1(config)#interface port-channel 1(config-if)#switchport trunk encapsulation dot1q(config-if)#switchportmode trunk将指定接口加入聚合组内#int range f x/x-x #channel-group 1 mode on查看聚合接口#show etherchannel summary 「生成树协议」基于vlan的生成树可防止环路开启生成树协议(STP默认是开启的,可省略)(config)#spanning-tree vlan n修改生成树协议优先级(根网桥:mac最小、优先级最小)(config)#spanning-tree vlan n priority m交换机和主机之间连接的端口开启portfast,可防止主机发送BPDU伪造数据(config-if)#spanning-tree portfast查看生成树#show spanning-tree [vlan n]「静态路由」查看协议#show ip protocols查看路由表#show ip route添加静态路由(以默认路由举例)(config)#ip route 0.0.0.0 0.0.0.0 {出接口|下一跳ip}浮动静态路由(备份链路,在原链路失效后起作用)(config)#ip route 0.0.0.0 0.0.0.0 出接口AD管理距离静态黑洞路由(config)#ip route 192.168.0.0 255.255.0.0 null 0「RIP距离矢量路由,动态路由」配置RIP宣告直连网段(config)#router rip(config-router)#network 网段更改为版本2(config-router)#version {2|1}关闭自动汇总(如果被其他网路隔开时,最好关闭自动汇总)(config-router)#no auto-summary设置被动接口(只接受更新,不宣告自己)(config-router)#passive-interface 接口单播更新(只和指定的ip 交换路由信息)(config-router)#neighbor ip地址清除路由表内容#clear ip route *「OSPF链路状态路由,动态路由」配置OSPF宣告直连网路(config)#router ospf <进程号>(config-router)#router-id <任意ip地址>(config-router)#network <反掩码> area n重启OSPF进程#clear ip ospf process查看接口的OSPF信息#show ip ospf interface查看邻居表#show ip ospf neighbor查看链路数据表#show ip ospf database 「EIGRP链路状态路由,动态路由」配置EIGRP宣告直连网路(config)#router eigrp <系统编号>(config-router)#network 查看邻居表#show ip eigrp neighbors 查看拓扑表#show ip eigrp topology「VRRP虚拟路由器路由协议」提供网关冗余查看VRRP信息#show vrrp VRRP配置(在提供备份的两台路由器上做以下配置)端口跟踪(监视某个接口的状态)(config)#track 1 interface 接口line-protocol(config-if)#vrrp <1~254> ip 额外配置优先级(IP和优先级越大Master)和抢占(config-if)#vrrp <1~254> priority <1~254>(config-if)#vrrp <1~254> preempt(config-if)#vrrp 1 track 1 decrement <1~255> 「访问控制列表ACL」ACL无法控制自身发起的流量,对于已经建立的流量不起作用标准ACL(不能单独删除、添加一条访问列表)(config)#access-list <1~99|1300~1999> {permit|deny} ip地址反掩码扩展ACL(config)#access-list <100-199> {permit|deny} <协议> <源ip> <反掩码> <源端口> <目标ip> <反掩码> <目标端口>应用到指定ACL到某个接口(config)#int 接口(config-if)#ip access-group <1~99|100-199|1300~1999> {in|out}命名ACL(config)#ip access-list standard <标准ACL名字>(config-std-nacl)#{permit|deny} ip地址反掩码(config)#ip access-list extended <扩展ACL名字>(config-ext-nacl)#{permit|deny} <协议> <源ip> <反掩码> <源端口> <目标ip> <反掩码> <目标端口>应用到指定ACL到某个接口(config)#int 接口(config-if)#ip access-group <标准ACL名字|扩展ACL名字> {in|out}自反ACL(RACL,可以只允许内网主动发起的流量通过)(config)#ip access-list extended OUTB(config-ext-nacl)#permit tcp any any reflect RACL(config)#ip access-list extended INB(config-ext-nacl)#evaluate RACL(config-ext-nacl)#deny ip any any应用到指定ACL到某个接口(config-if)#ip access-group OUTB out(config-if)#ip access-group INB in 基于时间的ACL设置时区时间(config)#clock timezone GMT +8 #clock set hh:mm:ss <日> <月> <年>定义时间(config)#time-range <时间名>(config-time-range)#periodic hh:mm to hh:mm(config-time-range)#absolute start hh:mm:ss <日> <月> <年> end hh:mm:ss <日> <月> <年>结合ACL(config)#ip access-list extended <扩展ACL名字>(config-ext-nacl)#deny tcp any any time-range <时间名>「NAT和PAT」定义内外网接口(config)#int 接口(config-if)#ip nat {inside|outside}静态NAT(config)#ip nat inside source static ip地址静态PAT(config)#ip nat inside source static <协议> ip地址 <端口号>使用ACL捕获流量(config)#access-list n permit ip地址反掩码(config)#ip nat pool <地址池名> <起始ip地址> <终止ip地址> netmask 掩码TCP负载均衡(轮询转换)(config)#ip nat pool <地址池名> <起始ip地址> <终止ip地址> netmask 掩码type rotary动态NAT(config)#ip nat inside source list n pool <地址池名>动态PAT(config)#ip nat inside source list n pool <地址池名> overload查看转换项#show ip nat translations「广域网PPP协议」在串行口上的两台路由器都封装ppp协议(config)#int sx/x(config-if)#encapsulation ppp(config-if)#no shut 启用PAP认证,未加密认证方(config)#username <用户名>password <密码>(config-if)#ppp authentication pap请求认证方(config-if)#ppp pap sent-username <用户名> password <密码> 启用CHAP认证,安全加密认证方(config)#username <请求认证方名> password <请求认证方密码>(config-if)#ppp authentication chap请求认证方(config)#username <认证方名> password <认证方密码>(config-if)#ppp authentication chap 「帧中继」无广播的多路访问网络(NBMA)配置帧中继交换机关闭路由器路由功能(config)#no ip routing启用帧中继(config)#frame-relay switching进入串行接口R8(config)#int sx/x封装frame-relay协议R8(config-if)#encapsulation frame-relay指定lmi-type类型(config-if)#frame-relay lmi-type cisco指定intf-type接口类型为DCE(config-if)#frame-relay intf-type dce配置时钟频率(config-if)#clock rate n配置DLCI(config-if)#frame-relay route <进DLCI 号> int <出接口> <出DLCI号>配置路由器,封装frame-relay协议(config-if)#encapsulation frame-relay静态指定映射(config-if)#frame-relay map ip 清除动态学到的Frame Relay #clear frame-relay-inarp查看映射#show frame-relay map调试#debug frame-relay lmi点到多点(解决水平分割问题,划分子接口)适用于全互联和部分互联(config)#int sx/x(config-if)#encapsulation frame-relay(config)#int sx/x.x multipoint关闭反向arp,禁止自学习DLCI号和IP对应,而采取静态Map(config-subif)#no frame-relay inverse-arp静态映射DLCI号和IP(config-subif)#frame-relay map ip broadcast如在R1上对R3 DLCI号103 IP地址192.168.1.3点到点子接口(不存在水平分割问题)子接口可以看作是专线,适用于星型(config)#int sx/x(config-if)#encapsulation frame-relay(config)#int sx/x.x point-to-point(config-subif)#frame-relay interface-dlci以上就是店铺带给大家不一样的精彩。
交换机路由器命令
交换机之间trunk
s3550(config-if)#switchport trunk encapsulation dot1q(三层)
s3550(config-if)#switchport mode trunk
S2126(config-if)#switchport mode trunk(二层交换机直接)
Router(config-if)#end(直接回到特权模式,而exit是向上一级一级的退)
Router#
四、
路由器:
Router#show ip route(显示路由表信息)
Codes: C - connected, S - static, I - IGRP, R - RIP, M - mobile, B - BGP
s2126(config-vlan)#exit
s2126(config)#exit
s2126#
s2126#show vlan
VLAN Name Status Ports
---- -------------------------------- --------- -------------------------------
Gateway of last resort is not set
C 192.168.50.0/24 is directly connected, FastEthernet0/0
Router(config)#hostname RC(路由器重新命名)
RC(config)#
RC(config)#ip route 65.154.12.0 255.255.255.0 202.98.1.2(静态路由表中,增加一条路由记录,如果要删除,则用no ip route65.154.12.0 255.255.255.0 202.98.1.2)