光纤交换机端口激活
B16交换机操作手册

4. 5. 6. 7. 二、 1.
2.
基本配置操作...................................................................................................................4 连接到B16 ........................................................................................................................4 1.1、SSH ..........................................................................................................................4 1.2、Web Tools.................................................................................................................4 1.3、串口管理..................................................................................................................4 设置IP地址 .......................................................................................................................5 设置默认账号密码...........................................................................................................5 3.1、登录时更改密码:..................................................................................................5 3.2、更改当前登录账号密码..........................................................................................6 3.3、更改其它账号密码..................................................................................................6 设置日期和时间...............................................................................................................7 设置交换机名...................................................................................................................7 禁用和激活交换机...........................................................................................................7 禁止和激活交换机端口...................................................................................................8 Zone的基本配置 ..............................................................................................................8 交换机相关术语解释.......................................................................................................8 1.1、 端口类型...........................................................................................................8 1.2、 FRU...................................................................................................................9 1.3、 Quad ..................................................................................................................9 1.4、 TRUK................................................................................................................9 1.5、 ZONE ..............................................................................................................10 1.6、 RSCN ..............................................................................................................10 Zone的划分 ....................................................................................................................11 2.1、创建zone ................................................................................................................11
cisco 9124 光纤交换机配置

命令行方式CISCO 的交换机和普通的博科或者QLOGIC的交换机差别很大。
普通的交换机直接进入默认IP地址,通过图形化界面直接配置就OK了。
CISCO的交换机没有图形界面,因此解决需要如下配置步骤:1、察看每个端口状态:switch2# show interface fc1/1fc1/1 is upHardware is Fibre Channel, SFP is short wave laser w/o OFC (SN)Port WWN is 20:01:00:0d:ec:be:0d:40Admin port mode is auto, trunk mode is onsnmp link state traps are enabledPort mode is F, FCID is 0xd40300Port vsan is 1Speed is 4 GbpsRate mode is dedicatedTransmit B2B Credit is 8Receive B2B Credit is 16Receive data field Size is 2112Beacon is turned off5 minutes input rate 0 bits/sec, 0 bytes/sec, 0 frames/sec5 minutes output rate 0 bits/sec, 0 bytes/sec, 0 frames/sec378 frames input, 17228 bytes0 discards, 0 errors0 CRC, 0 unknown class0 too long, 0 too short56 frames output, 3536 bytes0 discards, 0 errors3 input OLS, 3 LRR, 0 NOS, 13 loop initsswitch2# show interface fc1/2fc1/2 is upHardware is Fibre Channel, SFP is short wave laser w/o OFC (SN)Port WWN is 20:02:00:0d:ec:be:0d:40Admin port mode is auto, trunk mode is onsnmp link state traps are enabledPort mode is F, FCID is 0xd40500Port vsan is 1Speed is 4 GbpsRate mode is dedicatedTransmit B2B Credit is 3Receive B2B Credit is 16Receive data field Size is 2112Beacon is turned off5 minutes input rate 0 bits/sec, 0 bytes/sec, 0 frames/sec5 minutes output rate 0 bits/sec, 0 bytes/sec, 0 frames/sec11839 frames input, 476672 bytes0 discards, 0 errors0 CRC, 0 unknown class0 too long, 0 too short161 frames output, 8952 bytes0 discards, 0 errors1 input OLS, 1 LRR, 0 NOS, 33 loop initsswitch2# show interface fc1/3fc1/3 is down (Link failure: Link Reset)Hardware is Fibre Channel, SFP is short wave laser w/o OFC (SN) Port WWN is 20:03:00:0d:ec:be:0d:40Admin port mode is auto, trunk mode is onsnmp link state traps are enabledPort vsan is 1Receive data field Size is 2112Beacon is turned off5 minutes input rate 0 bits/sec, 0 bytes/sec, 0 frames/sec5 minutes output rate 0 bits/sec, 0 bytes/sec, 0 frames/sec966 frames input, 39704 bytes0 discards, 0 errors0 CRC, 0 unknown class0 too long, 0 too short89 frames output, 4424 bytes0 discards, 0 errors1 input OLS, 1 LRR, 0 NOS, 32 loop inits3 output OLS, 1 LRR, 5 NOS, 3 loop initsInterface last changed at Sat Aug 8 19:16:01 2009switch2# show interface fc1/7fc1/7 is upHardware is Fibre Channel, SFP is short wave laser w/o OFC (SN) Port WWN is 20:07:00:0d:ec:be:0d:40Admin port mode is auto, trunk mode is onsnmp link state traps are enabledPort mode is F, FCID is 0xd40000Port vsan is 1Speed is 4 GbpsRate mode is dedicatedTransmit B2B Credit is 8Receive B2B Credit is 16Receive data field Size is 2112Beacon is turned off5 minutes input rate 0 bits/sec, 0 bytes/sec, 0 frames/sec5 minutes output rate 0 bits/sec, 0 bytes/sec, 0 frames/sec296 frames input, 13284 bytes0 discards, 0 errors0 CRC, 0 unknown class0 too long, 0 too short301 frames output, 12820 bytes0 discards, 0 errors3 input OLS, 2 LRR, 1 NOS, 155 loop initsswitch2# show interface fc1/8fc1/8 is upHardware is Fibre Channel, SFP is short wave laser w/o OFC (SN) Port WWN is 20:08:00:0d:ec:be:0d:40Admin port mode is auto, trunk mode is onsnmp link state traps are enabledPort mode is F, FCID is 0xd40200Port vsan is 1Speed is 2 GbpsRate mode is dedicatedTransmit B2B Credit is 3Receive B2B Credit is 16Receive data field Size is 2112Beacon is turned off5 minutes input rate 0 bits/sec, 0 bytes/sec, 0 frames/sec5 minutes output rate 0 bits/sec, 0 bytes/sec, 0 frames/sec1265 frames input, 54276 bytes0 discards, 0 errors0 CRC, 0 unknown class0 too long, 0 too short309 frames output, 15104 bytes0 discards, 0 errors6 input OLS, 4 LRR, 0 NOS, 92 loop inits1、配置VSANVSAN的作用是隔离每一个交换机端口:switch2# conf tEnter configuration commands, one per line. End with CNTL/Z. switch2(config)# vsan databaseswitch2(config-vsan-db)# vsan 4000 name sw2switch2(config-vsan-db)# vsan 4000 interface fc1/1Traffic on fc1/1 may be impacted. Do you want to continue? (y/n) y switch2(config-vsan-db)# vsan 4000 interface fc1/2Traffic on fc1/2 may be impacted. Do you want to continue? (y/n) y switch2(config-vsan-db)# vsan 4000 interface fc1/7Traffic on fc1/7 may be impacted. Do you want to continue? (y/n) y switch2(config-vsan-db)# vsan 4000 interface fc1/8Traffic on fc1/8 may be impacted. Do you want to continue? (y/n) y switch2(config-vsan-db)# endswitch2# show vsan 4000 membershipvsan 4000 interfaces:fc1/1 fc1/2 fc1/7 fc1/82、创建ZONE并且添加ZONE成员。
EMC DS300B光纤交换机安装实施文档V1.0
命令行配置流程 (3)扩展端口激活流程 (3)创立Ali (5)创立Zone (5)仓∣J立Configurations (5)激活,保存config (6)博科交换机常用命令 (6)图形界面配置流程 (8)结语: (11)B-Series Switch Products:Select a B-Seriβs asset type ▼IM Series Switch Products:Select a M∙Series asset type_ 曰 MDS-Series Switch Products: Select a MDS∙Series asset type ▼ B and M Series Software Products: Select a softvrare asset type...For first time users and visitors to this web site, we offer licensing overviews in our help section by product series or type,the features of this web site.First time B-Series switch users - Please review the B-Senes licensing overview in the help section.First time M-Series switch users - Please review the M-Series licensing overview in the help section.First time MDS-Series switch users - Please review the MDS-Series licensing overview in the help section.First time B- and M Series software users - Please review the Connectπx Manager licensing overview in the help section.选择具体的交换机型号,自动进入下一步Home > Connectri× > View B-Series SwitchesApplication Options■ Select Asset Tvoe■ View Switches■ He ∣D Sgjtion EMC Connectri× Software Licensing: View B-Series Switches You can perform these license operations on this page: • Convert a Transaction Code into a software license for a switch. • View existing swιtch∕license registration details. •List existing swιtch∕lιcense registrations.First time users: Please take a minute to review the licensing overview in the he ∣D section.Need to convert a Transaction Code for a switch not listed below)选择 Need to convert a Transaction Code for a switch not listed below?命令行配置流程扩展端口激活流程博科光纤交换机标配一般只激活了局部端口,在客户需要增加端口时,需要另外购置 license 在光纤交换机上激活。
Cisco思科光纤交换机配置常用命令介绍

Cisco思科光纤交换机配置常用命令介绍交换机除了能够连接同种类型的网络之外,还可以在不同类型的网络(如以太网和快速以太网)之间起到互连作用。
你还在为不知道Cisco思科光纤交换机配置说明而烦恼么?下面小编为大家收集的Cisco思科光纤交换机配置说明教程,希望能帮到大家,一起来看看吧!Cisco思科光纤交换机配置说明的方法1. 初始化信息首次设置,必须通过console进行连接(需要U口转DB9针的接口线,专门卖接口线的有卖大约30元),然后进行初始化设计,以后设定IP后可通过LAN进行登陆具体步骤:(红色字体部分着重注意,需要进行设置,大部分按照默认设置即可,而且设置的部分进入管理工具软件可以更改) ---- System Admin Account Setup ----Enter the password for "admin": passwordConfirm the password for "admin": password--- Basic System Configuration Dialog ---This setup utility will guide you through the basic configuration of the system. Setup configures only enough connectivity for management of the system.Press Enter at any time to skip any dialog. Use ctrl-c at anytime to skip the remaining dialogs.Would you like to enter the basic configuration dialog (yes/no): yCreate another login account (yes/no) [n]:Configure read-only SNMP community string (yes/no) [n]:Configure read-write SNMP community string (yes/no) [n]: Enter the switch name: Pxx-MDS-x (where xx is your pod number and x is the switch number; for example:P01-MDS-1) Continue with Out-of-band (mgmt0) managementconfiguration? (yes/no) [y]:Mgmt0 IPv4 address : <10.0.x.y> (where x is your pod number and y is 5 for MDS-1 and 3 for MDS-2)(客户)0.16 Mgmt0 IPv4 netmask : 255.255.255.0Configure the default gateway? (yes/no) [y]:IPv4 address of the default gateway : 10.0.x.254 (where x is your pod number)Configure advanced IP options? (yes/no) [n]:Enable the telnet service? (yes/no) [y]:Enable the ssh service? (yes/no) [n]:Configure the ntp server? (yes/no) [n]:Configure default switchport interface state (shut/noshut) [shut]: (注意一下)noshutConfigure default switchport trunk mode (on/off/auto) [on]: Configure default zone policy (permit/deny) [deny]:Enable full zoneset distribution (yes/no) [n]:NOTE:初始设定的配置对新的VSAN起作用,即原始VSAN1无这些配置解决办法:1 zone default-zone permit VSAN2 新建 NEW VSAN2 将port转移VSAN2里面。
IBM B系列光纤交换机默认激活和license以及如何导入license

IBM B系列光纤交换机默认激活和license以及如何导入licenseB16/B5K/B64默认是否带有SFP? 端口需激活许可? 级联是否需要License?2498-B24/B40/B80分别是24/40/80端口的光纤存储交换机。
这些交换机上的SFP模块都需要花钱购买,如果购买的SFP模块超过了交换机默认激活的端口数量,就需要购买端口激活的许可。
2498-B24默认激活8个端口,端口激活许可是fc#7200,一个fc#7200激活8个端口,最多购买两个fc#7200。
默认支持级联。
2498-B40默认激活24个端口,端口激活许可是fc#7400,一个fc#7400激活8个端口,最多购买两个fc#7400。
默认即支持级联。
2498-B80默认激活48个端口,端口激活许可是fc#7800,一个fc#7800激活16个端口,最多购买两个fc#7800。
默认即支持级联。
以下产品停产或即将停产:2005-B16/B5K/B64分别是16/32/64端口的光纤存储交换机。
这些交换机上的SFP模块都需要花钱购买,如果购买的SFP模块超过了交换机总端口数的一半,就需要购买端口激活的许可。
2005-B16默认激活8个端口,端口激活许可是fc#7515,一个fc#7515激活4个端口,最多购买两个fc#7515。
默认不支持级联,即E_Ports,需要fc#7450 Full Fabric的激活许可,一个Fabric里最多支持10台。
2005-B5K默认激活16个端口,端口激活许可是fc#7514,一个fc#7514激活8个端口,最多购买两个fc#7514。
默认即支持级联。
2005-B64默认激活32个端口,端口激活许可是fc#7520,一个fc#7520激活16个端口,最多购买两个fc#7520。
默认即支持级联。
2005-B16级联license,即Full Fabric的激活步骤2005-B16级联license,即Full Fabric的激活步骤:2005-B16默认不支持级联,即E_Ports,需要fc#7450 Full Fabric的激活许可(如果MES升级,Full Fabric编号为fc#7451),并且一个Fabric里最多支持10台。
博科300光纤交换机的配置
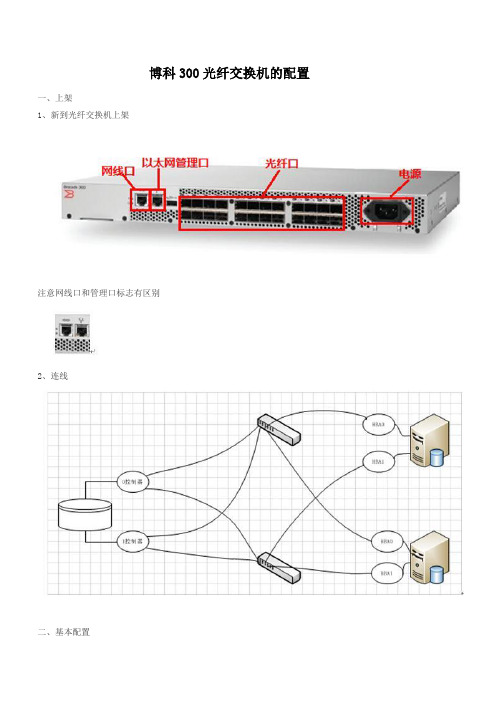
博科300光纤交换机的配置一、上架1、新到光纤交换机上架注意网线口和管理口标志有区别2、连线二、基本配置1、配置IP、修改用户密码a.新的光纤交换机默认ip为:10.77.77.77,需直连配置ipb.登录机器配置ip,用户名:admin,密码默认为passwordc.登入后的界面如下,右下角可以看到ip地址和登录用户名d.修改ip和用户密码“Manage”“Switch Admin”“Network”/“User”e.修改完成后有如下提示,需要重新登录2、启用端口a.“Manage”“Port Admin”,查看Speed(Gb/s)、Port Status,点击“Enable”(之前需要把光纤线插好,根据对应端口启用)b.检查机器状态三、配置Zone1、创建Alias首先,我们要找到主机设备的光纤HBA卡的WWN号:linux系统可以用如下的命令进行查询[14:19:21 root()@storedg host1]# cd /sys/class/fc_host/host1/ [14:19:34 root()@storedg host1]# cat port_name0x21000024ff0a6767[14:20:29 root()@storedg host2]# cat port_name0x21000024ff0a7aa2AIX系统可以用如下的命令进行查询[14:22:27 root@vposdb1 /]# lsdev -Cc adapter -S a | grep fcsfcs0 Available 04-08 FC Adapterfcs1 Available 04-09 FC Adapterfcs2 Available 02-08 FC Adapterfcs3 Available 02-09 FC Adapter[14:22:40 root@vposdb1 /]# lscfg -vpl fcs0fcs0 U78A0.001.DNWKYDT-P1-C4-T1 FC AdapterPart Number.................03N5029EC Level....................ASerial Number...............1D638080C6Manufacturer................001DCustomer Card ID Number (5759)FRU Number.................. 03N5029Device Specific.(ZM) (3)Network Address.............10000000C95A933EROS Level and ID............02C82774Device Specific.(Z0)........1036406DDevice Specific.(Z1) (00000000)Device Specific.(Z2) (00000000)Device Specific.(Z3) (03000909)Device Specific.(Z4)........FFC01231Device Specific.(Z5)........02C82774Device Specific.(Z6)........06C12715Device Specific.(Z7)........07C12774Device Specific.(Z8)........20000000C95A933EDevice Specific.(Z9)........BS2.71X4Device Specific.(ZA)........B1F2.70A5Device Specific.(ZB)........B2F2.71X4Device Specific.(ZC) (00000000)Hardware Location Code......U78A0.001.DNWKYDT-P1-C4-T1PLATFORM SPECIFICName: fibre-channelModel: LP11000Node: fibre-channel@1Device Type: fcpPhysical Location: U78A0.001.DNWKYDT-P1-C4-T“Alias”,以WWN地址划分Zone,命令格式“服务器名称_对应的HBA卡”◊“Zone Admin”◊a.“Manage”在找到WWN号以后,进入光纤交换机的管理界面b.在左边Port&Attached Devices(28 Members)中选择所对应的端口,点击Add Member将需要划分到一个zone的端口添加到右方的Alias Members 中2、创建Zonea.“Manage”“Zone Admin”“Zone”,根据Alias划分Zone,命名格式“服务器名称_对应的HBA卡_存储名称_对应0控制器的端口_对应1控制器的端口”b.根据Alias添加Zone在创建zone的时候,你需要把主机HBA卡的alias跟存储的alias添加到同一个zone中3、创建Zone Configa.“Manage”“Zone Admin”“Zone Config”b.使用默认的configure,选择创建好的Zones名字,点选“Add member”,将zone添加到config members中c.保存配置,注意下面状态栏的状态,当出现“end of commit;”时表示保存成功d.启用配置配置完成,下面开始存储的配置。
博科300光纤交换机故障诊断及管理方法

一、博科300,5100,6500系列光纤交换机基本故障处理1、License某些功能需要License才能正常工作。
多个交换机不能使用同一个License,请使用licenseshow命令查看,确保License已正确安装。
交换机功能运行不正常可能原因和建议措施可能未安装License,请确定已安装的License。
1)连接到交换机,并以拥有管理员权限的用户名登录。
2)输入licenseshow命令,查看当前交换机上所安装License的列表。
2、时间不同步故障建立NTP有助于同步交换机的消息日志和Fabric内其他交换机的端口日志,这将使查找定位问题更为方便。
可能原因和建议措施:在Fabric中,交换机上未建立NTP(Network Time Protocol)。
建议在所有SAN和metaSAN的Fabric 中的交换机都建立NTP。
3、交换机消息日志交换机消息日志(RAS日志)包含了交换机或Fabric中所发事件的消息,这是一个了解交换机或Fabric运行状态的有效工具,每周检查RAS日志非常必要,可以在早期发现问题,避免小问题成为大问题。
以下是交换机消息日志中一些常见的问题:系统消息日志不准确可能原因和建议措施:在极少数情况下,用TC(Track Change)功能追踪到的事件会上报错误的系统消息日志。
例如,用户输入正确的用户名和密码,但无法登录,这是因为用户数量已满。
然而,查看系统消息日志,发现报告登录成功。
如果交换机用户达到了最大用户数,即使输入正确的用户名和密码,登录还是会失败。
但在这个例子中,TC向系统消息日志错误地上报了此事件,导致显示登录成功。
这种现象仅发生在已达到最大用户数的情况下,其他情况下系统消息日志反映的都是真实情况。
在交换机日志中出现MQ错误可能原因和建议措施:MQ错误是一个消息队列错误,通过寻找M和Q两个字母后是否伴随数字来辨别是否有MQ错误。
MQ 错误会导致设备从交换机的NS(Name Server)上断开,或者致使交换机无法接入Fabric中。
Brocade(博科)光纤交换机端口激活步骤

Brocade(博科)光纤交换机端口激活步骤注:IBM,HP大部份都是OEM博科的,如果是OEM博科的产品,它们的端口激活方法一样。
博科光纤交换机标配一般只激活了部分端口,在客户需要增加端口时,需要另外购买license在光纤交换机上激活。
其中在license Key成生过程中需要提供光纤交换机的WWN。
这个十分重要,要特别小心重复核对。
以下提供网上对些比较详细说明的文章以作笔录。
博科交换机 License 激活方法https:///slkInternet/brocade(注册license 网址)输入你自己的Email地址;产品选择:Fabric OS Feature Activation (e.g.Trunking, APM etc.)Unipue ID:输入WWN 10:00:00:05:1E…(交换机上的WWN号或S/N号) Transaction Key:输入C4A99OAFL8BDB0C… (包装盒内授权纸上面)…… 之后生成最终的license Key即可看到,它也同时会发到你注册时填的邮箱里。
WEB添加license方法:web界面配置好你的IP地址,要在同一网段,比如:10.77.77.88,然后打开IE,然后输入URL:http://10.77.77.77博科默认用:http://10.77.77.77/ admin password 登陆即可在窗口左下角有几个按钮,其中有一个admin的,你按一下登陆会要求用户名和密码,你就输入上面那个admin password 然后选择 license选项点击下面的licenseAdd增加输入最终生成的license号码成功即可。
命令行的方法:telnet 10.77.77.77admin password ctrl+c licenseShow确认一下 licenseAdd按提示输入你从Internet得到的key Number即可。
然后licenseShow确定一下,注意你的防火墙允许这个telnet运行即可在命令行不知道命令就打Tab键或help查看一下。