Switch(交换机)配置笔记
交换机的配置命令

网络互连设备1、交换机基本配置命令(1)用户模式Switch>(2)特权模式Switch>enable Switch#(3)特权模式退回到用户模式:disable(4)下一级模式退回到上一级:exit(5)某个模式直接退回到特权模式:end(6)配置交换机名称命令hostname <交换机>(7)进入交换机端口模式命令模式:switch(config)# 命令:interface <端口类型> <端口号>交换机常见的端口类型:ethernet、fastethernet、gigabitethernet以及VLAN 接口等。
端口号一般采用插槽号/端口号,如0/1。
(8)进入交换机的某个端口模式switch(config-if)#显示交换机端口状态命令switch# show interface <端口类型> <端口号>(9)进入控制台线路模式模式:switch(config)# 命令:line console <编号>参数:编号是配置口的编号,从0开始编号。
结果:进入控制台模式switch(config-line)#。
(10)配置控制台口令模式:switch(config-line)# 命令:password <密码>参数:密码支持字母和数字。
启用密码认证模式:switch(config-line)# 命令:login(11)配置进入特权模式口令模式:switch(config)#命令:enable password|secret <密码> 参数:password表示密码以明文形式存放,secret表示密码以密文形式存放。
密码支持字母和数字。
(12)为之前设置的口令加密模式:switch(config)#命令:service password-encryption 结果:将之前设置的所有口令加密。
交换机基本配置命令汇总大全

交换机基本配置命令汇总大全一、交换机基本操作:1.1进入特权模式Switch>enableSwitch#1.2返回用户模式Switch#exitPress RETURN to get started!Switch>二、配置模式:全局配置模式[主机名(config)#]:配置交换机的整体参数2.1子模式:1.线路配置模式[主机名(config-line)#]:配置交换机的线路参数2.接口配置模式[主机名(config-if)#]:配置交换机的接口参数2.2进入、退出全局配置模式Switch#configure terminalSwitch(config)#exitSwitch#2.3进入、退出线路配置模式Switch(config)#line console0Switch(config-line)#exitSwitch(config)#2.4进入、退出接口配置模式Switch(config)#interface fastEthernet0/1Switch(config-if)#exitSwitch(config)#2.5从子模式下直接返回特权模式Switch(config-if)#endSwitch#三、交换机操作帮助:Ø支持命令简写(按TAB键将命令补充完整)Ø在每种操作模式下直接输入“?”显示该模式下所有的命令Ø命令空格“?”显示命令参数并对其解释说明Ø“字符?”显示以该字符开头的命令Ø命令历史缓存:(Ctrl+P)显示上一条命令,(Ctrl+N)显示下一条命令Ø错误提示信息四、交换机显示命令:Ø显示交换机硬件及软件的信息Switch#show versionØ显示当前运行的配置参数Switch#show running-configØ显示保存的配置参数Switch#show configure五、常用交换机flash中的命令:5.1将当前运行的配置参数复制到flashSwitch#write memoryBuilding configuration...[OK]Switch#5.2清空flashSwitch#delete flash:config.textSwitch#5.3交换机重新启动:Switch#reloadSystem configuration has been modified.Save?[yes/no]:n Proceed with reload?[confirm]5.4配置交换机主机名:Switch(config)#hostname S2126G-1S2126G-1(config)#5.5配置交换机口令:1)配置交换机的登陆密码S2126G(config)#enable secret level10star“0”表示输入的是明文形式的口令2)配置交换机的特权密码S2126G(config)#enable secret level150star“0”表示输入的是明文形式的口令六、常用交换机配置命令:6.1为交换机分配管理IPS2126G(config)#interface vlan1S2126G(config-if)#ip address{IP address}{IP subnetmask}[secondary]6.2将接口启用S2126G(config-if)#no shutdown6.3将接口关闭S2126G(config-if)#shutdown6.4配置接口速率S2126G(config-if)#speed[10|100|auto]6.5配置接口双工模式S2126G(config-if)#duplex[auto|full|half]七、显示接口状态:S2126G#show interface八、测定目的端的可达性:S2126G>ping{IP address}九、从TFTP服务器下载配置参数:S2126G#copy tftp startup-config十、管理交换机MAC地址表:10.1查看MACS2126G#show mac-address-table10.2配置MACS2126G(config)#mac-address-table aging-time<10-1000000> 10.3查看MACS2126G#show mac-address-table aging-time十一、VLAN的配置:11.1添加一个VLANS2126G(config)#vlan<1-4094>S2126G(config-vlan)#11.2为VLANS2126G(config-vlan)#name名字十二、将交换机端口分配到VLAN12.1配置Port VLANSwitch(config-if)#switchport access vlan<1-4094>12.2配置Tag VLANSwitch(config-if)#switchport mode trunk1)配置本地(native)VLANSwitch(config-if)#switchport trunk native vlan<1-4094> Native VLAN即PVID,默认情况下每个trunk口的native VLAN是12)从主干链路中清除VLANSwitch(config-if)#switchport trunk allowed vlanexcept vlan-list注:VLAN1不可被清除3)在主干链路中允许所有VLANSwitch(config-if)#switchport trunk allowed vlan all4)向主干链路中加入VLANSwitch(config-if)#switchport trunk allowed vlanadd vlan-list12.3VLAN1.显示全部的VLAN:Switch#show vlan2.显示单独的VLAN:Switch#show vlan id<1-4094>十三、RSTP的配置:13.1启用生成树:S2126G(config)#spanning-tree13.2配置交换机优先级:S2126G(config)#spanning-tree priority<0-61440>“0”或“4096”的倍数(RSTP BPDU该值后12bit全0)13.3配置交换机端口优先级:S2126G(config-if)#spanning-tree port-priority<0-240>“0”或“16”的倍数(RSTP BPDU该值后4bit全0)13.4生成树helloS2126G(config)#spanning-tree hello-time<1-10>13.5生成树的验证:Switch#show spanning-treeSwitch#show spanning-tree interface<接口名称><接口编号>十四、三层交换机路由功能:14.1开启三层交换机的路由功能Switch(config)#ip routing14.2开启端口的三层路由功能Switch(config)#interface fastethernet0/1Switch(config-if)#no switchport(这样就可以为某一端口配置IP)Switch(config-if)#ip address192.168.1.1255.255.255.0 Switch(config-if)#no shutdown。
switch部分笔记

Switching 技术笔记
红茶三杯 CCIE 学习文档
文档版本: 文档作者: 文档备注:
2.0 红茶三杯 请关注文档版本及更新时间
更新时间: 文档地址:
2013-04-26
1 以太网
1.1 基础知识
1. About Ethernet Ethernet (以太网) 于 20 世纪 70 年代中期, 由 Xerox 公司分部 Palo Alto 研究中心 (PARC) 开发的。 Xerox 最早发明的是一个 2Mbps 的以太网 , 后来又和 Intel 和 DEC 合作开发了出了 10Mbps 的以太网 , 俗称 (Ethernet II 或 Ethernet DIX).后来 IEEE 通过 802 委员会(802 Committee)把 Ethernet 标准化为 IEEE 802.3。 它和 Ethernet II 十分相似。 在 TCP/IP 中, 以太网的 IP 数据报文的封装格式由 RFC 894 定义, IEEE802.3 网络的 IP 数据报文封装由 RFC 1042 定义。当今最常使用的封装格式是 RFC894 定义的格式,通常称为 Ethernet II 或者 Ethernet DIX。 2. 管理 MAC 表 show mac address-table clear mac address-table 绑定一个 mac 地址到一个接口 Switch(config)# mac address-table static 机器的 mac 要取消用 no mac address-static …… 接口 vlan vlan 号
2 二层交换
2.1 VLAN
2.1.1 VLAN 基本概念
学习 沉淀 成长 分享 – 网络工程师成长之路
cisco交换机(Switch)配置命令大全

1.在基于IOS的交换机上设置主机名/系统名:switch(config)# hostname hostname在基于CLI的交换机上设置主机名/系统名:switch(enable) set system name name-string2.在基于IOS的交换机上设置登录口令:switch(config)# enable password level 1 password在基于CLI的交换机上设置登录口令:switch(enable) set passwordswitch(enable) set enalbepass3.在基于IOS的交换机上设置远程访问:switch(config)# interface vlan 1switch(config-if)# ip address ip-address netmaskswitch(config-if)# ip default-gateway ip-address在基于CLI的交换机上设置远程访问:switch(enable) set interface sc0 ip-address netmask broadcast-address switch(enable) set interface sc0 vlanswitch(enable) set ip route default gateway4.在基于IOS的交换机上启用和浏览CDP信息:switch(config-if)# cdp enableswitch(config-if)# no cdp enable为了查看Cisco邻接设备的CDP通告信息:switch# show cdp interface [type modle/port]switch# show cdp neighbors [type module/port] [detail]在基于CLI的交换机上启用和浏览CDP信息:switch(enable) set cdp {enable|disable} module/port为了查看Cisco邻接设备的CDP通告信息:switch(enable) show cdp neighbors[module/port] [vlan|duplex|capabilities|detail] 5.基于IOS的交换机的端口描述:switch(config-if)# description description-string基于CLI的交换机的端口描述:switch(enable)set port name module/number description-string6.在基于IOS的交换机上设置端口速度:switch(config-if)# speed{10|100|auto}在基于CLI的交换机上设置端口速度:switch(enable) set port speed moudle/number {10|100|auto}switch(enable) set port speed moudle/number {4|16|auto}7.在基于IOS的交换机上设置以太网的链路模式:switch(config-if)# duplex {auto|full|half}在基于CLI的交换机上设置以太网的链路模式:switch(enable) set port duplex module/number {full|half}8.在基于IOS的交换机上配置静态VLAN:switch# vlan databaseswitch(vlan)# vlan vlan-num name vlaswitch(vlan)# exitswitch# configure teriminalswitch(config)# interface interface module/numberswitch(config-if)# switchport mode accessswitch(config-if)# switchport access vlan vlan-numswitch(config-if)# end在基于CLI的交换机上配置静态VLAN:switch(enable) set vlan vlan-num [name name]switch(enable) set vlan vlan-num mod-num/port-list9. 在基于IOS的交换机上配置VLAN中继线:switch(config)# interface interface mod/portswitch(config-if)# switchport mode trunkswitch(config-if)# switchport trunk encapsulation {isl|dotlq}switch(config-if)# switchport trunk allowed vlan remove vlan-list switch(config-if)# switchport trunk allowed vlan add vlan-list在基于CLI的交换机上配置VLAN中继线:switch(enable) set trunk module/port [on|off|desirable|auto|nonegotiate]Vlan-range [isl|dotlq|dotl0|lane|negotiate]10.在基于IOS的交换机上配置VTP管理域:switch# vlan databaseswitch(vlan)# vtp domain domain-name在基于CLI的交换机上配置VTP管理域:switch(enable) set vtp [domain domain-name]11.在基于IOS的交换机上配置VTP 模式:switch# vlan databaseswitch(vlan)# vtp domain domain-nameswitch(vlan)# vtp {sever|cilent|transparent}switch(vlan)# vtp password password在基于CLI的交换机上配置VTP 模式:switch(enable) set vtp [domain domain-name] [mode{ sever|cilent|transparent }][pa ssword password]12. 在基于IOS的交换机上配置VTP版本:switch# vlan databaseswitch(vlan)# vtp v2-mode在基于CLI的交换机上配置VTP版本:switch(enable) set vtp v2 enable13. 在基于IOS的交换机上启动VTP剪裁:switch# vlan databaseswitch(vlan)# vtp pruning在基于CL I 的交换机上启动VTP剪裁:switch(enable) set vtp pruning enable14.在基于IOS的交换机上配置以太信道:switch(config-if)# port group group-number [distribution {source|destination}] 在基于CLI的交换机上配置以太信道:switch(enable) set port channel moudle/port-range mode{on|off|desirable|auto} 15.在基于IOS的交换机上调整根路径成本:switch(config-if)# spanning-tree [vlan vlan-list] cost cost在基于CLI的交换机上调整根路径成本:switch(enable) set spantree portcost moudle/port costswitch(enable) set spantree portvlancost moudle/port [cost cost][vlan-list] 16.在基于IOS的交换机上调整端口ID:switch(config-if)# spanning-tree[vlan vlan-list]port-priority port-priority在基于CLI的交换机上调整端口ID:switch(enable) set spantree portpri {mldule/port}priorityswitch(enable) set spantree portvlanpri {module/port}priority [vlans]17. 在基于IOS的交换机上修改STP时钟:switch(config)# spanning-tree [vlan vlan-list] hello-time secondsswitch(config)# spanning-tree [vlan vlan-list] forward-time secondsswitch(config)# spanning-tree [vlan vlan-list] max-age seconds在基于CLI的交换机上修改STP时钟:switch(enable) set spantree hello interval[vlan]switch(enable) set spantree fwddelay delay [vlan]switch(enable) set spantree maxage agingtiame[vlan]18. 在基于IOS的交换机端口上启用或禁用Port Fast 特征:switch(config-if)#spanning-tree portfast在基于CLI的交换机端口上启用或禁用Port Fast 特征:switch(enable) set spantree portfast {module/port}{enable|disable}19. 在基于IOS的交换机端口上启用或禁用UplinkFast 特征:switch(config)# spanning-tree uplinkfast [max-update-rate pkts-per-second]在基于CLI的交换机端口上启用或禁用UplinkFast 特征:switch(enable) set spantree uplinkfast {enable|disable}[rate update-rate] [all-protoc ols off|on]20. 为了将交换机配置成一个集群的命令交换机,首先要给管理接口分配一个IP地址,然后使用下列命令: switch(config)# cluster enable cluster-name cv21. 为了从一条中继链路上删除VLAN,可使用下列命令:switch(enable) clear trunk module/port vlan-range22. 用show vtp domain 显示管理域的VTP参数.23. 用show vtp statistics显示管理域的VTP参数.24. 在Catalyst交换机上定义TrBRF的命令如下:switch(enable) set vlan vlan-name [name name] type trbrf bridge bridge-num[stp {ieee|ibm}]25. 在Catalyst交换机上定义TrCRF的命令如下:switch (enable) set vlan vlan-num [name name] type trcrf{ring hex-ring-num|decring decimal-ring-num} parent vlan-num26. 在创建好TrBRF VLAN之后,就可以给它分配交换机端口.对于以太网交换,可以采用如下命令给VLAN分配端口:switch(enable) set vlan vlan-num mod-num/port-num27. 命令show spantree显示一个交换机端口的STP状态.28. 配置一个ELAN的LES和BUS,可以使用下列命令:ATM (config)# interface atm number.subint multiointATM(config-subif)# lane serber-bus ethernet elan-name29. 配置LECS:ATM(config)# lane database database-nameATM(lane-config-databade)# name elan1-name server-atm-address les1-nsap-addres sATM(lane-config-databade)# name elan2-name server-atm-address les2-nsap-addres sATM(lane-config-databade)# name …30. 创建完数据库后,必须在主接口上启动LECS.命令如下:ATM(config)# interface atm numberATM(config-if)# lane config database database-nameATM(config-if)# lane config auto-config-atm-address31. 将每个LEC配置到一个不同的ATM子接口上.命令如下: ATM(config)# interface atm number.subint multipointATM(config)# lane client ethernet vlan-num elan-num32. 用show lane server 显示LES的状态.33. 用show lane bus显示bus的状态.34. 用show lane database显示LECS数据库可内容.35. 用show lane client显示LEC的状态.36. 用show module显示已安装的模块列表.37. 用物理接口建立与VLAN的连接:router# configure terminalrouter(config)# interface media module/portrouter(config-if)# description description-stringrouter(config-if)# ip address ip-addr subnet-maskrouter(config-if)# no shutdown38. 用中继链路来建立与VLAN的连接:router(config)# interface module/port.subinterfacerouter(config-ig)# encapsulation[isl|dotlq] vlan-numberrouter(config-if)# ip address ip-address subnet-mask39. 用LANE 来建立与VLAN的连接:router(config)# interface atm module/portrouter(config-if)# no ip addressrouter(config-if)# atm pvc 1 0 5 qsaalrouter(config-if)# atm pvc 2 0 16 ilnirouter(config-if)# interface atm module/port.subinterface multipointrouter(config-if)# ip address ip-address subnet-maskrouter(config-if)# lane client ethernet elan-numrouter(config-if)# interface atm module/port.subinterface multipointrouter(config-if)# ip address ip-address subnet-namerouter(config-if)# lane client ethernet elan-namerouter(config-if)# …40. 为了在路由处理器上进行动态路由配置,可以用下列IOS命令来进行: router(config)# ip routingrouter(config)# router ip-routing-protocolrouter(config-router)# network ip-network-numberrouter(config-router)# network ip-network-number41. 配置默认路由:switch(enable) set ip route default gateway42. 为一个路由处理器分配VLANID,可在接口模式下使用下列命令:router(config)# interface interface numberrouter(config-if)# mls rp vlan-id vlan-id-num43. 在路由处理器启用MLSP:router(config)# mls rp ip44. 为了把一个外置的路由处理器接口和交换机安置在同一个VTP域中:router(config)# interface interface numberrouter(config-if)# mls rp vtp-domain domain-name45. 查看指定的VTP域的信息:router# show mls rp vtp-domain vtp domain name46. 要确定RSM或路由器上的管理接口,可以在接口模式下输入下列命令:router(config-if)#mls rp management-interface47. 要检验MLS-RP的配置情况:router# show mls rp48. 检验特定接口上的MLS配置:router# show mls rp interface interface number49. 为了在MLS-SE上设置流掩码而又不想在任一个路由处理器接口上设置访问列表:set mls flow [destination|destination-source|full]50. 为使MLS和输入访问列表可以兼容,可以在全局模式下使用下列命令:router(config)# mls rp ip input-acl51. 当某个交换机的第3层交换失效时,可在交换机的特权模式下输入下列命令:switch(enable) set mls enable52. 若想改变老化时间的值,可在特权模式下输入以下命令:switch(enable) set mls agingtime agingtime53. 设置快速老化:switch(enable) set mls agingtime fast fastagingtime pkt_threshold54. 确定那些MLS-RP和MLS-SE参与了MLS,可先显示交换机引用列表中的内容再确定:switch(enable) show mls include55. 显示MLS高速缓存记录:switch(enable) show mls entry56. 用命令show in arp显示ARP高速缓存区的内容。
Switch中文详尽学习笔记

第一章园区网概述园区网特点1. 在一个固定地理区域内的一个公司或一个公司的一部分。
2. 拥有该园区网的公司通常也拥有该园区内所用的物理线路。
传统园区网的主要问题1. 可用性2. 性能在传统园区网中,通常用多端口网桥将一个局域网分段成隔离的碰撞域。
这样可解决两个问题:1. 冲突域(Collision Domain)2. 距离限制网络中通信的三种形式:单播(Unitcast)、组播(Multicast)、广播(Broadcast)。
1. 多点广播实例:Cisco IP/TV分发多媒体数据、定位IP服务上的Novell 5。
2. 提出请求的广播:IP的地址解析协议(ARP)、NetBIOS的名字请求、网间包交换协议(IPX)寻找最近服务器(Get Nearest Server,GNS)请求。
3. 发布通告的广播:IPX服务通告协议(SAP)数据包、路由信息协议(RIP)、内部网关路由选择协议(IGRP)。
遏制广播的两种方法:1. 使用路由器生成多个子网;2. 利用交换机实施VLAN。
当前园区网由两部分组成:1. 局域网交换机2. 路由器传统的80/20规则和新的20/80规则1. 80/20规则:在设计恰当地网络环境中,一个给定网段上80%的流量是本地的,不超过20%的网络流量需要通过主干。
2. 20/80规则:只有20%的流量是到本地工作组局域网的,而80%的流量需要流出本地网络。
导致流量模式的改变有两个因素:1. 基于Web应用的计算普遍,很多PC既是信息的接受者,也是信息的发布者;2. 企业部署集中式的服务器群(既降低成本、提高安全、便于管理)。
新的园区网模型中的3类服务1. 本地服务:本地数据流不进入网络主干或通过路由器2. 远程服务:远程服务数据流穿过广播域边界,但可能也可不通过网络主干3. 企业级服务:放在距离网络主干很近的一个独立的子网上与OSI分层相应的PDU和设备类型模型层PDU类型设备类型数据链路层(第2层) 数据帧交换机/网桥网络层(第3层) 数据包路由器传输层(第4层) TCP数据分段TCP端多层交换机多层交换基于单独的流,MLS-SE为MLS流维护一个缓存条目并为每个流存储统计信息。
OmniSwitch系列交换机配置手册

Part No. 060160-10, Rev. DNov 2003OmniSwitch系列交换机操作手册目 录1 设备管理 (5)1.1 交换机登录 (5)1.2 打开其它访问权限 (5)1.3恢复到出厂配置 (5)1.4 文件系统操作 (6)1.5 装载软件到交换机 (7)1.6重启交换机 (9)1.7 保存交换机配置 (9)1.8 显示交换机所有配置 (9)2 配置以太网端口 (11)2.1 配置以太网端口指南: (11)2.2配置双工模式 (13)2.3 启用和关闭一个端口 (13)2.4 启用和关闭流控 (14)2.5 验证以太网端口配置 (14)3 管理源学习(Managing Sourcing learning) (16)3.1 MAC地址表项配置例子 (16)3.2 显示MAC 地址表信息 (17)4 配置 VLAN(Configure VLAN) (18)4.1 VLAN配置举例 (18)4.2 创建/修改VLAN (19)4.3 定义 VLAN的端口分配 (20)4.4 修改端口的缺省 VLAN配置 (20)4.5 打开/关闭一个 VLAN的生成树 (21)4.6 配置 VLAN 路由端口(Router port) (22)5 配置802.1Q (23)5.1 打开端口的标记(tag) (23)5.2 打开链路聚合的标记(tagging) (23)5.3 配置端口数据帧类型 (23)5.4 显示802.1Q 信息 (24)5.5 802.1Q配置实例 (25)6 配置静态链路聚合 (27)6.1 创建静态聚合 (27)6.2 删除静态链路聚合 (28)6.3 添加/删除静态链路聚合中的端口 (28)6.4 激活/关闭静态链路聚合状态 (28)6.5 显示静态链路聚合配置和统计信息 (29)7 配置动态链路聚合 (30)7.1 创建动态聚合 (30)7.2 删除动态链路聚合组 (31)7.3 添加/删除动态链路聚合中的端口 (31)7.4 激活/关闭动态链路聚合状态 (32)7.6 LACP配置实例 (33)8 配置IP (35)8.1 IP转发快速配置指南 (35)8.2 创建静态路由 (36)8.3 创建缺省路由 (37)8.4 创建 ARP (37)8.5 配置路由器主地址(Primary Address) (38)8.6 配置路由器号(Router ID) (38)8.7 使用PING命令 (38)8.8 使用Trceroute命令 (38)8.9 察看IP配置 (39)9 配置RIP (40)9.1 RIP操作快速指南 (40)9.2 RIP接口操作 (41)9.3 RIP再分布 (42)9.4 察看RIP配置 (43)9.5 RIP配置实例 (44)10 配置DHCP中继(Relay) (47)10.1 Per-VLAN DHCP (48)10.2 察看DHCP中继配置 (48)11 配置QoS (49)11.1 配置总体QoS参数 (49)11.2 配置QoS端口参数 (50)11.3 创建策略 (51)11.4 察看策略配置 (53)12 配置访问控制列表(ACLs) (54)12.1 ACL快速指南 (54)12.2 ACL配置步骤详析 (55)12.3 察看ACL配置 (56)12.4 ACL配置实例 (56)1 设备管理1.1 交换机登录OmniSwitch支持多种登录方式,包括console,telnet,http等,在缺省情况下,交换机只开放console管理。
switch基本配置-1

删除进入特权模式的密码 no enable password
交换机基本配置常用命令
设置特权模式 加密密码 enable secret 密码 当即设置了明文密码又设置了加密密码后 加密密码优先级高 删除特权模式加密密码
使用telnet远程配置交换机
使用telnet登录时要给vty 和 enable 都设置密码才能设置交换机
In NVRAM
wg_ro_c#show startup-config Using 1359 out of 32762 bytes ! version 12.0 ! -- More --
• Displays the current and saved configuration
Overview of Router Modes
基本实验操作
Wisdom>enable Wisdom#configure terminal Wisdom(config)#no ip domain-lookup Wisdom(config)#line console 0 Wisdom(config-line)#logging synchronous Wisdom(config-line)#no exec-timeout Wisdom(config-line)#password cisco Wisdom(config-line)#login Wisdom(config-line)#exit Wisdom(config)#line vty 0 4 Wisdom(config-line)#logging synchronous Wisdom(config-line)#no exec-timeout Wisdom(config-line)#password cisco Wisdom(config-line)#login Wisdom(config-line)#end Wisdom#configure terminal Wisdom(config)#enable secret cisco Wisdom(config)#end Wisdom#service password-encryption //手工加密,不再显示明文密码
交换机笔记

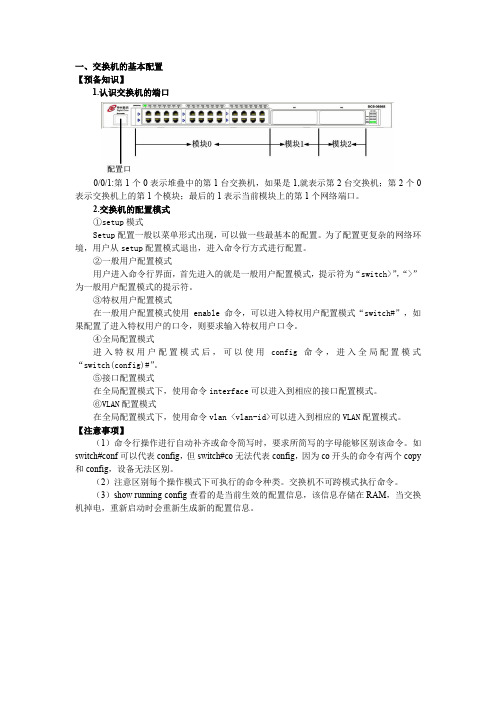
一、交换机的基本配置【预备知识】1.认识交换机的端口0/0/1:第1个0表示堆叠中的第1台交换机,如果是1,就表示第2台交换机;第2个0表示交换机上的第1个模块;最后的1表示当前模块上的第1个网络端口。
2.交换机的配置模式①setup模式Setup配置一般以菜单形式出现,可以做一些最基本的配置。
为了配置更复杂的网络环境,用户从setup配置模式退出,进入命令行方式进行配置。
②一般用户配置模式用户进入命令行界面,首先进入的就是一般用户配置模式,提示符为“switch>”,“>”为一般用户配置模式的提示符。
③特权用户配置模式在一般用户配置模式使用enable命令,可以进入特权用户配置模式“switch#”,如果配置了进入特权用户的口令,则要求输入特权用户口令。
④全局配置模式进入特权用户配置模式后,可以使用config命令,进入全局配置模式“switch(config)#”。
⑤接口配置模式在全局配置模式下,使用命令interface可以进入到相应的接口配置模式。
⑥VLAN配置模式在全局配置模式下,使用命令vlan<vlan-id>可以进入到相应的VLAN配置模式。
【注意事项】(1)命令行操作进行自动补齐或命令简写时,要求所简写的字母能够区别该命令。
如switch#conf可以代表config,但switch#co无法代表config,因为co开头的命令有两个copy 和config,设备无法区别。
(2)注意区别每个操作模式下可执行的命令种类。
交换机不可跨模式执行命令。
(3)show running-config查看的是当前生效的配置信息,该信息存储在RAM,当交换机掉电,重新启动时会重新生成新的配置信息。
- 1、下载文档前请自行甄别文档内容的完整性,平台不提供额外的编辑、内容补充、找答案等附加服务。
- 2、"仅部分预览"的文档,不可在线预览部分如存在完整性等问题,可反馈申请退款(可完整预览的文档不适用该条件!)。
- 3、如文档侵犯您的权益,请联系客服反馈,我们会尽快为您处理(人工客服工作时间:9:00-18:30)。
交换机(Switch)配置:
1 端口速率:
s(config)#int f0/1
s(config-if)#speed 10
2 双工模式:
s(config-if)#duplex full/ hatl
3 管理IP设置:
s(config)#int vlan 1
s(config-if)#ip add 192.168.0.253 255.255.255.0
s(config)# ip default-gateway 192.168.0.254
4 设置静态MAC
Sw(config)#
mac-address-table static 0000.220a.000F vlan 1 int f0/1 5 端口最大连接数
s(config)#int f0/1
S(config-if)#switchport mode access
S(config-if)#switchport port-security
S(config-if)#switchport port-security maximum 1
S(config-if)#switchport port-security violation shutdown
6 VLAN的创建:
1>先划分VLAN
Switch#vlan database
Switch(vlan)#vlan 2 name wangluo1
2>指定某端口所属VLAN
Sw(config)#int f0/1
Sw(config-if)#switchport mode access
Sw(config-if)#switchport access vlan 2
Sw(config)#int range f0/3 – f0/10
Sw(config-if)#switchport mode access
Sw(config-if)#switchport access vlan 4
7 trunk(汇聚链路设置)
Switch(config)#int g1/1
Switch(config-if)#switchport mode trunk(ISL)
Switch(config-if)#switchport trunk allowed vlan all
8VTP配置
Switch(config)#vtp mode server/client
Switch(config)#vtp domain wangluo1
Switch(config)#vtp password 888888
Switch(config)#vtp mode client
9VLAN间路由(外部路由:单臂路由)
Router(config)#int f0/0.1
Router(config-subif)#encapsulation dot1Q 10(vlan号) Router(config-subif)#ip add 192.168.1.1 255.255.255.0(网关) Router(config-subif)#no sh
Router(config)#int f0/0
Router(config-if)#no sh
10VLAN间路由(内部路由:三层交换)
方法一:把三层交换机端口当作路由器使用。
Sw3(config)#int f0/1
Sw3(config-if)#no switchport(关闭二层功能)
Sw3(config-if)#ip add 192.168.3.1 255.255.255.0
Sw3(config-if)#no sh
方法二:通过给不同的VLAN配置管理地址来实现路由。
Sw3(vlan)#vlan 10 name wangluo10
Sw3(config)#int f0/1(连接PC)
Sw3(config-if)#sw mo ac
Sw3(config-if)#sw ac vlan 10
Sw3(config)#int vlan 10
Sw3(config-vlan)#ip add 192.168.1.1 255.255.255.0(网关)
11端口聚合
C(config)#int port-channel 1 (建立一条聚合通道1)
C(config-if)#exit
C(config)#int range G1/1-2(把G1/1和G1/2添加到通道1)
C(config-if)#channel-group 1 mode on(启用端口聚合模式)
12STP负载均衡
方法一使用权值实现负载均衡:
Sw1 Sw2(f0/1-f0/1,f0/2-f0/2)
1 中继trunk配置
Sw1(config)#int f0/1
Sw1(config-if)#sw mod trunk
Sw1(config)#int f0/2
Sw1(config-if)#sw mod trunk
Sw2(config)#int f0/1
Sw2(config-if)#sw mod trunk
Sw2(config)#int f0/2
Sw2(config-if)#sw mod trunk
2 vtp配置
Sw1#vlan database
Sw1(vlan)#vtp domain sony
Sw1(vlan)#vtp server
Sw2(vlan)#vtp client
3 创建Vlan10 20 30 40
Sw1#vlan database
Sw1(vlan)#vlan 10 name wangluoA
Sw1(vlan)#vlan 20 name wangluoB
Sw1(vlan)#vlan 30 name wangluoC
Sw1(vlan)#vlan 40 name wangluoD
4 在Sw1端口使用STP生成树协议权值
Sw1(config)#int f0/1
Sw1(config-if)#spanning-tree vlan 10,20 port-priority 10 Sw1(config)#int f0/2
Sw1(config-if)#spanning-tree vlan 30,40 port-priority 10
5 指定vlan1020 vlan3040 各自的主根和副根
Sw1(config)#spanning-tree vlan 10,20 root primary
Sw1(config)#spanning-tree vlan 30,40 root secondary Sw2(config)#spanning-tree vlan 30,40 root primary Sw2(config)#spanning-tree vlan 10,20 root secondary。
