EpiCalc软件的下载与安装
Adobe Illustrator Cs3简体中文破解版安装图文教程
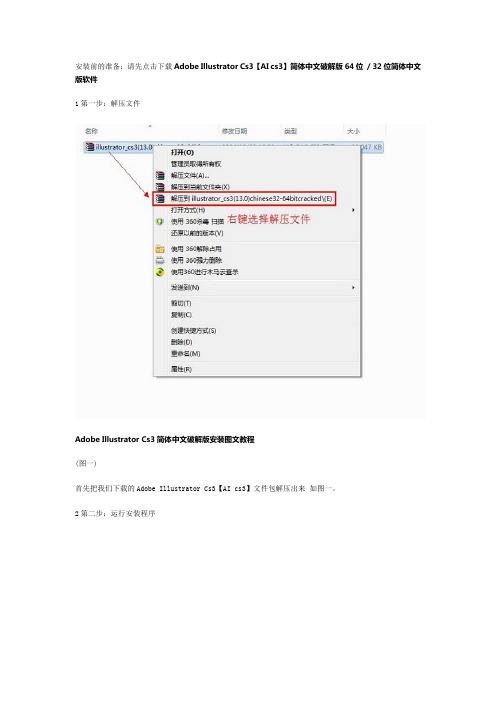
安装前的准备:请先点击下载Adobe Illustrator Cs3【AI cs3】简体中文破解版64位/ 32位简体中文版软件1第一步:解压文件Adobe Illustrator Cs3简体中文破解版安装图文教程(图一)首先把我们下载的Adobe Illustrator Cs3【AI cs3】文件包解压出来如图一。
2第二步:运行安装程序(图二)双击进行安装如图二。
3第三步:Adobe Illustrator Cs3【AI cs3】安装向导(图三)点击“下一步” 如图三。
4第四步:Adobe Illustrator Cs3【AI cs3】安装设置Adobe Illustrator Cs3简体中文破解版安装图文教程(图四)点击“浏览”可以自己选择软件的安装路径(安装目录),这里我保持默认如图四。
5第五步:创建桌面快捷方式(图五)勾选“创建桌面快捷方式”,然后点击“下一步” 如图五。
6第六步:确认Adobe Illustrator Cs3【AI cs3】安装信息(图六)点击“安装” 如图六。
7第七步:正在安装Adobe Illustrator Cs3【AI cs3】(图七)正在安装中请耐心等待一下...... 如图七。
8第八步:安装完成Adobe Illustrator Cs3简体中文破解版安装图文教程(图八)点击“完成” 如图八。
9第九步:安装成功Adobe Illustrator Cs3简体中文破解版安装图文教程(图九)这样我们的Adobe Illustrator Cs3【AI cs3】就安装完成了,大家双击打开即可使用了。
如图九。
本文由丝路教育提供分享。
CA Clarity

Studio 内容管理 ........................................................................................................................................................11 Microsoft Project Interface ........................................................................................................................................11 与 VersionOne 集成 ...................................................................................................................................................12 智能部分 .................................................................................................................................................................... 12 Apache Tomcat 日志分析..........................................................................................................................................13
医学研究数据管理与统计分析(1)-Epidata-幻灯片
编写调查表文件注意事项(二)
④尽可能把字段定义数值型,有利于统计分析。如糖尿病史 “dmhis”可定义为数值型字段,“1”表示“有”,“0”表示“无”。 ⑤调查表文件格式尽可能和原调查表一致,有利于直观录入数据。 ⑥如果用其他文本编辑器编写.qes文件,在运行EpiData后,打开 该.qes文件即可编辑。 ⑦调查表文件的编写是否符合要求,可通过“数据表预览”来查看。
53
编写调查表文件注意事项(一)
①编写过程中及时保存文件,文件类型为.qes文件。 ②系统只会根据“特殊符号”来定义一个输入字段(包括类型和 长度),并根据符号前的字符给字段命名。建议在编写过程中利 用“字段快速清单”插入“特殊符号”,即:选择字段类型,定 义好长度后,按“插入”图标,可避免由于“特殊符号”输入错 误而不能产生有效的输入字段。 ③调查表用中文编写时,可用定界符(“{}”)将字段名定义为英 文字符(英文字母或英文字母+阿拉伯数字),有利于数据库的 管理和其他软件的统计分析。注意:“{}”必须为半角型,而不能 是全角型(“{}”)。
✓ 把握度(power) 1-β,一般0.8-0.9 ✓ 单侧检验还是双侧检验,单侧检验所需样本量小,双
侧检验所需样本量大。
8
常用样本含量的估计软件:EpiCalc 2000
9
常用软件:EPI INFO
10
常用软件:OPENEPI
11
六、原始资料的收集
☉原始资料的收集方式
①直接观察法 ②采访法 包括面访、调查会及信访、电话访 问等 ③…
14
数据录入和管理软件
Dbase, FoxBase,
Visual FoxPro,
15
Lotus
用EPIDATA构建调查表数据库
披克门禁CIW10.0发卡管理系统使用手册

发卡管理软件PK-CIW10.0深圳市披克电子有限公司S H E N Z H E N P E A K E L E C T R O N I C S C O.,LT D.目录第一章软件安装说明 (3)1.1 软件安装 (3)1.1.1 安装环境 (3)1.1.2 安装条件: (3)1.1.3 安装软件 (3)第二章软件使用说明 (12)2.1 系统登陆 (12)2.1.1 系统登录设置 (12)2.1.2 登录一卡通管理系统 (13)2.2 系统管理 (14)2.2.1 数据库管理 (14)2.2.2 本机参数设置 (14)2.2.3 操作员 (17)2.2.4 权限管理 (18)2.2.5 锁定 (18)2.2.6 打开系统 (19)2.2.7 退出 (19)2.3 人员管理 (19)2.3.1 人员信息设置 (19)2..4 卡片管理 (26)2.4.1 卡片信息设置 (26)2.4.2 卡中数据审查 (36)2.5 账户管理 (36)2.5.1 充值/退款 (36)2.5.2 人员补助调整 (39)2.6 基础参数 (39)2.6.1 卡片押金设置 (39)2.6.2 人员补助设置 (40)2.6.3 读取卡片密码 (42)2.6.4 补助结算 (42)2.7 报表查询 (43)2.7.1 人员信心查询 (43)2.7.2 充值退款信息查询 (44)2.7.3 补助发放信息查询 (45)2.7.4 卡片押金信息查询 (46)2.8 帮助 (47)2.8.1帮助 (47)2.8.2注册模块 (47)2.8.3关于 (47)第一章软件安装说明1.1 软件安装1.1.1 安装环境硬件:计算机CPU奔腾2.0以上,内存256M,硬盘空间40G,监视器分辨率800×600以上,有多个串行通讯端口的PC。
操作系统:Win98/Win2000/Win2003/WinXp1.1.2 安装条件:安装此软件之前必须先安装并运行SQL server或Oracle数据库。
鼎力软件使用说明

图15图17图20图21 图22图28调整建议:29323至29441的PBGT门限由70->66,调整29511的频率。
复测(jixi_1208.RCU):29511改频,加快29323切出速度后复测多次,切换及时正常,整体话音质量较好。
如下图29示图293.3未接通:质量差,未接通。
问题分析:下图30示,和平南大街车行由北向南,问题路段MS空选至29441起呼,Call Proceeding 后,下行质量差,MS不停上发MR,未能解码下行信息,一直未收到Assignment Command,未能接通。
29541的最小接入电平由为15,29441的最小接入电平为8。
图30图31调整建议:29541的最小接入电平由15->10,29441的最小接入电平由8->10,29473电平由15->10。
3.4未接通:被叫LU问题现象:被叫LU导致未接通问题分析:车行由北向南,主叫手机占用29273起呼,占用TCH成功后(Assignment Complete 振铃。
由于此时被叫正在LU(位置更新),系统寻呼不到被叫,主叫下行收到Disconnect图32图33:主叫起呼时,被叫手机正在LU,导致一次未接通图33调整建议:调整29491频率。
3.5 串话接客户投诉黑龙江XX地市XX站的二三扇区覆盖区域最近老出现严重的串话现象,现场连接测试软件进行拨测,平均每拨打5个电话就有一个串话,最近也没对该区域所在BSC进行过任何改动,上站检查发现CM(中兴的主控板)有红灯告警,更换主控板之后发现问题仍然存在,至此,只能锁频并关掉跳频以后一个载频一个信道的拨打测试,该站是S9/11/10,锁频以后用软件拨测,检查确保每一个载频的每一个信道。
CEIBA2软件使用手册_新版本(中文)
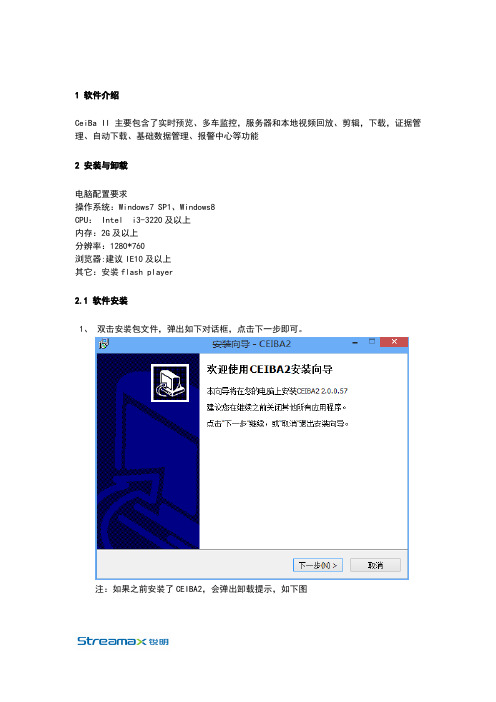
1 软件介绍CeiBa II主要包含了实时预览、多车监控,服务器和本地视频回放、剪辑,下载,证据管理、自动下载、基础数据管理、报警中心等功能2 安装与卸载电脑配置要求操作系统:Windows7 SP1、Windows8CPU: Intel i3-3220及以上内存:2G及以上分辨率:1280*760浏览器:建议IE10及以上其它:安装flash player2.1 软件安装1、双击安装包文件,弹出如下对话框,点击下一步即可。
注:如果之前安装了CEIBA2,会弹出卸载提示,如下图点击“是”按钮,开始卸载之前版本的CEIBA2,卸载完成后弹出完成提示,如下图。
点击确定按钮,进行2.1.2的操作。
2、选择安装路径,如下图,安装路径可手动更改,尽量选择磁盘剩余空间较大的盘符,点击下一步按钮进行下一步操作。
3、选择开始菜单文件夹,如下图,文件夹可手动更改,点击下一步进行下一步操作。
4、选择附加任务,如下图,选择是否创建桌面快捷方式,点击下一步按钮进行下一步操作。
5、安装准备完毕,如下图,确认安装信息后,点击安装按钮进行软件安装6、正在安装7、安装完成,如下图,选择是否运行CEIBA2,点击结束按钮即可2.2 软件卸载1、点击开始菜单找到CEIBA2文件夹,点击该文件夹下的“卸载CEIBA2”,弹出如下对话框,点击“是”按钮继续卸载即可。
2、卸载完成后,会提示是否删除用户配置信息。
用户配置信息主要是保存用户登录信息和一些下载任务注:如果卸载的同时,有Ceiba正在运行,会提示3服务器登录服务器登录可以使用的功能:实时监控、服务器回放、硬盘回放、远程设备回放、目录回放、证据中心、基础数据管理、自动下载、系统设置3.1登录3.1.1服务器登录1、双击CB2程序,弹出如下登录对话框。
2、类型选择”服务器“3、输入服务器IP地址(同时支持域名)或选择已添加的服务器名称注意:服务器默认端口为7264,如在部署服务器修改了默认端口,IP后需要加新端口4、输入正确的用户名、密码5、按 Enter键或点击登录按钮,进入到实时预览页面6、输入错误的服务器IP、用户名、密码登录时,会提示登录失败。
Adobe CC Family (CC 2015) 大师版【安装方法】请仔细阅读

Adobe Audition CC 2015.1 8.1.0.162 FEATURE
Adobe Bridge CC 6.2.0.179
Adobe Captivate 9 9.0.1.320
Adobe InCopy CC 2015 11.0.1.105 FEATURE
Adobe InDesign CC 2015.3 x32 11.3.0.34 FEATURE
Adobe InDesign CC 2015.3 11.3.0.34 FEATURE
Adobe Lightroom CC 2015.5 2015.5 FEATURE
(ACCC:No best language available for this product. so, installing it in en_US)
7: CC 2015 默认开启硬件加速,需要1080P以上分辨率支援,需要*较高*的硬件配置支援。
友情提示:硬件配置不足将会严重影响效能;双显卡驱动、设置等问题可能导致部分程序无法启动。
Adobe Photoshop Elements 14.1 14.1
Adobe Prelude CC 2015.3 4.3.0.19 FEATURE
Adobe Premiere Pro CC 2015.2 9.2.0.41 FEATURE
Adobe Premiere Elements 14.1 14.1
注:
1:标记FEATURE的为订阅更新。
2:系统需求:Win7/Win10 32位/64位。
3: 本版集成 Adobe Acrobat XI、Adobe Acrobat DC (2015) 特别版,
Practice CS 安装指南说明书

PRACTICE CS INSTALLATION INSTRUCTIONSInstalling Practice CS (1)Downloading and installing the license (2)Obtaining and installing licenses via CS Connect (2)Installing licenses received via email (2)Running desktop setup (for network installations only) (3)Use this document to do the following:▪install Practice CS®▪download and install the license and application updates, and▪run desktop setup (for network installations only)Installing Practice CSYou can install Practice CS to a network or to a standalone computer.Notes▪The installation process may require you to restart the computer. If you are installing the application on a network, be sure that all other users have logged off the network.▪Installation must be performed at the computer that you want to designate as the Database Server.▪The computer where the shared files are installed must be turned on in order for the application files to be available to users (workstations).1. If you haven’t done so already, download the application installation file from our website. (See thePractice CS download page for instructions.)2. From the computer on which the database will reside, verify that you are logged in to your computeror server as an administrator.3. Close all open applications, including background virus protection applications.4. Navigate to the EXE file that you downloaded from the website. If you saved the file to the browser’sdefault location, the EXE will be in your DOWLNLOADS folder.5. Double-click the EXE to extract the files to the default folder (C:\Practice CS\ <version> Download) orto another folder of your choosing. If the installation wizard doesn’t start automatically, navigate to the folder to which you extracted the files and double-click Setup.exe.6. When Practice CS Setup starts, click the Install Practice CS link. The wizard will guide you throughthe rest of the installation.7. Practice CS uses Microsoft® SQL Server® (including 2008 Express Edition and later) for storing data.The computer on which the data is located (the SQL server) must be turned on in order for others to access the data. In addition, you must create an exception within the firewall for the instance of SQL Server you are using (recommended) or disable the firewall (not recommended) to run Practice CS. Ifyou need assistance in creating an exception for the instance of SQL Server you are using, please refer to your firewall’s documentation.Downloading and installing the licenseAfter you install the application files, use CS Connect™ to download and install the license. In rare cases, you may receive a license file via email. If you received a license file via email, please skip the following procedure and proceed to “Installing licenses received via email” on page 2. Otherwise, complete the following procedure to install the licenses for your Practice CS application.Obtaining and installing licenses via CS ConnectComplete the following procedure to open Practice CS and use CS Connect to obtain and install the licenses electronically.1. Verify that you are logged in to your computer or server as an administrator.2. Start Practice CS.3. Click Cancel to close the login dialog.4. To open CS Connect, choose Help > About Practice CS, and click the Download Licenses button.5. Enter your firm ID (listed on your CS web account and on your mailing label) and your firm mailingaddress ZIP code, or PIN, and click Next.Note: If the Connect – Communications Setup dialog opens, verify or select the applicablecommunications settings, and then click OK to close the dialog.6. In the CS Connect dialog, click OK. CS Connect logs in to our secure data centers and downloadsyour licenses.7. Follow the remaining prompts to install the licenses.Installing licenses received via email1. If you received a Practice CS license file via email, please follow the instructions in that emailmessage and then follow the steps below.2. The installation wizard prompts you to choose the destination location for Practice CS. You need tochoose the folder where the shared files are installed. (The final destination for the application should be a folder called \WINCSI. For example, you may have installed your shared files inF:\APPS\WINCSI.)3. After you have verified the destination path, click Next to continue with the installation.Important! Even if you received your original license files via email, all updates to your Practice CS license information are available only via CS Connect. If you require an updated license in the future (for example, if you purchase a license for an optional add-on module later), you will need to download and install the updated license via CS Connect, as described in “Obtaining and installing licenses via CS Connect” on page 2.Running desktop setup (for network installations only) Important! If you installed the shared files on a network, you must also run the desktop setup program on each workstation.The desktop setup program ensures that each workstation meets the minimum operating system requirements and confirms that all required components are installed. When you run the desktop setup program, a shortcut to the single network installation of Practice CS (on your firm’s server) is added to each desktop. This keeps all firm-wide files and data in a single location on the server. We recommend that network users do not install the full application on their local computers.1. Verify that you are logged in to your computer as an administrator.2. Close all open applications.3. Click Start on the Windows taskbar and choose Run.Note: In Windows 8, enter Run in the search box.4. In the Run dialog, enter Z:\path\Practice CS\Desktop\Setup.exe (where Z represents the mappeddrive letter for the network path to the server on which you installed the shared files, and path is the path to your Practice CS folder). For example, if you installed the shared files inF:\WINAPPS\WINCSI, you would need to enter F:\WINAPPS\WINCSI\Practice CS\Desktop\Setup.exe in the Run dialog or \\<name of server>\WINAPPS\WINCSI\Practice CS\Desktop\Setup.exe.Note: If you need to uninstall the Practice CS desktop setup from a workstation, choose Start > Control Panel > Programs and Features, select Practice CS, and then click the Uninstall button.In Windows 8, enter Control Panel in the search box and choose Programs & Features.5. Click OK and follow the prompts.6. Remote Entry requires a local installation of Microsoft SQL Server, version 2008 or later. If you choseto enable Remote Entry, you will be prompted to select an existing instance of SQL Server, or to install a new instance. Select an existing instance of SQL Server to use for Remote Entry, or click the option to install a new instance. Then click Next.7. When prompted that the Practice CS setup has been successfully completed, click Finish.。
- 1、下载文档前请自行甄别文档内容的完整性,平台不提供额外的编辑、内容补充、找答案等附加服务。
- 2、"仅部分预览"的文档,不可在线预览部分如存在完整性等问题,可反馈申请退款(可完整预览的文档不适用该条件!)。
- 3、如文档侵犯您的权益,请联系客服反馈,我们会尽快为您处理(人工客服工作时间:9:00-18:30)。
EpiCalc软件简介
EpiCalc2000软件是Joe Gilman
和Mark myatt于1997年编写的 一个免费自由软件,供流行病学 专业、统计专业和临床专业等人 员使用。该软件可以满足常见简 单统计分析的需要,具有简单实 用的特点。
EpiCalc软件简介
该软件在IBM的Windows环境下
双击桌面
的快捷光 标,进入 EpiCalc 2000 软 件的运行 状态。
EpiCalc软件的下载与安装
工作需求
在实际工作中我们往往可以看到
一些经过统计处理的数据,如例 数、均数、标准差、卡方值、t 值、P值等。这些数据是否正确, 能否核对?答案是肯定的。
软件
满足这种要求最简单的办法是找
一个合适的软件,越简单,越直 观,越好。 EpiCalc是Epidemiological Calculator(流行病学计算器) 的简称,可以满足要求。
如google,yahoo等。 可以搜索到的很多网址可以 下载EpiCalc,用哪一个都可 以。如果下载不成功,可以 再找一个试一下。
软件安装
该软件的安装程序只有一个文
逐步运行,即可安装成功。软 件的安装过程中不需要提供密 码。
软件运行
运行,有良好的运行界面,可以 借助鼠标和键盘完成简单的统计 分析计算。该软件最大的特点是 可以处理二次数据,在阅读评价 论文,审稿时使用非常方便。
EpiCalc软件下载
可以从网上搜索“EpiCalc”,
即可找到很多下载的网址。 下面是一个实际搜索的案例, 供参考。
说明
搜索引擎可以选用通用的,