SelExam3-0.8
SAM 3X8E Hirel Arm 微控制器产品概述说明书

SAM 3X8E Hirel Arm® Microcontroller for AerospaceKey FeaturesCore• Arm Cortex®-M3 rev 2.0 running up to 84 MHz, delivering 105 DMips• Thumb®-2 instruction set, three-stage pipeline• Hardware divide, single cycle 32-bit multiply• Enhanced system debug with extensive breakpoint and trace capabilitiesMemory• 512 Kbytes in dual bank of 256 Kbytes embedded Flash • 64 + 32 Kbytes of SRAM memories in dual bank• 16 Kbytes ROM with embedded bootloader routines (UART, USB) and IAP routines• Static Memory Controller (SMC): SRAM, NOR, NAND support Nand Flash controller with 4 Kbyte RAM buffer and ECCSystem• Embedded voltage regulator for single supply operation • Power-on-Reset (POR), Brown-out Detector (BOD) and Watchdog for safe reset• Quartz or ceramic resonator oscillators: 3 to 20 MHz main and optional low power 32.768 kHz for RTC or device clock • High precision 8/12 MHz factory trimmed internal RC oscil-lator with 4 MHz default frequency for fast device startup • Slow clock internal RC oscillator as permanent clock for device clock in low-power mode• 3.0V to 3.6V/84 MHz operating voltage and speed grade • Temperature: –40˚C to +105˚C• One PLL for device clock and one dedicated PLL for USB2.0 high-speed mini host/device• Up to 17 peripheral DMA (PDC) channels and 6-channel central DMA plus dedicated DMA for Ethernet MAC• Low-power modesSAM3X8ECortex®-M384 MHzMPU6 LayerAHB Matrix25 ch DMAConnectivity22System1.8V RegulatorPOR, BOD2 Xtal OSC,2 RC OSC, 2 PLLWDT, RTT, RTCTRNGMemory Control16 ch, 12-bit ADC2 ch, 12-bit DACTemperatureSensor8x PWM9x 32-bit TimersUp to 103 IOsThe Microchip name and logo and the Microchip logo are registered trademarks of Microchip Technology Incorporated in the U.S.A. and other countries. Arm and Cortex are registered trademarks of Arm Limited (or its subsidiaries) in the EU and other countries All other trademarks mentioned herein are property of their respective companies. © 2021, Microchip Technology Incorporated. All Rights Reserved. 7/21 DS00002753BSpace Environment• Full wafer loT traceability• 144-lead hermetic ceramic package• Space grade screening and qualification• Total ionizing dose: up to 30 KRad (Si), QML and ESCC • Heavy ions and Protons test• Single Event latch-up LET> 62 MeV.cm2/mg• SEU full characterization at 105°C for all functional blocks •Safety application noteSAM3X8E Developement Tools• Arduino Due Development Board: /• Atmel Studio and software package: Worldwide supportecosystem of industry-leading suppliers of development tools, real-time operating systems and middleware productsOther Aerospace Applications• Full wafer lot traceability • 144-lead plastic package• QML-N/AQEC/AEC-Q100 equivalent• Unitary burn-in and temperature cycling (opt.)• Neutrons Latch-up immune (opt.)• SEU full characterization (opt.)•Other aerospace applicationProduct Selection GuidePeripherals• Up to 4 USARTs (ISO7816, IrDA ®, Flow Control, SPI, Man-chester and LIN support) and one UART• 2 TWI (I 2C compatible), up to 4 SPIs, 1 SSC (I 2S), 1 HSMCI (SDIO/SD/MMC) with up to 2 slots• 9-channel 32-bit Timer Counter (TC) for capture, compare and PWM mode, quadrature decoder logic and 2-bit gray up/down counter for stepper motor•Up to 8-channel 16-bit PWM (PWMC) with complementary output, fault input, 12-bit dead time generator counter for motor control• 32-bit low-power Real-Time Timer (RTT) and low-power Real-Time Clock (RTC) with calendar and alarm features • 16-channel 12-bit 1 msps ADC with differential input mode and programmable gain stage • 2-channel 12-bit 1 msps DAC• Ethernet MAC 10/100 (EMAC) with dedicated DMA • 2 CAN controllers with 8, mailboxes•True Random Number Generator (TRNG)© ESA/ill./HUART Jacky。
奥美晨曦系列微波传感器说明书

OS100 SERIES Mini-Infrared Transmitter e-mail:**************For latest product manuals: Shop online at User’s G ui d e***********************Servicing North America:U.S.A. Omega Engineering, Inc.Headquarters: Toll-Free: 1-800-826-6342 (USA & Canada only)Customer Service: 1-800-622-2378 (USA & Canada only)Engineering Service: 1-800-872-9436 (USA & Canada only)Tel: (203) 359-1660 Fax: (203) 359-7700e-mail:**************For Other Locations Visit /worldwideThe information contained in this document is believed to be correct, but OMEGA accepts no liability for any errors it contains, and reserves the right to alter specifications without notice.Table of ContentsSection ...................................................................PageSafety Warnings and IEC Symbols (iii)Caution and Safety Information (iii)Section 1 Introduction ....................................................................1-1Section 2Installation ......................................................................1-12.1 Unpacking and Inspection ......................................1-12.2 Electrical Connection ..............................................2-1Section 3Operation ........................................................................3-13.1 Main Board ................................................................3-13.2 Ambient Temperature ..............................................3-23.3 Atmospheric Quality ................................................3-33.4 Measuring Temperature ..........................................3-33.5 Alarm Setting ............................................................3-43.6 Adding Extension Cable...........................................3-4Section 4 Laser Sight Accessory ...................................................4-14.1 Warning and Cautions .............................................4-14.2 Operating the Laser Sight Accessory .....................4-1Section 5 Specifications .................................................................5-15.1 General .......................................................................5-15.2 Laser Sight Accessory (OS100-LS) ..........................5-2Section 6Emissivity Table .............................................................6-1iTable of FiguresFigure Description Page2-1Power Supply & Analog Output Connections ..........2-12-2 Alarm Output Connection ............................................2-13-1 Main PC Board ...............................................................3-23-2 Sensor..............................................................3-2Housing3-3 Optical Field of View .....................................................3-43-4Setting the Temperature Engineering Unit..................3-43-5Mounting Bracket OS100-MB .......................................3-53-6Water Cooling Jacket, OS100-WC ................................3-53-7Typical Water Cool Jacket Assembly ...........................3-53-8Air Purge Collar, OS100-AP..........................................3-63-9DIN Rail Mounting Adapter, OS100-DR ....................3-63-10NEMA-4 Aluminum Enclosure ....................................3-64-1Laser Sighting Accessory, OS100-LS ............................4-24-2Laser Warning Label ......................................................4-2iiSafety Warnings and IEC SymbolsThis device is marked with international safety and hazard symbols in accordance with IEC 1010. It is important to read and follow all precautions and instructions in this manual before operating or commissioning this device as it contains important information relating to safety and EMC. Failure to follow all safety precautions may result in injury and or damage to your calibrator. IEC symbols DescriptionCaution and Safety Information• If the equipment is used in a manner not specified in this manual, the protection provided by the equipment may be impaired.• The installation category is one (1).• There are no user replaceable fuses in this product• The output terminals of this product are for use with equipment (digital meters, chart recorders, etc,) which have no accessible five parts. Such equipment should comply with all the applicable safety requirements.• Do not operate the equipment in flammable or explosive environments.• All connections to the thermometer should be made via a shielded cable, 24 AWG stranded wire with the following ratings: 300V , 105°C (221°F), PVC insulation.• Power must be disconnected before making any electrical connections.• The power supply used to power the thermometer should be VDE or UL approved with the following ratings: 12 to 24vdc @150mA with overload protection of 500mA.iiiCaution, refer to accompanying documentsDirect Current Laser SymbolFrame or ChassisNOTES: ivSection 1 - IntroductionThe low cost OS101 mini-infrared transmitter provides non-contacttemperature measurement for industrial applications. The unit measures atemperature range of -18 to 538°C (0-1000°F) and provides a linear analogoutput of either 4-20 mA, 0-5 VDC, K type TC, 1 mV/°C, or 1 mV/°F.The new OS102 mini-infrared transmitter has all the functions of OS101plus a built-in LED display that shows the measured temperature indegrees F or degrees C which is switchable in the field.The miniature sensor head design 2.5 cm dia. x 6.3 cm Length (1" x 2.5") isideal for measuring temperature in confined, and hard to reach places.The aluminum sensor head as well as the rugged electronic housing (Diecast Aluminum) are NEMA-4 rated.The sensor head is connected to the electronic housing via a 1.82 m (6 feet)shielded cable as standard. The unit provides field adjustable alarmoutput.Section 2 - Installation2.1UnpackingRemove the packing list and verify that you have received all yourequipment. If you have any questions about the shipment, please callCustomer Service at:1-800-622-2378 or 203-359-1660. We can also be reached on the internet:e-mail:**************When you receive the shipment, inspect the container and equipment forany signs of damage. Note any evidence of rough handling in transit.inspection. After examination and removing contents, save packing material and carton in theevent reshipment is necessary.The following items are supplied in the box:• The infrared transmitter including the sensor head and the 1.82 m(6 feet) shielded cable• User's Manual• Mounting Nut1-1The following describes the ordering information:OS102 or OS101 - MA- *,**, where The following optional accessories are available:Here are the Features of OS101 and OS102 infrared transmitters:2.2Electrical Connection Sensor Head Cable - The Sensor head is pre-wired to a 1.8 m (6 feet)shielded cable. Plug & lock-in the male connector to the mating female connector on the aluminum housing.Power & Output Connection - Open the cover of the main aluminum housing. Slide the cable through the strain relief and connect the wires to the terminal block on the board as shown in Fig. 2-1. For Alarm output connection, refer to Fig. 2-2.2-1MA - 4/20 mA output V1 - 0 to 5 VDC output K - Thermocouple output, K type MV - Millivolt output C - 1 mV/°C output F - 1 mV/°F output HT- High temperature sensor head3-1Figure 2-2. Alarm Output Connection Section 3 - Operation3-1Main BoardThe Main Board is shown in Fig. 3-1. Here are the important components on the board:(1) - Terminal Block for Power & Output connections(2) - Single Turn Potentiometer to adjust Emissivity in tenths (0.x_)(3) - Single Turn Potentiometer to adjust Emissivity in hundreds (0._x)(4) -Slide switch to select between real time (Normal Operation) and alarm set point(5) - Alarm set point adjust, P4(6) - Sensor Head connection(7) - Input Zero adjust, P3(8) - Input Span adjust, P2(9) - Output Zero adjust, P5(10) - Output Span adjust, P6Figure 3-1. Main PC Board3.2Ambient TemperatureThe Sensing head can operate in an ambient temperature of 0 to 70°C (32to 158°F). The Sensing head in the high temperature model (-HT) can operate in an ambient temperature of 0 to 85°C (32 to 185°F) without any cooling required. The Sensing head can operate up to 200°C (392°F) using the water cool jacket accessory OS100-WC (See Fig. 3-6).There is a warm up period of 3 minutes after power up. After the warm up period, temperature measurement can be made.When the ambient temperature around the sensor head changes abruptly,the sensor head goes through thermal shock. It takes a certain amount of time for the sensor head to stabilize to the new ambient temperature. For example, it takes about 30 minutes for the sensor head to stabilize going from 25°C to 50°C (77 to 122°F) ambient temperature.The sensor head dimensions are shown in Fig. 3-2.Figure 3-2. Sensor Housing3-23-33.3Atmospheric QualityEnvironments with smoke, dust, and fumes dirty up the optical lens, and cause erroneous temperature readings. To keep the surface of the optical lens clean, the air purge collar accessory is recommended, OS100-AP , See Fig. 3-7.3.4Measuring TemperatureBefore starting to measure temperature, make sure that the following check list is met:ߜ The power and analog output connections are made (Fig. 2-1).ߜThe sensor head is connected to the main unit.ߜThe slide switch (SW1) on the main board is set to real time (Fig. 3-1).ߜThe target is larger than the optical field of view of the sensor head (Fig. 3-3).ߜThe emissivity adjustment on the main board is set properly (Fig. 3-1).ߜThe output load is within the product specification.On OS102 transmitters, follow these additional steps:ߜ The temperature display is set to °F or °C (Fig. 3-4)ߜ For 4-20mA output models, make sure an output load is added, ie. 250ohms.Figure 3-3. Optical Field Of ViewFigure 3-4. Setting the Temperature Engineering Unit3.5Alarm SettingThe unit provides 0-100% alarm set point adjustment. Here is an exampleof an alarm setting.• An OS101-MA(4/20 mA output), the alarm is to be set at 400°Ftemperature.• Connect the alarm output as shown in Fig. 2-2.• Set the slide switch (SW1) on the main board to the Alarm position.• Measure the analog output, and set the Potentiometer P4 until theoutput reads 10.4 mA which is 40% (400°F) of the temperature range.40 x (20-4)[10.4mA=+ 4]100• Set the slide switch (SW1) back to the Real Time position.• If the temperature reading is below the alarm set point, the alarmoutput stays high, otherwise it goes low.On the OS102, you can set the alarm set point directly based on thetemperature display.3.6Adding Extension CableYou can add extension cable between the Sensor Head and the mainelectronic housing up to 15.2 m (50 feet). After adding the extension cable,the Zero input potentiometer, P3 may be re-adjusted. (See Fig. 3-1, forproper analog output reading)The following figures show the mounting bracket (OS100-MB), Watercooling jacket (OS100-WC), Air purge collar (OS100-AP), DIN RailMounting adapter (OS-100-DR), and the main aluminum enclosure. TheDIN Rail Mounting adapter (OS100-DR) is mounted to the bottom of themain aluminum enclosure using two 4-40 screws.A typical water cool jacket assembly is shown in Fig. 3-7, on the following page.1. Mounting Nut2. Mounting Bracket3. Water Cool Jacket4. Sensor Head3-4Figure 3-5. Mounting Bracket OS100-MBFigure 3-6. Water Cooling Jacket, OS100-WCFigure 3-7. Typical Water Cool Jacket Assembly3-5Figure 3-8. Air Purge Collar, OS100-APFigure 3-9. DIN Rail Mounting Adapter, OS-100-DRFigure 3-10. NEMA-4 Aluminum Enclosure3-6Section 4 - Laser Sight Accessory4.1Warning and Cautionsbelow:•Use of controls or adjustments or performance of procedures other than those specified here may result in hazardous radiation exposure.• Do not look at the laser beam coming out of the lens or view directly with optical instruments - eye damage can result.• Use extreme caution when operation the laser sight accessory • Never point the laser accessory at a person • Keep out of the reach of all children4.2Operating the Laser Sight AccessoryThe laser sight accessory screws onto the front of the sensor head. This accessory is only used for alignment of the sensor head to the target area.After the alignment process, the accessory has to be removed from the front of the sensor head before temperature measurement.The laser sight accessory is powered from a small compact battery pack (included with the accessory). Connect the battery pack to the accessory using the cable provided. Aim at the target, and turn on the battery power using the slide switch on the battery pack. Adjust the sensor head position so that the laser beam points to the center of the target area. Turn off the battery pack, and remove the laser sighting accessory from the sensor head. See Fig. 4-1 for reference.4-14-2Figure 4-2. Laser Warning LabelSection 5 - Specifications5.1 - GeneralTemperature Range-18 to 538°C (0 to 1000°F)Accuracy @ 22°C (72°F)±2% of Rdg. or 2.2°C (4°F) whichever is ambient temperature & greateremissivity of 0.95 or greaterOptical Field of View6:1 (Distance/Spot Size)Repeatability±1% of Rdg.Spectral Response 5 to 14 micronsResponse Time150 msec (0 to 63% of final value)Emissivity Range0.1 to 0.99, adjustableOperating Ambient TemperatureMain Transmitter0 to 50°C (32 to 122°F)Sensor Head0 to 70°C (32 to 158°F)Sensor Head (-HT Model)0 to 85°C (32 to 185°F)Sensor Head with OS100-WC(Water Cooling Jacket)0 to 200°C (32 to 392°F)Operating Relative Humidity Less than 95% RH, non-condensingWater Flow Rate for OS100-WC0.25 GPM, room temperatureThermal Shock About 30 minutes for 25°Cabrupt ambient temperature change Warm Up Period 3 minutesAir Flow Rate for OS100-AP 1 CFM (0.5 Liters/sec.)Power12 to 24 VDC @ 100 mAAnalog OutputsMV-F 1 mV/°FMV-C 1 mV/°CK K Type TC - OS101 onlyMA 4 to 20 mAV10 to 5 VDCOutput Load requirementsMin. Load (0 to 5VDC) 1 K-OhmsMax. Load (4 to 20 mA)(Supply Power - 4 )/20 mATransmitter Housing NEMA-4 & IP65, Die Cast AluminumSensor Head Housing NEMA-4 , AluminumAlarm Output Open Drain, 100 mAAlarm Set Point0 to 100% , Adjustable via P4Alarm Deadband14°C (25°F)5-15-25.1 - General Con’t.DimensionsSensor Head25.4 OD. x 63.5 mm L(1" OD. x 2.5" L)Main Housing, OS10165.5 W x 30.5 H x 115.3 mm L(2.58" W x 1.2" H x 4.54" L)Main Housing, OS10265.5 W x 55.9 H x 115.3 mm L(2.58" W x 2.2" H x 4.54" L)Weight 272 g (0.6 lb)5.2Laser Sight Accessory (OS100-LS)Wavelength (Color)630 - 670 nm (Red)Operating Distance (Laser Dot)Up to 9.1 m (30 ft.)Max. Output Optical Power Less than 1 mW at 22°F ambienttemperature.European Classification Class 2, EN60825-1/11.2001Maximum Operating current45 mA at 3 VDCFDA Classification Complies with 21 CFR 1040.10,Class II Laser ProductBeam Diameter 5 mmBeam Divergence< 2 mradOperating Temperature0 to 50°C (32 to 122°F)Operating Relative Humidity Less than 95% RH, non-condensingPower Switch ON / OFF , Slide switch on the BatteryPackPower Indicator Red LEDPower Battery Pack, 3 VDC (Consists of two 1.5VDC AA size Lithium Batteries) Laser Warning Label Located on the head sight circumferenceIdentification Label Located on the head sight circumferenceDimensions38 DIA x 50.8 mm L(1.5" DIA x 2" L)Section 6 - Emissivity Table6-1Material Emissivity (ε)Aluminum – pure highly polished plate . . . . . . . . . . . . . . . . . . . . . . . . 0.04 to 0.06Aluminum – heavily oxidized . . . . . . . . . . . . . . . . . . . . . . . . . . . . . . . 0.20 to 0.31Aluminum – commercial sheet . . . . . . . . . . . . . . . . . . . . . . . . . . . . . . . . . . . . 0.09Brass – dull plate. . . . . . . . . . . . . . . . . . . . . . . . . . . . . . . . . . . . . . . . . . . . . . 0.22Brass – highly polished, 73.2% Cu, 26.7% Zn. . . . . . . . . . . . . . . . . . . . . . . . . 0.03Chromium – polished. . . . . . . . . . . . . . . . . . . . . . . . . . . . . . . . . . . . . 0.08 to 0.36Copper – polished. . . . . . . . . . . . . . . . . . . . . . . . . . . . . . . . . . . . . . . . . . . . . 0.05Copper – heated at 600°C (1112°F). . . . . . . . . . . . . . . . . . . . . . . . . . . . . . . 0.57Gold – pure, highly polished or liquid. . . . . . . . . . . . . . . . . . . . . . . . . 0.02 to 0.04Iron and steel (excluding stainless)– polished iron . . . . . . . . . . . . . . . . 0.14 to 0.38Iron and steel (excluding stainless)– polished cast iron. . . . . . . . . . . . . . . . . . . 0.21Iron and steel (excluding stainless)– polished wrought iron . . . . . . . . . . . . . . . 0.28Iron and steel (excluding stainless)– oxidized dull wrought iron . . . . . . . . . . . . 0.94Iron and steel (excluding stainless)– rusted iron plate . . . . . . . . . . . . . . . . . . . 0.69Iron and steel (excluding stainless)– polished steel. . . . . . . . . . . . . . . . . . . . . . 0.07Iron and steel (excluding stainless)– polished steel oxidized at600°C (1112°F). . . . . . . . . . . . . . . . . . . . 0.79Iron and steel (excluding stainless)– rolled sheet steel . . . . . . . . . . . . . . . . . . . 0.66Iron and steel (excluding stainless)– rough steel plate . . . . . . . . . . . . . 0.94 to 0.97Lead – gray and oxidized . . . . . . . . . . . . . . . . . . . . . . . . . . . . . . . . . . . . . . . 0.28Mercury . . . . . . . . . . . . . . . . . . . . . . . . . . . . . . . . . . . . . . . . . . . . . 0.09 to 0.12Molybdenum filament . . . . . . . . . . . . . . . . . . . . . . . . . . . . . . . . . . . . 0.10 to 0.20Nickel – polished . . . . . . . . . . . . . . . . . . . . . . . . . . . . . . . . . . . . . . . . . . . . . 0.07Nickel – oxidized at 649 to 1254°C (1200°F to 2290°F). . . . . . . . . . . 0.59 to 0.86Platinum – pure polished plate . . . . . . . . . . . . . . . . . . . . . . . . . . . . . . 0.05 to 0.10Platinum – wire . . . . . . . . . . . . . . . . . . . . . . . . . . . . . . . . . . . . . . . . 0.07 to 0.18Silver – pure and polished . . . . . . . . . . . . . . . . . . . . . . . . . . . . . . . . . 0.02 to 0.03Stainless steel – polished . . . . . . . . . . . . . . . . . . . . . . . . . . . . . . . . . . . . . . . . 0.07Stainless steel – Type 301 at 232 to 942°C (450°F to 1725°F). . . . . . . 0.54 to 0.63Tin – bright . . . . . . . . . . . . . . . . . . . . . . . . . . . . . . . . . . . . . . . . . . . . . . . . . 0.06Tungsten – filament . . . . . . . . . . . . . . . . . . . . . . . . . . . . . . . . . . . . . . . . . . . . 0.39Zinc – polished commercial pure . . . . . . . . . . . . . . . . . . . . . . . . . . . . . . . . . . 0.05Zinc – galvanized sheet. . . . . . . . . . . . . . . . . . . . . . . . . . . . . . . . . . . . . . . . . 0.23M E T A L S6-2Material Emissivity (ε) Asbestos Board . . . . . . . . . . . . . . . . . . . . . . . . . . . . . . . . . . . . . . . . . . . . . . .0.96 Asphalt, tar, pitch . . . . . . . . . . . . . . . . . . . . . . . . . . . . . . . . . . . . . . .0.95 to 1.00 Brick– red and rough . . . . . . . . . . . . . . . . . . . . . . . . . . . . . . . . . . . . . . . . . .0.93 Brick– fireclay . . . . . . . . . . . . . . . . . . . . . . . . . . . . . . . . . . . . . . . . . . . . . . .0.75 Carbon– filament . . . . . . . . . . . . . . . . . . . . . . . . . . . . . . . . . . . . . . . . . . . . .0.53 Carbon– lampblack - rough deposit . . . . . . . . . . . . . . . . . . . . . . . . . .0.78 to 0.84 Glass- Pyrex, lead, soda . . . . . . . . . . . . . . . . . . . . . . . . . . . . . . . . . .0.85 to 0.95 Marble– polished light gray . . . . . . . . . . . . . . . . . . . . . . . . . . . . . . . . . . . . .0.93 Paints, lacquers, and varnishes– Black matte shellac . . . . . . . . . . . . . . . . . . . .0.91 Paints, lacquers, and varnishes– aluminum paints . . . . . . . . . . . . . . . .0.27 to 0.67 Paints, lacquers, and varnishes– flat black lacquer . . . . . . . . . . . . . . .0.96 to 0.98 Paints, lacquers, and varnishes– white enamel varnish . . . . . . . . . . . . . . . . . .0.91 Porcelain– glazed . . . . . . . . . . . . . . . . . . . . . . . . . . . . . . . . . . . . . . . . . . . . .0.92 Quartz– opaque . . . . . . . . . . . . . . . . . . . . . . . . . . . . . . . . . . . . . . . .0.68 to 0.92 Roofing Paper . . . . . . . . . . . . . . . . . . . . . . . . . . . . . . . . . . . . . . . . . . . . . . .0.91 Tape– Masking . . . . . . . . . . . . . . . . . . . . . . . . . . . . . . . . . . . . . . . . . . . . . .0.95 Water . . . . . . . . . . . . . . . . . . . . . . . . . . . . . . . . . . . . . . . . . . . . . . . .0.95 to 0.96 Wood– planed oak . . . . . . . . . . . . . . . . . . . . . . . . . . . . . . . . . . . . . . . . . . . .0.90 NONMETALSNOTES:6-3NOTES: 6-4OMEGA’s policy is to make running changes, not model changes, whenever an improvement is possible. T his affords our customers the latest in technology and engineering.OMEGA is a trademark of OMEGA ENGINEERING, INC.© Copyright 2017 OMEGA ENGINEERING, INC. All rights reserved. T his document may not be copied, photocopied, reproduced, translated, or reduced to any electronic medium or machine-readable form, in whole or in part, without the prior written consent of OMEGA ENGINEERING, INC.FOR WARRANTY RETURNS, please have the following information available BEFORE contacting OMEGA:1. P urchase Order number under which the product was PURCHASED,2. M odel and serial number of the product under warranty, and3. Repair instructions and/or specific problems relative to the product.FOR NON-WARRANTY REPAIRS, consult OMEGA for current repair charges. Have the following information available BEFORE contacting OMEGA:1. Purchase Order number to cover the COST of the repair,2. Model and serial number of the product, and 3. Repair instructions and/or specific problems relative to the product.RETURN REQUESTS/INQUIRIESDirect all warranty and repair requests/inquiries to the OMEGA Customer Service Department. BEFORE RET URNING ANY PRODUCT (S) T O OMEGA, PURCHASER MUST OBT AIN AN AUT HORIZED RET URN (AR) NUMBER FROM OMEGA’S CUST OMER SERVICE DEPART MENT (IN ORDER T O AVOID PROCESSING DELAYS). The assigned AR number should then be marked on the outside of the return package and on any correspondence.T he purchaser is responsible for shipping charges, freight, insurance and proper packaging to preventbreakage in transit.WARRANTY/DISCLAIMEROMEGA ENGINEERING, INC. warrants this unit to be free of defects in materials and workmanship for a period of 25 months from date of purchase. OMEGA’s WARRANTY adds an additional one (1) month grace period to the normal two (2) year product warranty to cover handling and shipping time. This ensures that OMEGA’s customers receive maximum coverage on each product.If the unit malfunctions, it must be returned to the factory for evaluation. OMEGA’s Customer Service Department will issue an Authorized Return (AR) number immediately upon phone or written request. Upon examination by OMEGA, if the unit is found to be defective, it will be repaired or replaced at no charge. OMEGA’s WARRANT Y does not apply to defects resulting from any action of the purchaser, including but not limited to mishandling, improper interfacing, operation outside of design limits, improper repair, or unauthorized modification. T his WARRANT Y is VOID if the unit shows evidence of having been tampered with or shows evidence of having been damaged as a result of excessive corrosion; or current, heat, moisture or vibration; improper specification; misapplication; misuse or other operating conditions outside of OMEGA’s control. Components in which wear is not warranted, include but are not limited to contact points, fuses, and triacs.OMEGA is pleased to offer suggestions on the use of its various products. However, OMEGA neither assumes responsibility for any omissions or errors nor assumes liability for any damages that result from the use of its products in accordance with information provided by OMEGA, either verbal or written. OMEGA warrants only that the parts manufactured by the company will be as specified and free of defects. OMEGA MAKES NO OTHER WARRANTIES OR REPRESENTATIONS OF ANY KIND WHATSOEVER, EXPRESSED OR IMPLIED, EXCEPT THAT OF TITLE, AND ALL IMPLIED W ARRANTIES INCLUDING ANY W ARRANTY OF MERCHANTABILITY AND FITNESS FOR A PARTICULAR PURPOSE ARE HEREBY DISCLAIMED. LIMITATION OF LIABILITY: The remedies of purchaser set forth herein are exclusive, and the total liability of OMEGA with respect to this order, whether based on contract, warranty, negligence, indemnification, strict liability or otherwise, shall not exceed the purchase price of the component upon which liability is based. In no event shall OMEGA be liable for consequential, incidental or special damages.CONDITIONS: Equipment sold by OMEGA is not intended to be used, nor shall it be used: (1) as a “Basic Component” under 10 CFR 21 (NRC), used in or with any nuclear installation or activity; or (2) in medical applications or used on humans. Should any Product(s) be used in or with any nuclear installation or activity, medical application, used on humans, or misused in any way, OMEGA assumes no responsibility as set forth in our basic WARRANT Y /DISCLAIMER language, and, additionally, purchaser will indemnify OMEGA and hold OMEGA harmless from any liability or damage whatsoever arising out of the use of theProduct(s) in such a manner.Where Do I Find Everything I Need forProcess Measurement and Control?OMEGA…Of Course!Shop online at TEMPERATUREM U Thermocouple, RTD & Thermistor Probes, Connectors,Panels & AssembliesM U Wire: Thermocouple, RTD & ThermistorM U Calibrators & Ice Point ReferencesM U Recorders, Controllers & Process MonitorsM U Infrared PyrometersPRESSURE, STRAIN AND FORCEM U Transducers & Strain GagesM U Load Cells & Pressure GagesM U Displacement TransducersM U Instrumentation & AccessoriesFLOW/LEVELM U Rotameters, Gas Mass Flowmeters & Flow ComputersM U Air Velocity IndicatorsM U Turbine/Paddlewheel SystemsM U Totalizers & Batch ControllerspH/CONDUCTIVITYM U pH Electrodes, Testers & AccessoriesM U Benchtop/Laboratory MetersM U Controllers, Calibrators, Simulators & PumpsM U Industrial pH & Conductivity EquipmentDATA ACQUISITIONM U Communications-Based Acquisition SystemsM U Data Logging SystemsM U Wireless Sensors, Transmitters, & ReceiversM U Signal ConditionersM U Data Acquisition SoftwareHEATERSM U Heating CableM U Cartridge & Strip HeatersM U Immersion & Band HeatersM U Flexible HeatersM U Laboratory HeatersENVIRONMENTALMONITORING AND CONTROLM U Metering & Control InstrumentationM U RefractometersM U Pumps & TubingM U Air, Soil & Water MonitorsM U Industrial Water & Wastewater TreatmentM U pH, Conductivity & Dissolved Oxygen InstrumentsM3572/1217。
Schneider Electric X80 BMXAMI0810 解离分析模块数据表说明书

T h e i n f o r m a t i o n p r o v i d e d i n t h i s d o c u m e n t a t i o n c o n t a i n s g e n e r a l d e s c r i p t i o n s a n d /o r t e c h n i c a l c h a r a c t e r i s t i c s o f t h e p e r f o r m a n c e o f t h e p r o d u c t s c o n t a i n e d h e r e i n .T h i s d o c u m e n t a t i o n i s n o t i n t e n d e d a s a s u b s t i t u t e f o r a n d i s n o t t o b e u s e d f o r d e t e r m i n i n g s u i t a b i l i t y o r r e l i a b i l i t y o f t h e s e p r o d u c t s f o r s p e c i f i c u s e r a p p l i c a t i o n s .I t i s t h e d u t y o f a n y s u c h u s e r o r i n t e g r a t o r t o p e r f o r m t h e a p p r o p r i a t e a n d c o m p l e t e r i s k a n a l y s i s , e v a l u a t i o n a n d t e s t i n g o f t h e p r o d u c t s w i t h r e s p e c t t o t h e r e l e v a n t s p e c i f i c a p p l i c a t i o n o r u s e t h e r e o f .N e i t h e r S c h n e i d e r E l e c t r i c I n d u s t r i e s S A S n o r a n y o f i t s a f f i l i a t e s o r s u b s i d i a r i e s s h a l l b e r e s p o n s i b l e o r l i a b l e f o r m i s u s e o f t h e i n f o r m a t i o n c o n t a i n e d h e r e i n .Product data sheetCharacteristicsBMXAMI0810isolated analog input module X80 - 8 inputs -high speedProduct availability: Stock - Normally stocked in distribution facilityMainRange of product Modicon X80Product or component typeAnalog input module Electrical connection 1 connector 28 ways Isolation between chan-nels Isolated Input levelHigh level Analogue input number 8Analogue input typeCurrent +/- 20 mA Current 0...20 mA Current 4...20 mA Voltage +/- 10 V Voltage +/- 5 V Voltage 0...10 V Voltage 0...5 V Voltage 1...5 VComplementaryAnalog/digital conversion 16 bits Analogue input resolution 15 bits + sign Input impedance10 MOhmPermitted overload on inputs+/- 30 mA 0...20 mA +/- 30 mA 4...20 mA +/- 30 V +/- 10 V +/- 30 V +/- 5 V +/- 30 V 0...10 V +/- 30 V 0...5 V +/- 30 V 1...5 V+/- 30 mA +/- 20 mA Internal conversion resistor250 OhmPrecision of internal conversion resistor 0.1 % - 15 ppm/°C Type of filter First order digital filteringFast read cycle time 1 ms + 1 ms x number of channels used Nominal read cycle time 9 ms for 8 channelsMeasurement error<= 0.1 % of full scale +/- 10 V 0...60 °C <= 0.1 % of full scale +/- 5 V 0...60 °C <= 0.1 % of full scale 0...10 V 0...60 °C <= 0.1 % of full scale 0...5 V 0...60 °C <= 0.1 % of full scale 1...5 V 0...60 °C <= 0.3 % of full scale +/- 20 mA 0...60 °C <= 0.3 % of full scale 0...20 mA 0...60 °C <= 0.3 % of full scale 4...20 mA 0...60 °C 0.075 % of full scale +/- 10 V 25 °C 0.075 % of full scale +/- 5 V 25 °C 0.075 % of full scale 0...10 V 25 °C 0.075 % of full scale 0...5 V 25 °C 0.075 % of full scale 1...5 V 25 °C 0.15 % of full scale +/- 20 mA 25 °C 0.15 % of full scale 0...20 mA 25 °C 0.15 % of full scale 4...20 mA 25 °CTemperature drift30 ppm/°C +/- 5 V50 ppm/°C +/- 20 mA30 ppm/°C +/- 10 V30 ppm/°C 0...10 V30 ppm/°C 0...5 V30 ppm/°C 1...5 V50 ppm/°C 0...20 mA50 ppm/°C 4...20 mACommon mode between channels>= 80 dBDigital value format+/- 32767 in user scale+/- 10000 by defaultIsolation voltage300 V DC between channels1400 V DC between channels and ground1400 V DC between channels and bus Measurement resolution0.36 mV +/- 10 V0.36 mV 0...10 V0.36 mV 0...5 V0.36 mV 1...5 V0.36 mV +/- 5 V1.4 µA +/- 20 mA1.4 µA 0...20 mA1.4 µA 4...20 mAMaximum conversion value+/- 11.4 V +/- 10 V+/- 11.4 V 0...10 V+/- 11.4 V 0...5 V+/- 11.4 V 1...5 V0...30 mA +/- 20 mA0...30 mA 0...20 mA0...30 mA 4...20 mA0...30 mA +/- 5 VStatus LED 1 LED green RUN1 LED per channel green channel diagnostic1 LED red ERR1 LED red I/OProduct weight0.36 lb(US) (0.165 kg)Power consumption in W0.32 W 3.3 V DC typical0.48 W 3.3 V DC maximum1 W 24 V DC typical1.54 W 24 V DC maximum EnvironmentVibration resistance 3 gnShock resistance30 gnAmbient air temperature for storage-40...185 °F (-40...85 °C)Ambient air temperature for operation32...140 °F (0...60 °C)Relative humidity 5...95 % 131 °F (55 °C) without condensation IP degree of protection IP20Directives2014/35/EU - low voltage directive2014/30/EU - electromagnetic compatibility2012/19/EU - WEEE directiveProduct certifications CERCMMerchant NavyULEACCSAStandards EN 61010-2-201EN 61000-6-4EN 61131-2EN 61000-6-2Protective treatment TCOperating altitude0...6561.68 ft (0...2000 m)2000...5000 m (with derating factor)Ordering and shipping detailsCategory18160 - MODICON M340Discount Schedule PC34GTIN00785901676003Nbr. of units in pkg.1Package weight(Lbs)0.35999999999999999Returnability YCountry of origin FROffer SustainabilitySustainable offer status Green Premium productRoHS (date code: YYWW)Compliant - since 0901 - Schneider Electric declaration of conformity Schnei-der Electric declaration of conformityREACh Reference not containing SVHC above the thresholdProduct environmental profile Available Product Environmental ProfileProduct end of life instructions AvailableCalifornia proposition 65WARNING: This product can expose you to chemicals including:- - - - - - - Substance 1Lead and lead compounds, which is known to the State of California to cause can-cer and birth defects or other reproductive harm.- - - - - - - More information For more information go to Contractual warrantyWarranty period18 monthsDimensions DrawingsModules Mounted on RacksDimensions(1)With removable terminal block (cage, screw or spring).(2)With FCN connector.(3)On AM1 ED rail: 35 mm wide, 15 mm deep. Only possible with BMXXBP0400/0400H/0600/0600H/0800/0800H rack.Connections and SchemaWiring DiagramVIx + pole input for channel x COM x - pole input for channel xIIx current reading resistor + input Channel 0voltage sensor Channel 12-wire current sensor。
赛默飞离子色谱安培检测器参数
文章标题:探索赛默飞离子色谱安培检测器参数在化学分析领域,赛默飞离子色谱安培检测器参数是一个关键的主题。
本文将深入探讨该主题,为您带来全面的了解和深入的知识。
一、赛默飞离子色谱安培检测器简介赛默飞离子色谱安培检测器是用于离子色谱分析的重要仪器,主要用于检测离子和有机分子。
它具有高灵敏度、高选择性和宽线性范围的特点,被广泛应用于环境监测、食品安全、生物医药等领域。
二、赛默飞离子色谱安培检测器参数的深度解析1. 灵敏度赛默飞离子色谱安培检测器的灵敏度是衡量其检测能力的重要参数之一。
它受到多种因素的影响,如检测器的类型、工作原理、样品的性质等。
在实际应用中,我们需要根据样品的特点和分析要求来选择合适的灵敏度。
2. 选择性选择性是指赛默飞离子色谱安培检测器对目标化合物的识别能力。
它受到检测器的分辨能力、背景噪音的影响。
在实际分析中,我们需要确保检测器具有良好的选择性,能够准确识别目标化合物,同时排除干扰物质的干扰。
3. 线性范围赛默飞离子色谱安培检测器的线性范围是指其响应与样品浓度之间的关系。
通常情况下,我们希望检测器具有较宽的线性范围,能够适应不同浓度范围的样品分析。
4. 稳定性稳定性是评价赛默飞离子色谱安培检测器性能的重要指标之一。
它包括检测器的信噪比、漂移和重复性等方面。
在实际应用中,稳定的检测器能够提供准确可靠的分析结果,对于保证实验的可重复性和可比性至关重要。
三、总结与展望赛默飞离子色谱安培检测器参数对于确保分析结果的准确性和可靠性具有重要意义。
在实际应用中,我们需要充分理解这些参数的意义和影响,根据样品的特点和分析要求来选择合适的参数设置。
希望本文的介绍能够帮助您更好地理解赛默飞离子色谱安培检测器参数,从而在实验中取得更好的分析结果。
个人观点:我认为赛默飞离子色谱安培检测器参数的选择对于分析结果具有至关重要的影响。
在实际应用中,我们需要充分了解这些参数的含义和影响,根据具体的分析要求来合理设置参数,以确保分析结果的准确性和可靠性。
Z-5000系列偏振塞曼原子吸收光谱仪使用说明书(中文)

仪器说明书Z-5000系列偏振塞曼原子吸收光谱仪-------------------------------------(操作手册:石墨炉法)日立公司前言我会感谢你们购买了日立Z-5000系列偏振塞曼原子吸收光谱仪。
Z-5000系列偏振塞曼原子吸收光谱仪是用于元素分析的仪器这本说明书适用于具有一定化学基础知识使用。
用此仪器进行分析测定时,要求操作人场,因为仪器要求点燃火焰,原子化器需要高温加热,请牢记误操作仪器、化学试剂和样品,将不仅导致错误的分析数据操作说明由三部手册组成( Z-5000系列偏振塞曼原子吸收光谱仪维修手册。
( Z-5000系列偏振塞曼原子吸收光谱仪,火焰法分析部分手册。
( Z-5000系列偏振塞曼原子吸收光谱仪,石墨炉分析法操作手册。
安全注意事项在维修手册中介绍,所以使用仪器前一定要阅读维修手册。
石墨炉分析法操作手册介绍了使用Z-5000系列偏振塞曼原子吸收光谱仪如何进行石墨炉法分析,在用此仪器前,必须阅读这本手册。
火焰分析法的维修参见相应的操作手,而且也对个人安全构成伤害。
目录1前期工作 ................................................... 1-11.1检查仪器.................................................... 1-11.2 准备工作 ................................................... 1-21.2.1安装空心阴极灯............................................. 1-21.2.2打开气源................................................... 1-41.2.3打开排气管道的电源......................................... 1-51.2.3.1选择石墨管............................................... 1-51.2.3.2安装石墨管............................................... 1-61.2.4打开排气管道电源........................................... 1-91.3 Z-5000系列偏振塞曼原子吸收光谱仪............................ 1-102正确打开电源顺序............................................. 2-12.1打开光谱仪主机电源........................................... 2-12.2打开计算机电源............................................... 2-13开始操作软件................................................. 3-13.1启动原子吸收光谱仪的应用栏 .................................. 3-13.2启动原子吸收光谱仪的应用状态 ................................ 3-13.2.1在启动栏目下与仪器选择连通................................. 3-13.2.2在启动栏目下与仪器非选择连通............................... 3-33.3原子吸收光谱仪窗口的基本操作................................. 3-33.3.1单击和双击键............................................... 3-33.3.2窗口内容的名称和功能....................................... 3-33.3.3对话窗口的关闭............................................. 3-63.3.4输入数值和字母............................................. 3-73.3.5命名文件................................................... 3-83.3.6询求帮助................................................... 3-114.测量条件的设定.............................................. 4-14.1使用自动开始测量条件........................................ 4-14.2从文件库提取测量条件........................................ 4-14.3测量条件总缆................................................ 4-24.3.1显示方法设制窗口........................................... 4-34.3.2设置分析模式............................................... 4-34.3.3设置分析元素............................................... 4-34.3.4仪器设置................................................... 4-5(i)4.3.5设置分析条件............................................... 4-84.3.6设置工作曲线表............................................. 4-124.3.7设置样品表................................................. 4-174.3.8设置自动取样器............................................. 4-194.3.9 QC设置.................................................... 4-304.3.10设置报告格式.............................................. 4-434.3.11输入[分析名称]和[命令] .................................... 4-454.4测量条件的储存.............................................. 4-464.5测量条件的确认.............................................. 4-475.自动取样方式测量............................................ 5-15.1准备测量.................................................... 5-15.2准备自动取样器.............................................. 5-25.2.1提供清洗溶液............................................... 5-25.2.1.1配制清洗溶液............................................. 5-25.2.1.2运行清洗溶液............................................. 5-25.2.2调整喷嘴................................................... 5-35.2.3设置样品和试剂、容器....................................... 5-65.3运行冷却水.................................................. 5-95.4清洗石墨管.................................................. 5-105.5校正GA光学温度控制......................................... 5-105.6开始测量.................................................... 5-115.6.1开始测量................................................... 5-125.6.2检查工作曲线............................................... 5-125.6.3中断测量................................................... 5-135.6.4 停止测量................................................... 5-135.7阶段测量和连续测量......................................... 5-145.7.1连续测量不同的元素......................................... 5-145.7.2同一条件下连续测量......................................... 5-145.7.3使用工作曲线连续测量....................................... 5-165.7.4终止测量................................................... 5-175.7.5停止冷却水................................................. 5-186 手动方式测量................................................ 6-16.1准备测量.................................................... 6-16.2通冷却水.................................................... 6-26.3清洗石墨管.................................................. 6-26.4校正GA光学温度控制......................................... 6-36.5开始测量.................................................... 6-46.5.1进行自动调零............................................... 6-56.5.2测量标准样................................................. 6-66.5.3检查工作曲线............................................... 6-6(ii)6.5.4测量未知样品............................................... 6-76.5.5中断测量................................................... 6-86.5.6停止测量................................................... 6-86.6终止或连续测量.............................................. 6-96.6.1改变分析元素连续测量....................................... 6-96.6.2同样条件下连续测量......................................... 6-96.6.3用工作曲线连续测量......................................... 6-116.6.4终止测量................................................... 6-126.6.5停止冷却水................................................. 6-137.处理测量结果............................................... 7-17.1测量结果显示................................................. 7-17.1.1单个元素显示............................................... 7-37.1.2详细数据表................................................. 7-37.1.3浓度表显示................................................. 7-47.1.4浓度校正表显示............................................. 7-57.1.5工作曲线显示............................................... 7-67.1.6光谱图形显示............................................... 7-77.2测量结果重新计算............................................ 7-107.2.1删除样品结果............................................... 7-107.2.2恢复样品结果............................................... 7-107.2.3样品结果互换............................................... 7-117.2.4改变测量方式............................................... 7-127.2.5 测定样品空白............................................... 7-127.2.6校正浓度................................................... 7-137.2.7样品重命名................................................. 7-147.2.8改变样品测量单位........................................... 7-147.2.9改变小数点后位数........................................... 7-157.2.10改变工作曲线.............................................. 7-157.2.11确定基线.................................................. 7-177.3储存测量结果................................................ 7-177.4打开测量结果文件............................................ 7-187.5打印测量结果................................................ 7-207.6其他应用测量结果使用........................................ 7-217.6.1交换数据................................................... 7-217.6.2使用文件交换数据........................................... 7-227.7原子吸收光谱非数据处理的启动 ................................ 7-238各种测量方法................................................. 8-18.1吸收模式.................................................... 8-38.2工作曲线模式................................................ 8-6(iii)8.3标准加入法(炉内加入法) .................................... 8-108.4标准加入法(炉外加入法) .................................... 8-148.5简单标准加入法(炉内加入法) ................................ 8-198.6简单标准加入法(炉外加入法) ................................ 8-248.7等份标准溶液测量............................................ 8-298.8修改法测量.................................................. 8-338.9回归法测量.................................................. 8-388.10浓度测量................................................... 8-448.11稀释法测量................................................. 8-488.12热注样测量................................................. 8-529QC测量..................................................... 9-19.1检查工作曲线................................................. 9-19.1.1执行....................................................... 9-19.1.2打印报告................................................... 9-19.2检查样品.................................................... 9-29.2.1执行....................................................... 9-29.2.2打印报告................................................... 9-29.3检查QC样品................................................. 9-39.3.1执行....................................................... 9-39.3.2打印报告................................................... 9-39.4检查STD .................................................... 9-49.4.1执行....................................................... 9-49.4.2打印报告................................................... 9-49.5检查回收率.................................................. 9-59.5.1执行....................................................... 9-59.5.2打印报告................................................... 9-510结束软件 ................................................... 10-110.1关闭原子吸收光谱应用程序 ................................... 10-110.2退出Windows ............................................... 10-111结束工作 ................................................... 11-111.1关闭仪器电源............................................... 11-111.2最终步骤................................................... 11-112监视器窗口.................................................. 12-112.1[测量]菜单 ................................................. 12-212.1.1[开始测量]和[取消测量] ..................................... 12-212.1.2[自动零点]命令............................................. 12-212.1.3[回归法]命令............................................... 12-2(iv)12.1.4[准备开始]和[下一个元素]命令............................... 12-212.1.5[结束程序]和[重新设置程序]命令............................. 12-212.1.6[停止]命令................................................. 12-312.2[仪器监测]菜单.............................................. 12-312.2.1[条件设置…]命令........................................... 12-312.2.2[最高温度…]命令........................................... 12-312.2.3[关闭灯源]命令............................................. 12-412.2.4[检验自动取样器]命令....................................... 12-412.2.5[转到波长…]命令........................................... 12-712.2.6[波长校正…]命令........................................... 12-712.2.7[PMT电压…]命令........................................... 12-812.2.8[背景校正…]命令........................................... 12-812.2.9[检查火焰气体]命令......................................... 12-912.2.10[光源温度校正]命令........................................ 12-912.2.11[图形]命令................................................ 12-912.2.12[设置光源位置]命令........................................ 12-1012.3[监视器]菜单 ............................................... 12-1112.3.1[监视器条件…]命令......................................... 12-1112.4[应用]菜单 ................................................. 12-1212.4.1[仪器启动…]命令........................................... 12-1212.4.2[分析信息…]命令........................................... 12-1312.4.3[仪器数据库…]命令......................................... 12-1512.4.4[错误数据栏…]命令......................................... 12-1613消除故障 ................................................... 13-1 14错误信息 ................................................... 14-115偏振赛曼方法原理............................................ 15-1(v)1.前期工作在开始操作原子吸收光谱仪时,要严格履行以下程序。
SEC-MALS分子量检测
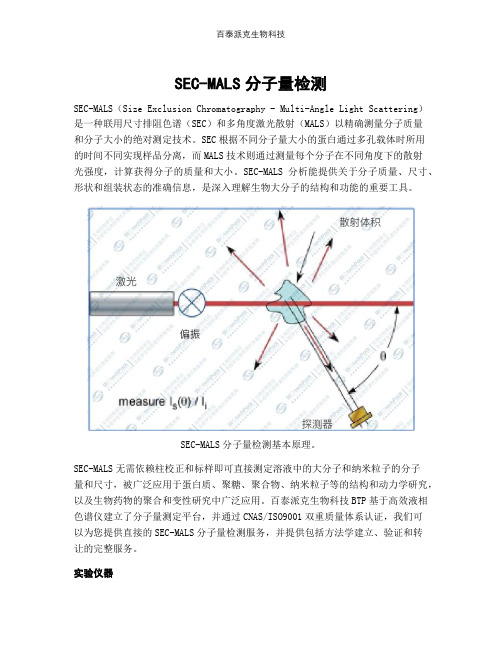
SEC-MALS分子量检测SEC-MALS(Size Exclusion Chromatography - Multi-Angle Light Scattering)是一种联用尺寸排阻色谱(SEC)和多角度激光散射(MALS)以精确测量分子质量和分子大小的绝对测定技术。
SEC根据不同分子量大小的蛋白通过多孔载体时所用的时间不同实现样品分离,而MALS技术则通过测量每个分子在不同角度下的散射光强度,计算获得分子的质量和大小。
SEC-MALS分析能提供关于分子质量、尺寸、形状和组装状态的准确信息,是深入理解生物大分子的结构和功能的重要工具。
SEC-MALS分子量检测基本原理。
SEC-MALS无需依赖柱校正和标样即可直接测定溶液中的大分子和纳米粒子的分子量和尺寸,被广泛应用于蛋白质、聚糖、聚合物、纳米粒子等的结构和动力学研究,以及生物药物的聚合和变性研究中广泛应用。
百泰派克生物科技BTP基于高效液相色谱仪建立了分子量测定平台,并通过CNAS/ISO9001双重质量体系认证,我们可以为您提供直接的SEC-MALS分子量检测服务,并提供包括方法学建立、验证和转让的完整服务。
实验仪器高效液相色谱(紫外检测器):Waters 2695/2996。
技术应用可以对混合样品的分子量进行检测,适用于较为复杂的混合样品。
案例示意将准备好的样品加入SEC系统中,大的分子因为无法进入孔隙而先被洗脱出柱,小的分子则因为进入孔隙内部而后被洗脱出柱。
从SEC柱中洗脱的样品接着流入MALS检测器。
MALS检测器通过向样品散射激光并从多个角度测量散射光的强度,可以计算出样品的绝对分子量。
最后通过数据分析软件对MALS原始数据进行分析以获取样品的分子量和聚合度信息。
样品色谱检测示意图示,横坐标为出峰时间,纵坐标为紫外信号值。
分子量检测结果示意图,横坐标为时间,纵坐标为摩尔质量。
样品分子量分布表。
中/英文项目报告在技术报告中,百泰派克会为您提供详细的中英文双语版技术报告,报告包括:1. 实验步骤(中英文)。
洛美E 2当地电流分离器和信号分离器SIL3 SIL2,HART透明度说明书

E 1user safety manualLOREME 12, rue des Potiers d'Etain Actipole BORNY - B.P. 35014 - 57071 METZ CEDEX 3Téléphone 03.87.76.32.51 - Télécopie 03.87.76.32.52Nouscontacter:******************************@Loreme.frManuel téléchargeable sur: www.loreme.frREV 2-18/10/19CAL23DMA-S2SIL2 SIL3Commissioning and safety manual4-20 mA Current loop isolator and signal splitterSIL3 / SIL2, HART transparencySommaire1 Introduction E3 1.1 General Information E3 1.2 Functions and intended uses E3 1.3 Standards and Guidelines E32 Safety function and safety state E4 2.1 Safety function E4 2.2 Safety fallback position E43 Safety Recommendation E4 3.1 Interfaces E4 3.2 Configuration / Calibration E4 3.3 Useful lifetime E44 Installation, commissioning and replacement E5 4.1 Front panel description E5 4.2 Electrical connection E6 4.3 Wiring E65 Commissioning and periodic proof E7 5.1 control steps E7 5.2 proof interval E7Annex 1: EMC consideration E8 Annex 2 : terms et definitions.E9 E 2LOREME 12, rue des Potiers d'Etain - 57071 Metz 03.87.76.32.51-Fax03.87.76.32.52-Email:******************************@Loreme.frSOMMAIRE4-20 mA Current loop isolator and signal splitterSIL3 / SIL2, HART transparency1 Introduction1.1 General InformationThis manual contains necessary information for product integration to ensure the functional safety of related loops.All the failure modes and the HFT of the module are specified in the FMEA analysis referenced AMDEC_CAL23DmA Revision A1Other documents:Technical datasheet CAL23DmA- EMC conformity declaration CAL23DmA- FMEA analysis CAL23DmAThe mentioned documents are available on www.loreme.frThe assembly, installation, commissioning and maintenance can only be performed by trained personnelqualified and have read and understood the instructions in this manual.When it is not possible to correct the defects, the equipment must be decommissioned, precaution must be taken to pro-tect against accidental use. Only the manufacturer can bring the product to be repaired.Failure to follow advice given in this manual can cause a deterioration in security features, and damage to property, en-vironment or people.1.2 Functions and intended usesThe transducer CAL23DmA-S2 provides isolation and duplication of analog current loop 4 ....20mAIt also allows the transmission of HART signals between input and output 1.an auxiliary power supply for a loop powered sensor is available.The devices are designed, manufactured and tested according to security rules.They should be used only for the purposes described and in compliance with environmental conditionscontained in the data sheet: http://www.loreme.fr/fichtech/CAL23DmA_eng.pdf1.3 Standards and GuidelinesThe devices are evaluated according to the standards listed below:• Functional safety according to IEC 61508, 2000 edition:Standard for functional safety of electrical / electronic / programmable electronic .The evaluation of the material was performed by "failure modes and effects analysis"(IEC 60812 - Issue 2 - 2006)to determine the device safe failure fraction (SFF)The FMEA is based on (IEC 62380-2004)Reliability data handbook. Universal model for reliability prediction of electronics components, PCBs and equipment1.4 Manufacturer informationLOREME SAS12, rue des potiers d'étain 57071 Actipole Metz Bornywww.loreme.frE 3SOMMAIRE4-20 mA Current loop isolator and signal splitterSIL3 / SIL2, HART transparency2 Safety function and safety state2.1 Safety functionThe safety function of the device is completed, as long as the outputs reproduce the input current(4 ... 20 mA) with a tolerance of + / -2%.The operation range of the output signal goes from 3.8 mA to 20.5 mA2.2 Safety fallback positionThe safety fallback state is defined by output current outside the range of 3.6 mA to 21mA.• Either an output current <3.6 mA• Either an output current> 21 mAThe application should always be configured to detect the current value out of range(<3.6 mA -> 21 mA) and considered "faulty ".Thus, in the FMEA study, this condition is not considered dangerous.The reaction time for all safety functions is <30 ms.3 Safety Recommendation3.1 InterfacesThe device has the following interfaces.• safety interfaces: input, output 1, output 2, simulation link (at rear the front panel)• not safety interfaces : noHART communication is not relevant for functional safety3.2 Configuration / Calibrationno hardware configuration is needed, the calibration is only possible by factory return .no changes should be made to the device3.3 Useful lifetimeAlthough a constant failure rate is assumed by the probabilistic estimation,that it applies only to the useful lifetime of components.Beyond this lifetime, the probability of failure is increasing significantly with time.The useful lifetime is very dependent components themselvesand operating conditions such as temperature, particularly(Electrolytic capacitors are very sensitive to temperature).This assumption of a constant failure rate is based on the bathtub curve,which shows the typical behavior of electronic components.Therefore, the validity of this calculation is limited to the useful life of each component.It is assumed that early failures are detected for a very high percentage during the burn inand the installation period, assuming a constant failure rate during the useful life remains valid.according to IEC 61508-2, a useful lifetime based on the feedback, must be considered.Experience has shown that the useful lifetime is between 15 and 20 years, and may be higherif there are no components with reduced lifetime in security function.(Such as electrolytic capacitors, relays, flash memory, opto coupler)and if the ambient temperature is well below 60 °C.Note:The useful lifetime corresponds to constant random failure rate of the device.The effective lifetime may be higher.user must ensure that the device is no longer necessary for the security before its disposal.E 4LOREME 12, rue des Potiers d'Etain - 57071 Metz ☎03.87.76.32.51-Fax03.87.76.32.52-Email:******************************@Loreme.frSOMMAIRE4-20 mA Current loop isolator and signal splitterSIL3 / SIL2, HART transparency4 Installation, commissioning and replacementOperating capacity and current error reporting should be checkedduring commissioning (validation) see section: "commissioning and periodic proof"and at appropriate intervals recommended in paragraph: " proof interval "Any device that does not satisfy the commissioning control must be replaced.WARNING!No user maintenance should be conducted, a defective device must be replaced by a new device of the same type.For a repair return or recalibration, it is very important that all types of equipment failures are reportedto allow the company to take corrective action to prevent systematic errors.4.1 Front panel descriptionConvention:- The green LED indicate correct operation.- Red LED indicate a warning or a defect.Output 1 current passes through the Green led andindicates that the output loop is closed. (Current flow)the green LED goes OFF when opening the output loopand when using test terminals located under the frontpanelOutput 2 current passes through the Green led andindicates that the output loop is closed. (Current flow)the green LED goes OFF when opening the output loopand when using test terminals located under the frontpanelGreen power supply LED indicates that the device isproperly powered.flashes when the power goes into protection.(under voltage , thermal overload or short circuit )Red "test" LEDindicates that the module is in simulation mode.(Insertion of the jack underneath the front face)the device transmits input current injected on the simu-lation cable.(The led goes off when the simulation link is removedand the device return in normal operation)Jack socket (simulation link) located under the frontpanel allows the switching in test mode for the periodicloop control.(Use only the cable provided by LOREMEfor this purpose)E 5SOMMAIRE4-20 mA Current loop isolator and signal splitterSIL3 / SIL2, HART transparency4.2 Electrical connection* Device power supply :between terminal K + and terminal L - , The module is insensitive to power polarityThe polarity is given as a guide for the implementation of schemes.* Output 1: Two modes of operation are possible (active mode and loop powered mode)- Active Mode (device supplied the output current) between terminal G + and terminal H -- Loop powered mode (the device regulates the current of a loop with his own power supply) between terminal H + and terminal J - (Loop powered output is protected against reverse polarity)(Hart protocol transparency is ensured between the input and output 1)* Output 2: Two modes of operation are possible (active mode and loop powered mode)- Active Mode (device supplied the output current) between terminal P + and terminal Q -- Loop powered mode (the device regulates the current of a loop with his own power supply) between terminal Q+ and terminal O - (Loop powered output is protected against reverse polarity)WARNING !Do not wire loop with its own power supply on the active output otherwise the device can be damaged .Do not exceed the technical specifications to ensure output safe operation.- In Loop powered mode , the output loop voltage must be between 10 volts and 35 volts- In Active mode, the output load resistance must be between 0 ohms and 750 ohms.Input : two modes of operation are possible (active mode and passive mode)- passive input (the sensor must provide the device input current) Terminal D+ and Terminal E-- active input (the device provides power supply to the input loop powered sensor) Terminal C (+22 V) and Terminal D - WARNING !- Do not short the sensor power supply (terminal C) otherwise the device can be damaged- During a input simulation on the test jack (red LED 'test' on) the safety function of the unit is not maintained,(the unit does not repeat the signal from the input terminal, but the signal injected into the test lead.4.3 WiringE 6LOREME 12, rue des Potiers d'Etain - 57071 Metz ☎03.87.76.32.51-Fax03.87.76.32.52-Email:******************************@Loreme.frSOMMAIRE4-20 mA Current loop isolator and signal splitterSIL3 / SIL2, HART transparency5 Commissioning and periodic proofThe periodic test procedure is defined by LOREMEand must be followed by the end user to ensure and guarantee the SIL level over time.Periodic testing should be performed following the procedure defined belowand at the intervals defined under paragraph " proof interval "5.1 control stepsPeriodic proof allows detection of possible product internal failure and loop calibration.environmental conditions and a minimum heating time of 5 minutes must be respected.Isolator test and complete output Loop control (the system is unavailable during the test)1. If necessary, bypass the security system and / or take appropriate provision to ensure safety during the test.2. raise the front hood off the device3. Using the jack cable and a simulator (current generator * Note 1) set the input current to high alarm value (≥ 21.0 mA).(The insertion of the jack must turn on the red LED "test")4. Check if the current of each output reaches this value at +/-2%5. Set the input current to the low alarm value (≤ 3.6 mA)6. Check if the signal from each output reaches this value at +/-2%7. Set the output current to a median value (= 12 mA)8. Check if the signal from each output reaches this value at +/-2% (linearity check and the transfer function)9. Remove the simulation link (red LED goes OFF "test"), close the front panel hood.10. Remove the bypass on the safety controller system or return to a normal operating condition11. After testing, the results should be documented and archived.Any device that does not satisfy the control needs to be replaced.Note 1: The current generator must be calibrated (according to the state of the art and practice)5.2 proof intervalAccording table 2 from CEI 61508-1 the PFDavg ,for systems operating in low demand mode,must be between ≥ 10-3 and <10-2for SIL2 safety functions and between ≥ 10-4 and <10-3 for SIL3 safety functions .λsafeλdangerous = PFH SFF305 FIT 1.8 FIT 99.4%temperature conditions 45°CPFD avg value depending proof intervalT[Proof] = 1 an T[Proof] = 5 ans T[Proof] = 10 ans T[Proof] = 20 ans PFD avg=7.88E-06PFD avg=3.94E-05PFD avg=7.88E-05PFD avg=1.57E-04approximation : PFDavg = λdangerous x T[Proof] /2 (error caused by approximation < 3%)Fields marked in green means that the calculated values of PFDavg are within the limits allowed for SIL 3Summary:fault probability PFD = 7.88 E-6 x Tproof [year]either for : Tproof = 10 years 8 % from SIF and for Tproof = 20 years 16 % from SIF in SIL3Remarks :- Test intervals should be determined according to the PFDavg required .- The SFF , PFDavg and PFH must be determined for the entire safety instrumented function (SIF)ensuring that the " out of range current values" are detected at system leveland they actually lead to the safety position.E 7SOMMAIRE4-20 mA Current loop isolator and signal splitterSIL3 / SIL2, HART transparencyAnnex 1: EMC consideration1) Introduction:In order to satisfy its policy of Electromagnetic compatibility, based on the EU Directive 89/336/EC,LOREME company takes into account the standards relative to this directive early in the design of each product.All tests performed on devices designed to work in industrial environment, are compliant to EN 50081-2 and EN 50082-2 in order to establish the EMC compliance certificate. The devices being in some typical configurations during the test, it is impossible to guarantee results in all possible configurations.To ensure optimum operation of each device ,it would be judicious to comply with several recommendations of use.2) Recommendations:2.1) General information:- Comply with the mounting recommendations (mounting direction, devices spacing ...) specified in the datasheet.- Follow the recommendations of use (temperature range, protection) specified in the datasheet.- Avoid dust and excessive moisture, corrosive gases, sources of heat.- Avoid disturbed environments and disruptive phenomena.- If possible, group together the instrumentation devices in a zone separated from the power and relay circuits.- Avoid close proximity with remote switches for high power, contactors, relays, SCR ,...- Do not approach within two feet of a device with a walkie-talkie ( 5 W output power),because it creates a electromagnetic field with an intensity greater than 10 V / M for a distance of less than 50 cm.2.2 ) Power supply:- Observe the characteristics specified in the datasheet (Voltage and frequency tolerance).- It is preferable that the power comes from a system with section switches equipped with fuses forinstrumentation components, and the supply line is the most direct route possible from the section switch.Avoid using this power supply to control relays, contactors, solenoid valves, …- If the power circuit is heavily disturbed by SCR switching , motor, inverter, ...it may be necessary to install an isolation transformer specifically for instrumentationand connecting the screen to ground.- It is also important that the installation has a good grounding, and preferable that the voltagecompared to neutral does not exceed 1V, and the ground resistance less than 6 ohms.- If the installation is located near high frequency generators or arc welding, itis preferable to mount adequate power line filter.2.3) Inputs / Outputs:- In harsh conditions, it is advisable to use sheathed twisted cables whose ground braid will be grounded at on point.- It is advisable to separate the input/output lines from the power supply lines in order to avoid the coupling phenomena. - It is also advisable to minimize the lengths of data cables.E 8LOREME 12, rue des Potiers d'Etain - 57071 Metz ☎03.87.76.32.51-Fax03.87.76.32.52-Email:******************************@Loreme.frSOMMAIRE4-20 mA Current loop isolator and signal splitterSIL3 / SIL2, HART transparencyCertification to a Safety Integrity LevelThe International Electrotechnical Commission's (IEC) standard IEC 61508, defines SIL using requirements grouped into two broad categories: hardware safety integrity and systematic safety integrity.A device or system must meet the requirements for both categories to achieve a given SIL.The SIL requirements for hardware safety integrity are based on a probabilistic analysis of the device. To achieve a given SIL, the device must meet targets for the maximum probability of dangerous failure and a minimum Safe Failure Fraction. The concept of'dangerous failure' must be rigorously defined for the system in question, normally in the form of requirement constraints whose integ-rity is verified throughout system development. The actual targets required vary depending on the likelihood of a demand, the com-plexity of the device(s), and types of redundancy used.PFD (Probability of Failure on Demand) and RRF (Risk Reduction Factor) of low demand operation for different SILs as defined in IEC EN 61508 are as follows:For continuous operation, these change to the following.Hazards of a control system must be identified then analyzed through risk analysis. Mitigation of these risks continues until their over-all contribution to the hazard are considered acceptable. The tolerable level of these risks is specified as a safety requirement in the form of a target 'probability of a dangerous failure' in a given period of time, stated as a discrete SIL level.Abbreviation DescriptionHFT Hardware Fault Tolerance, capability of a functional unit to continue the execution of the demanded function when faults or anomalies exist.MTBF Mean interval between two failuresMTTR Mean interval between the occurrence of the failure in a device or system and its repairPFD Likelihood of dangerous safety function failures occurring on demandPFDavg Average likelihood of dangerous safety function failures occurring on demandSIL Safety Integrity Level, the international standard IEC 61508 defines four discrete safety integrity levels (SIL1 to SIL4).Each level corresponds to a specific probability range with respect to the failure of a safety function.The higher the integrity level of the safety-related system,the lower the likelihood of the demanded safety functions not occurring.SFF Safe Failure Fraction, the proportion of failures without the potential to put the safety-related system intoa dangerous or impermissible functional state.TProof In accordance with IEC 61508-4, chapter 3.5.8,TProof is defined as the periodic testing to expose errors in a safety-related system.XooY Classification and description of the safety-related system with respect to redundancyand the selection procedure used. "Y" indicates how often the safety function is carried out (redundancy)."X" determines how many channels must work properly.λsd und λsu λsd Safe detected + λsu Safe undetected Safe failure (IEC 61508-4, chapter 3.6.8):A safe failure is present when the measuring system switches to the defined safe stateor the fault signaling mode without the process demanding it.λdd +λdu λdd Dangerous detected + λdu Dangerous undetected Unsafe failure (IEC 61508-4, chapter 3.6.7):Generally a dangerous failure occurs if the measuring systemswitches into a dangerous or functionally inoperable condition.λdu λdu Dangerous undetected A dangerous undetected failure occurs if the measuring system does not switch into a safeE 9。
Omega DRA-DCC-8数字到8电流循环转换器用户指南说明书

Contents1. MOUNTING INSTRUCTIONS2. REPLACING FUSES3. ASSEMBLY4. SUPPLY VOLTAGE5. MODES OF OPERATION5.1 0-20 or 4-20mA output current selection5.2 Switch Settings6. PARALLEL CONTROL MODE6.1 PLC Interface6.2 The "E" (ENABLE) Terminal7. SERIAL CONTROL MODE7.1 RS232c / RS422 Select7.2 RS422 Termination7.3 Serial Control Switch Settings7.4 Serial Communication Parameters7.4.1 Baud Rate Select7.4.2 ID Code7.4.3 Command Formats8. SELF TEST MODES8.1 Self Test # 18.2 Self Test # 28.3 Self Test # 39. MULTIDROP CONFIGURATION10. PUTTING THE UNIT INTO OPERATION11. CALIBRATION12. SPECIFICATIONS11. MOUNTING INSTRUCTIONS2The DRA-DCC-8 is designed for standard DIN rail mounting.Place the unit on the upper part of the mounting rail with the fastening tab facing down. Using a suitable flat screwdriver loosen the tab slightly and attach the unitto the rail. Once the tab is loosened, ensure that the unit is fastened securely in place.2. REPLACING FUSESIn order to replace a blown fuse, the unit has to be disassembled, as follows:a. Take off both terminal strips by removing the four screws at the edges. Note: This does not require disconnecting the cables connected to the strips.Remove the front panel using a suitable flat screwdriver. Press down gently on the plastic springloaded tabs located in the slots either side of the unit.c. Disconnect the flat connector which couples the LED circuit on the front panel.d. Replace the blown fuse.WARNING: Never install a fuse rated more than 800mA3. ASSEMBLYThe DRA-DCC-8 unit includestwo printed circuit cardsdesignated as P.N 7041 andP.N 7040. The two printedcircuit cards should occupythe slots in the enclosureaccording to fig 1.Figure 1Insert the two printed cards into their slots. Connect the flat cable between them. Connect the front panel flat cable. The panel must be inserted into the grooves on both sides of the case while pressing down until a distinct "click" is heard. Assembly is completed by laying the terminal strips in place.Note: The terminal strips are polarized and must not be placed backwards.b.4Figure 2.SW5 MSB Self Test Mode* according to para #5.26. PARALLEL CONTROL MODE* according to para #5.2In the parallel control mode, the DRA-DCC-8 unit is controlled via a 15 bit bus.Three Address bits (A0-A3) select the proper current output channel and 12 Data bits (D0-D11) determine its value (A0 and D0 are MSB). The DRA-DCC-8microprocessor continuously scans the input vector (Address + Data) terminals and updates its memory tables upon recognizing a new vector. The unit isasynchronous in nature. The data should be valid for at least 160 microseconds.S1S2S3S4S5S6S7SELF TEST#1ON OFF X OFFX OFF ON OFFX MODE ON ON OFFX SELF TEST#2SELF TEST#3**S1S2S3S4S5S6S7PARALLEL MODE OFF OFF *OFFX MODE 6.1 PLC INTERFACEThe PLC's output modules can be divided intothree popular types; TTL output module, 24Vdcsink type and 24Vdc source type.There is a jumper selector on printed circuit cardPN 7040 which selects between Sink/Sourceinput. (TTL output module should usualy beconsidered as sink type). See figure 2.SINK SOURCES1S2S3S4S5S6S73004800960019200OFF OFF OFF OFF ON ON ON ON ONONONONUNIT ID CODE ON=4-20mA OFF=0-20mA BAUD RATE (BPS)Serial Control Mode56.2 THE "E" (ENABLE) TERMINALFor E="1" the unit is enabled, which means that all input vectors are received and the output is updated. When E="0" the unit ignores any new input vector. The E terminal is recommended to be used as a strobe for parallel data which has a long setup time. In this case the following sequence is recommended: prior to applying a new vector, the E terminal should be set to logical 0 (inhibit state), then the new input vector should be imposed. Once the new data is set, the E terminal should be pulsed.The E terminal is also used for multidrop configuration. The 15 bit vectors are applied to the units in parallel and the selection is carried out by controlling the "E" inputs.7. SERIAL CONTROL MODEFigure 3.7.1 RS232c / RS422 SELECThe DRA-DCC-8 is equipped with two serialcommunication ports: The RS232c and theRS422. A jumper switch at the right side of theDIP switch array is used to select the requiredcommunication type. See figure 3.7.2 RS422 TERMINATION The SW8's ON state terminates the RS422 receiver terminals with a 100W load.In a multidrop configuration, the last (most distant) DRA-DCC-8 unit should be terminated in order to match the transmission lines.Note: Only one termination load per RS422 communication link is permissible.7.3 SERIAL CONTROL SWITCH SETTINGSS1S2S3S4S5S6S7BAUD RATE ID CODE *ON* according to para #5.27.4 SERIAL COMMUNICATION PARAMETERSThe communication protocol is 8 bit ASCII, even parity, and one stop bit.RS-422RS-232c7Note: If the value is omitted it will be treated as zero. Separators such as blanks or commas are not allowed.Example:Channel 4 in DRA-DCC-8 no. 7 has to receive the value of 981. Echo back is required The command format is:[C] [7] [4] [981] [CR]The echo back will be: C 7 4Note: The channel numbers on the DRA-DCC-8 front panel are designated from 1 to 8, in binary they are designated from 0 to 7.Note: When applying the echo back mode, it is advisable to wait for the echo back before transmitting a new command.7.4.3.3 STATUS REPORT FORMAT[S] [ID CODE] [CR]The addressed DRA-DCC-8 unit will respond with the values stored in its eight channels. The response will start with S, ID code, following with eight channel values separated with commas and [LF] [CR] as terminators.Example:DRA-DCC-8 unit number 3 has the following stored data: ch1: 300, ch2: 1270,ch3: 0, ch4: 4087, ch5: 2099, ch6: 764, ch7: 3078, ch8: 550. The response from the device will be:S3,300,1270,0,4087,2099,764,3078,550 [LF] [CR].Note: Wait until the status report has terminated before transmitting new commands.8. SELF TEST MODESThe DRA-DCC-8 is provided with three test modes.S1S2S3S4S5S6S7SELF TEST#1ON OFF X OFFX OFF ON OFFX MODE ON ON OFFX SELF TEST#2SELF TEST#3*** according to para #5.2[C] [ID CODE CHANNEL] [LF] [CR]88.1 SELF TEST #1 (Communication Ports Test)In order to test the serial communication ports, this test mode converts the unit to a transponder for ASCII characters. Any transmitted character will be echoed to the host terminal. The host parameters should be set to:Baud rate : 4800, Word length: 8 bits, Parity: even, Stop bit: 18.2 SELF TEST #2 (Same Leve)lIn this test mode, the DRA-DCC-8 unit ignores the address field. All the outputs are set according to the data field only.8.3 SELF TEST #3 (Saw Tooth)In this test mode, only one output channel (according to the address setting) will produce a saw tooth wave form in which the whole value range is used.9. MULTIDROP CONFIGURATIONUp to eight DRA-DCC-8 units can be installed in a multidrop configuration using the RS422 communication port.The controller's RS-422 transmitter is connected to the units' receivers while the controller's RS-422 receiver is connected to the units' transmitters.As the communication cable might be several thousand feet long, it is necessary to terminate the end of the line with its characteristic impedance in order to avoid reflections in the transmission line causing data distortion. SW8 in its ON state terminates the Rx inputs with a 100Ωload.10. PUTTING THE UNIT INTO OPERATIONThe DRA-DCC-8 is supplied with a set configuration for parallel control mode.The DIP switch setting is:The communication port selector (see para #7.1) is set to RS232C.The unit should be set up according to the required configuration.Before applying voltage to the unit see para #4 for power supply consideration.S1S2S3S4S5S6S7PARALLEL 4-20mA ON OFF OFF OFF OFF OFF OFF MODE911. DRA-DCC-8 CALIBRATIONGenerally there is no need to calibrate the DRA-DCC-8 unit. However if calibration is required, the following steps should be carried out: Two potentiometer trimmers,one for "Zero" and the other for "Span" are located on printed card 7040. The trimmer close to the card edge is the "Zero". Use the following switch setup for switching all the outputs between 4 and 20mAStep 1:Select one channel (for example ch.#1) for the initial tuning. Set the DIPswitch array to "all 4mA".Apply supply voltage to the unit. The initial state of all the output currents is 4 e SW2 to switch all the outputs between 4 and 20mA. Iteratively set the "Zero"and the "Span" trimmers for 4.00mA and 20.00mA.Step 2:Monitor all the 8 channels in 4mA state, and calibrate the Zero trimmer so that their average readings is 4.000mA.Then repeat for 20mA state, and calibrate the Span trimmer so that their average readings is 20.000mA. This procedure should be repeated until calibration is satisfactory.In the parallel control mode, internal pull-up resistors on each of the input terminals keep them in logical 1 state. The unit will recognize input voltage up to 0.5V as logical 0 and voltages from 4V to 60V as logical 1.Note: After every power on, the unit is reset and the initialized default output currents are according to the SW6 setting (see para #5.2).Note: Set the unit to sink mode (fig.2).S1S2S3S4S5S6S7ALL CH. = 4mA ON OFF OFFOFF X ALL CH. = 20mA ON OFF ON OFFX X X X X MODE The channel LEDs are connected in series with the output current so that they will light only as an indication of a closed current loop.INPUTS:PARALLEL INPUTSLOGIC LEVELS:DATA HOLD TIME:MAXIMUM PARALLEL INPUT RATE: SERIAL COMMUNICATION BAUD RATES:PARITY:STOP BIT:STATUS REPORT:MULTIDROP CAPABILITY: OUTPUTS:OUTPUT CURRENT SPAN: OUTPUT CURRENT SETTLING TIME: POWER SUPPLY:CURRENT CONSUMPTION: MAXIMUM LOOP RESISTANCE: ACCURACY: RESOLUTION: INDICATORS:AMBIENT TEMPERATURE Operation:Storage:RELATIVE HUMIDITY:HOUSINGBox:Terminals:MOUNTING:FUSE:WEIGHT:DIMENSIONS:Parallel & Serial control inputs3 - Output current loop address12 - Output current value (Data)1- Enable (E)0<"0"<0.5V, 4 <"1"< 60V160 microsecond6000 updates per secondRS232c full duplexRS422 full duplex300, 4800, 9600, 19200 BPSEvenOneReports as interrogatedUp to eight units8 continues current loops0-20mA or 4-20mA (user selected)4.2 ms max. for 99% of step15-32 Vdc (regulated)85mA max.According to Rmax(KΩ)= (Vsupply -6)/20±0.1% of span typical, ±0.2% of span max.0.025% of span typical,0.05% of span max. Yellow Power On LED8 Red output channel LEDs-10 to 60 o C (14 to 140 o F)-25 to +85 o C (-13 to 185 o F)5 to 95%, non condensingPlastic PolycarbonateAccording to IP 50 DIN 40050According to IP 20 DIN 40050 Standard DIN rail630mA fast blow (5x20mm)0.7Kg (1.5 lb.)73.2H x 200W x 121mmD (2.88"x7.88"x4.76")12. SPECIFICATIONS10RETURN REQUESTS / INQUIRIESDirect all warranty and repair requests/inquiries to the OMEGA Customer Service Department.BEFORE RETURNING ANY PRODUCT(S) TO OMEGA, PURCHASER MUST OBTAIN AN AUTHORIZED RETURN (AR) NUMBER FROM OMEGA’S CUSTOMER SERVICE DEPARTMENT (IN ORDER TO AVOID PROCESSING DELAYS). The assigned AR number should then be marked on the outside of the return package and on any correspondence.The purchaser is responsible for shipping charges, freight, insurance and proper packaging to prevent breakage in transit.OMEGA’s policy is to make running changes, not model changes, whenever an improvement is possible.This affords our customers the latest in technology and engineering.OMEGA is a registered trademark of OMEGA ENGINEERING, INC.© Copyright 1996 OMEGA ENGINEERING, INC. All rights reserved. This document may not be copied,photocopied, reproduced, translated, or reduced to any electronic medium or machine-readable form, i n w h o l e o r i n p a r t , w i t h o u t p r i o r w r i t t e n c o n s e n t o f O M E G A E N G I N E E R I N G , I N C.FOR WARRANTY RETURNS, please have the following information available BEFORE contacting OMEGA:1. P .O. number under which the product was PURCHASED,2. Model and serial number of the product under warranty, and 3. Repair instructions and/or specific problems relative to the product.FOR NON-WARRANTY REPAIRS, consult OMEGA for current repair charges. Have the following information available BEFOREcontacting OMEGA:1. P .O. number to cover the COSTof the repair,2. Model and serial number of product, and3. Repair instructions and/or specific problems relative to the product.WARRANTY/DISCLAIMEROMEGA ENGINEERING, INC. warrants this unit to be free of defects in materials and workmanship for a period of 13 months from date of purchase. OMEGA Warranty adds an additional one (1) month grace period to the normal one (1) year product warranty to cover handling and shipping time. This ensures that OMEGA’s customers receive maximum coverage on each product. If the unit should malfunction,it must be returned to the factory for evaluation. OMEGA’s Customer Service Department will issue an Authorized Return (AR) number immediately upon phone or written request. Upon examination by OMEGA, if the unit is found to be defective it will be repaired or replaced at no charge. OMEGA’s WARRANTY does not apply to defects resulting from any action of the purchaser, including but not limited to mishandling, improper interfacing,operation outside of design limits, improper repair, or unauthorized modification. This WARRANTY is VOID if the unit shows evidence of having been tampered with or shows evidence of being damaged as a result of excessive corrosion; or current, heat, moisture or vibration; improper specification; misapplication; misuse or other operating conditions outside of OMEGA’s control. Components which wear are not warranted, including but not limited to contact points, fuses, and triacs.OMEGA is pleased to offer suggestions on the use of its various products. However,OMEGA neither assumes responsibility for any omissions or errors nor assumes liability for any damages that result from the use of its products in accordance with information provided by OMEGA, either verbal or written. OMEGA warrants only that the parts manufactured by it will be as specified and free of defects.OMEGA MAKES NO OTHER WARRANTIES OR REPRESENTATIONS OF ANY KIND WHATSOEVER, EXPRESSED OR IMPLIED, EXCEPT THAT OF TITLE, AND ALL IMPLIED WARRANTIES INCLUDING ANY WARRANTY OF MERCHANTABILITY AND FITNESS FOR A PARTICULAR PURPOSE ARE HEREBY DISCLAIMED. LIMITATION OF LIABILITY: The remedies of purchaser set forth herein are exclusive and the total liability of OMEGA with respect to this order, whether based on contract,warranty, negligence, indemnification, strict liability or otherwise, shall not exceed the purchase price of the component upon which liability is based. In no event shall OMEGA be liable for consequential, incidental or special damages.CONDITIONS: Equipment sold by OMEGA is not intended to be used, nor shall it be used: (1) as a “Basic Component” under 10 CFR 21 (NRC), used in or with any nuclear installation or activity; or (2) in medical applications or used on humans. Should any Product(s) be used in or with any nuclear installation or activity,medical application, used on humans, or misused in any way, OMEGA assumes no responsibility as set forth in our basic WARRANTY / DISCLAIMER language, and additionally, purchaser will indemnify OMEGA and hold OMEGA harmless from any liability or d a m a g e w h a t s o e v e r a r i s i n g o u t o f t h e u s e o f t h e P r o d u c t (s ) i n s u c h a m a n n e r.Where Do I Find Everything I Need forProcess Measurement and Control?OMEGA…Of Course!TEMPERATUREߜ Thermocouple, RTD & Thermistor Probes,Connectors, Panels & Assembliesߜ Wire: Thermocouple, RTD & Thermistorߜ Calibrators & Ice Point Referencesߜ Recorders, Controllers & Process Monitorsߜ Infrared PyrometersPRESSURE, STRAIN AND FORCEߜ Transducers & Strain Gaugesߜ Load Cells & Pressure Gaugesߜ Displacement Transducersߜ Instrumentation & AccessoriesFLOW/LEVELߜ Rotameters, Gas Mass Flowmeters & Flow Computersߜ Air Velocity Indicatorsߜ Turbine/Paddlewheel Systemsߜ Totalizers & Batch ControllerspH/CONDUCTIVITYߜ pH Electrodes, Testers & Accessoriesߜ Benchtop/Laboratory Metersߜ Controllers, Calibrators, Simulators & Pumpsߜ Industrial pH & Conductivity EquipmentDATA ACQUISITIONߜ Data Acquisition & Engineering Softwareߜ Communications-Based Acquisition Systemsߜ Plug-in Cards for Apple, IBM & Compatiblesߜ Datalogging Systemsߜ Recorders, Printers & PlottersHEATERSߜ Heating Cableߜ Cartridge & Strip Heatersߜ Immersion & Band Heatersߜ Flexible Heatersߜ Laboratory HeatersENVIRONMENTALMONITORING AND CONTROLߜ Metering & Control Instrumentationߜ Refractometersߜ Pumps & Tubingߜ Air, Soil & Water Monitorsߜ Industrial Water & Wastewater Treatmentߜ pH, Conductivity & Dissolved Oxygen Instruments M2612/0197。
- 1、下载文档前请自行甄别文档内容的完整性,平台不提供额外的编辑、内容补充、找答案等附加服务。
- 2、"仅部分预览"的文档,不可在线预览部分如存在完整性等问题,可反馈申请退款(可完整预览的文档不适用该条件!)。
- 3、如文档侵犯您的权益,请联系客服反馈,我们会尽快为您处理(人工客服工作时间:9:00-18:30)。
西北农林科技大学生命科学学院 有机化学与物胶化教研室
- 1 -
一、命名下列化合物(每小题1分,共8分)
C N(CH 3)2O H 3C CH
3CH 2CH 3
CH 3
O
CH 3
3
CH 2HOCH 2CH CHCH 2CH 31. 2. 3.4. 5.N N N N OH H 2N
CH 3CH 3CH 2C C H H
C C CH 3
3
Cl
NH
2
H H OH OH CH 36. 7. 8.
二、按要求写出下列化合物的结构式(每小题2分,共10分)
1. (2S,3Z)-4-甲基-2-苯基-3-己烯
2. 反-1,3-环己基二甲酸的优势构象
3. 甲基-α-葡萄糖苷的哈沃斯式
4. 苯丙氨酰甘氨酸
5. 1,2-二溴乙烷优势构象的纽曼投影式
三、单项选择(每小题1分,共10分)
1. 苯环硝化反应能得到间位产物的是( ) 。
④Cl NHC CH 3O
N(CH 3)2C O NHCH 3
①②③ 2.
没有变旋现象的化合物是( )。
① D-葡萄糖 ② 麦芽糖 ③ D-果糖 ④ 蔗糖
3. 当溶液的pH 为3.00时,在电场中向阳极移动的氨基酸是( )。
① 半胱氨酸(pI=5.02) ② 天门冬氨酸(pI=2.77)
③ 赖氨酸(pI=9.74) ④ 谷氨酸(pI=3.22)
4. 不能发生碘仿反应的化合物是( )。
① CH 3CH 2COC 6H 5 ② C 6H 5CH 2COCH 3 ③ CH 3CH 2CH(OH)CH 3 ④ CH 3CHO
5.没有芳香性的化合物是( )。
④ ①②③
N N H N H
6. 丙烯与Br 2反应生成1,2-二溴丙烷的反应机理是( )。
①亲核取代 ② 亲电取代 ③ 亲核加成 ④ 亲电加成
7. 酸性最弱的化合物是( )。
OH OCH 3OH 3OH 2OH
①②③④
朱伟教授编 2003.10 陕西,杨凌高新农业示范区
- 2 - 8. 最容易发生分子内脱水反应的化合物是( )。
① 异丁醇 ② 仲丁醇 ③叔丁醇 ④ 正丁醇
9. 通常情况下最易发生S N 2反应的化合物是( )。
① (CH 3)3CBr ② (CH 3)2CHBr ③ C 2H 5Br ④ C 6H 5Br
10. 熔点最高的化合物是( )。
① 丙酰胺 ② 甘氨酸 ③ 丙酸 ④ 乳酸
四、按要求将下列各化合物排序(每小题2分,共12分)
1. S N 1反应活性(大→小)
① β-苯基乙基溴 ② 苄基溴 ③ α-苯基乙基溴 ④ 4-甲基溴苯丙烷
2. 碱性(强→弱)
① 吡啶 ② 六氢吡啶 ③ 苯胺 ④ 环己基胺
3. 沸点(高→低)
① HOCH 2CH 2CH 2OH ② (CH 3)2CHCH 2OH
③ CH 3(CH 2)2CH 2OH ④ (CH 3)3COH
4. pKa (大→小)
① HOOCCOOH ② CH 3COOH ③ HOOCCH 2COOH ④ C 6H 5COOH
5. 与HCN 加成的活性(大→小)
① (C 6H 5)2CO ② C 6H 5COCH 3 ③ Cl 3CCHO ④ CH 3CHO
6. 立体异构体的数目(多→少)
① ClCH=CHCH(CH 3)2 ② Cl 2C=CHCH 2CH 2Cl
③ CH 2=CHCHClCHClCH=CH 2 ④ ClCH=CHCHClCH 3
五、写出下列反应的主要产物(每个产物2分,共30分)
CH CHBr CH 2Cl NaOH H 2O
? 1.
1.O 3?? 2OH CH 3
2.
C C NH O
O +
?
3. ? CH 2 CHCH 2CH 3HBr NaOH 25
4. H 2NOH O CH 2 CHCH 2
5.? CH 3 C CH 2 C OC 2H 5
O
O 24 6.? CHO + CH 3CH 2CHO ? ? NaOH
H 2O 7.
NHCH 3 ? NaNO 2? 8.
2OH HOH 2+ H 2NNH 9.?
西北农林科技大学生命科学学院 有机化学与物胶化教研室
- 3 -
COOH 10.? ?
六、用化学方法鉴定下列各组化合物(每小题2分,共8分)
1. 溴苯和苄基溴
2. 乙酰乙酸乙酯和3-己酮
3. 乙醇和丙醇
4. 葡萄糖和麦芽糖
七、用指定原料和必要的试剂制备下列各化合物(第一小题4分,第二小题6分,共10分)
CH 3CCH 3
O OH CH 3CH 3C CHCCH 3 1. Br
Br
Br 2.
八、推导结构(第一小题4分,第二小题8分,共12分)
1.化合物A (C 6H 10O ),在室温下能与卢卡斯试剂迅速反应,可被KMnO 4/H +氧化,并能吸收1mol 的Br 2。
A 催化加氢得B ,B 经氧化得C (C 6H 10O )。
B 在加热情况下与浓H 2SO 4作用,所得到的产物经催化加氢后生成环己烷。
试推测A 、B 、C 的可能结构,并写出有关反应式。
2.化合物A 、B 、C 、D 的分子式都是C 10H 14,它们都有芳香性。
A 不能氧化为苯甲酸;B 可被
氧化为苯甲酸,且B 有手性;C 也可氧化成苯甲酸,但C 无手性,C 的一氯代产物中有两个具有手性,分别为E 和F ;D 可氧化为对苯二甲酸,D 的一氯代产物中也有两个具有手性,分别是G 和H 。
试写出A 、B 、C 、D 、E 、F 、G 、H 的构造式。