SmartMesh_IP_Manager_CLI_Guide
博达模块化路由器常用配置

ip nat local-service udp enable //
ip nat local-service tcp enable //
!
interface FastEthernet0/1
deny tcp any any eq 139
deny tcp any any eq 445
deny tcp any any eq 3333
deny tcp any any eq 593
deny udp any any eq 135
deny udp any any eq tftp
no service password-encryption
!
!
interface FastEthernet0/0
ip address 119.184.117.226 255.255.255.254
no ip broadcast
ip nat outside //
deny udp any any eq 4444
deny udp any any eq 137
deny udp any any eq 138
permit ip any any //
!
!
ivr-cfg
!
ip nat translation max-links all 300 //
2、ip nat outside 端口的icmp、tcp、udp服务是可选的,如果不想让外界的icmp和tcp、udp连接进入;可以不用配置上述的三命命令!
博达模块化路由器配置(2621)
Router_config#show run
华为交换机端口命令

目录第1章以太网端口配置命令....................................................................................................1-11.1 以太网端口配置命令..........................................................................................................1-11.1.1 broadcast-suppression............................................................................................1-11.1.2 copy configuration...................................................................................................1-11.1.3 description...............................................................................................................1-21.1.4 display counters......................................................................................................1-31.1.5 display interface......................................................................................................1-41.1.6 display port..............................................................................................................1-61.1.7 display port vlan-vpn...............................................................................................1-71.1.8 duplex......................................................................................................................1-81.1.9 flow-control..............................................................................................................1-81.1.10 link-status hold......................................................................................................1-91.1.11 interface...............................................................................................................1-101.1.12 jumboframe enable.............................................................................................1-101.1.13 loopback..............................................................................................................1-111.1.14 mdi.......................................................................................................................1-111.1.15 port access vlan..................................................................................................1-121.1.16 port hybrid pvid vlan............................................................................................1-131.1.17 port hybrid vlan....................................................................................................1-131.1.18 port link-type........................................................................................................1-141.1.19 port-mode............................................................................................................1-151.1.20 port trunk permit vlan..........................................................................................1-151.1.21 port trunk pvid vlan..............................................................................................1-161.1.22 reset counters interface.......................................................................................1-171.1.23 shutdown.............................................................................................................1-171.1.24 speed...................................................................................................................1-181.1.25 vlan-vpn enable...................................................................................................1-19第2章以太网端口汇聚配置命令............................................................................................2-12.1 以太网端口汇聚配置命令...................................................................................................2-12.1.1 debugging lacp packet............................................................................................2-12.1.2 debugging lacp state...............................................................................................2-12.1.3 debugging link-aggregation error............................................................................2-22.1.4 debugging link-aggregation event...........................................................................2-32.1.5 display lacp system-id.............................................................................................2-32.1.6 display link-aggregation summary...........................................................................2-42.1.7 display link-aggregation verbose.............................................................................2-52.1.8 display link-aggregation interface............................................................................2-72.1.9 lacp enable..............................................................................................................2-82.1.10 lacp port-priority.....................................................................................................2-82.1.11 lacp system-priority...............................................................................................2-92.1.12 link-aggregation.....................................................................................................2-92.1.13 link-aggregation group agg-id description...........................................................2-102.1.14 link-aggregation group agg-id mode...................................................................2-112.1.15 port link-aggregation group.................................................................................2-112.1.16 reset lacp statistics..............................................................................................2-12第3章 POS端口配置命令......................................................................................................3-13.1 POS端口配置命令.............................................................................................................3-13.1.1 clock........................................................................................................................3-13.1.2 crc............................................................................................................................3-13.1.3 description...............................................................................................................3-23.1.4 display interface pos...............................................................................................3-23.1.5 debugging ppp.........................................................................................................3-53.1.6 flag...........................................................................................................................3-63.1.7 frame-format............................................................................................................3-73.1.8 interface pos............................................................................................................3-73.1.9 loopback..................................................................................................................3-83.1.10 mtu........................................................................................................................3-93.1.11 pos access vlan.....................................................................................................3-93.1.12 ppp timer negotiate.............................................................................................3-103.1.13 reset counters interface pos................................................................................3-103.1.14 scramble..............................................................................................................3-113.1.15 shutdown.............................................................................................................3-123.1.16 threshold..............................................................................................................3-123.1.17 timer hold.............................................................................................................3-13第4章 RPR端口配置命令......................................................................................................4-14.1 RPR端口配置命令.............................................................................................................4-14.1.1 clock-source............................................................................................................4-14.1.2 debugging rpr..........................................................................................................4-14.1.3 display interface......................................................................................................4-24.1.4 display rpr defect.....................................................................................................4-64.1.5 display rpr fairness-para..........................................................................................4-74.1.6 display rpr protection...............................................................................................4-84.1.7 display rpr rs-table.................................................................................................4-104.1.8 display rpr statistics...............................................................................................4-114.1.9 display rpr timers...................................................................................................4-114.1.10 display rpr topology.............................................................................................4-124.1.11 flag.......................................................................................................................4-134.1.12 frame-format........................................................................................................4-144.1.13 port-type..............................................................................................................4-154.1.14 reset counters interface.......................................................................................4-154.1.15 rpr admin-request................................................................................................4-164.1.16 rpr echo...............................................................................................................4-174.1.17 rpr default-rs........................................................................................................4-174.1.18 rpr cos-precedence-map.....................................................................................4-184.1.19 rpr protect-mode..................................................................................................4-194.1.20 rpr reserve-band..................................................................................................4-194.1.21 rpr reversion-mode..............................................................................................4-204.1.22 rpr static-rs..........................................................................................................4-214.1.23 rpr station-name..................................................................................................4-214.1.24 rpr timer...............................................................................................................4-224.1.25 rpr weight.............................................................................................................4-234.1.26 sdh threshold.......................................................................................................4-234.1.27 shutdown.............................................................................................................4-24第5章 IDS联动配置命令........................................................................................................5-15.1 IDS联动配置命令...............................................................................................................5-15.1.1 acl-ids......................................................................................................................5-15.1.2 display acl ids..........................................................................................................5-1第1章以太网端口配置命令1.1 以太网端口配置命令1.1.1 broadcast-suppression【命令】broadcast-suppression pctundo broadcast-suppression【视图】以太网端口视图【参数】pct:指定以太网端口最大广播流量的线速度百分比,百分比越小,则允许通过的广播流量也越小。
ruckus smartzone 3.4 控制器 api 部署指南说明书

Deploying APIs to a Ruckus Smartzone Controller This document is to help in the use and deployment of API call to a Ruckus Smartzone 3.4 Controller. The below link is a reference to the locations we will be using as well as a host of other API calls you will ever need. In the location, the first part is a version folder location. This is specific to versions of Smartzone. Here is an example:Smartzone version 3.2 - /v3_0Smartzone version 3.4 - /v4_0Smartzone API Reference 3.4:/vscg-enterprise/vsz-e-public-api-reference-guide-3-4.htmlTo deploy API commands to a Smartzone controller, there are several ways to accomplish this. For this demonstration, we will be using Postman by Google.First, you will need to download and install Postman:https:///Once you have Postman installed, create a new Collection. This is where we will keep our API Calls. Create a Collection:Create an Environment:Select the Gear and Manage Environments:Select Add:Give the Environment a Name and Select Add:Inside the Environment is where we will define variables for you API calls. The Key will be the variable name and the Value will be the value for the Key.You will need to add two header values to every API you create. Below is an explanation and the values.Create a Login Session API Call:Select POST and add the destination to the controller and the location for this call. I have used a variable for the destination. Here is a break down:{{LabvSz}} - https://{host}:7443/api/public (Where {host} is the IP Address or Hostname of your controller). If you use the {{LabvSz}}, this is a variable created in your environment./v4_0/session is the location.Under the Headers Tab, add the two fields for all your API Calls:Content-Type - application/json;charset=UTF-8Cookie - JSESSIONID={JSESSIONID}Headers TabUnder the Body Tab, you need to add the username and password to login to the controller. You will use the raw format and it must be formatted exactly as below. The apiVersion can be left to the default and the timeZoneUtcOffset is the time zone of the controller.Body TabWhen you are done, select the down arrow next to Save to do Save As.Save the API to the Collection Name you created earlier.Retrieve the System Summary API:Now we are going to create an API to Retrieve the System Summary.For this call Use GET and add the destination URL plus the location (/v4_0/controller). Remember to add the header information as above and Save AS when you are done.To execute this call, select the send button.Below is a Sample Output:Retrieve AP List API:Now we are going to create an API to retrieve a list of APs from the controller.For this call Use GET and add the destination URL plus the location (/v4_0/aps). Remember to add the header information as above and Save AS when you are done. Below is the command and sample output.AP MACIn this example, we received a list of APs from the controller. I only have one AP. From here we can get the MAC Address of the AP to use in the next API.Retrieve AP Information API:Now we are going to create an API to retrieve information about a specific AP from the controller.For this call Use GET and add the destination URL plus the location (/v4_0/aps/{apMac}). For this example, we need the AP MAC Address from the last example to replace {apMac}. Remember to add the header information as above and Save AS when you are done. Below is the command and sample output.AP MACNow we are going to create an API to retrieve a list of AP Zones from the controller.For this call Use GET and add the destination URL plus the location (/v4_0/rkszones). Remember to add the header information as above and Save AS when you are done. Below is the command and sample output.Default Zone ID We will use the “Default Zone” ID to perform the next API.Now we are going to create an API to create a WLAN Group on the controller.For this call Use POST and add the destination URL plus the location(/v4_0/rkszones/{zoneId}/wlangroups). Remember to add the header information as above. Here wewill also have to add information to the Body Tab. The body tab has the name of the WLAN Group we want to create and the Description. This is input in the raw format. Refer to the API Guide for more details. Be sure to Save AS when you are done. Below is the command and sample output.Zone ID fromprevious exampleBody TabInput must be formattedexactly as aboveWhen you execute this command with the Send Button, you will see the following:ID for new WLAN GroupNow we are going to create an API to delete a WLAN Group on the controller.For this call Use DELETE and add the destination URL plus the location(/v4_0/rkszones/{zoneId}/wlangroups/{id}). We will use the zone ID from the previous example and the ID of the WLAN Group we want to delete. This can be found from a retrieve WLAN List API. Rememberto add the header information as above and Save AS when you are done.Below is the output from the Retrieve WLAN Group List: Total Count is 2 for my example.ID of the WLAN Group todeleteBelow is the command and sample output.Now we run the WLAN Group Retrieve API again and the group has been deleted. Total Count is now one.ID of the WLAN Group todeleteCreate a Logout API:When you are finished, we need to logout of the controller. For this call Use DELETE and add the destination URL plus the location (/v4_0/session). Remember to add the header information as above and Save AS when you are done.This is only the beginning of the APIs you can create. Please refer to the API Guide for reference.。
华为5G网管U2020操作指导书

5G 网管操作指导书一、登录路径5G网管为“云网管” ,使用内网翻开“火狐阅读器”后,登录进入。
登录界面以下:二、常用模块1.主界面2.常用 MML命令使用经过主界面进入或许保护—→MML命令进入。
5GMML常用命令整理.xlsx以下为部分命令示例,常用命令见附件。
查问小区静态参数LST NRCELL:;LST NRDUCELL:;查问小区动向参数DSP NRCELL:;DSP NRDUCELL:;激活小区ACT NRCELL:;ACT NRDUCELL:;去激活小区DEA NRCELL:;DEA NRDUCELL:;改正小区信息MOD NRCELL:;MOD NRDUCELL:;改正小区频点MOD NRDUCELL:;“双工模式”改正为“CELL_TDD”,能够改正下行频点(若改正上行频点,“上行频点配置指示”需改正为“CONFIG”)。
详细以下:改正帧偏置MOD GNODEBPARAM:;3.追踪任务及数据收集信令追踪监控—→信令追踪管理,详细方法与LTE 同样。
一键式日记被备份软件—→网元文件传输。
性能指标查问性能—→结果查问。
频谱扫描主拓扑—→选择相应基站—→属性—→ IP 地点 1;网页上打卡 WEB-LMT,登录 WET-LMT—→监测—→FFT追踪;进行设置后确立刻可。
4.告警查问监控—→阅读目前告警,进行设置后确立刻可。
三、注意事项经过 4A 登录部分模块时,会出现以下界面,依据步骤安装达成即可。
山石网科静态数据脱敏系统 V2.0R1 安装手册说明书

山石网科静态数据脱敏系统V2.0R1 安装手册山石网科静态数据脱敏系统V2.0R1安装手册Copyright 2020 Hillstone Networks. All rights reserved.Information in this document is subject to change without notice. The software described in this document is furnished under a license agreement or nondisclosure agreement. The software may be used or copied only in accordance with the terms of those agreements. No part of this publication may be reproduced, stored in a retrieval system, or transmitted in any form or any means electronic or mechanical, including photocopying and recording for any purpose other than the purchaser's personal use without the written permission of Hillstone Networks.Hillstone Networks联系信息北京苏州地址:北京市海淀区宝盛南路1号院20号楼5层地址:苏州高新区科技城景润路181号邮编:100192 邮编:215000联系我们:https:///about/contact_Hillstone.html关于本手册本手册介绍山石网科的静态数据脱敏系统V2.0R1的安装方法。
天工 iSpirit 8806 用户说明书

目录第1章 CLI命令行介绍 (12)1.1 访问交换机的CLI (13)1.1.1 用户通过Console口访问CLI (13)1.1.2 用户通过TELNET访问CLI (14)1.2 CLI模式介绍 (15)1.2.1 CLI模式的作用 (15)1.2.2 CLI模式的标识 (16)1.2.3 CLI模式的分类 (16)1.3 命令语法介绍 (19)1.3.1 命令组成 (19)1.3.2 参数类型 (19)1.3.3 命令语法规则 (19)1.3.4 命令缩写 (21)1.3.5 语法帮助 (21)1.3.6 命令行错误信息 (22)1.4 命令行快捷键 (22)1.4.1 行编辑快捷键 (22)1.4.2 显示命令快捷键 (23)1.5 历史命令 (23)第2章系统管理配置 (24)2.1 系统安全配置 (25)2.1.1 多用户管理控制 (25)2.1.2 Telnet密码控制 (26)2.1.3 enable密码控制 (27)2.1.4 Telnet服务控制 (28)2.1.5 源IP地址控制 (29)2.2 系统维护和调试 (29)2.2.1 配置系统的主机名 (30)2.2.2 配置系统的时钟 (30)2.2.3 配置终端超时属性 (31)2.2.4 系统复位 (31)2.2.5 查看系统信息 (32)2.2.6 网络连通性调试 (32)2.2.7 Traceroute调试 (33)2.2.8 Telnet 客户端 (33)2.3 系统监控 (33)2.4 配置文件管理 (35)2.4.1 查看配置信息 (36)2.4.2 保存配置 (36)2.4.3 删除配置文件 (37)2.4.4 配置文件上下载 (37)2.5 软件版本升级 (40)2.5.1 联合文件 (40)2.5.2 软件版本升级的命令 (40)2.5.3 软件升级过程 (41)第3章配置模块 (44)3.1 管理模块的自动配置 (45)3.2 业务模块的自动配置 (45)3.3 业务模块的手动配置 (47)3.3.1 用户手动创建业务模块 (47)3.3.2 用户手动删除业务模块 (48)3.4 电源模块的自动配置 (48)3.5 风扇模块的自动配置 (48)3.6 管理模块,业务模块,电源模块,风扇模块信息查询 (49)3.7 风扇模块故障自动告警 (50)3.8 电源模块故障自动告警 (51)3.9 业务模块不匹配自动告警 (51)第4章配置端口 (53)4.1 端口的通用配置 (54)4.1.1 端口的打开和关闭 (54)4.1.2 端口的速率配置 (54)4.1.3 显示端口的信息 (55)4.2 配置MIRROR (55)4.2.1 配置MIRROR的监听端口和被监听端口 (55)4.2.2 显示MIRROR的配置 (56)4.3 配置STORM-CONTROL (56)4.3.1 缺省配置 (57)4.3.2 广播抑制配置 (57)4.3.3 组播抑制配置 (57)4.3.4 DLF抑制配置 (58)4.3.5 显示STORM-CONTROL 配置 (58)4.4 配置FLOW-CONTROL (58)4.4.1 缺省配置 (59)4.4.2 设置端口发送侧流控 (59)4.4.3 设置端口接收侧流控 (59)4.4.4 关闭端口流控 (59)4.4.5 显示流控信息 (59)4.5 配置端口带宽 (60)4.5.1 缺省配置 (60)4.5.2 设置端口发送或接收带宽控制 (60)4.5.3 取消端口发送或接收带宽控制 (60)4.5.4 显示端口配置的带宽控制 (61)4.6 配置TRUNK (61)4.6.1 TRUNK组的配置 (61)4.6.2 TRUNK组成员端口配置 (62)4.6.3 TRUNK负载均衡策略配置 (62)4.6.4 TRUNK的显示 (63)第5章配置VLAN (64)5.1 VLAN 介绍 (65)5.1.1 VLAN 的好处 (65)5.1.2 VLAN ID (66)5.1.3 VLAN 端口成员类型 (67)5.1.4 基于MAC的VLAN和基于IP子网的VLAN (67)5.1.5 端口的缺省VLAN (67)5.1.6 端口的VLAN模式 (68)5.1.7 VLAN 中继 (68)5.1.8 数据流在VLAN 内的转发 (69)5.1.9 VLAN 的子网 (70)5.2 VLAN 配置 (71)5.2.1 创建和删除VLAN (71)5.2.2 配置端口的VLAN模式 (71)5.2.3 ACCESS模式的VLAN配置 (72)5.2.4 TRUNK模式的VLAN配置 (73)5.2.5 HYBRID模式的VLAN配置 (74)5.2.6 查看VLAN的信息 (75)5.2.7 基于MAC的VLAN和基于IP子网的VLAN配置 (76)5.3 VLAN 配置示例 (77)5.3.1 基于PORT 的VLAN (77)5.3.2 基于802.1Q 的VLAN (78)5.3.3 基于MAC的VLAN和基于IP子网的VLAN (80)第6章配置QinQ (83)6.1 QinQ介绍 (84)6.2 QinQ配置 (86)6.3 QinQ配置示例 (87)6.3.1 配置 (87)第7章配置MSTP (88)7.1 MSTP介绍 (89)7.1.1 概述 (89)7.1.2 多生成树域 (89)7.1.3 IST, CIST, 和 CST (89)7.1.4 域内操作 (90)7.1.5 域间操作 (90)7.1.6 跳的计数 (91)7.1.7 边界端口 (91)7.1.8 MSTP和802.1d STP的互用性 (92)7.1.9 端口角色 (92)7.1.10 802.1D生成树简介 (94)7.2 MSTP配置 (96)7.2.1 缺省配置 (96)7.2.2 一般配置 (96)7.2.3 域配置 (99)7.2.4 实例配置 (99)7.2.5 端口配置 (100)7.2.6 PORTFAST 相关配置 (102)7.2.7 Root Guard相关配置 (104)7.3 MSTP 配置示例 (105)第8章配置EAPS (107)8.1 EAPS简介 (107)8.2 EAPS基本概念 (107)8.3 EAPS协议介绍 (108)8.3.1 Link-Down 报警 (108)8.3.2 环路检查 (109)8.3.3 环的恢复 (109)8.3.4 兼容Extreme的EAPS (110)8.3.5 多EAPS Domain (110)8.4 EAPS配置 (110)8.5 限制条件 (110)8.6 EAPS 命令的简单介绍 (111)8.6.1 EAPS配置命令 (111)8.7 配置示例 (112)第9章配置IGMP SNOOPING (118)9.1 IGMP SNOOPING介绍 (119)9.1.1 IGMP SNOOPING处理过程 (119)9.1.2 二层动态组播 (120)9.1.3 加入一个组 (120)9.1.4 离开一个组 (122)9.2 IGMP SNOOPING配置 (123)9.2.1 IGMP SNOOPING缺省配置 (123)9.2.2 打开和关闭IGMP SNOOPING (123)9.2.3 配置生存时间 (124)9.2.4 配置 fast-leave (124)9.2.5 配置 MROUTER (125)9.2.6 显示信息 (125)9.3 IGMP SNOOPING配置示例 (126)9.3.1 配置 (126)第10章配置ACL (128)10.1 ACL资源库介绍 (129)10.2 ACL过滤介绍 (130)10.3 ACL资源库配置 (132)10.4 ACL过滤配置 (135)10.5 ACL配置示例 (136)第11章配置QOS (138)11.1 QOS介绍 (139)11.1.1 QOS概述 (139)11.1.2 QOS模型 (139)11.1.3 QOS业务分类 (140)11.1.4 QOS策略 (141)11.1.5 QOS调度 (142)11.2 QOS配置 (143)11.2.1 QOS缺省配置 (143)11.2.2 配置QOS映射表 (144)11.2.3 配置QOS信任端口 (145)11.2.4 配置 QOS业务类 (146)11.2.5 配置 QOS策略 (147)11.2.6 配置QOS非信任端口 (149)11.2.7 配置QOS调度方法 (151)11.3 QOS配置示例 (151)11.3.1 配置 (151)第12章配置IP路由 (153)12.1 配置VLAN接口 (154)12.2 配置ARP (155)12.2.1 配置静态ARP (156)12.2.2 配置ARP绑定 (157)12.2.3 查看ARP的信息 (158)12.3 配置静态路由 (159)12.4 路由冗余备份 (161)12.5 配置策略路由 (163)12.6 IP路由配置示例 (165)12.6.1 三层接口 (165)12.6.2 静态路由 (166)12.6.3 ARP (166)第13章配置RIP (167)13.1 RIP介绍 (168)13.2 RIP配置 (168)13.2.1 启动RIP并进入RIP配置模式 (169)13.2.2 使能RIP接口 (169)13.2.3 配置单播报文传送 (170)13.2.4 配置接口的工作状态 (170)13.2.5 配置缺省路由权值 (171)13.2.6 配置管理距离 (171)13.2.7 配置计时器 (172)13.2.8 配置版本 (172)13.2.9 引入外部路由 (173)13.2.10 配置路由过滤 (173)13.2.11 配置附加路由权值 (174)13.2.12 配置接口的RIP版本 (174)13.2.13 配置接口的收发状态 (175)13.2.14 配置水平分割 (176)13.2.15 报文认证 (176)13.2.16 配置接口权值 (177)13.2.17 显示信息 (177)13.3 RIP配置示例 (178)第14章配置OSPF (180)14.1 OSPF介绍 (181)14.2 OSPF配置 (182)14.2.1 启动OSPF并进入OSPF模式 (183)14.2.2 使能接口 (183)14.2.3 指定主机 (184)14.2.4 配置路由器ID (184)14.2.5 配置邻接点 (185)14.2.6 禁止接口发送报文 (186)14.2.7 配置SPF计算时间 (186)14.2.8 配置管理距离 (187)14.2.9 引入外部路由 (188)14.2.10 配置接口的网络类型 (189)14.2.11 配置hello报文发送时间间隔 (189)14.2.12 配置邻居路由器失效时间 (190)14.2.13 配置重传时间 (190)14.2.14 配置接口延时 (191)14.2.15 配置接口在DR选举中的优先级 (191)14.2.16 配置接口上发送报文的代价 (192)14.2.17 配置接口发送DD报文是否填MTU域 (193)14.2.18 配置接口报文认证 (193)14.2.19 配置区域虚链路 (194)14.2.20 配置区域路由聚合 (195)14.2.21 配置区域报文认证 (196)14.2.22 配置stub区域 (196)14.2.23 配置nssa区域 (197)14.2.24 配置外部路由聚合 (197)14.2.25 配置外部路由的缺省权值 (197)14.2.26 显示信息 (198)14.3 OSPF配置示例 (199)第15章配置VRRP (201)15.1 VRRP介绍 (202)15.1.1 VRRP概述 (202)15.1.2 VRRP术语 (204)15.1.3 VRRP协议交互 (205)15.1.4 虚拟主路由器的选举 (207)15.1.5 虚拟路由器的状态 (208)15.1.6 VRRP跟踪 (210)15.2 VRRP配置 (211)15.2.1 创建和删除虚拟路由器 (211)15.2.2 配置虚拟路由器的虚拟IP地址 (212)15.2.3 配置虚拟路由器的参数 (213)15.2.4 配置VRRP跟踪 (214)15.2.5 启动和关闭虚拟路由器 (215)15.2.6 查看VRRP信息 (216)15.3 VRRP配置示例 (216)第16章配置VLLP (219)16.1 VLLP介绍 (220)16.2 VLLP配置 (222)16.2.1 在三层接口上创建vllp设备 (223)16.2.2 使能vllp设备 (223)16.2.3 在二层接口上创建vllp端口 (223)16.2.4 配置vllp设备优先级 (223)16.2.5 配置vllp设备查询计时器间隔 (224)16.2.6 显示信息 (224)16.3 VLLP配置示例 (224)第17章配置DHCP RELAY (227)17.1 DHCP RELAY介绍 (228)17.2 DHCP RELAY配置 (229)17.2.1 启动接口的DHCP-relay功能 (229)17.2.2 配置接口对应的DHCP server (229)17.2.3 启动DHCP snooping功能 (230)17.3 DHCP RELAY配置示例 (230)第18章配置IGMP (232)18.1 IGMP介绍 (233)18.2 IGMP配置 (234)18.2.1 启动接口的IGMP功能 (234)18.2.2 配置接口的组过滤访问控制列表 (234)18.2.3 配置接口离开组过滤的访问控制列表 (235)18.2.4 配置接口的特定组查询的次数 (235)18.2.5 配置接口的特定组查询间隔 (236)18.2.6 配置接口的非查询者计时器时间 (236)18.2.7 配置接口的查询计时器间隔 (236)18.2.8 配置接口的最大响应时间 (237)18.2.9 配置接口的活力参数 (237)18.2.10 配置接口的协议版本 (238)18.3 IGMP配置示例 (238)第19章配置PIM-SM (241)19.1 PIM-SM介绍 (242)19.2 PIM-SM配置 (243)19.2.1 启动组播路由功能 (244)19.2.2 配置组播路由表容量 (244)19.2.3 配置组播接口ttl值 (245)19.2.4 启动接口pim-sm功能 (245)19.2.5 配置接口的被动模式 (246)19.2.6 配置接口优先级 (246)19.2.7 配置接口hello报文不包含genid信息 (246)19.2.8 配置接口hello计时器间隔 (247)19.2.9 配置接口上邻居的保持时间 (247)19.2.10 配置接口的邻居列表过滤 (248)19.2.11 配置单播注册报文的源地址 (248)19.2.12 配置注册报文数量限制 (248)19.2.13 配置注册时检查RP可达 (249)19.2.14 配置注册抑止计时器时间值 (249)19.2.15 配置注册KAT计时器时间值 (249)19.2.16 配置注册源地址过滤 (250)19.2.17 配置注册报文cisco方式的校验和 (250)19.2.18 配置静态RP地址 (251)19.2.19 配置候选RP (251)19.2.20 配置忽略RP-set优先级 (252)19.2.21 配置cisco方式的C-RP-Adv报文 (252)19.2.22 配置候选BSR (252)19.2.23 配置JP计时器间隔 (253)19.2.24 配置SPT切换 (253)19.2.25 配置SSM (254)19.2.26 配置组播安全 (254)19.3 PIM-SM配置示例 (255)第20章配置SNMP (258)20.1 SNMP 介绍 (259)20.2 SNMP 配置 (260)20.3 SNMP 配置示例 (262)20.3.1 配置 (262)第21章配置系统日志 (264)21.1 系统日志介绍 (265)21.1.1 日志信息的格式 (265)21.1.2 日志的存储 (267)21.1.3 日志的显示 (268)21.1.4 debugging工具 (268)21.2 系统日志配置 (268)21.2.1 配置终端实时显示开关 (269)21.2.2 查看日志信息 (270)21.2.3 配置debugging开关 (270)21.2.4 查看debugging信息 (272)第1章 CLI命令行介绍本章对CLI 命令行接口进行详细的描述,主要包括以下内容:z访问交换机的CLIz CLI模式介绍z命令语法介绍z命令行快捷键z历史命令1.1 访问交换机的CLI交换机的CLI 命令行接口提供了用户管理交换机的界面。
明御安全网关(下一代防火墙)用户FAQ手册-180802_修正版

明御®安全网关下一代防火墙用户手册杭州安恒信息技术股份有限公司二〇二二年四月目录1 部署方式FAQ (8)1.1. DAS-Gateway应部署在哪里? (8)1.1 DAS-Gateway部署方式有哪些? (8)1.2 什么是路由模式? (9)1.3 路由模式使用在什么情况下? (9)1.4 路由模式下无法访问外网? (9)1.5 什么是透明模式? (9)1.6 透明模式无效果? (9)1.7 透明模式的工作原理? (9)1.8 透明模式的实用性在哪里? (9)1.9 什么是旁路模式? (10)1.10 使用旁路模式的好处是什么? (10)1.11 查看DAS-Gateway日志信息为空时怎么处理? (10)1.12 部署DAS-Gateway有什么好处? (10)1.13 为什么DAS-Gateway配置正确但是数据无法通过? (10)2 设备管理FAQ (10)2.1 为什么管理员用户不能通过HTTP、SSH、或者Telnet登录设备,不显示web页面? (10)2.2 为什么HTTPS无法打开防火墙的WEB页面? (10)2.3 在“系统管理>管理员”,“添加管理员”页面中的"管理IP/掩码"的作用是什么? (10)2.4 用户登录成功后,可在哪里修改密码? (11)2.5 默认admin管理员帐户的密码如何重置? (11)3 应用审计FAQ (11)3.1 如何查看当前的应用审计策略? (11)3.2 应用审计可以做关键字过滤吗? (11)3.3 为什么恶意URL白名单不生效? (11)4 用户中心FAQ (11)4.1 当用户中心用户识别错误的时候,同时用户数已经达到了用户中心的规格数,如何操作? (11)4.2 当用户很大时,特定用户的信息为何没有更新? (11)4.3 为何用户流量统计有时会出现某应用类的应用未显示在饼图中? (12)4.4 为何用户在线时长有时会比在线用户显示的时长少? (12)4.5 为何用户中心在线时长有时会比在线用户显示的时长多? (12)4.6 用户中心用户的排名是按照什么方式? (12)4.7 为何用户的应用行为不能记录到时间? (12)4.8 为何在无线环境下在用户中心看到的账号信息不正确? (12)5 流控FAQ (13)5.1 带宽的上下行如何区分? (13)5.2 配置最大带宽和保障带宽为何无法成功? (13)5.3 流量控制通道有多个匹配条件时如何匹配? (13)5.4 最大带宽和保障带宽分别有什么作用? (13)5.5 配置了保障带宽但是在拥塞时流量无法达到其保障带宽? (13)5.6 配置了多个流量控制通道,只有第一个通道有流量匹配? (13)5.7 什么是流量排除策略? (13)5.8 每IP限速和通道带宽限制的处理关系? (13)5.9 如何限制P2P的流量? (14)5.10 流量控制通道的高、中、低级别有何作用? (14)5.11 子通道的保障带宽总和大于父通道保障带宽,如何分配保障带宽? (14)5.12 线路整体带宽仍然有富裕,部分应用延时很大? (14)5.13 如何调整流控通道的顺序? (14)5.14 如何定位QoS策略是否被命中,命中哪条QoS策略? (14)5.15 如何定位数据包是否被QoS策略丢弃? (14)6 设备流量统计FAQ (14)6.1 设备流量统计的值为何比实际数据包的速率小? (14)6.2 设备整机转发流量中上行、下行如何区分? (14)6.3 设备流量统计为何与用户流量统计有所出入? (15)6.4 设备异常掉电后,为何丢失了部分数据? (15)6.5 更改系统时间对设备流量统计会产生哪些影响? (15)6.6 接口状态页面,没有完全显示所有接口的状态信息? (15)6.7 接口状态页面上有接收或发送速率的信息,但健康统计页面整机转发流量无数据? (15)6.8 设备健康统计页面,整机转发流量只能看到上行或者下行的流量信息? (15)6.9 接口状态页面的数据,多长时间更新一次? (15)7 策略路由FAQ (16)7.1 什么是策略路由? (16)7.2 同一条策略路由最多支持几个下一跳?同时配置多个下一跳的情况下,如何转发报文? (16)7.3 策略路由转发流程图 (17)7.4 策略路由下一跳不可达的判断条件是什么? (17)8 ISP路由FAQ (18)8.1 什么是ISP路由? (18)8.2 ISP路由的工作环境是什么? (18)8.3 ISP路由是怎样工作的? (18)8.4 ISP路由如何进行流量负载均衡? (18)9 IPsec VPN FAQ (18)9.1 如何查看当前IKE SA信息? (18)9.2 如何查看当前IPsec sa信息? (18)9.3 IPsec VPN中报文的默认加密方式是什么? (19)9.4 一条VPN最多支持多少条隧道? (19)9.5 为什么IPsec VPN第一阶段协商不成功? (19)9.6 为什么IPsec VPN第二阶段协商不成功? (19)9.7 为什么保护子网不能通讯? (19)9.8 为什么某些移动终端接入VPN不成功? (20)9.9 NAT环境下IPSEC协商不成功? (20)9.10 IPSEC建起连接后,一端断开后,IPSEC无法协商? (20)9.11 本端SA状态显示连接,流量无法转发? (20)9.12 当设备存在多出口时,其它参数正确,IPSEC协商失败? (20)9.13 IPSEC使用国密证书协商不成功? (20)9.14 IPSEC快速配置与IPSEC VPN标准配置有什么区别? (21)9.15 IPSEC快速配置一阶段和二阶段默认参数? (21)9.16 IPSEC快速配置默认参数支持修改吗? (21)9.17 IPSEC预共享密钥有字符限制么? (22)10 IPv6 FAQ (22)10.1 配置IPv6有什么优点? (22)10.2 什么是IPv6邻居发现协议? (22)10.3 IPv6中的路由器请求报文作用(Router Solicitation)? (22)10.4 IPv6中的路由器通告报文作用(Router Advertisement)? (22)10.5 邻居请求(Neighbor Solicitation)报文作用? (23)10.6 邻居通告(Neighbor Advertisement)报文作用? (23)10.7 邻居发现协议的功能是什么? (23)10.8 在配置IPv6静态路由之前,需完成以下任务? (23)10.9 IPv6缺省路由的生成方式? (23)10.10 在Tunnel接口上配置了相关的参数后(例如隧道的起点、终点地址和隧道模式)仍未处于up状态? (24)10.11 6to4隧道是否需要配置目的地址? (24)10.12 ISATAP隧道是否需要配置目的地址? (24)10.13 从设备端执行什么配置去主动ping另一台设备的IPv6地址? (24)10.14 什么是IPv6手动隧道? (24)10.15 什么是6to4自动隧道? (24)10.16 什么是ISATAP自动隧道? (25)11 VRF FAQ (25)11.1 不同的VRF间如何相连? (25)11.2 DAS-Gateway最多可以创建多少个VRF? (25)11.3 VRF基本设计概念是什么? (25)11.4 路由表隔离功能的逻辑? (25)11.5 流表的隔离功能? (25)11.6 VRF模块设计背景? (26)12 动态路由FAQ (26)12.1 RIP支持v1和v2功能吗? (26)12.2 RIP开启时默认是V1还是V2版本? (26)12.3 OSPF是否支持pppoe接口? (26)12.4 OSPF的Router ID如何配置,缺省是什么? (26)12.5 OSPF没有路由,甚至邻居都不能形成Full关系,最常见的原因是什么? (26)12.6 有什么好的办法知道OSPF出了什么问题? (27)12.7 OSPF如何自动计算接口cost的? (27)12.8 OSPF链路两端配置不同的网络类型,能否形成Full关系? (27)12.9 OSPF路由聚合是否可以跨区域聚合? (27)12.10 OSPF的Virtual-Link是否很有用处? (28)12.11 OSPFv3在界面中是否有配置选项? (28)12.12 OSPFv3邻居无法建立? (28)12.13 OSPFv3路由信息不正确? (28)12.14 当执行no router ospf6后,其它接口有关ospfv3配置是否自动删除? (28)13 HA FAQ (28)13.1 配置HA的优点? (28)13.2 HA的工作模式 (29)13.3 什么是HA的主备模式? (29)13.4 什么是HA的主主模式? (29)13.5 HA工作状态 (29)13.6 HA接口概念 (29)13.7 抢占模式 (30)13.8 抢占延时定时器 (30)13.9 心跳报文 (30)13.10 HA管理地址 (30)13.11 HA状态同步 (30)13.12 HA主备状态切换 (30)13.13 HA主主状态切换 (31)13.14 HA主主邻居为什么建立不起来 (31)13.15 HA主主地址代理 (31)13.16 HA主主非对称路由 (31)14 Bypass FAQ (31)14.1 每台设备最多有多少组Bypass接口? (31)14.2 Bypass接口使用在哪种网络场景中? (31)14.3 Bypass功能默认开启吗? (31)14.4 进程异常时是否会触发Bypass? (32)14.5 系统运行过程断电是否会触发Bypass? (32)14.6 系统启动过程中是否会持续Bypass状态? (32)14.7 从系统正常到掉电进入Bypass状态时,会丢几个ICMP报文? (32)15 APP缓存FAQ (32)15.1 本地文件如果不存在怎么办? (32)15.2 App缓存文件存储在哪里? (32)15.3 为什么重启后app缓存计数不正确? (32)15.4 APP缓存能缓存哪些文化类型? (32)15.5 URL链接为什么无法提交? (32)15.6 CLI下上传的文件能大于剩余缓存空间? (32)16 会话限制FAQ (33)16.1 会话限制基于什么原则来进行限制? (33)16.2 配置两条会话限制,引用的地址对象分别都包含了某个IP地址,但是会话限制的配置不同,那么该以哪一个为标准? (33)16.3 会话限制是否可以只限制会话总数,而不限制新建会话速度? (33)16.4 同一个地址对象是否可以配置多个会话限制? (34)16.5 在配置会话限制之前,地址对象的会话总数已经超过了该会话限制的会话总数,那么配置该条会话限制后是否会将会话数保持在限制的数目下? (34)17 DNS代理FAQ (34)18 攻击防护FAQ (35)18.1 扫描攻击防御中的黑名单作用是什么? (35)19 统计集FAQ (35)19.1 统计集统计最近1小时、最近1天、最近1周数据统计的刷新间隔是多少? (35)19.2 统计集应用流量统计中所显示的流速计算? (35)19.3 统计集用户统计中用户的类型? (36)19.4 统计集统计用户及应用的规格? (36)19.5 统计集中总流量是如何计算的? (36)19.6 统计集中刷新按钮的作用? (36)19.7 上行流量和下行流量如何区分? (36)19.8 统计集数据是否支持HA? (36)19.9 统计集数据保存重启后是否会丢失?导出再导入是否会丢失? (36)19.10 饼图默认显示Top多少?其它应用是什么? (36)19.11 统计集中是否会统计出到本地流量? (36)19.12 当统计集显示页面放大或缩小时,饼图显示变化? (36)19.13 统计集是否支持旁路模式? (37)19.14 统计集中应用统计与用户统计查看区别? (37)20 地址探测FAQ (37)20.1 如何配置track? (37)20.2 为什么ping类型的track状态不稳定? (37)20.3 为什么tcp类型的探测不成功? (37)20.4 为什么dns类型探测失败? (37)20.5 DAS-Gateway配置HA并且关联track,主墙无法切换? (37)20.6 HA联动备墙无法跨网段探测? (37)20.7 WEB页面导入csv格式用户和用户组无法同步? (38)21 策略优化FAQ (38)21.1 七元组策略按照什么顺序进行匹配? (38)21.2 单条七元组审计策略中的应用审计规则、URL审计规则按照什么顺序进行匹配? (38)21.3 添加或修改七元组策略会有什么影响? (38)22 第三方用户存储认证 (38)(1)首先查看ipv4策略是否将此数据包拒绝; (38)(2)查看DAS-Gateway设备路由是否正确; (38)(3)查看用户策略的目的IP是否将服务器的IP地址排除在外。
华为路由器路由策略和策略路由
路由策略和策略路由一、路由策略简介路由策略主要实现了路由过滤和路由属性设置等功能,它通过改变路由属性(包括可达性)来改变网络流量所经过的路径。
路由协议在发布、接收和引入路由信息时,根据实际组网需求实施一些策略,以便对路由信息进行过滤和改变路由信息的属性,如:1、控制路由的接收和发布只发布和接收必要、合法的路由信息,以控制路由表的容量,提高网络的安全性。
2、控制路由的引入在一种路由协议在引入其它路由协议发现的路由信息丰富自己的路由信息时,只引入一部分满足条件的路由信息。
3、设置特定路由的属性修改通过路由策略过滤的路由的属性,满足自身需要。
路由策略具有以下价值:通过控制路由器的路由表规模,节约系统资源;通过控制路由的接收、发布和引入,提高网络安全性;通过修改路由属性,对网络数据流量进行合理规划,提高网络性能。
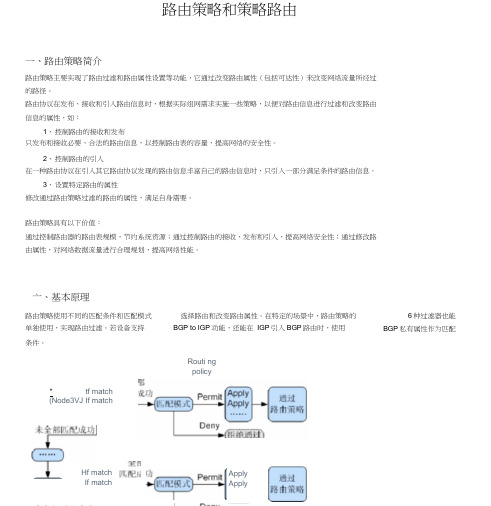
亠、基本原理路由策略使用不同的匹配条件和匹配模式选择路由和改变路由属性。
在特定的场景中,路由策略的单独使用,实现路由过滤。
若设备支持BGP to IGP功能,还能在IGP引入BGP路由时,使用条件。
Routi ngpolicy* tf match(Node3VJ If matchHf matchIf matchApplyApply6种过滤器也能BGP私有属性作为匹配N ( N>=1 )个节点(Node )。
路由进入路由策略后, lf-match 子句定义,涉及路由信息的属性和路由策略的 当路由与该节点的所有 lf-match 子句都匹配成功后,进入匹配模式选择,不再匹配其他节点匹配模式分 permit 和deny 两种:图1路由策略原理图如图1,一个路由策略中包含 节点是否匹配。
匹配条件由按节点序号从小到大依次检查各个 6种过滤器。
permit :路由将被允许通过,并且执行该节点的 Apply 子句对路由信息的一些属性进行设置。
deny :路由将被拒绝通过。
当路由与该节点的任意一个 If-match 子句匹配失败后,进入下一节点。
- 1、下载文档前请自行甄别文档内容的完整性,平台不提供额外的编辑、内容补充、找答案等附加服务。
- 2、"仅部分预览"的文档,不可在线预览部分如存在完整性等问题,可反馈申请退款(可完整预览的文档不适用该条件!)。
- 3、如文档侵犯您的权益,请联系客服反馈,我们会尽快为您处理(人工客服工作时间:9:00-18:30)。
SmartMesh IP Manager CLI GuideTable of Contents1About This Guide _________________________________________________________________________________ 41.1Related Documents __________________________________________________________________________ 41.2Conventions Used ___________________________________________________________________________ 61.3Revision History _____________________________________________________________________________ 8 2Introduction _____________________________________________________________________________________ 92.1CLI Access _________________________________________________________________________________ 92.1.1Login/Logout _________________________________________________________________________ 92.1.2Managing user and viewer Passwords _____________________________________________________ 102.1.3Mote Commands _____________________________________________________________________ 10 3Commands ____________________________________________________________________________________ 113.1delete acl _________________________________________________________________________________ 113.2delete mote ________________________________________________________________________________ 123.3exec clearStat ______________________________________________________________________________ 133.4exec exchJoinKey ___________________________________________________________________________ 143.5exec exchNetId _____________________________________________________________________________ 153.6exec restore _______________________________________________________________________________ 163.7exec setAdv _______________________________________________________________________________ 173.8exec setDnFrame ___________________________________________________________________________ 183.9exec sendData _____________________________________________________________________________ 193.10help _____________________________________________________________________________________ 203.11log ______________________________________________________________________________________ 213.12login _____________________________________________________________________________________ 223.13logout ____________________________________________________________________________________ 233.14onechan __________________________________________________________________________________ 243.15ping _____________________________________________________________________________________ 253.16radiotest __________________________________________________________________________________ 263.16.1radiotest on/off ______________________________________________________________________ 263.16.2radiotest tx __________________________________________________________________________ 273.16.3radiotest rx __________________________________________________________________________ 293.16.4radiotest stat ________________________________________________________________________ 303.17reset _____________________________________________________________________________________ 313.18set acl ____________________________________________________________________________________ 323.19set config _________________________________________________________________________________ 333.20seti ______________________________________________________________________________________ 353.21show _____________________________________________________________________________________ 363.21.1show acl ____________________________________________________________________________ 383.21.2show config & show curconfig __________________________________________________________ 393.21.3show mote __________________________________________________________________________ 403.21.4show motever _______________________________________________________________________ 423.21.5show path __________________________________________________________________________ 433.21.6show stat ___________________________________________________________________________ 443.21.7show status _________________________________________________________________________ 453.21.8show time __________________________________________________________________________ 473.21.9show trace __________________________________________________________________________ 483.21.10show ver ___________________________________________________________________________ 49 3.22showi ____________________________________________________________________________________ 50 3.23sm ______________________________________________________________________________________ 51 3.24su _______________________________________________________________________________________ 52 3.25trace _____________________________________________________________________________________ 533.25.1trace bw ____________________________________________________________________________ 553.25.2trace fa _____________________________________________________________________________ 563.25.3trace glbcmd ________________________________________________________________________ 573.25.4trace io (reserved) ____________________________________________________________________ 583.25.5trace iodata (reserved) _________________________________________________________________ 593.25.6trace link ___________________________________________________________________________ 603.25.7trace loop ___________________________________________________________________________ 613.25.8trace monitor ________________________________________________________________________ 623.25.9trace motest _________________________________________________________________________ 633.25.10trace netmode _______________________________________________________________________ 643.25.11trace opt ____________________________________________________________________________ 653.25.12trace power _________________________________________________________________________ 663.25.13trace rawio_enc (reserved) _____________________________________________________________ 673.25.14trace route __________________________________________________________________________ 683.25.15trace spl_task & trace spl_ack (reserved) __________________________________________________ 693.25.16trace stats __________________________________________________________________________ 703.25.17trace timeout ________________________________________________________________________ 713.25.18trace tplglock (reserved) _______________________________________________________________ 721 About This Guide1.1 Related DocumentsThe following documents are available for the SmartMesh IP network:Getting Started with a Starter Kit- walks you through basic installation and a few tests to make sure your network is SmartMesh IP Easy Start Guideworking- the Installation section contains instructions for installing the serial drivers and example SmartMesh IP Tools Guideprograms used in the Easy Start Guide and other tutorials.User's Guide- describes network concepts, and discusses how to drive mote and manager APIs to SmartMesh IP User's Guideperform specific tasks, e.g. to send data or collect statistics. This document provides context for the API guides. Interfaces for Interaction with a Device- used for human interaction with a Manager (e.g. during development of a client, SmartMesh IP Manager CLI Guideor for troubleshooting). This document covers connecting to the CLI and its command set.- used for programmatic interaction with a manager. This document covers SmartMesh IP Manager API Guideconnecting to the API and its command set.- used for human interaction with a mote (e.g. during development of a sensor SmartMesh IP Mote CLI Guideapplication, or for troubleshooting). This document covers connecting to the CLI and its command set.- used for programmatic interaction with a mote. This document covers connecting to SmartMesh IP Mote API Guidethe API and its command set.Software Development Tools- describes the various evaluation and development support tools included in the SmartMesh IP Tools Guide, including tools for exercising mote and manager APIs and visualizing the network.SmartMesh SDKApplication Notes- Cover a wide range of topics specific to SmartMesh IP networks and topics that SmartMesh IP Application Notesapply to SmartMesh networks in general.Documents Useful When Starting a New DesignThe Datasheet for the , or one of the based on it.LTC5800-IPM SoC modulesThe Datasheet for the , or one of the based on it.LTC5800-IPR SoC embedded managersA for the mote/manager SoC or - this discusses best practices for integrating theSoC or module into your design.Hardware Integration GuideA for the embedded manager - this discusses best practices for integrating the embeddedmanager into your design.Board Specific Integration GuideA - For SoC motes and Managers. Discusses how to set default IO configuration andcrystal calibration information via a "fuse table".Hardware Integration Application Notes- contains an SoC design checklist, antenna selection guide, etc.The - a guide to the Programmer Board and ESP software used to load firmware on a ESP Programmer Guide DC9010device.ESP software - used to program firmware images onto a mote or module.Board Specific Configuration Guide Fuse Table software - used to construct the fuse table as discussed in the .Other Useful DocumentsA glossary of wireless networking terms used in SmartMesh documentation can be found in the SmartMesh IP User'sGuideA list of Frequently Asked Questions1.2 Conventions UsedThe following conventions are used in this document:Computer typeindicates information that you enter, such as specifying a URL.indicates buttons, fields, menu commands, and device states and modes.Bold typeItalic typeis used to introduce a new term, and to refer to APIs and their parameters.Tips provide useful information about the product.Informational text provides additional information for background and contextNotes provide more detailed information about concepts.Warning! Warnings advise you about actions that may cause loss of data, physical harm to the hardware or your person.The CLI commands are described using the following notations and terminology:1.3 Revision History2 IntroductionThis guide describes the commands that you can send to a SmartMesh IP Manager by logging on to its Command Line Interface (CLI). The CLI is available by connecting a serial terminal program to the Manager. The CLI is intended for human interaction with a manger, e.g. during development, or for interactive troubleshooting. Most commands are atomic - a command and its arguments are typed into the CLI, and a response is returned. For example, the command returns ahelplist of possible commands. Traces are not atomic - once started, they generate output asynchronously until cancelled.For a machine-to-machine communications (e.g. a host program talking to the manager), the Application Programming Interface (API) is used. See the for details on that interface.SmartMesh IP Manager API Guide2.1 CLI AccessThere are two dedicated serial ports on the SmartMesh IP manager: one is for API communication with an external application, and the other is dedicated to this command line interface.You can log on to the CLI from any serial terminal program (such as HyperTerminal or Tera Term):— If connecting to an evaluation board integrated with an FTDI serial-to-usb interface, the CLI will be found Serial 0on the 3rd COM port mapped onto your system.The default serial port settings are 9600 baud, 8 data bits, No parity, 1 stop bit, no flow control.2.1.1 Login/LogoutThere are two sets of privileges on this system, namely and . The privilege allows for system settings to beuser viewer userset and the privilege only allows the viewing of manager and network information.viewerTo login to the manager CLI from the terminal program enter either of the following usernames and passwords:To logout of the Manager CLI:2.1.2 Managing user and viewer PasswordsThe default passwords should be changed with the following commands (after logging in with "user" privileges):2.1.3 Mote CommandsCommands beginning with an 'm' such as or are specific to the Access Point "mote" and are described in themtrace minfodocumentation.SmartMesh IP Mote CLI Guide3 CommandsThis manual describes the CLI commands available in the SmartMesh IP manager. The CLI is case-insensitive. In most cases a command will be recognized by the shortest unambiguous string, so the following are all equivalent:3.1 delete aclDescriptionThe command removes a mote's entry in the access control list (ACL), clearing the mote's join key and join delete aclcounter. Deleting a mote from the ACL prevents the mote from joining the network, or rejoining if the mote is already in the network. It does not force a mote to leave the network. If all motes are deleted from the ACL, the system reverts to using a common join key. This change is persistent.SyntaxParametersExample3.2 delete moteDescriptionDelete a mote from the manager. This command is will not remove an operational mote from the network. It is merely intended as a way to remove it from the list of motes known to the manager. Note that you can only delete a mote from the network if the mote is in the or state. This change is persistent.Lost IdleSyntaxParametersExample3.3 exec clearStatDescriptionClear all network statistics. SyntaxParametersExample3.4 exec exchJoinKeyDescriptionReplace the join key for a specified mote. The message is sent to the mote and is also changed in the ACL. This change is persistent.SyntaxParametersExample3.5 exec exchNetIdDescriptionExchange the Network ID. This command will change the Network ID of the manager and all motes connected to the network. The new Network ID takes effect the next time the network is restarted. Network IDs 0 and 65535 are reserved and should not be used. This change is persistent.SyntaxParametersExample3.6 exec restoreDescriptionRestores all factory default settings. The license enabling optional features remains unchanged. This change is persistent. SyntaxParametersExample3.7 exec setAdvDescriptionSet advertising in the network to on or off. Setting to off turns off all advertisements and saves the most power, but motes will not be able to hear and join the network in this state. Setting to on turns on advertisements to allow motes to join the network.SyntaxParametersExample3.8 exec setDnFrameDescriptionChange the downstream superframe size. This is only valid when running a network with the downstream superframe multiplier configuration parameter () set to either 2 or 4. This command will turn that multiplier on (normal), or offdnfr_mult(fast). Using this command disables the automatic switching of superframe size after the network has formed. As an example, if the starting frame size for the network is 256 slots and is set to 4, then changing to 'normal' multiplies thednfr_multsupeframe by 4 to a 1024-slot superframe.SyntaxParametersExample3.9 exec sendDataDescriptionSend packet with specified payload to a mote. This CLI command is equivalent to invoking API command .sendData SyntaxParametersExampleSend packet to Mote ID=2, source port=20, destination port=20, priority=1, payload bytes="0x11,0x22,0x33,0x44,0x55":3.10 helpDescriptionShow help. Entering this command without parameters displays the list of all available commands to the current user and mode. Help on a specific command may be obtained by entering that command as an argument.SyntaxParametersExample3.11 logDescriptionRetrieves debug log information from a mote's flash memory. This is used for debugging if a mote reset from a network. SyntaxParametersExample3.12 loginDescriptionThe CLI interface requires a login, and the password entered determines the privilege used for the session. The default passwords match the two privilege levels: and . The cannot make any configuration changes to theviewer user viewermanager. The has access to all commands. The login command can be used repeatedly without logging out to switch userbetween privilege levels. Passwords for the two privilege levels can be changed using the command.set configSyntaxParametersExample3.13 logoutDescriptionLogout from the current CLI session. SyntaxParametersExample3.14 onechanDescriptionSetup the network to run on a single channel. This command may be used for RF compliance testing. This command takes effect only after system reset. This setting is persistent, and must be turned off to revert to normal operation.Channel numbering for this command is 0-15, corresponding to IEEE 2.4 GHz channels 11-26SyntaxParametersExample3.15 pingDescriptionRequest a reply from a mote in the network. Mote should respond with temperature and voltage. Note this is a Dust command - it does not use ICMP echo.SyntaxParametersExample3.16 radiotest3.16.1 radiotest on/offDescriptionEnable or disable radiotest mode on the device. Radiotest functionality can be used to exercise the radio for certification and testing purposes. This command takes effect after reboot and the selected mode persists until changed, i.e. if ON, it will remain on even after reset or power cycle until the mode is set to OFF and the device is rebooted.SyntaxParametersExamplePut device into radiotest mode:Return device to normal operational mode:3.16.2 radiotest txDescriptionradiotest txThe command allows the user to initiate a radio transmission test. This command may only be issued in radiotest mode. Three types of transmission tests are supported:pk - Packet Transmissioncm - Continuous Modulationcw - Continuous Wave (unmodulated signal)pkcca - Packet transmission with clear channel assessment (CCA) enabled (Available in IP Manager >= 1.3.0 and IP mote >= 1.4.0)repeatCntIn a packet transmission test, the device generates a number of packet sequences. Each sequence consists of up to 10 packets with configurable sizes and delays. Each packet consists of a payload of up to 125 bytes, and a 2-byte 802.15.4 CRC at the end. Byte 0 contains sender's stationId. Bytes 1 and 2 contain the packet number (in big-endian format) that increments with every packet transmitted. Bytes 3..N contain a counter (from 0..N-3) that increments with every byte insidechanMaskpayload. Transmissions occur on the set of channels defined by , selected in pseudo-random order.In a continuous modulation test, the device generates continuous pseudo-random modulated signal, centered at the specified single channel. The test is stopped by resetting the device.In a continuous wave test, the device generates an unmodulated tone, centered at the specified single channel. The test tone is stopped by resetting the device.In a packet transmission with CCA test, the device is configured identically to that in the packet transmission test, however the device does a clear channel assessment before each transmission and aborts that packet if the channel is busy.Channel numbering is 0-15, corresponding to IEEE 2.4 GHz channels 11-26.SyntaxExampleInitiate packet test on channels 0,1 (chMap=0x03), with output tx power of 0 dBm, station id = 26 Repeat the sequence 5 times: 50-byte packet, 20ms delay, 30-byte packet, 20msec delayStart transmission with continuous modulation on channel 0 with output tx power of 8 dBStart transmission with continuous wave on channel 1 with output tx power of 8 dB3.16.3 radiotest rxDescriptionThe command puts the radio into receive mode where statistics on packet reception are collected. The radiotest rxnonzero station id specified must match station id of the sender, which is necessary to isolate traffic of multiple tests runningradiotest statin the same radio space. Statistics may be viewed with the command.Channel numbering is 0-15, corresponding to IEEE 2.4 GHz channels 11-26.SyntaxParametersExamplePut device into receive mode for 60 seconds on channel 2, use station id 26:3.16.4 radiotest statDescriptionradiotest stat radiotest rx The command displays packet reception statistics collected during the previously runcommand. This command may only be used when the device is in radiotest mode.SyntaxParametersExample3.17 resetDescriptionReset a specified entity in the network: either a mote or the manager. This command requires privilege.user SyntaxParametersExample3.18 set aclDescriptionThe command is used to create a new ACL entry or change an existing one. The key is in hexadecimal with two set aclcharacters per byte. This change is persistent.SyntaxParametersExampleDescriptionSet a configuration parameter in the Manager. The change will take effect upon the next system start (after reset or power cycle). This change is persistent. Note that features that require a license will take two resets - once for the license to take effect (and enable the settings change), and once for the setting to take effect.SyntaxParametersExample3.20 setiDescriptionThe command is used change an internal INI parameter. This command is for advanced configuration as instructed by setian application note, and requres privileges (see ).superuser suSyntaxParametersExample3.21 showDescriptionShows status information for various system objects. SyntaxParametersExample3.21.1 show aclThis command shows the motes currently whitelisted on the manager Access Control List. A reboot is necessary for the ACL to take effect.3.21.2 show config & show curconfigBoth of these commands return the same data structure. If the config parameters have been changed since the last boot, will display the parameters in use since the last boot. The command displays the show config show curconfigparameters that will be used following the next boot. See for a description of parameters.set config3.21.3 show moteDescription of fields:Mote: Short address of motemac: EUI-64 of moteState: Current state - Idle, Negot1-2, Conn1-5, Oper, LostHops: Average ("empirical") hops for upstream dataUptime: Time since last state changeAge: Time, in seconds, since the manager received the last packet from this devicePower type: Power (maxStCurrent in powerSrcInfo param = 0xffff), Regular, or Low Power (maxStCurrent less than needed for routing)Route type by mote: Route, No-route (from routingMode param)Route type by manager: TplgRoute, TplgNo-RoutePower Cost: powerSrcInfo param reported by moteNumber of neighbors: first entry is # parents + # children = # nbrs, first entry in parentheses is # parents, second entry in parentheses is descendants. From this can calculate # children = # nbrs - # parentsBandwidth (ms/packet): total (mote + children), mote (mote alone). A lower value here is more bandwidth.total data links: Exist (assigned to mote already for itself and children), extra (will be deleted through optimization) total mote links: Exist (assigned to mote already for itself), requested (service requested by mote)Number of links: Total links across all slotframes. This is the sum of the next three rowsCompressed: Number of compressed (manager doesn't store details) links, which are used for advertising, listen for join requests, and discoveryUpstream: Total, (# Tx / # Rx)Downstream: Total, (# Tx / # Rx)Neighbors: relationship (-> to parent, <- to child, – discovered), peer ID, path quality (30% or 74% until path stability is measured), RSSI to, RSSI fromNote that "routing type" can be set either on the mote or on the manager. If either the mote or the manager declares a mote to be non-routing, then the mote will not be assigned children or advertisement links.3.21.4 show moteverThis command displays all version information for a mote in the network. Note that this is a command sent to the mote over the air and the response will not be instantaneous.Two responses will be displayed. The first is the Network stack software version, and the second will contain the vendor ID and application layer software version.3.21.5 show pathThis command displays all the paths that the manager currently knows about in the network whether they have active links or not. Each mote gets one row of the display. By looking at the second row, we can see the paths associated with Mote ID 2. This row indicates that mote 1 is a (P)arent, and this path 2 to 1 has a Quality which has been measured based on success/fail (s)tatistics to be 97% - this is also called the "stability" of the path. The report also indicates that mote 3 is a (C)hild and that there is not yet any stability measurement on this path so we are using (r)SSI to estimate the quality.3.21.6 show statThis command displays the mote and network statistics. The counters here are incremented or averaged over the lifetime of the network, or since they have actively been cleared using an CLI command or a APIexec clearStat clearStatistics command.In this example, mote 4 is generating data much more often than the other motes. It is also at 2.4 hops, so all its packets are being forwarded through other motes. Mote 3 is at 1.0 hops, so all its packets are going straight to the AP (it is the "single parent" mote). Motes 2 and 5 are forwarding a fraction of their traffic through mote 3.Analyzing the numbers:Reliability: Arrived = 7217 = 257 + 249 + 6463 + 248, Lost = 0. The arrived/lost counters and reliability are kept real-time on the manager so will always be up-to-the-second accurate.Stability: Transmit = 14304 ≈ 7217 (the packets that arrived) + 204 (the packets that failed and needed to be retransmitted) + 6463 (the packets from mote 4 that needed to be forwarded by 2, 3, & 5) + 50 (20% of mote 5's packets forwarded by mote 3) + 77 (30% of mote 2's packets forwarded by mote 3) + 293 (packets from mote 4 that went to motes 2 and 5 and needed to be forwarded through mote 3). The stability counters and average stability are calculated based on mote health reports so they lag the reliability statistics by up to 15 minutes.3.21.7 show statusThis command displays some fixed global details about the network followed by several states which may change over the network lifetime.S/N: EUI-64 of ManagerMAC: Long address of manager (may not match EUI-64)IP6: IPv6 address. Shown here using link-local prefixHW ver: Hardware versionNetworkID: 0-65535Base Bandwidth: Global bandwidth target for each mote, in msFrame size: Randomized 256-284 slots. Not all values are possible. Working slots is always 256 and represents the number of slots in the slotframe that can have active linksAvailable Channels: 15 unless blacklistingBase Timeslot: This offsets all links by a random number between 0 and 255 to improve performance when multiple networks are co-locatedDownstream Frame: Set by config parameter, this can either be 1x, 2x, or 4x the frame size abovednfr_multOptimization: On by defaultAdvertisement: On by default. Can be enabled/disabled through orexec setAdv on exec setAdv off AP output: AP is ready to accept packetsBackbone: Off by default. Can be enabled through config parameterbbmode。