Samsung Galaxy A9(2016)SM-A9100(6.0.1)如何开启闪烁通知
I900刷机教程
准备工作:1、9100一部,(有没有root权限都行)2、质量良好的数据线一根3、Windows系统的电脑一部,并需要有GalaxyS2的驱动,驱动下载地址4、下载以下工具:odin3-v1_85_194442.zipGT-I9100_ClockworkMod-Recovery_4.0.1.4.tarsuperoneclickv1_9_1-shortfuse_194514.zip正式开始:第一步:刷入Recovery1、把odin3-v1_85_194442.zip解压2、电脑上打开里面的Odin3 v1.85.exe3、手机进入挖煤模式(实际上9100已经不是挖煤的样子了)进入方法:关机状态下,音量下+HOME键+POWER ON 出现第一界面后,按提示按下音量键上进入4、手机连接电脑,如果在左下角message那出现像上图那样有added,并且ID:COM 下面第一个方框内有显示说哪个端口已经链接,就表示你的手机成功识别.5、点击PDA按钮,并选择刚才下载的recovery-clockwork-4.0.1.4-galaxys2.tar的位置,这时候确保只有3个位置是打开勾,如上图所示.然后就可以点击Start,等程序把这个内核包刷入手机后,手机会自动重启。
(出现下图界面表示已成功)第二步:ROOT注:ROOT操作不能单独进行!必须先执行上面第一步!第一步里面的Recovery那里实际上自带一个可以理解为ROOT破解的东西在里面的!!1、解压superoneclickv1_9_1.zip2、电脑端打开SuperOneClick.exe3、保持手机连接电脑,点击"Root"直接开始4、完成后会提示你要不要测试下,点击yes就是了,所有步骤完成后会弹出一个框问你捐不捐款给作者。
重启手机后你的手机root就完成了,enjoy!第三步:开始刷机(卡刷zip方法)I9100 ROM推荐1、把下载好的zip包放到手机自己的sdcard目录处2、进入CWM 恢复模式:进入方法:关机状态下,按下“音量上+”+“HOME”+"POWER ON" (先把音量键跟HOME键按住再按开机键)CWM Recovery操作方法:用音量键控制上下,HOME键点选进入,电源键返回3、执行第三项:wipe data/factory reset,进去后选择“yes”4、执行第四项:wipe cache partition,进去后选择“yes”5、执行install zip from sdcard,进去后执行choose zip from sdcard6、选择你刚才放进手机大容量内存中的zip刷机包,选择yes开始刷机注意:手机如果是第一次刷zip包的,请连续执行第六步的操作两次,否则将会无法进入系统!!!7、选择Reboot system now,首次加载系统速度会慢点,请耐心等待注意:首次进入系统后,最好再重启一次手机,可以避免不必要的问题!。
Samsung Galaxy A9(2016)SM-A9100(6.0.1)如何安装,取出SIM ,USIM,UIM卡

Samsung Galaxy A9(2016)SM-A9100(6.0.1)如何安装/取出SIM /USIM/UIM卡?
Last Update date : 2016.05.10
如需安装Samsung Galaxy A9(2016)SM-A9100(6.0.1)的SIM /USIM/UIM卡,请按照以下步骤操作:
一、安装SIM /USIM/UIM卡
安装卡前注意事项如下:
以下为SIM卡类型参考图:
1.将取卡针插入卡托上的小孔弹出卡托。
(注:确保取卡针与小孔垂直。
否则,可能会损坏设备。
)
2.将卡托轻轻地从卡托插槽中拉出。
3.将SIM、USIM或UIM卡放在卡槽1上,并将另一张SIM、USIM或UIM卡放在卡槽2上。
此处卡槽①和②均支持移动、联通、电信4G。
(注:插入双卡时,其中一个卡槽可支持移动/联通/电信的4G/3G/2G网络,而另一个卡槽仅支持移动/联通/电信的2G网络,但两个卡槽不能同时支持电信网络。
)
4.将卡托重新插入卡托插槽。
(注:小心插入卡托以防止卡脱离或掉出托盘。
)
二、取出SIM /USIM/UIM卡
1.将取卡针插入卡托上的小孔弹出卡托。
2 将卡托轻轻地从卡托插槽中拉出。
3 移除 SIM、USIM 或 UIM 卡。
4 将卡托重新插入卡托插槽。
相关型号信息
SM-A9100ZDACHC。
2019年三星a9100恢复出厂设置-实用word文档 (1页)
2019年三星a9100恢复出厂设置-实用word文档
本文部分内容来自网络整理,本司不为其真实性负责,如有异议或侵权请及时联系,本司将立即删除!
== 本文为word格式,下载后可方便编辑和修改! ==
三星a9100恢复出厂设置
导语:感谢生活,我热爱每一件原始粗俗的工作,我愿在完全自然的状态下,寄放我的欢乐,那种到养鱼池里钓鱼的事,我始终拒绝。
以下小编为大家介绍三星a9100恢复出厂设置文章,欢迎大家阅读参考!
三星a9100恢复出厂设置
三星A9100双清格机恢复出厂设置教程详解:
1、确保手机电量充足,在手机关机的状态下,按住电源上键+音量键+Home 键,手机进入recovery模式。
2、用音量上/下键进行选择“wipe data/factory reset",然后用Home键确定。
3、然后选择“wipe cache partition”,用Home键来确定,此时就完成了三星A9100手机的双清。
4、三星A9100双清之后,也就是三星A9100格机之后数据都没有了,手机也恢复到了出厂时的状态。
补充:如果手机上使用的是第三方的recovery,我们可以按照下面的办法来双清。
①手机关机后按音量键+Home键+电源键进入recovery
②向右滑动按钮进行修改
③选择清楚数据选择格式化data分区——输入YES选择GO
④返回选择高级清楚选项打钩Dalvik,Cache system data internal storage cache五项,向右滑动按钮清楚
⑤返回选择重启项,然后选择线刷模式就可以刷机了。
三星I9100拆机全过程图解

三星i9100拆机全过程图解三星Galaxy S II(三星i9100)凭借8.49mm的纤薄机身打破了iPhone 4的厚度纪录,不过I9100采用的双核CPU在机能方面可是远超iPhone 4。
以下为大家介绍三星Galaxy S II的拆解图,看看8.49mm机身如何容纳下这些精细的配件。
这是后盖就是拿掉后盖,看起来也像个三星手机在跟三星Galaxy S II外在同样精巧的内部,安置着一颗三星自制的1.2GHz Exynos双核处理器,全新的CMOS传感器,主要负责通讯的Infineon XMM6260基带等。
这些精细的配件,紧凑地安置在主板上,加上1650毫安锂电池,共同组成8.49mm的超薄机身,真是三星不俗工业设计集大成之作。
拿掉后壳,终于得以一睹真容拿下来的后壳图片上面介绍的是三星Galaxy S II的后盖和主板一览图,可以看到I9100的电池占了比较的面积,同时尽管机身如此纤薄,但主板间还能叠加组装在一块。
这条主板很有型红框部分是前置摄像头、振动器、录音孔和USB接口对主板动手,拆掉连接排线,卸下螺丝,轻轻一拿,主板就出来了。
由于要为电池让出位置,因此主板的设计也尽管也利用好机身每一寸位置,除了CPU所在的主板外,还有几个不同功能的小元件,如前后摄像头等。
800万像素摄像头200万像素前置摄像头和光线感应器三星Galaxy S II里面的每一个元件都非常小,当然也只有这样才能组成Galaxy S II性感的8.49mm机身。
难怪iFixit称三星Galaxy S II里面就像外面一样漂亮。
不仅是漂亮,小编还为三星超强的工艺所折服,同时后置800万像素和前置200万像素的摄像头也是现在旗舰级的配置。
主板细节拆解元件图。
三星i9100开不了机了怎么办

现在刷机的人是越来越多了,可是刷机失败的人也不少,今天在来说说咱们的三星i9100手机刷机失败了开不了机了怎么办,当然开不了机不一定是刷机失败导致的,也有可能是root或着是删错系统文件导致的,在这里就来说说怎么解决这个问题吧,解决的方法就是采用救砖的方法就可以了:简要说明:要想救砖,前提是你的手机还能进入线刷模式,也就是挖煤模式,如果你的手机变砖了,按什么键都没用了,什么模式的都进不了,这种情况下只能用“挖煤神器”(一个类似数据线的小插头,不到10元钱就能买一个)来引导手机进入挖煤模式即可,如果感觉麻烦,还是建议你到售后或手机维修店帮你解决。
如果你的手机能正常的进入挖煤模式(线刷模式),可以继续往下看:一、刷机准备工作:1:确认你的手机能和电脑用数据线正常的连接,这个是必须的2:电脑上要安装三星i9100的驱动软件,如果你还没有安装的话,这里有教程:/a/jishuyingyong/2013/0307/25911.html3:下载i9100的官方rom包,必须是官方原版的固件rom包/a/jishuyingyong/2013/0307/25910.html如果你有其它的rom包也行,只要是支持线刷的就行,把线刷包下载下来放到电脑上就行了4:下载刷机工具包odin,/share/link?shareid=251865&uk=2164678797 这个工具包下载下来放到电脑上解压二:开始刷机:1:手机先完全的关机,然后同时按住下音量下键+ HOME键+ 电源键,等待5秒,出现英文界面2:然后再按音量上键,进入界面为绿色机器人,此为刷机模式,也就是大家常说的挖煤模式3:把上面下载下来的odin工具包解压出来,解压出来之后有一个文件夹,点击进入会看到两个版本的odin,并且都是exe格式的,咱们选择英文版的odin工具双击打开就行了。
4:打开之后软件会自动识别你的手机,识别成功后会在ID:COM处显示蓝色的(表示手机连接成功了,如果没有显示蓝色的,说明没有有连接好),然后勾选PDA,选择刚才下载下来的线刷包,一般是tar 格式的(如果你下载的官方包是zip或rar格式的,请解出来找到tar 或md5的文件就可以了)。
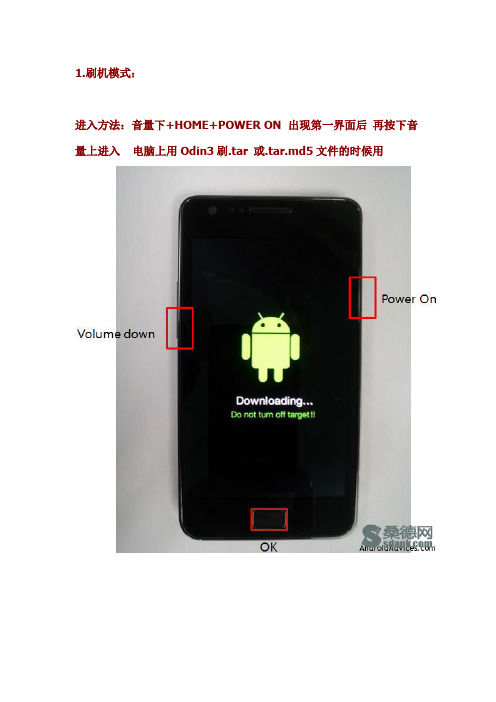
玩转I9100
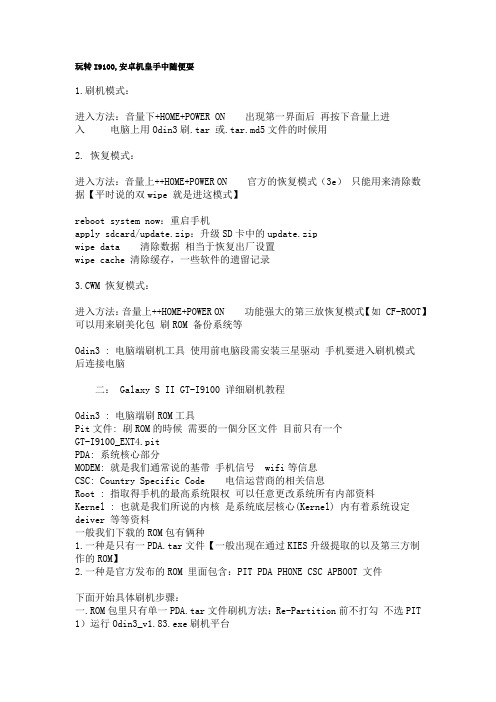
玩转I9100,安卓机皇手中随便耍1.刷机模式:进入方法:音量下+HOME+POWER ON 出现第一界面后再按下音量上进入电脑上用Odin3刷.tar 或.tar.md5文件的时候用2. 恢复模式:进入方法:音量上++HOME+POWER ON 官方的恢复模式(3e)只能用来清除数据【平时说的双wipe 就是进这模式】reboot system now:重启手机apply sdcard/update.zip:升级SD卡中的update.zipwipe data 清除数据相当于恢复出厂设置wipe cache 清除缓存,一些软件的遗留记录3.CWM 恢复模式:进入方法:音量上++HOME+POWER ON 功能强大的第三放恢复模式【如 CF-ROOT】可以用来刷美化包刷ROM 备份系统等Odin3 : 电脑端刷机工具使用前电脑段需安装三星驱动手机要进入刷机模式后连接电脑二: Galaxy S II GT-I9100 详细刷机教程Odin3 : 电脑端刷ROM工具Pit文件: 刷ROM的時候需要的一個分区文件目前只有一个GT-I9100_EXT4.pitPDA: 系统核心部分MODEM: 就是我们通常说的基带手机信号 wifi等信息CSC: Country Specific Code 电信运营商的相关信息Root : 指取得手机的最高系统限权可以任意更改系统所有内部资料Kernel : 也就是我们所说的内核是系统底层核心(Kernel) 内有着系统设定deiver 等等资料一般我们下载的ROM包有俩种1.一种是只有一PDA.tar文件【一般出现在通过KIES升级提取的以及第三方制作的ROM】2.一种是官方发布的ROM 里面包含:PIT PDA PHONE CSC APBOOT 文件下面开始具体刷机步骤:一.ROM包里只有单一PDA.tar文件刷机方法:Re-Partition前不打勾不选PIT 1)运行Odin3_v1.83.exe刷机平台2)点击PDA选择PDA_I9100XXXXX.tar文件3) 除默认的 Auto Reboot F.Reset Time前打勾外其它地方均不打勾4)手机关机按音量下+HOME+POWER ON 出现第一界面后再按下音量上进入刷机模式5)通过数据线连接电脑确认刷机平台认出COM口【COM口处会变为***】6)按下“Start”开始刷机刷机过程中平台上方会有进度条7)刷机平台出现绿色“PASS”后刷机完成手机会自动重启三:Galaxy S II GT-I9100 ROM可精简列表以及精简教程Galaxy S II GT-I9100 ROM可精简列表以及精简教程注意:动手精简之前请做好备份有同名的ODEX文件要一起删除这是我自己精简的列表供大家参考欢迎大家补充一:使用RE文件管理器精简REguanliqimeihuaban_Root_Explorer__mumayihanhua__V2.16_mumayi_8530e.a pk (264.99 KB)精简路径:system/appAnalogClock.apk 时钟插件AxT9IME.apk 內建T9輸入法BuddiesNow.apk 好友现况ChocoEUKor.apk 某種英文特殊字型Days.apk Samsung的Widget其中一個日歷DigitalClock.apk 双时钟插件Dlna.apk 無線分享裝置DualClock.apk 時鐘插件Email.apk 这个不用介绍了吧EmailWidget.apk email插件GameHub.apkGenieWidget.apkKobo.apkMaps.apk 谷歌地图Memo.apk 备忘录MiniDiary.apk 迷你日志MinimalHome.apkPolarisOffice.apkPostIt.apkPressReader.apk 阅读的ReadersHub.apkSamsungApps.apk 这个也不用介绍了吧SamsungAppsUNAService.apkSamsungIM.apk 三星的即时信息SamsungWidget_News.apk 新闻插件SamsungWidget_ProgramMonitor.apk 任务管理器桌面插件SamsungWidget_StockClock.apk 这个应该是股票插件SevenEngine.apk 社交圈物体SnsAccountFb.apk 社交圈物体SnsAccountLi.apk 社交圈物体SnsAccountMs.apk 社交圈物体SnsAccountPk.apk 社交圈物体SnsAccountTw.apk 社交圈物体SocialHub.apkStk.apk SIM卡工具Street.apk 谷歌的街景Swype.apk 一种输入法syncmldm.apkTalk.apkTrimApp.apkVideoEditor.apkVoiceRecorder.apk 语音记录VoiceSearch.apk 语音谈话VoiceToGo.apk 语音搜索YouTube.apkZinio.apk二:使用CWM精简一步到位无须你再手动删除了适用于Deodex版ROM【system/app下无ODEX文件的】:update1.zip (157.25 KB)适用于官方原版ROM【system/app下有ODEX文件的】:update.zip (157.39 KB)操作方法:1.下载以上相对的精简包后复制到手机内置SD卡上2.进入应用程序打开CWM图标如下图:3.选择:Flash update 如下图:4.选择update1.zip 如下图:5.点击Flash6.等待手机重启恭喜你精简完成四:Samsung Galaxy S II GT-I9100 指令全集Samsung Galaxy S II GT-I9100 指令全集部分指令请慎用获取/更改设备信息*#06#(显示IMEI号码)*#1234#(显示当前固件)* 2767 * 4387264636#(要显示产品代码)* IMEI号*#272#*(显示/更改留学基金委代码)或*#272#* * HHMM*#12580 * 369#(软件&硬件信息)*#44336#(软件版本信息)复位*#*#7780#*#*或*#7780#(厂软复位)* 2767 * 3855#(工厂硬复位的ROM固件默认设置)固件工具*#2663#(重钙/邓肇坚固件更新)*#34971539#(相机固件更新)*#7412365#(相机固件菜单)或*#*#34971539#*#**#03#(NAND快闪记忆体的S / N)的通用测试/调试*#0 *#(综合测试模式)*#*#4636#*#*(诊断和模式一般设置)*#*#197328640#*#*(服务模式下的主菜单)*#7353#(快速测试菜单)无线*#232337#(蓝牙地址)*#232331#(蓝牙测试模式)*#232338#(无线局域网MAC地址)*#232339#(WLAN测试模式)*#526#(无线局域网工程模式)*#528#(无线局域网工程模式)全球定位系统*#1575#(GPS控制菜单)*#*#1472365 *#*#(GPS测试设置)传感器*#0588#(接近传感器测试模式)*#0589#(光感应器测试模式)音频*#0673#(音频测试模式)*#0283#(音频回传控制)*#0289#(旋律测试模式)按钮*#7594#(重映射关机以结束通话邓肇坚)电池*#0228#(电池状态:容量,电压,温度)其他测试/调试(其中许多项目都可以通过其服务/测试上面列出菜单)*#32489#(通话加密信息)*#0842#(抑振电机测试模式)*#0782#(实时时钟测试)*#2263#(射频波段选择)*#9090#(诊断配置)*#7284#(I2C模式的USB控制)*#872564#(记录的USB控制)*#4238378#(GCF的配置)*#3214789650#(磅测试模式)*#745#(RIL的转储菜单)*#746#(调试转储菜单)*#9900#(系统转储模式)*#273283 * 255 * 3282 *#(数据创建菜单)*#273283 * 255 * 663282 *#(数据创建SD卡)*#3282 * 727336 *#(资料使用情况)*#80#(未知)*#07#(测试历史)*#3214789#(GCF的模式状态)*#272886#(自动应答选择)*#8736364#(OTA更新菜单)*#301279#(HSDPA / HSUPA的控制菜单)* 2767 * 4387264636#(出卖短信/ PCODE观点)*#7465625#(查看手机锁定状态)* 7465625 * 638 *#(配置网络锁定的MCC /跨国公司)#7465625 * 638 *#(插入网络锁密码)* 7465625 * 782 *#(配置网络锁定新型干法)#7465625 * 782 *#(插入Partitial网络锁定密码)* 7465625 * 77 *#(插入网络锁定密钥号码SP法)#7465625 * 77 *#(插入操作锁密码)* 7465625 * 27 *#(插入网络锁定密钥号码新型干法/处长)#7465625 * 27 *#(插入内容提供商密码)Galaxy S II GT-I9100 常见问题解答我如何知道我手机的ROM版本是多少答:手机拨号输入:*#1234# 即可显示你手机的ROM版本 PDA PHONE CSC I9100如何自定义来电铃声、短信铃声、闹钟铃声?答:在sd卡上新建3个文件夹:alarms,闹铃;ringtones,来电铃声;notifications,短信铃声。
三星9100刷机,查询,root,新手教程详解
1.刷机模式:进入方法:音量下+HOME+POWER ON 出现第一界面后再按下音量上进入电脑上用Odin3刷.tar 或.tar.md5文件的时候用2. 恢复模式:进入方法:音量上++HOME+POWER ON 官方的恢复模式(3e)只能用来清除数据【平时说的双wipe 就是进这模式】reboot system now:重启手机apply sdcard/update.zip:升级SD卡中的update.zipwipe data 清除数据相当于恢复出厂设置wipe cache 清除缓存,一些软件的遗留记录所谓双WIPE就是这个,进入恢复模式后选择wipe data yes返回以后进入wipe cache 再yes最后重启3.CWM 恢复模式:进入方法:音量上++HOME+POWER ON 功能强大的第三放恢复模式【如CF-ROOT】可以用来刷美化包刷ROM 备份系统等Odin3 : 电脑端刷机工具使用前电脑段需安装三星驱动手机要进入刷机模式后连接电脑Galaxy S II GT-I9100 详细刷机教程Odin3 : 电脑端刷ROM工具Pit文件: 刷ROM的時候需要的一個分区文件目前只有一个GT-I9100_EXT4.pitPDA: 系统核心部分MODEM: 就是我们通常说的基带手机信号wifi等信息CSC: Country Specific Code 电信运营商的相关信息Root : 指取得手机的最高系统限权可以任意更改系统所有内部资料Kernel : 也就是我们所说的内核是系统底层核心(Kernel) 内有着系统设定deiver 等等资料一般我们下载的ROM包有俩种1.一种是只有一PDA.tar文件【一般出现在通过KIES升级提取的以及第三方制作的ROM】2.一种是官方发布的ROM 里面包含:PIT PDA PHONE CSC APBOOT 文件下面开始具体刷机步骤:一.ROM包里只有单一PDA.tar文件刷机方法:Re-Partition前不打勾不选PIT1)运行Odin3_v1.83.exe刷机平台2)点击PDA选择PDA_I9100XXXXX.tar文件3) 除默认的Auto Reboot F.Reset Time前打勾外其它地方均不打勾4)手机关机按音量下+HOME+POWER ON 出现第一界面后再按下音量上进入刷机模式5)通过数据线连接电脑确认刷机平台认出COM口【COM口处会变为***】6)按下“Start”开始刷机刷机过程中平台上方会有进度条7)刷机平台出现绿色“PASS”后刷机完成手机会自动重启三:Galaxy S II GT-I9100 ROM可精简列表以及精简教程Galaxy S II GT-I9100 ROM可精简列表以及精简教程注意:动手精简之前请做好备份有同名的ODEX文件要一起删除这是我自己精简的列表供大家参考欢迎大家补充一:使用RE文件管理器精简(推荐)精简路径:system/appAnalogClock. apk 时钟插件AxT9IME. apk 內建T9輸入法BuddiesNow. apk 好友现况ChocoEUKor. apk 某種英文特殊字型Days. apk Samsung的Widget其中一個日歷DigitalClock. apk 双时钟插件Dlna. apk 無線分享裝置DualClock. apk 時鐘插件Email. apk 这个不用介绍了吧EmailWidget. apk email插件GameHub. apkGenieWidget. apkKobo. apkMaps. apk 谷歌地图Memo. apk 备忘录MiniDiary. apk 迷你日志MinimalHome. apkPolarisOffice. apkPostIt. apkPressReader. apk 阅读的ReadersHub. apkSamsungApps. apk 这个也不用介绍了吧SamsungAppsUNAService. apkSamsungIM. apk 三星的即时信息SamsungWidget_News. apk 新闻插件SamsungWidget_ProgramMonitor. apk 任务管理器桌面插件SamsungWidget_StockClock. apk 这个应该是股票插件SevenEngine. apk 社交圈物体SnsAccountFb. apk 社交圈物体SnsAccountLi. apk 社交圈物体SnsAccountMs. apk 社交圈物体SnsAccountPk. apk 社交圈物体SnsAccountTw. apk 社交圈物体SocialHub. apkStk. apk SIM卡工具Street. apk 谷歌的街景Swype. apk 一种输入法syncmldm. apkTalk. apkTrimApp. apkVideoEditor. apkVoiceRecorder. apk 语音记录VoiceSearch. apk 语音谈话VoiceToGo. apk 语音搜索YouTube. apkZinio. apk二:使用CWM精简一步到位无须你再手动删除了首先确认你有CWM适用于Deodex版ROM【system/app下无ODEX 文件的】:update.zip (157.39 KB)适用于官方原版ROM【system/app下有ODEX文件的】:update1.zip (157.25 KB)操作方法:1.下载以上相对的精简包后复制到手机内置SD卡上2.进入应用程序打开CWM图标如下图:3.选择:Flash update如下图:4.选择update1.zip如下图:5.点击Flash如下图:6.等待手机重启恭喜你精简完成四:Samsung Galaxy S II GT-I9100 指令全集四:Samsung Galaxy S II GT-I9100 指令全集Samsung Galaxy S II GT-I9100 指令全集部分指令请慎用英文版Obtain/Change Device Information*#06# (Display IMEI number)*#1234# (Display current firmware)*2767*4387264636# (To display product code)*#272*imei#* (Display/change CSC code)or *#272*HHMM#**#12580*369# (SW & HW Info)*#44336# (Sofware Version Info)Reset*#*#7780#*#* or *#7780# (Factory soft reset)*2767*3855# (Factory hard reset to ROM firmware default settings)Firmware Tools*#2663# (TSP / TSK firmware update)*#34971539# (Camera Firmware Update)*#7412365# (Camera Firmware Menu)or *#*#34971539#*#**#03# (NAND Flash S/N)General Testing/Debugging*#0*# (General Test Mode)*#*#4636#*#* (Diagnostic and general settings mode)*#*#197328640#*#* #*(Service mode main menu)*#7353# (Quick Test Menu)Wireless*#232337# (Bluetooth Address)*#232331# (Bluetooth Test Mode)*#232338# (WLAN MAC Address)*#232339# (WLAN Test Mode)*#526# (WLAN Engineering Mode)*#528# (WLAN Engineering Mode)GPS*#1575# (GPS Control Menu)*#*#1472365#*#* (GPS test settings)Sensors*#0588# (Proximity Sensor Test Mode)*#0589# (Light Sensor Test Mode)Audio*#0673# (Audio Test Mode)*#0283# (Audio Loopback Control)*#0289# (Melody Test Mode)Buttons*#7594# (Remap Shutdown to End Call TSK)Battery*#0228# (Battery status: capacity, voltage, temperature)Other Test/Debugging (many of these items are accessible via the service/test menus listed above)*#32489# (Ciphering Info)*#0842# (Vibra Motor Test Mode)*#0782# (Real Time Clock Test)*#2263# (RF Band Selection)*#9090# (Diagnostic ConfiguratioN)*#7284# (USB I2C Mode Control)*#872564# (USB Logging Control)*#4238378# (GCF Configuration)*#3214789650# (LBS Test Mode)*#745# (RIL Dump Menu)*#746# (Debug Dump Menu)*#9900# (System Dump Mode)*#273283*255*3282*# (Data Create Menu)*#273283*255*663282*# (Data Create SD Card)*#3282*727336*# (Data Usage Status)*#80# (Unknown)*#07# (Test History)*#3214789# (GCF Mode Status)*#272886# (Auto Answer Selection)*#8736364# (OTA Update Menu)*#301279# (HSDPA/HSUPA Control Menu)*2767*4387264636# (Sellout SMS / PCODE view)*#7465625# (View Phone Lock Status)*7465625*638*# (Configure Network Lock MCC/MNC)#7465625*638*# (Insert Network Lock Keycode)*7465625*782*# (Configure Network Lock NSP)#7465625*782*# (Insert Partitial Network Lock Keycode) *7465625*77*# (Insert Network Lock Keycode SP)#7465625*77*# (Insert Operator Lock Keycode)*7465625*27*# (Insert Network Lock Keycode NSP/CP) #7465625*27*# (Insert Content Provider Keycode)谷歌翻译获取/更改设备信息*#06#(显示IMEI号码)*#1234#(显示当前固件)* 2767 * 4387264636#(要显示产品代码)* IMEI号*#272#*(显示/更改留学基金委代码)或*#272#* * HHMM*#12580 * 369#(软件&硬件信息)*#44336#(软件版本信息)复位*#*#7780#*#*或*#7780#(厂软复位)* 2767 * 3855#(工厂硬复位的ROM固件默认设置)固件工具*#2663#(重钙/邓肇坚固件更新)*#34971539#(相机固件更新)*#7412365#(相机固件菜单)或*#*#34971539#*#**#03#(NAND快闪记忆体的S / N)的通用测试/调试*#0 *#(综合测试模式)*#*#4636#*#*(诊断和模式一般设置)*#*#197328640#*#*#*(服务模式下的主菜单)*#7353#(快速测试菜单)无线*#232337#(蓝牙地址)*#232331#(蓝牙测试模式)*#232338#(无线局域网MAC地址)*#232339#(WLAN测试模式)*#526#(无线局域网工程模式)*#528#(无线局域网工程模式)全球定位系统*#1575#(GPS控制菜单)*#*#1472365 *#*#(GPS测试设置)传感器*#0588#(接近传感器测试模式)*#0589#(光感应器测试模式)音频*#0673#(音频测试模式)*#0283#(音频回传控制)*#0289#(旋律测试模式)按钮*#7594#(重映射关机以结束通话邓肇坚)电池*#0228#(电池状态:容量,电压,温度)其他测试/调试(其中许多项目都可以通过其服务/测试上面列出菜单)*#32489#(通话加密信息)*#0842#(抑振电机测试模式)*#0782#(实时时钟测试)*#2263#(射频波段选择)*#9090#(诊断配置)*#7284#(I2C模式的USB控制)*#872564#(记录的USB控制)*#4238378#(GCF的配置)*#3214789650#(磅测试模式)*#745#(RIL的转储菜单)*#746#(调试转储菜单)*#9900#(系统转储模式)*#273283 * 255 * 3282 *#(数据创建菜单)*#273283 * 255 * 663282 *#(数据创建SD卡)*#3282 * 727336 *#(资料使用情况)*#80#(未知)*#07#(测试历史)*#3214789#(GCF的模式状态)*#272886#(自动应答选择)*#8736364#(OTA更新菜单)*#301279#(HSDPA / HSUPA的控制菜单)* 2767 * 4387264636#(出卖短信/ PCODE观点)*#7465625#(查看手机锁定状态)* 7465625 * 638 *#(配置网络锁定的MCC /跨国公司)#7465625 * 638 *#(插入网络锁密码)* 7465625 * 782 *#(配置网络锁定新型干法)#7465625 * 782 *#(插入Partitial网络锁定密码)* 7465625 * 77 *#(插入网络锁定密钥号码SP法)#7465625 * 77 *#(插入操作锁密码)* 7465625 * 27 *#(插入网络锁定密钥号码新型干法/处长)#7465625 * 27 *#(插入内容提供商密码)五:Galaxy S II GT-I9100 常见问题解答Galaxy S II GT-I9100 常见问题解答我如何知道我手机的ROM版本是多少答:手机拨号输入:*#1234# 即可显示你手机的ROM版本PDA PHONE CSCI9100如何自定义来电铃声、短信铃声、闹钟铃声?答:在sd卡上新建3个文件夹:alarms,闹铃;ringtones,来电铃声;notifications,短信铃声。
Samsung电视用户操作手册说明书
ENGUSER MANUALThank you for purchasing this Samsung product.To receive more complete service, please register your product at Model Serial No.If you have any questions, please call us at 1-800-SAMSUNG (1-800-726-7864) for assistance.Figures and illustrations are provided for reference only and may differ from the actual product appearance.Product design and specifications may change without notice.© 2022 Samsung Electronics Co., Ltd. All rights reserved.Before Reading This UserManualThis TV comes with this User Manual and an embeddede-Manual ( > Menu > Settings > Support > Opene-Manual).On the website (), you can download themanuals and see its contents on your PC or mobile device.Warning! ImportantSafety InstructionsPlease read the Safety Instructions before using your TV.Refer to the table below for an explanation of symbols whichmay be on your Samsung product.CAUTIONRISK OF ELECTRIC SHOCK. DO NOT OPEN.CAUTION: TO REDUCE THE RISK OF ELECTRIC SHOCK,DO NOT REMOVE COVER (OR BACK). THERE ARENO USER SERVICEABLE PARTS INSIDE. REFER ALLSERVICING TO QUALIFIED PERSONNEL.This symbol indicates that high voltage ispresent inside. It is dangerous to make anykind of contact with any internal part ofthis product.This symbol indicates that this producthas included important literatureconcerning operation and maintenance.Class II product: This symbol indicatesthat a safety connection to electrical earth(ground) is not required. If this symbolis not present on a product with a powercord, the product MUST have a reliableconnection to protective earth (ground).AC voltage: Rated voltage marked withthis symbol is AC voltage.DC voltage: Rated voltage marked withthis symbol is DC voltage.Caution. Consult instructions for use: Thissymbol instructs the user to consult theuser manual for further safety relatedinformation.Power•Do not overload wall outlets, extension cords, or adaptorsbeyond their voltage and capacity. It may cause fire orelectric shock. Refer to the power specifications section ofthe manual and/or the power supply label on the productfor voltage and amperage information.•Power-supply cords should be placed so that they are notlikely to be walked on or pinched by items placed upon oragainst them. Pay particular attention to cords at the plugend, at wall outlets, and at the point where they exit fromthe appliance.•Never insert anything metallic into the open parts of thisapparatus. This may cause electric shock.•To avoid electric shock, never touch the inside of thisapparatus. Only a qualified technician should open thisapparatus.•Be sure to plug in the power cord until it is firmly seated.When unplugging the power cord from a wall outlet,always pull on the power cord's plug. Never unplug it bypulling on the power cord. Do not touch the power cordwith wet hands.•If this apparatus does not operate normally - in particular,if there are any unusual sounds or smells coming from it -unplug it immediately and contact an authorized dealer orSamsung service center.•To protect this apparatus from a lightning storm, or toleave it unattended and unused for a long time, be sure tounplug it from the wall outlet and disconnect the antennaor cable system.–Accumulated dust can cause an electric shock, anelectric leakage, or a fire by causing the power cord togenerate sparks and heat or by causing the insulationto deteriorate.•Use only a properly grounded plug and wall outlet.–An improper ground may cause electric shock orequipment damage. (Class l Equipment only.)•To turn off this apparatus completely, disconnect it fromthe wall outlet. To ensure you can unplug this apparatusquickly if necessary, make sure that the wall outlet andpower plug are readily accessible.Installation•Do not place this apparatus near or over a radiator or heat register, or where it is exposed to direct sunlight.•Do not place vessels (vases etc.) containing water on this apparatus, as this can result in a fire or electric shock.•Do not expose this apparatus to rain or moisture.•Be sure to contact an authorized Samsung service center for information if you intend to install your TV in a location with heavy dust, high or low temperatures, high humidity, chemical substances, or where it will operate 24 hours a day such as in an airport, a train station, etc. Failure to do so may lead to serious damage to your TV.•Do not expose this apparatus to dripping or splashing. Mounting the TV on a wallIf you mount this TV on a wall, followthe instructions exactly as set out by themanufacturer. If it is not correctly mounted,the TV may slide or fall and cause seriousinjury to a child or adult and serious damageto the TV.•To order the Samsung wall mount kit, contact Samsung service center at 1-800-SAMSUNG (1-800-726-7864).•Samsung Electronics is not responsible for any damage to the product or injury to yourself or others if you choose to install the wall mount on your own.•Samsung is not liable for product damage or personal injury when a non-VESA or non-specified wall mount is used or when the consumer fails to follow the product installation instructions.•You can install your wall mount on a solid wall perpendicular to the floor. Before attaching the wall mount to surfaces other than plaster board, contact your nearest dealer for additional information. If you install the TV on a ceiling or slanted wall, it may fall and result in severe personal injury.Safety PrecautionCaution: Pulling, pushing, or climbingon the TV may cause the TV to fall. Inparticular, ensure your children do nothang on or destabilize the TV. This actionmay cause the TV to tip over, causingserious injuries or death. Follow allsafety precautions provided in the SafetyFlyer included with your TV. For addedstability and safety, you can purchaseand install the anti-tip device, referringto "Preventing the TV from falling."WARNING: Never place a television set in anunstable location. The television set may fall,causing serious personal injury or death. Manyinjuries, particularly to children, can be avoidedby taking simple precautions such as:•Always use cabinets or stands or mounting methodsrecommended by Samsung.•Always use furniture that can safely support the televisionset.•Always ensure the television set is not overhanging theedge of the supporting furniture.•Always educate children about the dangers of climbingon furniture to reach the television set or its controls.•Always route cords and cables connected to yourtelevision so they cannot be tripped over, pulled orgrabbed.•Never place a television set in an unstable location.•Never place the television set on tall furniture (forexample, cupboards or bookcases) without anchoringboth the furniture and the television set to a suitablesupport.•Never place the television set on cloth or other materialsthat may be located between the television set andsupporting furniture.•Never place items that might tempt children to climb,such as toys and remote controls, on the top of thetelevision or furniture on which the television is placed.If the existing television set is going to be retained andrelocated, the same considerations as above should beapplied.•When you have to relocate or lift the TV for replacement orcleaning, be sure not to pull out the stand.•When installing a wall mount kit, we recommend youfasten all four VESA screws.•If you want to install a wall mount kit that attaches to thewall using two top screws only, be sure to use a Samsungwall mount kit that supports this type of installation. (Youmay not be able to purchase this type of wall mount kit,depending on the geographical region.)•Do not mount the TV at more than a 15 degree tilt.•Standard dimensions for wall mount kits are shown in thetable on the Quick Setup Guide.Do not install your wall mount kit while your TVis turned on. This may result in personal injuryfrom electric shock.•Do not use screws that are longer than the standarddimension or do not comply with the VESA standardscrew specifications. Screws that are too long may causedamage to the inside of the TV set.•For wall mounts that do not comply with the VESAstandard screw specifications, the length of the screwsmay differ depending on the wall mount specifications.•Do not fasten the screws too firmly. This may damage theproduct or cause the product to fall, leading to personalinjury. Samsung is not liable for these kinds of accidents.•Always have two people mount the TV onto a wall.–For 82 inch or larger models, have four people mountthe TV onto a wall.Providing proper ventilation for your TVWhen you install your TV, maintain a distance of at least4 inches (10 cm) between the TV and other objects (walls,cabinet sides, etc.) to ensure proper ventilation. Failing tomaintain proper ventilation may result in a fire or a problemwith the product caused by an increase in its internaltemperature.•When you install your TV with a stand or a wall mount, westrongly recommend you use parts provided by SamsungElectronics only. Using parts provided by anothermanufacturer may cause difficulties with the product orresult in injury caused by the product falling.Preventing the TV from fallingWall-anchor(not supplied)1. Using the appropriate screws, firmly fasten a set ofbrackets to the wall. Confirm that the screws are firmlyattached to the wall.–You may need additional material such as wall anchorsdepending on the type of wall.2. Using the appropriately sized screws, firmly fasten a set ofbrackets to the TV.–For the screw specifications, refer to the standardscrew part in the table on the Quick Setup Guide.3. Connect the brackets fixed to the TV and the bracketsfixed to the wall with a durable, heavy-duty string, andthen tie the string tightly.–Install the TV near the wall so that it does not fallbackwards.–Connect the string so that the brackets fixed to thewall are at the same height as or lower than thebrackets fixed to the TV.Contact SAMSUNG WORLD WIDECountry Samsung Service Center Web Site AddressU.S.A1-800-SAMSUNG (726-7864)/us/support Samsung Electronics America, Inc.85 Challenger Road Ridgefield Park, NJ 07660Accessibility contact information in U.S.A. : accessibility@If you experience issues, please do not take the TV back to the store.In the United States of America, call us at 1-800-SAMSUNG (1-800-726-7864) or visit us at or www.samsung. com/spsn for support and warranty service.-01–If your access point or modem has a standby mode button, use it to disconnect your home network from the Internet when it is not in use.•Use strong passwords for all your Internet accounts (Netflix, Facebook, etc.).•If any unexpected messages appear on your TV screen requesting permission to link a device or enable a remote session, do NOT accept.•Do not visit suspicious web sites and do not install any suspicious programs. We recommend that users install only those authorized apps provided by Samsung through Samsung Smart Hub.Operation•This apparatus uses batteries. In your community, there might be environmental regulations that require you to dispose of these batteries properly. Please contact your local authorities for disposal or recycling information. •Store the accessories (remote control, or etc.) in a location safely out of the reach of children.•Do not drop or strike the product. If the product is damaged, disconnect the power cord and contact a Samsung service center.•Do not dispose of remote control or batteries in a fire. •Do not short-circuit, disassemble, or overheat the batteries.•CAUTION : There is danger of an explosion if you replace the batteries used in the remote with the wrong type of battery. Replace only with the same or equivalent type. •WARNING - TO PREVENT THE SPREAD OF FIRE, KEEP CANDLES AND OTHER ITEMS WITH OPEN FLAMES AWAY FROM THIS PRODUCT AT ALL TIMES.Caring for the TV•To clean this apparatus, unplug the power cord from the wall outlet and wipe the product with a soft, dry cloth. Do not use any chemicals such as wax, benzene, alcohol, thinners, insecticide, air fresheners, lubricants, or detergents. These chemicals can damage the appearance of the TV or erase the printing on the product.•The exterior and screen of the TV can get scratched during cleaning. Be sure to wipe the exterior and screen carefully using a soft cloth to prevent scratches.•Do not spray water or any liquid directly onto the TV. Any liquid that goes into the product may cause a failure, fire, or electric shock.01 Initial SetupWhen you turn on your TV for the first time, it immediately starts the Initial Setup. Follow the instructions displayed on the screen and configure the TV's basic settings to suit your viewing environment.Using the TV ControllerYou can turn on the TV with the TV Controller button at the bottom of the TV, and then use the Control menu . The Control menu appears when the TV Controller button is pressed while the TV is On.•The screen may dim if the protective film on the SAMSUNG logo or the bottom of the TV is not removed. Please remove the protective film.Control menuTV Controller button / Remote control sensor / Microphone switchHow to turn on and off the MicrophoneType AOn Off Type BOn OffYou can turn on or off the microphone by using the switch at the bottom of the TV. If microphone is turned off, All voice and sound features using microphone are not available. •This function is supported only in Q7*B/Q8*B/QN8*B/QN9*B Series.•The position and shape of the microphone switch may differ depending on the model.•During analysis using data from the microphone, the data is not saved.Internet securitySamsung takes a number of steps to protect its Internet-compatible Smart TVs against unauthorized incursions and hacking. For example, certain sensitive communications between the TV and the Internet servers are encrypted. In addition, the TV’s operating system has adopted controls to prevent the installation of unauthorized applications.Although we take steps to protect your Smart TV and personal information, no Internet-connected device or transmission is completely secure. We therefore encourage you to take additional steps to safeguard your TV, secure your Internet connection, and minimize the risk of unauthorized access. These steps are listed below:•When Samsung releases software updates to improve the security of your TV, you should promptly install these updates. To automatically receive these updates, turn on Auto Update in the TV's menu (>Menu >Settings > Support > Software Update > Auto Update ). When an update is available, a popup message appears on the TV screen. Accept the software download and update by selecting Yes when prompted. Take steps to secure your wireless access point and network. Your access point's manual should provide additional details about how to implement the following measures: –Secure your wireless access point's management settings with a unique password to prevent unauthorized changes to security related settings. –Implement standard encryption (e.g., WPA2 encryption) on your wireless access point to secure your wireless network signal.–Secure access to your wireless network with a hard-to-guess password.–Confirm your access point's firewall setting is enabled (if so equipped).–Make sure that all your Internet-connected devices are behind your network's firewall.02 Troubleshooting and MaintenanceTroubleshootingFor more information, refer to "Troubleshooting " or "FAQ " in the e-Manual. >Menu >Settings > Support > Open e-Manual >Troubleshooting or FAQIf none of the troubleshooting tips apply, please visit "" and click Support or contact the Samsung service center.•This TFT LED panel is made up of sub pixels which require sophisticated technology to produce. There may be, however, a few bright or dark pixels on the screen. These pixels will have no impact on the performance of the product.•To keep your TV in optimum condition, upgrade to the latest software. Use the Update Now or Auto Update functions on the TV's menu ( >Menu >Settings> Support > Software Update > Update Now or AutoUpdate ).The TV won’t turn on.•Make sure that the power cord is securely plugged in to the TV and the wall outlet.•Make sure that the wall outlet is working and the remote control sensor at the bottom of the TV is lit and glowing a solid red.•Try pressing the TV Controller button at the bottom of the TV to make sure that the problem is not with the remote control. If the TV turns on, refer to "The remote control does not work."03 Specifications and Other InformationSpecificationsDisplay Resolution3840 x 2160Sound (Output)Q6*B/Q7*B Series: 20 W Q8*B Series: 60 W (50": 40 W)QN85BA Series: 60 W QN85BD Series: 70 WQN90BA Series: 60 W (43": 20 W, 50": 40 W)QN90BD Series: 70 W (43": 20 W, 50": 40 W)Operating Temperature50 °F to 104 °F (10 °C to 40 °C)Operating Humidity10 % to 80 %, non-condensingStorage Temperature-4 °F to 113 °F (-20 °C to 45 °C)Storage Humidity5 % to 95 %, non-condensing Notes•This device is a Class B digital apparatus.•For information about the power supply, and more information about power consumption, refer to the information on the label attached to the product. –On most models, the label is attached to the back of the TV. (On some models, the label is inside the cover terminal.)•To connect a LAN cable, use a CAT 7 (*STP type) cable for the connection. (100/10 Mbps)* Shielded Twisted Pair•The images and specifications of the Quick Setup Guide may differ from the actual product.The remote control does not work.•Check if the remote control sensor at the bottom of the TV blinks when you press the button on the remotecontrol.–When the remote's battery is discharged, charge the battery using the USB charging port (C-type), or turn over the remote to expose the solar cell to light. •Try pointing the remote directly at the TV from 5 ft. to 6 ft. (1.5-1.8 m) away.•If your TV came with a Samsung Smart Remote (Bluetooth Remote), make sure to pair the remote to the TV. To pair a Samsung Smart Remote, press the andbuttonstogether for 3 seconds.Eco Sensor and screen brightnessEco Sensor adjusts the brightness of the TV automatically. This feature measures the light in your room and optimizes the brightness of the TV automatically to reduce power consumption. If you want to turn this off, go to >Menu>Settings > All Settings > General & Privacy > Power andEnergy Saving > Brightness Optimization .•The eco sensor is located at the bottom of the TV. Do not block the sensor with any object. This can decrease picture brightness.Decreasing power consumptionWhen you shut the TV off, it enters Standby mode. In Standby mode, it continues to draw a small amount of power. To decrease power consumption, unplug the power cord when you don't intend to use the TV for a long time.LicensesThe terms HDMI and HDMI High-Definition Multimedia Interface, and the HDMI Logo are trademarks or registered trademarks of HDMI Licensing Administrator, Inc. in the United States and other countries.。
- 1、下载文档前请自行甄别文档内容的完整性,平台不提供额外的编辑、内容补充、找答案等附加服务。
- 2、"仅部分预览"的文档,不可在线预览部分如存在完整性等问题,可反馈申请退款(可完整预览的文档不适用该条件!)。
- 3、如文档侵犯您的权益,请联系客服反馈,我们会尽快为您处理(人工客服工作时间:9:00-18:30)。
4. 点亮【闪烁通知】右侧滑块开关即可。
注:若收到通知或闹钟铃响时翻转设备闪光灯依然闪烁,请检查【设置】-【高级功能】-开启轻松静音功能。 相关型号信息
SM-A9100ZDACHC
相关内容
Samsung Galaxy A9(2016)SM-A9100(6.0.1)如何开启超级省电模式? Samsung Galaxy A9(2016)SM-A9100(6.0.1)如何开启自动重启? Samsung Galaxy A9(2016)SM-A9100(6.0.1)如何查看电池使用详情? Samsung Galaxy A9(2016)SM-A9100(6.0.1)如何使用缩小屏幕尺寸功能? Samsung Galaxy A9(2016)SM-A9100(6.0.1)如何开启单手输入?
Samsung Galaxy A9(2016)SM-A9100(6.0.1)如何开启闪烁通
知?
Last Update date : 2016.06.14
闪烁通知是设置设备以在您收到通知或在闹钟铃声响起时,相机闪光灯会闪烁,翻转设备可以停止闪光,开启方法如下:
1.在标准模式下,向左滑动屏幕。
2.点击【设置】。