萤之光2 学习笔记6,7
火炬之光2 全主线、支线任务图文攻略2
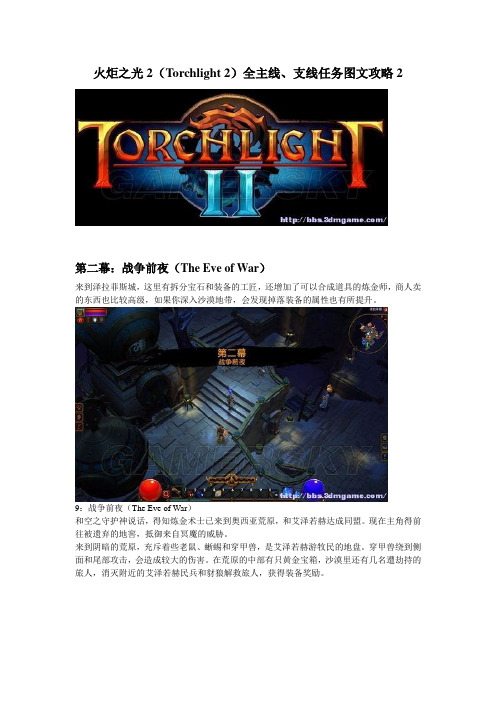
火炬之光2(Torchlight 2)全主线、支线任务图文攻略2第二幕:战争前夜(The Eve of War)来到泽拉菲斯城,这里有拆分宝石和装备的工匠,还增加了可以合成道具的炼金师,商人卖的东西也比较高级,如果你深入沙漠地带,会发现掉落装备的属性也有所提升。
9:战争前夜(The Eve of War)和空之守护神说话,得知炼金术士已来到奥西亚荒原,和艾泽若赫达成同盟。
现在主角得前往被遗弃的地窖,抵御来自冥魔的威胁。
来到阴暗的荒原,充斥着些老鼠、蜥蜴和穿甲兽,是艾泽若赫游牧民的地盘。
穿甲兽绕到侧面和尾部攻击,会造成较大的伤害。
在荒原的中部有只黄金宝箱,沙漠里还有几名遭劫持的旅人,消灭附近的艾泽若赫民兵和豺狼解救旅人,获得装备奖励。
离荒原入口不远的废墟里遇到宝石鉴定员那雷亚斯,交谈接到支线“一人之乱”。
在荒原的西部有艘坏掉的飞艇,和船长交谈接到支线“修复灰烬飞艇”。
前往荒原的东南部找到一处遗迹,见到了守护神殿的神兽斯芬克斯,得知魔法守护神被艾泽若赫俘虏带进了遗迹,主角得前往阴暗鹰巢杀掉蝎狮兽,它才会打开遗迹大门。
10:蝎狮兽的巢穴(Lair of the Manticore)阴暗鹰穴里的怪物包括蜥蜴怪、骷髅傀儡等,多是毒属性的攻击,进入之前换上抗毒装备。
有小部分的杂兵是远程射击的弓手,迅速冲过去清除。
在迷宫有有名附魔师,最多可给一件装备附魔三次。
进到二层打褐翼的蝎尾狮,它会召唤幼崽,释放几道龙卷风暴攻击,其余都是近身攻击,并不难打。
将它打掉一半血量,空中坠落另一只黑翼的蝎狮兽,是前一只的伴侣,它会施展空中坠落石椎,和悬空释放沙尘旋风攻击。
这里要绕着中央的坑穴拖着打,避免陷入夹击的境地。
杀掉这对蝎尾狮兽,返回遗迹和斯芬克斯交谈,它帮忙打开了遗迹的大门。
11:恶人的诡计(Artifice of Evil)魔法守护者被艾泽若赫带到了遗忘秘库,现在得尽快解救出她。
遗忘秘库是两层大型迷宫,远古建筑的格局方正,曲径回廊。
萤火传说2:保姆[Campfire Legends 2- The Babysitter]图文攻略
![萤火传说2:保姆[Campfire Legends 2- The Babysitter]图文攻略](https://img.taocdn.com/s3/m/4cfa46e9b8f67c1cfad6b816.png)
萤火传说2:保姆Campfire Legends 2- The BabysitterWalkthrough - Part I: The TwinsFront Gate•Click on the intercom located on the left.•Pick up your stuff and put it back in your purse. The locations of the various objects are shown below:•Once you've collected everything, click on the purse for a closer view, then place the objects back inside.•Proceed to the Mansion.Hallway•Continue into the living room.Living Room•Take a closer look at the table in the center of the room. Click on the remote on the left for another close-up.•Click the Power Button, A/B Button, and (channel) 7 respectively.•After a cutscene, go into the kitchen.Kitchen•Find the family recipe for homemade cocoa. It's lying on the counter island. Click on it for a closer view.•Click on the recipe, and a list of necessary ingredients will appear.•Click on the fridge for a closer view: pick up the Milk and add it to your inventory.•Take a look at the pan rack hanging over the center counter island for a closer view. Pick up the Saucepan to add it to your inventory.•Take a closer look at the cupboard on the left. Pick up the Sugar and the Cocoa to add it to your inventory.•You've now got all the ingredients to make the cocoa. Click on the stove on the right to prepare it.•Place the Saucepan on the bottom right burner, then add all the ingredients from your inventory. Click the knob to boil and prepare the cocoa.•Click the cocoa once it's done warming to add it to your inventory.•Time to find spoons for the cocoa mugs. Click on the kitchen drawer sticking out on the right side of the center island for a closer view.•Click on the two spoons hidden inside the drawer to add them to your inventory.•Click on the center island for another close-up view. Pour the cocoa into each of the blue mugs, then place a spoon inside each. Vióla, fresh homemade cocoa!•Exit the kitchen back into the living room.Living Room•Click on the center table for a closer view.•Click on the pirate-themed slide puzzle next to the phone and below the newspaper to begin.•Click the puzzle pieces to move them around and reassemble the picture. The solution is as follows:•Time to check on the twins. Proceed into the Hallway...Hallway•After a slightly harrowing cutscene, pick up all the marbles that have fallen down the stairs. Their locations are shown below:•Click on the bowl on the table on the right for a closer view. Place the marbles from your inventory inside the bowl.•Time to resume the check on the twins. Go Upstairs.Upstairs•Take a closer look at the door of the Twin's Room. Click on the handle to discover it's been locked. You'll have to find a way to retrieve the key from the keyhole, so go back downstairs into the Living Room.Living Room•Take a closer look at the table in the center of the room.•Pick up the Newspaper lying on the table, then take a closer look at the purse in the corner.•Pick up the Nail File inside the purse to add it to your inventory, then go back upstairs.Upstairs•Take a closer look at the Twins' Door again. Place the Newspaper under the door, then use the Nail File on the lock to knock out the key. Click on the Newspaperagain, then collect the Key to add it to your inventory.•Use the Key on the door lock to unlock it.• A Mirror? That's right, but before you can pick it up and add it to your inventory, click on it to discover the objects you need in order to clean it.•Click on the left arrow, then enter the Bathroom.Bathroom•Click on the cabinet under the sink for a closer view.•Pick up the Cleaner and the Rag to add them to your inventory.•Go back to the Mirror in the Upstairs/Twins' Room.Upstairs•Use the Cleaner, spraying it over all of “Go Away” until it vanishes. T hen, use the Rag to wipe it all clean.•Click on the Mirror to add it to your inventory.•Go to the second part of the Upstairs Hallway, then click on the Parents' Room to enter.Parents' Room•Take a closer look at the blank space of wall on the left.•Try and place the mirror on the wall, however the nail is too bent. You'll have to find a replacement Nail and Hammer to boot. Proceed back downstairs to thehallway.Hallway•Enter the Closet. It's located on the left just around the corner of the stairs. Closet•Take a closer look at the box on the right near the door. Pick up the Hammer inside to add it to your inventory.•Take a closer look at the workspace on the left. Click on the Nail to add it to your inventory.•Go back upstairs to the Parents' Room.Parents' Room•Take a closer look at the blank wall again. Use the Nail, followed by the Hammer to replace the bent nail.•Click on the mirror, now sitting below the blank wall space, for a closer look.•The cord behind the mirror broke! You'll have to fix it with some First Aid Tape.Return to the Bathroom.Bathroom•Take a closer look at the medicine cabinet to the left of the door. Pick up the First Aid Tape inside to add it to your inventory.•Return to the Parents' Room.Parents' Room•Click on the mirror for a closer view.•Use the First Aid Tape on the back of the mirror to repair the cord. The mirror will then be added to your inventory again.•Take a closer look at the blank space of wall where you hung the new nail. Place the mirror on the nail to return it to its rightful place.•Exit the room back into the Upstairs hallway.Upstairs•Take a closer look to the right of the Parents' Room door: there's remnants of a broken plate.•Find the missing plate pieces. Their locations are all in the Upstairs are and are shown below:•You're going to need Glue in order to fix the plate, too, so proceed downstairs into the Closet.Closet•Take a closer look at the workspace on the left. Pick up the Glue and add it to your inventory.•Return to the Upstairs, outside the Parents' Room door.Upstairs•Take a closer look at the broken plate to the right of the Parents' Room door again.•Reassemble the pieces of broken plate. Right-click to rotate pieces. Once you've assembled it, drag the Glue over the cracks to mend them. The solution and anexample is shown below:•Enter the Parents' Room.Parents' Room•Take a closer look at the drawer on the right: it's next to the bed and slightly behind the table.•It appears all of the mother's make up is missing. Exit the close-up.•Find the missing make up. Their locations are shown below:•Return to the close-up of the make up case. Place the items back in their correct locations. The solution is shown below:•It's probably best to check on the twins again. Exit to the Upstairs hallway, then click on the Twins' Room for a cutscene.Upstairs•Catch the lizards and put them back in their terrarium. You'll need some sort of a net first, though.•Enter the Bathroom.Bathroom•Take a closer look at the wooden stool at the bottom of the screen, next to the bathtub.•Click on the lizard: you can't catch it yet, but the hairnet looks promising. Three additional items you'll need to make it function as a net will appear at the bottom of the screen. Time to find them!•Proceed down to the Kitchen.Kitchen•Take a closer look at the drawer sticking out on the right side of the center counter island. Find the Chopstick inside and add it to your inventory.•Enter the Closet.Closet•Take a closer look at the box on the right. Pick up the String inside to add it to your inventory.•Go Upstairs to the Parents' Room.Parents' Room•Click on the Hairband hanging off the corner of the bed to add it to your inventory.•Now you can finally assemble a net! Return to the Bathroom.Bathroom•Take a closer look at the wooden stool near the bottom of the screen again. Use the Hairband and Chopstick, and lastly the String to assemble a Net and add it to your inventory.•Use the Net on the lizard to catch it. That's 1 of 6.Upstairs•Outside the Twins' Room is another lizard. Its location is shown below:•That's 2 of 6. On to the (downstairs) Hallway.Hallway•The locations of the lizard here is shown below:•That's 3 of 6. On to the Living Room...Living Room•There's two lizards here. Their locations are shown below. You'll have to take a closer look at the table to catch the one hiding there.•That's 5 of 6. The last one is hiding in the Closet.Closet•Click on the box on the right for a closer view. Catch the lizard hiding inside to finally retrieve 6 of 6.•Return to the Upstairs, outside the Twins' Room.Upstairs•Take a closer look at the terrarium on the floor: it's slightly to the left. Click on it fora closer view.•Place the 6 lizards inside to complete the task at hand.•Enter the Twins' Room.Twins' Room•The twins seem to have gone missing. Go back downstairs to the Living Room to find the emergency number to contact their parents.Living Room•The power will momentarily go out, revealing a creepy image on the TV before the lights flick back on.•Click on the table in the center of the room: the emergency number is gone! Exit the close-up and find the pieces of torn note strewn throughout the room: theirlocations are shown below:•Return to the close-up of the table. Use the torn note pieces on the table to enter a puzzle.•Reassemble the torn note: you can rotate pieces by right-clicking. The solution is shown below:•Once reassembled, pick up the phone on the right and dial the number as it appears on the note.•Something's odd. Return to the Hallway.Hallway•Muddy footprints all over the floor! They lead towards the right, into the Library... Library•There seems to be something awful funny about the bookcase in this room. Find the House Plans.•Click on the painting on the right to remove it and reveal a hidden safe. Click on it for a closer view.•You'll need a Key and a Passcode to open the safe: these items have now been added to your to-find list.•Take a closer look at the open drawer in the desk in the middle of the room. •Click on the colorful box inside to enter a puzzle.•Reassemble the pieces of the box into their proper locations to complete the pattern and unlock the box, using the left mouse click to rotate clockwise and the right click to rotate counter-clockwise. The solution is shown below:•Pick up the Passcode revealed inside the open box to add it to your inventory. •Take a close look at the panel on the left side of the bookcase: it controls the library ladder. Move the lever into the far right and up position to extend the ladder within reach of the box on the top right corner of the bookshelf.•Click on the box on the shelf for a closer view until you enter a puzzle.•Click all the buttons that need to be clicked: the solution is shown below:•The box will open and reveal a key. Click on the Key to add it to your inventory.•Take a closer look at the safe on the right wall again.•Place the Passcode note on the safe, then use the Key on the lock to activate the panel. Click in the Passcode 1-9-5-3-7-2 to open the safe and gain access to the contents within.•Click on the Plans for the House to strike them from your list.•Go back upstairs to the Twins' Room.Twins' Room•Click on the panel on the back wall: the portion of the wall covered in numbers, to reveal a hidden elevator. Click once more for a closer view and to discover thatthe Elevator Key is missing.•Click on the box in the center of the table in the middle of the room for a closer view.•Several beads are missing from the box. Find them to activate the puzzle: their locations are shown below:•Click on the box once again for a closer look, then place the beads you've found onto it to activate the puzzle.•Use the left and right mouse buttons to move the dial clockwise and counter-clockwise. The goal is to place all the beads of a certain color together in one slot. Upon completing the puzzle, click the Elevator Key that appears. The solution is shown below:•Use the Key on the Elevator lock to open it and gain access to...Part II: The Secret Laboratory•Take a closer look at the handcuffs. They're locked, but the hairpin in your pocket should do the trick!•Take a closer look at your right pocket to enter a close-up. Pick up the Hairpin to add it to your inventory.•Take a closer look at the handcuffs again. Use the Hairpin on the handcuffs to pick them and open the lock. For the left cuff, move the hairpin Up, Right, then Down.For the right cuff, move the hairpin Down, Right, then Up. The handcuffs are now gone.•Click on the Knife on the surgical tray, then use it on the bandages binding you to cut yourself free.Surgery•The room is dark, so you'll need to find a way to switch on the lights. Take a closer look at the desk on the far wall, to the left.•Click on the device on the desk: it's a generator, but it needs more parts.•Exit the desk, and take a closer look at the surgical tray near the bottom of the screen.•Find the generator parts scattered on the surgical tray: their locations are shown below:•Go back to the desk and take a closer look. Find the remaining parts scattered there: their locations are shown below:•Use all the parts on the generator to repair it. You'll need paper for a spark, though.Return to the surgical tray and pick up the piece of paper to add it to yourinventory:•Use the Paper on the generator to get the Flame, then return to the surgical tray and use the Flame on the Candle to restore light to the room.•The door is locked, however take a closer look at the wall next to the wheelchair on the right.•Click on the anchor bolting the wheelchair to the wall until it falls off, then take a closer look at the rotted wall.•Find the objects needed to remove the rotted wall. Their locations are shown below:•Take a closer look at the wall again. Use the Hammer to crack the wall, then use the paint-scraper to remove the plaster and reveal the bricks underneath. Use the Scalple on the plaster between the bricks to remove them. However, it will break.•Click on the surgical tray, then take a closer look at the tube lying in the middle.Click on it to discover which items you'll need to make it into a strong tool forremoving plaster.•Find the items needed for the tool: their locations are shown below:•Use the items on the tube to create the handmade drill. Click on it to add it to your inventory.•Go back to the rotted section of wall. Use the handmade drill to remove the plaster between the bricks (holding down the mouse button as you move it back and forth) until a hole into the next room is cleared.•Enter the new room.Office•Take a closer look at the door on the left: it's locked. A Key will be added to your list of items to find.•Take a closer look at the safe panel in the far corner. It appears to be a sort of locking mechanism. Find the missing letters for the mechanism hidden throughout the room. Their locations are shown below:•Return to the locking mechanism. Use the letters you've found on the panel to activate a puzzle.•Arrange the letters so that they spell “No Way Out” to solve the puzzle and open the safe.•Inside the safe is a videotape, but you'll need to find a VCR before you can watch it.•Exit the safe and take a closer look at the board on the wall to the immediate left of the safe, between the safe and the door on the left.•It appears to be some sort of chess board, with the much-needed Key floating in a tube nearby. Several missing pieces from the board will add themselves to your to-find list.•Find the pieces needed for the board puzzle. Their locations are shown below:•Add the buttons to the chessboard on the wall to activate a puzzle. Press the buttons at the bottom of the board to move the knight onto the red square. There are multiple solutions. Moving it onto the final green square will reward you withthe Key. Click on it to add it to your inventory.•Use the Key on the lock on the door to the left to open it.Office Corridor•Proceed into the main HallHall•This is a large two-screen area that gives you access to many other rooms and corridors. From here, take the corridor on the left in the first screen, to the Video Room.Video Room•Click on the control panel at the front of the screen for a closer view.•Click on it: it's a broken video recorder. Find the pieces necessary to repair it.Their locations are shown below:•Return to the Office for the remaining items. Office•Return to the Video Room to repair the VCR.Video Room•Repair the VCR. The locations of the various items are shown below:•Return to the Offic e to retrieve the Video Tape marked “Libby”. Office•Click on the safe in the back corner and collect the Video Tape.•Return to the Video Room.Video Room•Use the Video Tape on the VCR to watch it.• A new Video Tape and a Notebook will be added to your list of items to find.Return to the Office.Office•Take a closer look at the red door with the turn wheel. The turn wheel is missing handles which will be added to your to-find list. Their locations are shown below:•Return to the Surgery room for the last handle. Surgery•Return to the Office.Office•Use the Handles on the door, then click on it to open it.•Enter the Holding Cell.Holding Cell•The Notebook you're looking for is located on a pedestal on the left. Take a closer look.•Read the inside of the Notebook, then click out. An alarm will go off, and the room will lock you in.•Find the keys for the lockbox. Their locations are shown below:•Click on the box in the center of the room for a closer view.•Place the correct key shape for each color in its respective lock: the solutions are shown below:•Inside the box is the next Video Tape. Its location is shown below:•Take a closer look at the door on the right: it's locked and requires a Key. Check back inside the box in the middle of the room. The Key's location is shown below:•Use the Key on the door to unlock it and open it. Proceed through the Office and into the Video Room.Video Room•Use the Video Tape on the VCR to play it and watch the cutscene that ensues.•Another Video Tape will be added to your to-find list, with the recommendation of searching in the Workshop.•Proceed to the main Hall area.Hall•Click on the arrow on the left to access the second part of the area. Proceed down the Workshop Corridor.Workshop Corridor•Take a closer look at the door: it's buckled. You'll need some items in order to open it.•Go back to the Office.Office•Take a closer look at the desk. Pick up the Dropper and add it to your inventory.•Enter the Holding Cell.Holding Cell•Take a closer look at the box in the center of the room: pick up the Glass Jar inside and add it to your inventory.•Proceed to the main Corridor area.Corridor•Enter the Food Storage area via the passage on the far left. Proceed into Food Storage.Food Storage•Take a closer look at the shelves. Pick up the Crowbar and add it to your inventory.•Return to the Workshop Corridor.Workshop Corridor•Use the Glass Jar on the area below the dripping acid to collect it, then use the Dropper to acquire the acid and use it on the door hinges.•Once the hinges are completely gone, use the Crowbar to pry the door open and gain access into the next room.Workshop•Take a closer look at the drawers just beyond the body gurney.•Pick up the Video Tape inside the file cabinet and add it to your inventory.•Return to the Video Room.Video Room•Use the Video Tape on the VCR, then watch the cutscene that follows. Only two video tapes left to find.•Take a closer look at the box on the left.•Click on the box lid: you'll need to find the missing red and green chips before you can activate the puzzle. Their locations are shown below:。
海底两万里6-10章读书笔记

海底两万里6-10章读书笔记嘿,小伙伴们,今天咱们来聊聊《海底两万里》这本书的第6到10章,简直就像是一场奇幻的海底探险啊!第六章开始,咱们的主人公阿龙纳斯教授和他的小伙伴们,被那个神秘的尼摩船长带到了他的潜水艇“鹦鹉螺号”上。
这一章啊,就像是咱们第一次玩VR游戏,眼前的一切都那么真实,又那么不可思议。
那些闪闪发光的海底珊瑚礁,还有那些五颜六色的热带鱼,感觉就像是在看4D电影一样,身临其境,太震撼了!第七章呢,真的是让人惊心动魄!尼摩船长带着他们在海底穿梭,突然,一条巨大的鲨鱼出现在他们的面前,那血盆大口,还有那锋利的牙齿,吓得我心脏都要跳出来了!阿龙纳斯教授他们也是,一个个紧张得要命,生怕被这大家伙给一口吞了。
不过还好,尼摩船长可不是吃素的,他机智地指挥着“鹦鹉螺号”,巧妙地躲过了鲨鱼的追击,真是有惊无险啊!第八章,咱们的主角们算是见识到了海底的奇妙了。
他们遇到了海底火山,那些岩浆翻滚的样子,就像是在看一部科幻大片。
不过,火山可不是闹着玩的,那高温和毒气,让他们的潜水艇差点就栽了跟头。
好在尼摩船长经验丰富,带着他们及时逃离了危险区域,真是让人捏了一把汗!第九章,这一章啊,就像是海底版的“桃花源记”。
他们发现了一个隐藏在海底的神秘洞穴,里面居然有着各种各样的海底植物和动物,还有好多珍贵的宝石和化石。
这简直就是海底的宝藏库啊!阿龙纳斯教授他们看得眼花缭乱,恨不得把这里的每一样东西都研究个透。
第十章,哎呀,这一章可真是让人感慨万千!他们遇到了被海底沉船困住的船员,那些船员们无助的眼神,还有他们那绝望的呼救声,让人心里难受极了。
阿龙纳斯教授他们二话不说,立刻展开了救援行动。
经过一番努力,他们终于救出了那些船员,真是大快人心啊!这一章啊,就像是告诉我们,不管在哪里,都要有一颗善良和勇敢的心,去帮助那些需要帮助的人。
总的来说,《海底两万里》的第6到10章,就像是带着我们进行了一场奇妙的海底探险。
那些神奇的海洋生物,那些惊心动魄的冒险经历,还有那些感人至深的故事情节,都让我们流连忘返。
海底两万里每章读书笔记概括

海底两万里每章读书笔记概括《海底两万里》的每章读书笔记概括如下:第一章:飞逝的巨礁。
讲述了诺第留斯号被章鱼所困扰的情景。
第二章:赞成与反对。
叙述尼摩船长以海为试验场,展现他对科学、自然的热爱。
第三章:尼摩船长和他的“客人们”。
描绘了船上的丰富食物和在海底的奇妙景色。
第四章:黑潮。
讲述了船只通过黑潮的过程,描绘了深海的壮丽景色。
第五章:海底漫步。
描述了尼摩船长带领阿龙纳斯漫步海底森林的过程。
第六章:海底捕猎。
描绘了尼摩船长和阿龙纳斯捕猎鲸鱼的情景,体现了他的勇敢和机智。
第七章:马尾藻海。
讲述了船只穿越马尾藻海的经过,作者充分展示了这一海域的独特之处。
第八章:章鱼。
描述了船只遭到章鱼袭击,阿龙纳斯的机智应对。
第九章:邀请。
描绘了尼摩船长邀请阿龙纳斯参观奇妙的海底世界。
第十章:漫步海底平原。
概括了船长带领阿龙纳斯漫步海底平原的情景,表现了海洋的壮丽和神秘。
第十一章:海底的葬礼。
描述了尼摩船长参加小艇成员的葬礼,展现了船长的善心和责任感。
第十二章:珊瑚王国。
描绘了美丽的珊瑚王国,以及尼摩船长对珊瑚的独特见解。
第十三章:冲突。
描述了尼德·兰和尼摩船长之间的冲突,体现了他们不同的性格特点。
第十四章:从合恩角到亚马逊河。
讲述了船只穿越合恩角和亚马逊河的过程,展现了作者丰富的地理知识。
第十五章:尾声。
描述了尼摩船长最终的命运,以及阿龙纳斯的感慨和感激之情。
读书笔记的主要内容是对所阅读的内容进行深入分析,包括对其主题、情感、重要情节、人物形象、语言表达等方面进行思考和评价。
通过这种分析,可以更好地理解作品的意义和价值,提高自己的阅读能力和文学鉴赏能力。
昆虫记萤火虫读书笔记5篇
昆虫记萤火虫读书笔记5篇昆虫记萤火虫读书笔记篇1世界是多姿的,在我们身边有许多昆虫,他们的生活是怎么样的呢?《昆虫记》这本书就真实记录下了这些。
我也细细品味了这本书。
《昆虫记》详细描绘的是生物界中各种各样,形形色色的昆虫,有萤火虫、蚂蚁、蜜蜂、蟑螂、蜘蛛、蝎子、蝉、甲虫、蟋蟀,等等。
记录了它们在大自然重是怎样生活的,是吃什么样的食物的,是怎样捕猎食物的,如何繁衍后代,如何在雷雨中得以生存的……这给后世作出了很大的贡献,使人类社会迅速走了现代文明。
在这本书中,我知道了一些平常我不了解的。
例如萤火虫的身上有斑斓的色彩,身体是栗棕色的,胸部呈现红色,身上的花纹是环形状的,边缘还点缀这几颗小红点,如同穿了一条美丽的群子。
还有在这本书中我还了解到怎么可爱的萤火虫竟然是一个肉食主义者,而且手段很毒辣,猎物也是如樱桃般大的蜗牛,这真是我万万不曾了解到的事情,一只如此娇小的萤火虫竟然会以比它大好几倍的蜗牛作为下手对象,并且几乎无一不漏,这让我联想到一个在动物界,人类界,甚至连昆虫界都可以行的通的道理——“弱肉强食”的道理。
接着往下看,《昆虫记》是一个个有趣的故事:“螳螂是一种十分凶残的动物,然而在它刚刚拥有生命的初期,也会牺牲在个头儿最小的蚂蚁的魔爪下”蜘蛛织网,“即使用了圆规、尺子之类的工具,也没有一个设计家能画出一个比这更规范的网来”, 丰富的故事情节使我浮想联翩。
看着看着,这些虫子们渐渐地清晰起来,我思考着:如果我们保护环境,不污染环境,这些虫子是不是还会在呢现在的环境恶化,又是不是在以后还会有呢我仔细地想着这彼此之间的关系,这一次的阅读,《昆虫记》为我打开了一扇全新的门.并且,当我看到法布尔为了更仔细地研究昆虫们,一次又一次地实验,一步又一步地推敲实验过程。
一次实验失败了,他毫不气馁,收集更多的资料,做更多的准备,再转身进行下一次。
严谨的实验方法,大胆的质疑精神,勤勉的作风。
使我感受到了法布尔的伟大的科学精神。
后室灵异空间王不二探险笔记6

后室灵异空间王不二探险笔记6
摘要:
1.红绿灯指标公式源码概述
2.红绿灯指标公式的构成
3.如何应用红绿灯指标公式源码
4.总结
正文:
红绿灯指标公式源码概述
红绿灯指标公式源码是一种计算机程序代码,用于计算交通信号灯(红绿灯)的切换时机。
通过这种源码,可以实现根据实时交通情况自动调整信号灯的时长,以达到优化交通流量、提高道路通行效率的目的。
本文将介绍红绿灯指标公式的构成、应用方法以及源码实现的相关知识。
红绿灯指标公式的构成
红绿灯指标公式主要包括以下几个部分:
1.实时交通数据:包括实时车流量、车速等,这些数据可以通过传感器、摄像头等设备收集。
2.历史交通数据:包括历史车流量、车速等,这些数据可以用于分析和预测交通状况。
3.信号灯时长策略:根据实时和历史交通数据,制定信号灯时长的调整策略,例如增加或减少绿灯时长。
4.切换条件判断:根据设定的切换条件,判断何时应该切换信号灯。
如何应用红绿灯指标公式源码
要应用红绿灯指标公式源码,需要进行以下几个步骤:
1.数据收集:通过传感器、摄像头等设备收集实时和历史交通数据。
2.数据处理:对收集到的数据进行分析和预测,为制定信号灯时长策略提供依据。
3.策略制定:根据数据处理结果,制定信号灯时长的调整策略。
4.源码实现:编写计算机程序代码,实现红绿灯指标公式的计算过程。
5.信号灯控制:根据计算结果,自动控制信号灯的切换。
总结
红绿灯指标公式源码是实现智能交通系统的关键技术之一。
通过应用红绿灯指标公式源码,可以有效地提高道路通行效率、缓解交通拥堵问题。
海底两万里第二部分第六章批注

海底两万里第二部分第六章批注本章主要讲述了主人公们在海底的探险过程中遭遇到的各种危险
以及他们如何应对这些危险。
具体来说,他们首先遭遇了海怪的袭击,但是通过高超技巧和勇气,最终成功地摆脱了海怪的追击。
接着,他
们又遇到了水下的岩石和悬崖等自然障碍,但是通过紧密配合和谨慎
行动,他们一次次克服难关,顺利前行。
从本章的内容中,我们可以体会到探险旅途中的种种挑战和困难,以及需要探险家具备的勇气、智慧和耐力等素质。
同时,本章也提示
了我们需要对自然环境保持敬畏之心,谨慎对待自然界的力量和变幻
无常性。
在生活中,与海底探险者类似,我们也常常面对各种困难和挑战。
我们需要学会如何从容应对这些问题,既要发挥自己的能力,又要善
于借助他人的力量,才能取得成功。
在这一过程中,我们也需要时刻
提醒自己保持谦虚、谨慎和敬畏之心,避免对自然环境和现实情况的
过度自信和轻视。
总之,本章内容生动、贴近实际,提供了丰富的启示和指导,值
得我们在实际生活中加以参考和借鉴。
萤火传说2:保姆[Campfire Legends 2- The Babysitter]图文攻略
萤火传说2:保姆Campfire Legends 2- The BabysitterWalkthrough - Part I: The TwinsFront Gate•Click on the intercom located on the left.•Pick up your stuff and put it back in your purse. The locations of the various objects are shown below:•Once you've collected everything, click on the purse for a closer view, then place the objects back inside.•Proceed to the Mansion.Hallway•Continue into the living room.Living Room•Take a closer look at the table in the center of the room. Click on the remote on the left for another close-up.•Click the Power Button, A/B Button, and (channel) 7 respectively.•After a cutscene, go into the kitchen.Kitchen•Find the family recipe for homemade cocoa. It's lying on the counter island. Click on it for a closer view.•Click on the recipe, and a list of necessary ingredients will appear.•Click on the fridge for a closer view: pick up the Milk and add it to your inventory.•Take a look at the pan rack hanging over the center counter island for a closer view. Pick up the Saucepan to add it to your inventory.•Take a closer look at the cupboard on the left. Pick up the Sugar and the Cocoa to add it to your inventory.•You've now got all the ingredients to make the cocoa. Click on the stove on the right to prepare it.•Place the Saucepan on the bottom right burner, then add all the ingredients from your inventory. Click the knob to boil and prepare the cocoa.•Click the cocoa once it's done warming to add it to your inventory.•Time to find spoons for the cocoa mugs. Click on the kitchen drawer sticking out on the right side of the center island for a closer view.•Click on the two spoons hidden inside the drawer to add them to your inventory.•Click on the center island for another close-up view. Pour the cocoa into each of the blue mugs, then place a spoon inside each. Vióla, fresh homemade cocoa!•Exit the kitchen back into the living room.Living Room•Click on the center table for a closer view.•Click on the pirate-themed slide puzzle next to the phone and below the newspaper to begin.•Click the puzzle pieces to move them around and reassemble the picture. The solution is as follows:•Time to check on the twins. Proceed into the Hallway...Hallway•After a slightly harrowing cutscene, pick up all the marbles that have fallen down the stairs. Their locations are shown below:•Click on the bowl on the table on the right for a closer view. Place the marbles from your inventory inside the bowl.•Time to resume the check on the twins. Go Upstairs.Upstairs•Take a closer look at the door of the Twin's Room. Click on the handle to discover it's been locked. You'll have to find a way to retrieve the key from the keyhole, so go back downstairs into the Living Room.Living Room•Take a closer look at the table in the center of the room.•Pick up the Newspaper lying on the table, then take a closer look at the purse in the corner.•Pick up the Nail File inside the purse to add it to your inventory, then go back upstairs.Upstairs•Take a closer look at the Twins' Door again. Place the Newspaper under the door, then use the Nail File on the lock to knock out the key. Click on the Newspaperagain, then collect the Key to add it to your inventory.•Use the Key on the door lock to unlock it.• A Mirror? That's right, but before you can pick it up and add it to your inventory, click on it to discover the objects you need in order to clean it.•Click on the left arrow, then enter the Bathroom.Bathroom•Click on the cabinet under the sink for a closer view.•Pick up the Cleaner and the Rag to add them to your inventory.•Go back to the Mirror in the Upstairs/Twins' Room.Upstairs•Use the Cleaner, spraying it over all of “Go Away” until it vanishes. T hen, use the Rag to wipe it all clean.•Click on the Mirror to add it to your inventory.•Go to the second part of the Upstairs Hallway, then click on the Parents' Room to enter.Parents' Room•Take a closer look at the blank space of wall on the left.•Try and place the mirror on the wall, however the nail is too bent. You'll have to find a replacement Nail and Hammer to boot. Proceed back downstairs to thehallway.Hallway•Enter the Closet. It's located on the left just around the corner of the stairs. Closet•Take a closer look at the box on the right near the door. Pick up the Hammer inside to add it to your inventory.•Take a closer look at the workspace on the left. Click on the Nail to add it to your inventory.•Go back upstairs to the Parents' Room.Parents' Room•Take a closer look at the blank wall again. Use the Nail, followed by the Hammer to replace the bent nail.•Click on the mirror, now sitting below the blank wall space, for a closer look.•The cord behind the mirror broke! You'll have to fix it with some First Aid Tape.Return to the Bathroom.Bathroom•Take a closer look at the medicine cabinet to the left of the door. Pick up the First Aid Tape inside to add it to your inventory.•Return to the Parents' Room.Parents' Room•Click on the mirror for a closer view.•Use the First Aid Tape on the back of the mirror to repair the cord. The mirror will then be added to your inventory again.•Take a closer look at the blank space of wall where you hung the new nail. Place the mirror on the nail to return it to its rightful place.•Exit the room back into the Upstairs hallway.Upstairs•Take a closer look to the right of the Parents' Room door: there's remnants of a broken plate.•Find the missing plate pieces. Their locations are all in the Upstairs are and are shown below:•You're going to need Glue in order to fix the plate, too, so proceed downstairs into the Closet.Closet•Take a closer look at the workspace on the left. Pick up the Glue and add it to your inventory.•Return to the Upstairs, outside the Parents' Room door.Upstairs•Take a closer look at the broken plate to the right of the Parents' Room door again.•Reassemble the pieces of broken plate. Right-click to rotate pieces. Once you've assembled it, drag the Glue over the cracks to mend them. The solution and anexample is shown below:•Enter the Parents' Room.Parents' Room•Take a closer look at the drawer on the right: it's next to the bed and slightly behind the table.•It appears all of the mother's make up is missing. Exit the close-up.•Find the missing make up. Their locations are shown below:•Return to the close-up of the make up case. Place the items back in their correct locations. The solution is shown below:•It's probably best to check on the twins again. Exit to the Upstairs hallway, then click on the Twins' Room for a cutscene.Upstairs•Catch the lizards and put them back in their terrarium. You'll need some sort of a net first, though.•Enter the Bathroom.Bathroom•Take a closer look at the wooden stool at the bottom of the screen, next to the bathtub.•Click on the lizard: you can't catch it yet, but the hairnet looks promising. Three additional items you'll need to make it function as a net will appear at the bottom of the screen. Time to find them!•Proceed down to the Kitchen.Kitchen•Take a closer look at the drawer sticking out on the right side of the center counter island. Find the Chopstick inside and add it to your inventory.•Enter the Closet.Closet•Take a closer look at the box on the right. Pick up the String inside to add it to your inventory.•Go Upstairs to the Parents' Room.Parents' Room•Click on the Hairband hanging off the corner of the bed to add it to your inventory.•Now you can finally assemble a net! Return to the Bathroom.Bathroom•Take a closer look at the wooden stool near the bottom of the screen again. Use the Hairband and Chopstick, and lastly the String to assemble a Net and add it to your inventory.•Use the Net on the lizard to catch it. That's 1 of 6.Upstairs•Outside the Twins' Room is another lizard. Its location is shown below:•That's 2 of 6. On to the (downstairs) Hallway.Hallway•The locations of the lizard here is shown below:•That's 3 of 6. On to the Living Room...Living Room•There's two lizards here. Their locations are shown below. You'll have to take a closer look at the table to catch the one hiding there.•That's 5 of 6. The last one is hiding in the Closet.Closet•Click on the box on the right for a closer view. Catch the lizard hiding inside to finally retrieve 6 of 6.•Return to the Upstairs, outside the Twins' Room.Upstairs•Take a closer look at the terrarium on the floor: it's slightly to the left. Click on it fora closer view.•Place the 6 lizards inside to complete the task at hand.•Enter the Twins' Room.Twins' Room•The twins seem to have gone missing. Go back downstairs to the Living Room to find the emergency number to contact their parents.Living Room•The power will momentarily go out, revealing a creepy image on the TV before the lights flick back on.•Click on the table in the center of the room: the emergency number is gone! Exit the close-up and find the pieces of torn note strewn throughout the room: theirlocations are shown below:•Return to the close-up of the table. Use the torn note pieces on the table to enter a puzzle.•Reassemble the torn note: you can rotate pieces by right-clicking. The solution is shown below:•Once reassembled, pick up the phone on the right and dial the number as it appears on the note.•Something's odd. Return to the Hallway.Hallway•Muddy footprints all over the floor! They lead towards the right, into the Library... Library•There seems to be something awful funny about the bookcase in this room. Find the House Plans.•Click on the painting on the right to remove it and reveal a hidden safe. Click on it for a closer view.•You'll need a Key and a Passcode to open the safe: these items have now been added to your to-find list.•Take a closer look at the open drawer in the desk in the middle of the room. •Click on the colorful box inside to enter a puzzle.•Reassemble the pieces of the box into their proper locations to complete the pattern and unlock the box, using the left mouse click to rotate clockwise and the right click to rotate counter-clockwise. The solution is shown below:•Pick up the Passcode revealed inside the open box to add it to your inventory. •Take a close look at the panel on the left side of the bookcase: it controls the library ladder. Move the lever into the far right and up position to extend the ladder within reach of the box on the top right corner of the bookshelf.•Click on the box on the shelf for a closer view until you enter a puzzle.•Click all the buttons that need to be clicked: the solution is shown below:•The box will open and reveal a key. Click on the Key to add it to your inventory.•Take a closer look at the safe on the right wall again.•Place the Passcode note on the safe, then use the Key on the lock to activate the panel. Click in the Passcode 1-9-5-3-7-2 to open the safe and gain access to the contents within.•Click on the Plans for the House to strike them from your list.•Go back upstairs to the Twins' Room.Twins' Room•Click on the panel on the back wall: the portion of the wall covered in numbers, to reveal a hidden elevator. Click once more for a closer view and to discover thatthe Elevator Key is missing.•Click on the box in the center of the table in the middle of the room for a closer view.•Several beads are missing from the box. Find them to activate the puzzle: their locations are shown below:•Click on the box once again for a closer look, then place the beads you've found onto it to activate the puzzle.•Use the left and right mouse buttons to move the dial clockwise and counter-clockwise. The goal is to place all the beads of a certain color together in one slot. Upon completing the puzzle, click the Elevator Key that appears. The solution is shown below:•Use the Key on the Elevator lock to open it and gain access to...Part II: The Secret Laboratory•Take a closer look at the handcuffs. They're locked, but the hairpin in your pocket should do the trick!•Take a closer look at your right pocket to enter a close-up. Pick up the Hairpin to add it to your inventory.•Take a closer look at the handcuffs again. Use the Hairpin on the handcuffs to pick them and open the lock. For the left cuff, move the hairpin Up, Right, then Down.For the right cuff, move the hairpin Down, Right, then Up. The handcuffs are now gone.•Click on the Knife on the surgical tray, then use it on the bandages binding you to cut yourself free.Surgery•The room is dark, so you'll need to find a way to switch on the lights. Take a closer look at the desk on the far wall, to the left.•Click on the device on the desk: it's a generator, but it needs more parts.•Exit the desk, and take a closer look at the surgical tray near the bottom of the screen.•Find the generator parts scattered on the surgical tray: their locations are shown below:•Go back to the desk and take a closer look. Find the remaining parts scattered there: their locations are shown below:•Use all the parts on the generator to repair it. You'll need paper for a spark, though.Return to the surgical tray and pick up the piece of paper to add it to yourinventory:•Use the Paper on the generator to get the Flame, then return to the surgical tray and use the Flame on the Candle to restore light to the room.•The door is locked, however take a closer look at the wall next to the wheelchair on the right.•Click on the anchor bolting the wheelchair to the wall until it falls off, then take a closer look at the rotted wall.•Find the objects needed to remove the rotted wall. Their locations are shown below:•Take a closer look at the wall again. Use the Hammer to crack the wall, then use the paint-scraper to remove the plaster and reveal the bricks underneath. Use the Scalple on the plaster between the bricks to remove them. However, it will break.•Click on the surgical tray, then take a closer look at the tube lying in the middle.Click on it to discover which items you'll need to make it into a strong tool forremoving plaster.•Find the items needed for the tool: their locations are shown below:•Use the items on the tube to create the handmade drill. Click on it to add it to your inventory.•Go back to the rotted section of wall. Use the handmade drill to remove the plaster between the bricks (holding down the mouse button as you move it back and forth) until a hole into the next room is cleared.•Enter the new room.Office•Take a closer look at the door on the left: it's locked. A Key will be added to your list of items to find.•Take a closer look at the safe panel in the far corner. It appears to be a sort of locking mechanism. Find the missing letters for the mechanism hidden throughout the room. Their locations are shown below:•Return to the locking mechanism. Use the letters you've found on the panel to activate a puzzle.•Arrange the letters so that they spell “No Way Out” to solve the puzzle and open the safe.•Inside the safe is a videotape, but you'll need to find a VCR before you can watch it.•Exit the safe and take a closer look at the board on the wall to the immediate left of the safe, between the safe and the door on the left.•It appears to be some sort of chess board, with the much-needed Key floating in a tube nearby. Several missing pieces from the board will add themselves to your to-find list.•Find the pieces needed for the board puzzle. Their locations are shown below:•Add the buttons to the chessboard on the wall to activate a puzzle. Press the buttons at the bottom of the board to move the knight onto the red square. There are multiple solutions. Moving it onto the final green square will reward you withthe Key. Click on it to add it to your inventory.•Use the Key on the lock on the door to the left to open it.Office Corridor•Proceed into the main HallHall•This is a large two-screen area that gives you access to many other rooms and corridors. From here, take the corridor on the left in the first screen, to the Video Room.Video Room•Click on the control panel at the front of the screen for a closer view.•Click on it: it's a broken video recorder. Find the pieces necessary to repair it.Their locations are shown below:•Return to the Office for the remaining items. Office•Return to the Video Room to repair the VCR.Video Room•Repair the VCR. The locations of the various items are shown below:•Return to the Offic e to retrieve the Video Tape marked “Libby”. Office•Click on the safe in the back corner and collect the Video Tape.•Return to the Video Room.Video Room•Use the Video Tape on the VCR to watch it.• A new Video Tape and a Notebook will be added to your list of items to find.Return to the Office.Office•Take a closer look at the red door with the turn wheel. The turn wheel is missing handles which will be added to your to-find list. Their locations are shown below:•Return to the Surgery room for the last handle. Surgery•Return to the Office.Office•Use the Handles on the door, then click on it to open it.•Enter the Holding Cell.Holding Cell•The Notebook you're looking for is located on a pedestal on the left. Take a closer look.•Read the inside of the Notebook, then click out. An alarm will go off, and the room will lock you in.•Find the keys for the lockbox. Their locations are shown below:•Click on the box in the center of the room for a closer view.•Place the correct key shape for each color in its respective lock: the solutions are shown below:•Inside the box is the next Video Tape. Its location is shown below:•Take a closer look at the door on the right: it's locked and requires a Key. Check back inside the box in the middle of the room. The Key's location is shown below:•Use the Key on the door to unlock it and open it. Proceed through the Office and into the Video Room.Video Room•Use the Video Tape on the VCR to play it and watch the cutscene that ensues.•Another Video Tape will be added to your to-find list, with the recommendation of searching in the Workshop.•Proceed to the main Hall area.Hall•Click on the arrow on the left to access the second part of the area. Proceed down the Workshop Corridor.Workshop Corridor•Take a closer look at the door: it's buckled. You'll need some items in order to open it.•Go back to the Office.Office•Take a closer look at the desk. Pick up the Dropper and add it to your inventory.•Enter the Holding Cell.Holding Cell•Take a closer look at the box in the center of the room: pick up the Glass Jar inside and add it to your inventory.•Proceed to the main Corridor area.Corridor•Enter the Food Storage area via the passage on the far left. Proceed into Food Storage.Food Storage•Take a closer look at the shelves. Pick up the Crowbar and add it to your inventory.•Return to the Workshop Corridor.Workshop Corridor•Use the Glass Jar on the area below the dripping acid to collect it, then use the Dropper to acquire the acid and use it on the door hinges.•Once the hinges are completely gone, use the Crowbar to pry the door open and gain access into the next room.Workshop•Take a closer look at the drawers just beyond the body gurney.•Pick up the Video Tape inside the file cabinet and add it to your inventory.•Return to the Video Room.Video Room•Use the Video Tape on the VCR, then watch the cutscene that follows. Only two video tapes left to find.•Take a closer look at the box on the left.•Click on the box lid: you'll need to find the missing red and green chips before you can activate the puzzle. Their locations are shown below:。
- 1、下载文档前请自行甄别文档内容的完整性,平台不提供额外的编辑、内容补充、找答案等附加服务。
- 2、"仅部分预览"的文档,不可在线预览部分如存在完整性等问题,可反馈申请退款(可完整预览的文档不适用该条件!)。
- 3、如文档侵犯您的权益,请联系客服反馈,我们会尽快为您处理(人工客服工作时间:9:00-18:30)。
实用口语讲解6
●ありのままの君でいいんだ。
(02:46)
做原来的你就好了。
ありのまま:意思是据实,事实上,实事求是。
指不加任何修饰的事实原貌。
可以作名词、副词、形容动词使用。
如:ありのままの事実/事实真相、真人真事
ありのままを告白する/老实坦白
ありのままに言えば/说老实话、说实在的
●腰が引けちゃったみたい。
(09:51)
貌似很恐惧。
腰が引ける:字面意思是伸不直腰,引申义为吓得腿软。
形容害怕、畏惧。
同义词是腰が抜ける。
●あとは、向こうが腹をくくるのを待つしかないの。
(10:03)
剩下的就只能等待对方下决心了。
腹をくくる:也写作腹を括る。
本来这是将「腹をすえる」和「高をくくる」混淆之后的错误用法,但一直被日本人沿用至今。
「腹をすえる」的意思是“下定决心;做好精神准备”。
「高をくくる」是“不放在眼里,不屑一顾”的意思。
?鼻クソといい、うんこといい、この女。
(14:34)
一会儿鼻屎、又来便便,这个女人真是!
~といい~といい:……也好……也好;无论是……还是……。
前接体言。
这个句型是从不同的侧面评价某一事物,含有“不只是这两个方面,其他方面也是如此”的意味。
表示吃惊、感叹的心情。
例:色といい形といいすばらしい。
/不管是颜色还是形状,都很好看。
彼女は容姿といい知性といい、申し分のない女性だ。
/无论是容颜还是知性,她都是无可挑剔的女性。
实用口语讲解7
●信じられないような成長ぶり。
(00:16)
难以置信的成长姿态。
-ぶり:接在名词好动词连用形的后面,也写作-振り、-っぷり。
这里指事物的样子、状态、情况等。
例如:いかにも学者らしい話しぶりだ。
/讲话的样子确实像个学者。
彼女の歌いぶりはプロ歌手のようだ。
/她唱歌像专业歌手一样。
このマツは枝ぶりがすばらしい。
/这棵松树长得很漂亮。
●私のような女にとってめったにない出来事。
(00:50)
对像我这样的女人来说,这是少有的事。
めったに:不多,稀少,不常。
副词,与后面的ない相呼应,表示几乎没有或者只在特殊情况下才存在的情况。
例:こんな機会はめったにない。
/这样的机会很难得。
私はめったに外出しません。
/我几乎很少出去过。
このショーはめったに見られない。
/这样的表演难得一见。
●ね、杉下さん、今度のお盆休みに一緒にパワースポットに行かない。
(04:36)
杉下小姐,这次的盂兰盆节我们一起去灵地吧。
パワースポット:也叫エネルギースポット、気場,指民间流传的具有强大能量的风水宝地。
据说在这样的地方逗留,能强化生命的能量,净化躯体和心灵。
日本出名的灵地有富士山、东京的明治神宫、京都的鞍马山等。
●部長に甚平を買ったんですけど、紙袋を取り違えちゃって。
(06:17)
给部长买了夏和服,但是把包装的纸袋拿错了。
甚平(じんべい):(男生或儿童穿的)和服式夏季短外衣。
全称是“甚兵衛羽織”,有一种说法是来源于“名为甚兵衛的人穿著的服装”,也有说是江户末期的平民所穿著的“「袖無し羽織(そでなしばおり)」”(无袖短外罩)。
由于形式上类似武术家所穿著的阵羽织(穿在铠甲之外的无袖外罩),后者的说法可能性较高。
根据古老的说法,在大阪这种无束口的筒袖在大正时代普及。
甚平长度很短及臀,袖口无袖束,并且在领衿尾与腰部固定的地方,附有打结用的绳子。
打结的地方,右侧在外,左侧在内,与一般和服右衽的穿著方式相同。
现今的甚平是搭配有成套的短裤。
不过,直到昭和40年左右之前,甚平只是长度及膝的上衣。
●あなたは一見チャラ男だけど。
(08:07)
乍看一眼,以为你是个花心男。
チャラ来源于チャラい。
意思为“(浅薄轻浮)看起来很没品”或“花心,同时和多个异性交往”。
例:チャラいわりには常識的だ。
看起来轻浮浅薄,却合乎情理。
ああいうチャラいやつは、いつか刃傷沙汰になるぞ。
那种劈腿的家伙早晚会遭到报应的。
●蒸し返さないで。
(20:04)
别翻旧账啊。
蒸し返す:むしかえす。
意思是把冷掉的饭或者馒头等重新蒸一次。
例:ご飯を蒸し返す。
/把米饭再热热。
还有一层引申义是旧事重提,老调重弹,翻老账。
例:昔のけんかを蒸し返す。
/重复从前的争吵
あの問題をもう一度蒸し返されても困る。
/重新提起那个问题不太合适。