Informatica邮件功能配置(MAPI)
informatica中常用各组件的功能

目录未找到目录项。
Informatica 数据整合分为三类数据集成,即下游集成、中游集成和上游集成下游集成:指数据仓库,显著特点是,从数据流的角度看,数据仓库的主体功能是所有应用系统的下游,所有数据都会流向数据仓库中游集成:指数据交换平台,特点是,任何平台和它的关系都是对等的,它是这个数据枢纽hub的中心点,用来支持所有系统之间数据的数据交换,用于解决数据集成毛团问题。
上游集成:指主数据平台,而且是交易型主数据平台。
用于管理企业核心数据的黄金记录,作为企业核心记录的黄金数据的标准平台。
Informatica 的四个客户端及作用:1,Repository Manager:用于管理Repository本身,如创建文件夹,导入/导出Mapping、Worlkfolw,版本管理,部署,Repository的清除。
2,Designer:用于导入ETL元数据,开发ETL程序。
在Power Center中ETL程序被叫做Mapping,即源到目标的映射。
3,Workflow Manager:用于对Mapping的进行数据源、数据目标、使用的字符集、调优及参数配置等,使Mapping能够运行。
此外,还提供了基本的调度和排程的能力。
4,Workflow Monitor:用于监控运行时的Workflow和session,监控ETL运行是否正常、执行效率及异常时的错误信息。
Power Center的开发过程:0,使用PowerCenter客户端连接域(Domian)和数据库服务器Repository Service;建立一个文件夹(Folder),用于开发学习;1,在客户端PowerCenter Designer中导入源表和目标表的结构定义;注:在Power Center Designer中导入的仅仅是表结构,与执行过程的表名无强相关2,在Designer中,创建Mapping(ETL流程)3,在Designer中,拖动源和目标,以及相应组件进入Mapping4,在Designer中,建立源和目标,以及相应组件之间的映射5,在Workflow Manager中提供相应的配置信息及参数6,通过Workflow Monitor客户端进行监控7,预览执行结果重要概念:Mapping:是一个程序,但它不直接可以执行Session:是一个Mapping的实例,指定相关的配置信息后,可以执行;Workflow:可以执行一个或者多个Session,对Session或者其他Task组件进行排程基础组件:1,Source:源文件数据源可以是数据库表,文本文件,XML文件,SAP等,应用系统、Hadoop,MQ等源文件常用方法:手工创建,通过数据库、文本文件、样例文件导入注意:理论上,源表结构定义继承了数据库中表的定义,但是实践中有可能导入后的数据类型发生变化,如表中varchar2,而导入后变为nvarchar2,从而引起Session执行异常。
Imap+activesync方式配置邮箱操作手册

目录一、概述 (2)二、适用环境及注意事项 (2)1.手册适用环境。
(2)2.注意事项 (2)三、操作步骤 (2)1.Imap方式配置邮箱 (2)2.Activesync方式配置邮箱 (8)一、概述本手册主要作用是指导用户通过imap和activesync协议方式配置outlook 2013邮件客户端收发邮件,使用activesync方式配置邮箱的目的是为了弥补imap不能同步日历的缺陷,即:配置activesync方式收发邮件的目的是同步用户日历(imap方式无法同步用户日历),下面简单介绍使用imap和activesync配置outlook客户端收发邮件的注意事项及操作步骤。
二、适用环境及注意事项1.手册适用环境。
邮箱:公司zimbra邮箱(版本:8.0.5)邮件客户端:outlook 20132.注意事项(1)用户outlook客户端配置两种方式收发邮件(imap和activesync),即:outlook客户端中会看到用户的两个邮箱账号。
(2)Activesync方式配置用户邮箱的目的主要是同步用户日历。
三、操作步骤1.Imap方式配置邮箱(1)打开“控制面板”,定位到“邮件”,单击。
(2)在弹出的对话框中点击“显示配置文件”。
(3)在填出的对话框中点击“添加”,输入配置文件名称,如下:(4)在弹出的对话框中选择“电子邮件账户”,单击“下一步”(5)选择“手动设置或其他服务器类型(M)”,下一步。
(6)选择“POP或IMAP(P)”,然后点击“下一步”。
选“我的发送服务器(SMTP)要求验证(O)”点击“确定”,单击“下一步”。
(8)测试会弹出测试服务器的配置信息,测试完成后,点击“关闭”,单击“完成”。
(9) 返回到“邮件”选项卡,选中上面创建的配置文件,单击“确定”。
(10)至此配置outlook2013配置imap方式手法邮件配置完成,打开outlook客户端即可看到对应邮件,如下:2.Activesync方式配置邮箱(1)打开outlook 2013,点击“文件”,选择“账户设置”,如下图:(2) 在弹出的对话框中点击“新建”,如图。
原创Informatica使用说明(图解)
Informatica使用说明(图解)唾沫星冲锋枪 2013-4-22目录前言 (3)第一篇环境搭建 (3)服务器 (3)准备 (3)安装 (3)配置 (17)客户端 (23)准备 (23)安装 (24)介绍 (28)第二篇开发应用 (28)Repository Manager (28)环境介绍 (28)配置目录 (31)Designer (33)环境介绍 (33)配数据源 (34)引入数据源 (36)引入数据目标表 (38)制作Mapping (40)WorkFlow Manager (43)制作session (43)配置服务器数据源 (44)配置session源 (46)配置session目标 (47)制作workflow (48)执行workflow (50)WorkFlow Monitor (50)第三篇监控维护 (51)基本信息查看 (51)运行时间查看 (51)Session日志查看 (52)Workflow日志查看 (52)结束语 (53)前言个人从事ETL方面工作多年,各种工具都有一定了解,POWERCENTER是较为优秀的产品之一。
POWERCENTER是C/S模式,客户端开发服务器运行,本文主要介绍POWERCENTER 基本使用部分,详细的各个组件使用可以查阅相关帮助文档。
第一篇环境搭建服务器准备因为INFORMATICA把配置信息和开发的ETL过程信息都保存在资料库里,所以要预先准备一个数据库资料库。
本文采用oracle做资料库,名称INFO用户INFO密码INFO,配置好数据库的监听。
安装找到软件SERVER目录下的install.bat运行。
POWERCENTER的授权文件是按数据库接口出售的,支持数据库越多价格越高。
这里请注意配置,之前准备好的数据库资料库。
安装完成后可以查看一下服务项里面是否正常。
安装补丁。
因机器不同选择相应的补丁版本,如64位server系统需要补丁。
Informatica数据隐私管理说明书

Key Benefits• Protection and monitoring of personal and sensitive data to fuel data-driven digital transformation and support for privacy and compliance efforts• Centralized visibility across data platforms and types, providing the support needed for today’s complex environments• Continuous risk analysis of personal and sensitive data,to prioritize resources and investments across functional, geographic, and line of business views• AI-driven detection to uncover high-risk, anomalous data usage • A single view of data subjects’ information to provide identity capabilities (rights and consents requests) required for GDPR, CCPA and other privacy legislation• Automated orchestration and protection with sensitive data intelligence remediates privacy and security risks Metadata-driven Intelligence and Automation to Operationalize PrivacyInformatica® Data Privacy Management helps you discover, classify, analyze, protect and monitor personal and sensitive data across your organization. It leverages artificial intelligence (AI) to deliver actionable data discovery and classification, risk scoring, data subject identity capabilities, behavioral analytics, and automated protection in a single solution. It supports structured, semi-structured and unstructured data in the cloud, on premises, in big data stores, and in relational and mainframe systems.Informatica Data Privacy Management helps you prioritize data protection and privacy investments, policies, processes, and programs:• Discover and classify your sensitive data: Gain global visibility into personal and sensitive data across the enterprise with data classification, discovery, proliferation and process analysis, user access, and activity correlation.• Map individual identities to sensitive data: Understand sensitive data by individual identities and quickly locate an individual’s sensitive data to support privacy requests.• Analyze and monitor privacy risk: Track data risk and remediation of misuse and privacy violations based on multiple factors, customize to your organization’s needs, and identify top risk areas based on privacy regulation requirements. Risk simulation helps you understand the impact of data controls before implementation.• Continuously monitor data movement, access, and user activity: Leverage analytics to detect suspicious or unauthorized data access by continuously correlating, baselining, analyzing, and alerting on high-risk conditions and potential anomalous behaviors that threaten sensitive data.• Protect personal and sensitive data and remediate risk: Automate the orchestration of data security controls to protect data at rest and in use, prevent unauthorized access, and de-identify/anonymize/pseudonymize sensitive data. Initiate remediation workflows with custom scripting, automated email notifications of security policy violations, ServiceNow integration, andout-of-the-box third-party protection integration.Data SheetKey FeaturesDiscover and Classify Sensitive Data• Discover, classify and analyze the risk of sensitive and personal data across the enterprise—in structured data across traditional relational databases, including mainframes; semi-structured and unstructured data in environments such as Hadoop repositories, Amazon S3; file mounts (e.g., CIFS); and SharePoint.• Attain complete sensitive data visibility with dashboards and drill-downs to identify functional and organizational information such as department, application, user, and data storage types.• Gain a complete understanding of data, its movement, and its usage in business processes with proliferation tracking and interactive visualizations—both inside and outside the enterprise and between partner and client organizations.Figure 1. Informatica Data Privacy Management provides 360-degree visibility of sensitive data through its dashboard.Support Regulatory Compliance• Accelerate and continuously measure regulated privacy data compliance with risk scoring based on customizable factors, including data sensitivity, volume, protection, proliferation, location, and user activity.• Apply a combination of data domains to define GDPR, CCPA, PII, PHI, and PCI risks relevantto policies, laws, and regulations.• Leverage subject registry for a single view of data subjects across structured and unstructured data. Provide automated matching and linking of data subjects’ records for privacy legislation compliance and to support the execution and management of subject rights and consent requests.• Enforce compliance with automated remediation, stakeholder notification, continuous monitoring of user behavior and sensitive data proliferation across data stores and geographic locations.About InformaticaDigital transformationchanges expectations: betterservice, faster delivery, withless cost. Businesses musttransform to stay relevantand data holds the answers.As the world’s leader inEnterprise Cloud DataManagement, we’re preparedto help you intelligently lead—in any sector, category, orniche. Informatica providesyou with the foresight tobecome more agile, realizenew growth opportunities, orcreate new inventions. With100% focus on everythingdata, we offer the versatilityneeded to succeed.We invite you to exploreall that Informatica hasto offer—and unleash thepower of data to drive your next intelligent disruption.Worldwide Headquarters 2100 Seaport Blvd., Redwood City, CA 94063, USA Phone: 650.385.5000, Toll-free in the US: 1.800.653.3871IN06_1120_03836© Copyright Informatica LLC 2020. Informatica and the Informatica logo are trademarks or registered trademarks of Informatica LLC in the United States and other countries. A current list of Informatica Protect Personal and Sensitive Data • Identify critical data protection priorities and create plans to support privacy by design objectives.• Protect sensitive data with automated remediation that leverages integrated Informatica Dynamic Data Masking, Persistent Data Masking, and third-party protection methods such as Hortonworks Ranger and Cloudera Sentry.• Integrate with custom scripts, email notifications, system log messages, or ServiceNow tickets. Configure these actions to run when triggered by security policy violations or run them manually when potential risks are detected.For more information, visit the Data Privacy Management Product Page。
Outlook 2007 MAPI邮箱配置手册
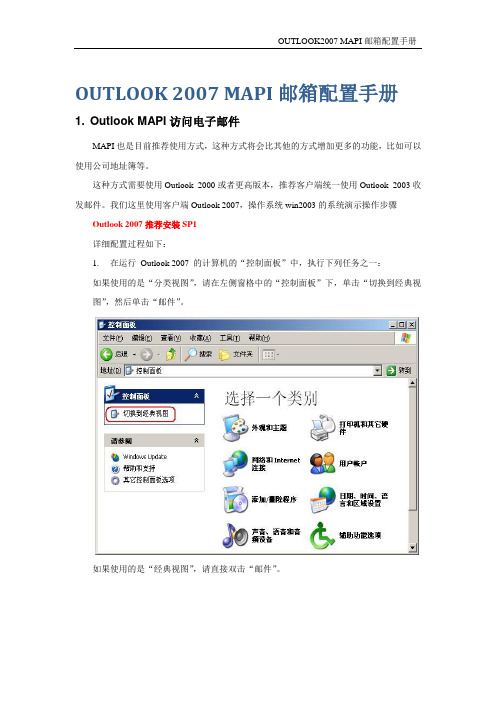
OUTLOOK 2007 MAPI邮箱配置手册1. Outlook MAPI访问电子邮件MAPI也是目前推荐使用方式,这种方式将会比其他的方式增加更多的功能,比如可以使用公司地址簿等。
这种方式需要使用Outlook 2000或者更高版本,推荐客户端统一使用Outlook 2003收发邮件。
我们这里使用客户端Outlook 2007,操作系统win2003的系统演示操作步骤Outlook 2007推荐安装SP1详细配置过程如下:1.在运行Outlook 2007 的计算机的“控制面板”中,执行下列任务之一:如果使用的是“分类视图”,请在左侧窗格中的“控制面板”下,单击“切换到经典视图”,然后单击“邮件”。
如果使用的是“经典视图”,请直接双击“邮件”。
如果是第一次使用则单击“添加”,并选中“提示要使用的配置文件”建立一个名为MAPI的配置文件,单击“确定”如果已经存在其它的配置文件,在弹出的“邮件设置--Outlook”对话框,单击“点子邮件账户”。
2.在“电子邮件帐户”向导中,单击“添加新电子邮件帐户”,然后单击“下一步”。
3.在“添加电子邮件帐户”页上,单击“Microsoft Exchange Server、POP、IMAP或HTTP”,然后单击“下一步”。
4.然后输入用户名、电子邮件地址、密码信息,单击“下一步”5.等待邮箱的自动发现过程(大约3分钟左右),在弹出的安全警告中选择“是”6.再次输入你的密码信息internal\demo,(你的用户名的为internal\yourname)7.等待返回成功页面,点击完成8.重新启动outlook2007,选择你刚才建立的“MAPI”配置文件,点击确定9.进入程序主界面,在工具选项卡点击选项PS:在非公司网络情况下,输入帐号密码时应输入:internal\用户名。
Informatica配置与开发警告邮件解决方法
Informatica 警告邮件解决方案(通过查询后台表监控 Session 运行情况)作者:赵飞云一、项目背景 (2)A.项目背景 (2)二、Session 监控 (3)A.通常做法 (3)B.项目做法 (4)C.查询后台表 (5)D.查询出错任务 (6)E.判断是否有出错任务 (7)F.发送邮件 (8)G.邮件内容 (9)三、Apache Ant (10)A.工具介绍 (10)B.环境配置 (10)C.环境配置 (11)D.主文件 (12)E.主文件 (13)一、项目背景A. 项目背景本次项目是一个很小的BI 项目,数据源包括几个Oracle 数据库,数据仓库也建在Oracle 中,然后抽取到Essbase 11.1.1.3 ,然后提供给OBIEE 10 做报表展现。
本次项目的ETL 工具是Informatica 8.6.1 ,涉及到的数据源表和数据仓库表也不多,加起来也不过是一百多张表而已。
ETL 的顺序是:数据源表–> 落地表–> EDW 表–> DM 表–> Essbase 。
二、Session 监控A. 通常做法项目在开发测试阶段,每个Workflow 对应一个Session ,通过Monitor 监控运行结果。
实际上线时,会在一个Workflow 中串联或并联多个Session ,而且一般管理员很少去Monitor 查看每天的运行情况。
这就需要另外加上监控的功能。
如下图,通常的做法,是利用每个Session 配置中的Components 属性页来实现事后失败(或成功)时做某项操作,比如发送邮件,或者执行某个命令行(来发邮件或做其他动作)。
我嫌这样做太麻烦,需要更改每一个Session ,改动太多,而且下次单个调试时还麻烦。
另外,如下图,按照Informatica 的官方文档,要使用Email 控件也有一大堆的麻烦,尤其如果要配置MAPI 的话,需要安装Microsoft Office Outlook ,还涉及到License 等问题。
Informatica邮件功能配置(MAPI)

Informatica E-mail config instruction(MAPI) Informatica邮件发送功能配置(MAPI)说明书(以测试环境为例)Configuring MAPI on Windows1.先安装Microsoft Outlook (如果之前安装了,就不用在安装)2.配置邮箱服务,单击控制面板中的查看x86控制面板图标3.双击邮件图标4.点击上步操作出现后窗口的显示配置文件图标5.点击添加按钮6.在配置名称栏中填写合适的名称7.输入名称后点击确定8.上步确定后会出现邮件账户向导,选择exchange服务器选项,点击下一步9.选择手动配置服务器,点击下一步10.选择Microsoft Exchange 点击下一步11.出现下面的提示框12.填写exchange服务器名称和用户名,用户名就是发送邮件的邮箱名,点击下一步邮件服务器地址接收邮件的邮箱地址13.点击完成如果操作系统是64位,那么需要进行14-19步骤,32位不需要14.打开informatica的控制台15.点击是(Y)16.输入informatica的用户名和密码登陆17.点击左侧test_int(Integration Service)18.点击右侧最下方有Custom Properties的edit按钮19.点击add 添加以下属性值点击OKSMTPFromAddress XXX@SMTPServerAddress XXX_SMTPPortNumber 25至此邮箱服务器配置完成下面步骤是如何在informatica中使用发送邮件功能20.打开informatica的workflow Manager21.右击我们要使用的Repository 点击出现的connect22.输入用户名与密码登陆23.右击我们指定的文件夹,点击Open24.在工具栏中点击Tasks然后点击Create25.选择Email,然后输入需要的名称点击Create26.双击上步骤中生成的email_test27.点击Properties,会有Email user name,Emil Subject,Email TestEmail user name 是您需要发送的邮件地址,多个地址中间用分号(;)隔开Emil Subject 是您发送的邮件中的主题Email Test 是您发送的邮件中的内容28.在邮件内容窗口中可以输入我们需要的文本内容,但是左边的Variables暂时不可用(下面步骤中有讲到如何使用)29.选择一个可以使用的session,双击这个session,然后点击Components,窗口中有On Success E-Mail(意思是session如果成功则发邮件),然后选择type为Reusable,On Failure E-Mail(session如果失败则发邮件) 同上30.点击右侧小箭头的按钮31.会出现Email的列表,因为我们只做了一个,所以只显示一个,选择需要的Email Browser, 点击OK (可以点击Override按钮进行重写此邮件的配置,重写功能我们在下面一步中进行讲解)32.点击右击笔形按钮33.选择Properties,然后点击右侧的箭头按钮34.可以在Text的窗口中重新编辑邮件内容,可以选择左侧Variable框中的函数,也可以手工输入代表左侧函数的编码,如%w意思是此session所在的workflow的名称%a 可以发送本服务器中指定目录的附件例%a<G:\blat276\test.xlsx> 则发送G:\blat276目录下的test.xlsx文件作为附件%g 意思是把本session的日志文件作为附件发送%s 意思是本session的名称…设置完毕后点击OK至此session中的设置已经全部完成,后面步骤会有运行示例35.在一个可用的workflow中右击窗口,点击start workflow,运行workflow36.W orkflow运行完成后,查看您所要发送的邮箱,会发现邮件已经到达,附件,日志等等设置的内容也测试成功。
informatica产品选配说明
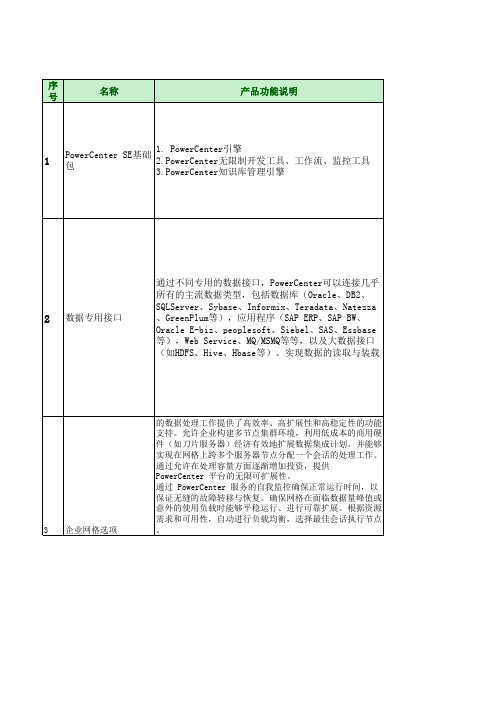
1. PowerCenter引擎 PowerCenter SE基础 2.PowerCenter无限制开发工具、工作流、监控工具 包 3.PowerCenter知识库管理引擎
2
数据专用接口
通过不同专用的数据接口,PowerCenter可以连接几乎 所有的主流数据类型,包括数据库(Oracle、DB2、 SQLServer、Sybase、Informix、Teradata、Natezza 、GreenPlum等),应用程序(SAP ERP、SAP BW、 Oracle E-biz、peoplesoft、Siebel、SAS、Essbase 等),Web Service、MQ/MSMQ等等,以及大数据接口 (如HDFS、Hive、Hbase等)。实现数据的读取与装载
7
元数据管理选项
产品选配说明 必选。1、每台服务器必须 已2C的倍数选配(例如: 2C/4C/6C/8C等)。2、如要 做集群功能规避单机风险, 必须最少部署两台服务器, 否则无法实现集群功能。3 、如是多台服务器,每台服 务器部署的数量必须1:1相 等。 1、数据库接口、大数据接 口只按照类型不同选配确定 数量。不按照同一个品牌的 库的个数选取。(例如:本 地现有Oracle数据库3个、 DB2数据库3个,那么最终选 取数据接口Oracle*1、 DB2*1)。2、应用程序所选 配的每个类型的个数与拥有 的(以前已经采购过的+现 在准备扩容的) PowerCenter SE的数量1:1 对应。3、注意:数据库和 大数据的类型价格一样,而 应用程序和其他接口价格不 一样
该功能模块选配数量必须与拥 有的(以前已经采购过的+现 在准备扩容的)PowerCenter SE的数量1:1对应。 该功能模块选配数量必须与拥 有的(以前已经采购过的+现 在准备扩容的)PowerCenter SE的数量1:1对应。
- 1、下载文档前请自行甄别文档内容的完整性,平台不提供额外的编辑、内容补充、找答案等附加服务。
- 2、"仅部分预览"的文档,不可在线预览部分如存在完整性等问题,可反馈申请退款(可完整预览的文档不适用该条件!)。
- 3、如文档侵犯您的权益,请联系客服反馈,我们会尽快为您处理(人工客服工作时间:9:00-18:30)。
Informatica E-mail config instruction(MAPI) Informatica邮件发送功能配置(MAPI)说明书
(以测试环境为例)
Configuring MAPI on Windows
1.先安装Microsoft Outlook (如果之前安装了,就不用在安装)
2.配置邮箱服务,单击控制面板中的查看x86控制面板图标
3.双击邮件图标
4.点击上步操作出现后窗口的显示配置文件图标
5.点击添加按钮
6.在配置名称栏中填写合适的名称
7.输入名称后点击确定
8.上步确定后会出现邮件账户向导,选择exchange服务器选项,点
击下一步
9.选择手动配置服务器,点击下一步
10.选择Microsoft Exchange 点击下一步
11.出现下面的提示框
12.填写exchange服务器名称和用户名,用户名就是发送邮件的邮箱
名,点击下一步
邮件服务器地址
接收邮件的邮箱地址
13.点击完成
如果操作系统是64位,那么需要进行14-19步骤,32位不需要14.打开informatica的控制台
15.点击是(Y)
16.输入informatica的用户名和密码登陆
17.点击左侧test_int(Integration Service)
18.点击右侧最下方有Custom Properties的edit按钮
19.点击add 添加以下属性值点击OK
SMTPFromAddress XXX@
SMTPServerAddress XXX_
SMTPPortNumber 25
至此邮箱服务器配置完成
下面步骤是如何在informatica中使用发送邮件功能20.打开informatica的workflow Manager
21.右击我们要使用的Repository 点击出现的connect
22.输入用户名与密码登陆
23.右击我们指定的文件夹,点击Open
24.在工具栏中点击Tasks然后点击Create
25.选择Email,然后输入需要的名称点击Create
26.双击上步骤中生成的email_test
27.点击Properties,会有Email user name,Emil Subject,Email Test
Email user name 是您需要发送的邮件地址,多个地址中间用分号(;)隔开
Emil Subject 是您发送的邮件中的主题
Email Test 是您发送的邮件中的内容
28.在邮件内容窗口中可以输入我们需要的文本内容,但是左边的
Variables暂时不可用(下面步骤中有讲到如何使用)
29.选择一个可以使用的session,双击这个session,然后点击
Components,窗口中有On Success E-Mail(意思是session如果成功则发邮件),然后选择type为Reusable,
On Failure E-Mail(session如果失败则发邮件) 同上
30.点击右侧小箭头的按钮
31.会出现Email的列表,因为我们只做了一个,所以只显示一个,选
择需要的Email Browser, 点击OK (可以点击Override按钮进行重写此邮件的配置,重写功能我们在下面一步中进行讲解)
32.点击右击笔形按钮
33.选择Properties,然后点击右侧的箭头按钮
34.可以在Text的窗口中重新编辑邮件内容,可以选择左侧Variable
框中的函数,也可以手工输入代表左侧函数的编码,如
%w意思是此session所在的workflow的名称
%a 可以发送本服务器中指定目录的附件例
%a<G:\blat276\test.xlsx> 则发送G:\blat276目录下的test.xlsx
文件作为附件
%g 意思是把本session的日志文件作为附件发送
%s 意思是本session的名称
…
设置完毕后点击OK
至此session中的设置已经全部完成,后面步骤会有运行示例
35.在一个可用的workflow中右击窗口,点击start workflow,运行
workflow
36.W orkflow运行完成后,查看您所要发送的邮箱,会发现邮件已经
到达,附件,日志等等设置的内容也测试成功。