3363962_INFRARED_OPTICAL_SYSTEM_COMPRISI
IT8716

IT8716F
Environment Control – Low Pin Count Input / Output (EC - LPC I/O)
Preliminary Specification V0.5.2 (For F Version)
ITE TECH. INC.
This specification is subject to Change without notice. It is provided “AS IS” and for reference only. For purchasing information, please contact the nearest sales representatives. Please note that the IT8716F V0.5.2 is applicable to the F version and future versions.
Enhanced Hardware Monitor − Built-in 8-bit Analog to Digital Converter − 3 thermal inputs from either remote thermal resistor or thermal diode or diode-connected transistor, the temperature sensor of the current mode. − 8 voltage monitor inputs (VBAT is measured internally.) − 1 chassis open detection input with low power Flip-Flop dual-powered by battery or VCCH − Watch Dog comparison of all monitored values − Provides VID0 – VID5 support for the CPU − External Thermal Sensor Host support.
适用于 HP-UX 的 HP Systems Insight Manager 6.0 安装与配置指南

Siemens SCALANCE XP208 8端口IE交换机数据表说明书

04/07/2020
Subject to change without notice © Copyright Siemens
Cascading in the case of a redundant ring / at reconfiguration time of <\~0.3\~s Cascading in cases of star topology
Yes
Identification & maintenance function
● I&M0 - device-specific information
Yes
● I&M1 – higher-level designation/location
Yes
designation
Product functions / Diagnostics
Yes
6GK5208-0HA00-2AS6 Page 4/6
04/07/2020
Subject to change without notice © Copyright Siemens
Protocol / is supported
AU5800报警列表_翻译
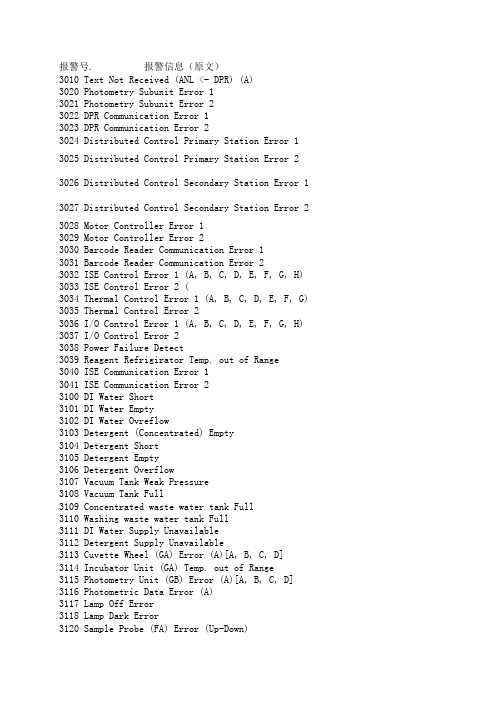
3121 Sample Probe (FA) Error (Rotation) 3122 Sample Probe (FA) Error (Liquid Sensor) 3123 Sample Probe (FA) Error (Clot Sensor) 3124 Sample Dispenser (SA-S) Error 3125 Inner Wash Dispenser (SA-W) Error 3127 R1 Reagent Probe (FD01) Error (Up-Down) 3128 R1 Reagent Probe (FD01) Error (Rotation) 3129 R1 Reagent Probe (FD01) Error (LiquidSensor) ( 3130 R1 Reagent Dispenser (SA-R1) Error 3131 R1 Inner Wash Water Dispensing Disabled 3132 R2 Reagent Probe (FD11) Error (Up-Down) 3133 R2 Reagent Probe (FD11) Error (Rotation) ( 3134 R2 Reagent Probe (FD11) Error (LiquidSensor) 3135 R2 Reagent Dispenser (SA-R2) Error 3136 R2 Inner Wash Water Dispensing Disabled 3137 S/R1 Mixing Unit (FC01) Error (Up-Down) 3138 S/R1 Mixing Unit (FC01) Error (Rotation) 3139 S/R1 Mixing Unit (FC01) Error (Mixing) 3140 R2 Mixing Unit (FC11) Error (Up-Down) 3141 R2 Mixing Unit (FC11) Error (Rotation) 3142 R2 Mixing Unit (FC11) Error (Mixing) 3143 Cuvette Wash Unit (FB) Error 3144 Cuvette Wash Water Dispensing Disabled 3145 R1 Reagent Refrigirator (DA01) Error 3146 R2 Reagent Refrigirator (DA11) Error 3147 STAT Table (DC) Error (A)[A, B, C, D] 3148 Second Washing Well Pouring Error (A) 3149 Second Washing Well Draining Error 3150 Cooling Unit (DB) Error (A) 3151 Detergent Supply Pump (P5) Error 3180 ISE Sequence Error (A, B, C, D) 3181 ISE A/D Unit Error (A, B, C, D) 3182 ISE Buffer Dispenser (SA-ISE) Error 3183 ISE Mixture Rolling Pump (IB-S) Error 3184 ISE MID Rolling Pump (IB-M) Error 3185 ISE Mixing Unit (ISE-MIX) Error 3186 ISE Sample Pot Liquid Sensor Error 3187 ISE Sample Pot Overflow 3188 ISE Data Low 3189 ISE Analog Power Supply Error (A) 3200 Sample Short 3201 Sample Probe Clot Detect 3203 Sample Probe Short Aspiration 3204 Sample Probe Detergent Short (A) 3205 Sample Probe Detergent Empty (A) 3206 Sample Probe W2 Detergent Empty (A) 3208 Sample Prior Diluent Short (A)
ADSI调制解调器错误代码一览表

659 The media .INI file refers to an unknown device name. 该媒体的INI文件提供了一个未知的设备名。
644 You will not receive network message popups. 你不能收到POPUPS的网络消息。
645 Internal authentication error. 内部鉴定错误。
646 The account is not permitted to log on at this time of day. 这个帐号在当天的这个时间不允许被登陆。
670 Cannot read the section name from the media .INI file. 无法从媒体INI文件中读取段名。
671 Cannot read the device type from the media .INI file. 无法从媒体INI文件中读取驱动器类型。
674 Cannot read the maximum connection BPS rate from the media .INI file. 无法从媒体INI文件中读取最大连接BPS速率。
675 Cannot read the maximum carrier BPS rate from the media .INI file. 无法从媒体INI文件中读取最大载波BPS速率。
642 One of your NetBIOS names is already registered on the remote network. 你的NETBIOS名字中的一个已经在远程网络中被注册。
HP_Proliant_error

无
可能原因:
启用 Advanced ECC with hot-add。
操作:
无
高级存错误消息 #3
错误消息:
Advanced Memory Protection mode: Online spare with Advanced ECC
...Xxxx MB System memory and xxxx MB memory reserved for Online Spare.
致命 ROM 错误消息
错误消息:
FATAL ROM ERROR: The System ROM is not Properly Programmed.
蜂鸣报警:
一声长音,一声短音
可能原因:
System ROM 未正确编程。
操作:
更换物理 ROM 部件。
光纤通道 Mezzanine 错误消息
错误消息:
蜂鸣报警:
无
可能原因:
系统发生严重错误并导致 NMI。
操作:
操作:运行 Insight Diagnostics,并更换指定的问题组件。
致命 Hub Link 错误消息
错误消息:
Fatal Hub Link Error
蜂鸣报警:
无
可能原因:
集线器链路接口发生严重错误并导致 NMI。
操作:
操作:运行 Insight Diagnostics,并更换有问题的指定组件。
...Xxxx MB System memory and xxxx MB memory reserved for RAID.
蜂鸣报警:
无
可能原因:
该消息说明启用了 RAID Memory,并指出为该功能保留的存大小。
DrayTek VigorAP 960C 802.11ax Ceiling-mount Access

VigorAP 960C802.11ax Ceiling-mount AccessPointQuick Start GuideVersion: 1.2Firmware Version: V1.4.5(For future update, please visit DrayTek web site)Date: Dec. 21, 2022Intellectual Property Rights (IPR) InformationCopyrights © All rights reserved. This publication contains information that is protected by copyright. No part may be reproduced, transmitted, transcribed, stored ina retrieval system, or translated into any language without written permissionfrom the copyright holders.Trademarks The following trademarks are used in this document:●Microsoft is a registered trademark of Microsoft Corp.●Windows, Windows 8, 10, 11 and Explorer are trademarks of MicrosoftCorp.●Apple and Mac OS are registered trademarks of Apple Inc.●Other products may be trademarks or registered trademarks of theirrespective manufacturers.Safety Instructions and ApprovalSafety Instructions ●Read the installation guide thoroughly before you set up the device.●The device is a complicated electronic unit that may be repaired only beauthorized and qualified personnel. Do not try to open or repair thedevice yourself.●Do not place the device in a damp or humid place, e.g. a bathroom.●Do not stack the devices.●The device should be used in a sheltered area, within a temperaturerange of 0 to +40 Celsius.●Do not expose the device to direct sunlight or other heat sources. Thehousing and electronic components may be damaged by direct sunlight or heat sources.●Do not deploy the cable for LAN connection outdoor to preventelectronic shock hazards.●Keep the package out of reach of children.●When you want to dispose of the device, please follow local regulationson conservation of the environment.Warranty We warrant to the original end user (purchaser) that the device will be free from any defects in workmanship or materials for a period of two (2) yearsfrom the date of purchase from the dealer. Please keep your purchase receiptin a safe place as it serves as proof of date of purchase. During the warrantyperiod, and upon proof of purchase, should the product have indications offailure due to faulty workmanship and/or materials, we will, at our discretion,repair or replace the defective products or components, without charge foreither parts or labor, to whatever extent we deem necessary tore-store theproduct to proper operating condition. Any replacement will consist of a newor re-manufactured functionally equivalent product of equal value, and willbe offered solely at our discretion. This warranty will not apply if the productis modified, misused, tampered with, damaged by an act of God, or subjectedto abnormal working conditions. The warranty does not cover the bundled orlicensed software of other vendors. Defects which do not significantly affectthe usability of the product will not be covered by the warranty. We reservethe right to revise the manual and online documentation and to make changesfrom time to time in the contents hereof without obligation to notify anyperson of such revision or changes.Declaration of ConformityHereby, DrayTek Corporation declares that the radio equipment type VigorAP 960C is in compliance with Directive 2014/53/EU.The full text of the EU declaration of conformity is available at the following internet address: https:///VigorAP 960C/Document/CE/Manufacturer: DrayTek Corp.Address: No.26, Fushing Rd., Hukou, Hsinchu Industrial Park, Hsinchu 303, Taiwan Product: VigorAP 960CFrequency Information for Europe area:2.4GHz WLAN 2400MHz - 2483MHz, max. TX power: 19.95dBm5GHz WLAN 5150MHz - 5350MHz, max. TX power: 22.84dBm5470MHz - 5725MHz, max. TX power: 28.14dBmRequirements in AT/BE/BG/CZ/DZ/DK/EE/FR/DE/IS/IE/IT/EL/ES/CY/LV/LI/LT/ LU/HU/MT/NL/NO/PL/PT/RO/SI/SK/TR/FI/SE/CH/HR.5150MHz~5350MHz is for indoor use only.This product is designed for 2.4GHz and 5GHz WLAN network throughout the EC region.Declaration of ConformityHereby, DrayTek Corporation declares that the radio equipment type VigorAP 960C is in compliance with Regulation SI 2017 No. 1206.Manufacturer: DrayTek Corp.Address: No.26, Fushing Rd., Hukou, Hsinchu Industrial Park, Hsinchu 303, Taiwan Product: VigorAP 960CImporter: CMS Distribution Ltd: Bohola Road, Kiltimagh, Co Mayo, IrelandFrequency Information for UK area:2.4GHz WLAN 2400MHz - 2483MHz, max. TX power: 19.95dBm5GHz WLAN 5150MHz - 5350MHz, max. TX power: 22.84dBm5470MHz - 5725MHz, max. TX power: 28.14dBmRequirements in UK. 5150MHz~5350MHz is for indoor use only.This product is designed 2.4GHz and 5GHz WLAN network use in the UK & Ireland.Regulatory InformationFederal Communication Commission Interference StatementThis equipment has been tested and found to comply with the limits for a Class B digital device, pursuant to Part 15 of the FCC Rules. These limits are designed to provide reasonable protection against harmful interference in a residential installation. This equipment generates, uses and can radiate radio frequency energy and, if not installed and used in accordance with the instructions, may cause harmful interference to radio communications. However, there is no guarantee that interference will not occur in a particular installation. If this equipment does cause harmfulinterference to radio or television reception, which can be determined by turning the equipment off and on, the user is encouraged to try to correct the interference by one of the following measures:● Reorient or relocate the receiving antenna.● Increase the separation between the equipment and receiver.● Connect the equipment into an outlet on a circuit different from that to which the receiver is connected.●Consult the dealer or an experienced radio/TV technician for help.This device complies with Part 15 of the FCC Rules. Operation is subject to the following two conditions:(1) This device may not cause harmful interference, and(2) This device may accept any interference received, including interference that may cause undesired operation.Company nameABP International Inc.Address 13988 Diplomat Drive Suite 180 Dallas TX 75234 ZIP Code 75234E-mail*******************USA Local Representative Contact PersonMr. Robert MesserTel. 19728311600Caution ● Any changes or modifications not expressly approved by the grantee of this device could void the user's authority to operate the equipment.● Any changes or modifications not expressly approved by the party responsible for compliance could void the user's authority to operate this equipment.● This transmitter must not be co-located or operating in conjunction with any other antenna or transmitter.●Radiation Exposure Statement: This equipment complies with FCC radiation exposure limits set forth for an uncontrolled environment. This equipment should be installed and operated with minimum distance 20cm between the radiator & your body.External Power Supply ErP Information1 2A Manufacturer DVE DVEB Address No.5, Baogao Rd, XindianDist, New Taipei City(23144), TaiwanNo.5, Baogao Rd, XindianDist, New Taipei City(23144), Taiwan DSA-12PF09-12 FUK DSA-18PFR-12 FUKC Model identifierDSA-12PF09-12 FEU DSA-18PFR-12 FEU D Input voltage 100~240V 100~240VInput AC frequency 50/60Hz 50/60HzEOutput voltage DC 12.0V 12.0VF Output current 1.0A 1.5AG Output power 12.0W 18.0WH Average active efficiency 83.3% 85.5%I Efficiency at low load 10% 80.8% 83.7%J No-load power consumption 0.06W 0.07W*The external power supply used for each product will be model dependent.For more update, please visit .T a b l e o f C o n t e n t s1. Package Content (1)2. Panel Explanation (2)3. Installation (3)3.1 Ceiling-mount Installation (Wooden Ceiling) (3)3.2 Ceiling-mount Installation (Plasterboard Ceiling) (4)3.3 Suspended Ceiling (Lightweight Steel Frame) Installation (5)3.4 Wall-Mounted Installation (7)4. Connection and Configuration (8)4.1 Notifications for Hardware Connection (8)4.2 Connect to a Vigor Router using AP Management (9)4.3 Web Configurations (10)5. Customer Service (14)Be a Registered Owner (14)Firmware & Tools Updates (14)1.P a c k a g e C o n t e n tTake a look at the package content. If there is anything missed or damaged, please contact DrayTek or dealer immediately.VigorAP 960C Main Unit Ceiling mount bracket & Quick StartGuideT-Rail Mounting Kits(Used for suspended ceiling)Fixings and Screws(for ceiling mounting) RJ-45 Cable (Ethernet)Screw set (for wall mounting) The type of the power adapter depends on the country that the AP will be installed:UK-type Power Adapter EU-type Power AdapterUSA/Taiwan-type Power Adapter AU/NZ-type Power AdapterThe maximum power consumption is 11 Watt.2. P a n e l E x p l a n a t i o nLED Status ExplanationOn The system is in boot-loader mode. OffThe system is not ready or fails.Blue LEDBlinking The system is in AP mode and work normally.Green LED BlinkingThe system is in Mesh mode or Range Extender modeand works normally.Orange LED Blinking The system is in TFTP mode. Off Off VigorAP is turned off or not functioning. Interface Explanation Ethernet Port Connects to LAN or router.Supports PoE power & Gigabit (1000BaseT).Power Jack (DC IN) Connecter for a power adapter. Hole Explanation Factory Reset Restores the unit back to factory default settings.To use, insert a small item such as an unbent paperclip into the hole. You will feel the button inside depress gently. Hold it for 5 seconds. The VigorAP will restart with the factory default configuration and the LED will blink blue.Note● For the sake of security, make the accessory kit away fromchildren.● Remove the protective film from the access point before useto ensure ventilation.LEDFactory ResetEthernet PortPower Jack (DC IN)3. I n s t a l l a t i o nVigorAP can be installed under certain locations: wooden ceiling, plasterboard ceilings, light-weighted steel frame and wall.3.1 C e i l i n g -m o u n t I n s t a l l a t i o n (W o o d e n C e i l i n g )1. Place the bracket under the wooden ceiling and fasten two screws firmly (asshown in Figure below, Step 1). 2. When the bracket is in place, fasten two screws firmly (as shown in Figurebelow, Step 2) on the bottom of VigorAP. 3. Make the device just below the bracket. Put the screws installed in Step 2 onthe holes of the bracket (as shown in Figure below, Step 3). 4. Gently rotate the device to make screws slide into the notches of thebracket and move forward till it is firmly fixed.Step 1Step 2BracketStep 33.2 C e i l i n g -m o u n t I n s t a l l a t i o n (P l a s t e r b o a r d C e i l i n g )1. Place the bracket under the plasterboard ceiling and fasten two turnbuckles firmly (as shown in Figure below, Step 1).2. Make the screws pass through the bracket and insert into the turnbuckles (asshown in Figure below, Step 2). Fasten them to offer more powerful supporting force.3. When the bracket is in place, fasten two screws firmly (as shown in Figurebelow, Step 3) on the bottom of VigorAP.4. Make the device just below the bracket. Put the screws installed in Step 3 onthe screw holes of the bracket (as shown in Figure below, Step 4).5. Gently rotate the device to make screws slide into the notches of thebracket and move forward till it is firmly fixed.BracketStep 1Step 2Step 3Step 43.3 S u s p e n d e d C e i l i n g (L i g h t w e i g h t S t e e l F r a m e )I n s t a l l a t i o nYou cannot screw into ceiling tiles as they are weak and not suitable for bearing loads. Your VigorAP is supplied with mounts (T-Rail brackets) which attach directly to the metal grid (‘T-Rail’) of your suspended ceiling.1. Choose one set of T-Rail mounting kits from the bundled package.2. Put the T-Rail brackets on the holes of the bottom side of the device. Fastenthem with suitable screws.3. If a larger gap is required between the ceiling and the VigorAP, use theextension pieces to extend the height of the brackets.T-Rail BracketExtension PieceT-Rail BracketExtension Piece4.Attach the T-Rail brackets to the ceiling frame.NoteWarning: The screw set shown below is for wall mounting only. Do not use such set for ceiling mounting due to the danger offalling.3.4 W a l l -M o u n t e d I n s t a l l a t i o nFor wall-mounting, the VigorAP has keyhole type mounting slots on the underside. You can fit the AP at any axis (i.e. 12, 3, 6 or 9 O’Clock) to allow for cable entry from the most convenient location if you are using side entry – note the position of the side entry cable cutout.1. A template is provided on the VigorAP’s packaging box to enable you tospace the screws correctly on the wall.2. Place the template on the wall and drill the holes according to therecommended instruction.3. Fit screws into the wall using the appropriate type of wall plug (as shown inthe ceiling section) but do not use the ceiling bracket – the VigorAP hangs directly onto the screws.Wall (wooden, concrete, plasterboard or others)4.C o n n e c t i o n a n d C o n f i g u r a t i o n4.1N o t i f i c a t i o n s f o r H a r d w a r e C o n n e c t i o n●If required, remove the protective cap of VigorAP to create extra spacefor the cables to pass through.●Connect VigorAP to Vigor router (via LAN port) with Ethernet cable.●Connect VigorAP to PoE switch (via LAN port) with Ethernet cable. Forconnecting with PoE switch, do not connect the power adapter. VigorAPwill get the power from the switch directly.4.2C o n n e c t t o a V i g o r R o u t e r u s i n g A P M a n a g e m e n tYour VigorAP can be used with Vigor routers which support AP management (such as the Vigor2865 or Vigor2927 series). AP Management enables you to monitor and manage multiple DrayTek APs from a single interface.1.Connect one end of the power adapter to power port of VigorAP, and theother side into a wall outlet.2.Access into the web user interface of Vigor router. Here we take Vigor2865as an example. Open Central Management>>AP>>Status.3.Locate VigorAP 960C. Click the IP address assigned by Vigor router to accessinto web user interface of VigorAP 960C.4.After typing username and password (admin/admin), the main screen will bedisplayed.4.3W e b C o n f i g u r a t i o n sThis section will guide you to install the AP and make configuration for VigorAP.C o n n e c t e d A s a M e s h N o d e(i n M e s h N e t w o r k)❶Install VigorAP on to the ceiling.❷As a mesh node, settings related to VigorAP 960C must be configured by a remote Mesh Root (e.g., VigorAP 903) within the mesh network.The user must detect VigorAP 960C via a Mesh Root to add it as a meshnode.C o n n e c t e d A s a n A c c e s s P o i n tAs an access point, VigorAP 960C must be connected to a router and configured in AP (Access Point) / Range Extender mode.❶Install VigorAP on to the ceiling.❷Use a twisted-pair cable with RJ-45 plugs at both ends, and plug into Ethernet device (e.g., Vigor router) and Ethernet port of VigorAP.❸ There are two methods to configure VigorAP.Method 1:(a) First, open a web browser on your PC and type https://192.168.1.2. Apop-up window will open to ask for username and password.Note You may either simply set up your computer to get IPdynamically from the router or set up the IP address of thecomputer to be in the same subnet as the IP address ofVigorAP 960C.● If there is no DHCP server on the network, then VigorAP960C will have an IP address of 192.168.1.2.● If there is DHCP available on the network, then VigorAP960C will receive its IP address via the DHCP server.● If you connect to VigorAP by wireless LAN, you could tryto access the web user interface through .(b) After clicking Login, Quick Start Wizard for configuring wirelesssettings will appear as follows.(c)Follow the on-screen steps to finish the network connection.Method 2:(a)Use a mobile phone to scan the QR code named with DrayTek WirelessApp to download DrayTek Wireless APP.(b)After downloading, run the APP.(c)From the home page, click the Connect icon to access the Connectpage. Next, press the QR code icon next to Scan QR Code on yourphone screen to open the camera.Scan the QR code named with Connect SSID to access the web user interface (configuration wizard) of VigorAP 960C. (For iOS users, the SSID and the password will be shown first. Simply click the Connect button to access the web user interface of VigorAP.)5.C u s t o m e r S e r v i c eIf the device cannot work correctly after trying many efforts, please contact your dealer/DrayTek for further help right away. For any questions, please feel freetosende-mailto“*******************”.B e a R e g i s t e r e d O w n e rWeb registration is preferred. You can register your Vigor router viahttps://..F i r m w a r e&T o o l s U p d a t e sDue to the continuous evolution of DrayTek technology, all routers will beregularly upgraded. Please consult the DrayTek web site for more information on newest firmware, tools and documents.https://GPL Notice This DrayTek product uses software partially or completely licensedunder the terms of the GNU GENERAL PUBLIC LICENSE. The author ofthe software does not provide any warranty. A Limited Warranty isoffered on DrayTek products. This Limited Warranty does not coverany software applications or programs.To download source codes please visit:GNU GENERAL PUBLIC LICENSE:https:///licenses/gpl-2.0Version 2, June 1991For any question, please feel free to contact DrayTek technical*************************************************.14。
checksysconf_ug

CheckSysConf User Guide Product Version 1.0October 20031999-2003 Cadence Design Systems, Inc. All rights reserved.Printed in the United States of America.Cadence Design Systems, Inc., 555 River Oaks Parkway, San Jose, CA 95134, USATrademarks:Trademarks and service marks of Cadence Design Systems, Inc. (Cadence) contained in this document are attributed to Cadence with the appropriate symbol. For queries regarding Cadence’s trademarks, contact the corporate legal department at the address shown above or call 800.862.4522.All other trademarks are the property of their respective holders.Restricted Print Permission:This publication is protected by copyright and any unauthorized use of this publication may violate copyright, trademark, and other laws. Except as specified in this permission statement, this publication may not be copied, reproduced, modified, published, uploaded, posted, transmitted,or distributed in any way,without prior written permission from Cadence.This statement grants you permission to print one (1) hard copy of this publication subject to the following conditions:1.The publication may be used solely for personal, informational, and noncommercial purposes;2.The publication may not be modified in any way;3.Any copy of the publication or portion thereof must include all original copyright,trademark,and otherproprietary notices and this permission statement; and4.Cadence reserves the right to revoke this authorization at any time, and any such use shall bediscontinued immediately upon written notice from Cadence.Disclaimer: Information in this publication is subject to change without notice and does not represent a commitment on the part of Cadence. The information contained herein is the proprietary and confidential information of Cadence or its licensors, and is supplied subject to, and may be used only by Cadence’s customer in accordance with, a written agreement between Cadence and its customer. Except as may be explicitly set forth in such agreement, Cadence does not make, and expressly disclaims, any representations or warranties as to the completeness,accuracy or usefulness of the information contained in this document. Cadence does not warrant that use of such information will not infringe any third party rights,nor does Cadence assume any liability for damages or costs of any kind that may result from use of such information.Restricted Rights:Use,duplication,or disclosure by the Government is subject to restrictions as set forth in FAR52.227-14 and DFAR252.227-7013 et seq. or its successor.ContentsCheckSysConf Components . . . . . . . . . . . . . . . . . . . . . . . . . . . . . . . . . . . . .5 Overview . . . . . . . . . . . . . . . . . . . . . . . . . . . . . . . . . . . . . . . . . . . . . . . . . . . . . . . . . . . . . .5 CheckSysConf Components . . . . . . . . . . . . . . . . . . . . . . . . . . . . . . . . . . . . . . . . . . . . . . .5 CheckSysConf Installation Hierarchy. . . . . . . . . . . . . . . . . . . . . . . . . . . . . . . . . . . . . . . . .5 CheckSysConf Syntax . . . . . . . . . . . . . . . . . . . . . . . . . . . . . . . . . . . . . . . . . . . .7 Syntax . . . . . . . . . . . . . . . . . . . . . . . . . . . . . . . . . . . . . . . . . . . . . . . . . . . . . . . . . . . . . . . .7 Operand and Switches: Description . . . . . . . . . . . . . . . . . . . . . . . . . . . . . . . . . . . . . . . . .8 Examples. . . . . . . . . . . . . . . . . . . . . . . . . . . . . . . . . . . . . . . . . . . . . . . . . . . . . . . . . . . . . .8 Example 1 . . . . . . . . . . . . . . . . . . . . . . . . . . . . . . . . . . . . . . . . . . . . . . . . . . . . . . . . . .8 Example 2 . . . . . . . . . . . . . . . . . . . . . . . . . . . . . . . . . . . . . . . . . . . . . . . . . . . . . . . . . .9 Example 3 . . . . . . . . . . . . . . . . . . . . . . . . . . . . . . . . . . . . . . . . . . . . . . . . . . . . . . . . . .9 Example 3 . . . . . . . . . . . . . . . . . . . . . . . . . . . . . . . . . . . . . . . . . . . . . . . . . . . . . . . . . .9 CheckSysConf Data Files . . . . . . . . . . . . . . . . . . . . . . . . . . . . . . . . . . . . . . .10 Overview . . . . . . . . . . . . . . . . . . . . . . . . . . . . . . . . . . . . . . . . . . . . . . . . . . . . . . . . . . . . .10 Data File Format . . . . . . . . . . . . . . . . . . . . . . . . . . . . . . . . . . . . . . . . . . . . . . . . . . . . . . .10 Sample Data Files. . . . . . . . . . . . . . . . . . . . . . . . . . . . . . . . . . . . . . . . . . . . . . . . . . . . . .12 Solaris . . . . . . . . . . . . . . . . . . . . . . . . . . . . . . . . . . . . . . . . . . . . . . . . . . . . . . . . . . . .12 HP-UX . . . . . . . . . . . . . . . . . . . . . . . . . . . . . . . . . . . . . . . . . . . . . . . . . . . . . . . . . . . .13 AIX . . . . . . . . . . . . . . . . . . . . . . . . . . . . . . . . . . . . . . . . . . . . . . . . . . . . . . . . . . . . . ..15 LINUX. . . . . . . . . . . . . . . . . . . . . . . . . . . . . . . . . . . . . . . . . . . . . . . . . . . . . . . . . . . . .161 CheckSysConf ComponentsOverviewCheckSysConf is a tool using which you can verify whether the machine on which you want to run the Cadence tools has the required system configuration and OS patches.This tool is available for Solaris, HP-UX, AIX and LINUX platforms.CheckSysConf ComponentsThis tool consists of three parts:s A scriptcheckSysConf is a script that performs the checks.s Data filesA group of datafiles that define all the parameters and patches required for a particularrelease of operating system. The script uses these datafiles to determine whether the machine has the required system configuration and system patches.s DocumentationThe documentation set consists of the user guide,a readmefile and the man pages.The READMEfile and man pages are located in<your_inst_dir>/doc/check_conf.The user guide can be accessed from CDSDoc.CheckSysConf Installation HierarchyCheckSysConf is installed in the following directory structure:CheckSysConf ComponentsLocation Description<your_inst_dir>/tools.hppa Contains the HP-UX script<your_inst_dir>/tools.ibmrs Contains the AIX script<your_inst_dir>/tools.sun4v Contains the Solaris script<your_inst_dir>/tools.lnx86Contains the LINUX script<your_inst_dir>/doc/check_conf Contains the README file and the man pagesContains the data files<your_inst_dir>/share/patchData2 CheckSysConf SyntaxSyntaxThe syntax for running CheckSysConf is as follows:checkSysConf<release>checkSysConf[-chrv] [ -ilq ] [ -d <directory>] [-p patch]checkSysConf <release> [ -ilq ] [ -d <directory>] [-p patch]Note:The output is saved in the/tmp/checkSysConf.<hostname>-<date>.log file.ImportantY ou need to have root privileges in order to uses the full functionality of this tool onHP-UX. This is not a requirement for Solaris, AIX or Linux.Operand and Switches: DescriptionOperand/Switch Description<release>Checks an OS configuration and patch list file located at<your_inst_dir>/share/patchData/<platformtype>/<OS>/<release> for the required systemconfiguration and patches for the Cadence product specifiedin<release>.-c Checks all existing data files for possible platform/OSconflicts. This option identifies if patches required in onerelease are known-problem patches in another release.-h Prints the help message.-r Returns the releases supported in the data directory. Theoutput of this option represents the only valid<release>operand.-v Returns the release version of this script.-i Suppresses title and other additional information output.-l Prints the patch data file associated with <platform>/<OS>/<release>.-q Executes the script silently and outputs only P ASS or FAIL.This switch will have no effect if used in conjunction the-l or-p option.-d <dir>Provides the patch data from the path specified in the <dir>location.The leading portion of the directory can be any validpath, but the last directory in the path must be namedpatchData.-p <patch>Prints the names of Cadence products that require thispatch.ExamplesExample 1checkSysConf IC443Determines if the machine has the correct configuration and patches for the IC443 release.Example 2checkSysConf <release> -d <patch Directory>Determines if this workstation has the correct configuration and patches for<release> based on the patch data files found in the data directory<patch Directory>. The specified directory must end with the patchData directory, such as /hm/aoyon/my_patches/patchData.Example 3checkSysConf <release> -p <patch>Queries the data file to determine which Cadence products require a particular patch. This feature allows users or system administrators to ignore a failure if the indicated product is not in use.Example 3checkSysConf <release> -qRuns the script silently from another script, which verifies the P ASS or FAIL output.3 CheckSysConf Data FilesOverviewThe data files are the actual files against which the configuration and the patch list are checked.By default,the datafiles are stored in<your_inst_dir>/share/patchData .There is a separate directory for each platform type and release.The actual patch data is in a Cadence tool release file, such as IC443, containing the minimum required systemconfiguration and patch levels for that Cadence tool release.For example,the datafile for the IC443 release on Solaris 8 is located at<your_inst_dir>/share/patchData/ SunOS/5.8/IC443.Data File FormatThe datafile format for the checkSysConf script is different for the Solaris,HP-UX,AIX and LINUX platforms.The following apply to all platforms:s Any line which starts with a# is a comment.s The first line contains the platform name, operating system name and product release name for which the data file is meant. Note that it is a commented line.s Each field within a record line must have at least one space separating it from the next field.s Thefirstfield must be one of these keywords:BANNER,MEMORY,SWAP or DISPLAY.There are other keywords, which are specific to platform like HARDWARE, LOCALE, GRAPHIC-P ATCH,PA TCH,NOT-P A TCH(OR FILESET,NOT-FILESET for IBM Platform) and PACKAGE for LINUX. The keywords can be divided into two categories:❑General: which applies to all platform types. The following table describes the general keywords.Keyword DescriptionBANNER For comments that are to be printed. The script prints out allinformation between two double quotes ("). Y ou should not usedouble quote as part of the comments.MEMORY & SWAP For representing value records.The secondfield on the line mustbe a number. The implied units are megabytes (MB).DISPLAY For checking the display environment of the system. There arethreefields for this key:depth-the depth of the visual,such as8planes, 24 planes. Class - the class of the visual, such asPseudoColor. (Product list) - list of product(s) that requires thischeck.❑Platform specific. These are described in the following table.Keyword DescriptionP ATCH For required patches to be checked for a particular versionexcluding the patches for the GRAPHIC card. The keyword isused in Solaris and HP-UX data files.NOT-PATCH For patches that need to be removed. The keyword is used inSolaris and HP-UX data files.P ATCH, AP AR Patch indicators and require additional fields representing theAPARA numbers that need to be installed. The keyword isspecific to AIX data files.FILESET For required OS filesets for the IBM platform, excluding forGRAPHIC, HARDWARE and LOCALE.NOT-FILESET For OS filesets that need to be removed.APAR For required OS AP ARs for IBM platform, excluding filesets forGRAPHIC, HARDWARE and LOCALE.P ACKAGE For required LINUX packages, excluding patches for GRAPHIC,HARDWARE and LOCALE.Keyword DescriptionGRAPHIC-P ATCH for patches specific for certain graphic card.When the keyword isGRAPHIC-P ATCH, the (Product list) field must contain a knowngraphic type. These are in the script (more can be added) andcurrently are: PGX32, CREA TOR, ELITE, SX, PGX, CG, andBW.HARDWARE For patches specific to certain hardware model.LOCALE For LOCALE patches.s The second and third fields are Solaris specific:❑xx - A two digit number indicating the minimum patch version.❑xx - A two digit number indicating that the current patch revision is available.❑99 - The number to be used when the current revision is unknown.❑The behavior changes for the NOT-P ATCH field. This field in the NOT-PA TCH line indicates the maximum patch version. It means the user should not use the patchversion in the range between the minimum and maximum version .❑Quoted string field - This field contains the title of the patch.❑(Product list)-This is a space-separated list of the products that require a specified patch. The default value is All_ProductsNote:The order of the keyword entries in thefile is not important.Remember that there can be only one keyword rule per line.Sample Data FilesSolaris# sun4v / 5.8 / IC446 System Configuration Info# Version 1.0 May 1, 2002# Version 1.1 May 15, 2002 Add patch 109354-14#KEY PATCH# MIN CURRENT TITLE PRODUCTSPATCH 109147 15 15 "Linker patch" (All_Products) PATCH 108434 06 06 "Shared library patch for C++" (All_Products)PATCH 108435 06 06 "Shared library patch for 64bit C++" (64bit Products) PATCH 108652 51 51 "Xsun patch" (All_Products) PATCH 108940 41 41 "Motif Runtime patch" (All_Products) PATCH 108921 14 14 "CDE 1.4: dtwm patch" (All_Products) PATCH 109354 14 14 "CDE 1.4: dtsession patch" (All_Products) PATCH 108528 13 13 "kernel update patch" (All_Products) PATCH 108727 14 14 "/kernel/fs/nfs patch" (All_Products) PATCH 108827 20 20 "usr/lib/libthread.so.1 patch" (All_Products)GRAPHIC-PATCH 108576 26 26 "Expert3D IFB Graphics Patch" (Expert) GRAPHIC-PATCH 108604 24 24 "Elite3D AFB Graphics Patch" (ELITE)GRAPHIC-PATCH 108605 24 24 "Creator FFB Graphics Patch" (CREATOR) GRAPHIC-PATCH 108606 21 21 "PGX-M64 Graphics Patch" (PGX)GRAPHIC-PATCH 109154 11 11 "PGX32 Graphics Patch" (PGX32)MEMORY 128SWAP 200#KEY DEPTH CLASS PRODUCTSDISPLAY 8 planes PseudoColor (DFII)For HP-UX systems,the same keywords are used.The only difference is that HP systems do not have two of thefields because there are two lessfields because they do not use an-xx nomenclature to indicate the version of patch. For this reason, the second field alone issufficient to indicate the patch and revision information.HP-UX# HP-UX 11.00 IC446 System Configuration Info.# Version 1.0 May 20, 2002# Version 1.1 June 6, add NOT-PATCH PHSS_25877# Version 1.2 June 18, use NFS patch PHNE_25484 instead pf PHNE_25626#KEY PATCH# TITLE PRODUCTS# Following section is for Run-time patchesPATCH PHCO_25590 "login cumulative patch" (All_Products)PATCH PHCO_24146 "csh cumulative patch" (All_Products)PATCH PHCO_23792 "libpthreads cumulative patch" (All_Products)PATCH PHCO_20070 "quota patch for NFS-quotas" (All_Products)PATCH PHCO_24635 "mount cumulative patch" (All_Products)PATCH PHCO_23118 "df cumulative patch" (All_Products) PATCH PHCO_23876 "cumulative SAM/ObAM patch" (All_Products) PATCH PHCO_25707 "libc cumulative patch" (All_Products) PATCH PHCO_23651 "fsck_vxfs cumulative patch" (All_Products) PATCH PHCO_23117 "bdf patch" (All_Products) PATCH PHCO_23706 "cumulative 10.20 libc patch" (All_Products) PATCH PHKL_18543 "PM/VM/UFS/async/scsi patch" (All_Products) PATCH PHKL_26059 "syscall,msem_lock,umask patch" (All_Products) PATCH PHKL_23409 "NFS,Large Data Space,kernel leak" (All_Products) PATCH PHKL_25475 "PM cumulative patch" (All_Products) PATCH PHKL_25906 "Probe,IDDS,PM,VM,PA-8700,FS" (All_Products) PATCH PHKL_20016 "2nd CPU not recognized patch" (All_Products) PATCH PHKL_24027 "VxFS 3.1 comulative patch" (All_Products) PATCH PHKL_22589 "LOFS select IDS and umount fix" (All_Products) PATCH PHKL_22677 "fix of getdirentries, MVFS,mmap" (All_Products) PATCH PHKL_24064 "11.00 eventport pseudo driver" (All_Products) PATCH PHKL_25613 "IDS/9000; related to socket" (All_Products) PATCH PHNE_23003 "r-commands cumulative mega-patch" (All_Products) PATCH PHNE_25385 "Streams Pty cumulative patch" (All_Products) PATCH PHNE_24413 "LAN product cumulative patch" (All_Products) PATCH PHNE_26771 "cumulative ARPA Transport patch" (All_Products) PATCH PHNE_25116 "Cumulative STREAMS Patch" (All_Products) PATCH PHNE_25484 "ONC/NFS General patch" (All_Products) PATCH PHSS_25091 "Font Server SEP2001 Patch" (All_Products) PATCH PHSS_26490 "CDE Runtime Periodic Patch" (All_Products) PATCH PHSS_26495 "CDE Msg Cat Periodic Patch" (All_Products) PATCH PHSS_26262 "ld and linker tools patch" (All_Products) PATCH PHSS_24627 "aC++ runtime libraries-A.03.33" (All_Products) PATCH PHSS_25290 "Xserver cumulative patch" (All_Products) PATCH PHSS_25718 "LIBCL patch" (All_Products) PATCH PHSS_25447 "X/Motif 64bit Runtime OCT2001" (All_Products) PATCH PHSS_25448 "X/Motif 32bit Runtime OCT2001" (All_Products) PATCH PHSS_24832 "MILLI/ASM general patch" (All_Products)MEMORY 128SWAP 200#KEY DEPTH CLASS PRODUCTS DISPLAY 8 planes PseudoColor (DFII)NOT-PATCH PHSS_25877 "X/Motif 32bit Runtime JAN2002" (All_Products)AIXFor IBM systems, the same keywords are used, the difference being that the additional keywords of ASYNCIO and MAINTLVL can also be used for Base OS installation andconfiguration. PSSP has been added to work with SP installations.# AIX / 4.3.3.0 / IC446 System Configuration Info# June 11, 2002MEMORY 128SWAP 200#KEY DEPTH CLASS PRODUCTSDISPLAY 8 planes PseudoColor (DFII)ASYNCIO Available#KEY MAINTENANCE LEVELMAINTLVL 4330-09_AIX_ML# This will check APARS and FILESETS, PTF's needed to be check using the FILSETS #KEY APAR TITLE PRODUCTS# The following patches are for Java installationsAPAR IY27684 "Java coredump: thread getreqs()fails" (Java 1.3.1)APAR IY22308 "Memmory lead in flose() subroutine" (Java 1.3.1)APAR IY27836 "Improve thread safety of malloc" (Java 1.3.1)#The following patches are for the VisualAge 5.0.2.2 UpgradeAPAR IY20193 "VisualAge C++ ML 5.0.2.4" (VisualAge 5.0)# The following patches are for systems with GXT3000P Graphics Cards installed GRAPHICS IX87011 "X on GXT3000P" (GXT 3000P Graphics) GRAPHICS IX87554 "Pull Down Menus deformed" (GXT 3000P Graphics) GRAPHICS IX87857 "Fix MultiThread Problem" (GXT 3000P Graphics) GRAPHICS IX89664 "X Hangs on 2D Polygon Apps" (GXT 3000P Graphics)# The following patches are for the IBM SP systemsPSSP IY15223 "PSSP 3.2.0 Fixes as of Dec 2000" (PSSP 3.2)PSSP IY16184 "PSSP 3.2.0 Fixes as of Jan 2001" (PSSP 3.2)PSSP IY17025 "PSSP 3.2.0 Fixes as of Feb 2001" (PSSP 3.2)PSSP IY18172 "PSSP 3.2.0 Fixes as of Mar 2001" (PSSP 3.2)#KEY FILESET# TITLE PRODUCTSLINUXFor RedHat LINUX systems, the keywords include a KERNEL entry for determining the specific kernel version in use because this is not always a package but might also be a custom built component.# lnx86 / 7.2 / 2H2001 sample data-file# Version 1.0 June 11, 2002 lnewby Initial#KernelKERNEL 2.4.9-34 2.4.18-5 "Kernel" (All_Products)#KEY PATCH# MIN CURRENT TITLE PRODUCT PACKAGE glibc-2.2.4 24 24 "GlibC" (All_Products) PACKAGE gcc-2.96 98 110 "GCC" (All_Products)MEMORY 128SWAP 200#KEY DEPTH CLASS PRODUCTSDISPLAY 8 planes PseudoColor (DFII)。