2010年呼和浩特市中考分招比重达50%
50WQ10FN中文资料

SCHOTTKY RECTIFIER5.5 Amp50WQ10FNBulletin PD-20526 rev.E 03/03D-Pak (TO-252AA)50WQ10FNBulletin PD-20526 rev. E 03/03Part number50WQ10FNV RMax. DC Reverse Voltage (V)V RWM Max. Working Peak Reverse Voltage (V)Voltage RatingsV FMMax. Forward Voltage Drop 0.77V @ 5A * See Fig. 1(1)0.91V @ 10A 0.63V @ 5A 0.74V @ 10A I RMMax. Reverse Leakage Current 1mA T J = 25 °C * See Fig. 2(1)4mA T J = 125 °CV F(TO)Threshold Voltage 0.47VT J = T J max.r t Forward Slope Resistance 21.46m ΩC T Typical Junction Capacitance 183pF V R = 5V DC , (test signal range 100Khz to 1Mhz) 25 °C L STypical Series Inductance5.0nHMeasured lead to lead 5mm from package bodyT J = 25 °C T J = 125 °C V R = rated V RElectrical SpecificationsParameters50WQ...UnitsConditions(1) Pulse Width < 300µs, Duty Cycle < 2%T J Max. Junction Temperature Range (*)-40 to 150°C T stgMax. Storage Temperature Range-40 to 150°C R thJC Max. Thermal Resistance Junction3.0°C/W DC operation * See Fig. 4to Case wtApproximate Weight 0.3 (0.01)g (oz.)Case StyleD - PAK Similar to TO-252AAThermal-Mechanical SpecificationsParameters50WQ...UnitsConditions100I F(AV)Max. Average Forward Current5.5A50% duty cycle @ T C = 135°C, rectangular wave form* See Fig. 5I FSM Max. Peak One Cycle Non-Repetitive 3305µs Sine or 3µs Rect. pulseSurge Current * See Fig. 711010ms Sine or 6ms Rect. pulse E AS Non-Repetitive Avalanche Energy 6.0mJ T J = 25 °C, I AS = 0.5 Amps, L = 40 mHI ARRepetitive Avalanche Current0.5ACurrent decaying linearly to zero in 1 µsecFrequency limited by T J max. V A = 1.5 x V R typicalAbsolute Maximum RatingsFollowing any rated load condition and withrated V RRM appliedA Parameters50WQ... Units Conditions< thermal runaway condition for a diode on its own heatsink (*) dPtot1dTjRth( j-a)50WQ10FN350WQ10FN50WQ10FN5 5K3A50WQ10FNBulletin PD-20526 rev. E 03/036IR WORLD HEADQUARTERS: 233 Kansas St., El Segundo, California 90245, USA Tel: (310) 252-7105TAC Fax: (310) 252-7309Visit us at for sales contact information. 03/03Data and specifications subject to change without notice.This product has been designed and qualified for Industrial Level.Qualification Standards can be found on IR's Web site.。
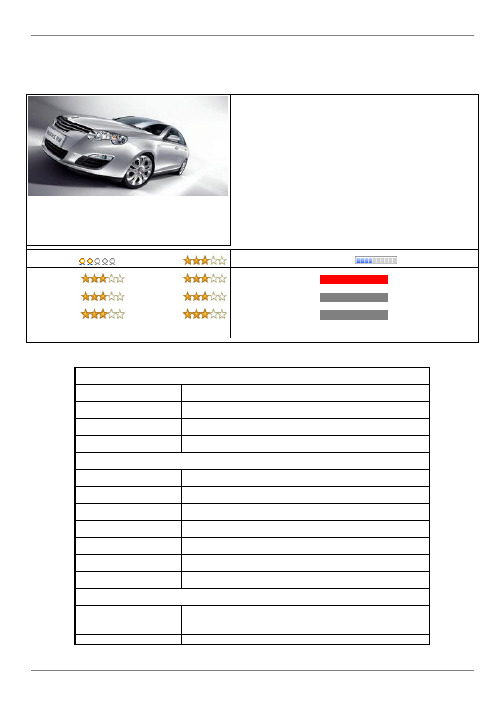
荣威2010款550 S 1.8DVVT MT 启逸版汽车参考资料手册
1.4. 博客 Blog - 2010年05月31日 【图】荣威350在沪有部分现车购车送装潢礼包_汽车之家 荣威 上海 汽车荣威 350 2010款 350c 1.5手动讯智版. 保险和贷款方面,店内提供多家保险公司的车险服务,新车第一年全 部车险约5000元左右,包括:不计免赔险,车损险,第三者责任险和交强险。经销商可以帮助消费者办理贷款服务,首 付30%,还款期限3年。 ...
>>更多 荣威 2010款550 S 1.8DVVT MT 启逸版 汽车 论坛 bbs
1.8. 故障 问题 疑难 帮助 2010年05月05日 问:2009款荣威550启臻版和2010款荣威550启臻版的区别在哪? 答: 2010款没有大的改进,车的整体做工相对老款来说有所提高,车的小毛病确实多,但看起来挺大气,没有十全十美的 车,自己喜欢就好。
变速器: 手动 5档 排放标准: 国Ⅳ标准 驱动方式: 前置前驱 汽车排量: 1.8升
人气指数 外观造型 维修保养 操控性能
评论评分 油耗节能 安全性能
性价比 更多评论>>
1.2. 参数资料 详细介绍ຫໍສະໝຸດ 市场影响力买过这款汽车
100%(1人次)
没买过,但是想买
0%(0人次)
没买过,也不想买
0%(0人次)
油耗节能: 维修保养: 安全性能: 操控性能: 性 价 比:
550毛病太多 老是开到半路就熄火,去4S店他们也说不知道什么原因 ,真郁闷! 2010年05月09日
20MT舒适型
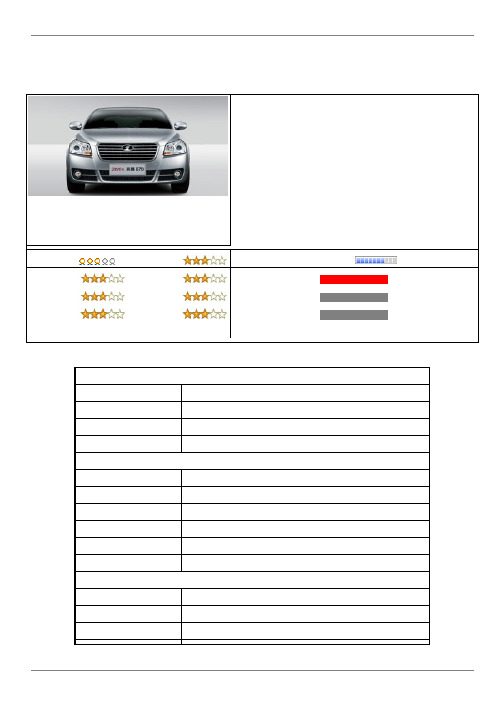
1. 奔腾 2010款B702.0MT舒适型 汽车 参考资料手册1.1. 导购 综述市场影响力1.2. 参数资料 详细介绍基本资料参考价格¥13上市日期2009年09月汽车类型三厢轿车豪华级别中型车尺寸 重量 容积全车长度4705 mm车身宽度1782 mm车身高度1465 mm轴距2675 mm轮距1540/1540 mm(前/后)车身重量1450 kg引擎参数标准引擎LF/直列四缸、双顶置凸轮轴、16气门、多点喷射汽油机标准变速器手动 6档标准排量 2.0 升</td></tr>气门数16最大功率108/6500 KW/rpm最大扭矩183/4000 N m/rpm燃油系统电子燃油喷射式理论油耗 6.0 升排放标准欧Ⅳ标准转向 悬挂 轮胎驱动方式前置前驱制动方式碟/碟转向助力助力转向式悬挂方式双横臂式独立前悬架带横向稳定杆/E型多连杆式独立后悬架带横向稳定杆(前/后)轮胎205/55R16 91V通过性CPU型号148 mm配置外观内饰电动车窗,带防夹功能车窗,铝合金轮圈,电动外后视镜驾驶员侧带广角镜,整体式无骨雨刷,机织布面料座椅,卤素前大灯,真皮方向盘,驾驶席座椅可调腰部支撑,单碟CD播放机,扬声器数量 4个,AM/FM收音机舒适性自动恒温空调,电子防眩目智慧型内后视镜(带指南针及倒车雷达显示),高度角度可调式转向柱,感速型齿轮齿条式动力转向系统,驾驶员信息显示(中央信息显示屏内),六方向手动调节驾驶员座椅,四方向手动调节副驾驶员座椅,车外温度显示安全防盗驾驶座安全气囊,副驾驶座安全气囊,电子防盗及防盗报警,安全带未系警报,智能行车自动落锁,按键式解锁功能,倒车雷达(带声音报警及距离显示),ABS防抱死制动系统,EBD电子制动力分配系统,EBA紧急制动辅助系统1.3. 新闻 资讯太平洋汽车网 - 2010年07月10日博达奔腾7月10日大型团购会启动在即!奔腾B70 凭借舒适的驾乘感受、卓越的安全性和出色的产品品质赢得了众多消费者的青睐,被誉为“中高级轿车超值首选”。
延续辉煌 再战征程 一汽丰田2010年目标销量50万

易” 信用卡贷款购车项 目, 为消费者开辟 了
一
条 轻松 购 车 的渠 道; 外 , ・ 田还 联 此 汽丰
合保 险 公 司将 品牌 保 险项 目从 深 圳推 广 至 全 国七 大 重 点城 市 ,为 更 多客 户 带去 _久 ) 心 、便 捷 的专 业化 、标 准化 汽车 保 险服 务 。
延 续辉 煌 再 战征 程
一
汽丰 田 2 年 目标销 量 5 0 1 0 O
日前 , 汽丰 田汽 车 销 售 有 限公 司正 一
精准 营销
一
决胜 品质
服务。 在金 融 及保 险业 务 方面 , ・ 丰 田联 汽 合 招商 银 行 针 对旗 下 主 力 车 型开 展 “ 购 车
式对外发布 2 0 年各项业绩及 2 1 年销 09 00 售 目标 。 0 9 , 2 0 年 一汽丰 田累计销量4 3 47 辆 ,同比增长 2 %,再 创历史新 高;2 1 6 00
年 1标 销 量 5 7 0万辆 ,新 峰 在 望 。
精 准营 销是 一汽丰 田向来所长 , 它为 汽丰 田系列高品质商品锦上添花。 0 9 2 0
年 ,一 汽 丰 田开 展 了卡 罗 拉 “ 庭 运 动 家 会 ” 锐 志 “ 移 归来 ”威 驰 “ 尚P ry 、 、 漂 、 时 at ”
制造材料 , 排放符合中国最高的标 准要求 , 并率先推出 了先进的混合动力技术环保车
型 普锐 斯 , 从 20 年 开 始 , 展 了 “ en 更 09 开 Gr e
1月 , 2 一汽丰田旗舰车 型全新 皇冠 震 撼上市 ,豪华革新 ” “ 的商品魅 力震撼高端
车 市 ,1 份新 皇冠 更以 6 0 辆 的销 量 突 月 40 破 了以 往 皇 冠 的 销 售记 录 , 国高 级 车 市 中 由此 重 新 洗 牌 。 至 此 ,一 汽 丰 田 已形 成 了 涵盖 轿 车 、 S UV、 市 s 城 UV、 多用 途 公商 务豪 华 用 车
奥迪Q5 常见问题汇总解答
关于奥迪Q5的介绍1,奥迪Q5有些什么型号呢?答:奥迪Q5现在分为进口,2010款国产跟2011款国产。
详细的分为:进口:2010款3.2 越野版2010款3.2 运动版2010款2.0TSI 越野版2010款2.0TSI 运动版2010款国产:2010款2.0TSI 进取型2010款2.0TSI 技术型2010款2.0TSI 舒适型2010款2.0TSI 豪华型2011款国产:2011款2.0TSI 进取型2011款2.0TSI 技术型2011款2.0TSI 舒适型2011款2.0TSI 动感型2011款2.0TSI 豪华型2,从现有的数据上,为什么2011款的长和宽都比别的型号要大?答:这是因为2011款的豪华版,增加了侧踏板和前后护板等包围,所以尺寸要比其他型号大。
3,关于新款的8速变速箱跟旧款的7速变速箱,哪款更好呢?答:我个人认为,不能单纯的说哪一款好哪一款差,毕竟存在即合理,就经济性,舒适性来说,8速占优势,就先进性,操控性,7速双离合占优势,新款8速AT变速器,加速快,省油,而且能承受更高的扭矩,而老款的7速双离合换挡快,传动高效,所以,对于这个非常有争议的话题,我觉得,根据这两款变速器的特点,如果喜欢运动型,追求快感的朋友,可以选择7速双离合,如果喜欢平稳,追求顺滑的朋友,可以选择8AT变速器。
4,进口跟国产有什么不同呢?答:这次Q5引进国产以后,并没有做加长处理,所以国产在外形尺寸上,跟进口的是一模一样,差别在于前包围跟后包围的不同,中网的不同,雾灯的不同,轮眉的不同,基本上区别都在外观上,而内饰上,进口跟国产内饰在做工上有区别,进口的材质优于国产,对了,3.2的进口,跟国产还有发动机的区别。
5,国产跟进口的发动机有什么区别?答:国产跟进口的发动机区别在于中冷器,发动机的冷却方式都是水冷系统,涡轮的冷却方式也是水冷,但是中冷器的冷却方式,进口的是水冷,国产的是风冷。
6,怎么区分国产的4款车型呢?答,从外观上区别,最明显的标志,就是轮毂,进取为17寸6幅铸铝轮毂,技术为6辐抛物线的18寸铸铝轮毂,舒适是10辐V型的18寸铸铝轮毂,豪华为10幅19寸的铸铝轮毂,新出的动感是5辐的19寸铸铝轮毂。
KD1000系列加速度计

一、概述KD1000系列压电式加速度传感器(下称加速度计),可广泛用于航空航天、国防军工、冶金机械、车辆运输、桥梁船舶、土木建筑、教学实验等方面的振动与冲击测量,它具有频响宽,灵敏度高、横向灵敏度小和抗外界干扰能力强的优点。
加速度计由底座、质量块、敏感元件和外壳组成。
加速度传感器的作用是与电荷放大器配套,真实复原被测信号。
工作原理是利用压电陶瓷的压电效应而制造出的一种机电换能产品。
注:5位数传感器为电压灵敏度≥10V,电荷灵敏度>1万pC二、参数说明及工作原理1.电荷灵敏度加速度计一般采用PZT压电陶瓷材料,利用晶体材料在承受一定方向的应力或形变时,其极化面会产生与应力相应的电荷,压电元件表面产生的电荷正比于作用力,因此有Q=d F其中,Q为电荷量,d为压电元件的压电常数,F为作用力。
加速度计的电荷灵敏度则是加速度计输出的电荷量与其输入的加速度值之比。
电荷量的单位取pC,加速度单位为m/s2。
(1g=9.8m/s2)2.电压灵敏度如果要换算加速度计的电压灵敏度,则可用下面公式得到SqSa = (v/ms-2)CaSq为电荷灵敏度,单位pC/ms-2;Ca为电容量,单位pF。
Sa电压灵敏度单位V。
3.频率响应(1)谐振频率,为加速度计安装时的共振频率,随产品附有谐振频率曲线(低频传感器不附图)。
(2)频率响应一般采用谐振频率的1/3—1/5。
加速度计频响在1/3谐振频率时,频响与参考灵敏度偏差≤1dB,(误差<10%)。
频响在1/5谐振频率时,频响与参考灵敏度≤ 0.5dB(误差<5%)。
我公司传感器频响均以1/3谐振频率计算。
4.最大横向灵敏度比加速度计受到垂直于安装轴线的振动时,仍有信号输出,即垂直于轴线的加速度灵敏度与轴线加速度之比称横向灵敏度。
5. 电荷输出的压电式加速度计配合电荷放大器,其系统的低频响应下限主要取决于放大器的频响。
三、安装技术及注意事项(一)安装方式用加速度计进行测量,为使数据准确和使用方便,可使用多种方法安装,现介绍几种供选用。
德尔优派5070小型机设置和规格说明书

Dell OptiPlex 5070 Small Form Factor Setup and SpecificationsNotes, cautions, and warningsNOTE: A NOTE indicates important information that helps you make better use of your product.CAUTION: A CAUTION indicates either potential damage to hardware or loss of data and tells you how to avoid the problem.WARNING: A WARNING indicates a potential for property damage, personal injury, or death.© 2019 Dell Inc. or its subsidiaries. All rights reserved. Dell, EMC, and other trademarks are trademarks of Dell Inc. or its subsidiaries. Other trademarks may be trademarks of their respective owners.2019 - 06Rev. A001 Set up your computer (5)2 Chassis (7)Front view (7)3 System specifications (8)Chipset (8)Processor (8)Memory (11)Intel Optane Memory (11)Operating system (12)Storage (13)System board connectors (14)External ports and connectors (14)Graphics and Video Controller (15)Communications—Wireless (16)Audio and speakers (16)Input devices (17)Regulatory and environmental compliance (17)4 System setup (19)Boot menu (19)Navigation keys (19)System setup options (20)General options (20)System information (21)Video screen options (22)Security (22)Secure boot options (23)Intel Software Guard Extensions options (24)Performance (25)Power management (25)Post behavior (26)Manageability (27)Virtualization support (27)Wireless options (28)Maintenance (28)System logs (28)Advanced configuration (29)Updating the BIOS in Windows (29)Updating BIOS on systems with BitLocker enabled (29)Updating your system BIOS using a USB flash drive (30)Updating the Dell BIOS in Linux and Ubuntu environments (30)Contents3Flashing the BIOS from the F12 One-Time boot menu (30)System and setup password (33)Assigning a system setup password (34)Deleting or changing an existing system setup password (34)5 Software (35)Downloading drivers (35)System device drivers (35)Serial IO driver (35)Security drivers (35)USB drivers (36)Network adapter drivers (36)Realtek Audio (36)Storage controller (36)6 Getting help (37)Contacting Dell (37)4ContentsSet up your computer1 Connect the keyboard and mouse.2 Connect to your network using a cable, or connect to a wireless network.3Connect the display.NOTE: If you ordered your computer with a discrete graphics card, the HDMI and the display ports on the back panel ofyour computer are covered. Connect the display to the discrete graphics card.4 Connect the power cable.5 Press the power button.6Follow the instructions on the screen to finish Windows setup:aConnect to a network.bSign-in to your Microsoft account or create a new account.7 Locate Dell apps.1Set up your computer 5Table 1. Locate Dell appsRegister your computerDell Help & SupportSupportAssist — Check and update your computer 6Set up your computerChassisThis chapter illustrates the multiple chassis views along with the ports and connectors and also explains the FN hot key combinations. Front view1Optical drive (optional)2Power button and power light3Hard drive activity light4Memory card reader (optional)5Headset/Universal audio jack port6USB 2.0 port with PowerShare7USB 2.0 port8USB 3.1 Gen 2 T ype-C port with PowerShare9USB 3.1 Gen 1 portChassis7System specifications NOTE: Offerings may vary by region. The following specifications are only those required by law to ship with your computer. Formore information about the configuration of your computer, go to Help and Support in your Windows operating system and select the option to view information about your computer.Topics:•Chipset•Memory•Intel Optane Memory•Operating system•Storage•System board connectors•External ports and connectors•Graphics and Video Controller•Communications—Wireless•Audio and speakers•Input devices•Regulatory and environmental complianceChipsetT able 2. ChipsetProcessorNOTE: Global Standard Products (GSP) are a subset of Dell’s relationship products that are managed for availability andsynchronized transitions on a worldwide basis. They ensure the same platform is available for purchase globally. This allows customers to reduce the number of configurations managed on a worldwide basis, thereby reducing their costs. They also enable companies to implement global IT standards by locking in specific product configurations worldwide.8System specificationsDevice Guard (DG) and Credential Guard (CG) are the new security features that are only available on Windows 10 Enterprise today.Device Guard is a combination of enterprise-related hardware and software security features that, when configured together, will lock a device down so that it can only run trusted applications. If it is not a trusted application, it cannot run.Credential Guard uses virtualization-based security to isolate secrets (credentials) so that only privileged system software can access them. Unauthorized access to these secrets can lead to credential theft attacks. Credential Guard prevents these attacks by protecting NTLMpassword hashes and Kerberos Ticket Granting TicketsNOTE: Processor numbers are not a measure of performance. Processor availability subject to change and may vary by region/country.NOTE: These are available offline only.T able 3. ProcessorSystem specifications 9T able 4. Processor10System specificationsMemoryNOTE: Memory modules should be installed in pairs of matched memory size, speed, and technology. If the memory modules arenot installed in matched pairs, the computer will continue to operate, but with a slight reduction in performance. The entire memory range is available to 64-bit operating systems.T able 5. MemoryIntel Optane MemoryNOTE: Intel Optane memory cannot replace DRAM entirely. However, these two memory technologies complement each otherwithin the PC.T able 6. M.2 16 GB Intel OptaneSystem specifications11Operating system This topic lists the operating system supported by T able 7. Operating system12System specificationsStorageT able 8. StorageSystem specifications1312.5 Inch Solid State Drives are only available as a secondary storage option and can only be paired with a M.2 Solid State Drive as the Primary Storage Device.System board connectorsNOTE: See Detailed Engineering Specifications for maximum card dimensions.T able 9. System board connectors1 PCIe x16 Slots (Support Standard Rev 3.0)2 PCIe x16 (wired x 4), PCIe x1 Slots, M.2 Slot (Support Standard Rev 3.0)3 Serial ATA (T ower/Small Form Factor support one Gen2 port for ODD and the rest of the ports support Gen3)4 M.2 Socket3: Support SATA & PCIe interface5 M.2 Socket1: Support Intel CNVi or USB2.0/PCIeExternal ports and connectorsNOTE: T ower supports Full Height (FH) cards and Small Form Factor supports Low Profile (LP) cards. See chassis diagramssection for port/connector locations.T able 10. External ports and connectors14System specificationsGraphics and Video ControllerNOTE: T ower supports Full Height (FH) cards and Small Form Factor supports low profile (LP) cards.T able 11. Graphics and Video ControllerSystem specifications 15Communications—Wireless T able 12. Communications—WirelessAudio and speakersT able 13. Audio and speakers16System specificationsInput devicesT able 14. Input devicesRegulatory and environmental complianceProduct related conformity assessment and regulatory authorizations including Product Safety, Electromagnetic Compatibility (EMC), Ergonomics, and Communication Devices relevant to this product may be viewed at /regulatory_compliance. The Regulatory Datasheet for this product is located at /regulatory_compliance.Details of Dell's environmental stewardship program to conserve product energy consumption, reduce or eliminate materials for disposal, prolong product life span and provide effective and convenient equipment recovery solutions may be viewed at /environment. Product related conformity assessment, regulatory authorizations, and information encompassing Environmental, Energy Consumption, Noise Emissions, Product Materials Information, Packaging, Batteries, and Recycling relevant to this product may be viewed by clicking the Design for Environment link on the webpage.T able 15. Regulatory/Environmental CertificationsSystem specifications1718System specificationsSystem setupSystem setup enables you to manage your hardware and specify BIOS level options. From the System setup, you can:•Change the NVRAM settings after you add or remove hardware •View the system hardware configuration •Enable or disable integrated devices•Set performance and power management thresholds •Manage your computer securityTopics:•Boot menu •Navigation keys •System setup options•Updating the BIOS in Windows •System and setup passwordBoot menuPress <F12> when the Dell logo appears to initiate a one-time boot menu with a list of the valid boot devices for the system. Diagnostics and BIOS Setup options are also included in this menu. The devices listed on the boot menu depend on the bootable devices in the system. This menu is useful when you are attempting to boot to a particular device or to bring up the diagnostics for the system. Using the boot menu does not make any changes to the boot order stored in the BIOS.The options are:•UEFI Boot:–Windows Boot Manager ••Other Options:–BIOS Setup –BIOS Flash Update –Diagnostics–Change Boot Mode SettingsNavigation keysNOTE: For most of the System Setup options, changes that you make are recorded but do not take effect until you restart the system.KeysNavigationUp arrow Moves to the previous field.Down arrow Moves to the next field.EnterSelects a value in the selected field (if applicable) or follow the link in the field.4System setup 19Keys NavigationSpacebar Expands or collapses a drop-down list, if applicable.T ab Moves to the next focus area.Esc Moves to the previous page until you view the main screen. Pressing Esc in the main screen displays a message that prompts you to save any unsaved changes and restarts the system.System setup optionsNOTE: Depending on the and its installed devices, the items listed in this section may or may not appear.General optionsT able 16. General.20System setupSystem informationVideo screen options T able 18. VideoSecurityT able 19. SecuritySecure boot options T able 20. Secure BootIntel Software Guard Extensions options T able 21. Intel Software Guard ExtensionsPerformanceT able 22. PerformancePower management T able 23. Power ManagementPost behaviorManageabilityT able 25. ManageabilityVirtualization support T able 26. Virtualization SupportWireless options T able 27. WirelessMaintenanceT able 28. MaintenanceSystem logsT able 29. System LogsAdvanced configurationT able 30. Advanced configurationUpdating the BIOS in WindowsIt is recommended to update your BIOS (System Setup), when you replace the system board or if an update is available.NOTE: If BitLocker is enabled, it must be suspended prior to updating the system BIOS, and then re-enabled after the BIOSupdate is completed.1 Restart the computer.2 Go to /support.•Enter the Service Tag or Express Service Code and click Submit.•Click Detect Product and follow the instructions on screen.3 If you are unable to detect or find the Service T ag, click Choose from all products.4 Choose the Products category from the list.NOTE: Choose the appropriate category to reach the product page5 Select your computer model and the Product Support page of your computer appears.6 Click Get drivers and click Drivers and Downloads.The Drivers and Downloads section opens.7 Click Find it myself.8 Click BIOS to view the BIOS versions.9 Identify the latest BIOS file and click Download.10 Select your preferred download method in the Please select your download method below window, click Download File.The File Download window appears.11 Click Save to save the file on your computer.12 Click Run to install the updated BIOS settings on your computer.Follow the instructions on the screen.Updating BIOS on systems with BitLocker enabled CAUTION: If BitLocker is not suspended before updating the BIOS, the next time you reboot the system it will not recognize the BitLocker key. You will then be prompted to enter the recovery key to progress and the system will ask for this on each reboot. If the recovery key is not known this can result in data loss or an unnecessary operating system re-install. For more information on this subject, see Knowledge Article: https:///support/article/sln153694Updating your system BIOS using a USB flash driveIf the system cannot load into Windows but there is still a need to update the BIOS, download the BIOS file using another system and save it to a bootable USB Flash Drive.NOTE: You will need to use a bootable USB Flash drive. Please refer to the following article for further details: https:///support/article/us/en/19/sln143196/1 Download the BIOS update .EXE file to another system.2 Copy the file e.g. O9010A12.EXE onto the bootable USB Flash drive.3 Insert the USB Flash drive into the system that requires the BIOS update.4 Restart the system and press F12 when the Dell Splash logo appears to display the One Time Boot Menu.5 Using arrow keys, select USB Storage Device and click Return.6 The system will boot to a Diag C:\> prompt.7 Run the file by typing the full filename e.g. O9010A12.exe and press Return.8 The BIOS Update Utility will load, follow the instructions on screen.Figure 1. DOS BIOS Update ScreenUpdating the Dell BIOS in Linux and Ubuntu environmentsIf you want to update the system BIOS in a Linux environment such as Ubuntu, see https:///support/article/us/en/19/sln171755/.Flashing the BIOS from the F12 One-Time boot menuUpdating your system BIOS using a BIOS update .exe file copied to a FAT32 USB key and booting from the F12 one time boot menu. BIOS UpdateYou can run the BIOS update file from Windows using a bootable USB key or you can also update the BIOS from the F12 One-Time boot menu on the system.Most Dell systems built after 2012 have this capability and you can confirm by booting your system to the F12 One-Time Boot Menu to see if BIOS FLASH UPDATE is listed as a boot option for your system. If the option is listed, then the BIOS supports this BIOS update option.NOTE: Only systems with BIOS Flash Update option in the F12 One-Time Boot Menu can use this function.Updating from the One-Time Boot MenuTo update your BIOS from the F12 One-Time boot menu, you will need:•USB key formatted to the FAT32 file system (key does not have to be bootable)•BIOS executable file that you downloaded from the Dell Support website and copied to the root of the USB key•AC power adapter connected to the system•Functional system battery to flash the BIOSPerform the following steps to execute the BIOS update flash process from the F12 menu:CAUTION: Do not power off the system during the BIOS update process. Powering off the system could make the system fail to boot.1 From a power off state, insert the USB key where you copied the flash into a USB port of the system .2 Power on the system and press the F12 key to access the One-Time Boot Menu, Highlight BIOS Update using the mouse or arrowkeys then press Enter.3 The Bios flash menu will open then click the Flash from file.System setup314 Select external USB device32System setup6 Click the Update BIOS then system will reboot to flash the BIOS.7 Once complete, the system will reboot and the BIOS update process is completed.System and setup passwordT able 31. System and setup passwordYou can create a system password and a setup password to secure your computer.CAUTION: The password features provide a basic level of security for the data on your computer.System setup33CAUTION: Anyone can access the data stored on your computer if it is not locked and left unattended.NOTE: System and setup password feature is disabled.Assigning a system setup passwordYou can assign a new System or Admin Password only when the status is in Not Set.T o enter the system setup, press F2 immediately after a power-on or re-boot.1 In the System BIOS or System Setup screen, select Security and press Enter.The Security screen is displayed.2 Select System/Admin Password and create a password in the Enter the new password field.Use the following guidelines to assign the system password:• A password can have up to 32 characters.•The password can contain the numbers 0 through 9.•Only lower case letters are valid, upper case letters are not allowed.•Only the following special characters are allowed: space, (”), (+), (,), (-), (.), (/), (;), ([), (\), (]), (`).3 Type the system password that you entered earlier in the Confirm new password field and click OK.4 Press Esc and a message prompts you to save the changes.5 Press Y to save the changes.The computer reboots.Deleting or changing an existing system setup passwordEnsure that the Password Status is Unlocked (in the System Setup) before attempting to delete or change the existing System and/or Setup password. You cannot delete or change an existing System or Setup password, if the Password Status is Locked.To enter the System Setup, press F2 immediately after a power-on or reboot.1 In the System BIOS or System Setup screen, select System Security and press Enter.The System Security screen is displayed.2 In the System Security screen, verify that Password Status is Unlocked.3 Select System Password, alter or delete the existing system password and press Enter or T ab.4 Select Setup Password, alter or delete the existing setup password and press Enter or T ab.NOTE: If you change the System and/or Setup password, re-enter the new password when prompted. If you delete the System and/or Setup password, confirm the deletion when prompted.5 Press Esc and a message prompts you to save the changes.6 Press Y to save the changes and exit from System Setup.The computer reboot.34System setupSoftwareThis chapter details the supported operating systems along with instructions on how to install the drivers.Downloading drivers1 Turn on the .2 Go to /support .3 Click Product Support , enter the Service T ag of your , and then click Submit .NOTE: If you do not have the Service Tag, use the auto detect feature or manually browse for your model.4 Click Drivers and Downloads .5 Select the operating system installed on your .6 Scroll down the page and select the driver to install.7 Click Download File to download the driver for your .8 After the download is complete, navigate to the folder where you saved the driver file.9 Double-click the driver file icon and follow the instructions on the screen.System device driversVerify if the system device drivers are already installed in the system.Serial IO driverVerify if the drivers for Touchpad, IR camera, and keyboard and are installed.Figure 2. Serial IO driverSecurity driversVerify if the security drivers are already installed in the system.5Software 35USB driversVerify if the USB drivers are already installed in the computer.Network adapter driversVerify if the Network adapter drivers are already installed in the system. Realtek AudioVerify if audio drivers are already installed in the computer.Storage controllerVerify if the storage control drivers are already installed in the system.36SoftwareGetting helpContacting DellNOTE: If you do not have an active Internet connection, you can find contact information on your purchase invoice, packing slip, bill, or Dell product catalog.Dell provides several online and telephone-based support and service options. Availability varies by country and product, and some services may not be available in your area. T o contact Dell for sales, technical support, or customer service issues:1Go to /support.2Select your support category.3Verify your country or region in the Choose a Country/Region drop-down list at the bottom of the page.4 Select the appropriate service or support link based on your need.6Getting help 37。
(整理)YTC定位器中文版样本.

●智能阀门定位器●电- 气阀门定位器●气 - 气阀门定位器●空气过濾减压阀●气动放大器●气锁阀●气控换向阀●电磁阀●阀位变送器●限位开关目录Young Tech Co., Ltd. Rev.C0804公司历史 3认证书4,5产品目录智能阀门定位器 6 YT-2300系列(本安型)7YT-2350系列(不锈钢型)8YT-2301L(直行程远传型)9YT-2301R(角行程远传型)10 YT-2400系列(隔爆型)11 YT-2500系列(断信号保位型)电-气阀门定位器12 YT-1300系列(电子式)直行程 13 YT-1000L角行程14 YT-1000R(标准型)15 YT-1000R(圆顶指示器)16 YT-1000R + 阀位变送器(内置型)17 YT-1000R + 阀位变送器(外置型)18 YT-1000R + 限位开关(内置型)19 YT-1000R + 限位开关(外置型)20 YT-1000R + 阀位变送器+ 限位开关(内置型)21 YT-1000R + 阀位变送器+ 限位开关(外置型)气-气阀门定位器直行程22 YT-1200L角行程23 YT-1200R空气过濾减压阀24 YT-200, YT-205气动放大器25 YT-300,YT-305, YT-310, YT-315,YT-320气锁阀26 YT-400, YT-405气控换向阀27 YT-500,YT-505, YT-510, YT-515电磁阀28 YT-700阀位变送器29 PTM-5VL,R(本安型)30 PTM-6VL,R(隔爆型)31PTM-6VR + 限位开关(隔爆型)限位开关32 YT-85033 YT-860(隔爆型)支架,反馈杆 34351996.01 成立YoungTech co.,Ltd. 1996.05 生产电-气阀门定位器YT-1000L,R 1996.08 生产空气过濾减压阀YT-200 ,220 1997.07 生产气动放大器 YT-3001997.12 生产气-气阀门定位器YT-1200L,R 1998.02 生产阀位变送器 PTM-5L,R1998.08 电-气阀门定位器YT-1000L,R 获得CE 证书 1999.04 生产智能阀门定位器 YT-2000L,R 1999.06 生产气动放大器YT-3101999.10 电-气阀门定位器YT-1000L,R 获得EM 证书(韩国政府颁发) 2000.01 获得ISO 9001认证2000.04 获得风险投资企业认证 (韩国政府颁发) 2000.07 生产气锁阀YT-4002000.11 生产气控换向阀YT-500,510 2001.01 生产阀位变送器PTM-6L, R 2001.05 建新工厂2001.08 电-气阀门定位器YT-1000L,R 获得KEMA EExmdIIBT4防爆等级证书 2001.11 电磁阀YT-700,710,720 获得ExdIICT6防爆等级证书2002.02 OEM 生产日本本山(Motoyama )公司的EA91,EA90型电气阀门定位器 2002.05 加入HART 协会2002.07 获得出口有望中小型企业证书(韩国政府颁发) 2002.09 生产不锈钢型空气过滤减压阀YT-205 2003.02 升级为ISO 9001:20002003.10 电-气阀门定位器YT-1000L,R 获得ATEX EEx dm IIB T5防爆等级证书 2003.11 生产智能阀门定位器YT-2003系列 2004.01 设立研究所2004.01 生产阀位变送器PTM-5V,PTM-6V 系列 2004.11 生产智能阀门定位器YT-2400系列2005.01 电-气阀们定位器YT-1000系列获得CSA Ex md IIB T5防爆等级证书 2005.01 电-气阀们定位器YT-1000L 系列获得日本JIS IIB T5防爆等级证书 2005.01 生产电子式阀门定位器YT-1300系列2005.08 生产不锈钢智能阀门定位器YT-1350系列和电子式阀门定位器YT-1350系列 2005.09 获得韩国水利核电站供货资质。
- 1、下载文档前请自行甄别文档内容的完整性,平台不提供额外的编辑、内容补充、找答案等附加服务。
- 2、"仅部分预览"的文档,不可在线预览部分如存在完整性等问题,可反馈申请退款(可完整预览的文档不适用该条件!)。
- 3、如文档侵犯您的权益,请联系客服反馈,我们会尽快为您处理(人工客服工作时间:9:00-18:30)。
龙源期刊网
2010年呼和浩特市中考分招比重达50%
作者:
来源:《内蒙古教育·基础教育综合版》2010年第06期
呼和浩特市教育局召开2010年呼和浩特市中考报名暨考务工作会议,对今年中考招生工作进行了具体安排。
据了解,今年市区公办普通高中计划招生8145人,民办2160人;市区公办职业高中(中专)计划招生7450人,民办11146人,市区参加中考人数为17000人左右。
今年呼和浩特市中考招生主要呈现以下七大变化。
一是分招名额加大。
以往呼和浩特市的分招是市区五所示范性高中各安排1个班用于扶持本市的薄弱初中学校,而今年是市区六所自治区示范性高中,按照招生计划50%对市内初中学校学生进行“分招”,统招和分招比例各占一半。
二是分招名额分配有所变化。
前几年分招政策是将分招名额分配给市区的部分薄弱初中学校,一些初中学校不享受分招指标。
而今年是市四区所有的公办初中学校均分“分招”名额。
“分招”名额计算公式为:某初中学校所得某示范高中学校的“分招”名额=该初中享有“分招”资格学生数×(某示范高中“分招”学生数÷全市享有“分招”资格的学生数)。
如:实验中学所得二中“分招”名额=665×(360÷6316)=37.9=38(实验中学符合分招条件的人数为665人,二中“分招”人数为360人,全市享有“分招”资格的学生数共6316人。
)
三是分招享受资格有变化,前几年享受分招资格的考生,必须同时具备城区正居户籍;本校学籍;中途正常转学学生必须在本校就读1年以上(毕业年必须在本校就读)三个条件。
而今年要求为:城区正居户籍;2007年参加电脑派位后注册入学的在籍学生;并在本校就读三年。
四是分招名单公示有变化。
往年分招录取后的考生名单只在考生结业学校公示,今年除在
考生结业学校公示外,还在录取学校进行公示。
五是停止呼和浩特市第十三中学的高中招生。
六是呼和浩特市第二十八中学正式纳入统一招生。
七是体育考试费用调整为11元。
(木尔/辑)。