魔灯固件中英说明
魔灯固件最简单的升级方法
很多朋友见到这么多文件发给他,都是一头雾水,头蒙,该怎么升级,其实很简单,就是把固件复制到卡里,相机内升级固件就可以了。
相机出现绿色英文提示:please restart your camera,关机相机,再开机就好了。
删除键是魔灯的菜单,menu是佳能的菜单。
半按快门退出菜单。
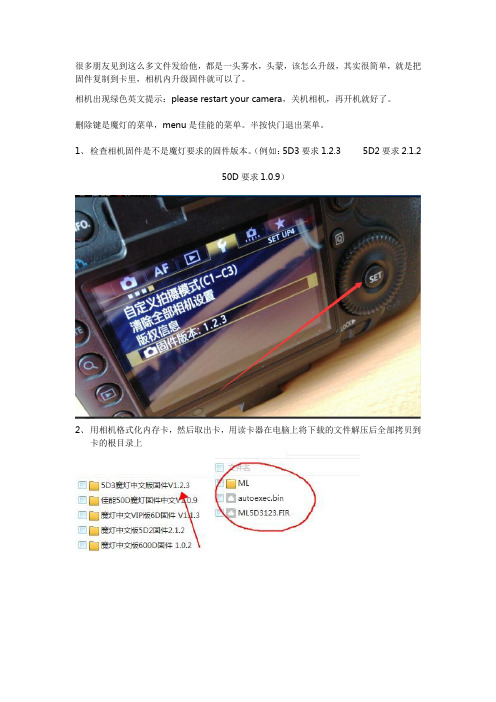
1、检查相机固件是不是魔灯要求的固件版本。
(例如:5D3要求1.2.3 5D2要求2.1.2
50D要求1.0.9)
2、用相机格式化内存卡,然后取出卡,用读卡器在电脑上将下载的文件解压后全部拷贝到
卡的根目录上
3、将卡插入相机,选择固件版本,按SET键,执行固件升级。
大约10秒,出现上图,立即关闭相机电源,必须在倒计时结束前关机相机电源。
打开相机,按删除键,调出ML菜单
5D3高级中文版,要告诉我你的机器码,格尼授权文件以后,才可以使用魔灯菜单
注意事项:相机不开机,按住SET键不松开开机(不加载魔灯固件)。
或者不装卡,重新插上电池就可以开机了,是因为卡里文件不对造成的。
实在开不开机,按住Q键和快门10秒后不松开,再开机!。
Eudemon 100-02-操作手册-系统管理
目录第1章系统维护管理.............................................................................................................1-11.1 系统维护管理介绍.............................................................................................................1-11.2 配置文件管理.....................................................................................................................1-11.2.1 配置文件内容及格式...............................................................................................1-11.2.2 查看防火墙的当前配置和起始配置.........................................................................1-11.2.3 修改和保存当前配置...............................................................................................1-21.2.4 擦除配置文件..........................................................................................................1-21.2.5 配置文件使用..........................................................................................................1-31.3 维护调试............................................................................................................................1-41.3.1 配置防火墙名称和系统时钟....................................................................................1-41.3.2 正则表达式的使用...................................................................................................1-41.3.3 系统状态信息收集...................................................................................................1-71.3.4 网络连接的测试工具...............................................................................................1-71.3.5 系统调试功能..........................................................................................................1-91.4 补丁软件升级...................................................................................................................1-111.4.1 补丁软件升级........................................................................................................1-111.5 信息中心功能...................................................................................................................1-121.5.1 信息中心简介........................................................................................................1-121.5.2 信息中心配置........................................................................................................1-121.5.3 显示终端的配置....................................................................................................1-171.5.4 信息中心配置举例.................................................................................................1-171.6 日志维护..........................................................................................................................1-191.6.1 日志简介...............................................................................................................1-191.6.2 Syslog日志配置.....................................................................................................1-201.6.3 二进制流日志配置.................................................................................................1-221.6.4 日志显示与调试....................................................................................................1-231.6.5 日志典型配置举例.................................................................................................1-231.7 VPN Manager适配...........................................................................................................1-261.7.1 VPN Manager简介................................................................................................1-261.7.2 Eudemon防火墙上的VPN Manager适配...............................................................1-27第2章文件管理.....................................................................................................................2-12.1 文件系统............................................................................................................................2-12.1.1 文件系统简介..........................................................................................................2-12.1.2 目录操作.................................................................................................................2-12.1.3 文件操作.................................................................................................................2-12.1.4 存储设备操作..........................................................................................................2-22.1.5 文件系统提示方式...................................................................................................2-22.1.6 文件系统使用举例...................................................................................................2-22.2 FTP配置.............................................................................................................................2-32.2.1 FTP简介..................................................................................................................2-32.2.2 FTP服务器配置........................................................................................................2-42.2.3 FTP服务器的显示和调试.........................................................................................2-52.2.4 FTP连接典型举例....................................................................................................2-52.3 TFTP配置...........................................................................................................................2-92.3.1 TFTP简介................................................................................................................2-92.3.2 TFTP协议配置.........................................................................................................2-92.4 XModem协议配置............................................................................................................2-102.4.1 XModem协议简介..................................................................................................2-102.4.2 XModem协议配置..................................................................................................2-11第3章 NTP配置.....................................................................................................................3-13.1 NTP协议简介.....................................................................................................................3-13.2 NTP协议配置.....................................................................................................................3-23.2.1 配置NTP工作模式...................................................................................................3-23.2.2 配置NTP身份验证功能...........................................................................................3-63.2.3 配置NTP验证密钥...................................................................................................3-63.2.4 配置指定密钥是可信的...........................................................................................3-73.2.5 配置本地发送NTP消息的接口.................................................................................3-73.2.6 配置NTP主时钟......................................................................................................3-73.2.7 配置禁止/允许接口接收NTP消息............................................................................3-83.2.8 配置对本地防火墙服务的访问控制权限..................................................................3-83.2.9 配置本地允许建立的sessions数目..........................................................................3-93.3 NTP显示与调试..................................................................................................................3-93.4 NTP典型配置举例............................................................................................................3-103.4.1 配置NTP服务器....................................................................................................3-103.4.2 配置NTP对等体举例.............................................................................................3-123.4.3 配置NTP广播模式.................................................................................................3-133.4.4 配置NTP组播模式.................................................................................................3-153.4.5 配置带身份验证的NTP服务器模式.......................................................................3-16第4章 SNMP配置.................................................................................................................4-14.1 协议简介............................................................................................................................4-14.1.1 SNMP协议介绍........................................................................................................4-14.1.2 SNMP版本及支持的MIB..........................................................................................4-14.2 SNMP配置.........................................................................................................................4-34.2.1 启动或关闭SNMP Agent服务.................................................................................4-34.2.2 使能或禁止SNMP协议的相应版本..........................................................................4-34.2.3 配置团体名(Community Name).........................................................................4-44.2.4 配置/删除SNMP组..................................................................................................4-44.2.5 添加/删除用户.........................................................................................................4-54.2.6 配置管理员的标识及联系方法(sysContact).......................................................4-54.2.7 允许/禁止发送Trap报文..........................................................................................4-64.2.8 配置本地设备的引擎ID...........................................................................................4-64.2.9 配置Trap目标主机的地址........................................................................................4-74.2.10 配置防火墙位置(sysLocation)..........................................................................4-74.2.11 指定发送Trap的源地址.........................................................................................4-74.2.12 视图信息配置........................................................................................................4-84.2.13 配置消息包的最大值.............................................................................................4-84.2.14 配置Trap报文的消息队列的长度...........................................................................4-84.2.15 配置Trap报文的保存时间......................................................................................4-94.3 SNMP显示和调试...............................................................................................................4-94.4 SNMP典型配置举例.........................................................................................................4-10第5章 RMON配置.................................................................................................................5-15.1 RMON简介.........................................................................................................................5-15.2 RMON配置.........................................................................................................................5-35.2.1 使能/禁止RMON接口统计.......................................................................................5-35.2.2 统计表的配置..........................................................................................................5-35.2.3 历史控制表的配置...................................................................................................5-45.2.4 事件表的配置..........................................................................................................5-45.2.5 告警表的配置..........................................................................................................5-55.2.6 扩展告警表的配置...................................................................................................5-55.3 RMON显示和调试..............................................................................................................5-65.4 RMON典型配置举例..........................................................................................................5-75.5 RMON故障诊断与排除.....................................................................................................5-10第6章 RMON2配置..............................................................................................................6-16.1 RMON2简介......................................................................................................................6-16.2 RMON2配置......................................................................................................................6-16.2.1 协议目录表的配置...................................................................................................6-16.2.2 主机控制表的配置...................................................................................................6-36.3 RMON2显示和调试...........................................................................................................6-46.4 RMON2典型配置举例.......................................................................................................6-56.5 RMON2故障诊断与排除....................................................................................................6-7第1章系统维护管理1.1 系统维护管理介绍系统维护管理主要包括以下几项内容:z配置文件管理z系统状态信息的收集和维护调试简单工具的使用z补丁软件升级z系统信息中心的维护管理z日志的维护和管理1.2 配置文件管理1.2.1 配置文件内容及格式配置文件为一文本文件,其格式如下:z以命令格式保存。
Silicon Labs Bluetooth Mesh 灯具示例说明书

QSG148: Getting Started with the Silicon Labs Bluetooth® Mesh Lighting Demonstration in SDK 1.xThis document provides step-by-step instructions to demonstratea basic Bluetooth mesh network. In this demo, three Wireless Starter Kit (WSTK)-based devices are provisioned as two Lights and one Switch. The mobile application allows the control of ei-ther the group of Lights or an individual Light. By pressing but-tons on the Switch device, you can control the ON/OFF states and brightness for all lights in the same group. The demo is open-sourced and provides a good demonstration of a basic Bluetooth mesh network.The Bluetooth Mesh mobile app is intended to demonstrate the Silicon Labs Bluetooth Mesh technology together with the Bluetooth Mesh SDK sample apps. The mobile app is a reference app for the Bluetooth Mesh mobile ADK but it should not be taken as a starting point for customers to create their own mobile apps. For guidance on creating mobile apps with the Bluetooth Mesh mobile ADK, refer to AN1200: Bluetooth® Mesh for iOS and Android ADK.KEY POINTS•Prerequisite for the demo•Hardware set-up of WTSKs •Bluetooth mesh SDK installation in Simplicity Studio•Demo firmware installation •Instructions for provisioning, configuring, and controlling network nodes using the Android smartphone applicationPrerequisites 1. PrerequisitesThe Silicon Labs Bluetooth mesh lighting demonstration is designed to illustrate Bluetooth mesh operation without any need to config-ure or compile software. To get started with the Bluetooth mesh demo, obtain the following.1.1 Order Development KitsThe Blue Gecko Bluetooth SoC Wireless Starter Kit is the easiest and fastest way to start the evaluation and development of your own Bluetooth mesh applications. To get started with the Bluetooth mesh demo, you need to have three (3) EFR32™ WSTK main boards and radio boards. These can be obtained by ordering any of the Wireless Starter Kit options below.Option 1:QTY(3) of PN: SLWSTK6020B kits: /products/development-tools/wireless/bluetooth/blue-gecko-bluetooth-low-energy-soc-starter-kitOption 2:QTY(1) of PN: SLWSTK6000B kit: /products/development-tools/wireless/mesh-networking/mighty-gecko-starter-kitOption 3: QTY(1) of PN: SLWSTK6006A kit: /products/development-tools/wireless/efr32xg21-wireless-starter-kitThis demo requires either EFR32MG21, EFR32BG13, EFR32MG13, EFR32BG12, or EFR32MG12 radio boards. If you already have the WSTK Main Boards, you can purchase the required radio boards here.Note: This document references the boards provided in PN: SLWSTK6020B. The radio board provided in SLWSTK6000B and SLWSTK6006A as well as the radio board mentioned above can be substituted for the EFR32BG13 board referenced in this document.1.2 Download Simplicity StudioGo to: /simplicity-studio to download the latest Simplicity Studio version compatible with your computer’s operat-ing system.1.3 Download Bluetooth Mesh by Silicon Labs Mobile App from iTunes or Google PlayiTunes:https:///us/app/bluetooth-mesh-by-silicon-labs/id1411352948?mt=8Google Play:https:///store/apps/details?id=com.siliconlabs.bluetoothmesh&hl=enNote: The minimum requirement for the smartphone is Android 6 (API23).1.4 Obtaining SupportYou can access the Silicon Labs support portal at https:///support through Simplicity Studio Resources. Click the “Email-Support” link and log in with your self-registered credentials. Use the support portal to contact Customer Support for any ques-tions you might have about the demonstration.2. About the Bluetooth Mesh SDKThe Silicon Labs Bluetooth mesh stack is an advanced Bluetooth mesh protocol stack implementing the Bluetooth mesh standard. It can run alongside the Bluetooth Low Energy (LE) stack, using a common link layer, which allows using LE features in parallel. The Silicon Labs Bluetooth mesh stack is meant for Silicon labs Wireless Gecko SoCs and modules.The Silicon Labs Bluetooth mesh stack provides multiple APIs for the developer to access the Bluetooth mesh functionality. Two modes are supported.1.Standalone mode (also referenced as SoC mode), where both the Bluetooth mesh stack and the application run in a WirelessGecko SoC or module. The application can be developed with the C programming language.work Co-Processor (NCP) mode, where the Bluetooth stack runs in a Wireless Gecko and the application runs on a separatehost MCU. For this use case, the Bluetooth stack can be configured into NCP mode where the API is exposed over a serial inter-face such as UART.2.1 Bluetooth Mesh Stack FeaturesThe features of the Silicon Labs Bluetooth stack are listed in the following table. For details on the features of the Bluetooth Low Ener-gy stack, refer to QSG139: Getting Started with Bluetooth® Software Development.Table 2.1. Bluetooth Mesh Stack FeaturesTable 2.2. Supported Models2.2 Bluetooth Mesh Stack Limitations(1) The node belongs to a single network but the network may have multiple network keys to encrypt the traffic.3. Getting Started3.1 Preparing the WSTKThe layout of the Wireless Starter Kit (WSTK) Main Board with attached EFR32BG13 radio board is shown in the following figure:Figure 3.1. WSTK Main Board with Radio Board Attached1.Connect a Blue Gecko Radio Board to the WSTK Main Board.Use radio board SLWRB4104A EFR32BG13 2.4 GHz (+10 dBm) for this demo experience.2.Connect the WSTK to a PC using the "J-Link USB" connector and the cable provided with the starter kit.3.If not already set, turn the Power switch to "AEM" position.4.Repeat the above steps for the other two kits so all three kits are connected to your computer.Verifying the Setup:1.Check that the blue "USB Connection Indicator" LED (next to “J-Link USB”) turns on or starts blinking.2.Check that the Main Board LCD display turns on and displays a Silicon Labs logo.For more detailed information regarding the Starter Kit, refer to UG279: EFR32BG13 Blue Gecko Bluetooth Starter Kit User's Guide.3.2 Open Simplicity Studio and Install Bluetooth Mesh SDKBluetooth mesh SDK is installed using the Simplicity Studio package manager.1.Open Simplicity Studio and log in using your Silicon Labs account.2.Click the Download Update icon (red/green down arrow under the menu bars), and click Package Manager.3.Go to the SDKs tab to install Bluetooth mesh SDK.4.In the Launcher screen, check if the preferred SDK is “Bluetooth mesh SDK + Platform”. If not, click the link provided to change thepreferred SDK to “Bluetooth mesh SDK + Platform”.You can find more detailed instructions for Simplicity Studio in QSG139: Bluetooth Development with Simplicity Studio.3.3 Install the Demonstration FirmwareWhen the devices are connected to your PC with a USB cable, you can see three devices listed in the Device window in Simplicity Studio. Select the J-link for a device to display demonstrations, examples, and documentation associated with the Bluetooth Mesh SDK.For this demo, you need to flash two devices with BT Mesh – Light Example and one device with BT Mesh – Switch Example.To install the firmware, click the demo. In the Mode drop-down in the next dialog, select Run. Click [Start].3.4 Use the Demo with an Android SmartphoneMake sure that all three devices have the status of “unprovisioned” on the device LCD screen before starting with the application. Open the Bluetooth Mesh App by Silicon Labs on your Android phone.Follow the procedures below to set up and use the demonstration.1.Go to provisioning view and search for unprovisioned devices.2.Select the Bluetooth mesh device you want to provision and configure.3.Enter the descriptive name for the device and the network you want to add it to.Note: The Android application has a pre-generated network and group, but you can add more groups to the application if you like. The network and node database can be erased by long-pressing the network in the main view and by pressing the trash icon.To configure the newly provisioned Bluetooth mesh:1.Right after provisioning the Android application connects the proxy service on the node.2.During configuration select the Bluetooth mesh features (proxy, relay, low power, and friend) that you want to enable.a.Notice that if you disable proxy, the node can no longer be directly accessed over GATT.3.Select the functionality (mesh model) that you want to enable.4.Select the group you want to add the device to.Note: The information view shows the Bluetooth mesh node features, such as Unicast address, UUID, and security keys as well as the supported mesh models. It can be used for debug purposes.To control a Bluetooth mesh node with the Android application:1.Select the network and group you want to control .2.The application will show the available nodes in that group.3.You can control the light:a.Pressing the light bulb icon will send an On/Off message.b.Moving the upper slider will send Light Lightness (dimming) messages.c.Moving the medium and lower sliders will send CTL (temperature and delta UV) messages.d.Pressing [STORE] stores the corresponding scene.4.By going to devices view and either swiping or long-pressing a node you can then either delete or reconfigure the node.Once the Android application has been used to provision a light bulb and a light switch to a network and group, the light switch (WSTK) can also be used to control the light bulb (WSTK) with the PB0 and PB1 buttons.PB0 button:•Short press: Decrease Light Lightness by 10%•Medium press: Decrease CTL (temperature) value•Long press: Send Off message•Very long press (5 seconds or more): Recall scene 1PB1 button:•Short press: Increase Light Lightness by 10%•Medium press: Increase CTL (temperature) value•Long press: Send On message•Very long press (5 seconds or more): Recall scene 23.5 Use the Demo with an iOS SmartphoneMake sure that all three devices have the status of “unprovisioned” on the device LCD screen before starting with the Mobile App.Open the Bluetooth Mesh App by Silicon Labs on your iOS phone.Follow the procedures below to set up and use the demonstration.1.Create a Bluetooth mesh network.2.Select the network and create a group.3.Go to the provisioning view and search for unprovisioned devices.4.Select the Bluetooth mesh device you want to provision and configure.The network and node database can be erased by left-swiping the network in the main view and then pressing the trash icon.To provision a Bluetooth mesh device and configure the node:1.During provisioning select the network you want to add the device to.2.During configuration select the Bluetooth mesh features (proxy, relay, low power and friend) that you want to enable.a.Notice that if you disable proxy, the node can no longer be directly accessed over GATT.3.Select the group you want to add the device to.4.Finally select the functionality (mesh model) that you want to enable.Note: The information view shows the Bluetooth mesh node features, such as Unicast address, UUID, and security keys as well as the supported mesh models. It can be used for debug purposes.To control a Bluetooth mesh node with the iOS application:1.Select the network and group you want to control.2.The application will show the available nodes in that group.3.You can control the light:a.Pressing the light bulb icon will send an On/Off message.b.Moving the upper slider will send Light Lightness (dimming) messages.c.Moving the medium and lower sliders will send CTL (temperature and delta UV) messages.d.Pressing [STORE] stores the corresponding scene.4.By going to the Devices view and tapping a node name you can reconfigure the node. To remove the node from the network, left-swipe it and press the trash icon.Once the iOS application has been used to provision a light bulb and a light switch to a network and group, the light switch (WSTK) can also be used to control the light bulb (WSTK) with the PB0 and PB1 buttons.PB0 button:•Short press: Decrease Light Lightness by 10%•Medium press: Decrease CTL (temperature) value•Long press: Send Off message•Very long press (5 seconds or more): Recall scene 1PB1 button:•Short press: Increase Light Lightness by 10%•Medium press: Increase CTL (temperature) value•Long press: Send On message•Very long press (5 seconds or more): Recall scene 24. Next StepsTo understand how the demo works, see AN1098: Understanding the Silicon Labs Bluetooth Mesh Lighting Demonstration .Explore the other documentation provided by Silicon Labs to get started with customizing your own Bluetooth mesh applications. SDK-specific documentation is provided under SDK Documentationon the Getting Started tab of the Launcher perspective.Next StepsIoT Portfolio/IoT SW/HW /simplicity Quality /quality Support & Community /communitySilicon Laboratories Inc.400 West Cesar Chavez Austin, TX 78701USADisclaimerSilicon Labs intends to provide customers with the latest, accurate, and in-depth documentation of all peripherals and modules available for system and software implementers using or intending to use the Silicon Labs products. Characterization data, available modules and peripherals, memory sizes and memory addresses refer to each specific device, and “Typical” parameters provided can and do vary in different applications. Application examples described herein are for illustrative purposes only. Silicon Labs reserves the right to make changes without further notice to the product information, specifications, and descriptions herein, and does not give warranties as to the accuracy or completeness of the included information. Without prior notification, Silicon Labs may update product firmware during the manufacturing process for security or reliability reasons. Such changes will not alter the specifications or the performance of the product. Silicon Labs shall have no liability for the consequences of use of the information supplied in this document. This document does not imply or expressly grant any license to design or fabricate any integrated circuits. The products are not designed or authorized to be used within any FDA Class III devices, applications for which FDA premarket approval is required, or Life Support Systems without the specific written consent of Silicon Labs. A “Life Support System” is any product or system intended to support or sustain life and/or health, which, if it fails, can be reasonably expected to result in significant personal injury or death. Silicon Labs products are not designed or authorized for military applications. Silicon Labs products shall under no circumstances be used in weapons of mass destruction including (but not limited to) nuclear, biological or chemical weapons, ormissiles capable of delivering such weapons. Silicon Labs disclaims all express and implied warranties and shall not be responsible or liable for any injuries or damages related to use of a Silicon Labs product in such unauthorized applications.Trademark InformationSilicon Laboratories Inc.®, Silicon Laboratories®, Silicon Labs®, SiLabs® and the Silicon Labs logo®, Bluegiga®, Bluegiga Logo®, ClockBuilder®, CMEMS®, DSPLL®, EFM®, EFM32®, EFR, Ember®, Energy Micro, Energy Micro logo and combinations thereof, “the world’s most energy friendly microcontrollers”, Ember®, EZLink®, EZRadio®, EZRadioPRO®, Gecko®, Gecko OS, Gecko OS Studio, ISOmodem®, Precision32®, ProSLIC®, Simplicity Studio®, SiPHY®, Telegesis, the Telegesis Logo®, USBXpress®, Zentri, the Zentri logo and Zentri DMS, Z-Wave®, and others are trademarks or registered trademarks of Silicon Labs. ARM, CORTEX, Cortex-M3 and THUMB are trademarks or registered trademarks of ARM Holdings. Keil is a registered trademark of ARM Limited. Wi-Fi is a registered trademark of the Wi-Fi Alliance. All other products or brand names mentioned herein are trademarks of their respective holders.。
魔灯

魔灯中有不同分类的论坛,针对不同人的不同需求。学习者在论坛中提出的一些疑难很快就会得到解决,或 者针对一个特定的话题展开讨论,在讨论交流的过程中不断学习。这与BBS论坛等交流工具相类似的。
对于教师或者管理者而言,在创建自己的课程网站时,魔灯随时有专用术语的解释与引导,可以使教师对于 课程的安排有一个清晰的思路。无论哪个论坛都需要学生的积极参与,同时还要求老师能够对学生的问题及时地 给与指导和提出建议。因此,如何调动学生的积极性也是老师应该考虑的问题。
有多种类型的论坛供选择,例如教师专用、课程新闻、全面开放和每用户一话题。 每个帖子都带有作者的照片,图片附件内嵌显示 可以以嵌套、列表和树状方式浏览话题,也可以让旧贴在前或新贴在前。 每个人都可以订阅指定论坛,这样帖子会以email方式发送。教师也可以强迫每人订阅 教师可以设定论坛为不可回复(例如只用来发公告的论坛) 教师可以轻松地在论坛间移动话题 如果论坛允许评级,那么可以限制有效时间段
可以指定作业的截止日期和最高分。 学生可以上传作业(文件格式不限)到服务器——上传时间也被记录。 也可以允许迟交作业,但教师可以清晰地看到迟交了多久 可以在一个页面、一个表单内为整个班级的每份作业评分(打分和评价)。 教师的反馈会显示在每个学生的作业页面,并且有email通知。 教师可以选择打分后是否可以重新提交作业,以便重新打分
简介
魔灯由其Moodle谐音而来。
魔灯平台界面简单、精巧。使用者可以根据需要随时调整界面,增减内容。课程列表显示了服务器上每门课 程的描述,包括是否允许访客使用,访问者可以对课程进行分类和搜索,按自己的需要学习课程。
魔灯平台还具有兼容和易用性。可以几乎在任何支持 PHP的平台上安装,安装过程简单。只需要一个数据库 (并且可以共享)。它具有全面的数据库抽象层,几乎支持所有的主流数据库(除了初始表定义)。利用魔灯, 现今主要的媒体文件都可以进行传送,这使可以利用的资源极大丰富。在对媒体资源进行编辑时,利用的是用所 见即所得的编辑器,这使得使用者无需经过专业培训,就能掌握魔灯的基本操作与编辑。魔灯注重全面的安全性, 所有的表单都被检查,数据都被校验, cookie是被加密的。用户注册时,通过电子邮件进行首次登陆,且同一 个邮件地址不能在同一门课程中进行重复注册,所有这些,都使得魔灯的安全性得到了加强。魔灯项目仍然在不 断的开发与完善中。
魔灯(Moodle介绍

第1课:什么是魔灯(Moodle)一、魔灯中文名的由来“魔灯”,一个充满神秘感的网站群落,正在世界各国的教育领域中悄然兴起。
只不过,在欧洲或者是美洲,使用这个网络平台的国家,把它称之为“Moodle”,而在我们中国,称之为——“魔灯”,是谁给这个网站群落起了如此具有魅力的名称呢?这一切源自于将Moodle引入中国教育界的第一人——上海师范大学教授黎加厚,是他赋予了Moodle这样一个充满神话色彩的名字。
那么,什么是魔灯(Moodle)呢?Moodle,恐怕你翻遍所有的英文词典,也找不到它的踪影。
但是,如果您通过“百度”搜索引擎,到互联网上搜索一下,你会查找到超过14万条的相关信息,而且还会在以后的日子里,不断飞速增长。
Moodle(Modular Object Oriented Dynamic Learning Environment)是“面向对象的模块化动态学习环境”的首字母缩写。
为了促进Moodle在我国教育中的使用更加本土化,黎加厚教授给Moodle翻译了一个中文名称“魔灯”。
正如Google的中文名“谷歌”,蕴含“丰收之歌”的含义一样,“魔灯”则蕴含“教师是课堂上的真正魔法师,而Moodle则是他手中的那盏阿拉丁神灯”(取自老幼皆知的《一千零一夜》传说故事)。
二、魔灯(Moodle)的开源者魔灯(Mood1e)是由澳大利亚Martin.Dougiamas博士主持他的志愿者团队合作开发的具有以下3大功能的系统:(1)网站管理系统(2)课程管理系统(CMS,Course Management System)(3)学习管理系统(LMS,Learning Management System)该系统是一套基于“社会建构主义理论”设计开发的开放源代码的软件,能够帮助教师高质量创建和管理的在线课程。
目前,国内部分中小学老师开始尝试利用Moodle管理自己的教学活动。
三、关于建构注意的一些观点1.建构主义主要的教学观点(1)学习是一个建构的过程(2)学习是一个活动的过程(3)学习是一个协作的过程(4)学习必须处于丰富的情景中(5)强调以学生为中心(6)强调情境对意义建构的重要作用(7)强调协作学习对意义建构的关键作用(8)强调对学习环境的设计(9)强调利用各种信息资源来支持学习(10)强调学习的最终目的是完成知识的意义建构2. 建构主义(Constructionism)建构主义断言,当为其他人创造一些事物去体验的时候,学习的效果将显著提高。
WIFI远程智能台灯摄像机双语中英文操作说明书

Wifi Remote IntelligentTable LampForewordThis manual provides a brief introduction to how to use the product and details for product use and operation. Please be sure to carefully read and completely understand the manual before use and keep it properly. We hope our product can meet your demands and serve you for a long time.Product AssuranceThis product is certified by FCC&CE and other authorities to conform to the recommended indicators. Customer safety is assured in use.Product features1. It has a stylish appearance, and the table lamp body adopts three-dimensional UV treatment.2. Remote talkback.3. Remote and local lamp opening and closing.4. Eyesafe lamp beads.6. Photographing, video recording, night vision, sound recording, motion detection and alarm.7. Point-to-point connection, can work without a network connection.8. APP zoomInstruction for quick operation of network surveillance cameraThis product is a 25-frame HD (1,080P) network camera intelligent table lamp with an external TF card and a multi-functional high-tech product integrating functions of video recording, photographing, night vision, illumination, motion detection alarm, APP real-time monitoring, and storage. It has a function of 5 megapixel HD recording, and supportsup to 32GB TF card, long-time work and APP operation, which makes it more convenient. Moreover, it works as the best anti-theft and evidence-gathering tool with strong concealment.1. Product structure1. Camera2. Night vision lamp3. Eyesafe lamp4. Microphone5. Wifi connection indicator light6. Equipment status indicator light7. Table lamp switch8. Reset key9. Loudspeaker 10. ON/OFF 11. Night vision lamp switch 12. TF card1. APP software download——(Picture 1) (Picture 2)Method 1: Scan the QR (picture 1) code directly to go to thedownload screen (picture 2). Select appropriate download software according to your mobile phone system.(Note: This kind of installation is only available for Chinese Mainland).Method 2: For Android phones, search for APP software named "RMON" in Google Play, download and install it.For IPhone, APP software named "RMON" in AppStore, download and install it.2. Installation1. Plug in the charger, connect the power supply, and turn on the ON/OFF switch of the device. (The device starts up 30 seconds later and the blue light keeps on while the red light flashes quickly).2. Flashes quickly for 30 seconds, it means the device is searching for wifi that is connected before. (In this mode, the device will automatically connect to the network that is connected before after the device is power off).3. If there is no wifi found after searching, the device will restart automatically (it takes 30 seconds). After restart, the blue light keeps on while the red light flashes slowly. (In this mode, the device is transmitting wifi hotspot for search connection of your mobile phone).4. When the red indicator light flashes slowly (2 minutes after starting up), use your mobile phone to search for wifi hotspot (begin with YM) for connection and exit. After that, enter inthe downloaded APP and set the configuration of router network. (Specific operation steps are shown as below).3. Wifi connection 1 (for iphone)1. Search for wifi hotspot for connection2. Open the APP when a wifi icon appears;3. Click to add it.4. Select a path to add;5. Enter in or scan the UID code of QR code of the device.6. Select or enter in the name and passwords of wifi before setting configuration.7. Search 8. Confirm 9. Done3. When it says “Wifi configuration completed”, the device will restart again. Both the blue and red indicator light will keep on for 30 seconds after the device starts up (It means the device is connected to network when the red indicator light keeps on).4. App is ready to add and search for camera by now (under the same network environment).4. Point-to-point connection (without network connection) 1. Search for wifi hotspot for connection on mobile phone-openAPP-click -select-search-confirm-connection completed (the blue light keeps onwhile the red light flashes slowly)5. Connection method 2 (point-to-point connection to router network) 2. Search for wifi hotspot for connection on mobile phone-openAPP-click-select-search-confirm-connectioncompleted-click to set the camera-select advance configuration-select wifi connection-select a wifi-enter in passwords-connect (30 seconds after the camera restarts automatically, both the blue and red indicator light for camera connection will keep on)6. Lamp opening and talkback.1. Click to remotely turn on the illumination lamp, and dragto adjust the brightness.2. Click to remotely turn on the night vision lamp.3. Click the microphone , and then press to talk, and voice will be automatically sent to the device side after release.7. Screen shot, video recording and alarm1. Click the online device to browse videos. There are three options “1080P 720P 480P” on the top of screen, which can be selected according to the current network environment to adjust the image quality and video fluency. In addition to that, thecolor contrast degree and brightness can also be adjustedrespectively represent: monitor, photograph, video recording,left/right rollover, up/down rollover. By clicking“photograph” or “video recording”, the images or videos willbe saved in the phone memory (as shown below).2. Long press the online device to start more settings.device)new passwords to change the passwords.8. Administrator operation guide1. Install the search tool in random disc on the computer.(Note: Administrator setting can only be made within LAN).2. Click to display the devices connected to network (as below)3. Double click the searched IP. Enter in the next page to type in user name (admin) and click to confirm it. (Note: The original user name is admin, with no password) (as shown below)4. Enter in setting page after completing the above steps. Download theplug-in and select a language for first use (click todownload and install) (as shown below).5. Click again to enter in setting page (as shown below).5. Click to start setting (as shown below)6. System management setting: to select the item to be set (as shown below).9. Main function description1. Time settingOpen system management page——click time setting——select timezone——save.2. Administrator password settingOpen “change password”——type in the new password——confirmthe new password——save.3. Change the password of device (original password: 8888)Open “network setting”——P2P setting——type in the new password——save——return to system management to restart the device. (it can also be set remotely by APP).4. Alarm settingOpen “alarm setting”——start alarm setting——click IP Camera built-in——select the required sensitivity. (Option 6 is suggested)5. SD card settingSD card should be formatted for the first time to insert——enter in SD card setting to select the needed function before setting other functions. (Note: The device defaults to automatically and circularly record videos).6. View the content of SD card1. Plug out the card directly and read with a card reader.2. Remote playback on APP.3. Open SD card video recording page, select and save the video file to be viewed.10. Specifications11. Trouble shooting1. Remote control is not enough.Please select the most suitable definition according to the current network environment.2. SD card cannot save files. SD must be formatted for first use.3. The device cannot be connected to network. Long press the reset key for 4 seconds and connect it again.4. The video in SD card cannot be played fluently on APP. It is due to different decoding capacity of mobile phones. You can adjust the definition of recording device to fit your mobile phone.5. The passwords are forgotten. Directly click the reset key of device for 4 seconds to restore factory settings.6. In case the indicator light does not work normally or connection is not smooth after long time use, please restore the factory default setting (press the reset key for above 4 seconds) and connect it again.12. PrecautionsUse occasions: please strictly comply with relevant state decrees and do not use it for any other illegal purposes at your own risks. Software upgrade: to achieve better product performance, the manufacturer will make continuous improvement to the software. This product is designed for convenient software upgrade by customers. Please ask your local distributor for the information and upgrading method of latest version of software.Working temperature: please use it under natural temperature. Do not operate it under a temperature that is not adapted for human body. Working humidity: please use it under an environmental humidity that is suitable for human life. Do not put the product in a moist working environment since the product is not designed with waterproof function. Shooting luminance: please use the product in an environment with adequate light sources. Do not point the camera directly to the sun and other superstring light sources to avoid any damage to the optical elements. Cleaning requirements: please do not use the product in an environment with too much dust to keep the camera lens and other components free of dust that may affect the shooting effect. The camera lens can be cleaned and maintained by wiping with lens wiping paper or glasses cloth. Other matters: the product is a kind of precision electronic product that should be kept safe from strong impact and vibration. Please do not use in high magnetic field and strong electric field.Wifi远程智能台灯前言本用户手册将快速说明如何使用本产品,同时提供给您详细的信息,包括使用、操作。
克罗韦尔 PowerMonitor 1000 单元固件版本更新 说明书

安装指南PowerMonitor 1000 单元固件版本更新产品目录号1408-BC3、1408-TS3、1408-EM3主题页码获取产品固件版本3使用 ControlFLASH 软件工具更新设备固件版本8本出版物提供了 PowerMonitor™ 1000 单元固件版本的更新说明。
重要事项在开始进行操作之前,请先确认已进行了正确的网络连接,并确认已在 RSLinx® Classic 软件中组态了网络驱动程序。
2罗克韦尔自动化出版物 1408-IN003A-ZH-P - 2015 年 年 7 月PowerMonitor 1000 单元固件版本更新用户重要须知在安装、配置、操作或维护设备之前,请仔细阅读本文档及“其它资源”部分列出的文档,了解设备的安装、配置和操作信息。
用户需要了解安装和接线指南以及所有适用规范、法律和标准的相关要求。
安装、调节、投入使用、操作、装配、拆卸和维护等活动均要求由经过适当培训的人员遵照适用法规执行。
如未按照制造商指定的方法使用设备,则设备提供的保护功能可能会受到影响。
对于由于使用或应用此设备而导致的任何间接损害或由此引起的损害,罗克韦尔自动化公司在任何情况下均不承担任何责任。
本手册中的实例和图表仅供说明之用。
由于具体安装情况存在许多可变因素及要求,因此罗克韦尔自动化公司概不承担根据实例及示意图进行实际使用而产生的任何责任或义务。
对于因使用本手册中所述信息、电路、设备或软件而引起的专利问题,罗克韦尔自动化公司不承担任何责任。
未经罗克韦尔自动化公司书面许可,任何单位或个人不得复制本手册之全部或部分内容。
在整本手册中,我们在必要的地方使用了以下注释,来提醒您注意相关的安全事宜。
标签也可贴放在设备表面或内部,用于提供特定警示。
警告:标识在危险环境下可能导致爆炸进而造成人员伤亡、财产损坏或经济损失的做法或情况的信息。
注意:标识可能会导致人员伤亡、财产损坏或经济损失的做法或情况的信息。
MAGIC LANTERN(魔灯) V2.3 FOR 600D菜单说明
1.请确保您的600D官方固体版本为1.0.2 ;2.将相机设置全部清除,回到初始状态;3.将拔盘转至“M”档;4.刷机前确保电池有80%以上的电量;5.魔灯V2.3没有为600D开启音频控制功能。
刷机有风险,请慎重!特别提醒:经本人亲身体验,使用ML的实时取景模式(如:峰值对焦、魔术放大、斑马纹等在实时取景下才能发挥效用)会很消耗电量。
各菜单选项说明一.Expo 曝光1. WhiteBalance 白平衡2. ISO自定ISO感光度3. Shutter 快门4. Aperture 光圈5. PictureStyle 照片风格设定6. REC PicStyle 录影风格设定7. Exp.Override 曝光优先二.Overlay 显示模式1. Global Draw 球形绘制2. Zebras 条纹显示3. Focus Peak 对焦辅助4. Magic Zoom 放大镜(魔术放大)5. Cropmarks 照片裁切构图辅助6. Ghost image 重影显示(要选定一张照片按LV键)7. Defishing 专供三洋8mm鱼眼矫正8. Spotmeter 点测光9. False color 伪色图10. Histogram 录影显示直方图(柱状图)Waveform 录影显示直方图(波形)11. Vectorscope 向量范围图三.Movie 影片1.Bit Rate 自定视频码率2.Time Indicator时间指示器3.Movie Logging影片记录4.Movie Restart 影片重新启动设定5.REC/STBY notif录制或待机自定义通知6.Movie REC key录影热键设置7.Force LiveView录制保持开启显示模式8.Shutter Lock 快门锁定9. FPS override 帧数优先10.HDR video 高动态范围视频11.Image Effects 图像效果四.Shoot 快门1.HDR Bracketing HDR包围2.Intervalometer 延时摄影3.Bulb/Focus Ramping B门曝光/焦距修正4.Bulb Timer 慢速快门5.Motion Detect 移动侦测快门6.Silent Picture 在LV模式下半按快门.自动静音拍摄7.Mirror Lockup 反光镜锁定8.Flash tweaks 闪光灯调整...五.Focus 对焦1.Trap Focus 陷阱对焦2.Focus Patterns 对焦方式3.Follow Focus 跟踪对焦4.Focus Step Size 焦距步长5.Focus Step Delay 对焦延迟6.Focus End Point 对焦结束点7.Rack Delay 聚焦延迟8.Rack Focus变焦9.Stack focus 焦点叠加10.Focus distance and DOF info 焦距和DOF信息六.Display 萤幕显示1.LV contrast LV对比2.LV saturation LV饱和3.LV display gain LV显示增益4.Color scheme 颜色方案5.Clear overlays 清除复盖6. Focus box (LV) 对焦框(LV)7.Force HDMI-VGA8.Screen layout settings 屏幕布局设置9.Audio Meters音频指示器七.Prefs 偏好设置1.Image review settings 图片查看设置2.LiveView zoom settings 实时查看缩放设置3.Arrow/SET shortcuts 箭头/ SET键的快捷方式设置4.Misc key settings 其它键设置5.Powersave in LiveView 实时查看时省电模式设置6. Config file…配置文件7.LV display presets LV显示预设8.Crop Factor Display 裁切系数显示八.Debug调试1.Screenshot – 10s 截图–10秒后2.Don’t click me! 这一项请不要按,否则会花屏!需关机再开才能消除3.Stability tests 稳定性试验4.Show tasks…显示任务…5.Save CPU usage log 保存CPU使用记录6. Free Memory 可用内存7.Shutter Count 快门次数(供参考,不是很准确,我这里后面的2168就不知道是什么意思,实际已使用快门7286次)8.CMOS Temperat CMOS温度九.最后一项是帮助信息, 不做介绍,省略……Magic Lantern 菜单详解按删除按钮显示菜单,使用箭头键导航。
- 1、下载文档前请自行甄别文档内容的完整性,平台不提供额外的编辑、内容补充、找答案等附加服务。
- 2、"仅部分预览"的文档,不可在线预览部分如存在完整性等问题,可反馈申请退款(可完整预览的文档不适用该条件!)。
- 3、如文档侵犯您的权益,请联系客服反馈,我们会尽快为您处理(人工客服工作时间:9:00-18:30)。
魔灯固件使用指南
Audio:
1. Audio Meters 音频测量器
2. Analog Gain 声音插值模拟增益
3. L-DigitalGain 左声道增益
4. R-DigitalGain 右声道增益
5. AGC ACG自动增益
6. Input Source 声音输入源
7. Mic Power 麦克风供电
8. Output volume 输出音量
9. Monitoring-USB USB端口监听
LiveV
1. Global Draw 全局信息显示
2. Zebras 斑马纹曝光不足区域显示
3. Focus Peak 对焦峰值
4. Magic Zoom MW对焦同步放大器
5. Cropmks(0/7) 剪裁比例
6. Ghost Image 鬼影显示,要选定一张照片按LV键
7. Live Defish
8. Spotmeter 点测光
9. False Color 伪色图,SET为开关,Q键选种类
10. Histo/Wavefm 录像时显示直方图
11. ClearScreen 清屏,半按快门时/待机时
Expo:
1. ISO 自定感光率
2. WhiteBalance 自定色温,LV模式下按Q可以检测
3. WBShift G/M 自定白平衡偏移
4. WBShift B/A 自定白平衡偏移
5. Shutter 自定快门速度,LV模式下按Q 检测
6. Aperture 自定光圈
7. Light Adjust 光线调节,高光色调优先/ALO浓度
8. PictureStyle 照片风格
9. REC PicStyle 录像的画面风格
10. Contrast 对比度,LV模式下可实时查看
11. Saturation 饱和度,LV模式下可实时查看
12. Sharpness 清晰度
13. Flash AEcomp 照片曝光补偿
Movie:
1. Bit Rate(CBR) 自定视频码率
2. BuffWarnLevel 缓冲区报警设置
3. Time Indicator 时间指示器
4. Bitrate Info 比特率信息
5. Movie Logging 生成短片文件日志
6. Movie Restart 录像中断时(29分29秒)重新录像
7. MovieModeRemap 视频模式映射
8. REC/STBY notif 录制备用通知
9. Movie REC key 录制热键设置
10. Force LiveView 强制保持实时显示模式
11. Force HDMI-VGA 强制同步输出HDIM或VGA信号
Shoot:
1. HDR Bracketing HDR档次,Q关闭/SET快门数/PLAY键设置EV值。
2. Take a pic ever 设定间隔拍摄时间,第三项需激活
3. Intervalometer 间隔拍摄启动,PLAY或MENU件停止
4. Bulb Ramping 曝光斜坡图
5. Bulb Timer 自定义慢速快门
6. LCD Remote Shot 使用LCD感应器拍照
7. Audio RemoteShot 使用话筒感知声音拍照
8. Motion Detect 运动、移位侦测拍照
9. Silent/slit pic 无声图片/分割图片,文件扩展名422
10. Mirror Lockup 反光板锁定,LV模式按第二次快门反光板即可复位
Focus:
1. Trap Focus 陷阱对焦,MF档,半按快门对焦完成即拍照
2. Focus Patterns 集中对焦
3. Follow Focus 按键跟焦
4. Focus StepSize 焦点选择
5. Focus StepDelay 对焦延迟
6. Focus End Point 对焦后自动结束
7. Rack focus 虚焦,LV模式下MF档调焦距
8. Stack focus 对焦堆积,SET调节,PLAY运行,LV模式下
Tweaks:
1. LVGain(NightVision) 添加LV模式
2. Exposure Simulation 模拟曝光
3. DOF Preview 景深预览
4. AF frame display AF帧显示
5. LCD Sensor Shortcuts 手动调整LCD亮度,挡住感应器按上下键
6. Auto BurstPicQuality 自动图片分割质量
7. Show cropmarks in 显示剪裁比例
8. ISO selection ISO选择
9. LV Auto ISO (M mode) LV模式自动ISO
10. Crop Factor Display 系数显示
11. LiveView Zoom LV时放大比例,PLAY键选择
Play:
1. SET+MainDial(play)
2. Cropmarks
3. After taking a pic 已使用的照片
4. Zoom in PLAY mode 缩放模式
5. Quick Erase 快速删除
Config:
1. Config AutoSave 参数自动保存
2. Save config now 保存参数
3. Delete config file 删除设置文件
4. DISP profiles 设置文件地址设置Debug:此功能调试相机用,非特殊情况严禁使用!
Power:电源
1. Dim display 显示较暗时
2. Turn off LCD and LV 关闭LCD和LV模式时
3. Turn off GlobalDraw
4. Save power when REC 当录制时保存电源信息
Help:帮助文件。