RT7295C智联创新
深圳市视美泰技术股份有限公司 AIoT-T972 V1.2 HDMI IN 4K 数字标牌 规格书说

AIoT-T972V1.2 HDMI IN版本4K数字标牌规格书文档修改历史版本描述日期V1.0创建2019-8-15修改为V1.1版本V1.12019-11-06PCB对应描述修改为V1.2版本V1.22020-08-12PCB对应描述目录第一章产品概述 (3)1.1适用范围.....................................................................................错误!未定义书签。
1.2产品概述.....................................................................................错误!未定义书签。
1.3产品特点.....................................................................................错误!未定义书签。
1.4外观及接口示意图.....................................................................错误!未定义书签。
第二章基本功能列表. (5)第三章PCB尺寸和接口布局 (7)3.1PCB尺寸图 (7)3.2接口参数说明 (8)第四章电气性能 (19)第五章组装使用注意事项 (20)第一章产品概述1.1AIoT-T972适用范围AIoT-T972属于安卓智能主板,普遍适用于智慧显示终端产品、视频类终端产品、工业自动化终端产品,如:广告机、数字标牌、智能自助终端、智能零售终端、O2O智能设备、工控主机、教育设备、机器人设备等。
1.2产品概述AIoT-T972采用晶晨T972芯片,四核Cortex-A55处理器,主频最高达1.9GHz;采用Mali-G31GPU;支持4K、H.265硬解码;搭载Android9.0系统;支持多路视频输出和输入;外围接口丰富,支持多款外设扩展;超低功耗、超强性能,是在商业展示、人机交互、工控项目上的最佳选择。
2022年最值得推荐的5大车载中控SOC芯片
2022年最值得推荐的5大车载中控SOC芯片目前车载中控大屏幕已经成为汽车领域的一种潮流,用途也越来越多,包括车辆运行信息显示、行车安全信息显示、娱乐多媒体显示、社交信息显示等,都能够在车载中控大屏中来呈现。
如此多的信息,需要一颗强劲的芯片来处理,包括高通、瑞芯微、三星等芯片大厂的强势加持,为车载中控大屏的进化提供了坚实的基础。
1、高通骁龙820A,模块化设计便于硬件升级高通骁龙820A基于14纳米FinFET工艺制程,支持自动异构计算处理器与机器学习模块,集成64位Kryo CPU、Adreno530 GPU、Hexagon 680 DSP、HVX、X12LTE调制解调器,可实现600Mbps下行速度和150Mbps上行速度,支持诸多基于云的实时特性,包括串流多媒体、企业协作、实时地图与定位服务、远程诊断和一键式车载信息处理。
同时,骁龙820A采用模块化设计,便于后期升级车载系统硬件,为汽车OEM带来性能、连接和多媒体创新上的巨大潜力。
骁龙820A搭载机器智能平台Zeroth方案,支持ADAS特性以改善车辆安全系统,能够实现高速公路和市区道路场景下的ADAS功能,可对车辆、行人、自行车等多类物体识别,以及对像素级别可行驶区域的实时语义分割。
并借助GNSS和航位推测技术提供定位与导航。
软件方面,骁龙820A支持CarPlay和Android Auto,车企可通过远程发送最新固件升级。
2、瑞芯微RK3568M,1.0Tops NPU算力强劲瑞芯微RK3568M适用于ADAS+中控主机的整合产品,集成4核ARM架构A55处理器和Mali G52 2EE图形处理器,内置独立自研1.0Tops NPU,支持FP16/BFP16,可轻松移植360度环视算法、DMS算法、BSD算法等,支持车企快速迭代产品。
多媒体方面,瑞芯微RK3568M内置强大同编同解VPU,支持1路4K 60fps或8路1080P 30fps的多格式解码和高达1080P 100fps的H.265编码,可实现中控、副驾、头枕等的多屏异显及多媒体播放,分辨率高达4K 60fps。
NCStudio 操作手册
维宏®数控系统NCSTUDIO V5.4软件使用手册目录升级纪录............................................................................................................................ I I 目录.. (I)1概述 (1)1.1软件特性 (1)2系统安装与连接 (3)2.1N CSTUDIO™的系统基本配置 (3)操作系统 (3)2.2N CSTUDIO™系统的安装 (4)安装Ncstudio™软件 (5)安装Ncstudio™运动控制卡 (8)重新启动计算机 (8)2.3其他安装问题 (8)2.4卸载N CSTUDIO™系统 (9)2.5N CSTUDIO™控制卡与驱动系统的连接 (10)3NCSTUDIO™基本概念 (11)3.1操作模式与状态 (11)操作模式 (11)操作状态 (12)3.2机床坐标系 (13)机械坐标系 (13)工件坐标系 (13)4NCSTUDIO™操作界面 (15)4.1标题栏 (16)4.2菜单栏 (17)4.3工具栏 (18)4.4数控信息栏 (19)4.5状态栏 (19)4.6数控状态窗口 (19)加工状态和时间信息 (20)进给速度 (21)机床控制 (22)4.7自动操作窗口 (23)4.8手动操作窗口 (25)4.9加工轨迹窗口 (28)三维视图模式 (28)上下文菜单 (31)设置个性化参数 (31)4.10系统日志窗口 (32)4.11程序管理窗口 (33)4.12系统参数窗口 (34)加工参数 (35)厂商参数 (38)4.13程序编辑窗口 (41)4.14输入输出状态(I/O状态)窗口 (42)5NCSTUDIO™菜单系统 (44)5.1“文件”菜单 (44)打开并装载 (44)卸载 (45)新建加工程序 (46)打开并编辑 (46)编辑当前加工程序 (46)保存 (46)另存为 (46)保存并装载 (47)关闭 (47)最近装载的加工程序 (47)最近编辑的加工程序 (47)退出 (47)5.2“编辑”菜单 (48)5.3“查看”菜单 (49)工具栏 (50)状态栏 (50)全屏 (50)显示加工程序行号 (51)跟踪加工程序当前行 (51)加工程序信息 (52)5.4“操作”菜单 (52)单步执行 (53)设置当前点为工件原点 (53)设置当前点工件坐标 (54)回工件原点 (54)开始 (55)暂停 (56)停止 (56)进入仿真模式并开始仿真 (56)高级开始 (57)断点继续 (57)执行加工指令 (58)微调 (61)对刀 (62)回机械原点 (62)复位 (63)限位释放 (64)5.5“机床”菜单 (64)5.7“帮助”菜单 (65)6操作步骤 (66)6.1开机 (66)6.2机械复位(可选) (66)6.3载入加工程序 (66)6.4手动操作 (67)6.5确定工件原点 (67)6.6执行自动加工 (68)6.7直接定位功能 (69)7操作时的注意事项 (70)7.1多任务执行注意事项 (70)7.2回机械原点注意事项 (70)8最终用户软件许可协议....................................................... 错误!未定义书签。
采购项目报价表
统工作环境温度:-40 ℃-+45 ℃12、系统工作
环境湿度:10%-90%13、工作电压:AC220V±
10%,50HZ14、功耗(峰值、平均值):不超
过600W/平方(峰值)300W/平方(平均值)15
、显示性能:无拖边,无毛刺,画面无抖动,
要求报价供应商提供本地化服务。
20
空调
4台 大三匹空调,制冷量7500W、单相220V50HZ
1.5匹挂式空调
CPU:AMD S3200+,内存:DDRⅡ 512M,硬盘:SATA7200转80G,显示器:17 6 学生用微机 48台 英寸标准屏液晶(4:3比例)网卡:100M,声 卡显卡:集成,备注:共备一张正版 WINDOWS XP专业版,4个DVD光驱
24口三层交换机,24个10/100M自适应RJ45端
单价
物理分辨率:1366×768,亮度:800,对比 度:1500:1,动态对比度:5000:1,多种画 质改善电路:3D滤波电路,ACM色彩优化, ACC动态对比度,运动画面和静态画面的画质 改善电路,节电保护模式,如没有输入信号 时,15分钟后,本机会自动进入低功耗睡眼状 态或待机状态,可有效延长本机使用寿命,并 节约电能。多媒体端口:(1)1路D-SUB15针 VGA输入、1路HDMi输入、3路视频输入、1路 S视频输入、2路分量输入、1路视频输出、1路 视频输入、1路音频输出。(2)外部接口:1路 1 液晶电视 3台 射频输入接口,3路视频输入接口,1路S视频 输入接口,2路分量输入接口:1路VGA DSUB15针输入接口,1路HDMi输入接口,6路 音频输入接口 ,1路视频输出接口,1路音频 输出接口,1路耳机输出接口 ,1路RS-232C 软件升级接口。(3)参数:额定电压: ~50HZ,220V,整机消耗功率:≤200W,外 形尺寸:(不含底座)1013MM×707MM× 112MM(宽×高×厚)(含底座)1013MM× 773MM×303MM(宽×高×厚),电压范围: 100-240V,重量:24.5KG(不含底座)。 (4)另外加吊架固定在天花板上。
TILTA TA-T19-FCC FOR SONY A7C RIG 用户手册说明书
FOR SONY A7C RIG免责声明和警告感谢您购买TILTA产品。
本文所提及的内容关系到您的安全以及合法权益与责任。
使用本产品之前,请仔细阅读本文以确保已对产品进行正确的设置。
不遵循和不按照本文的说明与警告来操作可能会给您和周围的人带来伤害,损坏本产品或其它周围的物品。
本文档及本产品所有相关的文档最终解释权归TILTA所有。
如有更新,恕不另行通知。
请访问官方网站以获取最新的产品信息。
一旦使用本产品,即视为您已经仔细阅读免责声明与警告,理解、认可和接受本声明全部条款和内容。
您承诺对使用本产品以及可能带来的后果负全部责任。
您承诺仅出于正当目的使用本产品,并且同意本条款以及TILTA制定的任何相关条例、政策和指引。
TILTA对于直接或间接使用本产品而造成的损坏、伤害以及任何法律责任不予负责。
用户应遵循包括但不限于本文提及的所有安全指引。
即使存在上述规定,消费者权益依然受当地法律法规所保障,并不受本免责声明影响。
TILTA是深圳市铁头科技有限公司及其关联公司的商标。
本文出现的产品名称、品牌等,均为其所属公司的商标或注册商标。
[套件分解说明]以下配件可根据需求自主搭配CECM01CECM03CECM05CECM04CECM06CECM09CECM08CECM10CECM11CECM07CECM02[全笼解说]底部单孔导轨卡件冷靴接口[可接麦克风/补光灯等配件]冷靴接口[可接上手提/冷靴等配件]相机固定螺丝孔[可接曼富图/阿卡底板等配件] [可直接安装在RS2云台上]1/4螺纹孔1/4螺纹孔1/4螺纹孔[可安装NATO滑条转接侧手柄]安全腕带接口1/4定位螺纹孔[可接H DMI固定卡件]安全绳接口1/4扩展螺纹口[可接曼富图/阿卡底板等配件]1/4扩展螺纹口15mm导管适配器接口镜头支撑固定螺纹孔<顶部><底部><右侧臂><左侧臂>132151234567838mm标准阿卡接口1591011121314[选配]OVERVIEWCECM01CECM03CECM05CECM04CECM06CECM09CECM08CECM10CECM11CECM07CECM02Each of the following accessories can beOVERVIEWMounting hole for 15mm bottom single rod holder Cold shoe mount (for installing microphone, additional light, etc.)Cold shoe mountCamera security screw hole (for installing Manfrotto and ARCA plate.)1/4”-20 screw hole1/4”-20 screw hole1/4”-20 screw hole Right side wrist strap holder 1/4”-20 screw holes with locating points (for HDMI clamp attachment.)Left side strap holder1/4”-20 screw hole(for installing Manfrotto and ARCA plate.)1/4”-20 screw holeMounting hole for 15mm side single rod holder Lens adapter support screw hole TOPBOTTOMRIGHT SIDE LEFT SIDE13215123456781591011121314(for installing NATO rail and side handle.)(for installing top handle.)ARCA standard 38mm mount(can mount onto RS 2 directly.)INSTALLING THE CAGEtAlign the 1/4”-20 screw holes on the bottom of thecage with the bottom plate.官方网站: 中国地址:深圳市光明新区光侨路转7号路 侨德高新科技园B栋2楼全国服务热线:4006 1998 67版权由深圳市铁头科技有限公司所有需授权方可转载本公司有权在不提前通知的情况下修改产品参数产品尺寸仅供参考,以实物为准是深圳铁头科技有限公司的注册商标Website: US Address: 2801 W Magnolia Blvd, Burbank, CA 91505US Contact Number: +1(818)651-4991All copyrights belong to Tilta Technology Co. Ltd.Written permission is needed for any reproductions.Tilta has the right to adjust product specification without notice.All measurements are for reference only. Please see the actual products for more details.are registered trademarks owned by Tilta Technology Co., Ltd.扫码进入官网关注微信公众号。
爱普生RC+ 7.5.1A版本发布说明说明书
EPSON RC+ 7.5.1A Release NotesJuly 19, 2021Thank you for using EPSON RC+ 7.5.1. This document contains the latest information for this release. Please read before using this software.DOCUMENTATION (2)GETTING STARTED (2)WHAT’S NEW IN VERSION 7.5.1A (2)WHAT’S NEW IN VERSION 7.5.1 (2)G ENERAL (2)P ART F EEDING (2)F IELDBUS (3)V ISION G UIDE (3)C ONVEYOR T RACKING (3)F ORCE G UIDE (3)S IMULATOR (4)WHAT’S FIXED IN VERSION 7.5.1 (4)V ISION G UIDE (4)P ART F EEDING (5)API (5)S IMULATOR (5)AOI (6)SPEL_R ESET AOI (6)VISION GUIDE (7)C AMERA &L ENS S ELECTION T OOL (7)P ARAMETER T UNING T OOL (7)DocumentationAll RC+ manuals are in PDF format and are installed on the PC hard disk. These manuals are accessible from the EPSON RC+ 7.0 environment Help menu.Getting StartedRead the Getting Started chapter in the EPSON RC+ 7.0 User's Guide. This chapter will refer you to a robot controller installation manual. This contains information for initial connections and start up.What’s New in version 7.5.1A1.Added support for T3-B series and T6-B series robots.What’s New in version 7.5.1General1.Added support for LS6-B602S-V1 robot.2.Added support for robot hands. Robot hands can be configured from the RobotManager Hands page. The robot controller firmware version must be 7.5.1.0 or greater.3.Added support for SCARA robot joint accuracy calibration. The robot controllerfirmware version must be 7.5.1.0 or greater.4.Added Project Wizard for creating new projects. It includes the ability to createsimple pick and place projects. Refer to section 5.9.1 in the EPSON RC+ 7.0User's Guide for details.Part FeedingNote: In order to use v7.5.1 Part Feeding, the robot controller firmware version must be 7.5.1.0 or greater.5.Added the ability for users to control the vibrations from SPEL+.Added the vibration callback function for custom controlling the feeder.6.The calibration dialog was changed to support manual tuning of vibrations.7.Added support for selection of centering method.8.Support for controller backup & restore of feeder configurations.Fieldbus9.Support for Allen-Bradley AOI is now included with the installer instead of beingprovided by a separate installer.10.Added SPEL_Reset AOI. The robot controller firmware version must be 7.5.1.0or greater to use this AOI. See the section AOI later in this document.11.Added support for CODESYS function blocks.Vision Guide12.Added Basic and Advanced modes for the Vision Guide window property andresults grids.13.Added new Description property for sequences, objects, and calibrations. ForCompact Vision, CV2-A firmware version 3.1.4.0 or greater must be installed14.Added ability to select the object result in the statistics dialog.Conveyor Tracking15.Added result screen of the conveyor calibration.Force Guide16.Improved performance of Contact object, ContactProbe object and PressProbeobject. If you want to maintain compatibility with previous version, set 7.4.0 toVersion property of Force Guide sequence.17.Improved usability of Force Guide window.The robot controller firmware version must be 7.5.1.0 or greater to use the following functions of Force Guide.18.Added system sequence and system object.19.Added function that move multiple consecutive points to PressMove object andFollowMove object.20.Added function that reduce overshoot on contact to Force Trigger object.21.Added Force Motion Restriction object for changing executions based on positionor orientation of robot.Simulator22.Added Virtual Direct Teaching function. It is now possible to perform jogoperations by dragging the tip of the robot tool with the mouse.23.Added Robot Operation Panel. You can use the slide bar to jog each arm of therobot. By the slide bar, it is now possible to perform a jog operation of each armof the robot.Wha t’s Fixed in version 7.5.1Vision Guide1.Fixed a memory leak problem which occurred when a vision sequence was runwith the ShowProcessing property set to False. This affects PC Vision andCompact Vision. For Compact Vision, CV2-A firmware version 3.1.3.2 orgreater must be installed.2.Fixed a problem where after teaching vision calibration points from the VisionGuide window, the Teach Points and Calibration buttons are hidden.3.Fixed a problem for strobed image acquisition. The CV2-A unit becameunresponsive after VRun is executed for a sequence with RuntimeAcquire set toStrobed. CV2-A firmware v3.1.3.1 must be installed, which is included in 7.5.0 R1.4.Fixed a problem where RC+ 7.5.0 could not connect to CV2-A units usingfirmware v3.1.0.1 or before. Using 7.5.1, after connecting to the CV2-A, thefirmware should be upgraded to v3.1.3.1 or greater to allow operation with robot controllers.5.Fixed a problem for when the Vision Guide window was opened in offline modefor RC+ sessions other than the first session and PC vision or virtual cameraswere being used in the project, then an exception occurred.6.Fixed a problem for upward camera calibration when the specified RobotTool haslarge offsets. The calibration could not be performed.7.Fixed a problem for VGoCenter. The Abort button was not stopping theprocess.8.Fixed AngleObjResult for the Point object. You could only select up to result 2.9.Now HDRMode is prevented when using a color camera and ImageColor is notGrayScale.10.Fixed a problem for changing to program mode during startup in auto mode. Ifthe control device was remote, and there were background tasks running, youcould not stop the background tasks.11.Fixed a problem where when using Compact Vision, if you changed the size of amodel window, the model should have been deleted, but after restarting RC+ orthe CV unit, the model was still valid.12.Fixed a problem for OCR ExportFont for when a network URL is used.13.Fixed a problem for importing a vision sequence that included a Contour objectwith a taught model. The model file was not being imported.14.Fixed a problem for CodeReader when CodeType is set to EAN13 andCode128OutputChecksum is set to True.15.Fixed a problem for OCR where if the object was renamed, the model data waslost.16.Fixed a problem for the Point object. When copied, the CenterPointObjectproperties were not copied.17.Fixed a problem for the ColorMatch object. If the SearchWinType was changedto Circle, an invalid error "Illegal value for Type property" occurred.Part Feeding18.Added the ability to import multiple parts at the same time from another project.19.Fixed a problem where the ThresholdColor property setting in the part blobsequence was not being used by the system.20.Fixed a problem where a user aborted error was occurring instead of the correcterror during PF calibration.API21.Fixed a problem for the API EStopOn property. A “String was not recognizedas a valid Boolean” exception was occurring.Simulator22.Fixed a problem where the default name of the Surveillance area and theSurveillance plane object could not be changed to more than 16 characters eventhough it exceeds 16 characters. The simulator now allows these names to be upto 32 characters in length, including Box, Sphere, Cylinder, and Plane objects.23.Fixed a problem where when the collision margin was enabled for a mobilecamera, the collision was detected even though it did not collide with otherobjects.24.Fixed a problem where the rotation guide displayed when rotating theSurveillance area object by mouse operation was not displayed correctly.25.Fixed a problem where RC+ crashes when acA1600-60gm and acA1600-60gc areselected in the camera addition dialog.26.Fixed a problem where the Hand object and the Force sensor would collide.27.Fixed a problem where RC+ crashes when the Pick, Place, and SetParentproperties are used in the SimSet command.28.Fixed a problem where it took a long time to open a project that uses many pointfiles.29.Fixed a problem that RC+ might crash when pressing the Teach button in theteach dialog.AOIThe SPEL_Reset AOI has been added. Controller firmware version 7.5.1.0 or greater is required.SPEL_Reset AOIDescriptionResets the robot controller to an initialized state.Common Inputs and OutputsRefer to section 2.4 Function Block Common Inputs and Output in the PLC Function Block manual. OperationRefer to section 2.5 Function Block General Operation in the Function Block manual.Refer to the Reset Statement in the SPEL+ Language Reference manual. The SPEL_Reset AOI performs the same functionality as the SPEL+ Reset statement. Note that the Reset Error statement described in the SPEL+ language reference is not the same as the SPEL_ResetError AOI. The Reset Error statement is for use in SPEL+ programs with advanced task commands enabled in the controller so that a system error can be reset from withing a program and is not required for PLC control. The SPEL_ResetError AOI is for resetting an error that occurred during an AOI execution.Vision GuideCamera & Lens Selection ToolA camera and lens selection tool is provided in the EpsonRC70\Tools folder after installation. A PDF file with instructions is provided in the folder.Parameter Tuning ToolA sample project for a vision parameter tuning tool is provided inEpsonRC70\Projects\Samples\Vision\VGTuningTool. A PDF file with instructions is provided in the folder. The GUI Builder option is required to use this tool.。
AOC显示器基本型号及全参数
显示器尺寸对应的最佳分辨率AOC V24t详细参数切换到传统表格版基本参数显示参数面板控制接口外观设计其它显示器附件保修信息基本参数•产品定位:娱乐影音•屏幕尺寸:23.6英寸•屏幕比例:16:9(宽屏)•最大分辨率:1920x1080 •最佳分辨率:1920x1080•高清标准:1080p(全高清)•面板类型:TN•背光类型:CCFL背光•动态对比度:60000:1•黑白响应时间:5ms显示参数•点距:0.2715mm•亮度:300cd/㎡•可视面积:521.28×293.22mm •可视角度:170/160°•显示颜色:16.7M•扫描频率:水平:30-80KHz垂直:55-75Hz•带宽:148.5MHz 面板控制•控制方式:按键•语言菜单:英文,德语,法语,意大利语,西班牙语,俄语,葡萄牙语,土耳其语,简体中文接口•视频接口:D-Sub(VGA),HDMI,色差,S端子,复合信号CVBS •其它接口:TV,音频输出外观设计•机身颜色:黑色烤漆,银色底座•外观设计:超薄设计,最薄处2.5cm•产品尺寸:595.4×483.54×220.13mm(包含底座)668×565×117mm(包装)•产品重量:5.5kg(净重)7.5kg(毛重)•底座功能:倾斜•音箱:内置音箱(2×2.5W)•壁挂:100×100mm其它•电视功能:支持电视功能•HDCP:支持HDCP•电源性能:90~240V交流, 50/60Hz External Adapter•消耗功率:最大:60W待机:1W•安规认证:CCC, CB, CE, GOST,EPA •其它性能:仰角:-3-10度•其它特点:Eco Mode 5种亮度情景模式获得EPEAT金奖•上市时间:2009年06月显示器附件•包装清单:显示器主机 x1 底座 x1电源线 x1信号线 x1保修卡 x1电子光盘说明书 x1保修信息•保修政策:全国联保,享受三包服务•质保时间:3年•质保备注:整机1月内包换,2年免费上门,3年免费全保•客服电话:400-887-8007•电话备注:8:00-22:00•详细内容:在中国大陆(不包括香港、澳门特别政区)购买并在大陆地区使用的显示器,出现保修范围内的硬件故障时,凭显示器保修证正本和购机发票到“冠捷国内维修站一览表”中的任何一个维修站均可享受1个月包换,2年在规定的城市地区免费上门维修服务,3年免费保修(包含CRT及LCD面板)的123保修服务。
SVS 迅控 多媒体中央控制系统 安装使用手册说明书
感谢您购买和使用本公司产品,为确保设备可靠使用及人员的安全,在安装、使用和维护时,请遵守以下事项:1、在设备安装时,应确保电源线中的地线接地良好,请勿使用两芯插头,确保设备的输 入电源为220V/50Hz的交流电;2、如果对系统不熟悉,请咨询专业人士后再进行调试,以免误操作损坏机器;3、为防止火灾或漏电,不要将系统设备置于过冷或过热的地方,请勿将本机受雨或受 潮,在阴雨或潮湿天气下如长时间不使用设备时,应拔掉设备电源插头;4、控制系统设备的电源在工作时会发热,因此要保持工作环境的良好通风,以免温度 过高而损坏机器;5、非专业人士未经许可,请不要试图拆开设备机箱,不要私自维修,以免发生意外事 故或加重设备的损坏程度;序 言目 录第一章、A型智能一体中控系统第二章、B型智能一体中控系统......................................2第三章、C型智能一体中控系统......................................4第四章、D型智能一体中控系统......................................7第五章、线路连接指导............................................9第六章、..........................................10、单机版中央控制软件说明...................................14第九章、网络版中央控制软件介绍...................................19第十章、常见故障排除............................................30......................................1投影机设置指导第第八章七章、一键联动设置和重要参数设置说明.....................10型号对照表:SVS 品牌对应型号:A 型中控...................................................SV-2500B 型中控...................................................SV-3200C 型中控...........SV-3300/SV-3500/SV-3550/SV-3560/SV-3600/SV-3800D 型中控...........................................SV-4500/SV-90002路麦克风接口,内置混音模块;4路强电控制接口,功放供电口、音响供电口、电动幕布供电口、投影机供电口; 内置音量控制模块,可调节麦克风和主音频输出的音量大小;投影机断电延时保护电路,更好的保护投影机;可设置一键联动控制模式;支持参数导入导出功能,方便批量安装;可选配红外遥控器控制中控系统;可选配IC卡控制中控系统;可增加内置定阻功放,2*40W;产品安装调试指导:一、线材准备1. 投影机处需要布有三芯电源线、三芯控制线、VGA线、视频线各一根;2. 电动幕布处需要布有三芯电源线一根;3. 台式电脑和笔记本电脑处各需要有两边公头的VGA线、两边3.5mm接头的音频线一根;4. 影碟机处需要有两芯控制线一根、两边莲花头的视频线一根、音频线一组;5. 数字展台和显示器处各需要有两边公头的VGA线一根;6. 功放处需要有两边双莲花的音频线一组(具体视功放接口的不同而改动);二、安装中控1. B型中控一般情况下是直接将控制面板嵌于桌面上,前面板平于或高于桌面,中控主机则放置于讲桌内部;2. 控制面板尺寸请参考下图,注意开孔尺寸必须略大于产品尺寸并小于前面板尺寸;三、红外方式控制投影机或者影碟机操作步骤在使用中控的红外功能控制影碟机、投影机等设备前,需要将这些设备的红外遥控器的信号录入到中控,以下介绍录入投影机遥控器红外信号的方法和步骤:1.长按面板上的 “主音量静音按钮5秒钟,进入红外学习状态,面板上6个信号按钮的灯同时长亮,中控主机前面板的学码指示灯长亮;2.按一下面板上的台式电脑按钮,面板上只剩下台式电脑按钮的灯长亮;3.按一下面板上的投影机的控制按钮,比如开机,主机前面板的操作指示灯闪烁一下;4.使用投影机的遥控器对着中控主机前面板的红外学习口按一下和第3步相对应的按钮,比如开机,中控主机前面板的学码指示灯闪烁一下;5.重复第3和第4步骤,直到4个投影机的控制按钮都学习完毕;6.长按面板上的按钮退出红外学习状态,面板上6个信号按钮的灯全部熄灭;7.把中控主机和投影机使用红外控制线连接起来,注意投影机端的发射头要对着投影机的红外接收点;”“主音量静音”8.按一下面板上的台式电脑按钮,再按投影机的控制按钮即可使用;注:如果录入的是影碟机遥控器的信号,则将步骤中需要按到台式电脑按钮和按投影机的控制按钮的步骤改为按影碟机按钮和影碟机的控制按钮即可。
唯创知音电子 WT85711功放芯片说明书
WT85711功放芯片说明书V1.02 Note:WAYTRONIC ELECTRONIC CO.,LTD.reserves the right to change this document without prior notice. Information provided by WAYTRONIC is believed to be accurate and reliable.However,WAYTRONIC makes no warranty for any errors which may appear in this document.Contact WAYTRONIC to obtain the latest version ofdevice specifications before placing your orders.No responsibility is assumed by WAYTRONIC for any infringement of patent or other rights of third parties which may result from its use.In addition,WAYTRONIC products are not authorized for use as critical components in life support devices/systems or aviation devices/systems,where a malfunction or failure of the product may reasonably be expected to result in significant injury to the user,without theWT85711输出功率Po at 10%THD+N,VDD=5V RL=4Ω3.12W(典型值)RL=2Ω5.00W(典型值)Po at 10%THD+N,VDD=3.7V RL=4Ω1.77W(典型值)RL=2Ω2.63W(典型值)・AB 类/D 类工作模式切换功能独创的AERC 技术提供优异的全带宽EMI 抑制能力优异的”噼噗-咔嗒"(pop-noise)杂音抑制能力优异的低噪扣制功能・反馈电阻300K・工作电压范围:2.5V 到5.5V 无需滤波的Class-D 结构・高达90%的效率高电源抑制比(PSRR):在217Hz 下为72dB ・快速的启动时间(150ms)低静态电流(5mA)低关断电流(<0.1pA)过流保护,短路保护和过热保护符合Rohs 标准的无铅封装应用・USB 音箱/篮牙音箱・扩音器典型应用图AB/D 切换,5.0W 单声道音频功率放大器WT85711是一款FM无干扰、AB类功放D类功放两种模式可切换的5.0W单声道音频放大器WT85711采用独创的AERC(Adaptive Edge Rate Contro1)技术,能提供优异的全带宽EMI抑制能力,在不加任何辅助设计时,在FCC Part15Class B标准下仍然具有超过20dB的裕量WT85711无需滤波器的PWM调制结构及增益内置方式减少了外部元件、PCB 面积和系统成本,并简化了设计。
十大触控一体机品牌技术参数
目录一、希沃 (1)70寸技术参数 (1)图片示例 (2)二、TCL (3)70寸技术参数 (3)图片示例 (4)65寸技术参数 (5)三、上海广电光显 (6)技术参数 (6)四、长虹 (7)65寸技术参数 (7)五、鸿合科技 (8)70寸技术参数 (8)六、创维光电 (8)70寸技术参数 (9)图片示例 (10)84寸技术参数 (11)65寸技术参数 (12)七、上海仙视 (12)70寸技术参数 (12)图片示例 (14)84寸技术参数 (15)八、夏普 (16)70寸技术参数 (16)80寸技术参数 (17)图片示例 (19)九、创显光电 (19)70寸技术参数 (20)84寸技术参数 (21)图片示例 (22)十、深圳中银科技 (23)70寸技术参数 (23)一、希沃70寸技术参数图片示例70寸图片165寸图片2二、TCL70寸技术参数图片示例70寸图片365寸图片465寸技术参数三、上海广电光显技术参数四、长虹65寸技术参数五、鸿合科技70寸技术参数产品规格:70英寸型号:HD-I7002E背光类型:LED显示比例:16:9可视角度:178°物理解析度:1920*1080Pixel图像制式/声音制式:PAL/DK,I3D功能:——工作电压:AC 90-265V,50/60Hz触摸表面材质:钢化玻璃感应方式:红外感应触摸技术特性:HID免驱触摸点数:多点触控,多点书写书写方式:手指或书写笔触摸分辨率:32767*32767通讯接口: USB存储温度/湿度:-20℃~60℃,10%~90% 工作温度/湿度:5℃~50℃,10%~90% 安装方式:壁挂或移动整机尺寸:1648.9*975.6*112.9mm重量:70KG六、创维光电70寸技术参数图片示例70寸图片565寸图片6七、上海仙视70寸技术参数图片示例八、夏普 70寸技术参数 电力消耗(W ) 230W 待机消耗功率(W ) 0.50电源要求 交流110-240V ,50Hz 屏幕显示语言 英文/中文(简体)/俄语 扬声器 (150mm×34mm )×2音频输出功率 10W×2(AV 输入,负载4欧姆,失真度为10%时) 电视调谐系统 自动预设99个频道视频彩色制式 PAL/SEAM/NTSC3.58/PAL60图像清晰度* RD 模拟信号:水平>=350,垂直>=400以上 SDTV :水平>=450,垂直>=450以上 背光源 LED 重量kg 57.5KG 外型尺寸(cm )宽×深×高 1.625 ×106 ×993mm液晶显示屏 X-GEN 面板分辨力1920(水平)×1080(垂直)下面-数字(天线输入)UHF/VHF 75q DIN 型插座下面-模拟(天线输UHF/VHF 75q DIN 型插座入)后面ー音频输入 HDMI2/电脑共用(直径3.5mm 插孔)RS-232C 9针D-sub 凸型插头电脑 15针小型D-sub,音频输入(与HDMI2共用)(直径3.5mm 插孔)后面—输入5 视频输入,音频输入后面—输入4色差输入(480I,576I,480P,576P,720P/50Hz,720P/60Hz, 1080I/50Hz,10080I/60Hz ),音频输入 后面-HDMI3HDMI(HDMI 输入)(480I,576I,480P,576P,720P/50Hz, 720P/60Hz,1080I50Hz,1080I/60Hz,1080P/50Hz, 1080P/60Hz,1080P/24Hz )侧面-HDMI2HDMI(HDMI 输入)(480I,576I,480P,576P,720P/50Hz720P/60Hz,1080I/50Hz,1080I/60Hz,1080P/50Hz,1080P/60Hz1080P/24Hz)音频输入(与电脑输入公用)(直径3.5mm 插孔))侧面-HDMI 1(ARC )HDMI(HDMI 输入)(480I,576I,480P,576P,720P/50Hz,720P/60Hz,1080I/50Hz,1080I/60Hz,1080P/50Hz,1080P/60Hz,1080P/24Hz ) 侧面-USB2(HDD ) USB2.0 前面 USB12.0侧面ー音频输出/耳机 直径3.5 插孔(音频输出)接收频道 VHF/UHF C1・C12・C13-C57 CATV SECAM/NTSC3.58/PAL60立体声/双语 丽音(NICAM )B/G ,I ,D/K A2 立体声:B/G 接收频率 模拟ATV 44.25-863.25MHz 数字DTV 55.25-863.25MHz电视制式 PAL :B/G,D/K ,I SECAM :B/G,D/K,K/K1 NTSC :M电源 由USB 提供操作系统 Win XP,Win CE,Vista,Win7,Linux,Mac,Android,Win8检测区域 153.9×86.6cmPC 连接器 USB (兼容1.1)书写方式 手指或非透明触控笔触摸定位精度 ± 2mm响应速度(单点连续) 4ms (典型值)触摸点数 6点检测方法 红外线阻隔检测方法80寸技术参数 基本规格电力消耗(W ) 260 待机消耗功率(W ) 0.50 能效指数(EEILCD ) 1.4分辨力1920(水平)×1080(垂直)外型尺寸(cm )宽×深×高 187.6×11.6×113.3液晶显示屏X超晶面板端子DVI-D 端口 1音频输出端子(HP) 1光纤数字音频输出 1Y,Pb,Pr输入端子 1USB端口 2RS-232C端口 1PC输入 1LAN(网络) 无HDMI端口 3复合视频输入端子 2声音声音输出(w) 10W+10W智能光控(opc) 有立体环绕SRS TruSurround HD图片示例九、创显光电图片示例十、深圳中银科技70寸技术参数。
- 1、下载文档前请自行甄别文档内容的完整性,平台不提供额外的编辑、内容补充、找答案等附加服务。
- 2、"仅部分预览"的文档,不可在线预览部分如存在完整性等问题,可反馈申请退款(可完整预览的文档不适用该条件!)。
- 3、如文档侵犯您的权益,请联系客服反馈,我们会尽快为您处理(人工客服工作时间:9:00-18:30)。
Industrial and Commercial Low Power Systems Computer Peripherals LCD Monitors and TVs Green Electronics/Appliances Point of Load Regulation for High-Performance DSPs, FPGAs, and ASICs
RT7295C
Absolute Maximum Ratings
(Note 1)
VIN to GND ----------------------------------------------------------------------------------------------------- −0.3V to 20V SW to GND ---------------------------------------------------------------------------------------------------- −0.3V to (VIN + 0.3V) < 10ns ----------------------------------------------------------------------------------------------------------- −5V to 25V BOOT to GND ------------------------------------------------------------------------------------------------- (VSW − 0.3V) to (VSW + 6V) Other Pins ------------------------------------------------------------------------------------------------------ −0.3V to 6V Power Dissipation, PD @ TA = 25°C TSOT-23-6 (FC) ----------------------------------------------------------------------------------------------- 1.429W Package Thermal Resistance (Note 2) TSOT-23-6 (FC), θJA ------------------------------------------------------------------------------------------ 70°C/W TSOT-23-6 (FC), θJC ----------------------------------------------------------------------------------------- 15°C/W Lead Temperature (Soldering, 10 sec.) ------------------------------------------------------------------ 260°C Junction Temperature ---------------------------------------------------------------------------------------- 150°C Storage Temperature Range ------------------------------------------------------------------------------- −65°C to 150°C ESD Susceptibility (Note 3) HBM (Human Body Model) --------------------------------------------------------------------------------- 2kV (Note 4)
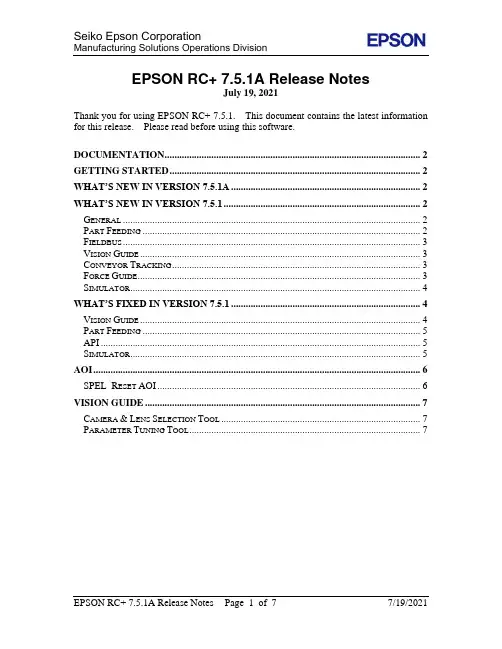
Function Block Diagram
BOOT VIN Reg VIBIAS PVCC VREF Min off PVCC UGATE Control UV & OV PVCC SW Ripple Gen. + Comparator EN GND SW VIN On-Time SW Driver LGATE GND SW VIN
is a registered trademark of Richtek Technology Corporation.
Copyright © 2015 Richtek Technology Corporation. All rights reserved.
DS7295C-07 2
October 2015
VIN VIN RT7295C BOOT SW Enable EN GND FB VOUT
Copyright © 2015 Richtek Technology Corporation. All rights reserved.
is a registered trademark of Richtek Technology Corporation.
Applications
RoHS compliant and compatible with the current requirements of IPC/JEDEC J-STD-020. Suitable for use in SnPb or Pb-free soldering processes.
Pin Configurations
(TOP VIEW)
SW VIN EN
6 5 2 4 3
Marking Information
05= : Product Code
05OOT GND FB
TSOT-23-6 (FC)
Simplified Application Circuit
SacPower 智联创新
RT7295C
3.5A, 18V, 500kHz ACOTTM Synchronous Step-Down Converter
General Description
The RT7295C is a synchronous step-down converter with Advanced Constant On-Time (ACOTTM) mode control. The ACOTTM provides a very fast transient response with few external components. The low impedance internal MOSFET supports high efficiency operation with wide input voltage range from 4.3V to 18V. The proprietary circuit of the RT7295C enables to support all ceramic capacitors. The output voltage can be adjusted between 0.6V and 8V.
OC
FB
EN
Operation
The RT7295C is a synchronous step-down converter with advanced constant on-time control mode. Using the ACOT control mode can reduce the output capacitance and fast transient response. It can minimize the component size without additional external compensation network. Current Protection The inductor current is monitored via the internal switches cycle-by-cycle. Once the output voltage drops under UV threshold, the RT7295C will enter hiccup mode. UVLO Protection To protect the chip from operating at insufficient supply voltage, the UVLO is needed. When the input voltage of VIN is lower than the UVLO falling threshold voltage, the device will be lockout. Thermal Shutdown When the junction temperature exceeds the OTP threshold value, the IC will shut down the switching operation. Once the junction temperature cools down and is lower than the OTP lower threshold, the converter will autocratically resume switching.
Features
Ordering Information
RT7295C Package Type J6F : TSOT-23-6 (FC) Lead Plating System G : Green (Halogen Free and Pb Free)