Qcapturepro软件操作说明
QTP11操作手册整理

第一章欢迎使用Quick Test Professional1.1QTP的背景知识◆QTP是HP公司花了45个亿收购的美科利产品套件之一◆QTP是继WR产品之后推出的以VBS内嵌语言的工具◆QTP是一款用于功能测试的自动化测试工具◆QTP可以和HP的QC产品协作进行自动化测试开发(BPT)◆QTP是一款容易掌握但价格很高的测试自动化工具HP Quick Test Professional支持功能测试和回归测试自动化,用于每个主要软件应用程序和环境,此解决方案使用关键字驱动的测试概念,简化了测试创建和维护过程,它使测试人员能够使用专业的捕获技术直接从应用程序屏幕中捕获流程来构建测试案例。
测试专家还可以通过集成的脚本和调试环境完全访问内在测试和对象属性。
自动化测试包括单元测试自动化,性能自动化,功能自动化。
QTP就属于是功能自动化测试。
1.2QTP文档的概述本手册分成十章课程,在每一个课程中你都会以Quick Test 内附的范例Mercury旅游网站为例作为练习的对象,建立并执行自动化测试脚本(script)。
当你完成手册的课程之后,就可以讲这些技巧应用在你的网站上面了:◆Quick Test Professional简介:比较自动测试与手动测试的差别,介绍Quick TestProfessional的测试流程,并熟悉Quick Test使用者接口,以及Mercury旅游范例网站。
◆录制测试脚本:教导你如何录制测试脚本,并且对测试脚本Keyword View做个介绍◆执行并分析测试脚本:示范如何执行测试脚本以及检查测试脚本执行的结果◆建立检查点:说明如何在测试脚本中建立检查点以验证网站上的信息,是你预期的◆参数化:示范如何通过参数化,是你可以在测试脚本中使用多组资料执行测试脚本◆建立输出值:教导你如何将网页上的数据,输出到参数中◆使用万用字符表示法:教导你如何在测试脚本中使用万用字符◆将测试脚本切割成多个测试动作:如何将测试脚本切割成多个动作,让脚本更加模块化◆从这里出发:告诉你哪里可以获得更多的Quick Test的信息。
PROII基础培训教程

PROII基础培训教程引言流程模拟是化学工程与工艺领域中至关重要的工具,它允许工程师在设计、操作和优化化工过程时进行详细的预测分析。
ProcessIndustryPractices(PROII)是一种广泛使用的流程模拟软件,它为工程师提供了一个全面的平台,以模拟和分析各种化工过程。
本教程旨在为初学者提供PROII的基础知识,通过系统的学习和实践,使读者能够掌握该软件的基本操作,并能够进行简单的流程模拟。
第一部分:PROII软件概述1.1软件背景ProcessIndustryPractices(PROII)是由AspenTechnology公司开发的一款化工流程模拟软件。
它自1982年推出以来,已经在全球范围内的化工、炼油、石化等行业中得到了广泛的应用。
PROII以其强大的物性数据库、精确的单元操作模型和用户友好的界面而闻名,是化工工程师进行流程模拟和优化的首选工具。
1.2软件功能PROII软件提供了从物料平衡、能量平衡到设备尺寸计算等全方位的模拟功能。
其主要功能包括:物性计算:软件内置了广泛的物性数据,能够计算纯物质和混合物的热力学性质。
单元操作模拟:提供多种单元操作的模型,如反应器、塔器、换热器等,用于模拟实际工艺流程。
流程分析和优化:可以对整个工艺流程进行分析,进行灵敏度分析和优化操作。
数据集成:能够与其他软件如Excel、数据库等进行数据交换,方便数据管理。
1.3软件界面PROII的用户界面设计直观,主要分为菜单栏、工具栏、流程图绘制区、数据输入区和输出窗口。
用户可以通过拖拽方式在流程图绘制区添加单元操作,并通过数据输入区输入相应的参数。
第二部分:PROII基本操作2.1软件启动与新建项目启动PROII软件。
选择“新建项目”选项,输入项目名称和保存位置。
在弹出的对话框中设置单位系统和物性方法。
2.2流程图的绘制使用工具栏中的绘图工具绘制流程图。
添加单元操作:通过菜单或工具栏选择单元操作,拖拽到流程图中。
第十二章 自动测试工具QTP的使用

QTP的安装和配置 12.1 QTP的安装和配置
这时,如果在其他应用程序的界面上做任何的操作,QTP并 不会将其录制下来,而是仅录制与Flight程序相关的界面操作。 按F4键停止录制后,将得到如图12-5所示的录制结果。在关 键字视图中,可看到录制的测试操作步骤,每个测试步骤涉及的 界面操作都会在Active Screen界面显示出来。
(1)单击Quick Test Professional 安装程序,程序引导安装。 (2)出现许可协议安装界面,选择“我接受该许可证协议中的条款”,点击“是”。 (3)在弹出的许可证类型中选择“单机版”,点击“下一步”。 (4)填写注册信息,点击“下一步”。维护号是随着你的Quick Test Professional包装提 供的。 (5)在弹出的启用Quick Test Professional远程执行界面中选择“自动设置这些选项”, 点击“下一步”。 (6)在设置Internet Explorer高级选项中选择“我将手动选择这些选项”,点击“下一 步”。 (7)在选择安装类型界面中,选择“完全”,点击“下一步”。 (8)自定义安装的目标文件夹。(QTP及其插件的安装仅支持英文路径,也就是说不能 在包含中文命名的文件夹目录中安装QTP或QTP的插件。) (9)等待安装,安装完成后弹出客户注册界面(不用点击“立即注册”),点击“下一 步”。 (10)完成后,在之后弹出的界面中选择“重启电脑”,点击“完成”。 (11)重启完成后,在界面中单击“完成”,出现图12-1所示界面。点击“取消”。
QTP的安装和配置 12.1 QTP的安装和配置
(6)使用QTP编写第一个自动化测试脚本图12-4 Flight程 序界面 设置成仅录制Flight程序后, 选择菜单 “Automation | Record”, 或按快捷键F3,QTP将自动启动 指定目录下的Flight程序,出现如 图12-4所示的界面,并且开始录 制所有基于Flight程序的界面操作。
QTP工具使用培训_基础应用

QTP工具使用培训_基础应用QTP (Quick Test Professional) 是一款功能强大的自动化测试工具,用于自动化执行软件功能测试和回归测试。
在这篇文章中,我将简要介绍QTP工具的基本应用和使用培训。
1.脚本录制和回放:QTP可以通过录制用户在应用程序上的操作来创建测试脚本,并可以回放这些脚本以执行测试。
录制和回放功能可以大大减少测试工作的时间和工作量。
2.对象识别和操作:QTP可以通过对象识别机制自动识别应用程序的各种用户界面元素,如按钮、文本框、复选框等,并可以对这些元素执行各种操作,如输入文本、点击按钮等。
3. 数据驱动测试:QTP可以从外部数据源(如Excel文件、数据库等)获取测试数据,并将这些数据应用于测试脚本,从而实现数据驱动的自动化测试。
4.条件和循环:QTP提供了条件和循环语句,可以根据不同的条件执行不同的操作,或者在特定条件下重复执行一些操作。
这使得测试脚本的编写更加灵活和复杂。
5.错误处理和异常处理:QTP可以捕捉和处理测试中的错误和异常情况,以便及时发现问题并采取相应的措施。
错误处理和异常处理功能可以保证测试的稳定性和可靠性。
以上仅是QTP工具的基本应用,QTP还提供了许多其他高级功能,如断言、日志记录、控制流程等。
要熟练地使用QTP工具,通常需要参加相关的培训课程。
1.QTP工具介绍:培训课程开始时,会对QTP工具进行详细介绍,包括其功能特点、适用范围、安装和配置等方面的内容。
学员可以通过这部分课程了解QTP工具的基本知识。
2.脚本录制和回放:接下来,学员将学习如何使用QTP工具进行脚本录制和回放。
培训课程会详细介绍录制和回放功能的使用方法,并提供实际的案例来进行演示和讲解。
3.对象识别和操作:学员将学习如何使用QTP工具进行对象识别和操作。
培训课程会教授学员如何使用对象识别器对应用程序进行对象识别,并演示和讲解如何对各种界面元素进行操作。
4.数据驱动测试:培训课程将介绍如何使用QTP工具进行数据驱动测试。
TracerDAQpro 使用说明
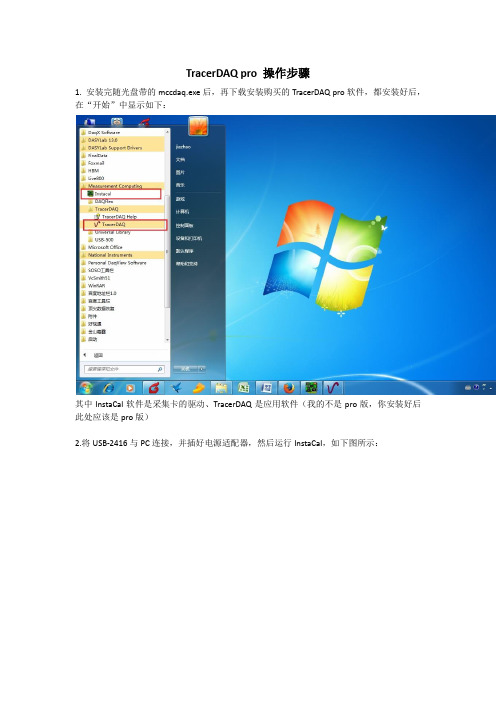
TracerDAQ pro 操作步骤1. 安装完随光盘带的mccdaq.exe后,再下载安装购买的TracerDAQ pro软件,都安装好后,在“开始”中显示如下:其中InstaCal软件是采集卡的驱动、TracerDAQ是应用软件(我的不是pro版,你安装好后此处应该是pro版)2.将USB-2416与PC连接,并插好电源适配器,然后运行InstaCal,如下图所示:正常情况下,InstaCal检测到USB-2416,并显示该卡的图标,分配编号(Board0)。
3.双击上图中Board#0图标,如下图所示(配置通道和设置采样率)。
选择Analog-In Channels 选项卡,显示如下:(1)在Sensor Category中选择测量信号类型,只有两个选项:voltage和thermocouples。
5个测温通道按类型选择相应的热电偶即可,其余5个电流通道和5个电压通道都选择电压测量即可(因为通过变送器都转为了电压)。
(2)在ConnectionType中选择单端、差分,对本应用而言,电压测量选择“单端”,热偶测量选择“差分”。
(3)Data rate是通道的数据率(但不是最终的采样速率),这个东西不好说清楚,只能是它正比于最终的采样率,选择一个合适的值即可,太大了,容易引入噪声。
设置好后,点击“确认”退出。
注意:在InstaCal中设置完成后,最好不要退出InstaCal,最小化即可。
4. 运行TracerDAQ(你的是TracerDAQ pro),显示如下:选中第1项“Strip Chart”,点击运行,如下图所示:这里要着重说明一下channel和lane的区别。
这两个词汇都是TracerDAQ pro中的概念,channel是测量通道(用ch表示),TracerDAQ pro可以测量48个channel;lane是显示窗口,如上图中的灰色区域,就是一个lane,TracerDAQ pro最多有8个lane。
tracepro使用指南
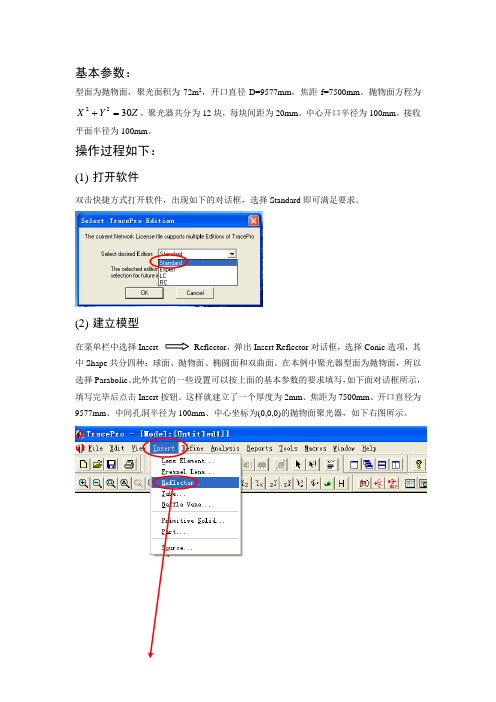
基本参数:型面为抛物面,聚光面积为72m 2,开口直径D=9577mm ,焦距f=7500mm 。
抛物面方程为 Z Y X 3022=+,聚光器共分为12块,每块间距为20mm 。
中心开口半径为100mm 。
接收平面半径为100mm 。
操作过程如下:(1) 打开软件双击快捷方式打开软件,出现如下的对话框,选择Standard 即可满足要求。
(2) 建立模型在菜单栏中选择Insert Reflector ,弹出Insert Reflector 对话框,选择Conic 选项,其中Shape 共分四种:球面、抛物面、椭圆面和双曲面。
在本例中聚光器型面为抛物面,所以选择Parabolic 。
此外其它的一些设置可以按上面的基本参数的要求填写,如下面对话框所示,填写完毕后点击Insert 按钮。
这样就建立了一个厚度为2mm 、焦距为7500mm 、开口直径为9577mm 、中间孔洞半径为100mm 、中心坐标为(0,0,0)的抛物面聚光器,如下右图所示。
要想从不同角度观察模型,可以从通过以下菜单进行操作。
其中和按钮比较常用,为全局放大,为对模型进行旋转观测。
要想观测模型的不同效果可以点击菜单栏View选项,有Silhouettes、Render、Wireframe、Hidden Line四个选项可供选择。
(3)分割聚光器按要求聚光器共分为12块,每块间距为20mm。
此处应用布尔运算对聚光器进行分割。
首先创建X向尺寸为10000mm(要比聚光器的开口直径大一些),Y向尺寸为20mm(为每块聚光镜的间距尺寸),Z向尺寸为5000mm(要比聚光器开口深度略大)的薄板,具体参数设置如下对话框所示。
薄板创建完成后,点击鼠标右键,出现下拉菜单,选择Rotate选项,对应弹出Rotation Selection 对话框,按对话框中参数填写完成按Copy按钮。
此操作共进行5次。
最终完成结果图如下所示。
Ctrl键加鼠标左键依次选择抛物镜面和各个薄板,点击鼠标右键,选择Subtract选项,对其进行布尔减运算。
QTP9.2基本操作讲义
检查文字
选取要建立检查点的文字
建立文字检查点
储存测试脚本
选择要建立检查点的文字
建立文字检查点
点选[Insert Text Checkpoint]开启[Text Checkpoint Properties]对 话窗口,当[Checked Text] 出现在下拉式清单中时,在 [Constant]字段会显示你刚 刚选取的文字。这也就是 QuickTest在执行测试时所 要检查的文字。
运行分析测试
⊙选择”Tool>Options”菜单, 如图选择Run标签页: 注意“Save step screen capture to test results”这 一项,它是用来设置需要在测 试结果中保存哪些图象信息的。 一般情况下我们选择“on error”或“on error and warning”,即在回放测试过程 中出现问题时,保存图象信息。 为了更多的展示QuickTest的功 能,我们在这里暂且选择 “select always”。
1、如果选择“Record and run test on any application”单选按钮,则在 录制过程中,QuickTest会记录你对所有的Windows程序所做的操作。 2、如果选择“Record and run on these application (opened when a session begins)”单选按钮,则在录制过程中,QuickTest只会记录对那些 添加到下面“Application details”列表框中的应用程序的操作(你可以通 过“Add”、“Edit”、 “Delete”按钮来编辑这个列表)。 3、选择第二个单选按钮。因为只是对浏览器进行操作,不涉及到Windows程 序,所以保持列表为空。点击“确定”按钮,开始录制了,你的IE被打开, 并连接到了服务器上。
Spectra Precision Survey Pro软件及其他产品说明书
Survey Pro SoftwareSurvey Pro: Simply The BestIncludes Spectra Precision Central:Spectra Precision’s cloud computing solution.S U R V E Y P R Oit meets rigorous MIL-STD-810G military standard for drops, vibration, humidity and extreme temperatures, and with an IP67 rating, it’s designed to keep your investment and your data safe. The Ranger 3 comes standard with 8 GB of onboard memory for storing data. Move your data fast and easily using a SDHC card, Bluetooth, USB cable, Wi-Fi, or WWAN modem.military standards the Nomad uses a high capabilities like GPS, Wi-FiSpectra PrecisionT41 Data CollectorThe Spectra Precision® T41™ Data Collector is rugged, powerful, connected and compact,offering high performance with a highresolution outdoor readable display.The slim, ergonomic design is easy tohold and enables all-day use. A newcapacitive touch-screen protected byGorilla® Glass provides intuitive andresponsive finger-tip touch capability.The T41 handheld has 3.75G cellulardata capabilities plus cellular voice andSMS capabilities.Spectra PrecisionMM20 Data CollectorThe Spectra Precision® MM20 Data Collector delivers maximum performance and reliability in a lightweight but rugged design. It’s dust- and waterproof andweighs just 380 g (13 ounces) It featureslong battery life making it a perfect tool forlong surveying tasks. The MM20 provides Bluetooth, wireless LAN (WiFi), and GSM/GPRS/3.5G modem. Top that off with a 5Mpixel camera and built-in GPS, and you havea powerful, yet inexpensive tool.Spectra Precision CentralSpectra Precision Central provides a cloud computing hub for your complete survey team to connect and exchange information from anywhere there is a data connection. A cloud service is nothing more than internet accessible data storage. It’s how you access and use the data that is really the important part. Spectra Precision Central is designed for professionals who make their living outside, doing measurements, and building the world. The PartsWeb PortalThe web portal provides an easy way to edit, manage, and use your Central accounts and data. It can be accessed with any browser from your office computer, tablet, or smart phone.Smart Phone ApplicationsSurvey Pro Central for Android and Survey Pro Central for iOS provide access with dedicated smart phone and tablet apps. These apps provide data access and a range of functionality to help you manage your data, and therefore your workday, better. Spectra Precision Central SyncCentral Sync is a tool that runs as a service on your computer and synchronizes the data files that are placed in the Central folders. This makes file management and synchronizing data with Central very easy.Survey Pro IntegrationSurvey Pro is fully integrated into Spectra Precision Central. Files are uploaded as they are created. New data is sent up to Central based on user preferences. So now, not only do Spectra Precision ultra-rugged data collectors and dedicated field software protect your data, so does Central, backing it up on a remote server. See the Spectra Precision Central product brochure for more information.S U R V E Y P R OSetupSurvey Pro setup routines are designed to get you working as soon as possible. Multiple instrument setup options using known points or resection means you can work the way you need to work. Results are conveniently displayed making it easy to check the setup. All setup data is stored and is easily reviewed and edited as necessary using the integrated data editor. If an instrument height is updated, all affected coordinates will also be updated. Survey Pro puts you in control.GNSS SetupSurvey Pro provides two main methods of configuring a GNSS survey: Mapping Plane and Calibration. With these two methods, there is nearly infinite flexibility. Calibration allows you to use a local coordinate system, often set using total stations. This keeps everything aligned which makes you more productive. Survey Pro walks you through the process and provides check routines toensure everything is spot on.Feature and Attribute collectionYou can define features like “utility pole” and “water line” using feature codes in the field or in the office. Add features and attributes as you survey. Using line features, Survey Pro will automatically draw lines in real time making it easy to verify your work before leaving the job site. Process and adjust the data in Spectra Precision Survey Office and export tocommon data formats when you are done.COGO, Inverse, and CurvesSurvey Pro software provides powerful Coordinate Geometry (COGO), Inverse and Curve functions. The calculation tools give you the power to do just about anything in the field. The end result is more productivity.Spectra Precision CentralSpectra Precision Central is a cloudcomputing solution that provides real-time data upload, backup, and download along with the tools to easily access your data wherever you are. Central is fully integrated into Survey Pro making it easy to use.Survey Pro Central for Android and iOS are the perfect companion tools. These apps allow access to your Central account so you can manage your data from just about any smart phone. These apps come with your Spectra Precision Central account.Central also has a dedicated web portal giving you compete access and control over youraccounts and account data.Active MapsSeeing your data graphically helps speed your work and ensures there are no mistakes. Survey Pro provides several exciting map features for just this reason. Active Maps provide a way to do calculations or initiate measurements right from the map views. Tap on a point to stake it. Tap two points to compute the inverse. Or, enter Survey Mode and collect points seeing them appear on the map as they are measured. Active Background Maps provide a method of importing DXF files that can be used forcalculations or staking. Select a DXF line and offset points or stake it. You have full control of the DXF file layers; hide them, show them, or freeze them. See what you need to see,how you need to see it.Stakeout / LayoutSurvey Pro provides tools to complete your stakeout tasks more efficiently. Using anactive map view or interactive features, Survey Pro navigates you to the points you need to stake, when you need to stake them. Points are checked off as they are staked, preventing you from duplicating observations.Survey Pro stores all measurement data and any as-built or as staked points that are collected. This data can then be used for cut sheet reports using Spectra Precision Survey Office or XML Style Sheets to create reports on your data collector while still in the field.Stake DTM surfaces and use the data collected to compute volumes in the field. View the resultant DTM being staked in the field to determine where additional points might be needed. Survey Pro displays cut / fill information for any location on the DTM surface in real-time.S U R V E Y P R OPower FeaturesSurvey Pro continually improves withcapabilities that make your job easier, help you work more productively, and get the job done right. Some of the most recent feature enhancements include:• Data Management ControlFlexibility in data collection with the ability to edit survey data to fix entry errors or blunders and immediately get updated coordinates. Change a rod height and see the change cascade through the file with our enhanced dynamic file viewer/editor.• Active DXFSupport staking with DXF files to enable data flow from design software to your field crews, improving efficiency on the road or construction site. Import a DXF file as a background map to select objects like lines and nodes for staking or calculations. Survey Pro also provides control over the layers you are viewing and what layers you can select objects from allowing you to see what you need to see.• Optimized WorkflowSurvey Pro contains a user customizable Home screen enabling you to configure your favorite choice of field processes to expedite your daily workflow. Easily switch between functions by selecting the home screen and choosing your next action. Also use the graphical Active Survey map screen to speed your activities. For example, tap and hold to create new points, then select your points and switch to your graphical stakeout screen to complete the task. Also, the customizable Quick Pick feature provides a custom menu that is available from most survey screens and allows you to jump to another feature and then back again quickly and easily.It’s More Than Just SoftwareWhen you choose Survey Pro, you get software built on more than 20 years of experience. You also get software that’s continually enhanced thanks to input from surveyors in the field. Many of our people—including members of the Survey Pro development team—have worked as surveyors so we understand how a small change to an existing function can help you be more productive or make your job easier. That’s why—and how—we continuously improve Survey Pro, along with all our hardware and software. So go ahead—tell us how we can make Survey Pro work even better for you — send an e-mail to ******************************RoadsImport road data from Spectra Precision Survey Office via a RXL file, which is alsoa supported format in many other CAD packages, or from a LandXML file. Multiple roads can be loaded into the road manager to use for road staking/layout. View any station and offset along the road, view a vertical profile, and see cut slope values for any station. It’s all there.Road StakeoutThe road staking capabilities enable you tostake any part and even locate catch points.Once your road has been opened, Survey Proprovides a comprehensive set of road stakeouttools and graphical views, depending uponwhich element of the road you are staking out.Quickly edit and view the road definition in thefield using the road editor. Points can also bestaked out to a predefined subgrade offset,depending upon the phase of the job you areworking on.Slope StakingSlope stake using a complete road definition,or define it yourself in the standard slopestaking screen, or just pick a point to use asthe anchor. Survey Pro displays all shots on avertical realtime map display so you can seethe profile, and quickly locate and stake thecatch point.SURVEY STANDARD™ is a complete data collection package for surveyors. It contains a complete COGO suite as well as traverse, sideshot and staking routines. SURVEY PRO shares all Survey Standard functions and adds advanced road layout routines, advanced staking routines, attribute collection, DTM routines, and much more.SURVEY PRO GNSS shares all theSurvey Pro functions, and it provides thecapability to collect data from RTK GNSSreceivers. Survey Pro GNSS software is easyto use, reduces training and simplifies setups.All staking functions are supported in theGNSS module.LEVELING MODULE Add Leveling toany module of Survey Pro to add support forlevel loops, trigonometric leveling, and digitallevel drivers.SURVEY PRO ROBOTICS shares allSurvey Pro functions and adds support forcontrolling robotic total stations. Use the datacollector at the rod to take measurements,control the instrument, and finish the surveyfaster than ever before.SURVEY PRO MAX™ is the ultimate fieldsoftware. It integrates Survey Pro Roboticsand Survey Pro GNSS functions, enablingyou to use the same job files with both GNSSreceivers and total stations.SURVEY STANDARD™ is a complete data collection package for surveyors. It contains a complete COGO suite as well as traverse, sideshot and staking routines.SURVEY PRO shares all Survey Standard functions and adds advanced road layout routines, advanced staking routines, attribute collection, DTM routines, and much more.SURVEY PRO GNSS shares all the Survey Pro functions, andit provides the capability to collect data from RTK GPS/GNSS receivers. The GNSS software is easy to use, reducestraining and simplifies setups. All staking functions aresupported when using GNSS receivers.LEVELING MODULE Add Leveling to any module of Survey Pro toadd support for level loops, trigonometric leveling, and digitallevel drivers.SURVEY PRO ROBOTICS shares all Survey Pro functions andadds support for controlling robotic total stations. Use thedata collector at the rod to take measurements, control theinstrument, and finish the survey faster than ever before.SURVEY PRO MAX™ is the ultimate field software. It integratesSurvey Pro Robotics and Survey Pro GNSS functions,enabling you to use the same job files with both GPS/GNSSreceivers and total stations.● Survey Standard▲ Survey Pro◆ Survey Pro Robotics■ Survey Pro GNSS★ Survey Pro MaxTITLE BAR/TASK BAR/MENUToggle collection mode (total station/GNSS)■★Battery status indicator●▲◆■★Map access button●▲◆■★Editable quick picks●▲◆■★Home screen●▲◆■★Build your own custom menu●▲◆■★FILEImport/export●▲◆■★JOB, RAW1, TXT, CSV, LandXML,JobXML, CR5.●▲◆■★Import Control●▲◆■★Backup/Restore●▲◆■★JOBEdit points/polylines●▲◆■★Edit alignments▲◆■★Auto linework (real time)▲◆■★View/edit raw data●▲◆■★View DTM▲◆■★Manage layers●▲◆■★Calculator●▲◆■★AU Conversions●▲◆■★SURVEY (CONVENTIONAL MODE)Backsight setup●▲◆■★Multiple point backsight●▲◆■★Traverse/sideshot●▲◆■★Quick shot4●▲◆■★Repetition shots●▲◆■★Multiple sideshots●▲◆■★Distance/angle offset●▲◆■★Corner & 2 lines●▲◆■★Corner & angle●▲◆■★Corner & offset●▲◆■★Corner & plane●▲◆■★Shoot from 2 ends●▲◆■★Resection●▲◆■★Remote elevation●▲◆■★Check point●▲◆■★Bluetooth support (Recon)●▲◆■★Solar observation▲◆■★Remote control◆★Fine turning◆★Tap to turn◆★Surface Scan2▲◆■★STAKEOUTQuick stake4●▲◆■★Cut/fill to design grade●▲◆■★Generate cut sheet data●▲◆■★Turn instrument to stake with 2-D and3-D modes◆★Remote stake from rod◆★Stake points/list of points●▲◆■★Stake to line/polyline●▲◆■★Offset staking▲◆■★Slope staking from line or point▲◆■★Stake to line and offset●▲◆■★Stake to curve and offset●▲◆■★Stake to spiral and offset▲◆■★Stake DTM▲◆■★Define a location●▲◆■★Where is next point●▲◆■★Slope stake from a point▲◆■★Station staking▲◆■★INVERSEMultiple types●▲◆■★COGOPoint in direction●▲◆■★Intersection●▲◆■★Offset line/points●▲◆■★Corner angle●▲◆■★Compute area●▲◆■★Triangle solutions●▲◆■★Map check●▲◆■★Predetermined area●▲◆■★HD/VD to/from SD/ZA●▲◆■★Station & offset▲◆■★CURVECurve solution●▲◆■★PI and tangents▲◆■★3-point curve▲◆■★Radius point●▲◆■★Tangent to circles▲◆■★Curve layout●▲◆■★Traverse on a curve●▲◆■★Parabolic curve/layout●▲◆■★Straight grade●▲◆■★Spiral/spiral layout▲◆■★Traverse on a spiral▲◆■★ROADSImport from Trimble RXL▲◆■★Supports Survey Office roads▲◆■★Complete road data supported▲◆■★Import from LandXML Roads▲◆■★Road Stakeout▲◆■★Alignment▲◆■★Cross Sections▲◆■★Any location▲◆■★Station and Offset▲◆■★Road Slope Staking▲◆■★Designate hinges and slopes▲◆■★ADJUSTScale/translate/rotate●▲◆■★Traverse adjust●▲◆■★Fix Station Setup●▲◆■★MAP VIEWSActive Background mapsDXF Layers●▲◆■★DXF Colors●▲◆■★Select objects for survey operations●▲◆■★Active Survey MapCollect points●▲◆■★Manage linework●▲◆■★Inverse point to point or line or location●▲◆■★Create Point●▲◆■★Stake to point or location●▲◆■★Show past results●▲◆■★Survey Setup displayOccupy point●▲◆■★Backsight point●▲◆■★Base location●▲◆■★Rover location●▲◆■★Rod location●▲◆■★Follow me mode●▲◆■★SURVEY (GNSS MODE)Cell phone/radio modem settings■★GPS/GNSS status■★Network connection manager■★Base/rover setup (Smart Setup)■★Control points■★Collect point, features, offset■★Projection setup/statistics■★Remote elevation■★Projection Calculator■★Receiver file manager3■★SETTINGS (GNSS MODE)Post process■★Map Projection or Calibration (localtransformation) modes■★Adjust with projection and control update■★All stakeout functions with GPS receiver■★Please note: This chart is an abbreviated general guide tosoftware functions. All specifications are subject to changewithout notice.1. Export Only.2. Requires motorized instrument.3. For Spectra Precision and Trimble receivers.4. Only available on the Nivo C, FOCUS 8 and FOCUS 30.。
tracepro教程
TracePro教程简介TracePro是一款广泛应用于光学系统设计和分析领域的光学仿真软件。
它提供了光线追踪和非准直光线追踪两种模式,可以用于设计和优化光学元件、光学系统,以及进行光学性能分析。
本教程将介绍TracePro的基本使用方法和一些常用功能,旨在帮助用户快速上手并利用TracePro进行光学系统设计和分析。
安装和配置在开始使用TracePro之前,首先需要进行软件的安装和配置。
1.下载TracePro的安装包,并根据安装向导进行安装,确保安装过程中选择了合适的安装路径。
2.安装完成后,可以启动TracePro软件,并进行必要的配置。
例如,可以设置默认的工作目录,修改界面语言等。
TracePro界面TracePro的界面简洁直观,提供了丰富的工具和功能来进行光学系统的设计和分析。
以下是TracePro的界面主要组成部分:1.菜单栏:包含各种菜单和下拉列表,用于进行设置、导入导出文件、运行仿真等操作。
2.工具栏:提供了常用的工具按钮,如新建文件、保存文件、运行仿真等。
可以通过自定义工具栏按钮来增加或移除对应的功能按钮。
3.视图栏:显示当前文件的视图类型,可以通过点击视图栏的不同选项来切换视图。
4.图纸窗口:用于绘制光学元件和系统的图纸,可以通过拖拽和绘制的方式添加和调整光学元件的位置和属性。
5.结果窗口:显示仿真结果和分析数据,例如光强分布、传输率、反射率等。
可以通过结果窗口对仿真结果进行分析和调整。
TracePro基本操作1. 创建新项目在菜单栏选择。
流程模拟软件pro的使用步骤
流程模拟软件pro的使用步骤简介流程模拟软件pro是一款功能强大的流程模拟工具,可以帮助用户对各类业务流程进行模拟和分析。
本文将介绍流程模拟软件pro的使用步骤,帮助用户快速上手并充分发挥软件的功能。
步骤一:安装软件1.下载流程模拟软件pro的安装包,并双击运行安装程序。
2.在安装向导中,选择安装目标文件夹,并点击“下一步”按钮。
3.阅读并接受软件许可协议,然后点击“下一步”按钮。
4.选择要安装的组件和附加工具(可根据需求进行选择),然后点击“下一步”按钮。
5.选择开始菜单文件夹和桌面图标的创建方式,然后点击“下一步”按钮。
6.确认安装设置,并点击“安装”按钮开始安装流程模拟软件pro。
7.安装完成后,可以选择启动软件或者关闭安装程序。
步骤二:创建新项目1.打开流程模拟软件pro。
2.在主界面上方的菜单栏中,点击“文件”选项,然后选择“新建项目”。
3.在弹出的对话框中,输入项目名称和保存路径,然后点击“确定”按钮。
4.新建项目的界面将显示出来,用户可以在该界面上进行下一步的操作。
步骤三:导入流程模板1.在新建项目的界面上,点击“导入”按钮。
2.在弹出的对话框中,选择流程模板文件所在的位置,并点击“打开”按钮。
3.软件将自动导入流程模板,并在界面上显示出来。
步骤四:编辑流程模板1.在项目界面上方的工具栏中,选择“编辑流程模板”按钮。
2.在弹出的编辑界面中,用户可以对流程模板进行编辑。
3.用户可以添加活动节点、连接线和决策点等等,来构建完整的流程模板。
4.用户可以设置活动节点的名称、类型、所属部门等属性。
5.用户可以设置连接线的路径、条件等属性。
6.用户可以设置决策点的条件、跳转路径等属性。
步骤五:运行流程模拟1.在项目界面上方的工具栏中,选择“运行流程模拟”按钮。
2.在弹出的运行界面中,用户可以选择要模拟的数据,并设置模拟的次数。
3.用户可以点击“开始模拟”按钮,软件将开始运行流程模拟。
4.软件将显示模拟过程中的各个节点的执行情况,并生成相应的报告。
- 1、下载文档前请自行甄别文档内容的完整性,平台不提供额外的编辑、内容补充、找答案等附加服务。
- 2、"仅部分预览"的文档,不可在线预览部分如存在完整性等问题,可反馈申请退款(可完整预览的文档不适用该条件!)。
- 3、如文档侵犯您的权益,请联系客服反馈,我们会尽快为您处理(人工客服工作时间:9:00-18:30)。
此菜单为高级设置菜单
在这里也可以选择拍摄,也可以点击basicdialog如图41返回原基本对话菜单拍摄;功能和原菜单没有区别,只是选项位置发生变化。
这里可以进行软件安装驱动位置,读取原有设定数值,可视范围和采集范围的调节等。
(图41)
在图像选项卡里(如图:42)可以对要捕捉的图像进行设置,如新建图像、活动图像、连续图像等等。
3.获得菜单:
视频/数字捕获
一般视频捕获
数字/视频捕获(Digital/videocapture)
点击软件上的 (Digital/videocapture)可以弹出功能菜单。
如图:
点击preview可以进行预览,然后在选定好图象的情况下,可以点击snap进行拍摄。
你可以在这里设定6个setting值,右键点击出现saveas可以直接储存,并可以在以后的工作中,直接使用此6个setting。
你已经完成此摄像头在Windows98和WindowsMe系统下的安装。
这个介绍将帮助你在Windows2000系统下安装软件和摄像头驱动程序
1关闭计算机或者拔下摄像头
2运行我们的安装程序(QCaptureSuiteinstaller)
(必须登陆Administratorprivileges安装本软件驱动程序)
(图42)
(图43)
在预览选项卡里可以设置曝光时间、区域、缩放。
(图44)
在捕捉选项卡里也可以设置如时间、面层、捕捉区域。
(图45)
在综合选项卡里可以设置拍摄方式等。
4.序列菜单:
音序器工具条
合并文件
剪切结构
复制结构
删除结构
粘贴结构
增加结构
摘录结构
合并图片
附属样品序列器
差别
水准
跑平均的选择
音序器工具条
可以在这里调节:gain,gamma,和offse数值
(图37)
(图38)(图39)
图40
点击autowhitebalance如图37出现如图40的界面,也可以手动调节白平衡,在调节中,会出现一个自选框,移动到自己认为白的地方即可;也可使用自动白平衡,选择空的画面,或者认为图片大部分已经颜色较好的情况下,在uselast…前打上勾,点击calculate键如图40;也可使用相对颜色进行具体调节,在RGB的数字框上可以手动调节白平衡,红、绿、兰增益的调节使您可以得到满意的图象色彩如图37。通过在工具栏上下浮动钮,在增益属性页中调节红增、绿、兰即可。比如您觉得颜色偏红,可以适当的减小红增益。
(必须登陆Administratorprivileges安装本软件驱动程序)
3打开你的摄像头
4插入光盘并打开驱动安装程序
(1)如果你是第一次安装这个摄像头的驱动,你必须做这个第四步骤
(2)每一次你在这个系统下添加新的摄像头,你需要重新修复这个安装程序
(3)如果你已经在这个驱动下使用过这个摄像头,这个程序只是一个升级的补丁,可以不安装此步骤
(图22)
点击Browse选择安装路径,点击next如:图22
(图23)
选择安装后是否立即重新启动机器
点击Finish完成安装。如:图23
软件安装全部完成。
Qcapturepro软件使用说明书
首先请注意,此软件要求采集卡,摄像头和加密狗同时存在才可运行。
采集卡请确认安装在电脑主板的空余插槽上。
如没有加密狗,会出现如图24:
点击more,进入更多的功能菜单
点击advance,进入高级选项
(图36)
点击more后进入此图:
在多功能菜单中,可细致调节可视范围以及采集范围,调节好数值后会出现一个相应的蒙板,可以移动确认。(注:视野范围只可缩小,不可扩大)调节可视范围(pvw)如图38和采集范围(acq)如图39.
采集深度(CaptureDepth)这里的下拉菜单里包括4个选项如图37,随着bit数的降低,可以拍摄黑白图片(注:前两种为彩色,后两种为黑白图片)
在列表里可以选择不同的荧光染料.
点击透镜列表如:图29
(图29)
在透镜列表里可以新建、编辑透镜的倍率、介质等条件。
点击转换选项如图30
(图30)
可以把图片转换成不同颜色类型。
点击旋转图象选项如图31
(图31)
可以向左或向右旋转翻转图片。
点击信息选项如:图32
(图32)
可以看到图片相关信息,如大小、时间、格式等。
(图55)
参数选择:
(图33)
Application申请表如:图33这里可以选择更新比率
(图34)
Document文件档案如:图34这里可以存贮你设定好的所有数值
(图35)
statusbar状态栏如:图35这里可以调节软件的右下的状态栏中显示的象素值、AOI数值AOI范围刻度单位等。
注:此菜单为默认设置为好,改变会影响摄像头部分运行程序。
Windows2000系统将提示你这个驱动没有签名
点击Yes如:图一
(图一)
你已经完成此摄像头在Windows2000系统下的安装。
这个介绍将帮助你在XPProfessional系统下安装软件和摄像头驱动程序
1关闭计算机或者拔下摄像头
2运行我们的安装程序(QCaptureSuiteinstaller)
退出
这里显示4个历史记录,可以直接点击打开
打开和保存图象
工具栏上的 和 按钮分别对应了打开和保存操作。您可以打开或保存为多种格式的文件。这里你可以打开已经拍摄过的图片进行更加细致的加工,也可以对图片和所要拍摄的图片进行简单的比较。
2.编辑菜单:
撤消
剪切
复制
粘贴
粘贴新的
粘贴设置
aoi
注释
颜色列表
透镜列表
5.提高菜单:
显示范围
对比增强
测试长带
转换形成对比
重新设置
点击显示范围选项
(图49)
如图49所示可以移动左右两边的绿色竖线,两条绿线之间所夹的区域可以延横轴左右移动来选择范围。
点击对比度增强选项如图50:
(图50)
可以调节亮度,对比度,伽玛值等。
调节对比度可以在这里存储,在下次使用时可以直接读取。
点击teststrips出现下一级菜单如:图51
(图24)
Qcaptureproisrunninginafull-featuremode.Youmayacquire,process,measure,andprintyourimages.qcaptureproreverttoademonstrationmodein13days.
TopurchaseQcapturepropleasecontactyourdealer.
3打开你的摄像头
4插入光盘并打开驱动安装程序
(1)如果你是第一次安装这个摄像头的驱动,你必须做这个第四步骤
(2)每一次你在这个系统下添加新的摄像头,你需要重新修复这个安装程序
(3)如果你已经在这个驱动下使用过这个摄像头,这个程序只是一个升级的补丁,可以不安装此步骤
在你插入摄像头几秒以后,系统将提示你找到硬件和驱动程序。(如果系统比较慢,请稍等30秒种)
在你插入摄像头几秒钟后,你会发现系统弹出FoundNewHardwareWizard
点击Next如:图二
(图二)
系统将通报你这个驱动没有签名
点击ContinueAnyway如:图三
(图三)
完成找到的硬件安装向导
你已经完成此摄像头在XPProfessional系统下的安装。
QCapturepro软件安装说明
1关闭计算机或者拔下摄像头
2运行我们的安装程序(QCaptureSuiteinstaller)
(必须登陆Administratorprivileges安装本软件驱动程序)
3打开你的摄像头
如果你是第一次安装这个摄像头的驱动程序,你需要等待提示为"Buildingdriverinformationdatabase"的对话框完成安装。
曝光时间可以对pvw和acq进行同时调节
由于环境光线的差异以及镜头光圈的大小,采集的图象有时会过亮或过暗,这与您设置的曝光时间有关。若使用自动曝光,请您选择自动曝光选项(如图36的Autoexparea),这时在图象中心出现一个矩形框,请确保矩形框内的亮度符合您的环境真实亮度。
在调节面层(binnin)的时候,如果担心曝光会有影响,请在AdjustExp…前面打上勾,这样可以自动随着binnin调节曝光
Qcapturepro是一个在整体特征的情况下才能运行的。你可以捕获,加工处理,测量和打印你的图片。Qcapturepro将在13天内回复你一个示范说明。欲购买Qcapturepro请联系你的经销商。
如摄像头没有安装,会出现如图25:
(图25)
1.文件菜单:
新建
打开
图象数据库
重新装入
关闭
保存
另存为
档案
(图46)
点击operation如:图46可以进行设置,出现下图:
(图47)
在framerate中,数值越大,图片转换时间越短(如图47)
可以选择3中不同的播放形式,循环,连续,自动倒转(如图47)
(图48)
在序列菜单中选择几张图片,然后软件会将几张图片合成一个图像文件(如:图48)在上图可以清楚地看出三张图片被合并成文件名为:untitle024(1/3)的文件,1/3分母表示的是图片的总和,分子表示的是第几张图片。Mergefiles选项可以打开多张图片进行合并。Cutframes和pasteframes组合可以将一张图片和另一张图片进行合并。Extractframes可以将合并的图片进行分解。Mergeimages….选项可以对多个需要的图片进行选择性合并。