Sartorius 系列电子天平使用说明
赛多利斯电子天平操作规程
赛多利斯电子天平操作规程
《赛多利斯电子天平操作规程》
一、前言
赛多利斯电子天平是一种高精度的电子称重设备,广泛应用于实验室、生产车间等场合。
为了保证电子天平的精确度以及延长使用寿命,我们制定了以下操作规程。
二、操作步骤
1. 开机准备
a. 检查电源线是否连接正常。
b. 打开电源开关,待电子天平屏幕显示稳定后即可进行下一步操作。
2. 校零
a. 将电子天平的托盘清洁干净。
b. 按下“Tare”按钮,等待屏幕归零后即可进行称量操作。
3. 称量
a. 将待称量物品放在电子天平托盘上。
b. 读取屏幕上的重量数据,并记录下来。
4. 关机
a. 将待称量物品从托盘上取走。
b. 关闭电源开关。
三、注意事项
1. 在使用电子天平前,务必检查天平的稳定性,托盘是否干净。
2. 在称量物品时,避免将液体、灰尘等杂质接触到电子天平。
3. 长时间不使用时,及时关闭电源,以减少机器的耗电和磨损。
四、维护保养
1. 定期对电子天平进行清洁和校准,确保准确度和稳定性。
2. 在清洁时,使用柔软的布擦拭托盘和屏幕,避免使用化学清洁剂。
3. 严格按照厂家要求更换零部件,定期进行维护保养。
五、结语
赛多利斯电子天平是一种高精度的称重设备,正确的操作和维护对于其性能和寿命至关重要。
希望使用者能够严格按照本规程进行操作,并加强维护保养工作,以确保电子天平的正常使用和精准度。
Sartorius XQ 6100 6100 B电子搅拌计量秤使用及操作指南说明书
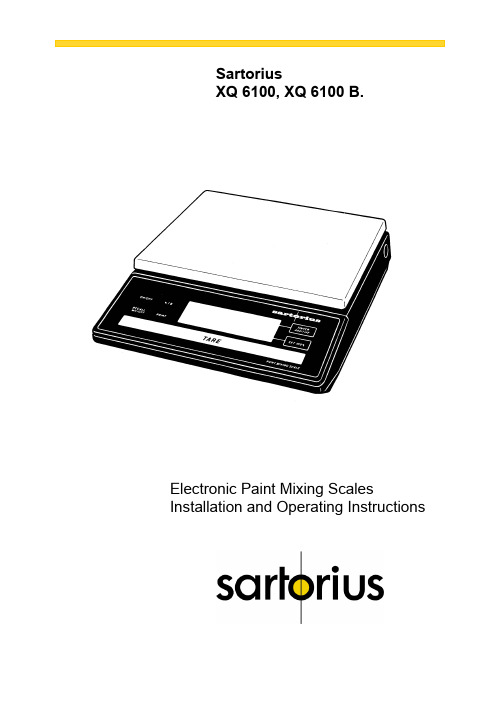
SartoriusXQ 6100, XQ 6100 B.Electronic Paint Mixing ScalesInstallation and Operating InstructionsSartoriusXQ 6100, XQ 6100 B.Please read these installation and operating instructions care-fully before operating your new scale.With this Sartorius Scale you have acquired a sophisticated,user-friendly electronic precision weighing instrument whichwill enable you to consistently match any colour to meet yourpaint supplier's high quality Standards.When operating this scale, please observe a few simple basicrules.Should you have additional questions after familiarizing yourpaint with this manual, please contact your paint supplier.2Contents.PageEquipment Supplied 5Installation Instructions 6Startup 7 Operation 8 Examples for Paint Mixing 9Calibration 15 Accessories (Options) 17Spezifications 1734 1 Weighing pan 2 Power receptacle3 Weight and linear range display4 TINTER/ADDITIVE key5 Set 100% key6 Access switch (for calibration)7 Tare control 8 PRINT key (functions only if the scalehas a built-in interface)9 RECALL WEIGHT-Taste 10ON/OFF key11 %/g key 12Manufacturer’s label (on the bottom of thebase plate of the scale)5Equipment Supplied. Do not miss out on the benefits of our warranty. Please fill out the warranty card, indicating the date of installa-tion, and return the card to your Sartorius dealer. Carefully unpack the scale and the accessory components. Save all packing material for future use. The equipment supplied comprises the components shown on the left: - Scale - Dust cover - AG adapter - Weighing pan lf you wish to send in your scale for repair work, please pro-ceed as follows: - remove all splashes or spills of paint - include a description of the equipment failures/faults. This will save you time and unnecessary expense for servic-ing. Please replace the cardboard between the scale base and the weighing pan (1) to prevent damage to the weighing system during shipment.6 Installation Instructions.Your Sartorius Scale provides exact readouts even under less than ideal conditions.However, exposure to extreme heat, vibrations or drafts may adversely affect the weighing accuracy and should be avoided whenever possible.The scale can be adapted to your particular requirements and to the specific ambient conditions simply by changing the menu code settings in the scale operating program. Please contact your dealer for assistance.After you have plugged your scale into the AC adapter and turned it on, allow for at least 30 minutes warmup. Once the scale has been warmed up, the STANDBY feature will enable you to skip the warmup procedure.Important NoteMake sure to unplug the AC adapter from the wall outlet be-fore you connect or disconnect additional devices (printer or PC) to or from the interface connector (Option). Startup.Remove the white backing from the adhesive disks on the dust cover. Attach the dust cover to the scale base by slightly pressing down on the adhesive disks.Mount the weighing pan (1) on the scale.Double-check to be sure that the base dust cover does not come in contact with the weighing pan.Your scale is powered by an AC adapter. Check that the volt-age rating printed on this unit is identical to your local line voltage.Plug the line cord of the adapter into the power receptacle of the scale. Now plug the AC adapter into an electrical or wall outlet.Whenever possible, avoid connecting your scale to over-loaded networks (compressors or similar equipment).lf you have problems with your local line power supply, use a suitable voltage stabilizer or an emergency power supply unit (Option). Be sure to contact your dealer for technical informa-tion.7Operation.Press the ON/OFF key (10) to turn the scale on or off. The display will go out whenever you turn off the scale. All other circuits will remain energized (STAND-BY state). This means the scale is immediately ready to operate without re-quiring warmup the next time you switch it on. Important Note To use the STANDBY feature, the scale must have been plugged into the AC adapter for at least 30 minutes (initial warmup). After the scale is turned on, an automatic self-test of the scale's electronic circuitry is performed. This self-test ends with the readout 0.0 g. Any other readout indicates an error. In this case, please con-tact your dealer, describing exactly what the display reads8 lf you wish to use a Container or if the weight display does not indicate 0.00 g (or the equivalent with the weight unit of your choice), press the tare control to zero the display.Important NoteThe small circle in the lower left-hand corner shows that the scale has been exactly tared so the display reads "0."Do not wait to replace worn dust covers.Make sure that paint spills over the sides of the housing do not harden, making the pan stick to the base. Frequent cleaning with solvents (such as paint thinner) will warp the dust cover which may then push against the pan, causing the readout to drift.9Examples for Paint Mixing. 1st Example Mix paint components with hardener (35% of the total weight of the paint quantity) and 20% thinner. The 20% thinner is in proportion to the total weight of the paint components and hardener. ——————————————————————————— Place an empty container on the scale and tare ——————————————————————————— Weigh in the 1st paint component according to your formula and then store it - press the key (4) ——————————————————————————— weigh in the 2nd paint component according to your formula and then store it - press the key (4)———————————————————————————10 You can obtain a display of the total net weight of the paint components by pressing thekey (9)——————————————————————————— To store the total net weight as 100 % –press the key (5)The decimal place will automatically disappear once the total weight is stored as 100 % or "E" will be displayed if the paint components are too light for the particular shade of paint. If "E" is displayed, press the RECALL WEIGHT key and in-crease the minimum amount of the individual paint components. ——————————————————————————— Add 35% hardener——————————————————————————— To display the momentary weight(paint components + hardener) –press the key (11)——————————————————————————— To store the total weight-press the key (9)———————————————————————————11Again, to store the total weight as 100 % – press the key (5) ——————————————————————————— Add 20% thinner Important Note: Make sure that the 20% thinner is in proportion to the total weight of the paint components and to the hardener. ——————————————————————————— to display the update total weight (paint components + hardener + thinner) – press the key (11) ——————————————————————————— The key (9) deletes the stored factor for calculation the percentages..12 2nd ExampleMix paint components with 13.5% hardener and 6.5% thinner. These percentages are in proportion to the total weight of the paint quantity(1st paint component + 2nd component = 100%).——————————————————————————— ^Place empty container on the scale and tare.——————————————————————————— To weigh in the paint components according to your for-mula and store them, see "1st Example" on page 9. ——————————————————————————— Display the total net weight of the paint components by press-ing thekey (9)———————————————————————————13To store the total net weight as 100 % - press the key (5) The decimal place will automatically disappear once the total weight is stored as 100 % or "E" will be displayed if the paint components are too light for the particular shade of paint. lf "E" is displayed, press the RECALL WEIGHT key and in-crease the minimum amount of the individual paint components.. ——————————————————————————— To store the amount as 100% – press the - key (4) ——————————————————————————— Add 13.5% hardener ———————————————————————————14 To add and store the updated total weight,press the key (4)——————————————————————————— Add 6,5% thinner——————————————————————————— Display the total net weight in percent by pressing thekey (9)——————————————————————————— To display the total net weight in the particular weight unit se-lected (in this case “g”) –press the key (11) ——————————————————————————— The key (9) deletes the stored factor for calculating the percentages.15Calibration.Have your scale checked and recalibrated, if necessary, by your dealer on the basis of a regular maintenance schedule. lf you have an accurate calibration weight (5,000 g ± 0.03 g; see Sartorius "Accessories" on page 17), proceed as follows: Remove the protective cap located on the front right of your scale and slide the access switch (6) in the direction of the ar-row. Turn off the scale, hold down the TINTER/ADDITIVE key (4) and briefly press the ON/OFF key (10). Upon the completion of the self-test release TINTER/ADDITIVE key when "C" is displayed. Unload the scale and tare. Press the TINTER/ADDITIVE key (4) when the display reads zero. "CAL" and the calibration weight readout will now be displayed.Centre the calibration weight on the weighing pan. Array Now the weight unit symbol is displayed. lt indicates the endof the calibration procedure.Relock the calibration access function by sliding the accessswitch back to its original setting, and replace the protectivecap.After calibration, use the ON/OFF key (10) to turn the scale offand then on again.Even if you do not calibrate your scale, this will not affect theaccuracy of the mixing ratio so you will always obtain the cor-rect shade of paint, provided you weigh in the componentscorrectly.However, the overall amount of your paint formula may slightlyvary.16Accessories (Options).Dust cover 69 60Q610Calibration weight (1 x 5000 g) 7072 13Antitheft locking device 6087For information on additional accessories, please contact yourdealer.Options:InterfaceExternal rechargeable batteryPrinterVoltage stabilizerEmergency power supply unitSpecifications.Model XQ 6100 XQ 6100 BCapacity g61006100 Readability g0,10,1 Tare range (by subtraction) g 6100 6100Standard deviation g ≤± 0,05 ≤± 0,5Max. linearity g ≤± 0,1 ≤± 0,5Stabilization (typical) s 1,5Display update— at stability (depends on the filter level selected— when load is changed ss0,1; 0,2; 0,40,1Adaptation to operating requirementand ambient conditions by selecting one of 3 optimised filter levelStability range d 0,25 ... 32 (selectable)Ambient temperature range K 273 — 313 (0o C .. +40o C)Allowable relative humidity % 15 ... 85 (moisture-proof rating; non-condensing) Sensitivity driftwithin 10 ... 30o C /o C ≤± 5 ∙ 10-6≤± 2,5 ∙ 10-5Pan size mm 235 x 180Scale base (W x D x H) mm 250 x 270 x 65Net weight, approx. kg 4 3,5Line voltage,(mains); frequency: 50-60 Hz115 or 230 V, depending on the AC adapter used Allowable voltage fluctuation -20% (15)Power consumption VA 7,5 (typical)Wattage rating of the scale for an inputvoltage of 12 Vw 0,55 0,3617Sartorius AGB37070 GöttingenP Weender Landstraße 94–108, 37075 GöttingenT (0551) 308-0,F(0551) 308-3289Internet: Copyright by Sartorius AG, Göttingen, Deutschland.All rights reserved. No part of this publication may beprinted or translated in any form or by any means withoutthe prior written permission of Sartorius AG.Sartorius AG reserves the right to make change to the technology, features, specification and design of the equipment without notice.。
Sartorius电子天平维护使用

天平操作将样品放于称盘中间
天平操作"sartorius建议 : 在尽可能短的时间内称量
¢ 样品或容器放入后请快速关闭 防风罩¢ 显示稳定时请尽快读数¢ 读数完成后请快速将样品拿出 称量室
天平操作
天平 操作"sartorius保持称量室和称盘的清洁 , 注意称 体与传感器轴尖之间的杂物!请使用干净的样品容器
Weighing Wisdom
电子天平的维护及使用
Weighing Wisdom·合适的安装位置·称量台·天平操作·影响称量的物理因素
称量室避免门对门建议只开一扇门
选择合适的安装位置避免房间气体对流
避免温度漂移使用恒温设备使房间温度恒定建议温度: +5℃ ~ +40℃
选择合适的安装位置不使用高瓦数的灯泡.建议使用冷光源的无窗房间.
选择合适的安装位置不要 … 让天平处于以下环境6 放于窗边而使阳光直射6 靠近加热源或辐射源6 充满腐蚀性的化学气体
1
选择合适的安装位置保持湿度的恒定建议相对湿度为: 45-60%
"sartorius
称量台称量台需要防震
"sartorius
称量台O 表面必须平整无凹陷O 无磁材料
m 水泥台面可直立或通过支架固定7 不要使用塑料 、玻璃或金属的板子覆盖 在台面上
天平操作"sartorius接通电源后 , 应预热30分钟以上平时可使天平处于备用状态
天平操作禁止用手直接接触 称量容器或样品 – 请使用镊子或其它 工具.
天平操作"sartorius禁止将手放入称量室中 – 请确认您使用地 镊子够长以便使您的手置于称量室外
天平操作尽量打开称量室窗门 以便轻松地放入容器 和样品避免称盘受到冲击
BT25S分析天平标准操作规程

Sartorius BT25分析天平标准操作规程一.目的:建立BT25S电子天平标准操作规程二.范围:适用于BT25S电子天平的使用与维护三.责任人:相关实验人员四.BT25S电子天平的使用:A 通电预热一定时间(按说明书规定);即:接通电源,打开电源开关和天平开关,预热至少30分钟以上。
也可于上班时预热至下班前关断电源,使天平处于稳定的预热状态。
B 参数选择:预热完毕后,轻轻按一下天平面控制上的开关键,天平即开启,并显示0.0000;C 天平自检:BT25S具内校功能,轻按内校校准按钮,即进行内部全自动校准,无需砝码人工校准D 放入被称物:将被称物预先放置使与天平室的温度一致(过冷、过热物品均不能放在天平内称量),必要时先用台式天平称出被称物大约重量。
开启天平侧门,将被称物置于天平载物盘中央;放入被称物时应戴手套或用带橡皮套的镊子镊取,不应直接用手接触。
并且必须轻拿轻放。
E 读数:天平自动显示被测物质的重量,等稳定后(显示屏左侧亮点消失)即可读数并记录。
关闭天平,进行使用登记。
F 调整水平;待零点显示稳定后,用自带的标准砧码进行校准;取下标准砧码,零点显示稳定后即可进行称量。
例如用小烧杯称取样品时,可先将洁净干燥的小烧杯置于称盘中央,显示数字稳定后按“去皮”键,显示即恢复为零,再缓缓加样品至显示出所需样品的质量时,停止加样,直接记录称取样品的质量。
短时间(例如2h)内暂不使用天平,可不关闭天平电源开关,以免再使用时重新通电预热。
BT25S电子天平技术参数:可读性(mg): 0.01称重范围(g) : 21称盘尺寸(mm) : ф80重复性(≤+mg): 0.02 线性(≤+mg): 0.03。
赛多利斯天平的使用方法

赛多利斯天平的使用方法赛多利斯天平是世界天平之父—德国赛多利斯集团创建于1870年,是世界称量、生物市场和技术的领导者。
其使用方法如下:1.调水平天平开机前,应察看天平后部水平仪内的水泡是否位于圆环的中央,否则通过天平的地脚螺栓调整,左旋上升,右旋下降。
2.预热天平在初次接通电源或长时间断电后开机时,至少需要30分钟的预热时间。
因此,试验室电子天平在通常情况下,不要常常切断电源。
3.称量a 按下ON/OFF键,接通显示器;b 等待仪器自检。
当显示器显示零时,自检过程结束,天平可进行称量;c 放置称量纸,按显示屏两侧的Tare键去皮,待显示器显示零时,在称量纸加所要称量的试剂称量。
d 称量完毕,按ON/OFF键,关断显示器。
赛多利斯天平注意事项:1.为正确使用天平,请您谙习天平的几种状态:a 显示器右上角显示O:表示显示器处于关断状态;b 显示器左下角显示O:表示仪器处于待机状态,可进行称量;c 显示器左上角显现菱形标志:表示仪器的微处理器正在执行某个功能,此时不接受其他任务。
2.天平在安装时已经过严格校准,故不可轻易移动天平,否则校准工作需重新进行。
3.严禁不使用称量纸直接称量!每次称量后,请清洁天平,避开对天平造成污染而影响称量精度,以及影响他人的工作。
赛多利斯天平的正确操作规程:人们把用电磁力平衡被称物体重力的天平称为电子天平。
其特点是称量精准牢靠、显示快速清楚并且具有自动检测系统、简便的自动校准装置以及超载保护等装置。
1、察看水平仪,如水平仪水泡偏移,需调整水平调整脚,使水泡位于水平仪中心。
2、接通电源,预热至规定时间后,开启显示器进行操作。
3、开启显示器。
轻按ON键,显示器全亮,约2s后,显示天平的型号,然后是称量模式0.0000g。
读数时应关上天平门。
4、天平基本模式的选定。
天平通常为“通常情况”模式,并具有断电记忆功能。
使用时若改为其它模式,使用后一经按OFF键,天平即恢复通常情况模式。
电子天平使用操作和注意事项

电子天平使用方法与维护
1、操作电子天平的主要步骤
(1)接通电源并预热使天平处于备用状态。
(2)打开天平开关(按操纵杆或开关键),使天平处于零位,否则按去皮键。
(3)放上器皿,读取数值并记录,用手按去皮键清零,使天平重新显示为零。
(4)在器皿内加人样品至显示所需重量时为止,记录读数,如有打印机可按打印键完成。
(5)将器皿连同样品一起拿出。
(6)按天平去皮键清零,以备再用。
6、注意事项:
(1) 电子天平应处于水平状态
(2)电子天平应按说明书的要求进行预热
(3)经常保持天平室内的环境卫生,更要保持天平称量室的清洁,一旦物品撒落应及时小心清除干净。
(4)称量易挥发和具有腐蚀性的物品时,要盛放在密闭的容器内,以免腐蚀和损坏电子天平。
(5)操作天平不可过载使用,以免损坏天平。
(6)放入天平的物体温度不宜太高以免损坏仪器一般温度≤70℃
本文档可编辑,内容仅供参考,需要结合您的实际情况进行修改调整。
编辑技巧:
ctrl+z是office软件撤回的操作,但是一般计算机默认只可以撤几步就不能撤了,这时我们可以通过设置word选项-高级,来设置可取消操作数即可
编辑文档时如果想要快速插入时间可以按shift+alt+d,时间显示的方式以天为单位,比如2018/3/22,按着shift+alt+t,时间显示以当天分钟为单位:08:31。
电子天平操作指南说明书

电子天平操作指南说明书一、概述电子天平是一种精密测量工具,可用于测量物体的质量。
本操作指南旨在向用户介绍如何正确操作电子天平以及注意事项,以确保准确的测量结果和安全使用。
二、器材准备1. 电子天平:确保天平正常工作,电源充足。
2. 校准物体:使用已知质量的校准物体,如标准砝码。
三、操作步骤1. 准备工作a) 将电子天平放置于干燥、稳固的平台上。
b) 打开电子天平电源,并等待其启动完成。
c) 等待天平显示屏上的数字稳定在零位。
2. 校准仪器a) 将已知质量的校准物体放置在天平盘上。
b) 按下校准键,并等待天平显示屏上的数字稳定。
c) 确保显示屏上的数字与校准物体的质量相符。
d) 如果校准不准确,可参考说明书中的校准方法进行调整,直到准确为止。
3. 测量物体质量a) 将待测物体放置在天平盘上。
b) 等待显示屏上的数字稳定,并记录下质量值。
c) 如需连续测量多个物体,记得在每次测量前将天平置零。
4. 关机a) 使用完毕后,关闭电子天平电源。
b) 清理天平盘和仪器表面的任何污渍。
c) 若长时间不使用电子天平,建议拔掉电源插头。
四、注意事项1. 保持稳定:在操作过程中,尽量避免震动或外力的干扰,以免影响测量结果的准确性。
2. 避免超重:不要将超过电子天平最大负载的物体放置在天平盘上,以免损坏天平。
3. 防止污染:保持天平盘和仪器表面的干净,避免污染物进入天平内部影响精度。
4. 小心操作:谨慎操作,避免磕碰、撞击或其他意外造成损坏。
5. 定期校准:根据使用频率和精度要求,定期对电子天平进行校准,以确保测量结果的准确性。
6. 预热时间:在使用前,让电子天平预热一段时间,以确保温度稳定。
五、故障排除1. 如电子天平无法启动或显示屏异常,检查电源是否连接正常,重启天平或联系厂家维修。
2. 如测量结果不准确,可以尝试重新校准天平,确认是否有外部干扰或其他原因造成误差。
六、总结电子天平是一种精密测量工具,正确的操作方法和注意事项对于获得准确的测量结果至关重要。
赛多利斯天平的操作使用

塑料托盘捷胜a1赛多利斯天平的操作使用赛多利斯天平的操作使用年月日: 来源:慧聪教育装备网T|T 赛多利斯天平的操作使用赛多利斯电子天平称量前的检查:取下天平罩,折叠好放在天平箱上面。
逐项检查:①称量物的温度与天平箱内温度是否相等,称量物的外部是否清洁和干燥。
②天平箱内、秤盘上是否清洁。
如有灰尘,用毛刷刷净。
③赛多利斯电子天平位置是否水平。
④天平各部件是否都处在应有位置,特别要注意吊耳和圈码。
⑤测定或调节赛多利斯电子天平的零点。
赛多利斯电子天平使用:赛多利斯天平赛多利斯电子天平的使用:赛索利斯电子天平的心脏一般是重力电磁传感器簧片(一般共有六-八片),细而薄,极易受损,且天平的精度越高,其重力传感簧片也越薄,所以在使用中应特别注意加以保护,不要向天平上加载重量超过其称量范围的物体,绝不能用手压称盘或使天平跌落地下,以免损坏天平或使重力传感器的性能发生变化;另外,称量一个物体(特别是较重的物体)一般不要超过秒钟,搬动和运输时应将称盘及其托盘取下来。
赛多利斯电子天平实际上是测量地球对放在称盘上的物体的引力即重力的仪器,而由于地球径纬度的不同,各地的重力加速度(g~ms)并不相同,在使用当地其称量准确度取决于是否进行了正确的校正和校正砝码的精度,假如您发现在广州经校正好的天平,在当地称重有一定误差,这并不表示天平有任何故障,请按各型号电子天平说明书上介绍的方法用计量部门认可的标准砝码进行校正,即可进行准确称量。
赛多利斯电子天平是一台对环境高度敏感的精密电子测量仪器,使用时应小心操作,安装台面应无明显振动,不要放在空调口,若这些条件不能满足,应采取一些改进措施,如变更使用地点,装上防风罩等,同时注意要调整底角螺丝使水平指示器的气泡居中。
天平未调好水平也是产生称量误差的原因之一。
赛多利斯电子天平的校正机构一般分三大类:全自动校正,内含标准砝码和电机伺服机构,只需按一个功能键即可在数十秒钟内完成校正,一般新型的万分之一克精度以上的电子天平均采用全自动校正机构;半自动校正:内装标准砝码但无伺服机构,在进入校正程序后,需要手动加载和卸下校正码;手动校正:天平内没有标准砝码和伺服机构,需要手动进入校正程序并外加标准砝码进行校正,一般精度较低的天平采用手动校正。
- 1、下载文档前请自行甄别文档内容的完整性,平台不提供额外的编辑、内容补充、找答案等附加服务。
- 2、"仅部分预览"的文档,不可在线预览部分如存在完整性等问题,可反馈申请退款(可完整预览的文档不适用该条件!)。
- 3、如文档侵犯您的权益,请联系客服反馈,我们会尽快为您处理(人工客服工作时间:9:00-18:30)。
BSA系列电子天平使用说明
使用步骤:
1.通过调节天平前端的地脚螺丝,调节天平平衡,使水平仪内的气泡正好位于圆环的中央。
2.检查防风罩是否已关闭好,若关闭好,则可接通天平电源后进行开机操作,天平自动去皮。
注意:若天平在操作之前需要预热30分钟。
3.将称量瓶放在天平上,听见蜂鸣声及显示示数稳定后,去皮(Tare)。
4.在称量瓶中加样品,显示示数稳定后,则显示为样品的实际重量。
按TARE键,听见蜂鸣声及归零时,开始第二次称量。
5.关闭天平。
校正:
Sartorius BSA系列电子天平的校正采用“外部校正”的方法,具体步骤:
1.天平去皮(Tare);
2.按(Cal),屏幕会显示CRL.EXE-----------“-100.0g”;
3.放置提示的校准砝码(100g)
若砝码太轻,显示“-”;砝码太重,显示“+”;砝码值一旦进入规定极限内,显示屏即停止闪烁;
4.校正结束,显示“CRL.END,+100.0g”;
5.校准砝码去除;
BS/BT系列电子天平使用说明
使用步骤:
1.通过调节天平前端的地脚螺丝,调节天平平衡,使水平仪内的气泡正好位于圆环的中央。
2.检查防风罩是否已关闭好,若关闭好,则可接通天平电源后进行开
机操作,天平自动去皮。
注意:若天平在初次接通电源或长时间断电之后,至少需要预热30分钟。
3.将称量瓶放在天平上,听见蜂鸣声及显示示数稳定后,去皮(Tare)。
4.在称量瓶中加样品,显示示数稳定后,则显示为样品的实际重量。
按TARE键,听见蜂鸣声及归零时,开始第二次称量。
5.关闭天平。
注意:不使用时天平应保持通电状态(24h),不使用时将开关键关至待机状态。
校正:
Sartorius BS/BT系列电子天平的校正采用“内部校正”的方法,具体步骤:
1.天平预热结束之后开始校正
2.开机,当显示示数为0时,按(Cal),天平进入自动校准模式;
若出现故障,显示屏出现“Err 02”信息;若正常,会显示“0.0000g”
3.自动校正结束
两台天平在使用中的注意事项:
1.实验室共两台天平,其中BSA 124S的最大量程为120g,而BT 25S 的最大量程为21g。
注意使用时不要超出其量程。
2.请勿将天平置于温度过高或过低、潮湿、剧烈振动、风大、易碰撞的环境中。
为避免潮湿,框罩内应放干燥剂。
3.在连接或断开外围设备之前,首先断开天平电源。
使用完毕关闭电源,注意保持天平内清洁,只准使用略有潮湿的布清理天平。
4.每次变换天平的安装位置后,重新调节天平平衡。
5.药品不能直接放置在称量盘上;吸湿性,腐蚀性药品必须在密闭容器内进行;被称物不能超过天平最大载荷。
6.取被称物时,利用天平侧门,随开随关动作轻缓。
7.完成一次测定,必须使用同一台天平。
维护:
一年检修一次。
赛多利斯公司可以向用户提供周期为1个月至两年的服务(BT 25S)。
清洗:
在对仪器清洗之前,要将仪器与工作电源断开;清洗时,不要使用强力清洗剂,应使用中性清洗剂(肥皂)浸润的毛巾擦洗。
用湿毛巾擦洗结束之后,用干燥的软毛巾擦干。
注意:不要让液体渗到仪器内部;粉末必须小心用刷子去除。