FCKEditor
FCKeditor使用方法详解
FCKeditor使用方法详解目录一、FCKeditor简介 (2)1.1 FCKeditor是什么 (2)1.2 FCKeditor的特点 (3)二、安装与配置FCKeditor (5)三、基本功能使用方法 (6)3.1 文本格式化 (7)3.2 段落和列表操作 (9)3.3 图片和表格插入 (10)3.4 表单字段 (11)3.5 样式和脚本 (12)四、高级功能使用方法 (13)4.1 可视编辑器 (14)4.2 自动排版 (16)4.3 批量导入/导出 (17)4.4 国际化支持 (18)4.5 客户端存储 (20)五、自定义插件与扩展 (21)5.1 如何安装插件 (22)5.2 插件的使用方法 (24)5.3 开发自定义插件 (25)六、常见问题与解决方案 (27)6.1 常见问题列表 (28)6.2 问题解决步骤 (29)七、实例演示 (30)7.1 创建一个简单的HTML页面 (31)7.2 在页面中添加FCKeditor (32)7.3 配置和使用FCKeditor的各种功能 (34)八、FCKeditor在主流开发框架中的应用 (35)8.1 PHP+MySQL环境下的应用 (36)8.2 环境下的应用 (37)8.3 Java/Spring环境下的应用 (39)九、总结与展望 (39)9.1 FCKeditor的优点 (40)9.2 FCKeditor的局限性与未来发展趋势 (41)一、FCKeditor简介FCKeditor是一款由德国Maxthon公司开发的强大的网页文本编辑器,它具有丰富的功能、高度的可定制性和易用性,被广泛应用于各种Web应用中,如论坛、博客、新闻发布等。
FCKeditor不仅提供了基本的文本编辑功能,还支持图像、表格、超链接等元素的插入和编辑,以及自定义插件和宏,可以满足用户的各种编辑需求。
FCKeditor采用了基于JavaScript的富文本编辑技术,具有高效的性能和较小的体积,可以轻松地集成到各种Web应用中。
FCKeditor (jsp在线编辑器)配置总结
FCKeditor (jsp在线编辑器)配置总结折腾了两天,从eWebEditor到CKeditor再到FCKeditor真是费足了劲了!本人比较喜欢开源的,在网上狂搜一通最后被CKeditor强大的功能和华丽的界面吸引的五体投地~~,高高兴兴的下载了CKeditor,花费了半天的时间终于把CKeditor配置好了,结果一点图片发现连个上传图片的按钮都没有(~~~~(>_<)~~~~ ),原来还需要一个CKfinder插件。
于是又兴冲冲的跑到官网上找CKfinder,找到最后却发现就是没有java版的!!!而且这个插件好像是要收费的,哎~真是郁闷死了。
不能用CKeditor那就用FCKeditor吧,呵呵,下面牢骚归正传:一、首先到官网下载最新版本的FCKeditor 2.6.5下载地址:/project/downloading.php?group_id=75348&filename=FCKeditor_2.6.5.zip FCKeditor.Java 2.6 要下的有fckeditor-java-demo-2.6.war (示例,我觉得下载这一个就够了)fckeditor-java-2.6-src.zip (源文件,如果你想看就下吧)fckeditor-java-2.6-bin.zip (我下了,但没有上)二、(1)、把FCKeditor 2.6.5解压到WebRoot下(2)、解压fckeditor-java-2.6-bin.zip,把文件夹中的fckeditor-java-core-2.6.jar以及lib中的所有jar包拷贝到你的web程序的lib中,fckeditor-java-demo-2.6.war中的slf4j-simple-1.5.8.jar也要拷进去(注意:slf4j-api和slf4j-simple的版本一定要一致)。
如果你觉得麻烦,那么就从fckeditor-java-demo-2.5.war 中直接将lib文件夹下的所有jar包复制到项目的lib中,我就是这么做的。
FCKeditor使用方法详解

FCKeditor使用方法技术详解作者:深蓝色QQ:76863715本文PHPChina论坛首发本文特为《PHP5和MySQL5 Web开发技术详解》一书编写1、概述FCKeditor是目前最优秀的可见即可得网页编辑器之一,它采用JavaScript编写。
具备功能强大、配置容易、跨浏览器、支持多种编程语言、开源等特点。
它非常流行,互联网上很容易找到相关技术文档,国内许多WEB项目和大型网站均采用了FCKeditor(如百度,阿里巴巴)。
本文将通过与PHP相结合,从基本安装到高级的配置循序渐进介绍给广大PHPer。
FCKeditor官方网站:/FCKeditor Wiki:/2、下载FCKeditor登录FCKeditor官方站(),点击网站右上角“Download”链接。
笔者编写本文时,FCKeditor当前最新的稳定版本是2.4.3,因此我们下载此版本的zip压缩格式文档。
如图1所示:图1:下载FCKeditor 2.4.3(最新稳定版)注意:当点击“FCKeditor_2.4.3.zip”链接后,将跳转到网站上自动下载。
如果您当前使用Linux或Unix系统,可以点击“FCKeditor_2.4.3.tar.gz”链接下载.tar.gz格式的压缩包。
3、安装FCKeditor解压“FCKeditor_2.4.3.zip”文档到您的网站目录下,我们先假定您存放FCKeditor和调用脚本存于同一个目录下。
目录结构如下图所示:图2:网站目录结构图fckeditor目录包含FCKeditor2.4.3程序文件。
check.php用于处理表单数据。
add_article.php 和add_article_js.html分别是PHP调用FCKeditor和JavaScript调用FCKeditor实例脚本文件。
3.1、用PHP调用FCKeditor调用FCKeditor必须先载入FCKeditor类文件。
解析文件上传漏洞从FCKEditor文件上传漏洞谈起
解析⽂件上传漏洞从FCKEditor⽂件上传漏洞谈起⽂件上传漏洞就是允许⽤户上传任意⽂件可能会让攻击者注⼊危险内容或恶意代码,并在服务器上运⾏,下⾯⼩编就为⼤家具体的讲解⽂件上传漏洞的知识,希望可以帮助到⼤家。
⽂件上传后导致的常见安全问题⼀般有:1)上传⽂件是Web脚本语⾔,服务器的Web容器解释并执⾏了⽤户上传的脚本,导致代码执⾏。
2)上传⽂件是Flash的策略⽂件crossdomain.xml,⿊客⽤以控制Flash在该域下的⾏为(其他通过类似⽅式控制策略⽂件的情况类似);3)上传⽂件是病毒、⽊马⽂件,⿊客⽤以诱骗⽤户或者管理员下载执⾏。
4)上传⽂件是钓鱼图⽚或为包含了脚本的图⽚,在某些版本的浏览器中会被作为脚本执⾏,被⽤于钓鱼和欺诈。
除此之外,还有⼀些不常见的利⽤⽅法,⽐如将上传⽂件作为⼀个⼊⼝,溢出服务器的后台处理程序,如图⽚解析模块;或者上传⼀个合法的⽂本⽂件,其内容包含了PHP脚本,再通过"本地⽂件包含漏洞(Local File Include)"执⾏此脚本;等等。
要完成这个攻击,要满⾜以下⼏个条件:⾸先,上传的⽂件能够被Web容器解释执⾏。
所以⽂件上传后所在的⽬录要是Web容器所覆盖到的路径。
其次,⽤户能够从Web上访问这个⽂件。
如果⽂件上传了,但⽤户⽆法通过Web访问,或者⽆法得到Web容器解释这个脚本,那么也不能称之为漏洞。
最后,⽤户上传的⽂件若被安全检查、格式化、图⽚压缩等功能改变了内容,则也可能导致攻击不成功。
⼀、从FCKEditor⽂件上传漏洞谈起FCKEditor是⼀款⾮常流⾏的富⽂本编辑器,为了⽅便⽤户,它带有⼀个⽂件上传功能,但是这个功能却出过多次漏洞。
FCKEditor针对ASP/PHP/JSP等环境都有对应的版本,以PHP为例,其⽂件上传功能在:配合解析漏洞。
(⼀)IIS5.x-6.x解析漏洞使⽤iis5.x-6.x版本的服务器,⼤多为windows server 2003,⽹站⽐较古⽼,开发语句⼀般为asp;该解析漏洞也只能解析asp⽂件,⽽不能解析aspx⽂件。
FCKEditor控件的配置使用
网站项目:Fckeditor使用Step-By-Step最近项目中要用到在线编辑器,网搜下下,一箩筐,众说纷纭,介绍下Fckeditor使用手记。
一.下载FCKeditor V2.*.*.官网地址:/project/showfiles.php?group_id=75348FCKeditor2.*.*.zip :Click Here.zip :Click HereFckeditorV2.*.*解压后里面文件很多,只需保留几个重要的文件,具体如下(二)。
解压后里面Bin文件夹下,有Debug和Release两个文件夹,用哪个文件夹里面的FredCK.FCKeditorV2.dll都行。
(下载不同的版本,Fckeditor文件夹里面有的有这两个文件夹,有的只有一个,关键的是要将Fckeditor和FredCK.FCKeditorV2.dll的版本号控制好,不然以后会报“未能加载未能加载类型FredCK.FCKeditorV2.Uploader”或“未能加载类型FredCK.FCKeditorV2.FileBrowser.Connector”或“未能加载类型FredCK.FCKeditorV2.Config”,当然要是遇到这种情况,只需要点击下面的错误提示,跳转到相应页面,改page指令里面的:将FredCK.FCKeditorV2.Connector改为FredCK.FCKeditorV2.FileBrowser.Connector )二. 精简文件:1.进入FCKeditor文件夹,把所有“_”开头的文件和文件夹删掉,这些都是一些范例,只保留editor文件夹、fckconfig.js、fckeditor.js、fckstyles.xml、fcktemplates.xml就可以了;2.进入editor文件夹,删掉“_source”文件夹,里面放的同样是源文件;ng里面放的是语言包,如果只是用简体中文,那么只保留zh-cn.js就行,建议也保留en.js(英文)、zh.js(繁体中文)两个文件三.修改配置:1.注入FredCK.FCKeditorV2.dll:一般网上介绍的是将Bin文件夹下的FredCK.FCKeditorV2.dll作为第三方控件,导入工具箱中,其实也没那个必要,只需将它添加引用到网站的Bin里面就行了。
PHP中使用FCKeditor编辑器

PHP中使用FCKeditor编辑器1、概述FCKeditor 是目前最优秀的可见即可得网页编辑器之一,它采用JavaScript编写。
具备功能强大、配置容易、跨浏览器、支持多种编程语言、开源等特点。
它非常流行,互联网上很容易找到相关技术文档,国内许多WEB项目和大型网站均采用了FCKeditor(如百度,阿里巴巴)。
本文将通过与 PHP相结合,从基本安装到高级的配置循序渐进介绍给广大PHPer。
FCKeditor官方网站:/FCKeditor Wiki:/2、下载FCKeditor登录FCKeditor官方站(),点击网站右上角“Download”链接。
注意:当点击“FCKeditor_2.4.3.zip”链接后,将跳转到网站上自动下载。
如果您当前使用Linux或Unix系统,可以点击“FCKeditor_2.4.3.tar.gz”链接下载.tar.gz格式的压缩包。
3、安装FCKeditor解压“FCKeditor_2.4.3.zip”文档到您的网站目录下,我们先假定您存放FCKeditor和调用脚本存于同一个目录下。
fckeditor 目录包含FCKeditor2.4.3程序文件。
check.php用于处理表单数据。
add_article.php和 add_article_js.html分别是PHP调用FCKeditor和JavaScript调用FCKeditor实例脚本文件。
3.1、用PHP调用FCKeditor调用FCKeditor必须先载入FCKeditor类文件。
具体代码如下。
PHP代码:<?phpinclude("fckeditor/fckeditor.php") ; // 用于载入FCKeditor类文件?>接下来,我们需要创建FCKeditor实例、指定FCKeditor存放路径和创建(显示)编辑器等。
具体代码如下所示(代码一般放在表单内)。
PHP代码:<?php$oFCKeditor = new FCKeditor('FCKeditor1') ; // 创建FCKeditor实例$oFCKeditor->BasePath = './fckeditor/'; // 设置FCKeditor目录地址$FCKeditor->Width='100%'; //设置显示宽度$FCKeditor->Height='300px'; //设置显示高度的高度$oFCKeditor->Create() ; // 创建编辑器?>下面是笔者创建好的实例代码,您可将代码保存为add_article.php通过浏览里打开http://127.0.0.1/add_article.php 查看FCKeditor安装效果。
FCKeditor中文文件上传乱码解决方案
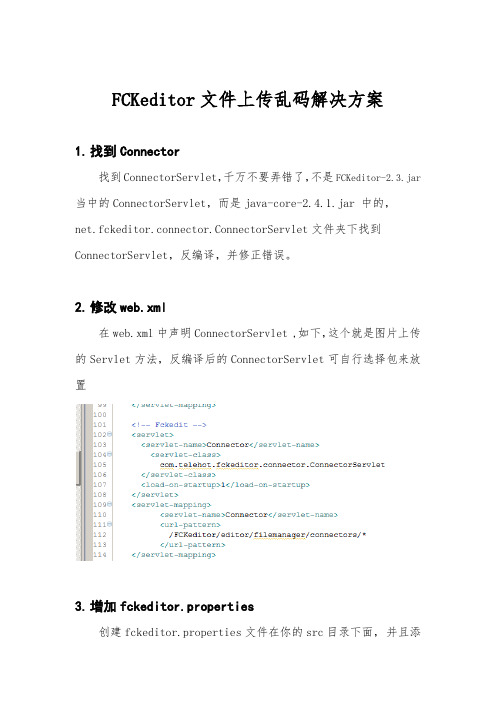
FCKeditor文件上传乱码解决方案1.找到Connector找到ConnectorServlet,千万不要弄错了,不是FCKeditor-2.3.jar 当中的ConnectorServlet,而是java-core-2.4.1.jar 中的,net.fckeditor.connector.ConnectorServlet文件夹下找到ConnectorServlet,反编译,并修正错误。
2.修改web.xml在web.xml中声明ConnectorServlet,如下,这个就是图片上传的Servlet方法,反编译后的ConnectorServlet可自行选择包来放置3.增加fckeditor.properties创建fckeditor.properties文件在你的src目录下面,并且添加以下内容,分别对应“路径”,“方法”以及“FLASH支持格式”4.解决上传中文名出现乱码问题在ConnectorServlet找到这行在下面添加upload.setHeaderEncoding("UTF-8");这句即可(图片中已经是添加过后正确的写法)5.解决创建中文名的目录时会出现乱码修改tomcat的server.xml配置如图所示,在后面加上URIEncoding=”UTF-8”即可在ConnectorServlet 中找到newFolderStr,对其进行编码转换,如下所示即可6.解决引用的中文名字的图片不能正常显示在ConnectorServlet 中找到filename,获取到后缀之后只要用UUID 来对其重命名即可,如下所示即可以上即为解决Fckeditor图片中文出现乱码问题的解决方案。
------------------------------------------------------------- 附上更正后的ConnectorServlet源代码-------------------------------------------------------------package com.telehot.fckeditor.connector;import java.io.File;import java.io.IOException;import java.io.PrintWriter;import java.util.List;import java.util.UUID;import javax.servlet.ServletException;import javax.servlet.http.HttpServlet;import javax.servlet.http.HttpServletRequest;import javax.servlet.http.HttpServletResponse;import mandHandler;import net.fckeditor.handlers.ConnectorHandler;import net.fckeditor.handlers.ExtensionsHandler;import net.fckeditor.handlers.RequestCycleHandler;import net.fckeditor.handlers.ResourceTypeHandler;import net.fckeditor.response.UploadResponse;import net.fckeditor.response.XmlResponse;import net.fckeditor.tool.Utils;import net.fckeditor.tool.UtilsFile;import net.fckeditor.tool.UtilsResponse;import mons.fileupload.FileItem;import mons.fileupload.FileItemFactory;import mons.fileupload.disk.DiskFileItemFactory;import mons.fileupload.servlet.ServletFileUpload;import mons.io.FilenameUtils;import org.slf4j.Logger;import org.slf4j.LoggerFactory;public class ConnectorServlet extends HttpServlet{private static final long serialVersionUID = -5742008970929377161L;private static final Logger logger = LoggerFactory.getLogger(ConnectorServlet.class);public void init()throws ServletException, IllegalArgumentException{String realDefaultUserFilesPath = getServletContext().getRealPath(ConnectorHandler.getDefaultUserFilesPath());File defaultUserFilesDir = new File(realDefaultUserFilesPath);UtilsFile.checkDirAndCreate(defaultUserFilesDir);("ConnectorServlet successfully initialized!");}public void doGet(HttpServletRequest request, HttpServletResponse response)throws ServletException, IOException{logger.debug("Entering ConnectorServlet#doGet");response.setCharacterEncoding("UTF-8");response.setContentType("application/xml; charset=UTF-8");response.setHeader("Cache-Control", "no-cache");PrintWriter out = response.getWriter();String commandStr = request.getParameter("Command");String typeStr = request.getParameter("Type");String currentFolderStr = request.getParameter("CurrentFolder");logger.debug("Parameter Command: {}", commandStr);logger.debug("Parameter Type: {}", typeStr);logger.debug("Parameter CurrentFolder: {}", currentFolderStr);XmlResponse xr;if (!RequestCycleHandler.isEnabledForFileBrowsing(request)) {xr = new XmlResponse(1, "The current user isn't authorized for file browsing!");}else{if (!CommandHandler.isValidForGet(commandStr)) {xr = new XmlResponse(1, "Invalid command specified");}else{if ((typeStr != null) && (!ResourceTypeHandler.isValid(typeStr))) {xr = new XmlResponse(1, "Invalid resource type specified");}else{if (!UtilsFile.isValidPath(currentFolderStr)) {xr = new XmlResponse(1, "Invalid current folder specified");} else {CommandHandler command = CommandHandler.getCommand(commandStr);ResourceTypeHandler resourceType = ResourceTypeHandler.getDefaultResourceType(typeStr);String typePath = UtilsFile.constructServerSidePath(request, resourceType);String typeDirPath = getServletContext().getRealPath(typePath);File typeDir = new File(typeDirPath);UtilsFile.checkDirAndCreate(typeDir);File currentDir = new File(typeDir, currentFolderStr);if (!currentDir.exists()) {xr = new XmlResponse(102);}else {xr = new XmlResponse(command, resourceType, currentFolderStr, UtilsResponse.constructResponseUrl(request, resourceType, currentFolderStr, true, ConnectorHandler.isFullUrl()));if (command.equals(CommandHandler.GET_FOLDERS)) {xr.setFolders(currentDir);} else if (command.equals(CommandHandler.GET_FOLDERS_AND_FILES)) {xr.setFoldersAndFiles(currentDir);} else if (command.equals(CommandHandler.CREATE_FOLDER)) {String tempStr = request.getParameter("NewFolderName");tempStr = new String(tempStr.getBytes("ISO8859-1"), "UTF-8");String newFolderStr = UtilsFile.sanitizeFolderName(tempStr);logger.debug("Parameter NewFolderName: {}", newFolderStr);File newFolder = new File(currentDir, newFolderStr);int errorNumber = 110;if (newFolder.exists())errorNumber = 101;else {try {errorNumber = newFolder.mkdir() ? 0 : 102;}catch (SecurityException e) {errorNumber = 103;}}xr.setError(errorNumber);}}}}}}out.print(xr);out.flush();out.close();logger.debug("Exiting ConnectorServlet#doGet");}public void doPost(HttpServletRequest request, HttpServletResponse response)throws ServletException, IOException{logger.debug("Entering Connector#doPost");response.setCharacterEncoding("UTF-8");response.setContentType("text/html; charset=UTF-8");response.setHeader("Cache-Control", "no-cache");PrintWriter out = response.getWriter();String commandStr = request.getParameter("Command");String typeStr = request.getParameter("Type");String currentFolderStr = request.getParameter("CurrentFolder");logger.debug("Parameter Command: {}", commandStr);logger.debug("Parameter Type: {}", typeStr);logger.debug("Parameter CurrentFolder: {}", currentFolderStr);if ((Utils.isEmpty(commandStr)) && (Utils.isEmpty(currentFolderStr))) {commandStr = "QuickUpload";currentFolderStr = "/";}UploadResponse ur;if (!RequestCycleHandler.isEnabledForFileUpload(request)) {ur = new UploadResponse(new Object[] { new Integer(203), null, null, "The current user isn't authorized for file upload!" });}else{if (!CommandHandler.isValidForPost(commandStr)) {ur = new UploadResponse(new Object[] { new Integer(1), null, null, "Invalid command specified" });}else{if ((typeStr != null) && (!ResourceTypeHandler.isValid(typeStr))) {ur = new UploadResponse(new Object[] { new Integer(1), null, null, "Invalid resource type specified" });}else{if (!UtilsFile.isValidPath(currentFolderStr)) {ur = UploadResponse.UR_INVALID_CURRENT_FOLDER;} else {ResourceTypeHandler resourceType = ResourceTypeHandler.getDefaultResourceType(typeStr);String typePath = UtilsFile.constructServerSidePath(request, resourceType);String typeDirPath = getServletContext().getRealPath(typePath);File typeDir = new File(typeDirPath);UtilsFile.checkDirAndCreate(typeDir);File currentDir = new File(typeDir, currentFolderStr);if (!currentDir.exists()) {ur = UploadResponse.UR_INVALID_CURRENT_FOLDER;}else {String newFilename = null;FileItemFactory factory = new DiskFileItemFactory();ServletFileUpload upload = new ServletFileUpload(factory);upload.setHeaderEncoding("UTF-8");try{List items = upload.parseRequest(request);FileItem uplFile = (FileItem)items.get(0);String rawName = UtilsFile.sanitizeFileName(uplFile.getName());String filename = FilenameUtils.getName(rawName);String baseName = FilenameUtils.removeExtension(filename);String extension = FilenameUtils.getExtension(filename);filename = UUID.randomUUID().toString() + "." + extension;if (!ExtensionsHandler.isAllowed(resourceType, extension)) {ur = new UploadResponse(new Object[] { new Integer(202) });}else{File pathToSave = new File(currentDir, filename);int counter = 1;while (pathToSave.exists()) {newFilename = baseName.concat("(").concat(String.valueOf(counter)).concat(")").concat(".").concat(extension);pathToSave = new File(currentDir, newFilename);counter++;}if (Utils.isEmpty(newFilename)) {ur = new UploadResponse(new Object[] { new Integer(0), UtilsResponse.constructResponseUrl(request, resourceType, currentFolderStr, true, ConnectorHandler.isFullUrl()).concat(filename) });}else{ur = new UploadResponse(new Object[] { new Integer(201), UtilsResponse.constructResponseUrl(request, resourceType, currentFolderStr, true,ConnectorHandler.isFullUrl()).concat(newFilename), newFilename });}if ((resourceType.equals(ResourceTypeHandler.IMAGE)) && (ConnectorHandler.isSecureImageUploads())){if (UtilsFile.isImage(uplFile.getInputStream())) {uplFile.write(pathToSave);} else {uplFile.delete();ur = new UploadResponse(new Object[] { new Integer(202) });}}else uplFile.write(pathToSave);}}catch (Exception e){ur = new UploadResponse(new Object[] { new Integer(203) });}}}}}}out.print(ur);out.flush();out.close();logger.debug("Exiting Connector#doPost");}}。
【知识学习】Fckeditor漏洞利用总结
Fckeditor漏洞利用总结查看编辑器版本Fckeditor/_whatsnew.html—————————————————————————————————————————————————————————————2.Version2.2版本Apache+linux环境下在上传文件后面加个.突破!测试通过。
—————————————————————————————————————————————————————————————3.Version<=2.4.2Forphp在处理PHP上传的地方并未对media类型进行上传文件类型的控制,导致用户上传任意文件!将以下保存为html文件,修改action地址。
<formid="frmUpload"enctype="multipart/form-data"action="/Fckeditor/editor/filema nager/upload/php/upload.php?Type=media"method="post ">Uploadanewfile:<br><inputtype="file"name="NewFile"size="50">< br><inputid="btnUpload"type="submit"value="Upload"& gt;</form>—————————————————————————————————————————————————————————————4.Fckeditor文件上传“.”变“_”下划线的绕过方法很多时候上传的文件例如:shell.php.rar或shell.php;.jpg会变为shell_php;.jpg这是新版Fck的变化。
- 1、下载文档前请自行甄别文档内容的完整性,平台不提供额外的编辑、内容补充、找答案等附加服务。
- 2、"仅部分预览"的文档,不可在线预览部分如存在完整性等问题,可反馈申请退款(可完整预览的文档不适用该条件!)。
- 3、如文档侵犯您的权益,请联系客服反馈,我们会尽快为您处理(人工客服工作时间:9:00-18:30)。
21-PHP环境下的FCKEditor编辑器的配置今天有朋友问PHP环境下的FCKEditor编辑器的配置问题,那么我们今天就来看一下下吧!在我们使用PHP开发WEB项目的时候,经常会使用多行文本框来收集信息,如新闻系统的新闻正文、论坛的帖子正文等。
而且我们经常需要对多行文本框的内容进行修饰(如字体、字号等),如果我们通过JS来实现的话,其操作过程是非常繁琐的。
现在比较常用的是FCKEditor编辑器来实现,通过这个编辑器我们可以轻松的控制内容的样式。
现在,我们就来看看在PHP下如何来配置FCKEditor编辑器。
1. 下载FCKEditor编辑器网址: /download在众多的版本中,我们选择2.6.5版即可。
2. 将下载的文件解压到主目录,解压后的效果如下(图一、二所示)3. 将解压后的文件保留editor文件夹、fckconfig.js、fckeditor.js、fckeditor.php、fckeditor_php4.php、fckeditor_php5.php、fckpackager.xml、fckstyles.xml、fcktemplates.xml后,删除其他文件。
(如下图)4. 安装FCKEditor的安装是非常简单的:只需要在相关的网页中包含fckeditor.php文件即可如require_once(“fckeditor.php”);当把fckeditor.php文件包含过来以后,安装程序就算完毕了,那么关键的问题是如何来应用FCKEditor编辑器FCKEditor编辑器的实现是通过OOP的编程方式实现的,所以在应用之前必须先行创建对象(或者称为实例),其语法结构如下:$FCKEditorObj = new FCKEditor(“实例名称”) ;这里的”实例名称”其实指得是多行文本框的名称,所以,我们必须赋予含义明确的名称。
如$FCKEditorObj = new FCKEditor(“content”);5. FCKEditor对象的属性Width功能:设置/获取编辑器的宽度语法:$对象名称-> Width = “值”;$变量名称= $对象名称-> Width;Height功能:设置/获取编辑器的高度语法:$对象名称-> Height = “值”;$变量名称= $对象名称-> Height;说明:编辑器的默认宽度为100%;默认的高度为200像素另外,在用户设置宽度或高度时,如果指定的单位为像素,那么可以直接书写宽度/高度值,而无需指定单位,但指定的单位为百分比时,则必须指定单位--%如$FCKEditorObj –> Width = “85%”;$FCKEditorObj -> Height = “400”;ToolbarSet功能:获取/设置编辑器使用的工具栏语法:$对象名称-> ToolbarSet = “工具栏名称”;$变量名称= $对象名称-> ToolbarSet;说明:系统默认的工具栏有:Default和Basic两个BasePath功能:获取/设置编辑器所在的路径语法:$对象名称-> BasePath = “路径”;$变量名称= $对象名称-> BasePath;Value功能:设置/获取编辑器的初始值语法:$对象名称-> Value = “值”;$变量名称= $对象名称-> Value;说明:在一般情况下,只有在修改内容时才会设置初始值;Config功能:获取/设置编辑器的配置参数语法:$对象名称-> Config[‘参数’] = 值;$变量名称= $对象名称-> Config[‘参数’];对于参数,我们以后再详细来了解!6. FCKEditor对象的方法Create()功能:显示FCKEditor编辑器语法:$对象名称-> Create();CreateHtml()功能:返回运行FCKEditor编辑器的必须的HTML代码语法:$变量名称= $对象名称-> CreateHtml();其实,Create()方法就是将CreateHtml()方法的返回结果给输出了!我们先来看一个简单的例子!<?phprequire_once "editor/fckeditor.php";$oFCKeditor =new FCKeditor("content");$oFCKeditor ->Width="100%";$oFCKeditor ->Height="350";$oFCKeditor ->ToolbarSet="Default";$oFCKeditor ->BasePath="editor/";$html =$oFCKeditor->CreateHtml();?><!DOCTYPE html PUBLIC "-//W3C//DTD XHTML 1.0 Transitional//EN" "/TR/xhtml1/DTD/xhtml1-transitional.dtd"><html xmlns="/1999/xhtml"><head><meta http-equiv="Content-Type" content="text/html; charset=gb2312" /> <title>发表主题</title><link href="style/common.css" rel="stylesheet" type="text/css" media="all" /></head><body><div id="container"><h1 id="title">发表主题</h1><form id="form1" name="form1" method="post" action="post.php"><table border="0" cellspacing="0" cellpadding="0"><tr><th>主题:</th><td><input name="subject" type="text" class="subject" id="subject" /></td></tr><tr><th>正文:</th><td><?=$html?></td></tr><tr><th> </th><td><input name="submit" type="submit" id="submit" value="发表主题" /></td></tr></table></form></div></body></html>运行结果如下:那么,我们现在的问题是如何获取输入的内容?我们刚刚提到过,其实在创建FCKEditor对象时的参数,其实也就是多行文本框的名称,对于有OOP编程经验的人来说,对于这行代码应该是很清楚的!class FCKeditor{public function__construct($instanceName){$this->InstanceName=$instanceName;$this->BasePath='/fckeditor/';$this->Width='100%';$this->Height='200';$this->ToolbarSet='Default';$this->Value='';$this->Config=array();}}和$Html .= "<textarea name=\"{$this->InstanceName}\" rows=\"4\"cols=\"40\" style=\"width: {$WidthCSS}; height:{$HeightCSS}\">{$HtmlValue}</textarea>";而对于没有OOP经验的人来说,这些东东,我们会在以后的博文中陆续来介绍!既然多行文本的名称确定了,那么一切就可以搞定了!7. 获取多行文本框的值$变量名称= $_POST[“表单元素名称”];源码如下:<!DOCTYPE html PUBLIC "-//W3C//DTD XHTML 1.0 Transitional//EN" "/TR/xhtml1/DTD/xhtml1-transitional.dtd"><html xmlns="/1999/xhtml"><head><meta http-equiv="Content-Type" content="text/html; charset=gb2312" /> <title>信息确认</title><link href="style/common.css" rel="stylesheet" type="text/css" media="all" /></head><body><div id="container"><h1 id="title">信息确认</h1><table border="0" cellspacing="0" cellpadding="0"> <tr><th>标题:</th><td><?=$_POST["subject"]?></td></tr><tr><th>正文:</th><td><?=$_POST["content"]?></td></tr></table></div></body></html>运行效果如下:。