用户手册家庭影院扬声器系统
音响使用说明书范本
音响使用说明书范本音响成为了现代家庭中常见的电子设备之一,它能够带来高品质的音质享受。
然而,对于一些新手用户来说,如何正确使用音响设备可能会成为一道难题。
因此,本文将为您提供一份简单明了的音响使用说明书范本,旨在帮助您更好地使用音响设备。
1. 连接和设置首先,您需要确保音响设备与电源连接良好以及与音源设备(例如电视、手机、电脑)连接稳定。
通常情况下,音响设备会配备相应的连接线和接口,您只需根据设备指南进行正确插拔即可。
另外,建议将音响设备放置在稳固的台面上,并保持一定的通风空间,以避免过热损害设备。
2. 操作和调节一般而言,音响设备会配备一套遥控器,您可以通过遥控器来控制音响的开/关机、音量调节、音效选择等功能。
此外,您还可以通过设备上的按键进行相应操作。
在使用音响设备时,您可以根据个人喜好选择合适的音效模式,如立体声、环绕声等,以提升听音体验。
3. 音质调节某些音响设备配备了音质调节功能,您可以根据不同音源的特点进行相应的调节,以获得更为清晰,逼真的音质效果。
例如,您可以通过调节低音和高音,使得音质更加均衡。
此外,部分音响设备还支持自动音质优化功能,您可以通过设备上的相应按钮进行设置。
4. 音源选择音响设备通常支持多种音源的接入,如蓝牙、USB、AUX等。
对于蓝牙连接的音源设备,您需要在音响上将蓝牙功能打开,并进行设备配对。
而对于USB和AUX音源设备,只需插入相应的接口即可。
在使用音响设备时,请注意选择正确的音源,以便正常播放音乐或其他媒体。
5. 维护保养为了保证音响设备的正常使用寿命和音质效果,您需要定期进行维护保养。
首先,定期清洁音响设备的外壳和箱体,以去除积尘和污渍。
其次,避免将液体或金属物质进入设备内部,以防止短路或损坏。
最后,当您长时间不使用音响设备时,建议将其断电并妥善保管,以免长时间使用不良或损坏。
总结起来,以上是一份简要的音响使用说明书范本。
希望通过这份说明书,您能够更加了解音响设备的使用方法,能够轻松享受高品质的音质效果。
音响系统设置指南

音响系统设置指南音响系统是我们日常娱乐生活中不可或缺的一部分。
正确的音响设置能够提供更好的音质,带给我们更出色的听觉体验。
本文将为您提供一份音响系统设置指南,帮助您实现最佳声音效果。
请根据以下步骤进行设置。
1. 室内环境准备首先,确保您的音响系统放置在合适的室内环境中。
避免将音响放置在靠近墙角或者有波镖的位置,这样会导致声音产生回响和失真。
选择一个相对开放的区域,并确保周围没有太多的障碍物。
2. 找到最佳位置将您的音响系统放置在房间的合适位置,以便均匀分布声音。
一般来说,将音箱放置在房间的两侧并稍微倾斜,让声音向中心聚焦。
主音箱可以放置在电视前面,音响扬声器可以放置在后方,以创造更加立体的声音效果。
3. 连接设备将您的音响系统与各种设备连接,如电视、音频播放器或游戏机。
使用合适的音频线缆将它们连接起来。
常见的连接方式包括HDMI、光纤或RCA线缆。
确保插头的接触良好,以免产生杂音或信号不稳定。
4. 设置音频参数调整音响系统的音频参数,以获得最佳音质。
您可以通过音响面板或遥控器上的设置选项来完成这个步骤。
以下是一些常见的音频参数设置:- 音量:根据您的需求来调整音量大小。
- 均衡器:调整低音、中音和高音的平衡,以满足您个人的喜好。
- 声场模式:选择适合不同类型音乐和内容的声场模式,如音乐、电影或游戏模式。
- 对话增强:如果您在观看影片时希望对话更加清晰明确,可以启用对话增强功能。
5. 调整音箱定位和角度根据您的需求和房间的布局,微调音箱的位置和角度。
通过调整音箱的指向,您可以改变声音的分布和聚焦度。
尝试不同的位置和角度,找到最适合您房间和个人喜好的设置。
6. 调试和测试完成以上步骤后,进行一些测试来确保音响系统设置正确。
播放不同类型的音乐或影片,并在房间各个位置听取声音的表现。
如果发现任何问题或不满意的地方,可以重新调整参数或位置,直到达到最佳效果。
7. 定期维护和清洁保持音响系统的良好状态需要定期的维护和清洁。
JBL SB300 两件盒家庭影音扬声器系统快速指南说明书
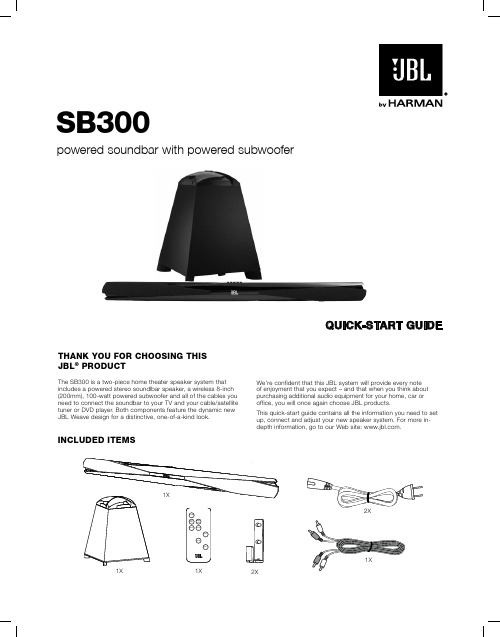
3 E n g l i s hStatus LED: Indicates the subwoofer’s operational status:Lights blue continuously when the subwoofer is on and linked to • the soundbar. Slowly flashes blue when the subwoofer is on and the wireless link • is not established between the subwoofer and the soundbar. Rapidly flashes blue during the wireless pairing process.• Lights amber continuously when the subwoofer is in the Standby • mode. Turns off when the subwoofer’s Power switch is in the “Off” • position.Level Control: Use this control to balance the subwoofer’s volume with that of the soundbar. Turn the knob clockwise to increase the subwoofer’s volume; turn it counterclockwise to decrease the subwoofer’s volume.Cutoff Control: This knob adjusts the subwoofer’s cutoff between 40Hz and 200Hz.The higher you set the Cutoff control, the higher in frequency the subwoofer will operate and the more its bass will “overlap” that of the soundbar. This adjustment helps achieve asmooth transition of bass frequencies between the subwoofer and the soundbar for a variety of different rooms and subwoofer locations. See Subwoofer Cutoff Control , on page 7, for more information.Phase Switch: This switch determines whether the subwoofer driver’s piston-like action moves in and out in phase with the speakers in the soundbar. If the subwoofer were to play out of phase with the soundbar speakers, some of the sound waves produced by thesubwoofer or soundbar could be canceled, reducing bass performance and sonic impact. This phenomenon depends in part on the relative placement of the speakers in the room. See Subwoofer Phase Switch , on page 7, for more information.Wireless Pairing Switch: Press this switch to initiate wireless pairing between the subwoofer and the soundbar. See Pairing the Units for Wireless Operation , on page 6, for more information.Power Switch: Set this switch to the “On” position to activate the subwoofer. In normal operation, this switch will be left in the “On” position. See Turning the Subwoofer On and Off , on page 6, for more information.If you will not be using the subwoofer for an extended period – for instance, if you’re going on vacation – set the Power switch to the “Off” position.Power Cord Connector: Connect the included power cord here and into an active, unswitched AC outlet. See Power Connections , on page 5, for more information.IMPORTANT: Do not connect the power cord to an AC outlet until you have made and verified all other connections.suBWooFer rear-Panel controlsPower SwitchPower Cord ConnectorWireless Pairing SwitchLevel ControlStatus LEDCutoff ControlPhase SwitchPLaciNg tHe sOuNdBar ON a taBLeIf your TV is placed on a table, you can place the soundbar on the table directly in front of the TV stand, centered with the TV screen. As long as the surface of the table is flat, the soundbar will rest on its rubber bumpers.WaLL-MOuNtiNg tHe sOuNdBarIf your TV is attached to a wall, you can use the included wall-mount brackets to mount the soundbar on the wall directly below the TV screen.Determine the location for the soundbar on the wall. Make sure 1.that the top of the soundbar will not block your view of the TVscreen when it is mounted on the wall.Mark the locations of the soundbar wall-mount bracket holes on 2.the wall. The holes for the left and right brackets are spaced30-5/16" (770mm) apart, and are designed to accept 4mmdiameter screws. The top and bottom holes for each bracket are spaced 1" (25mm) apart. See the illustration below.30-5/16" (770mm)1" (25mm) (not to scale)NOTE: To ensure that the soundbar will be level, use a carpenter’s level, laser sight or other device to ensure that the two sets of holes are at exactly the same height.3. A ttach the two wall-mount brackets to the wall at the locationsyou marked, using hardware that is appropriate for the wall’sconstruction and materials. Note that the soundbar weighs 2.5kg(5.5 lb). Be sure to use hardware that can support this weight.4. A fter making all of the connections described in the Connectionssection, on page 5, attach the soundbar to the brackets by sliding the brackets’ vertical tabs into the slots in the soundbar’s rubber bumpers.S in R Slide BracketTabs into Slots inRubber BumpersPLaciNg tHe suBWOOFerThe performance of a subwoofer is directly related to its placementin the listening room and its physical position relative to the otherspeakers in the system.While it is true that in general, our ears do not hear directional soundsat the low frequencies where subwoofers operate, when installinga subwoofer within the limited confines of a room, the reflections,standing waves and absorptions generated within the room willstrongly influence the performance of any subwoofer system. Asa result, the specific location of the subwoofer in the room doesbecome important to the amount and quality of bass that is produced.For example, placing the subwoofer next to a wall generally willincrease the amount of bass in the room; placing it in a corner (1)generally will maximize amount of bass in the room. However, cornerplacement can also increase the destructive effect of standing waveson bass performance. This effect can vary depending on the listeningposition – some listening positions may yield very good results,while others may have far too much (or too little) bass at certainfrequencies.In many rooms, placing the subwoofer along the same plane as thesoundbar (2) can produce the best integration between the sound ofthe subwoofer and that of the left and right speakers. In some rooms,the best performance could even result from placing the subwooferbehind the listening position (3).1. 2.3.Soundbar TVWe strongly recommend that you experiment with placement beforechoosing a final location for your subwoofer. One way you candetermine the best location for the subwoofer is by temporarilyplacing it in the listening position and playing music with strongbass content. Move around to various locations in the room whilethe system is playing (putting your ears where the subwoofer wouldbe placed), and listen until you find the location where the bassperformance is best. Place the subwoofer in that location.IMPORTANT: The maximum wireless operating distance between thesoundbar and subwoofer is approximately50 feet (15.3m).sPeaker Placement4usiNg YOur sOuNdBar sYsteMturNiNg tHe sOuNdBar ON aNd OFFSet the soundbar’s Power switcn to the “On” position.Press the Power button on either the soundbar or the remote to turn the soundbar on. To put the soundbar in the Standby mode, press either Power button while the soundbar is on.ButtonOn/OffAux Input DigitalPower ButtonPowerButtonIf you do not press the Power button, the soundbar will automatically go into the Standby mode approximately 15 minutes after the audio signal ceases. NOTE: If you have put the soundbar into the Standby mode by pressing the Power button, you must manually turn it on by pressing the Power button again. If the soundbar has automatically gone into the Standby mode 15 minutes after the audio signal has ceased, it will automatically turn itself on when it receives an audio signal at either the analog (Aux) input or the optical digital input. turNiNg tHe suBWOOFer ON aNd OFFSet the subwoofer’s Power switch to the “On” position. The subwoofer will automatically attempt to establish pairing with the soundbar (the subwoofer’s LED will flash blue). If pairing is not established within one minute, the subwoofer will enter the Standby mode (its LED will turn amber). If pairing is established, the subwoofer will turn on (its LED will light blue continuously).The subwoofer will remain on for approximately one minute after the soundbar enters the Standby mode, or for approximately 15 minutes after the audio signal ceases.If you will be away from home for an extended period of time, orif you will not be using the system for an extended period, set the subwoofer’s Power switch to the “Off” position.PairiNg tHe uNits FOr WireLess OPeratiONAfter turning the soundbar and subwoofer on for the first time, you will need to “pair” the subwoofer and soundbar so they both operate at the same wireless frequency. To pair the units, press the Wireless Pairing switches on both units within 30 seconds. The units will communicate with each other and operate at the same frequency.soundbar subwooferPhasePairing0°180°NOTE: The maximum wireless operating distance between the soundbar and subwoofer is approximately 50 feet (15.3m). adJustiNg tHe sYsteM’s VOLuMePress the soundbar’s or remote’s Volume Up and Down buttons to raise and lower the system’s volume one step at a time. Hold down the buttons to continuously raise or lower the volume.Buttons Vol.+Vol.–MuteVoBuVolumeButtonVolume Up/DownButtonsFor the best sound, we recommend turning your TV’s built-in speakers off. Consult your TV’s owner’s manual to find out how to do this. MutiNg tHe sYsteMMomentarily press the soundbar’s Power button or press the remote’s Mute button to mute the system. (The Power Indicator flashes blue.) Momentarily press the soundbar’s Power button or press the remote’s Mute button again to un-mute the system. (The Power Indicator turns to a steady blue.)ButtonOn/OffStereoAuxInputVol.+Vol.–MuteSurroundDigitalInputMuteButtonPowerButtonMuteButtonsurrOuNd MOde ButtONsThese buttons switch the sound between normal stereo (the Surround Mode Indicator lights white) and 3-D Surround (the Surround Mode Indicator lights blue). The 3-D Surround setting will produce a complete surround-sound experience for anyone sitting in front of and several feet away from the soundbar. Although it is particularly effective when watching movies, you can also try the 3-D Surround setting for music.ButtonOn/OffStereoAuxInputVol.+Vol.–MuteSurroundDigitalInputSurroundModeButtonsSurround-ModeButtonSurround-Mode Buttons67 E n g l i s hsuBWOOFer LeVeL kNOBUse the subwoofer’s Level knob to balance the bass with the rest of the sound. Play music or movies that you are familiar with, and adjust the subwoofer’s Level knob so the bass sounds balanced on both music and films. Listen to several different music recordings and film soundtracks that contain strong bass passages, and find a setting for the Level knob that doesn’t over-emphasize the bass or make it sound weak.LevelMINMAXOnce you find a setting for the subwoofer’s Level knob that balances the bass with the rest of the sound, you shouldn’t have to change it.suBWOOFer cutOFF cONtrOLThe subwoofer’s Cutoff control adjusts the subwoofer’s cutoff between 40Hz and 200Hz. The higher you set the Cutoff control, the higher in frequency the subwoofer will operate and the more its bass will “overlap” that of the soundbar. This adjustment helps achieve asmooth transition of bass frequencies between the subwoofer and the soundbar for a variety of different rooms and subwoofer locations.40Hz200HzCutoffTo set the Cutoff control, listen for the smoothness of the bass. If the bass seems too strong at certain frequencies, try a lower Cutoff control setting. If the bass seems too weak at certain frequencies, try a higher Cutoff control setting.suBWOOFer PHase sWitcHThis switch determines whether the subwoofer’s piston-like action moves in and out in phase with the speakers in the soundbar. If the subwoofer were to play out of phase with the soundbar speakers, some of the sound waves produced by the soundbar and subwoofer could be canceled out at some frequencies, reducing bassperformance and sonic impact. This phenomenon depends in part on the relative placement of the soundbar and subwoofer in the room.Phase0°180°Although there is no absolutely correct setting for the Phase switch, in most cases it should be left in the “0°” position. When the subwoofer is properly in phase with the soundbar speakers, the sound will be clearer and have more impact. It will make percussive sounds like drums, piano and plucked strings sound more lifelike. The best way to set the Phase switch is to listen to music that you are familiar with and adjust the switch so that drums and other percussive sounds have maximum impact.sPeciFicatiONssB300 sYsteM Frequency response:42Hz – 20kHz (–3dB)sB300cNtr POWered sOuNdBar sPeaker Low-frequency transducer:Two 2" (51mm) cones per channel, video-shieldedHigh-frequency transducer:One 1" (25mm) dome per channel, video-shieldedAmplifier power:30 watts per channel Audio controls:Volume, surround modeConnections:Optical digital (TOSLINK ™) input, stereo analog (RCA-type) inputs Power requirement:100V – 240V, 50Hz/60Hz, 80W Power consumption:1W standby; 80W maximum Dimensions (H x W x D):3-5/8" x 45-3/4" x 3"(92mm x 1162mm x 76mm)Weight:5.5 lb (2.5kg)sB300suB POWered suBWOOFer Low-frequency transducer:8" (200mm) cone, down-firing Enclosure type:Ported (down-firing)Amplifier power:100 wattsFrequency response:42Hz – 200Hz (–3dB)Audio controls:Level, phase, cutoff frequencyConnections:LFE input, left and right RCA line-level inputs Power requirement:100V – 240V, 50Hz/60Hz, 160W Power consumption:1W standby; 160W maximum Dimensions (H x W x D):19" x 14-1/4" x 14-1/4" (483mm x 362mm x 362mm)Weight:24.5 lb (11.1kg)HARMAN Consumer, Inc.8500 Balboa Boulevard, Northridge, CA 91329 USA© 2011 HARMAN International Industries, Incorporated. All rights reserved.JBL is a trademark of HARMAN International Industries, Incorporated, registeredin the United States and/or other countries. Manufactured under license fromDolby Laboratories. Dolby and the double-D symbol are registered trademarks ofDolby Laboratories. TOSLINK is a trademark of Toshiba Corporation. Manufacturedunder license under U.S. Patent #’s: 5,451,942; 5,956,674; 5,974,380; 5,978,762;6,487,535 & other U.S. and worldwide patents issued & pending. DTS and theSymbol are registered trademarks & DTS Digital Surround and the DTS logos aretrademarks of DTS, Inc. Product includes software. © DTS, Inc. All Rights Reserved.Features, specifications and appearance are subject to change without notice.Part No. 819016501400S 。
JBL Cinema 300 六部分家庭影院扬声器系统用户指南说明书

5D E U T S C HLaUTSPReCHeR aUFSTeLLenLINKER UND RECHTER FRONTLAUTSPRECHERCENTERSURROUND-LAUTSPRECHER UND SUBWOOFERLinker Front-LautsprecherTVCenterRechter Front-LautsprecherSubwooferLinker Surround-LautsprecherRechter Surround-LautsprecherRechter Surround-LautsprecherLinker Surround-Lautsprecher1,5 - 1,8 mLinker Frontlaut-sprecherRechter Frontlaut- sprecherTVCenterTV0 - 0,6 mLinker Front-LautsprecherRechter Front-Lautsprecher6mOnTaGemÖGLiCHKeiTenAUFSTELLUNG MITTELS REGAL-STATIV Satelliten:Center:1.3.2.WiCHTiGeR SiCHeRHeiTSHinWeiS: Wird zusätzliches Befestigungsmaterial nötig, ist der Kunde selbst für dessen Auswahl und korrekte Installation verantwortlich. Der Hersteller verweigert jegliche Verantwortung für den korrekten Zusammenbau und die Befestigung der Lautsprecher.Bitte folgen Sie den Anweisungen in dieser Bedienungsanleitung. Sollten Sie Zweifel hegen, ob Sie die Lautsprecher korrekt und sicher an die Wand befestigen können, wenden Sie sich bitte an Ihren Fachhändler.Satelliten49 mm55 mm195.5 mmCenter1. S uchen Sie nach passenden Aufstellungsorten für Ihre Lautsprecher – konsultieren Sie hierzu das Kapitel Lautsprecher aufstellen auf Seite 5.2. W ählen Sie für Ihre Wände geeignetes Befestigungsmaterial. Die Front- und Surround-Lautsprecher der Cinema 300 Serie wiegen 0,90 kg; der Cinema 300 Center bringt 1,47 kg auf die Waage. Bitte suchen Sie Befestigungsmaterial aus, das dieses Gewicht tragen kann.3. I nstallieren Sie die Wandhalterungen. Stellen Sie bitte sicher, dass die Halterungen sicher an Holzbalken befestigt werden. Für die montage auf Ziegel-, Gipskarton- oder Betonwände benötigen Sie geeignete Dübel.4. Hängen Sie nun die Lautsprecher in die Wandhalterungen ein.WANDMONTAGE7D E U T S C H+–+–+–FRONTLEFT +–+–SURROUNDRIGHT CENTERLaUTSPReCHeR anSCHLieSSenaCHTUnG: Schalten Sie ihren Receiver bzw. Verstärker vollständig aus oder trennen Sie ihn vom Stromnetz BeVOR Sie mit der Verkabelung beginnen.WiCHTiG: a chten Sie bitte darauf, dass die positiven und negativen Leitungen weder sich noch andere Kabel anderer anschlussterminalsberühren (Kurzschluss).2.1.3.Die farblich markierte Ader an die "+"-Klemme anschließenLautsprecher mit dem Receiver verbinden:SPEAKER OUTPUTDie "+"-Klemme am Lautsprecher mit der "+"-Klemme am Verstärker verbinden:Die Lautsprecher mit den entsprechenden Lautsprecherterminals am Verstärker verkabeln:LautsprecherDie farblichmarkierte Ader an die "+"-Klemme anschließenVerstärkerDie farblich markierte Ader an die "+"-KlemmeanschließenLinker Front-LautsprecherCenterKabel mit weißer MarkierungKabel mit grüner MarkierungKabel mit blauer MarkierungKabel mit grauer MarkierungKabel mit roter MarkierungLinker Surround-LautsprecherRechter Front-LautsprecherRechter Surround-LautsprecherReceiver oder Verstärker9D E U T S C HnORmaLBeTRieB DeS SUBWOOFeRSSUBWOOFER EIN- UND AUSSCHALTENStellen Sie den Netzschalter auf der Rückseite des Subwoofers auf …On“.Haben Sie den Power-On-Mode-Schalter auf …Auto" gestellt, •schaltet sich der Subwoofer automatisch vollständig ein sobald am Eingang ein Tonsignal erkannt wird. Empfängt er 20 Minuten lang kein Signal, schaltet er wieder in den Standby-Modus. Ist der Subwoofer aktiviert, leuchtet die Betriebsanzeige grün; leuchtet die LED rot, befindet sich der Subwoofer im Standby-Modus.Steht der Power-Schalter auf …On“ bleibt der Subwoofer•ständig aktiviert. Steht der Power-Schalter auf "On" bleibt der Subwoofer ständig aktiviert, und die LED leuchtet grün.Verwenden Sie den Subwoofer über einen längeren Zeitraum nicht (zum Beispiel während der Sommerferien), sollten Sie den Power-Schalter auf …Off“ stellen und ihn damit vollständig ausschalten.SUBWOOFER-BEDIENELEMENTE: CROSSOVER-REGLER:HINWEIS: Der Crossover-Regler wirkt nur, wenn das Signal über die Line-Level In L/R-Eingänge empfangen wird. Das am Line-Level In LFE-Anschluss anliegende Signal durchläuft weder den Crossover-Regler noch die eingebaute Frequenzweiche.Mit dem Crossover-Regler können Sie die obere Grenzfrequenz des Subwoofers im Bereich zwischen 50 und 200 Hz justieren. Je höher Sie die obere Grenzfrequenz einstellen, desto größer ist der mitden Satelliten-Lautsprechern überlappende Frequenzbereich. Auf diese Weise sorgen Sie selbst in Wohnräumen mit schwierigen akustischen Eigenschaften und unabhängig vom Aufstellungsort des Subwoofers für einen gleichmäßigen Frequenzübergang zwischen den Satelliten-Boxen und dem Bass-Lautsprecher.Achten Sie auf eine gleichmäßige Basswiedergabe in Ihrem Hörraum. Werden bestimmte Basstöne überbetont, sollten Sie eine niedrigere obere Grenzfrequenz ausprobieren. Wirken bestimmte Basstöne schwach, können Sie das Klangbild mit einer höheren oberen Grenzfrequenz verbessern.SUBWOOFER-BEDIENELEMENTE: SUBWOOFER LEVELMit diesem Regler können Sie die Lautstärke des Subwoofers justieren. Drehen Sie den Regler im Uhrzeigersinn, um die Lautstärke zu erhöhen. Drehen Sie ihn gegen den Uhrzeigesinn, um die Lautstärke zu mindern. Haben Sie einmal eine ausgeglichene Lautstärke zwischen Satelliten und Subwoofer gefunden, sollten Sie diese Einstellung nicht mehr verändern.Hinweise zur korrekten einstellung der Subwoofer-Lautstärke:Manchmal ist die ideale Lautstärke für Musik zu laut für die •Wiedergabe von Filmen und umgekehrt. Deswegen sollten Sie für die Einstellung der Subwoofer-Lautstärke bassbetonte Filme und Musikstücke verwenden – wählen Sie einen Durchschnittswert, der zu beiden Inhalten passt.Klingt Ihr Subwoofer ständig zu laut oder zu leise, wählen Sie •bitte einen anderen Aufstellort. Rücken Sie den Subwoofernäher in eine Zimmerecke, wird die Bass-Wiedergabe verstärkt. Vergrößern Sie den Abstand zur nächsten Wand, wird der Bass schwächer.SUBWOOFER-BEDIENELEMENTE: PHASE Dieser Schalter legt fest, ob sich die Bassmembran des Subwoofers und die Membranen der Satelliten-Lautsprecher synchron oder gegenläufig bewegen. Bewegen sich die Membranen nicht synchron, löschen sich einige Bassfrequenzen des Subwoofers oder der Satelliten gegenseitig auf, wodurchBassleistung und Dynamik sinken. Dieser Effekt hängt überwiegendermaßen vom Aufstellungsort der Lautsprecher im Raum ab.In den meisten Fällen können Sie den Phasen-Schalter auf …Normal“ belassen – eine wirklich …richtige“ Einstellung gibt es dennoch nicht. Spielen Subwoofer und Satelliten in Phase, bleibt das Klangbild klar und packend – dynamische Instrumente wie Schlagzeug oder Klavier klingen besonders naturgetreu. Am besten gehen Sie wie folgt vor, um die Phase Ihres Subwoofers korrekt einzustellen: Legen Sie Musik auf, die Sie sehr gut kennen. Stellen Sie den Phasenschalter so ein, dass Schlagzeug und Bass lauter klingen. Korigieren Sie anschließend evtl. die Lautstärke mit dem Subwoofer-Level-Regler mit höchster Dynamik wiedergegeben werden.© 2010 HARMAN International Industries, Incorporated. Alle Rechte vorbehalten.JBL ist eine Marke von HARMAN International Industries, Incorporated, eingetragen in den Vereinigten Staaten und/oder anderen Ländern. PolyPlas ist eine Marke von HARMAN International Industries, Incorporated.Teile-Nr. 950-0296-001, Rev.: AHARMAN Consumer, Inc.8500 Balboa Boulevard, Northridge, CA 91329 USA HARMAN Deutschland GmbH Hünderstraße 1 D-74080 HeilbronnD E U T S C HTeCHniSCHe DaTenCinema 300 SystemFrequenzbereich:Cinema 300 SatellitenBass-Chassis:Chassis mit 75 mm großen PolyPlas™-Membranen, magnetisch abgeschirmtHochtöner:25-mm-Hochtonkalotte aus Titan-Verbundmaterial, magnetisch abgeschirmt Belastbarkeit:100 Watt Nennimpedanz:8 Ohm Wirkungsgrad (2,83 V/1 m):86 dB Übergabefrequenz:3,7 kHz Gehäusetyp:geschlossen Anschlussterminals:Federkontaktklemme Maße (H x B x T):235 x 121 x 86 mm Gewicht:0,90 kgCinema 300 CenterBass-Chassis:Zwei 75-mm-PolyPlas-Membranen, magnetisch abgeschirmtHochtöner:25-mm-Hochtonkalotte aus Titan-Verbundmaterial, magnetisch abgeschirmt Belastbarkeit:100 Watt Nennimpedanz:8 Ohm Wirkungsgrad (2,83 V/1 m):89 dB Übergabefrequenz:3,7 kHz Gehäusetyp:geschlossen Anschlussterminals:Federkontaktklemme Maße (H x B x T):124 x 305 x 86 mm Gewicht:1,47 kgSUB140P SubwooferBass-Chassis:Ein nach unten abstrahlendes Chassis mit 200 mm großer Membran, magnetisch abgeschirmt Gehäusetyp:Nach unten abstrahlendes Gehäuse mit Bassreflexöffnung Verstärkerleistung:150 Watt Frequenzbereich:32 – 200 Hz (–6dB)Bedienelemente:Lautstärkeregler, Phasenschalter, Regler für die obere GrenzfrequenzAnschlüsse:LFE-Eingang, Linker und Rechter Line-Level-Anschluss (Cinch)Betriebsspannung:120 V/60 Hz, 150 W (US); 220 V – 240 V/50 Hz, 150 W (EU)Stromaufnahme:<1 W (8 mA bei 120 V) Standby; 300 W (2,5 A bei 120 V) maximal Maße (H x B x T):483 x 355 x 355 mm Gewicht:10 kgAlle Leistungsmerkmale und Spezifikationen sowie das mechanische Design können sich ohne vorherige Ankündigung ändern.32 Hz – 20 kHz (–6dB)。
专业影院环绕声扬声器产品说明书

感谢您购买 产品!请仔细阅读本手册,它将帮助你妥善设置并运行您的系统,使其发挥卓越的性能。
并保留这些说明以供日后参照。
警告:为了降低火灾与电击的风险,请不要将产品暴露在雨中或潮湿环境中。
警告:为了降低电击的风险,非专业人士请勿擅自拆卸该系统。
仅供专业人士操作。
等边三角形中的闪电标记,用以警示用户该部件为非绝缘体,系统内部存在着电压危险,电压。
可能足以引起触电。
可能足以引起触电如系统标有带惊叹号的等边三角形,则是为提示用户严格遵守本用户指南中的操作与维护规定。
注意:请勿对系统或附件作擅自的改装。
未经授权擅自改装将造成安全隐患。
警告:燃不得将明火源(如点的蜡烛)放在器材上面。
1. 请先阅读本说明。
2. 保留这些说明以供日后参照。
3. 注意所有警告信息。
4. 遵守各项操作指示。
5. 不要在雨水中或潮湿环境中使用本产品。
6. 不要将产品靠近热源安装,例如暖气管、加热器、火炉或其它能产生热量的装置(包括功放机 )。
7. 不要破坏极性或接地插头的安全性设置。
如果提供的插头不能插入插座,则应当请专业人员更换插座。
8. 保护好电源线和信号线,不要在上面踩踏或拧在一起(尤其是插头插座及穿出机体以外的部分 )。
9. 使用厂商规定及符合当地安全标准的附件。
10.雷电或长时间不使用时请断电以防止损坏产品。
12. 不要让物体或液体落入产品内——它们可能引起火灾或触电。
13. 请注意产品外罩上的相关安全标志。
. 仅与厂商指定或与电器一同售出的推车、架子、三脚架、支架或桌子一起使用。
推动小车/电器时,应谨防翻倒。
11注意事项产品的安装调试须由专业人士操作。
在使用非本厂规定的吊装件时,要保证结构的强度并符合当地的安全规范。
警告:1扬声器及扬声器系统的产品有限保修期为自正式购买日起的3年。
由于用户不合理的应用而导致音圈烧毁或纸盆损坏等故障,不包含于产品保修项目。
产品吊附件(包括音箱装配五金件和吊挂配件)的有限保修期为自正式购买日起的1年。
bose-cinemate-15-10-用户指南说明书

监管信息有毒或有害物质或元素的名称及成分有毒或有害物质和元素零件名称铅 (Pb)汞 (Hg)镉 (Cd)六价铬 (CR(VI))多溴化联苯 (PBB)多溴二苯醚 (PBDE)印刷电路板X O O O O O金属零件X O O O O O塑料零件O O O O O O扬声器X O O O O O线缆X O O O O OO:表示此零件中所有同类物质包含的有毒或有害物质低于 SJ/T 11363-2006 中的限定要求。
X:表示此零件使用的同类物质中至少有一种包含的有毒或有害物质高于 SJ/T 11363-2006 中的限定要求。
请填写以下内容,留作记录:序列号位于 Acoustimass®低音箱的连接器面板上和条形音箱底部。
型号位于连接器面板上。
低音箱序列号: __________________________________________________________________________条形音箱序列号: ________________________________________________________________________型号: __________________________________________________________________________________购买日期: ______________________________________________________________________________建议您将发票和本用户指南保存在一起。
生产日期:序列号中的四位加粗数字表示生产日期。
第一位数字是生产年份;“5”即 2005 年或 2015 年。
第二位至第四位数字是月份和日期;“001”即 1 月 1 日,“365”即 12 月 31 日。
中国进口商: Bose 电子(上海)有限公司,中国(上海)自由贸易试验区,日樱北路 353 号,9 号厂房 C 部欧洲进口商:Bose GP, Castleblayney Road, Carrickmacross, Ireland台湾进口商: Bose 台湾分公司,105 台北市民生东路三段 131 号环球商业大楼 905 室©2015 Bose Corporation. 未经事先书面许可,不得复制、修改、发行或以其他方式使用本资料的任何部分。
音响操作说明

音响操作说明音响是一种常见的音频设备,用于放大和播放声音。
无论是在家庭娱乐系统中还是在音乐会现场,音响都扮演着重要的角色。
本操作说明将向您介绍如何正确使用和操作音响设备,确保您获得最佳的音频体验。
1. 连接设备:首先,确保音响设备与音频源正确连接。
这可以通过使用适当的音频电缆来实现。
通常,音频设备都有输入和输出接口,您需要将音响的输出与音频源的输入端连接。
请注意,连接电缆的两端要与接口相匹配,并牢固连接。
如果您使用的是无线音响设备,那么您只需要将其与音频源进行配对即可。
2. 打开电源:在连接设备之后,您需要打开音响设备的电源开关。
通常,电源开关位于音响设备的前面板或背面。
请确保电源线正确连接,并将其插入电源插座。
在打开音响电源之前,请确保音响的音量调节旋钮调至最小值。
这将有助于避免尖锐的声音从音响喇叭中传出并损坏您的听力。
3. 调节音量:一旦音响设备开启,您可以开始调节音量。
通常,音响设备都配备了音量控制旋钮或按钮。
您可以将音量旋钮逆时针旋转以降低音量,顺时针旋转以增加音量。
请在开始播放音频之前将音量调至适度,然后再进一步微调。
确保不要将音量调得过高以避免干扰他人或损坏音响设备。
4. 选择音频源:音响设备通常具有多个音频输入选项,例如CD播放器、电视或蓝牙连接等。
您需要确认音频源的选择以确保正确的信号输入。
通常,音响设备的前面板上会有一个选择按钮或旋钮,您可以使用它来切换不同的音频源。
如果您使用的是蓝牙连接,您需要在音响设备和移动设备之间进行配对,确保它们在蓝牙范围内。
5. 调节音效:。
DHT-S316 家庭影音系统使用指南说明书
DHT-S316HOME THEATER SYSTEM Owner’s ManualAccessories4 Inserting the batteries5 Operating range of the remote control unit5 Features6 Part names and functions7 Sound bar7 Subwoofer10 Remote control unit11 ConnectionsPositioning12 Positioning the sound bar12 Positioning the subwoofer14 Connecting a TV15 Connection 1: TV equipped with an HDMI connector and compatible with the ARC (Audio Return Channel)16 Connection 2: TV equipped with an HDMI connector and incompatible with the ARC / TV equipped with an optical digital connector17 Connection 3: TV equipped with an HDMI connector and incompatible with the ARC / TV equipped with an analog connector18 Connecting the power cords19PlaybackEnjoying television, movies and music20 Status LED table21 Listening to music on a Bluetooth device22 Pairing a Bluetooth device for the first time22 Pairing with other Bluetooth devices23 Listening to music with a paired Bluetooth device23 SettingsSettings24 Adjusting the volume24 Adjusting the subwoofer volume24 Selecting a listening mode25 Turning off the sound temporarily25 Setting the Bluetooth standby function25 Auto standby function26 Volume limiter function26TipsTroubleshooting27 Power does not turn on / Power is turned off28 Operations cannot be performed through the remote control unit28 No sound comes out29 Bluetooth playback does not work30 The HDMI Control function does not work30 Resetting factory settings31 AppendixAbout HDMI32 Trademark information33 Specifications34 Sound bar34 Subwoofer37Thank you for purchasing this Denon product.To ensure proper operation, please read this owner’s manual carefully before using the product. After reading this manual, be sure to keep it for future reference. AccessoriesCheck that the following parts are supplied with the product.Inserting the batteries1Slide the rear cover off the remote control unit in the2Insert 1 battery into the battery compartment as indicated.3Put the rear cover back on.NOTE0Remove the batteries from the remote control unit if it will not be in use for long periods.0If the battery fluid should leak, carefully wipe the fluid off the inside of the battery compartment and insert new batteries.Operating range of the remote control unitPoint the remote control unit at the remote sensor when operating it.0Two-way sound bar with wireless subwoofer: Powerful, dynamic Denon home theater soundEasy Setup: Quickly connect to your TV with the supplied HDMI or Optical cables.Wireless Subwoofer: Powerful bass without the cables. Place the subwoofer within 30 ft of the sound bar for optimal enjoyment.2" Low-profile Design: At 2" tall, the Denon DHT-S316 fits most spaces and can be placed in front of your TV without blocking your TV's bottom edge or IR remote sensor.0Exceptional sound clarity for your TV, Blu-ray, gaming system and favorite music sourcesHDMI with Audio Return Channel: Send audio from your TV’s built-in apps, on-board tuner or HDMI connections over a single cable when you connect your TV’s HDMI ARC output to the sound bar using the included HDMI cable.Digital Audio Optical Input: Effortlessly connect your Blu-ray, gaming or other device with the included Optical cable.Analog Auxiliary Input: Connect any source compatible with a 3.5 mm input and listen through the DHT-S316.Bluetooth: Connect your smartphone or tablet to the DHT-S316 to wirelessly stream music and other audio.0Immerse yourself in a realistic home theater experienceDolby Digital and DTS Decoding: Virtual surround technology creates a powerful, realistic multi-channel home theater experience.Denon Dialogue Enhancer: Never miss a word of your favorite TV show or movie, Denon Dialogue Enhancer improves dialogue intelligibility - ideal for movies and TV shows. Turn up the dialogue without having to adjust overall volume.Sound baro Top panelA Power operation button (c )Turns the sound bar power on/off (standby). (v p. 20)Links to sound bar power and turns the subwoofer power on/off (standby).B Input source button (d )This selects the input source. (v p. 20)Switches the input source each time the button is pressed.C Bluetooth button (g )0Switches the input source to “Bluetooth”. (v p. 22)0Used to pair with Bluetooth devices. (v p. 22)D Volume buttons (+, –)These adjusts the volume level. (v p. 24)o Front panelA Status LEDDisplays the status of input source / input signal / listening mode, etc. (v p. 21)B Remote control sensorThis receives signals from the remote control unit. (v p. 5)o Bottom panelqA USB portService terminal. Not used in normal operation.o Rear panelA Wall hook holeUsed to mount the sound bar on a wall. (v p. 13)B HDMI connector (TV (ARC))Use the included HDMI cable to connect an ARC function-compatible TV. (v p. 16)C AUX audio input connectorUse a commercially available 3.5 mm stereo audio cable to connect an audio device. (v p. 18)D Optical digital input connector (TV OPTICAL)Use the included optical digital cable to a TV with an optical digital terminal. (v p. 17)E AC inletUsed to connect the power cord. (v p. 19)Subwoofero Rear panelA Status LEDDisplays subwoofer status.0The sound bar and subwoofer are wirelessly connected as the factory default.If no audio is output from the subwoofer, wirelessly connect the sound barand subwoofer again. (v p. 29)B BAR SYNC buttonUsed to wirelessly connect the sound bar and subwoofer. (v p. 29)C AC inletUsed to connect the power cord. (v p. 19)q weRemote control unitThis section mainly explains remote control operations.A Power button (c )Turns the sound bar power on/off. (v p. 20)Links to sound bar power and turns the subwoofer power on/off.B Input source buttons (TV, AUX, g )This selects the input source. (v p. 20)C Button to adjust subwoofer (BASS +, -)Adjusts the volume level for the subwoofer. (v p. 24)D Night mode button (NIGHT)Compresses the dynamic range (difference between loud and soft sounds) to make audio easier to hear at low volumes. (v p. 25)E Movie mode button (MOVIE)Enjoy movie theater-like surround sound. (v p. 25)F Mute button (h )This mutes the output audio. Press again to unmute. (v p. 25)G Volume buttons (VOL +, –)These adjusts the volume level. (v p. 24)H Music mode button (MUSIC)Enjoy the full presence of a wide, encompassing acoustic field. (v p. 25)I Dialog enhancer buttons (DIALOG ENHANCER 1 - 3)Adjust the volume of dialog in movies, vocals in music, etc. so these can be heard more easily. (v p. 25)Can be set to 3 levels. Set this to the desired value.NOTE0When positioning the sound bar in front of your TV, make sure the sound bar does not obstruct the TV’s remote control light sensor, etc.o When hanging the sound bar on a wallThe sound bar has a wall hook hole to hang it on a wall. When hangingit on a wall, position it in a flat, vertical position.0When hanging it on a wall, use the included wall mount template.[How to use the wall mount template]A Affix the template to the location you would like to mount the sound bar.B Screw in the wall mount screws by following the template.Consult a construction professional about the proper wall mount screws forthe material and strength of your wall.C Remove the template from the wall.D Mount the included wall mount spacer on the spine of the sound bar.Mounting the wall mount spacer creates a space for cords to pass throughbetween the sound bar and the wall.E Mount the sound bar on the wall.NOTE0To ensure safety, request a contractor perform the mounting work when mounting onto a wall.0In order to use the unit safely, do not place items on or hang items from the unit.0Be sure to fix connection cables to the wall to ensure that cannot be pulled or tripped over causing this unit to fall. Check that the unit is mounted safely after the mounting work is complete.0Also, periodically check the safety of this unit and whether there is a possibility that the unit may fall.0Denon cannot accept any responsibility for damage, injury or accidents caused by problems with the mounting location or mounting method.Positioning the subwoofer Position the subwoofer in a flat location near the sound bar.How to connect a TV depends on the connectors and functions equipped on the TV.0Enable the TV’s HDMI control function when using an HDMI cable to connect this device to your TV. (See the TV Owner’s Manual for details.) 0Turn off the TV’s speaker or minimize the volume when using this device.0HDMI cable connection is recommended, but connection can be performed without an HDMI cable.NOTE0Make sure all devices are off when connecting.0Do not plug device power cords into an outlet until all devices have been connected.Connection 1: TV equipped with an HDMI connector and compatible with the ARC (Audio Return Channel)Use the included HDMI cable to connect this device to an ARC function-compatible TV.HDMI cable (included)0The TV also needs to be compatible with the ARC function.Connection 2: TV equipped with an HDMI connector and incompatible with the ARC / TV equipped with an optical digital connectorUse the included HDMI and optical digital cables to connect this device to your TV.HDMI cable (included)0Line up the optical digital cable with the shape of the terminal to insert.Connection 3: TV equipped with an HDMI connector and incompatible with the ARC / TV equipped with an analog connectorUse the included HDMI cable and a commercially available 3.5 mm stereo audio cable to connect this device to your TV.HDMI cable (included)After completing all the connections, insert the power plug into the power outlet.Connect to household power outlet(AC 120 V, 60 Hz)X buttons 1Turn on the power of the TV and connected devices. 2Press c to turn on power to the unit.3Press the input source button.4Play the device connected to this unit.For details, see the relevant device manual.0Connect an HDMI control-compatible TV and this device via HDMI and enable the HDMI control to enable linked control from either device. (v p. 32)Status LED tableStatus LEDs change depending on the input source, input signal, etc.0Audio signal is not displayed when the input source is “Bluetooth”.Music files stored on Bluetooth devices such as smartphones, digital music players, etc. can be enjoyed on this unit by pairing and connecting this unit with the Bluetooth device.XPairing a Bluetooth device for the first timePair a Bluetooth device with this unit.Once the Bluetooth device has been paired, it does not need to be paired again.1Press c to turn on power to the unit.2Press g to switch the input source to “Bluetooth”. 3Activate the Bluetooth settings on your Bluetooth device.Switches to pairing mode the first time it is used.4Select “DHT-S316” from the list of devices displayed on the screen of the Bluetooth device.Status display LED lights up in blue and this device and theBluetooth device are paired.0Pairing is canceled if the power cord is removed. Perform pairing again.Pairing with other Bluetooth devices 1Press c to turn on power to the unit.2Press g to switch the input source to “Bluetooth”. 3Activate the Bluetooth settings on your Bluetooth device.4Push g on this device until the status display LED blinks in blue.5Select “DHT-S316” from the list of devices displayed on the screen of the Bluetooth device.Status display LED lights up in blue and this device and theBluetooth device are paired.0This unit can be paired with a maximum of 8 Bluetooth devices. When a 9th Bluetooth device is paired, it will be registered in place of the oldest registered device.0Pairing is canceled if the power cord is removed. Perform pairing again.Listening to music with a paired Bluetooth device1Press c to turn on power to the unit.2Press g to switch the input source to “Bluetooth”. 3Activate the Bluetooth settings on your Bluetooth device.4Press g.The status display LED lights up in blue and connects to the last Bluetooth device connected. If the connection is cut, performconnection again.5Play music using any app on your Bluetooth device.Perform the below operations and settings as needed.BASS+, –Adjusting the volume1Use VOL + or VOL – to adjust the volume.The selected input source LED blinks once every time the button ispushed.Adjusting the subwoofer volume1Use BASS + or BASS – to adjust the subwoofer volume.The selected input source LED blinks once every time the button ispushed.Selecting a listening mode1Press the listening mode button to select a listening mode.The status display LED blinks once in purple.Turning off the sound temporarily1Press h.The selected input source LED blinks.0To cancel, press h again.Setting the Bluetooth standby function If Bluetooth standby function is set to “on”, this device automatically turns on when Bluetooth connects via the paired Bluetooth device.In order to use this operation, the device needs to be paired with this unit in advance.1Press and hold TV for 5 seconds or more until the status display LEDs blink as indicated below.Auto standby functionIf no operations have been performed for 15 minutes or more and audio is not being output, this device automatically switches to standby.Volume limiter functionThis device is loaded with a volume limiter function which limits excessive output. If volume is above 18 when the power is off, the volume is set to 18 the next time power is turned on.If a problem should arise, first check the following:1.Are the connections correct?2.Is the set being operated as described in the owner’s manual?3.Are the other devices operating properly?If this unit does not operate properly, check the corresponding symptoms in this section.If the symptoms do not match any of those described here, consult your dealer as it could be due to a fault in this unit. In this case, disconnect the power immediately and contact the store where you purchased this unit.Power does not turn on / Power is turned offPower does not turn on.0Check whether the power plug is correctly inserted into the power outlet. (v p. 19)0If you cannot turn on the unit with the TV’s HDMI control function, press the c button to turn the unit’s power or set the Bluetooth standby function to “On”. (v p. 25)Power automatically turns off.0If no operations have been performed for 15 minutes or more and audio is not being output, this device automatically switches to standby. (Auto standby function)Operations cannot be performed through the remote control unitOperations cannot be performed through the remote control unit.0Batteries are worn out. Replace with new batteries. (v p. 5)0Operate the remote control unit within a distance of about 23 ft/7 m from this unit and at an angle of within 30°. (v p. 5)0Remove any obstacle between this unit and the remote control unit.0Insert the batteries in the proper direction, checking the f and e marks. (v p. 5)0The set’s remote control sensor is exposed to strong light (direct sunlight, inverter type fluorescent bulb light, etc.). Move the set to a place in which the remote control sensor will not be exposed to strong light.No sound comes outNo sound comes out.0Check the connections for all devices. (v p. 12)0Insert connection cables all the way in.0Check that input connectors and output connectors are not reversely connected.0Check cables for damage.0Check that a proper input source is selected. (v p. 20)0Adjust the volume. (v p. 24)0Make sure volume is not muted. (v p. 25)No sound is produced from subwoofer.0When there is an obstacle between the sound bar and the subwoofer, remove it or place the subwoofer closer to the sound bar.0Make sure the subwoofer status display LED is lit in green. If lights are not lit, it may indicate that the sound bar and subwoofer are not wirelessly connected. Perform connection again according to the following steps.A Press the c button to turn on power to the unit.B Press and hold the subwoofer BAR SYNC button for 3 seconds or more.The subwoofer status display LED blinks once in green.C Press and hold the sound bar g and + buttons for 5 seconds or more until the subwoofer status display LEDs blink as indicated below.The sound bar and subwoofer wirelessly connect. Perform steps A to C again if they do not connect.Bluetooth playback does not workCannot pair with a Bluetooth device.0It may be that Bluetooth is not enabled on the Bluetooth device. See the Owner’s Manual of the Bluetooth device to enable the Bluetooth function.0This device may be paired with another Bluetooth device. Select this unit from the list of devices displayed on the screen of the Bluetooth device.0Bring the Bluetooth device near to this unit.0Turn the power of the Bluetooth device off and on again, and then try again.0Only 1 Bluetooth device can be connected at a time.The sound is cut off.0Bring the Bluetooth device near to this unit.0Remove obstructions between the Bluetooth device and this unit.0To prevent electromagnetic interference, locate this unit away from microwave ovens, wireless LAN devices and other Bluetooth devices.0Pair with the Bluetooth device again. (v p. 22)The HDMI Control function does not workThe HDMI Control function does not work.0You cannot operate devices that are not compatible with the HDMI Control function. In addition, depending on the connected device or the settings, the HDMI Control function may not work. In this case, operate the external device directly.0Check that the HDMI Control function setting is enabled on all devices connected to this unit.Perform this procedure if the display is abnormal or if operations cannot be performed.Various settings are reset to the factory default values. Make settings again.1Press c to turn on power to the unit.2Press and hold the main unit's c, d and + at the sametime for at least 5 seconds.All status display LEDs blink 4 times.3Wait for around 10 seconds after the LED turns off andthen press c.All settings return to the factory settings after the sound bar isrestarted.This unit supports the following HDMI functions.0ARC (Audio Return Channel) functionEnjoy movies, music, etc., on your TV simply by connecting an ARC function-compatible TV to this device via HDMI.0HDMI control functionConnect an HDMI control-compatible TV and this device via HDMI and enable the HDMI control to enable linked control from either device.0Input source switchingIf the TV is turned on, this device automatically powers on and switches the input source.0Power off linkThe TV power off operation is linked so this device also turns off. (Does not work if input source is “OPTICAL” or “Bluetooth”.)0Volume adjustmentThe volume of this unit can be adjusted using the TV remote control.0Audio output destination switchingIf this unit is turned on, TV audio is output from this unit. If this device is turned off, TV audio is output from the speakers of the TV. NOTE0Some functions may not operate depending on the connected TV. Check the owner’s manual of each device for details beforehand.Sound baro GeneralOperating temperature:41 °F - 95 °F (5 °C - 35 °C)Power supply:AC 120 V, 60 HzPower consumption:40 WPower consumption in standby mode:0.3 WPower consumption in Bluetooth standby: 1.6 WSampling frequency:32 kHz, 44.1 kHz, 48 kHzSupported audio formats:Linear PCM, Dolby Digital, DTS Digital Surroundo Bluetooth sectionCommunications system:Bluetooth Version 4.2Transmission power:Power Class 2Maximum communication range:Approx. 32.8 ft/10 m in line of sight zUsed frequency range: 2.4 GHz bandModulation scheme:FHSS (Frequency-Hopping Spread Spectrum)Supported profiles:A2DP (Advanced Audio Distribution Profile) 1.3AVRCP (Audio Video Remote Control Profile) 1.6Corresponding codec:SBCTransmission range (A2DP):20 Hz – 20,000 Hzz The actual communication range varies depending on the influence of such factors as obstructions between devices, electromagnetic waves from microwave ovens, static electricity, cordless phones, reception sensitivity, antenna performance, operating system, application software etc.o Dimensions (Unit : in. (mm))oWeight : 3 lbs 16 oz (1.8 kg)Subwoofero GeneralOperating temperature:41 °F - 95 °F (5 °C - 35 °C) Power supply:AC 120 V, 60 HzPower consumption:40 WPower consumption in standby mode:0.26 WPower consumption in Bluetooth standby: 1.1 Wo Dimensions (Unit : in. (mm))12 5/8 (318)6 3/4 (171)13 1/2(342)o Weight: 11 lbs 7 oz (5.2 kg)3520 10646 00ADACopyright © 2018 D&M Holdings Inc. All Rights Reserved.。
- 1、下载文档前请自行甄别文档内容的完整性,平台不提供额外的编辑、内容补充、找答案等附加服务。
- 2、"仅部分预览"的文档,不可在线预览部分如存在完整性等问题,可反馈申请退款(可完整预览的文档不适用该条件!)。
- 3、如文档侵犯您的权益,请联系客服反馈,我们会尽快为您处理(人工客服工作时间:9:00-18:30)。
Bose®Acoustimass®15 -16家庭影院扬声器系统用户手册警告:为减少火灾和电击的危险,请勿将Acoustimass® 有源低音箱暴露于雨中或潮湿环境中。
小心:为避免遭到电击,插座簧片需与插缝相符,并完全插入。
以下CAUTION标记符号位于低音箱上:对称三角形中的箭头指示灯,在系统的罩壳带有未绝缘的危险电压时会闪亮,告诫用户可能有足够电流量形成电击。
对称三角形中的感叹号,系统中标有此记号的地方告诫用户参照本指南中较为重要的操作指示和保养要求。
附加安全事项:请看扬声器系统内所附重要安全事项上的附加指示。
本产品符合EMC官方指令89/336/EEC和低压产品官方指令73/23/EEC。
您可以从www.bose.com/static/compliance/index.html找到完整的符合声明。
小心:切勿将明火,如点燃的蜡烛,放在器材上。
C 2006 Bose公司。
本手册任何部分不得复制、更改、发散或未经书面允许使用。
经Dolby实验室认证制造。
"Dolby"与双D记号为Dolby实验室标志。
属机密不可出版。
1992-1997Dolby实验室。
保留所有权利。
请花一点时间仔细阅读本用户指南。
它将帮助您更准确地安装与操作您的系统,并享受其具有的先进功能。
妥善保留本手册以供日后参考。
请阅读本用户指南:安全信息安装开始之前拆箱事宜合理摆放扬声器以达到逼真的家庭影院音响效果前中置扬声器的摆放左右前置扬声器的摆放后置扬声器的摆放有源Acoustimass® 低音箱的摆放扬声器的连接有源低音箱和前置扬声器的连接连接有源低音箱和后置扬声器连接Acoustimass® 低音箱和功放检查连接接通Acoustimass® 低音箱的电源升级Acoustimass® 15|||扬声器系统使用系统逼真的家庭影院声效调整LFE电平调整低音/房间补偿电平设置数码环绕声功放确认已收到数码音频信号设定模拟环绕声接收器参考信息故障及排除方法售后服务扬声器的清洁技术信息保修期附件非常高兴您选择了BOSE®公司的Acoustimass®15|||或Acoustimass®16||家庭影院扬声器系统。
BOSE Virtually Invisible®扬声器技术使您无需在房间中摆满扬声器,即可欣赏到由环绕声数码电影,CD和电视节目所带来的逼真的家庭影院效果。
五组卫星式扬声器与有源低音箱一起通过多声道的数码编程,重现丰满美妙的声音。
集成信号处理确保根据您的功放设置,在任何频道,任何聆听水准下,都能有最完美的低音表现。
立体声录像机,立体声电视机,或DVD播放机将所录制的节目源输入环绕声接收器,接收器解码并将之分配至有源低音箱。
低音箱把低音传送至所有通道并将合适的声音输送至每一个扬声器列阵。
不同的节目类型有不同的声音合成:对白通常输入中置扬声器, 左右前置扬声器用来扩展直观声像, 由于声音和特殊效果直接进入环绕(后置)扬声器,所以让您有身临其境的感觉。
在整个环绕声播放过程中任一时候,您都可听到从一个,几个或全部扬声器中发出的声音。
在选择环绕声节目片源时,可以寻找有环绕声的,杜比环绕声,双D记号 。
杜比数字 或其它数字格式,以及电视广播前有"Surround"字样的节目。
您的系统能够兼容目前流行的家庭影院功放。
您也可以用扬声器欣赏没有环绕声的各类立体声节目。
开始之前拆箱事宜警告:有源低音箱重33磅(15公斤)。
请小心提放避免造成损坏。
请小心拆开包装内容(如图1):1. 取出装有五组卫星音箱的棕色内包装箱。
2. 轻轻翻开纸箱四边的盖子。
3. 慢慢将低音箱从纸箱中提出。
4. 使低音箱向上站立。
警告:请将扬声器的塑料包装材料保存在儿童够不着的地方,避免引起窒息。
注意:本产品不可使用用于汽车、娱乐机动设施、船舶或其它类似场所中的数模 转换器电源。
注意:现在最好在本手册第2页和保修卡上记下扬声器的编码。
并保存好所有包 装材料以备不时之需。
安装图1包装箱内包括3根20英尺(6.1米)前置卫星音箱连接线Acoustimass音响气量流 有源低音箱用于前置及中置卫星音箱的橡皮脚垫Acoustimass® 15|||系统Acoustimass®2根50英尺(15.2m)后置扬声器连接线2根50英尺(15.2m)后置扬声器连接线中国电源线(1)合理摆放扬声器以达到逼真的家庭影院音响效果建议家庭影院扬声器的摆放与图2一致。
您也可以选择不同的摆放,因不同的房间音质特点不同。
以下是一些关于扬声器系统摆放的建议: 五组扬声器完全相同,使用于所有通道。
所有的扬声器组都具有防磁功能避免对电视画面造成干扰。
卫星扬声器组的顶部和底部都可旋转,扩展声像至整个房间(如图3)。
Bose®墙面支架和落地支架能增加您的摆放选择。
请参照第17页的"附件"。
请仔细遵照 墙面支架的指示操作,精确的安装将保证您的系统有最好的表现及安全性。
注意:Acoustimass® 15III的中后置音箱已升级。
参见12页的"升级Acoustimass® 15III" 系统。
安装图2家庭影院建议摆放位置(a和c)声像图(b和d)Acoustimass®16 II 系统®前中置扬声器的摆放前中置扬声器能加强荧屏中的动作和对白定位感。
使声音听起来像由画面中发出。
中置扬声器可放在电视机的上面,下面或顶部。
如放在电视机下面,请确保扬 声器不以任何方式承受电视机的重量。
扬声器尽可能靠近荧屏的垂直中心线,以保证对白的精确重现。
小心:请选择稳定及水平的表面安放卫星音箱。
振动或是移动,尤其是光滑的表面 如大理石、玻璃或高度磨光的木质表面都会导致音箱滑落。
如您将中置扬 声器放在电视机的顶部,请使用我们提供的四个橡皮脚。
您还可联系Bose® 售 后服务部获得免费的其它橡皮脚(零件号码178321-04)。
安装左右前置扬声器的摆放左右前置扬声器使来自荧屏的音像更宽广,让观看者无论坐在房间哪一处都感觉自然。
您可将它放在电视机附近,不产生画面干扰的地方。
将前置扬声器放在电视机两边至少6英尺(2m),或者最多15英尺(5m)的地方(参见图2)。
后置扬声器的摆放环绕或后置扬声器增加了声音的分离和特殊效果,扩展了视像,把观看者带入了逼真的画面之中。
环绕扬声器同时也能很好地驾驭对白。
左右后置扬声器的摆放应使声音能够反射到观看者的两边,而不是直接 反射到背后(参照图2)。
如果可能,后置扬声器的高度应与耳齐或超过耳朵。
(以坐姿为准)旋转后置音箱的顶部或底部使声音朝向聆听者的前方或后方。
如果您有 后置扬声器的话(Acoustimass® 16|I或Acoustimass® 15||I升级版),请把 它放在左右后置卫星的正中。
有源Acoustimass® 低音箱的摆放Bose® Acoustimass® 低音技术改变了纯低音箱有方向性的缺点,因此您可将低音箱方便地藏于视线看不见的地方。
可将低音箱摆放在与电视机成一直线的地方。
您可将低音箱藏于家具背后或下面,但不能堵塞出风口。
确认出风口和 任何表面相距至少2英寸(5cm)以上。
如出风口面对墙壁,会增加低音。
反之则减少低音。
小心:为避免干扰,请将低音箱放在离电视机至少2英尺(6m)的地方。
图4有源低音箱的摆放位置注意:垂直安放或侧放会减少空气流通,小心:切勿直接将卫星音箱连接到功放输出端。
先连接卫星音箱和有源低音箱, 然后将低音箱连接到您的接收机上。
小心:切勿使用断裂或磨损的线材,否则会导致电击或损坏系统。
本系统电 线未考虑墙内排线。
请查建筑说明或询问有资格的安装人员。
有源低音箱和前置扬声器的连接3根独立的20英尺(6.1m)喇叭线将低音箱与中置,右前置和左前置扬声器组连接(如图5)。
请确认连接线是否正确,是否与相应地扬声器端口相符。
3根前置扬声器连接线的一端分别是蓝色的标有L(左)、R(右)、及C(中)记号的RCA接头。
另一端则有两股极性电线。
正极电线上的红色套环标记着LEFT、RIGHT或是CENTER。
图5卫星音箱与低音 箱之间的连接注意:Acoustimass®16II包括中后置扬声器,Acoustimass®15III如果需要也可以添加。
升级信息请参照12页的"Acoustimass®15III扬声器系统的升级"。
扬声器连接安装91. 将标有CENTER 记号的双股极性电线连接至中置扬声器。
按下扬声器背后的插座簧 片,把标有(+)的极性线插入红色端口,(-)的极性线插入黑色端口。
然后放开簧片 确保极性电线已安插牢固。
2. 将有RIGHT 记号的双股极性电线连接至右前置扬声器(您面对电视机时的右边)。
3. 将有LEFT 记号的双股极性电线连接至左前置扬声器。
4. 把每根连接线的另一端分别接入低音箱相应地CENTER FRONT ,RIGHT FRONT 及LEFT FRONT 蓝色jack 插口中。
连接有源低音箱和后置扬声器每一个后置扬声器都可用一根50英尺(15m)长的扬声器连接线与低音箱连接。
请确认连接线是否正确,是否与相应地扬声器端口相符。
后置扬声器连接线的一端分别是橙色的标有LR (左后置)、RR (右后置)、及CR (中后置)记号的RCA 接头。
另一端则有两股极性电线。
正极电线上的红色套环标记着LEFT REAR 、RIGHT REAR 或是CENTER REAR 。
1. 把标有RIGHT REAR 的极性电线接入右后置音箱(您面对电视机的右边)。
按下扬声 器背后端口的簧片。
将有标记的电线插入红色端口,无记号的接入黑色端口,然后 松开簧片,确认电线已安插牢固。
2. 把标有LEFT REAR 记号的连接线接入左后置扬声器。
3. 如果您拥有中后置扬声器(Acoustimass®16II系统或是升级的Acoustimass®15III系统), 请把标有CENTER REAR记号的电线插入中后置扬声器中。
注意:Acoustimass®15III系统系统可以通过添加中后置扬声器升级。
参见12页的 "Acoustimass®15III扬声器升级"。
4. 将连接线另一端插入低音箱相应地RIGHT REAR , LEFT REAR 及CENTER REAR 橙色RCA jack 插口中。
安装系统输入连接线有20英尺(6.1m)长,把低音箱接入环绕功放(参见图6)。
系统输入线一端是一个多芯插头,另一端是几根双股电线。