热压机说明书范文
T18数字多功能热压机说明书

New Combo Heat press machine Digital,double-display,self-clockingInstructionThank you for purchasing T18 digital multi-functional heat press machine. It is most unique combo heat press with perfect slide rail in the world. It is a patented technology for protection.This machine adopts microprocessor program control, featuring high precision in parameter memory and control and unique touch button control panel. The advanced design philosophy and independent control unit structure provides convenience for combination and upgrading of machines and after-sale service.With the slide rail design , it is faster and more convenient to replace thermal transfer components.Some important components use imported material, so it is more stable and durable .In addition,the design of the machine is very nice and luxurious,and machine takes up very little room.I. Features1. Brand new slide rail design for easier part replacement.2. Automatic count down button and alarm clock.3. The controller uses microprocessor program and parameter memory, to increaseaccuracy.4. Uses the new degree Celsius heating chip, to increase stability..5. Heating thermocouple: adopting new generation “K” updated version heatingthermocouple. With double merged lines, it is safer and not easily broken down.(The glass tube is adopted for traditional ordinary machinery to pack thermistor.Once in case of unstable voltage, it will be easily broken down, burn out or crashed into pieces due to the uneven pressure!)6. The aluminum plates are a upgraded and thickened. The quality became moresecure and the phenomena of uneven base board and carrying capacity are avoided.7. Can be lifted, lowered and rotated by 360 degrees and convenient to retrieve articlesand transfers.8. Adding one heat-resisting foaming silicon on the baseboard that can withstand 249Celsius degree, it eliminates potential deformity of the image.II.Technical parameters·Voltage:220V / 110V Frequency:50HZ / 60 HZ·Power:1000W·Main Heating plate size:290*380mm / 800W·Packing Size:520mm x 500mm x 480mm·8 inch plate heating mat:Diameter 11~12CM (Ф122/200W, Ф155/260W)·10 inch plate heating mat:Diameter 15CM (Ф122/200W, Ф155/260W)·Mug heating pad: 11oz, heating band dimension: 105X235(unfolded)/350W·Cap pad :print on the edge of cap printing area: 14*8.5 CM·Weight:24Kg·T ime Range:0-999 sec.·Temperature range:0-200℃ /0-399FTemperature rise time: About 5-15 mins·Real-time display of temperature state: Automatic alarm.Other expanded functions: 10oz min mug pad,12oz cone mug pad,17oz cone mug pad,7.1 long mug pad,8 inch plate pad ,10 inch plate pad .III.Operation guide1.Introduction of control panel and buttons OUT: Heating Indicator LightWORK: Countdown Time Indicator lightSET: Function setting key: Reducing Key / M anual timing S tart & clear key: Increase Key(H1): LED Temperature Display screen(H2): LED Time Display screen2. Guide of setting parameterI. Working temperature setting (temperature of heating & press object)Press the “SET” Key first time, the H1 LDE screen will show “SP”, it indicates the current temperature. Temperature can be adjusted by pressing ▼or ▲. Note: before setting temperature pleasure check your controller setting for C or F degree reading.(For Example 330 F Degree)3. Time setting (time of heating & press object)Press the “SET” Key 2nd time, the H1 LDE window will show “” it indicates the setting time. Timer can be adjusted by pressing ▼or ▲.IV. Secondary Manual setting. (Regarding Second Menu (Non-professionals, please do not use this menu; When necessary please use it very carefully!)1. How to change Fahrenheit degree or Celsius degree reading?Press SET Key at the same time for 5 Sec. TheH1 LED window will show “C-F”, Press ▼or ▲Key, to select Fahrenheit degree OR Celsius degree reading. Press SET 5 Sec. again to save setting.V. The process for Printing customized giftsStep 1. Print the designed photo on the sublimation paper or color inkjet paper in sublimation ink ,While printing ,choose mirror image .When theink is dry on the paper, transfer the image to your item .Step 2. Turn power switch on; Press SET first time to set the desired temperature, the LED will show SP, indicating that you can select by press ▼or ▲Step 3. To set the heating time, press SET second time, LED light will show , then press ▼or ▲key to adjust heating time.The temperature rising time within 5-15 minutes;Step 4, Adjust the right pressure (turn the pressure adjust regulator for adjust the pressure);After the temperature reach the desire setting, Place the picture-wrapped mug in to the machine, close the handle.THE TIMER WILL START WORKING AFTER PRESSING ▼Step 5. The machine will start the timer.Step 6. When the timer shows “0”, the machine will alert you by making a buzzer sound. That indicates your transfer is finished. R elease the handle and take out the printed object; Press ▼ Key to cancel the alarm prompt, and then retrieve the object and finish DIY gift printing.Get rid of the picture paper after the printed objects to be taken out from the machine.VI. Replacement of accessoriesThe counterdie of the heat press equipment is slide rail design. It is only necessary to plug it out and replace accessories easily and conveniently.1. Parts replacement instruction2. Adjustable MatUneven work surface, adjust the height and direction of the mat will be OK 1. Adjust the height of the mat roughly, in order to achieve the basic flat 2. Adjust the direction of the mat finely, in order to achieve the completely flat.3. Installation for each heating accessories:A. Flat press (for t shirt): Plug out other heating pad, and put this flat into the slidingrails and fix it.B. Plate press parts installation: Maintain the bottom flat-panel, and push the plate part into the hole and fixed with a screwdriver.C. Mug press parts installation: Put foaming rubber pad fixed in mug shelves(push the long screws into the both side holes of the steel mug shelves directly, without disassembly of the screws).D. Cap Press Parts installation: Push one part along the slide rails, and push theother part into the hole and fixed with a screwdriver.3. Adjust pressureStep 1, Loosen the screw with a screwdriver.Step 2, Hold the handle and gently pull it forward, and then remove the partsAdjust the right pressure before printing or after replace different accessories. Turn the pressure regulator to adjust appropriate pressure,then turn the back side to lock the screw cap .Different Combo heat press accessories For your choiceName Flat Press Mug press pad Cap press Platepress4 in 1One piece29*38cmOne piece 1set8’ or 10‘5 in 1One piece29*38cmOne piece1set8’ & 10’6 in 1One piece29*38cmTwo pieces1set8’ & 10’7 in 1One piece29*38cm3 PCS (different sizes)1set8’ & 10’8 in 1One piece29*38cm4 PCS (different sizes)1set8’ & 10’Mug & Cap Heat press accessoriesTurn the pressure regulator toadjust appropriate pressurePlease lock the screw cap afteradjusting the pressure well .VI. Kindly prompts:To print and make individualized DIY products, it is also necessary for you to prepare the following equipment and materials.1. Ink jet printer/ six colors printer (For example: Epson R-330 / R270 / R290 / T50)2. CISS (Continuous ink supply system)Different models of Ink jet Printer will need different CISS.3. Sublimation ink / Heat transfer ink;4. High-temperature resistant tape;5. Sublimation paper / Heat transfer paper (for Ceramic and fabric)6. Paper cutter7. Press mug / cup and plate: Normal mug and plate will can not use for press, Only sublimation mug and plate can be use.VII. WARRANTY SERVICE REGULATIONSAll machines comes with a one year warranty from the date of purchase. Please contact us or the dealers if you encounter quality problems..In accepting the warranty service, please provide all of information as follow: (You can send us those information, through the scans or express way. Address:Repair date:Repair fault:Repair reason:Fault handing:Customer name & address:Email:Products Model:Purchase date:VIII.ATTENTION1.Be sure to connect safe and correct ground wire !2.Be cautious when operating the heat press. Parts will be hot and may cause serious burn. Keep surrounding clear of the machine.3.The steel of mug frame is sharp, handle with care..4.Object may still be hot after the transfer.5.Please keep children and senior citizens away from the machine .。
热压机使用说明

热熔后将holder拉出拿出工件 热熔后将holder拉出拿出工件 holder
注意事项 1、操作过程中严禁将手伸入工作区域 或接触压头上的铜板(实际使用的时候 会在热压机的前后加装有机玻璃挡板) 否则会造成压伤或烫伤 2、非指定的专业人员不允许拆卸热压 机部件
调试说明
压头载板
定位机构由导柱和导 定位机构由导柱和导 套组成当气缸下压时 以导柱刚好能顺畅的 嵌入导套为宜, 嵌入导套为宜,它是 判断热熔位置是否准 确的重要标志 限位柱的作用是调节 限位柱的作用是调节 气缸下压行程, 气缸下压行程,由于 其本身是细牙螺钉, 其本身是细牙螺钉, 所以通过它可以精确 控制热熔点高度 接近开关由接近传感 接近开关由接近传感 器和限位螺钉组成, 器和限位螺钉组成, 当热熔点位置调好以 后,调整接近开关到 相应位置
热熔后
h1
压头容积 计算方法
Holder及压头制作注意事项 Holder及压头制作注意事项
压点直 接在铜 板上铣 出 1、压头分为整体式压 头及分体式压头, 头及分体式压头,整体 式压头精度高成本高不 易更换; 易更换;分体式压头精 度较高,成本低, 度较高,成本低,易更 换。所以要求制作压头 时务必保证加工重复精 度,避免因此产生的使 用问题。 用问题。 holder在设计并加 2、holder在设计并加 工后一定要保证工件放 置状态良好,无翘起, 置状态良好,无翘起, 热熔点下方一定要有支 撑。 压头及holder holder设计 3、压头及holder设计 加工的好坏直接影响到 热熔点的好坏, 热熔点的好坏,所以一 定要谨慎。 定要谨慎。
调试步骤2 调试步骤
上治具载板 限位柱
细调
压头
热熔后蘑菇头 未热熔到部分
接通电源, 接通电源,将待热熔件 放入holder holder。 放入holder。调节限 位柱高度, 位柱高度,使holder 在被推进热熔区域压头 下降, 下降,直到上治具载板 顶到限位柱, 顶到限位柱,压头不再 下降时, 下降时,此时的压头刚 好能压到热熔柱。 好能压到热熔柱。由于 没有完全压下, 没有完全压下,所以热 熔点只压出了如左图所 示的一小段蘑菇头, 示的一小段蘑菇头,此 时观察蘑菇头和未热熔 部分的同心度状况即可。 部分的同心度状况即可。
压机使用说明书(范本)

压机使用说明书压机使用说明书篇一:KD3800压机操作说明书 KD3800全自动液压压砖机使用说明书(机械部分) 广东科达机电股份有限公司二零零一年五月目录一、总则二、机械概述三、安全说明四、安装过程五、操作规程六、维护与保养七.压制砖坯规格表八、用户自购备件明细表九.随机附件明细表附图一、压机外形图附图二、压机主体附图三、液压部阀组结构图附图五、复合顶出装置结构图附图六、模具安装连接尺寸图(一、二) 附图七、液压气动原理图附图八、压制曲线图附图九、地基图附图十、压机吊装图附图十一、冲头开关箱附图十二、锁模安装示意图附图十三、复合顶出系统装模示意图一.总则1.在压机使用之前,操作人员及日常维护人员需经过培训及仔细阅读说明书的全部内容,这样对操作人员、维修人员及设备自身的安全很重要。
本手册中所述的产品及材料会因技术原因或工作原因随时更改,我们保留更改的权利,恕不另行通知。
说明书的内容属于有价技术资料,不得交付第三方复印或转让。
2.严格按本说明书操作、维护压机,未按本说明书操作、维护产生的不良后果本公司不负责任。
3.用户对说明书必须妥善保管,为便于查阅,说明书应放在靠近设备的地方,使操作和维修人员能在需要的时候及时查阅。
4.对工作循环和机器结构进行的任何修改请向科达集团的产品支持人员咨询,只有他们才有权进行这项工作。
5.压机的使用寿命为10年,本手册也应妥善保管10年以上。
对使用非原装配件导致的设备损坏本公司不承担责任。
6.压机铭牌公称压制力(t)二.机械概述1.设备概述 KD3800全自动液压压砖机(以下简称科达系列压机)是全自动化设备,专门用于陶瓷墙地砖生产过程中的粉料压制成型。
它由主机部分、液压部分和电气控制部分组成,本机采用液压传动,用可编程控制器实现控制功能。
11.热压机运转操作说明书
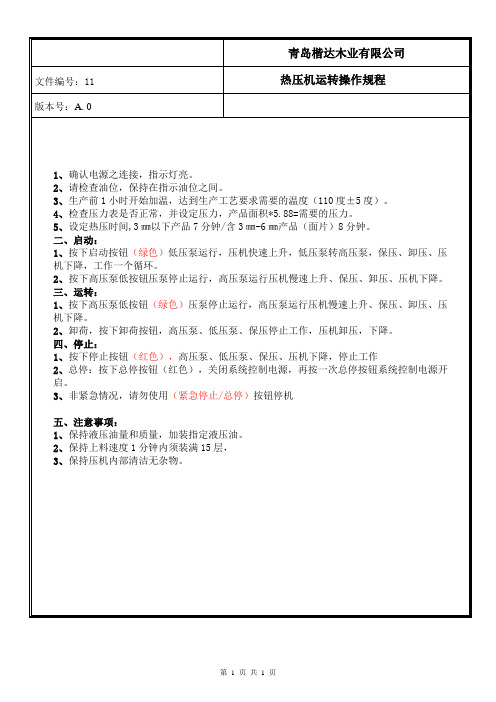
文件编号:11
热压机运转操作规程
版本号:A.0
1、确认电源之连接,指示灯亮。
2、请检查油位,保持在指示油位之间。
3、生产前1小时开始加温,达到生产工艺要求需要的温度(110度±5度)。
4、检查压力表是否正常,并设定压力,产品面积*5.88=需要的压力。
5、设定热压时间,3㎜以下产品7分钟/含3㎜-6㎜产品(面片)8分钟。
3、保持压机内部清洁无杂物。
四、停止:
1、按下停止按钮(红色),高压泵、低压泵、保压、压机下降,停止工作
2、总停:按下总停按钮(红色)பைடு நூலகம்关闭系统控制电源,再按一次总停按钮系统控制电源开启。
3、非紧急情况,请勿使用(紧急停止/总停)按钮停机
五、注意事项:
1、保持液压油量和质量,加装指定液压油。
2、保持上料速度1分钟内须装满15层,
二、启动:
1、按下启动按钮(绿色)低压泵运行,压机快速上升,低压泵转高压泵,保压、卸压、压机下降,工作一个循环。
2、按下高压泵低按钮压泵停止运行,高压泵运行压机慢速上升、保压、卸压、压机下降。
三、运转:
1、按下高压泵低按钮(绿色)压泵停止运行,高压泵运行压机慢速上升、保压、卸压、压机下降。
2、卸荷,按下卸荷按钮,高压泵、低压泵、保压停止工作,压机卸压,下降。
贴面压机说明书

1、主要技术参数
序 号
名称
规格
备注
主机外形尺寸
主机额定压力
31.5Mpa
热压板尺寸、层数
2600x1370x52x1
最大日产量
油缸额定压力
31.5Mpa--
柱塞泵额定压力、排量
电动机额定配置
7500W-4
齿轮泵额定压力、排量
电动机额定配置
15000W-4
BYTM型贴面热压机组
使
用
说
明
书
山东省临沂市木工机械厂
一、用途及特点1
二、主要技术参数1
三、热压机工作示意图及明细表2
四、设备的安装调整及使用3
五、安全与保养4
六、电器的工作原理图5
七、出现的一般故障及排除方法6
八、附录7
、用途及特点
本设备主要适用于生产胶合板、贴面板、装饰板、细木工板、纸板 和橡胶板等产品的热压。主要由液压泵站提供机械能,液压油顶拖动热 压板来完成热压机的闭合、加压与卸栽功能。由锅炉提供热能以达到提 高粘合强度和生产效率的目的。
需用油液
46#
油箱最大容积
500Kg
、热压机工作示意图及部件明细表
部件明细表
序号
名 称
规格或型号
备注
1
导热油锅炉总成
2
导热油回油管
3
导热油进油管
4
热压板总成
5
液Байду номын сангаас油缸
6
热压机龙门架
7
热压机中托
8
液压输油管
9
电磁液控阀
10
电磁换向阀
11
(信力热压机操作说明20150122)TM-100PR-2H Operation Manual RevA CN

目录
ii
电子噪音 ........................................................................................................................ 13 环境 ............................................................................................................................... 13 安全 ............................................................................................................................... 13 第 3 章: 产品安装和使用 ................................................................................................ 14 机器安放位置................................................................................................................. 14 开机 ............................................................................................................................... 14 程序概述 ........................................................................................................................ 15
热压机使用说明书
热压机使用说明书使用说明书一、产品介绍热压机是一种常见的机械设备,用于将热塑性塑料、热固性塑料以及木材、纤维板、合成材料等通过高温和压力进行热压成型。
本文档旨在为用户提供热压机的详细使用指南,以确保用户能够正确、安全地操作该设备。
二、安装与调试1.设备安装:根据设备的尺寸和安装要求,选择适当的安装位置,确保周围有足够的工作空间和通风条件。
将设备稳固地安装在坚实的地面上,避免震动和噪音。
2.电源接入:将设备插头插入正确的电源插座,并确保电压与设备要求相符。
3.温度调节:根据所需的热压温度,调节设备上的温度控制器或设定器。
注意不要将温度设定过高,以免损坏设备或引发安全事故。
4.压力调节:根据所需的热压压力,调节设备上的压力调节阀。
确保压力调节阀工作正常,以免造成工件变形或设备损坏。
三、操作步骤1.准备工作:将待加工的材料切割成所需的形状和尺寸,并清洁表面上的杂质和灰尘。
检查设备的工作状态和各项安全装置是否完好。
2.开机操作:将设备的电源开关置于ON位置,待设备预热达到设定温度后,开始工作。
3.加载材料:将准备好的材料放置在热压机的工作台上,并根据实际情况调整材料的位置和摆放方式。
4.设定参数:根据加工要求,设定热压温度、热压时间和热压压力。
确保设定值与实际需求一致,避免产生产品质量问题。
5.开始热压:按下启动按钮,设备开始进行热压过程。
在热压过程中,注意观察设备运行状态,确保设备工作平稳、安全。
6.热压完成:热压时间到达设定值后,设备会自动停止工作。
此时,打开热压机的顶盖,取出热压成型的产品。
四、维护与保养1.定期保养:按照设备说明书中的维护周期进行定期保养,包括清洁设备表面、检查电路连接和控制系统、添加润滑剂等。
2.检查安全装置:定期检查热压机的各项安全装置是否正常工作,如过载保护装置、温度保护装置、压力保护装置等。
3.注意安全操作:在使用热压机时,务必戴好防护手套和防护眼镜,避免发生意外伤害。
禁止在运行时伸手或放入身体部位。
KWS-A800热压机说明书
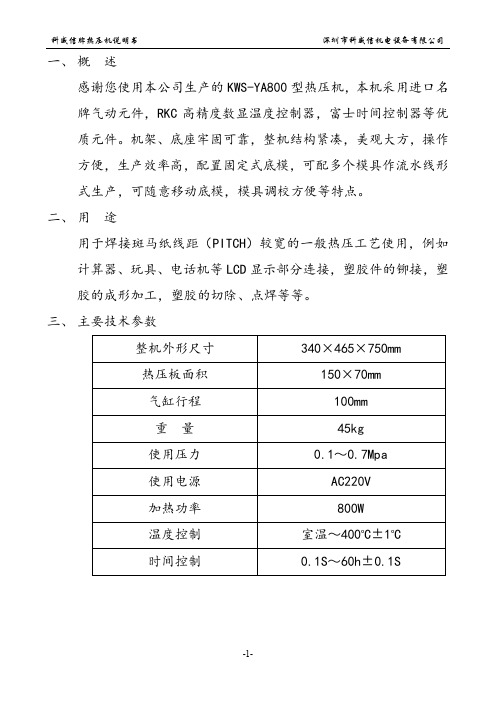
一、概 述感谢您使用本公司生产的KWS-YA800型热压机,本机采用进口名牌气动元件,RKC高精度数显温度控制器,富士时间控制器等优质元件。
机架、底座牢固可靠,整机结构紧凑,美观大方,操作方便,生产效率高,配置固定式底模,可配多个模具作流水线形式生产,可随意移动底模,模具调校方便等特点。
二、用 途用于焊接斑马纸线距(PITCH)较宽的一般热压工艺使用,例如计算器、玩具、电话机等LCD显示部分连接,塑胶件的铆接,塑胶的成形加工,塑胶的切除、点焊等等。
三、主要技术参数整机外形尺寸 340×465×750mm热压板面积 150×70mm气缸行程 100mm重 量 45kg使用压力 0.1~0.7Mpa使用电源 AC220V加热功率 800W温度控制 室温~400o C±1o C时间控制 0.1S~60h±0.1S四、机器外形图1、焊头下降2、焊接时间3、计数器4、热压板5、工作台6、急停按钮7、电源开关8、温度控制9、气压调节 10、气缸 11、行程调节 12、下降速度调节 13、启动按钮五、使用说明1、使用前的准备1)核对机器标牌的电压要求,并要确保系统接地良好。
2)将机器与电源气源连接,注意要先将电源开关关断。
3)空气管路接于干净且不含润滑剂的压缩空气源,最大压力为0.7兆帕。
2、操 作1)把上模装于热压板上,把M5的螺母放置在机头热压板的腰形槽内,用内六角螺钉把上模往热压板上装。
2)把高度定位螺母调于中间,再把下模(固定夹具)放于工作台上,按焊头下降按钮,使机头降落。
3)进一步把装好工件的下模对准焊接位置,使机头反复升降几次,待焊接位置确保对好,再固定好下模。
4)调整高度定位螺母,使焊接行程符合产品焊接的要求。
5)根据焊接工艺的要求,适当调整焊接时间,气压的压力,和加热的温度。
a、时间的调节,旋转时间继电器的大旋钮可设定所需要的焊接时间,调节时间继电器左侧的小螺丝可改变时间的刻度,调节左侧的小螺丝可改变时间的单位。
- 1、下载文档前请自行甄别文档内容的完整性,平台不提供额外的编辑、内容补充、找答案等附加服务。
- 2、"仅部分预览"的文档,不可在线预览部分如存在完整性等问题,可反馈申请退款(可完整预览的文档不适用该条件!)。
- 3、如文档侵犯您的权益,请联系客服反馈,我们会尽快为您处理(人工客服工作时间:9:00-18:30)。
热压机说明书范文
热压机说明书范文
篇一:热压机使用说明
热压机使用说明
热压机是一种将两个预先上好助焊剂镀锡的零件加热到足以使焊锡熔化、流动的温度,固化后,在零件与焊锡之间形成一个永久的电气机械连接设备。
应不同产品,洛阳广盈机械热压机升温速度可供挑选。
热压机工作原理:利用一个2000W的变压器产生一个低电压的大电流,通过焊接头令其迅速发热。
脉冲电流就是指电流的ON及OFF频率比例,此脉冲比例越大,电流输出越大,焊接头升温越快。
热压机使用说明:
篇二:16-热压机(电热)操作说明书
热压机(电热)操作说明书
编号:INCTO/QM-SB-16
版本/次:A/1
设备名称:热压机(电热)
放置场所:医疗车间使用单位:镇江医疗生产线机台操作顺序:
篇三:棕垫热压机说明书
产品型号:ZY25X22100
产品名称:棕垫热压机
使用说明书
明恒汇机械设备有限公司
目录
一.机器简介.........................................................1 二.工作原理..........................................................2 三.主要技术參数....................................................3 四.设备主要结构用途..............................................4 五.安裝与调试.......................................................4 六.易损件明细表....................................................5 七.附图. (6)
一.机器简介
本机是将施胶后的棕丝加压为棕垫的设备,设备加热介质为热油。
二.工作原理
本机为多层热压机,其层数可由用户需要订制,其基本原理为:当施胶后的成型棕丝板坯送入热压机后,高压泵电机启动,压机上活动横梁往下移动,当活动横梁碰到行程开关后,压机开始对棕垫板坯加压,当碰块碰到下限行程开关后,压机停止加压,进入保压阶段,完成保压后,压机卸压,卸压完成后,活动横梁提升,当碰块碰到上限行程开关后,高压泵电机停止运转,完成一个热压周期,热压后的`板坯被运走,压机等待和重复下一热油周期,如此往复循环。
三.主要技术参数
1.公称压力: 100T
2.热压板幅面(长x宽x高):2500x2200x42mm 3.油缸数量: 4个
布置方式:上置式 4.闭合速度: 85mm/min 5.进板方式:横向进板 6.热压板层数:(1)4层 1台
(2)5层 1台
7.热压板的间隔开档尺寸:(1)4层: 400mm
(2)5层500mm 8.加热介质:热油
工作温度:230℃ 9.电机总功率: 17.5~30 KW
10.主机外形尺寸(长x宽x高):2200x2738x5678mm 11.整机重量:
四.设备主要结构及用途
本机主要由以下部件组成:框架,压板,上活动横梁,油缸,下固定横梁,液压系统,加热系统,电气控制箱。
框架是整机的支撑件,是主要的承力元件;压板内部有加热介质通道,通入热油后,可对其加热,可对棕丝板坯进行加热使胶固化成型;上活动横梁是连接上压板和油缸的元件;油缸是将液压能转换为机械能的元件,通过油缸向下施加压力;下固定横梁为下压板支撑和承受加压力的元件;液压系统是压机工作的动力源,由液压泵产生压力油液,通过控制阀组以及电气控制使压机完成上升下降加压保压卸压等有规律的协调动作;加热系统可为压机提供热能能量;电气控制箱可实现整机的动作电气控制。
五.安装调试
1.安装
(1)主机的安装
在水泥地面基础上组装整机,先组装框架和下固定横梁,注意保证下固定横梁组装后的平面度,找水平后再固紧横梁端面和立柱之间的联接螺栓,接下来按顺序安装绝热材料,下热压板,各层热
压板及上压板,上活动横梁,油缸,平衡机构等,待主机整体安装完成后,将主机调到水平后,方可进行地脚基础的施灌和保养。
(2)液压控制系统的安装
液压控制系统的连接管道应采用二次安装。
先点焊联结好各管道,拆下后进行焊接,除渣,除锈后用20%硫酸或盐酸溶液清洗,再用10%苏打水中和后用洁净的清水冲洗干净,彻底干燥后才能安装。
连接焊缝须开焊接坡口,且保证焊接质
量。
2.调试
(1)开机前的准备工作:
认真检查设备的装配准确性,各连接螺栓及各管结头是否紧固。
检查各行程开关的位置,检查各行程开关与碰杆接触是否可靠。
(2)整机调试
认真检查液压控制系统的各管道连接是否正确,检查泵的旋转方向是否正确,松开溢流阀待油泵运转正常后再逐渐调整溢流阀的压力,每次调整的压升不超过5MPa,且运转时间不少于5分钟。
调整电接点压力表的控制压力;检查各电磁阀的电磁铁动作是否可靠;检查油箱的液位是否正常。
在调试液压系统过程中观察压机上活动横梁的运行是否平稳,各行程开关是否可靠。
(3)带料试车
在压机空车试车正常后,可进入带料试车阶段。
将液压系统各参数调整至生产合格棕垫所需参数及可。