PCC1301中文说明书
PC-100_110_操作手册

PC-100/PC-110微电脑酸碱度& 氧化还原电位监视器感谢您购买本公司的产品,为持续提高监视器质量及增进功能的需要,本公司保有随时修改内容及图标显示的权利,实际显示与操作手册可能有所差异,故实际情况以机器为准,不另行通知。
本监视器在使用时请依照操作手册内所描述之功能与安装方式,本公司不对任何个人或实体因不当使用本产品所引起的任何直接或间接损失或损害负责。
若您有任何问题或发现操作手册有遗漏、疏忽或错误之处,请与本公司业务人员联系。
安全与注意事项安装前请先熟读本操作手册,避免错误的配线产生安全问题及损坏仪器。
● 在所有配线完成并检查确认无误后始可送电,以免发生危险。
● 请避开高温、高湿及腐蚀性环境位置安装本监视器,并避免阳光直接照射。
● 电极信号传输线须采用特殊之电缆线,建议使用本公司所提供的电缆线,不可使用一般电线代替。
● 使用电源时,应预防电源产生突波干扰,尤其在使用三相电源时,应正确使用地线。
(若有电源突波干扰现象发生时,可将监视器之电源及控制装置如:加药机,搅拌机等电源分开,即监视器采用单独电源,或在所有电磁开关及动力控制装置之线圈端接突波吸收器来消除突波)。
●PC-110监视器输出继电器供承接警报或控制的接点信号。
基于安全与防护理由,请务必外接耐足够电流之继电器来承载,以确保仪器使用的安全。
(请参考第3.4节电气配线参考图)机型PC-100 PC-110 测试项目pH/ORP/Temp测试范围pH -2.00~16.00pH ORP -1999~1999mV TEMP -30.0~130.0℃解析度pH 0.01pH ORP 1mV TEMP 0.1℃精确度pH ±0.01pH (±1 Digit)ORP ±0.1% (±1 Digit)TEMP ±0.2℃ (±1 Digit) 具温度误差修正功能温度补偿NTC30K / PT1K自动温度补偿手动温度补偿工作环境温度0~50℃储存环境温度-10~70℃显示屏幕液晶显示电流输出隔离式4~20mA可设定对应pH/ORP测量范围,最大负载500Ω控制接点输出-RELAY ON/OFF接点240V AC 0.5A Max.(建议) 设定-一组独立可设定高/低点(HI/LO)之控制点电源供应100V~240V AC±10%,5W Max.,50/60Hz安装方式配电箱上挖孔安装固定本机尺寸48mm × 96mm × 110mm (H×W×D)挖孔尺寸44 mm 92 mm (H×W)重量0.25Kg2.1主机固定请预先在配电箱面板上留一44 mm × 92 mm的方孔,监视器从配电箱之面板直接放入,将监视器所附之固定器由后方套入,卡进固定槽内。
1301F和1301G型高压调节器说明书

Types 1301F and 1301GD 100341X 012Instruction Manual Form 1111September 2015Failure to follow these instructions or to properly install and maintain this equipment could result in an explosion, fire and/or chemical contaminationcausing property damage and personal injury or death.Fisher ® regulators must be installed, operated and maintained in accordance with federal, state and local codes, rules and regulations and Fisher instructions.If the regulator vents gas or a leakdevelops in the system, service to the unit may be required. Failure to correct trouble could result in a hazardous condition.Installation, operation and maintenance procedures performed by unqualified personnel may result in improperadjustment and unsafe operation. Either condition may result in equipmentdamage or personal injury. Use qualified personnel when installing, operating and maintaining the 1301 Series high-pressure regulator.IntroductionScope of the ManualThis Instruction Manual provides instructions for the installation, adjustment, maintenance and parts ordering of the Types 1301F and 1301G high-pressure regulators.Product DescriptionTypes 1301F and 1301G regulators are direct-operated, high-pressure regulators, which can be used where high-pressure gas must be reduced for use as pilot supply pressure in pilot-operated regulators or as loading pressure in pressure-loaded regulators.1301 Series High-Pressure RegulatorsTypes 1301F and 1301G regulators can also be used in many other applications due to their rugged design as high-pressure reducing regulators for various fluids such as air, gas, water and other liquids.The Type 1301F can handle outlet pressures from 10 to 225 psig / 0.69 to 15.5 bar in three ranges and the Type 1301G can handle outlet pressures from 200 to 500 psig / 13.8 to 34.5 bar in one range.Figure 1. Type 1301F High-Pressure RegulatorP1025Types 1301F and 1301G2Available ConfigurationsType 1301F: Direct-operated, high-pressure reducing regulator for inlet pressures to 6000 psig / 414 bar and outlet pressure ranges from 10 to 225 psig / 0.69 to 15.5 bar in three rangesType 1301G: Direct-operated, high-pressurereducing regulator for inlet pressures to 6000 psig / 414 bar and an outlet pressure range of 200 to 500 psig / 13.8 to 34.5 bar Body Size and End Connection Style1/4 NPT (one inlet and two or three outletconnections), CL300 RF , CL600 RF and CL1500 RF; or PN 25 RF (all flanges are 125 RMS)Maximum Allowable Inlet Pressure (1) Brass Body: Air and Gas:6000 psig / 414 bar at or below 200°F / 93°C and 1000 psig / 69.0 bar above 200°F / 93°C Liquid:P olytetrafluoroethylene (PTFE) Disk: 1000 psig / 69.0 bar Nylon (PA) Disk: Water: 1000 psig / 69.0 bar Other Liquids: 2000 psig / 138 bar Stainless Body: Air and Gas: 6000 psig / 414 bar Liquid:P olytetrafluoroethylene (PTFE) Disk: 1000 psig / 69.0 bar Nylon (PA) Disk: Water: 1000 psig / 69.0 bar Other Liquids: 2000 psig / 138 bar Outlet Pressure RangesSee Table 1Maximum Emergency Outlet Pressure (1)Type 1301F: 250 psig / 17.2 barType 1301G: 550 psig / 37.9 barWide-Open Flow Coefficients for Relief Valve SizingC g : 5.0C v : 0.13 C 1: 38.5SpecificationsSpecifications section lists the specifications for Types 1301F and 1301G high-pressure regulators. The maximum outlet pressure for a given regulator as it comes from the factory is stamped on the regulator nameplate.IEC Sizing CoefficientsX T : 0.938F D : 0.50F L : 0.85Recovery CoefficientK m : 0.72Material Temperature Capabilities (1)Nylon (PA) Valve Disk and Neoprene (CR) Gaskets:-20 to 180°F / -29 to 82°CPTFE Valve Disk and Fluorocarbon (FKM) Gaskets: -20 to 400°F / -29 to 204°C (2)PTFE Valve Disk and Ethylenepropylene (EPDM) Gaskets: -40 to 300°F / -40 to 149°CLow Temperature ServiceService to -65°F / -54°C is available with low temperature bolting and special low temperature Nitrile (NBR) O-rings to replace the gaskets.Service to -80°F / -62°C is available with low temperature bolting and special low temperature Fluorosilicone (FVQM) O-rings to replace the gaskets.Pressure RegistrationInternal Orifice Size5/64 in. / 2.0 mm Spring Case VentsType 1301F Brass Spring Case: Four 5/32 in. / 4.0 mm holesType 1301F Stainless Steel Spring Case: One 1/4 NPT connectionType 1301G Spring Case:One 1/8 NPT connection with screen Approximate Weight8 pounds / 4 kg1. The pressure/temperature limits in this Instruction Manual and any applicable standard or code limitation should not be exceeded.2. Fluorocarbon (FKM) is limited to 180°F / 82°C hot water.Types 1301F and 1301G 3Principle of OperationThe 1301 Series regulators are direct-operated.Downstream pressure is registered internally through the body to the underside of the diaphragm. When downstream pressure is at or above set pressure, the disk is held against the orifice and there is no flow through the regulator. When demand increases, downstream pressure decreases slightly allowing theregulator spring to extend, moving the yoke and disk assembly down and away from the orifice. This allows flow through the body to the downstream system. As the downstream pressure reaches its setpoint, it starts to overcome the spring force, which is sensed by the diaphragm, moving the yoke and disk assembly up near its orifice, restricting flow across the regulator.M 1015INLET PRESSUREOUTLET PRESSUREATMOSPHERIC PRESSUREType 1301FFigure 2. Type 1301F Operational SchematicTYPE OUTLET PRESSURERANGES (1)SPRING COLOR SPRING PART NUMBERSPRING WIRE DIAMETERSPRING FREE LENGTHpsig bar In.mm In.mm1301F10 to 750.69 to 5.2Blue 1D3872270220.200 5.08 1.6942.950 to 150 3.4 to 10.3Silver 1B7885270220.225 5.72100 to 2256.9 to 15.5Red 1D4651271420.243 6.171301G200 to 50013.8 to 34.5Silver1K1560271420.3318.410.8822.41. All springs can be backed off to 0 psig / 0 bar.Table 1. Outlet Pressure RangesDISK HOLDERM1015INLET PRESSURE OUTLET PRESSUREATMOSPHERIC PRESSURETypes 1301F and 1301G4InstallationOverpressuring a regulator or associated equipment may causeleakage, part damage or personal injury due to bursting of pressure containing parts or explosion of accumulated gas. Do not install a regulator where service conditions can exceed the specifications listed on the Specifications section, or any applicable local, state or federal codes and regulations.Use qualified personnel when installing, operating and maintaining these regulators. Make sure that there is no damage or foreign material in the regulator and that all tubing and piping are clean and unobstructed. The regulator may be installed in any position. Apply pipe compound to the pipeline threads. Connect inlet piping or tubing to the 1/4 NPT connection marked “In” and outlet piping or tubing to one of the 1/4 NPT connections marked “Out”. Install a pressure gauge or pipe plug in the unused outlet connections.If continuous operation of the system is requiredduring inspection or maintenance, install a three-valvebypass around the regulator.A regulator may vent some gas to the atmosphere. In hazardous gas service, vented gas may accumulate, causing personal injury or equipment damage due to fire or explosion. Vent a regulator in hazardous gas service to a remote, safe location.The optional stainless steel spring case of the Type 1301F regulator has one 1/4 NPT internal connection. The Type 1301G regulator spring case has one 1/8 NPT internal connection with a screen. T o remotely vent the spring case, remove the screen, if present, and connect 1/4 or 1/8 NPT piping or tubing to the spring case connection. The piping or tubing should vent the spring case to a safe location, have as few bends as possible, and have a screened vent on its exhaust end.Each regulator is factory-set for the pressure setting specified on the order. If no setting is specified, outletpressure is factory-set at the midpoint of the regulator spring range. If pressure adjustment is necessary, refer to the Startup section. In all cases, check the spring setting to make sure it is correct for the application.Overpressure ProtectionThe 1301 Series regulators have an outlet pressure rating lower than their inlet pressure rating. If actual inlet pressure can exceed the outlet pressure rating, outlet overpressure protection is necessary. However, overpressuring any portion of the regulators beyond the limits in Specifications section may cause leakage, damage to regulator parts or personal injury due to bursting of pressure-containing parts.Some type of external overpressure protection should be provided if inlet pressure will be high enough to damage downstream equipment. Common methods of external overpressure protection include relief valves, monitoring regulators, shutoff devices and series regulation.If the regulator is exposed to an overpressurecondition, it should be inspected for any damage that may have occurred. Regulator operation below these limits does not preclude the possibility of damage from external sources or from debris in the pipeline.StartupWith installation completed and downstreamequipment adjusted, slowly open the upstream and downstream block valves while using pressure gauges to monitor pressure.If adjustment is necessary, loosen the locknut (key 18, Figures 3 and 4), and turn the adjusting screw (key 15, Figures 3 and 4) clockwise to increase the set pressure or counterclockwise to decrease the set pressure. Monitor pressure with gauges during adjustment. When adjustment is complete, tighten the locknut. If the desired outlet pressure is not within the range of the regulator spring, install a spring with a desired range according to the Maintenance section.ShutdownFirst, close the upstream shutoff valve, and then, close the downstream shutoff valve. Next, open the vent valve between the regulator and thedownstream shutoff valve and open the vent valve between the regulator and the upstream shutoff valve. If vent valves are not installed, safely bleed off both inlet and outlet pressures and check that the regulator contains no pressure.Types 1301F and 1301G5MaintenanceRegulator parts are subject to normal wear and must be inspected and replaced as necessary. The frequency of inspection and parts replacement depends on the severity of service conditions and the requirements of local, state and federal rules and regulations.Instructions are given below for disassembly andassembly of parts.To avoid personal injury or equipment damage from sudden release of pressure or explosion of accumulated gas, do not attempt any maintenance or disassembly without first isolating the regulator from system pressure and relieving all internal pressure from the regulator.DisassemblyThe following procedure describes how to completely disassemble the regulator. When part replacement or inspection is required, complete only those steps necessary to accomplish the job. Key numbersreferenced are shown in Figure 3 for the Type 1301F regulator and in Figure 4 for the Type 1301G regulator unless otherwise indicated.1. Loosen the locknut (key 18).2. Turn the adjusting screw (key 15)counterclockwise to remove spring compression.3. Remove the bottom cap (key 3), bottom capO-ring (key 14) and spring (key 10).4. Unthread the valve disk assembly (key 6) fromthe yoke (key 4).5. Remove the valve disk collar (key 22) from thevalve disk assembly.6. Remove the spring case cap screws (key 16),and separate the spring case (key 2) from the body (key 1).7. Remove the upper spring seat and spring(keys 9 and 11).8. Refer to Figure 5. Unscrew the diaphragmlocknut (key 19), and remove the diaphragmplate (key 8), the two diaphragms (key 7) and the diaphragm plate gasket (key 13).9. Remove the screws (key 17) from the yoke, andtake the lower and upper halves of the yoke out of the body. The yoke halves are a matched set and need to be kept together. 10. Unscrew the orifice (key 5). Examine seatingedge of orifice. Replace with a new part if worn or nicked.AssemblyThis procedure assumes that the regulator was completely disassembled. If not, start theseinstructions at the appropriate step. Key numbers used are shown in Figure 3 for the Type 1301F regulator and in Figure 4 for the Type 1301G regulator unless otherwise indicated.1. Screw the orifice (key 5) into the regulator.2. Insert both halves of the yoke (key 4) into theregulator, and fasten them together with thescrews (key 17). The yoke halves are a matched set and need to be kept together.3. The valve disk assembly (key 6) has two valvedisks, one on each end. Inspect both valve disks, and select the one to be used. Thread the valve disk assembly into the yoke so that the disk to be used is positioned against the orifice. Thread the valve disk collar (key 22) onto the exposed end of the valve disk assembly.4. Place the bottom cap O-ring (key 14) on thebottom cap (key 3). Place the spring (key 10) in the bottom cap, and thread it into the regulator.5. Put the body gasket (key 12) on the regulatorbody (key 1).6. Refer to Figure 5. Place the diaphragm plategasket (key 13), two diaphragms (key 7), and the diaphragm plate (key 8) on the yoke (key 4). Make sure the diaphragm convolutions are toward the spring, and secure the parts by threading the diaphragm locknut (key 19) onto the yoke.7. Place the regulator spring (key 11) and upperspring seat (key 9) on the diaphragm plate.8. Position the spring case (key 2) over the spring andon the regulator body. Orient the spring case vent or vents as necessary. Insert the cap screws (key 16), and tighten them only finger-tight.9. Thread the adjusting screw and locknut (keys 15and 18) into the spring case just far enough to slightly compress the spring. Securely tighten the cap screws (key 16), and refer to the Startup section for adjustment procedures.Types 1301F and 1301G6Figure 3. Type 1301F High-Pressure Regulator AssemblyFigure 4. Type 1301G High-Pressure Regulator AssemblyCN7095_C1987BP6341-AFigure 5. Exploded View of The Diaphragm HeadAssembly and Yoke2040S6000P S IM A X . I N L E T F I S H E RMA X. OU T L E T P S INOTE: OPTIONAL THIRD OUTLETTypes 1301F and 1301G7Parts OrderingWhen corresponding with your local Sales Office about this regulator, include the type number and all other pertinent information stamped on the bottom cap and on the nameplate. Specify the complete 11-character part number from the following parts list when ordering replacement parts.Parts ListNoteParts marked NACE in this parts listare intended for corrosion-resistant service as detailed in the NACE International Standards MR0175/ ISO 15156 and/or MR0103.Key Description Part NumberParts Kits (Includes keys 5, 6, 7, 12, 13 and 14) Stainless steel kits include Fluorocarbon (FKM)gaskets. Brass kits include Neoprene (CR) gaskets.Brass With Nylon (PA) Disk R1301FX0012 Stainless steel With Nylon (PA) Disk R1301FX0022 Brass With PTFE Disk R1301FX0032 Stainless steel With PTFE Disk R1301FX00421 Body 1/4 NPT Connection Brass (2 outlet port) 39A1342X012 Brass (3 outlet port) ERAA00584A0 CF8M Stainless steel (2 outlet port) 32B4291X022 CF8M Stainless steel (3 outlet port) ERAA00603A0 1/4 x 1/2 in. Flanged Connection CF8M Stainless steel CL300 RF 14B1420X012 CL600 RF 14B2059X012 CL1500 RF 14B3375X012 PN 25 14B3377X012 1/4 x 1 in. Flanged Connection CF8M Stainless steel CL300 RF 14B3376X012 CL600 RF 14B1386X012 CL1500 RF 14B3370X012 PN 25 14B3377X022 Body (Cold Temperature) 1/4 NPT Connection CF8M Stainless steel (2 outlet port) 34B0527X012 CF8M Stainless steel (3 outlet port) ERAA00604A0NPS 1/4, NPT Connection 2 Spring Case Type 1301F Brass Standard or with T-Handle 1D383113012 Stainless steel With 1/4 NPT vent connection22B0753X012Key Description Part Number2 Spring Case (continued) Type 1301G1/8 NPT vent connection Standard or with T-Handle Brass 2P195713022 316 Stainless steel 21A6377X0123 Bottom Cap Brass 1D468513012 304 Stainless steel 1J919635072 316 Stainless steel (NACE) 1J9196X00324 Yoke Brass 1D383313012 316 Stainless steel (NACE) 1J9259360425* Orifice303 Stainless steel 1D386535032 316 Stainless steel (NACE) 1D3865X00326* Valve Disk Assembly Brass/Nylon (PA) 1D4684000A2 Brass/PTFE 1D4684X0012 303 Stainless steel/Nylon (PA) 1D4684000C2 303 Stainless steel/PTFE 1D4684000B2 316 Stainless steel/PTFE (NACE) 1D4684X0082 7* Diaphragm (2 required) 302 Stainless steel 1D387036012Monel ®(NACE) 1D3870X00128 Diaphragm Plate, Zinc-plated steel Type 1301F 1D387325072 Type 1301G 1K1557250729 Upper Spring Seat, Steel Type 1301F 1B798525062 Type 1301G 1K155******** Valve Spring302 Stainless steel 1D387137022 Inconel ® X750 (NACE) 15A3522X01211 Spring, Zinc-plated steel Type 1301F0 to 75 psig / 0 to 5.2 bar, Blue 1D387227022 0 to 150 psig / 0 to 10.3 bar, Silver 1B788527022 0 to 225 psig / 0 to 15.5 bar, Red 1D465127142 Type 1301G200 to 500 psig / 13.8 to 34.5 bar, Silver 1K156********* Body Gasket Neoprene (CR) 1D372903012 Fluorocarbon (FKM) 1D37290412213* Diaphragm Plate Gasket Neoprene (CR) 1D373003012 Fluorocarbon (FKM) 1D37300412214* Bottom Cap O-ring Fluorocarbon (FKM) 1J926806382 EPDM 1J9268X0022 Nitrile (NBR) -65F 1J9268X0012 Fluorosilicone (FVQM) -80F ERAA03306A015 Adjusting Screw Type 1301FSteel (standard) 1E639928992 Handwheel, 416 Stainless steel 1N411435132 T-handle, Steel 1F2236000A2 Type 1301G Zinc-plated steel (standard) 1K140624092 T-handle, Steel 19A8060X012 16 Spring Case Cap Screw (6 required) Zinc-plated steel 1E8220X0012 Stainless steel 1E8220X0212 Stainless steel(For Type 1301G Cold Temperature) 1E8220X0022*Recommended spare part.Monel ® and Inconel ® are trademarks of Special Metals Corporation.Types 1301F and 1301G©Emerson Process Management Regulator Technologies, Inc., 1975, 2015; All Rights ReservedThe Emerson logo is a trademark and service mark of Emerson Electric Co. All other marks are the property of their prospective owners. Fisher is a mark owned by Fisher Controls International LLC, a business of Emerson Process Management.The contents of this publication are presented for informational purposes only, and while every effort has been made to ensure their accuracy, they are not to be construed as warranties or guarantees, express or implied, regarding the products or services described herein or their use or applicability. We reserve the right to modify or improve the designs or specifications of such products at any time without notice.Emerson Process Management Regulator Technologies, Inc. does not assume responsibility for the selection, use or maintenance of any product. Responsibility for proper selection, use and maintenance of any Emerson Process Management Regulator Technologies, Inc. product remains solely with the purchaser.Industrial RegulatorsEmerson Process Management Regulator Technologies, A - HeadquartersMcKinney, Texas 75070 USA Tel: +1 800 558 5853Outside U.S. +1 972 548 3574Asia-PacificShanghai 201206, China Tel: +86 21 2892 9000 EuropeBologna 40013, Italy Tel: +39 051 419 0611Middle East and AfricaDubai, United Arab Emirates Tel: +971 4811 8100Natural Gas Technologies Emerson Process Management Regulator Technologies, A - HeadquartersMcKinney, Texas 75070 USA Tel: +1 800 558 5853Outside U.S. +1 972 548 3574Asia-PacificSingapore 128461, Singapore Tel: +65 6770 8337EuropeBologna 40013, Italy Tel: +39 051 419 0611Chartres 28008, France Tel: +33 2 37 33 47 00Middle East and AfricaDubai, United Arab Emirates Tel: +971 4811 8100TESCOMEmerson Process Management Tescom CorporationUSA - HeadquartersElk River, Minnesota 55330-2445, USA Tels: +1 763 241 3238 +1 800 447 1250EuropeSelmsdorf 23923, Germany Tel: +49 38823 31 287 Asia-PacificShanghai 201206, China Tel: +86 21 2892 9499For further information visit Key Description Part Number 17 Machine Screw (2 required) Steel, for brass yoke1H526928982 302 Stainless steel, for Stainless steel yoke 1J92693899218 LocknutType 1301F Brass (for standard spring case) 1A518014012 Steel (for Stainless steel spring case) 1A352224122 Type 1301G Zinc-plated steel1A35402412219 Diaphragm Locknut, Aluminum 1A30932412221 Top Connector, 316 Stainless steel Use with Stainless steel yoke only 1J92603507222 Valve Disk Collar 304 Stainless steel1D468635032 316 Stainless steel (NACE) 1D4686X001224 Handwheel (Not shown) Type 1301F1L21754499226 Vent Screen (Not shown)Type 1301F, 18-8 Stainless steel 0L078343062 Type 1301G, 304 Stainless steel0W08634306227 Mounting Post (3 required) (Not shown)Type 1301F T-handle panel mounting only, 316 Stainless steel1F2449X0022 Type 1301G panel mounting only, Steel 1L2629X001228 Mounting Screw, Brass (3 required)Use with key 27 (Not shown)0V070414012Key Description Part Number29 Screw, Steel (Not shown)Type 1301F with handwheel and steel spring case only1E98542898230 Washer, Steel (Not shown)Type 1301F with handwheel and steel spring case only1L44942898232 Mounting Bracket (Not shown) Yoke mounted 22A6305X012 Casing mounted1U9284X001233 Bracket Cap Screw (2 required) Use with key 32 (Not shown) 1C63122405234 Bracket Mounting WasherUse with key 32 (Not shown) T12861T001235 NACE TagUse with NACE unit (Not shown) - - - - - - - - - - -36 Tag WireUse with key 35 (Not shown) - - - - - - - - - - -38* Body O-ring (Not shown)Use with -65°F / -54°C Cold Service Unit ERAA03305A1 Use with -80°F / -62°C Cold Service Unit ERAA03305A039* Top Connector O-ring (Not shown)Use with -65°F / -54°C Cold Service Unit 14B8848X012 Use with -80°F / -62°C Cold Service Unit ERAA03307A040 Pipe Plug (Not shown) Brass1C333528992Stainless steel1C3335X0012*Recommended spare part.Parts List (continued)。
NOVO PC3120 PC1200 说明书

用户手册ANOVO User’s Manual 目录声明 ------------------------------------------------------------------------ 3商标 -------------------------------------------------------- 3安全指导 -------------------------------------------------------------------- 3快速指导 -------------------------------------------------------------------- 4第一章产品介绍1.1 简介 -------------------------------------------------------------------- 51.2 主要特性1.2.1 尺寸 ------------------------------------------------------------ 51.2.2 微处理 --------------------------------------------------------- 51.2.3 芯片组 --------------------------------------------------------- 51.2.4 系统存贮器 --------------------------------------------------- 51.2.5 板上VGA ------------------------------------------------------ 51.2.6 LCD显示 ------------------------------------------------------ 51.2.7 主板集成可选LAN 功能 ---------------------------------- 51.2.8 主板 IDE 接口功能 ---------------------------------------- 61.2.9 板上I/O 接口功能 ------------------------------------------ 61.2.10 先进功能 ---------------------------------------------------- 6BIOS --------------------------------------------------------- 61.2.11第二章安装说明2.1 PC3120/1200机种外部接口----------------------------------------- 72.1.1 键盘/ 鼠标接口 ----------------------------------------------- 72.1.2 VGA 接口 ---------------------------------------------------- 72.1.3 LAN接口 ---------------------------------------------------- 72.1.4 板载 USB接口 --------------------------------------------- 82.1.5 板载声卡接口 --------------------------------------------------- 82.1.6 软驱(FOLPPY)接口----------------------------------------------92.1.7 S-VDEIO显示接口--------------------------------------------- 102.1.8 供电电源接口 ------------------------------------------------- 102.1.9 串口COM1 COM2接口 -------------------------------------- 112.1.10 电源控制面板接口 ------------------------------------------- 122.1.11 显示接口(TFT-LVDS)--------------------------------------- --122.1.12 PC104/PC104PLUS接口---------------------------------- 122.1.13 硬盘(IDE)接口------------------------------------------------- 132.1.14 内存扩展接口(SO-DIMM)------------------------------------ 13 2.2 PC1200机种接口示意图2.2.1 显示接口LVDS-------------------------------------------------------142.2.2显示接口(VGA)------------------------------------------------- 142.2.3软驱(FOLPPY)接口-------------------------------------------152.2.4 USB1 USB2 USB3接口-------------------------------------- 152.2.5 鍵盘/鼠标接口-------------------------------------------------------162.2.6显示接口(S-VIDEO)-- ----------------------------------------- 162.2.7 声卡接口 ----------------------------------------------------- 172.2.8 网络接口(LAN)------------------------------------------------- 172.2.9 CF卡接口(CFCARD)----------------------------------------- 18第三章 BIOS设置 ---------------------------------------------- 183.1 主菜单 -------------------------------------------------------- 193.2 标准CMOS配置--------------------------------------------------- 203.3 BIOS功能配置----------------------------------------------------- 213.4 客户配置------------------------------------------------------------ 223.5 随插即用配置 ------------------------------------------------ 233.6 ROM映射配置 ----------------------------------------------- 233.7 启动系统BIOS调试器 ------------------------------------- --------243.8 恢复到最后一次设定的BIOS参数----------------------------- 243.9 恢复到系统出厂默认值------------------------------------------ 243.10 保存修改并退出------------------------------------------------- 243.11 不保存修改参数并退出 --------------------------------------- 24声明本手册为上海华北科技有限公司NOVO 3120/pc1200的使用手册,我们非常认真的整理此手册,但我们对本手册的内容不保证完全正确。
MKM330PCC 工程宝说明书(中文)

工程宝——操作手册目录1,安全注意事项 (2)1.1 使用产品前注意事项 (2)1.2 使用产品时注意事项 (2)1.3 使用电源和充电操作注意事项 (2)2,产品介绍 (2)2.1 功能特点介绍 (2)2.2 产品包装配件 (3)2.3 产品结构介绍 (4)2.4 功能参数 (6)3,操作说明 (7)3.1 电源使用和充电操作说明 (7)3.2 主菜单说明 (7)3.3 视频信号测试 (8)3.4 系统信息菜单 (8)3.5 PTZ测试功能 (9)3.6 视频信号衰减分析 (10)3.7 显示屏亮度调节功能 (10)3.8 网线测试功能 (10)3.9 视频信号发生功能 (11)3.10 RS485协议测试功能 (11)3.11 数字万用表功能 (12)3.12 摄像机供电功能 (13)4,产品质保条款 (14)4.1 质保范围 (14)4.2 例外条款 (14)4.3 补充条款 (14)1,安全注意事项1.1 使用产品前注意事项A. 使用产品前请仔细阅读产品操作手册;B. 连接电源前请仔细检查电源配件是否正常;C. 使用产品时请满足下列工作条件:●环境温度:-30℃-70℃●环境相对湿度:30%-90%●充电电压:DC 9V1.2 使用产品时注意事项A. 避免用在潮湿和易燃气体泄漏环境使用产品;B. 避免用潮湿的手操作产品;C. 避免强烈震动和碰撞损坏产品;D. 避免在强电磁场环境使用产品;E. 避免产品接口接触潮湿和灰尘;F. 禁止违规操作产品。
1.3 使用电源和充电操作注意事项A. 请使用产品配套的电池和充电器;B. 请勿接错电池的极性;C. 请避免电池短路,勿拆解电池。
2,产品介绍2.1 功能特点介绍A. 视频信号测试功能工程宝可通过连接图像采集设备测试视频信号的图像质量。
B. PTZ控制测试功能可测试PTZ产品的功能,包括:水平/垂直旋转,镜头焦距调整,预制位设置和调用,旋转速度设定,光圈控制等。
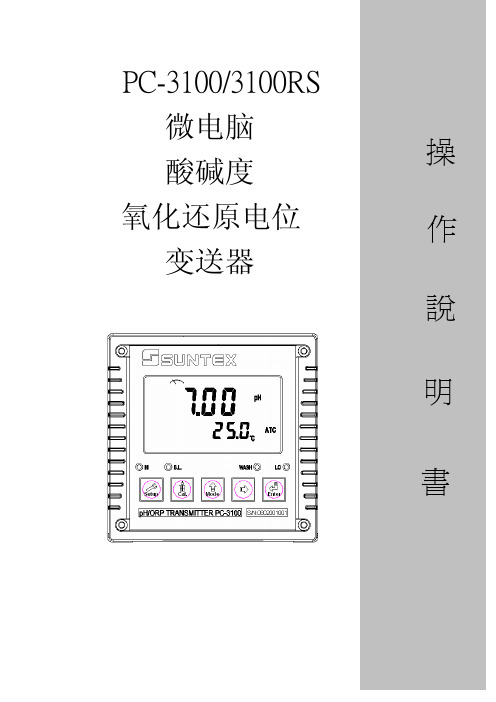
PC3100简体中文操作手
键回到测量模式。 注二:做单点校正时仅调校零点 OS 值,未修改斜 率 SLP 值,仪器沿用上次校正后储存的斜率值。
3. 校正成功时,屏幕出现 CAL PASS 字样,校 正失败时,出现 CAL Err 讯息。(请参阅第十 章错误讯息,寻求原因及处理方法)
4. 屏幕将自动显示校正之 OS (零点电位)值, 按 键显示校正之 SLP (斜率) 值,再 按 键回至测量模式。
2.1 主机固定:本变送器可盘面式、2 吋管式、壁挂式安装 盘面式安装:请预先在配电箱面板上留一 138 x 138mm 的方孔,变送器从配电箱之面板直接放 入,将变送器所附之固定架由后方套入,卡进固定槽内。 2.2 盘面式安装参考图:
138mm
138mm
挖孔尺寸
固定器
+
42mm 42mm
+ +
+
盘面安装方式,使用盘 面固定器固定
Байду номын сангаас
恢复原厂默认值
按 + 键五秒后,再按 键,出现 后,即恢复原厂参数默认值
按
+
键五秒后,再按
键,出现
后,即恢复原厂校正默认值
4
一、 规格
机型 测试项目 测 试 范 围 解 析 度 精 确 度 pH ORP TEMP pH ORP TEMP pH ORP TEMP PC-3100 pH/ORP/TEMP -2.00~16.00pH -1999~1999mV -30.0~130.0C 0.01pH 1mV 0.1C ±0.01± 1 Digit ±0.1% ± 1 Digit ±0.2C± 1 Digit 具温度误差修正功能 NTC30K/ PT1000 自动温度补偿 手动温度补偿 自定义单双点校正及预设 Tech & 自定义单双点校正及预设 Tech、 NIST 标准液两点自动校正 NIST 标准液两点或三点自动校正 0~50C -20~70C > 1012 Ω 背光式大型液晶显示,具背光感应器做自动及手动背光选择 隔离式 0/4~20mA 可设定对应 pH/ORP 量测范围,最大负载 500 隔离式 0/4~20mA 可设定对应温度 量测范围,最大负载 500 - HI/LO 两组独立之控制点 接点输出,ON 0~9999 秒 / OFF 0~999.9 小时 DC±12V IP65 100V~240VAC±10%,50/60Hz 壁挂式/管路式/盘面式 144 mm 144 mm 115 mm (HWD) 138 mm 138 mm (HW) 0.8Kg
PowerCommand 2100 控制系统

控制系统功能PowerCommand 控制系统是一款集成式发电机组控制系统有调压、发动机保护、操作界面和同步调速(选配)等功能。
主要功能包括:具有蓄电池监控和测试功能,控制系统智能启动标准PCCNet 接口,可连接远程指示器等设备,用于NFPA 110应用控制板按环保要求设计适于在温度为-40 °C 至 +70 °C (-40 °F 至+158 °F )、海拔不超过5000米(1.3万英尺)的环境下工作 经过原型机测试,符合UL 、CSA 和CE 标准基于PC 机的InPowerTM 维修工具可进行详细的故障诊断操作/显示面板手动停机开关字母数字显示,带有按钮,既可观察发动机和交流发电机数据,亦可设定、控制和调节(以英文和国际化符号显示)LED 灯显示发电机组的运行、非自动位、公共报警、公共停机、手动运行模式和远程起动等状态适合在温度从-20°C 到 +70°C 的环境下运行条形图表显示屏(选配)交流保护功能过电流报警和停机过压和欠压停机过频和欠频停机过励故障(检测信号丢失)励磁电路过载发动机保护功能超速停机机油压力过低报警/停机冷却液温度过高报警/停机冷却液液位过低报警/停机冷却液温度过低报警蓄电池电压过高/过低/不足报警起动失败(过盘车)停机盘车失败停机备用起动马达分离盘车锁定传感器故障提示燃油液位过低报警/停机双层油箱外壳破裂报警/停机交流发电机数据交流线电压、相电压三相交流电流频率视在总功率发动机数据直流电压机油压力冷却液温度发动机转速其它数据发电机组型号起动尝试次数、起动次数、运行小时数故障历史记录RS485 Modbus®接口数据记录和故障模拟(需使用InPower 维修工具)数字调速(选配)电子集成同步调速器温度动态调速数字调压数字集成电子调压器2相线电压检测可调扭矩匹配控制功能起动延时、停机延时多次盘车PCCNet 接口(2)组可设置输入端口(2)组可设置输出端口远程紧急停机电热塞控制器(部分型号)选装功能辅助输出继电器 (2)120/240 V ,100 W 防凝结加热器远程报警指示器,带有3个可设置输入端和4个可设置输出端永磁发电机励磁PowerCommand iWatch 网络服务器(用于进行远程监控和报警显示)(散件)辅助性可设置信号输入端(8个)和可设置继电器输出(8个)数字调速交流输出模拟仪表(条形图表式)-彩色编码图形显示: -三相交流电压 -3 相电流 -频率 -千伏安远程操作面板带有AmpSentry 保护功能的PowerCommand 2.2 控制系统康明斯电力柴油发电机组技术参数· 应用标准:ISO 8528-2005, ISO3046, BS5514, GB/T 2820-2009· 备载功率:指紧急状态时,变动负载工况下的应急运行功率,无过载能力· 所有额定功率都基于ISO-3046标准· 常载功率:指变动负载工况下的连续运行功率,每12小时允许1小时超载10%· 标准电压为400VAC · 额定转速1500rpm控控更多具体信息请参考S_1567文档LED 指示灯—包括下述功能的状态指示:发电机组运行非自动运行模式公共报警五个颜色和功能可配置的LED 灯停机低油压报警高水温报警低油压停机超速停机PowerCommand 控制系统是一款集成式发电机组控制系统,具 2.2控制系统55kVA - 2500kVAPowerCommand ® 3.3 控制系统控制系统功能PowerCommand ®控制系统是一款基于微处理器的发电机组控制系统,具有调压、发动机保护、交流发电机保护、操作界面和同步调速等功能。
PCC调速器使用说明

第一章概述可编程计算机系列水轮机调速器是我所2001年研发的一代新型水轮机调速器,它充分考虑了PLC和IPC两种机型的优点,充分发挥了可编程计算机控制器(PCC)的技术特点,是总结了长控所双微机调速器和全可编程调速器的经验成果而研制的一类新型调速器。
PCC系列调速器适用于大、中、小型混流、转桨、贯流、冲击式等机组。
是长控所大、中型调速器的推荐方案之一。
1.1功能和特点1.1.1本调速器具有如下功能1频率测量与调节:可测量机组和电网的频率,并实现机组频率的调节和控制。
2频率跟踪:当跟踪功能投入时,机组频率自动跟踪电网频率,可实现快速自动同期并网。
3自动调整与分配负荷:机组并入电网,调速器将根据其整定的bp值和电网频差,自动调整机组的出力。
4负荷调整:可接受上位机控制指令,实现发电自动控制功能( A.G.C)。
5开停机操作:接受中控室或上位机指令,实现开停机操作。
6手动操作:具有电手动和机械手动操作功能,并可无条件、无扰动实现自动运行与手动操作的相互切换。
7能采集并显示调速系统的主要参数,如:机组频率、电网频率、导叶开度、调节器输出和调节器的整定参数等。
8有完善的通讯功能,为电站监控系统设置了标准、可靠的接口,能方便地实现与上位机的通讯。
9具有频率计的相关试验功能。
10辅助实验功能:通过操作面板上的功能键和显示屏,可以很方便地完成空载摆动和静态特性测试实验。
1.1.2本调速器的主要特点1可靠性问题PCC调速器的电气部分由PCC控制器、操作显示面板、各功能模块等构成,平均无故障时间可达50万小时即57年,因此具有比PLC调速器更高的可靠性。
2测频问题a测频通道多PCC调速器有四路测频通道,可以用于①机组PT测频、②机组齿盘测频(两路)、③电网频率测量,因此测频容错能力强。
b测频精度高由于一般的微机测频都采用1M计数时钟,而B&R2003系列CPU的内部计数时钟10M左右。
因此,PCC测频精度远比一般的微机测频精度高。
CSC-280系列数字式保护(测控)装置说明书(0SF.451.069)_V2.0
2.7
ห้องสมุดไป่ตู้
输出触点容量............................................................................................................................ 4
2.8
装置主要技术参数.................................................................................................................... 4
1.1
适用范围 ................................................................................................................................... 1
1.2
装置主要特点............................................................................................................................ 1
技术支持
电话:010-62986668 传真:010-62981900
重要提示
感谢您使用北京四方继保自动化股份有限公司的产品。为了安全、 正确、高效地使用本装置,请您务必注意以下重要提示:
1) 本说明书仅适用于 CSC-280 系列数字式保护(测控)装置。 2) 请仔细阅读本说明书,并按照说明书的规定调整、测试和操作。如
3.6
人机接口(MMI) ................................................................................................................... 7