HttpWatch 7.0 帮助文档整理
client帮助文档
前言超文本传输协议(HTTP)也许是当今互联网上使用的最重要的协议了。
Web服务,有网络功能的设备和网络计算的发展,都持续扩展了HTTP协议的角色,超越了用户使用的Web 浏览器范畴,同时,也增加了需要HTTP协议支持的应用程序的数量。
尽管包提供了基本通过HTTP访问资源的功能,但它没有提供全面的灵活性和其它很多应用程序需要的功能。
HttpClient就是寻求弥补这项空白的组件,通过提供一个有效的,保持更新的,功能丰富的软件包来实现客户端最新的HTTP标准和建议。
为扩展而设计,同时为基本的HTTP协议提供强大的支持,HttpClient组件也许就是构建HTTP客户端应用程序,比如web浏览器,web服务端,利用或扩展HTTP协议进行分布式通信的系统的开发人员的关注点。
1. HttpClient的范围基于HttpCore[/httpcomponents-core/index.html]的客户端HTTP运输实现库基于经典(阻塞)I/O内容无关2. 什么是HttpClient不能做的HttpClient 不是一个浏览器。
它是一个客户端的HTTP通信实现库。
HttpClient的目标是发送和接收HTTP报文。
HttpClient不会去缓存内容,执行嵌入在HTML页面中的javascript 代码,猜测内容类型,重新格式化请求/重定向URI,或者其它和HTTP运输无关的功能。
第一章基础1.1 执行请求HttpClient 最重要的功能是执行HTTP方法。
一个HTTP方法的执行包含一个或多个HTTP 请求/HTTP响应交换,通常由HttpClient的内部来处理。
而期望用户提供一个要执行的请求对象,而HttpClient期望传输请求到目标服务器并返回对应的响应对象,或者当执行不成功时抛出异常。
很自然地,HttpClient API的主要切入点就是定义描述上述规约的HttpClient接口。
这里有一个很简单的请求执行过程的示例:HttpClient httpclient = new DefaultHttpClient();HttpGet httpget = new HttpGet("http://localhost/");HttpResponse response = httpclient.execute(httpget);HttpEntity entity = response.getEntity();if (entity != null) {InputStream instream = entity.getContent();int l;byte[] tmp = new byte[2048];while ((l = instream.read(tmp)) != -1) {}}1.1.1 HTTP请求所有HTTP请求有一个组合了方法名,请求URI和HTTP协议版本的请求行。
安卓HttpClient+Jsoup+Httpwatch模拟登陆正方教务获取信息
安卓HttpClient+Jsoup+Httpwatch模拟登陆正方教务获取信息分类: android | 标签: 安卓,爬虫| 作者: u013082133 相关| 发布日期 : 2014-10-03 | 热度 : 1107°目录[+]之前想要写一下关于爬数据的文章的,发现时间有点急迫。
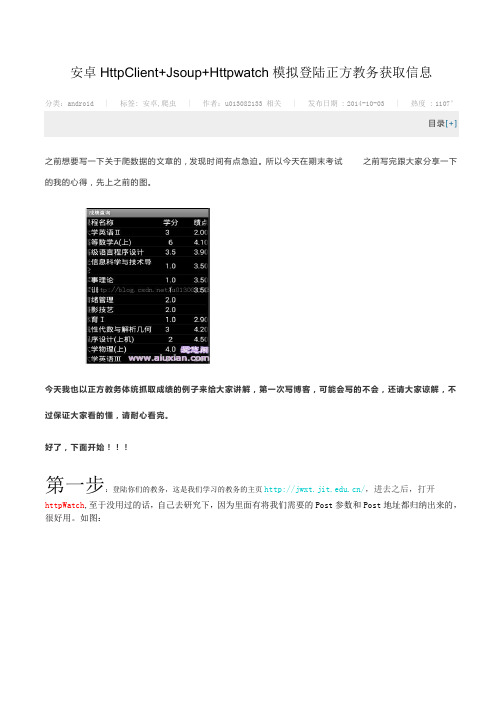
所以今天在期末考试之前写完跟大家分享一下的我的心得,先上之前的图。
今天我也以正方教务体统抓取成绩的例子来给大家讲解,第一次写博客,可能会写的不会,还请大家谅解,不过保证大家看的懂,请耐心看完。
好了,下面开始!!!第一步:登陆你们的教务,这是我们学习的教务的主页/,进去之后,打开httpWatch,至于没用过的话,自己去研究下,因为里面有将我们需要的Post参数和Post地址都归纳出来的,很好用。
如图:进去之后你会看见HttpWatch刷刷的,出来一大片数据,当然我们的从当中挑选出有用的数据。
如图,我们打开上栏中的第一列标签,就是横线的地方。
首先我们来观看下数据,请求方法:post,状态值:302,请求的URL:/default2.aspx。
然后,我们来观察下面大圈圈中的数据,这里是Post所带的参数,里面有__ViewStat(我也不知道是什么,不过一起带着Post就好了,这里有个情况,我等会在下面讲,先用绿色标记),Button的值(乱码),lbLanguage(不管,先记下),RadioButtonList1(单选按钮:学生...),TextBox1:账号,TextBox2:密码。
Ok.......下面我们来看一下Button和lbLanguage和RadioButtonList1具体的值,下面的标签打开Stream,如图:看,里面有一些不认识的参数的值。
Button="" ,lbLanguage="",RadioButtonList1="%D1%A7%C9%FA",哦了。
TRSWCM7.0Fix自动更新手册

内容协作平台Array TRS WCMFIX自动更新手册V 7.0北京拓尔思信息技术股份有限公司Beijing TRS Information Technology Co., Ltd.版权说明本手册由北京拓尔思信息技术股份有限公司(以下简称TRS公司)出版,版权属TRS公司所有。
未经出版者正式书面许可,不得以任何方式复制本文档的部分或全部内容。
©北京拓尔思信息技术股份有限公司版权所有。
保留所有权利。
是北京拓尔思信息技术股份有限公司的注册商标。
关于本手册本手册旨在指导TRS WCM V7.0用户完成WCM的FIX自动更新。
读者对象本手册读者对象为使用TRS WCM V7.0的使用者。
用户反馈TRS公司感谢您使用TRS 产品。
如果您发现本手册中有错误或者产品运行不正确,或者您对本手册有任何意见和建议,请及时与TRS公司联系。
您的意见将是我们做版本修订时的重要依据。
目录第1章概述 (1)1.1 背景 (1)1.2 适用版本 (1)第2章FIX自动更新 (2)2.1 环境准备 (2)2.1.1 更新过程中确保应用不重启 (2)2.1.2 服务器部署Ant (2)2.2 更新FIX步骤 (2)2.2.1 在线更新 (3)2.2.2 离线更新 (3)2.3 更新FIX过程解读 (3)2.3.1 更新检测页面 (3)2.3.2 更新标识含义 (4)2.3.3 更新结果信息 (5)2.3.4 冲突文件信息 (5)2.3.5 手工部署操作信息 (6)第3章常见问题 (7)3.1 在更新过程中关掉页面或者更新完后未做手工操作、冲突文件比较等怎么办? (7)3.2 在离线更新的模式下,向服务器端请求的时间很久怎么办? (7)第1章概述1.1 背景TRSWCMV7_Build1015_6612_20130506 版本发布后,维护过程中问题的处理都以FIX包的方式提供,而项目手工更新FIX会带来一系列的问题:更新不完整、数据库脚本需要手工执行、多个FIX需要依次手工操作、项目定制的冲突文件无法智能化检测等问题,为了避免这些问题,产品组提供了自动更新FIX工具。
iwr命令用法-概述说明以及解释

iwr命令用法-概述说明以及解释1.引言1.1 概述概述:在计算机科学领域中,iwr命令是一个强大的工具,用于进行网络请求和获取网络上的数据。
该命令是PowerShell中的一个内置命令,可用于发送HTTP、HTTPS、FTP等协议的请求,并获取返回的数据。
它可以用于自动化任务、数据采集、网页爬虫等多种应用场景。
iwr命令提供了一种简便的方式来与网络进行交互。
通过发送HTTP 请求,我们可以从远程服务器获取数据,也可以向服务器发送数据。
它支持GET、POST、PUT、DELETE等常用的HTTP请求方法,并可以通过自定义HTTP头部和请求体来满足各种需求。
此外,iwr命令还支持对FTP 服务器进行文件传输操作。
除了基本的请求功能,iwr命令还提供了一些高级用法。
它可以与PowerShell的其他命令和模块进行结合,实现更加复杂的操作。
例如,可以通过iwr命令下载远程文件,并对其进行处理或解析。
还可以使用iwr 命令与API进行对接,实现自动化数据采集和处理。
然而,虽然iwr命令功能强大,但也存在一些局限性。
首先,它依赖于网络连接,如果网络不稳定或不可用,可能会导致请求失败。
其次,对于一些复杂的请求场景,iwr命令可能无法满足需求,需要借助其他工具或编程语言来完成。
另外,使用iwr命令进行大规模的请求时,需要注意机器的性能和网络负载,避免影响其他正常的网络请求。
尽管如此,iwr命令在网络请求和数据获取方面仍具有广泛的应用前景。
随着互联网的快速发展和数据的日益重要,对于网络数据的获取和处理需求也越来越高。
使用iwr命令可以简化这一过程,提高效率,为后续的数据分析和挖掘提供便利。
总的来说,iwr命令是一个功能丰富的网络请求工具,它的简单易用和强大灵活使其成为众多开发者和系统管理员的首选工具之一。
通过深入了解iwr命令的用法,我们可以更好地利用它在各种场景下进行网络请求和数据获取。
在不断改进和学习的过程中,我们可以更好地应对日益增长的网络数据需求,推动科技的进步和应用的创新。
IIS 7开发与管理完全参考手册说明书

图书基本信息书名:《IIS 7开发与管理完全参考手册》13位ISBN编号:978730220377310位ISBN编号:7302203776出版时间:2009-7出版社:清华大学出版社作者:[美] Ken Schaefe,Jeff Cochran页数:799译者:颜炯版权说明:本站所提供下载的PDF图书仅提供预览和简介以及在线试读,请支持正版图书。
更多资源请访问:前言WindowsServer2008是微软公司最新开发的服务器操作系统,提供了全新的InternetInformationServices7.0。
IIS7.0的基本工作机制已经进行了全新的设计,是一个完全模块化的Web服务器,易于部署,易于配置,因而大大提高了产品的可用性。
安全性和性能,同时,IIS7.0与紧密结合,大大扩展了IIS 的功能。
此外,IIS7.0还提供了全新的FTP服务程序,并提供了对FastCGI的支持,还具备了全新的实时诊断和错误定位功能。
因此,对于IIS管理人员和开发人员来说,为了充分利用IIS7.0的新特性,必须深入掌握更多的新知识。
本书正是基于上述原因编写的。
本书介绍了IIS7.0的新特性,并关注如何最有效地利用IIS7.0的新特性。
通过学习本书的内容,读者可以掌握如何部署。
使用和管理IIS7.0,并且学会如何在企业级系统中操作IIS7.0。
本书面向的主要读者是IIS管理人员以及应用IIS的技术人员。
因此,本书不仅仅关注IIS的各项功能,也不仅仅关注于如何利用某个图形用户界面或命令行管理工具配置这些功能,更重要的是:本书详细解释了IIS各项功能的内部工作原理,这样,当系统发生错误时,读者可以迅速找到错误的根源。
此外,因为许多IIS管理人员需要具备将常用过程自动化的能力,所以,本书的某些章节讨论了如何通过编程方式完成IIS管理工作,同时,还给出了大量的代码示例。
本书还介绍了在应用IIS过程中与高可用性。
WebFarm,以及IIS扩展等有关的内容,并且用一章的篇幅介绍如何进行错误定位和诊断。
WES7 定制手册
Windows Embedded Standard 2011 CTP2 Lab ManualWindows Embedded Standard 2011 – CTP2 Lab ManualTable of Contents1 Preparing to Use Windows Embedded Standard 2011 ...................................................................... 5 1.1 1.2 1.3 1.4 1.5 1.6 Introduction .............................................................................................................................. 5 Related Windows 7 Documentation .......................................................................................... 5 Minimum Device Hardware Requirements ................................................................................ 5 Release Notes ........................................................................................................................... 5 Install Windows Embedded Standard 2011 Toolkit .................................................................... 6 1.5.1 1.6.1 1.6.2 1.7 1.7.1 1.7.2 2 2.1 Open Windows Embedded Standard 2011 Toolkit Help .................................................. 6 Make Your Utility Disk Bootable ..................................................................................... 7 Add Image Builder Wizard to Your Utility Disk ................................................................ 7 Create a Windows PE Utility Disk with Image Configuration Editor ................................. 8 Create a Custom Windows PE Image .............................................................................. 8 Create a Utility Drive ................................................................................................................. 7Create a Windows Preinstallation Environment Utility Drive (Optional) ..................................... 8Build Windows Embedded Standard 2011 Images ............................................................................ 9 Build a Windows Embedded Standard 2011 Image with Image Builder Wizard .......................... 9 2.1.1 2.1.2 2.2 2.2.1 2.2.2 2.2.3 2.2.4 2.2.5 2.2.6 2.2.7 Build a Thin Client Image with Embedded Enabling Features .......................................... 9 Build an Image with Embedded Core Only .................................................................... 11 Build a Thin Client Image with Custom Settings ............................................................ 11 Add Update Packages to a Distribution Share (Optional) .............................................. 14 Add Third-Party Software (Optional) ............................................................................ 15 Run a Custom Script (Optional) .................................................................................... 16 Add Third-Party Drivers (Optional) ............................................................................... 17 Make Your Install Fully Unattended (Optional) ............................................................. 17 Create Image Builder Wizard Disk from Answer File (optional) ..................................... 24Build a Windows Embedded Standard 2011 Image Using Image Configuration Editor ............. 113Deploy an Image ............................................................................................................................ 25 3.1 Prepare and Capture an Image for Deployment ...................................................................... 25 3.1.1 3.1.2 3.2 3.2.1 3.2.2 Sysprep the Image........................................................................................................ 25 Capture the Image Into a Windows Image (.wim) File................................................... 25 Prepare your Destination Device .................................................................................. 26 Apply an Image to Your Device’s Hard Drive ................................................................. 27Page 2Deploy an Image Using ImageX ............................................................................................... 26©2009 Microsoft. All Rights Reserved.Windows Embedded Standard 2011 – CTP2 Lab Manual3.2.3 3.3 3.3.1 3.3.2 4 4.1Shut Down the Destination Device ............................................................................... 27 Start Image Builder Wizard with your Image ................................................................ 28 Customize a Captured Image ........................................................................................ 29Deploy an Image Using Image Builder Wizard.......................................................................... 27Service an Image ............................................................................................................................ 31 Service an Image with Image Configuration Editor and DISM................................................... 31 4.1.1 4.1.2 4.1.3 4.2 4.2.1 4.2.2 4.2.3 4.2.4 4.2.5 4.2.6 4.3 4.4 Create a Configuration Set using Image Configuration Editor........................................ 31 Install using your Configuration Set .............................................................................. 32 Test your image ........................................................................................................... 34 Mount your image ....................................................................................................... 34 Add sample packages ................................................................................................... 34 Adding a Package Using DISM ...................................................................................... 35 Unmount and Commit Changes .................................................................................... 35 Redeploy and Verify ..................................................................................................... 35 Add a Language Pack (optional).................................................................................... 35Service an Image with DISM .................................................................................................... 34Install Updates with WUSA...................................................................................................... 36 Service an Image with Package Scanner .................................................................................. 36 4.4.1 4.4.2 4.4.3 Package Enumeration................................................................................................... 37 Find Applicable Updates ............................................................................................... 37 Scavenging ................................................................................................................... 375Additional Windows Embedded Standard 2011 Labs ...................................................................... 39 5.1 Suppress OOBE ....................................................................................................................... 39 5.1.1 5.1.2 5.2 5.2.1 5.2.2 5.2.3 5.2.4 5.2.5 5.3 5.3.1 5.3.2 5.4 Create an Answer File .................................................................................................. 39 Using your answer file with Image Builder Wizard ........................................................ 39 Hide boot screens ........................................................................................................ 40 Use Shell Launcher ....................................................................................................... 40 Remove Windows branding ......................................................................................... 41 Replace the startup screen background image ............................................................. 41 Add Message Blockers.................................................................................................. 42 Install from Image Builder Wizard directly to UFD : ...................................................... 44 Install from Image Builder Wizard to Hard Drive, ImageX to UFD: ................................. 44Using a Custom Shell and Custom Branding............................................................................. 40Build a USB bootable Windows Embedded 2011 image ........................................................... 44Create Custom Templates for IBW .......................................................................................... 46©2009 Microsoft. All Rights Reserved. Page 3Windows Embedded Standard 2011 – CTP2 Lab Manual5.4.1 5.4.2Creating Templates ...................................................................................................... 46 Using Custom Templates in IBW ................................................................................... 46©2009 Microsoft. All Rights Reserved.Page 4Windows Embedded Standard 2011 – CTP2 Lab Manual1 Preparing to Use Windows Embedded Standard 20111.1 IntroductionWelcome to Windows Embedded Standard 2011. This lab manual is a guide to help you use and evaluate Windows Embedded Standard 2011. In addition to preparation steps, such as toolkit installation, this manual includes labs for key scenarios such as building an image, deploying an image and servicing an image. The labs are most easily followed in the order presented. You can also chose labs individually based on your interests and previous experience with Windows Embedded, but please note that several lab scenarios assume you have the output of an earlier lab scenario.1.2 Related Windows 7 DocumentationWindows Embedded Standard 2011 is based on Windows 7; therefore much of the Windows 7 documentation can be used as reference material. • Windows 7 Automated Installation Kit (Windows AIK) online documentation /downloads/details.aspx?FamilyID=f1bae135-4190-4d7c-b19319123141edaa&displaylang=en Windows 7 Technical Library on Microsoft TechNet /enus/library/dd349342.aspx Windows Developer Center for Windows 7 /enus/windows/dd433113.aspx• •1.3 Minimum Device Hardware RequirementsYou must have the following minimum hardware to be able to build a Windows Embedded Standard 2011 image on your device: • • • • • 1 GHz x86 or amd64 processor 1 GB of flash or hard drive space (4 GB recommended) 512 MB of RAM (1 GB recommended for amd64 devices) 900 MHz CPU or equivalent At least one of the following bootable media types: • • • • Bootable DVD-ROM drive Bootable USB 2.0 port and a USB Flash Drive (UFD) with 4 GB free space, or access to a local networkBIOS supporting Windows Preinstallation Environment (Windows PE) 3.0 Minimum hardware requirements, particularly RAM requirements, may be greater depending on the size and type of feature packages selected.1.4 Release NotesAlthough every attempt has been made to provide workarounds and additional usage notes for scenarios that are affected by known issues in the pre-release versions of Windows Embedded Standard 2011, we strongly recommend that you refer to the release notes provided with this release before beginning any of the labs described in this manual. ©2009 Microsoft. All Rights Reserved. Page 5Windows Embedded Standard 2011 – CTP2 Lab Manual1.5 Install Windows Embedded Standard 2011 ToolkitYou can install Windows Embedded Standard 2011 Toolkit on your development computer from a DVD or from setup files downloaded from Microsoft Connect. 1. Run Setup.exe • If you have the Windows Embedded Standard 2011 Toolkit DVD, installation should begin when you insert the DVD into the DVD drive. If it doesn’t start automatically, the Setup.exe file can be found at: <DVD Drive>:\WindowsEmbeddedStudio.msi. 2. On the Setup Type page, do one of the following: • To install the tools and distribution share to the default location, select Complete. The default locations are: • • • 3. 32-bit operating system: [System Drive]:\Program Files\Windows Embedded Standard 2011 64-bit operating system: [System Drive]:\Program Files(x86)\Windows Embedded Standard 2011To install the tools and distribution share to a different location, select Custom.Follow the instructions in the installation wizard to complete the installation process.1.5.1 Open Windows Embedded Standard 2011 Toolkit HelpThe Windows Embedded Standard 2011 Toolkit Help contains more detailed information on many of the topics and steps contained in this manual. To access the Windows Embedded Standard 2011 Toolkit Help: 1. Start Image Configuration Editor on your development computer • 2. From the Start menu, click Programs, click Windows Embedded Standard 2011, and then click Image Configuration Editor.On the toolbar, click the Help icon to launch Help.©2009 Microsoft. All Rights Reserved.Page 6Windows Embedded Standard 2011 – CTP2 Lab Manual1.6 Create a Utility DriveIf your device is able to boot from a DVD, you can use the Windows Embedded Standard 2011 DVD appropriate to your device’s architecture to install the OS image directly to your device. Otherwise you can create a bootable USB drive by using the DiskPart tool and then loading the USB Drive with Image Builder Wizard (IBW) or WindowsPreinstallation Environment (WinPE). Diskpart supports the partitioning and formatting of a USB Flash Device (UFD) as a bootable device. A USB drive with a minimum of 4 GB is recommended for a utility drive loaded with Image Builder Wizard.1.6.1 Make Your Utility Disk Bootable1. 2. Attach your USB drive to your development computer. From a Windows Vista, Windows 7 or Windows Preinstallation (Windows PE) 3.0 environment, run the DiskPart tool by typing the following at a command prompt: diskpart Note: The version of the DiskPart tool provided by Windows Vista, Windows 7 and Windows PE 2.0, 2.1 and 3.0 supports the partitioning and formatting of a UFD as a bootable device. Previous versions of the DiskPart tool, including the version provided by Windows XP, do not fully support partitioning and formatting a UFD to be bootable and should not be used. 3. Use the DiskPart tool to determine the disk number and device size to be used for the next step by typing the following at the DiskPart prompt: list disk 4. Use the DiskPart tool to partition and format the drive and make it bootable. At the DiskPart prompt, type the following, replacing <disk_number> with the disk number of the USB drive: select clean create select active format assign exit disk <disk_number> part pri part 1 fs=ntfs quickYour USB drive is now bootable.1.6.2 Add Image Builder Wizard to Your Utility DiskThe Image Builder Wizard disks provide the ability to quickly generate a new IBW disk in the event IBW has been serviced or new packages have been added to the distribution share. To generate an Image Builder Wizard Disk:©2009 Microsoft. All Rights Reserved.Page 7Windows Embedded Standard 2011 – CTP2 Lab Manual 1. Start Image Configuration Editor on your development computer • 2. 3. 4. 5. 6. From the Start menu, selectPrograms, selectWindows Embedded Standard 2011, then selectImage Configuration Editor.On the Tools menu, select Media Creation, then select Create IBW Disk Enter the desired distribution share to be copied. Select your USB drive as the target folder. Select the desired disk architecture. Click OK.1.7 Create a Windows Preinstallation Environment Utility Drive (Optional)In some instances, you may want to create a utility disk that includes the Windows Preinstallation Environment (Windows PE). Windows PE is a lightweight version of Windows used mainly for deployment. You may prefer to use Windows PE instead of Image Builder Wizard if your USB drive is smaller than 2 GB, if you have space limitations on your device or if your device requires custom drivers that you will install on a custom version of Windows PE.1.7.1 Create a Windows PE Utility Disk with Image Configuration EditorThe Windows PE Utility Disk feature of the Media Creation tool in Image Configuration Editor provides the ability to quickly generate a Windows PE disk for gathering information about your target device or for deploying an image using Image Builder Wizard. The generated disk includes TAP.exe, ImageX and Package Scanner. To generate a Windows PE utility disk: 1. 2. Create a bootable utility disk (section 1.6.1 above). Start Image Configuration Editor on your development computer • 3. 4. 5. 6. 7. From the Start menu, selectPrograms, selectWindows Embedded Standard 2011, then selectImage Configuration Editor.On the Toolsmenu, selectMedia Creation, then selectCreate PE Image. Enter a target folder on your development computer to which the binaries will be copied. Select the desired disk architecture. Click OK. Copy the contents of the ISO sub-folder from the target folder on your development computer to the root directory of your bootable utility disk.1.7.2 Create a Custom Windows PE ImageSee the topic “Create a Custom Windows PE Image” in the Windows Embedded Standard 2011 Toolkit Help for more information about creating a custom Windows PE Image and gathering other files to add to the bootable USB drive you created in section 1.6.1.©2009 Microsoft. All Rights Reserved.Page 8Windows Embedded Standard 2011 – CTP2 Lab Manual2 Build Windows Embedded Standard 2011 Images2.1 Build a Windows Embedded Standard 2011 Image with Image Builder WizardImage Builder Wizard (IBW) is a tool you can use to create, configure and install Windows Embedded Standard 2011 on your device. The wizard runs directly on your device and guides you through a set of configuration choices. After you make your selections, the wizard creates and installs Windows Embedded Standard 2011 onto the device. You can further customize the installation or you can capture it to an image file and deploy it to other devices. In this lab, you will use IBW on your device to create different Windows Embedded Standard 2011 images. You can follow the steps provided in this lab to create the following variations: • • An image that can be used for a thin client device. A “minboot” image that contains only the base packages (referred to as Embedded Core).2.1.1 Build a Thin Client Image with Embedded Enabling FeaturesTo build a thin client image using IBW: 1. Start Image Builder Wizard on your device by either: • • Start the wizard from your Windows Embedded Standard 2011 DVD, your ISO image, or the USB drive prepared in section 1.6 Boot your device into Windows PE and run setup.exe from another location (USB drive, network share, etc.). Note: Image Builder Wizard will setup and install Windows Embedded Standard 2011. It’s important to make sure you are running the wizard on your device itself and not on your development computer. 2. On the first page, select Build an Image This option starts IBW and allows you to choose packages, drivers and languages to include in your image. You can optionally start from a template. 3. 4. Accept the End User License Agreement (EULA). The Choose the way you want to build your image page allows you to start from a template or from a blank configuration. In this exercise, select the Thin Client template and click Next. Select a language, time and currency format and keyboard or input method to install on the final image. These selections are for the primary language of your image. You can add additional languages later. Click Next to continue. The Summary of Drivers and Features page shows a summary of the drivers to be installed, detected devices and feature packages in your template. Check the Modify Drivers and Modify Features checkboxes and click Next.5.6.©2009 Microsoft. All Rights Reserved.Page 9Windows Embedded Standard 2011 – CTP2 Lab Manual 7. On the Find and Select Drivers page, choose one of the following options and click Next to continue: • • The Automatically detect devices option detects the drivers on your device and attempts to find drivers for them. The Choose a PMQ option makes it possible for you to import a device list from a previously generated PMQ file. As with Windows Embedded XP, TAP.exe is used to generate this PMQ file. The Do not select additional drivers option includes only the drivers in Embedded Core. Your image will still be bootable but drivers for non-boot-critical devices may not be installed.•8.The Confirm drivers to be installed page shows drivers that will be installed as well as the devices that were detected on your computer for which we do not have drivers. Click Browse if you want to add custom drivers. Click Next to continue. On the Please select Feature Packagesto include in your image page you can add additional features to your configuration. Because you started from the Thin Client template, several packages have been preselected for you. Choose any additional packages you wish to include.9.10. Determine which type of write filters you want to use for your thin client and select the appropriate feature packages. To use File Based Write Filter (FBWF) and Registry Filter, select: • • OR To use Enhanced Write Filter (EWF), Hibernate Once Resume Many (HORM) and Registry Filter, select: • • • Embedded Enabling Features\Enhanced Write Filter with HORM Embedded Enabling Features\Registry Filter Boot Environments\Enhanced Write Filter Boot Environment Note: Although EWF can be used without HORM, using HORM requires EWF. Adding EWF in IBW (without an answer file) will configure all existing volumes to be protected in RAM-REG mode; however EWF will be disabled for all of them. 11. Click the Resolve Dependencies button. If a pop-up window asks you to choose between multiple packages, make the following selections: a. If you are installing HORM, select Embedded Windows 7 Boot Environment, otherwise select the Windows 7 Boot Environment. • • • Select Windows Embedded Standard Startup Screens. Select Windows Explorer. Select Standard Windows USB Stack. Embedded Enabling Features\File Based Write Filter (FBWF) Embedded Enabling Features\Registry Filter©2009 Microsoft. All Rights Reserved.Page 10Windows Embedded Standard 2011 – CTP2 Lab Manual b. Resolve all other dependencies, then click Done. Click Next to continue.12. The Summary of Drivers and Features page gives you a final overview of packages and drivers to be installed. If you are satisfied with your selections, click Next. 13. Select the disk or partition where you would like to install the image, then click Next to begin installation and set up of the customized Windows Embedded Standard 2011 image on your device. 14. To enable Embedded Enabling Features after installation is complete, open a command prompt on your device and run the following commands: • For FBWF and Registry Filter: fbwfmgr /enable fbwfmrg /addvolume c: • For EWF, HORM and Registry Filter: ewfmgr c: -enable ewfmgr c: -activatehorm 15. Once HORM has been activated, it should be tested: a. b. c. d. e. f. Reboot so that EWF is enabled. Start Internet Explorer Enable hibernation by typing the following at a command prompt: powercfg –h on Reboot and device should resume from hibernation. Make changes and reboot your device again Verify your device state returns to that of step d above and that the changes made in step e were not retained.2.1.2 Build an Image with Embedded Core OnlyA Windows Embedded Standard 2011 image that contains just the Embedded Core package is described as a “minboot” image. To build an Embedded Core (eCore) image using Image Builder Wizard, follow the steps in section 2.1.1 Build a Thin Client Image with Embedded Enabling Features with the following changes: 1. 2. At step 4, choose the Minimum Configuration template Complete steps 10 and 15 only if you want to enable write filters.2.2 Build a Windows Embedded Standard 2011 Image Using Image Configuration Editor2.2.1 Build a Thin Client Image with Custom Settings1. Start Image Configuration Editor on your development computer. • From the Start menu, selectPrograms, selectWindows Embedded Standard 2011, then selectImage Configuration Editor.©2009 Microsoft. All Rights Reserved.Page 11Windows Embedded Standard 2011 – CTP2 Lab Manual 2. On the File menu, select Distribution Share, then navigate to the desired distribution share. The default distribution share locations are: • On a development computer running a 32-bit operating system: • • • x86 distribution share: C:\Program Files\Windows Embedded Standard 2011\DS amd64 distribution share: C:\Program Files\Windows Embedded Standard 2011\DS64On a development computer running a 64-bit operating system: • • x86 distribution share: C:\Program Files(x86)\Windows Embedded Standard 2011\DS amd64 distribution share: C:\Program Files(x86)\Windows Embedded Standard 2011\DS643. 4.On the File menu, click New Answer File. By default, the Embedded Edition package is added to this new answer file. This is the Embedded Core package. Add Driver Packages a. On the File menu, click Import then select Import PMQ to add device drivers using a PMQ file. In the Messages pane, in the Import PMQ tab, you can review the results of mapping the devices in a PMQ file to driver packages. • • Successfully mapped devices will be listed. To view the package in the answer file that the device was mapped to, double-click the device name. The warning icons denote devices that were not mapped to driver packages. If you need support for these devices, see section 2.2.3 Note: For more information on how to generate a PMQ file, refer to the Windows Embedded Standard 2011 Help topic “How to Generate a .PMQFile Using Target Analyzer”. b. In the Distribution Share pane, under Packages/Driver, you can add additional driver packages. Double-click any driver package (leaf node in the tree) to add it to your answer file. In the Distribution Share pane, expand the Packages/FeaturePack node. Expand the Browsers/Internet Explorer 8 node, right-click on Internet Explorer 8 Browser and select Add to Answer File. Expand the Graphics and Multimedia node, right-click on Windows Media Player 12 and selectAdd to Answer File. Expand the Remote Connections node, right-click on Remote Desktop Connectionand select Add to Answer File.5.Add Feature Packages a. b. c. d.6.Determine which type of write filters you want to use for your thin client. In the Distribution Share pane, under Packages/FeaturesPack, right-click on the appropriate feature packages and select Add to Answer File. To use File Based Write Filter (FBWF) and Registry Filter, select:©2009 Microsoft. All Rights Reserved.Page 12Windows Embedded Standard 2011 – CTP2 Lab Manual • • OR To use Enhanced Write Filter (EWF), Hibernate Once Resume Many (HORM) and Registry Filter, select: • • • Embedded Enabling Features\Enhanced Write Filter with HORM Embedded Enabling Features\Registry Filter Boot Environments\Enhanced Write Filter Boot Environment Note: Although EWF can be used without HORM, using HORM requires EWF. Adding EWF in IBW (without an answer file) will configure all existing volumes to be protected in RAM-REG mode; however EWF will be disabled for all of them. 7. To add language packs, in the Distribution Share pane, expand the Packages/LanguagePack/en-US node. Right-click the English (US) Language Pack package and select Add to Answer File. Add additional language packs the same way. To change Internet Explorer 8 settings: a. b. c. d. e. f. In theAnswer File pane, click on theInternet Explorer 8 Browser package. In the Settings pane, change Filter View to “4 Specialize”. In the Settings pane, click on the Value column to update the value for each of the following settings: Set Home_Page to /embedded SetIEWelcomeMsg to false Save your answer file. Embedded Enabling Features\File Based Write Filter (FBWF) Embedded Enabling Features\Registry Filter8.You have now changed the way Internet Explorer behaves by using Image Configuration Editor’s settings UI. You can change additional settings in your answer file the same way. 9. To resolve dependencies, from the Validate menu, select Add Required Packages. a. If there are any errors listed in the Validation tab of the Messages pane that state “Dependencies of the source package are not satisfied,” double-click the error message and use the Resolve Dependencies dialogue box to satisfy all required package dependencies. • If you are asked to choose between two USB stacks, choose “Bootable Windows USB Stack” only if you are using the USB Boot Embedded Enabling Feature and enabling a USB bootable image (see section 5.3). Otherwise choose “Standard Windows USB Stack.” If you are asked to choose between two boot environment packages, choose “Enhanced Write Filter Boot Environment” if you are installing HORM with EWF. Otherwise choose “Windows Boot Environment”.•b.Warnings that state “Optional Dependencies exist for the source package” are acceptable and may be ignored. Page 13©2009 Microsoft. All Rights Reserved.。
性能测试常用监控工具简介

一、 LINUX监控工具--NMON
NMON简介
● Nmon是一种在Aix与Linux操作系统上 广泛使用的监控与分析工具
● Nmon所记录的信息非常全面 ● Nmon可以产生数据文件与图形化结果
NMON监控内容
● cpu占用率 ● 内存使用情况 ● 磁盘I/O速度、传输和读写比率 ● 文件系统的使用率 ● 网络I/O速度、传输和读写比率、错误统计率与传输包的大小 ● 消耗资源最多的进程 ● 计算机详细信息和资源 ● 页面空间和页面I/O速度 ● 用户自定义的磁盘组 ● 网络文件系统
Spotlight on oracle监控top session
TopSessions面板可以查看当前哪个session当前占用了大量的资源;单 击session列表,会在session Information中显示该会话的所有详细信息 ,可以查看执行计划,判断是否存在全表扫描
Spotlight on oracle监控top sql
● 举例:./nmon –F test.nmon –s 5 –c 1000
NMON生成数据文件
● nmon analyser生成数据文件 ● 需要将nmon analyser的宏安全模式调至低
NMON数据文件分析
NMON数据文件分析
主要关注TAB: ● SYSSUM ● CPU_ALL ● CPU_SUMM ● DISK_SUMM ● DISKBUSY ● MEM ● NET
Jconsole启动
服务器端启动:
在catalina.sh的JAVA_OPTS参数中添加-Djava.awt.headless=true 在Xshell的参数选项中,将X11连接选中:
Jconsole启动
远程连接:
WEB知识-HttpWatch工具简介

HTTP协议头部与Keep-Alive模式详解/home-space-uid-42237-do-blog-id-234552.html1、什么是Keep-Alive模式?我们知道HTTP协议采用“请求-应答”模式,当使用普通模式,即非KeepAlive模式时,每个请求/应答客户和服务器都要新建一个连接,完成之后立即断开连接(HTTP协议为无连接的协议);当使用Keep-Alive模式(又称持久连接、连接重用)时,Keep-Alive功能使客户端到服务器端的连接持续有效,当出现对服务器的后继请求时,Keep-Alive功能避免了建立或者重新建立连接。
http 1.0中默认是关闭的,需要在http头加入"Connection: Keep-Alive",才能启用Keep-Alive;http 1.1中默认启用Keep-Alive,如果加入"Connection: close ",才关闭。
目前大部分浏览器都是用http1.1协议,也就是说默认都会发起Keep-Alive的连接请求了,所以是否能完成一个完整的Keep- Alive连接就看服务器设置情况。
2、启用Keep-Alive的优点从上面的分析来看,启用Keep-Alive模式肯定更高效,性能更高。
因为避免了建立/释放连接的开销。
下面是RFC 2616上的总结:1.1.By opening and closing fewer TCP connections, CPU time is saved inrouters and hosts (clients, servers, proxies, gateways, tunnels, orcaches), and memory used for TCP protocol control blocks can besaved in hosts.2.HTTP requests and responses can be pipelined on a connection.Pipelining allows a client to make multiple requests without waitingfor each response, allowing a single TCP connection to be used muchmore efficiently, with much lower elapsed time.work congestion is reduced by reducing the number of packetscaused by TCP opens, and by allowing TCP sufficient time todetermine the congestion state of the network.tency on subsequent requests is reduced since there is no timespent in TCP's connection opening handshake.5.HTTP can evolve more gracefully, since errors can be reported withoutthe penalty of closing the TCP connection. Clients using futureversions of HTTP might optimistically try a new feature, but ifcommunicating with an older server, retry with old semantics afteran error is reported.RFC 2616(P47)还指出:单用户客户端与任何服务器或代理之间的连接数不应该超过2个。
- 1、下载文档前请自行甄别文档内容的完整性,平台不提供额外的编辑、内容补充、找答案等附加服务。
- 2、"仅部分预览"的文档,不可在线预览部分如存在完整性等问题,可反馈申请退款(可完整预览的文档不适用该条件!)。
- 3、如文档侵犯您的权益,请联系客服反馈,我们会尽快为您处理(人工客服工作时间:9:00-18:30)。
1Getting StartedOpening the HttpWatch Browser Plug-inYou can display the HttpWatch plug-in in the lower part of the Internet Explorer (IE) or Firefox window by following the instructions shown below:Opening the HttpWatch Plug-in in IE 6Click on the HttpWatch toolbar button:or select it from the View menu:If neither of these options is available please restart Windows and try again. The plug-in can also be opened using Shift+F2 (see Using Keyboard Shortcuts).Opening the HttpWatch Plug-in in IE 7 or 8Click on the HttpWatch toolbar button which is normally on a hidden part of the IE Command Bar. You need to click on the toolbar chevrons (>>) before clicking on the HttpWatch button:or by selecting it from the Tools->Toolbars->Explorer Bar menu:If neither of these options is available please restart Windows and try again. The plug-in can also be opened using Shift+F2 (see Using Keyboard Shortcuts).The position of the HttpWatch button on the Command Bar can be changed using the Tools->Toolbars->Customize... menu item:If you move the HttpWatch toolbar button up:It can then be accessed more easily in IE:Opening the HttpWatch Plug-in in Firefox 2.0 - 3.6Click on the HttpWatch Tools menu item or status bar icon:If neither of these options is available please restart Firefox and check that HttpWatch is not disabled in Tools->Add-ons. The plug-in can also be opened using Shift+F2 (see Using Keyboard Shortcuts).Recording HTTP and HTTPS trafficOnce you have HttpWatch displayed in the browser, press the Record button to start recording HTTP requests.If you are using the free Basic Edition then extended HTTP information is only displayed for sites in the Alexa Top 20 or .HttpWatch includes an offline log file viewer known as HttpWatch Studio. It can be started from the HttpWatch program group under the Start menu or by double clicking on a .hwl file.2What's newNew in Version 7.0Page Level EventsPage level time charts now include lines to indicate when events were raised during the loading of a page:Improved Grouping of Requests during Page LoadRequests occurring after the page onload event are now grouped with the requests recorded during the initial loading of the page:HttpWatch Detects and Highlights Potential ProblemsHttpWatch now examines each request and issues warnings where problems relating to performance, security or functionality are detected. Requests that have warnings are highlighted with a new Warning column marker:and a new request level Warnings tab shows the details of each potential problem:There's also a new Warning tab in the Summary window that summarizes the occurrence of each type of warning in a page or set of selected requests:Customizable Grid ControlsRight clicking on a grid's column headers opens a customization menu:For example, you may want to increase the font size if you are using HttpWatch in a demonstration:New Data Columns in the Request GridThere's now more than thirty columns to choose from in the main request grid covering almost every data item that is available in HttpWatch:Customizable CSV ExportThe CSV output now can now be customized to include the data fields that you need:Data Tips Help You Understand The Recorded DataData tips are now displayed when you hold the mouse pointer over an item such as an HTTP status code:Or a header value saving you the trouble of looking up what the value means:New Icon Based Type ColumnThe new icon based type column saves space and provides an instant visual marker for different types of content. The data tip shows the underlying mime type:Coloring of Result Column ValuesThe result column now uses red to indicate errors and gray for (Cache):More Information About CookiesThe cookie tab now displays the HttpOnly and Secure flags for each cookie; including cookie values that were sent to the server. The source column shows whether the cookie value was returned from the server, set by Javascript or saved in the cookie store by a previous session:Improved Support For HAR FilesHTTP Archive (HAR files) can now be:∙Saved as HttpWatch log files (.hwl)∙Open using the HttpWatch automation interface∙Re-exported in CSV or XML formatsImproved Automation InterfaceThe automation interface allows HttpWatch to be controlled from programs written in almost any programming language (e.g. C#, , Ruby, Javascript). In version 7.0, this interface has been extended with new classes, properties and methods to support:∙Page level events∙Warnings∙Export of customized CSV output∙HTTP Archive (HAR) filesImage dimensionsThe documentation is also improved with a new format and object relationship diagrams:Uploaded File Type on POST Data tabThe content type of uploaded files is now shown in a separate column in the POST Data tab:3Version HistoryVersion 7.0.23∙Fixed: HAR files with a BOM marker can now be opened in HttpWatch∙Fixed: An access violation occurred when attempting to open a HAR file with no page groups∙Fixed: More than three fractional digits are now accepted for the seconds value in ISO8601 date/time strings when importing HAR filesVersion 7.0.22∙Improved: Added a 'Using Ruby' section to the HttpWatch Automation Reference help file ∙Fixed: Corrected typos and broken links in help files∙Fixed: An error message is no longer displayed by HttpWatch when nesting Firefox within a tab using the URL 'chrome://browser/content/browser.xul'Version 7.0.21∙Fixed: The error 'Invalid Seek offset' could be displayed when opening a log file in HttpWatch Basic EditionVersion 7.0∙New: Page event timings are now displayed in the the time chart with tooltips∙New: Added 'Page Events' to page summary window∙Improved: Requests that occur before and after the page load event now appear in a single page group∙New: Added a warning column that displays a ! for any request where a warning was issued (see Warnings section below for more information). The tool tip for the ! displays a short summary of the warnings found on the request∙New: Added a Warnings tab to display the warnings found on a request∙New: The summary window now contains a Warnings tab∙New: Right clicking on a column heading in the main grid displays a content menu of customization options∙New: Added Tools->Warnings dialog that can be used to disable individual warnings. Also available from the context menu on a warning∙New: The columns used in the main grid can be changed using the 'Select Columns' option in the grid header context menu∙New: Columns can be reordered by dragging∙New: The font used in the main grid can be changed using the 'Font...' option in the header context menu. If you choose a larger font the grid text, headings and data tips are scaled up making it useful for demos∙New: Tooltips have been added to all grid column headers to explain what the grid is displaying∙New: Data tips display explanations of certain data values (e.g. result codes) and HTTP header names∙New:Send by Email, Export CSV, Export HAR and Export XML are now available for HAR files in HttpWatch Studio∙New: Added a Type column to the POST Data tab to show the content type of uploaded files ∙New: The Result column value for failing request is colored red and (Cache) results are grayed∙New: Secure, HttpOnly and Source columns added to Cookie grid∙New: Added Tools->Options->CSV Export to allow customization of fields in CSV export files∙New: The Type column now uses icons to indicate content type. The text based column is still available as the 'Content Type' column in the Select Columns window∙New: Can now save a HAR file as a HWL file∙Changed: Has a new version 7.x HWL file format∙Changed: Renamed 'Performance' summary tab to 'Network'∙Changed: Can no longer load HWL files saved with HttpWatch version 4.x4Plug-in for Internet Explorer and FirefoxUsing the HttpWatch Plug-inWhen HttpWatch is installed, it adds a plug-in to Internet Explorer and Firefox that can be used to record and view HTTP requests. The plug-in window can be opened by clicking on the HttpWatch icon(see Getting Started ).The HttpWatch plug-in window consists of three sections:ToolbarThe toolbar is displayed at the top of the window and contains buttons that are used to control HttpWatchRequest GridThis displays a scrollable list of HTTP requests that have been recorded by HttpWatch.Request ViewSelecting an item in the requests grid causes the lower part of the HttpWatch window to display detailed information about that item. The size of this region can be adjust by dragging the horizontal line that separates it from the requests grid.Recording HTTP requests with HttpWatchThe basic steps required to control logging are as follows:1.In Internet Explorer or Firefox open the HttpWatch window by clicking on the icon or byselecting it from the menu (See Getting Started).2.Click the Record button to start recording HTTP requests.e the browser to interact with the web site you want to examine. Whilst doing this,you can close the HttpWatch window and it will carry on logging requests in thebackground.4.Individual requests can be viewed by selecting them in the request grid.5.The log can be emptied using the Clear button or logging can be halted with the Stopbutton.You can avoid logging certain types of requests by using the filter. For example, if you are only interested in the pages returned by a site and not the images you would do the following:1.Open the Filter dialog by clicking on the Filter button.2.Enable filtering by clicking on the Enable filtering check box3.Control the type of HTTP request that is logged by clicking on the Content is: checkbox and clicking on the first check box marked text/html.This will restrict HttpWatch to only recording HTTP requests that return HTML content. For more information see Using the Filter.Saving the LogThe Save button in HttpWatch allows the log to be saved as a .hwl file and loaded into HttpWatch Studio at a later date (See Save button ). The log can also be exported as an XML or CSV file.4.1Toolbar ButtonsThe main toolbar is used to control HttpWatch and contains the following buttons:∙Record∙Stop∙Clear∙View∙Summary∙Find∙Filter∙Save∙Print∙Tools∙LicenseRecordClicking this button will start recording requests in the HttpWatch.StopClicking this button will stop requests being logged.ClearClicking this button clears the contents of the log.ViewClicking this button will open the View menu and display menu items that control the appearance and behavior of the HttpWatch request grid.SummaryClicking this item shows or hides the Summary View.FindClicking this button will open the Find dialog and allow text to be quickly located anywhere in the log of requests.FilterClicking this button will open the Filter dialog and allow requests to be filtered by content type.SaveClicking this item saves the complete log to an HttpWatch log file (.hwl). The Open using HttpWatch Studio checkbox can be used to automatically load the log file into the HttpWatch Studio after it has been saved.The arrow on the toolbar next to this button provides access to Export to CSV... , Export to XML..., Export to HAR... and Send by Email...HttpWatch log files can be reopened using File->Open in HttpWatch Studio or by double clicking on a .hwl file.If you are using HttpWatch Professional Edition, the files you save can be viewed in HttpWatch Basic Edition and you can view the complete contents of files saved in HttpWatch BasicEdition. For more information about transferring log files please see Basic vs Professional Edition.PrintClicking this item opens the Print dialog.ToolsClicking this button will open the Tools menu and display menu items that allow cookies and cache entries to be cleared.LicenseClick this button to set or change the HttpWatch license key.4.2View MenuThe View menu offers the following commands:4.3 Tools MenuThe Tools menu offers the following commands:4.4Options DialogOptions Dialog TabsThe options dialog contains three tabs that can be used to configure the HttpWatch plug-in:1.General2.Recording3.CSV ExportGeneral OptionsThe General tab of the Options dialog contains the following options to configure HttpWatch:Clear log when recording startsIf this check box is selected the log is automatically cleared whenever recording is started interactively.Confirm Cache and Cookie ClearingThis controls whether a confirmation dialog is displayed when one of the clearing options is used on the Tools menu.Use shortcut keys in Internet Explorer / FirefoxClear this check box if you want to disable the use of shortcut keys in the browser. You may need to do this if an HttpWatch shortcut key clashes with a shortcut key used by a web application.Allow shortcut keys that open HttpWatchClear this check box if one of the shortcuts that open HttpWatch (e.g. Shift+F2 for Dock) is interfering with the use the keyboard shortcuts provided by the browser or a web applicationOnly allow other shortcut keys if HttpWatch is openWhen this check box is enabled, shortcut keys that do not open HttpWatch will only be processed if the HttpWatch plugin window is visible. By clearing this option you could perform an action like starting recording (Ctrl+F2) without opening HttpWatch.Recording OptionsUse Record button to start recordingThis is the default setting when you install HttpWatch. Recording is only started when you click on the record button and will continue until the Stop button is clicked.Start Recording when HttpWatch is openedIf this option is enabled HttpWatch will automatically start recording as soon as the Plug-in window is opened.Stop Recording when HttpWatch is closedThis options causes HttpWatch to stop recording when the Plug-in window is closedAutomatically Record when IE/Firefox StartsUsing this options enables automatic recording in HttpWatch, unless the browser was started using the automation interface's New method. The automatic record and saving settings are used when the next instance of the browser starts.Confirmation MessageEnabling this check box causes a confirmation message to be displayed to the user when the browser starts asking them whether they want to proceed with automatic HttpWatch recording. This setting can only be disabled in HttpWatch Professional Edition.Save Log file when IE/Firefox closes or every N minutesThis option can be used to automatically save the HttpWatch log file when the browser exits or after a period of time specified in minutes.If the value in minutes is set to 0 the log file is only written out when IE or Firefox exits. No log file is written out if the log is empty.Write Log files toAutomatically saved log files are written to this location. The following locations are support:∙Local directories, e.g. C:\LOGFILES∙Network paths, e.g. \\DEVSERVER\LOGFILES∙The temporary directory for the current user. Leave the field blank to do thisThe file name is automatically generated and contains the date/time, user name and computer name. See Automatic Recording for more information.Automatically purge log files older then N daysIf this option is selected any log files older than the specified value in days are deleted from the directory used for automatic saving. The deletion occurs just before a new log file automatically saved by HttpWatch. Only log files written by the same user on the same computer will be deleted. If any other HttpWatch log files are present in the directory they will not be deleted.CSV Export OptionsThe same fields as HttpWatch request grid:Select this option to use the columns from the request grid as CSV export fields.These fields:Select this option to manually configure which fields should be used for CSV export. Once the option is selected you can setup the fields using the Change and Reset buttons.Change...Clicking on this button opens the CSV field selection dialog. You can then choose exactly which fields should be included in the CSV output.ResetClick this button to copy the list of fields in the HttpWatch request grid into the list of manually selected fields.The same data as HttpWatch version 6.x and earlierThis options causes CSV export to use the same format as previous versions of HttpWatch.4.5Using Keyboard ShortcutsKeyboard shortcuts in HttpWatchTo do this Press thisOpen a docked HttpWatch window Shift+F2Close the HttpWatch window Shift+F8Undock the HttpWatch window Shift+F3Hide/Show the HttpWatch window Shift+F7Start recording Ctrl+F2Stop recording Ctrl+F3Clear all requests Ctrl+DelOpen Filter dialog Ctrl+F9Hide/Show the Summary window Shift+F9Hide/Show the Properties window Shift+F12Turn on filter Ctrl+F7Turn off filter Ctrl+F8Previous highlight Ctrl+Up ArrowNext highlight Ctrl+Down Arrow Save Ctrl+Shift+SExport to XML Ctrl+Shift+XExport to CSV Ctrl+Shift+C Collapse All Ctrl+Shift+Left Arrow Expand All Ctrl+Shift+Right Arrow Clear Cache and All Cookies Alt+DelClear Cache Alt+CClear All Cookies Alt+KOpen the Options window Alt+OOpen the Warnings window Alt+W5HttpWatch StudioUsing HttpWatch StudioHttpWatch Studio is a standalone viewer for HttpWatch files. It can be started from the Windows Start menu under the HttpWatch program group or by double clicking on a .hwl file.The HttpWatch Studio window consists of four sections:MenuThe toolbar is displayed at the top of the window and contains buttons that are used to control HttpWatch Studio. For more information see Menus.ToolbarThe toolbar is displayed at the top of the window and contains buttons that are used to control HttpWatch Studio. For more information see Toolbar Buttons.Request GridThis displays a scrollable list of HTTP requests that have been recorded by HttpWatch. For more information see Requests Grid.Request ViewSelecting an item in the requests grid causes the lower part of the HttpWatch window to display detailed information about that item. The size of this region can be adjust by dragging the horizontal line that separates it from the requests grid. For more information see Request View.5.1 MenusFile menuEdit menuView menuTools menuWindow menuHelp menuFile menu commandsThe File menu offers the following commands:Edit menu commandsThe Edit menu offers the following commands:View menu commandsThe View menu offers the following commands:Group By Page Controls whether requests should be grouped by pageTools menu commandsThe Tools menu offers the following commands:Window menu commandsThe Window menu offers the following commands: Cascade Arranges windows in an overlapped fashion.Help menu commandsThe Window menu offers the following commands:5.2Toolbar Buttons∙Open∙Save∙Print∙Print Preview∙Summary∙Properties∙Filter∙LicenseOpenClicking this item opens an HttpWatch log file (.hwl) in HttpWatch Studio.Clicking this item saves the complete log to an HttpWatch log file (.hwl). The Open using HttpWatch Studio checkbox can be used to automatically load the log file into the HttpWatch Studio after it has been saved.The arrow on the toolbar next to this button provides access to Export to CSV... , Export to XML..., Export to HAR... and Send by Email...HttpWatch log files can be reopened using File->Open in HttpWatch Studio or by double clicking on a .hwl file.If you are using HttpWatch Professional Edition, the files you save can be viewed in HttpWatch Basic Edition and you can view the complete contents of files saved in HttpWatch Basic Edition. For more information about transferring log files please see Basic vs Professional Edition.PrintClicking this item opens the Print dialog.Pint PreviewClicking this item opens the Print Preview window.SummaryClicking this item shows or hides the Summary View.PropertiesClicking this item shows or hides the Properties Window.FindClicking this button will open the Find dialog a nd allow text to be quickly located anywhere in the log of requests.Clicking this button will open the Filter dialog and allow requests to be filtered by content type. LicenseClick this button to set or change the HttpWatch license key.6Using HttpWatchThis section describes how to use and configure HttpWatch:HttpWatch User InterfaceUsing the FilterConfiguring Content EditorsWorking with SAP URLsSilent Install of HttpWatch6.1User InterfaceThe HttpWatch user interface in HttpWatch Studio and the plug-in for Internet Explorer and Firefox have four main sections:1. ToolbarThe toolbar is displayed at the top of the window and contains buttons that are used to control HttpWatch. For more information see Toolbar Buttons.2. Request GridThis displays a scrollable list of HTTP requests that have been recorded by HttpWatch. For more information see Requests Grid.3. Request ViewSelecting an item in the requests grid causes the lower part of the HttpWatch window to display detailed information about that item. The size of this region can be adjust by dragging the horizontal line that separates it from the requests grid. For more information see Request View.4. Summary ViewClicking on the Summary toolbar button or selecting multiple items in the requests grid opens a window that displays summary data. For more information see Summary View.Request GridWhat is the Request Grid?The upper part of the HttpWatch window displays a scrollable list of captured HTTP/HTTPS requests and is automatically updated in the HttpWatch plug-in as you access a web site. Clicking on a column heading will cause the data to be sorted in ascending order based on data in that column. A second click on the same column will reverse the sort order and display the data in descending order.Details of the currently selected item are displayed in the request view. If you selected more than one request or a page heading then a summary of the recorded data is displayed in the Summary View.For more information on the way data is displayed please refer to these sections:Page GroupingPage Level Time ChartsData ColumnsThe columns used by the grid can be changed using the Select Columns dialog. These columns are displayed by default:StartedThe time at which the request was started by the browser. This is an offset in hours, minutes and seconds from the first entry in the log.TimeThe time in seconds to complete the request. This is measured from when the browser first started processing the request until the last byte of data is read from the response.Time ChartA graphical bar chart representation of each request relative to other requests in the same page. This column can be hidden using the 'Time Chart Column' option on the view menu. The timing bars and events lines shown in this column are described in Page Level Time Charts! (Warnings)HttpWatch detects possible problems in each recorded request. An exclamation mark is displayed in this column if one or more warnings were assigned to a request.SentThis is total number of bytes sent by the browser in the HTTP request message. It includes the size of the HTTP request headers and any POST data (e.g. form values or uploaded files).ReceivedThis is total number of bytes downloaded by the browser while reading the HTTP response and includes both the size of the HTTP headers and content. For commonly encountered result values you can interpret this value as follows:200For an HTTP OK response this value is the size of HTTP response headersThe HTTP method that was used when the request was sent.ResultIf the request was successful then the HTTP status code will be shown here, e.g. 200 for OK, 404 for page not found, 403 permission denied or 304 if a requested resource has not been modified. In cases where the content was read from the cache without contacting the HTTP server, this column contains '(Cache)'.The value 'Aborted' in this column indicates that the browser cancelled the HTTP operation before it completed. This can occur if images are being downloaded when you click on a link to a different page.TypeThis shows an icon representing the type of content that was downloaded. The tooltip for each entry displays the underlying mime type, e.g. 'text/html'.URLThe address of the web content being accessed, e.g. /default.asp. HttpWatch can reformat SAP portal URLs into an easier to read format. See for Working with SAP URLs more details.Page GroupingGrouping of Recorded RequestsThe Request Grid is grouped by page unless there is no page grouping information available or grouping as been disabled using the 'Group By Page' option on the view menu.Please refer to the sections below that describe the numbered items in this screen shot:1. Expanded Page GroupThis page group starts at 0:00.000 in the log file and contains 12 requests. The page header shows the title of the page and displays a '-' symbol that can be used to collapse the group. The summary line at the end of the group shows that the page took 3.671 seconds to download, The blue color of the page header indicates that this is a normal page load.The structure and color scheme used in the time chart for the page are described in Page Level Time Charts.2. Expanded Dynamic Page GroupThis page group starts at 0:23.649 in the log file and the yellow color of the page header indicates that this was a dynamic change to a previously loaded page. Dynamic page groups are usually the result of AJAX calls or modifications made by Javascript functions or event handlers.3. Collapsed Page GroupThis page group has been collapsed using the +/- control. The page header shows the page title, total time and the number of requests.4. Ungrouped RequestsSome requests do not directly relatePage Level Time ChartHttpWatch Time ChartsColored bars are displayed in the time chart column of the Request Grid to show the relative timing of requests making up a page and the different phases of an HTTP request, e.g. connect, send, etc. Vertical lines are also included to show where certain page level events occurred.The screen shot below shows a time chart from the Google Mail home page:Request TimingsThe colored horizontal bars are described below:ColorTiming NameDescriptionBlocked The Blocked time includes any pre-processing time (such as cache lookup) and the time spent waiting for a network connection to become available. IE 7 and Firefox 2 will only create a maximum of two concurrent network connections per host name (i.e.) and will queue up requests until a network connection is available. Often the Blocked time is the most significant factor in the download time of images embedded in a web page.DNS Lookup DNS Lookup is the time required to resolve a host name (e.g. ) into a numeric IP address (e.g. 216.239.59.99).Connect Connect is the time required to create a TCP connection to the web server (or proxy). If a secure HTTPS connection is being used this time includes the SSL handshake process. Keep-Alive connections are often used to avoid the overhead of repeatedly connecting to the web server.Send Send is the time required to send the HTTP request message to the server and will depend on the amount。