A8TI_TPS659102_RK3066_V04_20120802_1746
惠普全系列
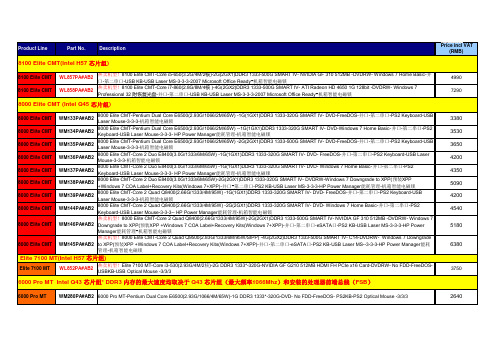
3380 3530 3650 4200 4350 5090 4200 4540 5180
8000 Elite CMT
WM145PA#AB2
6380
Elite 7100 MT(Intel H57 芯片组) 芯片组
Elite 7100 MT WL852PA#AB2 3750
6000 Pro MT Intel Q43 芯片组 DDR3 内存的最大速度均取决于 Q43 芯片组(最大频率 芯片组* 芯片组(最大频率1066Mhz)和安装的处理器前端总线(FSB) )和安装的处理器前端总线( )
2980 3350 3800
6005 Pro MT (AMD 785G 芯片组 芯片组)
6005 Pro MT 6005 Pro MT 6005 Pro MT WL851PA#AB2 6005 Pro MT-Athlon II X2 B24(3.0G/2M/65W)-1G DDR3 1333-320G-DVD- No FDD-FreeDOS- PS2KB-PS2 Optical Mouse -3/3/3 CTO CTO 6005 Pro MT-Phenom II X2 B55(3.0G/7M/80W)-2G DDR3 1333-320G-DVD- No FDD-FreeDOS- PS2KB-PS2 Optical Mouse -3/3/3 6005 Pro MT-Phenom II X4 B95(3.0G/8M/95W)-2G DDR3 1333-320G-NVIDIA GF 310 DP SH x16 512MB显卡-DVDRW- No FDD-Windows 7 Home BasicPS2KB-PS2 光电Mouse -3/3/3-22in1 Media Card Reader-并口-MS Office Ready 2007(60天试用)-HP Power Manager能耗管理
ALPS马达驱动型电位器RK168系列选型手册

金属轴 绝缘轴 旋钮操作型 中空轴
总阻值种类
总阻值 (kΩ)
电阻规律
电阻规律
操作部的种类
10
20
15A
L1 12
˃
ø6 4.5
C1
50
3B
L1 20 25 30
工作最大 电流值
旋转时 100mA 末端空转时 150mA (4.5V DC)
100
Unit:mm
轴承和支架固定标准尺寸
7
Unit:mm
旋转电位器 滑动电位器
金属轴
产品一览
电阻体数 安装方向
操作部 操作部长度 总阻值
形状
(L1)(mm)
(kΩ)
电阻规律
马达 配线端子
最小订货单位 (pcs.) 日本 出口
产品编号
图号
2联
3B
有
RK16812MG099 1
Horizontal type
平轴
25
100
200
200
4联
15A
无
RK16814MGA0K 2
适用于相互偏差
(2 联以上的音量用)
-40dB to 0dB 3dB max.
-
-70dB to -60dBɹ3dB max. -60dB to 0dBɹ2dB max
-100dB to 0dB 2dB max.
-60dB to -40dBɹ5dB max. -40dB to 0dBɹ3dB max.
轴的形状
齿轴, 平轴, 槽轴
平轴
槽轴, 平轴
槽轴
平轴
端子形状
插入式, 引线
插入式
附属开关
-
按开开关
深圳市视美泰技术股份有限公司 AIoT-T972 V1.2 HDMI IN 4K 数字标牌 规格书说

AIoT-T972V1.2 HDMI IN版本4K数字标牌规格书文档修改历史版本描述日期V1.0创建2019-8-15修改为V1.1版本V1.12019-11-06PCB对应描述修改为V1.2版本V1.22020-08-12PCB对应描述目录第一章产品概述 (3)1.1适用范围.....................................................................................错误!未定义书签。
1.2产品概述.....................................................................................错误!未定义书签。
1.3产品特点.....................................................................................错误!未定义书签。
1.4外观及接口示意图.....................................................................错误!未定义书签。
第二章基本功能列表. (5)第三章PCB尺寸和接口布局 (7)3.1PCB尺寸图 (7)3.2接口参数说明 (8)第四章电气性能 (19)第五章组装使用注意事项 (20)第一章产品概述1.1AIoT-T972适用范围AIoT-T972属于安卓智能主板,普遍适用于智慧显示终端产品、视频类终端产品、工业自动化终端产品,如:广告机、数字标牌、智能自助终端、智能零售终端、O2O智能设备、工控主机、教育设备、机器人设备等。
1.2产品概述AIoT-T972采用晶晨T972芯片,四核Cortex-A55处理器,主频最高达1.9GHz;采用Mali-G31GPU;支持4K、H.265硬解码;搭载Android9.0系统;支持多路视频输出和输入;外围接口丰富,支持多款外设扩展;超低功耗、超强性能,是在商业展示、人机交互、工控项目上的最佳选择。
RK3188&68_REF_RK618_V11_0802参考图发布通知
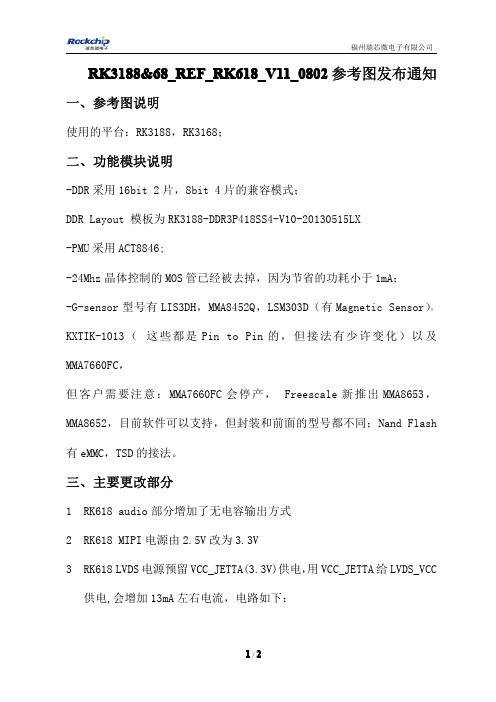
RK3188&68_REF_RK618_V11_080808022参考图发布通知RK3188&68_REF_RK618_V11_0一、参考图说明使用的平台:RK3188,RK3168;二、功能模块说明-DDR采用16bit2片,8bit4片的兼容模式;DDR Layout模板为RK3188-DDR3P418SS4-V10-20130515LX-PMU采用ACT8846;-24Mhz晶体控制的MOS管已经被去掉,因为节省的功耗小于1mA;-G-sensor型号有LIS3DH,MMA8452Q,LSM303D(有Magnetic Sensor),KXTIK-1013(这些都是Pin to Pin的,但接法有少许变化)以及MMA7660FC,但客户需要注意:MMA7660FC会停产,Freescale新推出MMA8653,MMA8652,目前软件可以支持,但封装和前面的型号都不同;Nand Flash 有eMMC,TSD的接法。
三、主要更改部分1RK618audio部分增加了无电容输出方式2RK618MIPI电源由2.5V改为3.3V3RK618LVDS电源预留VCC_JETTA(3.3V)供电,用VCC_JETTA给LVDS_VCC 供电,会增加13mA左右电流,电路如下:4USB ESD U143型号由ESDA6V8UD改为ESDA6V8UL5C221改为R4900R电阻,降低芯片因过温死机的可能性6VCC50升压电路输入端增加电源控制,解决关机漏电流,电路如下:7DDR模板更改为RK3188-DDR3P418SS4-V10-20130515LX8R133改为330R%1,R79改为634R%19主控和WiFi使用独立晶振,取消晶振复用。
柔性检查作用域套件-USB 产品说明书
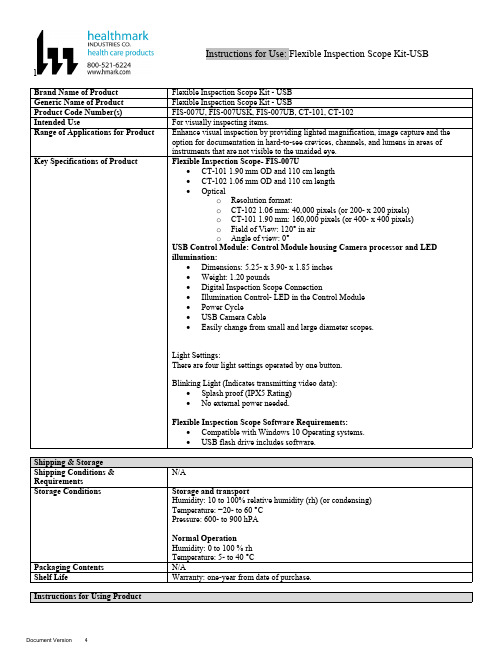
lInstructions for Use: Flexible Inspection Scope Kit-USB Brand Name of ProductFlexible Inspection Scope Kit - USB Generic Name of ProductFlexible Inspection Scope Kit - USB Product Code Number(s)FIS-007U, FIS-007USK, FIS-007UB, CT-101, CT-102Intended UseFor visually inspecting items.Range of Applications for ProductEnhance visual inspection by providing lighted magnification, image capture and the option for documentation in hard-to-see crevices, channels, and lumens in areas of instruments that are not visible to the unaided eye.Key Specifications of Product Flexible Inspection Scope- FIS-007U∙CT-101 1.90 mm OD and 110 cm length∙CT-102 1.06 mm OD and 110 cm length∙Opticalo Resolution format:o CT-102 1.06 mm: 40,000 pixels (or 200- x 200 pixels)o CT-101 1.90 mm: 160,000 pixels (or 400- x 400 pixels)o Field of View: 120° in airo Angle of view: 0°USB Control Module: Control Module housing Camera processor and LEDillumination:∙Dimensions: 5.25- x 3.90- x 1.85 inches∙Weight: 1.20 pounds ∙Digital Inspection Scope Connection∙Illumination Control- LED in the Control Module∙Power Cycle∙USB Camera Cable∙Easily change from small and large diameter scopes.Light Settings:There are four light settings operated by one button.Blinking Light (Indicates transmitting video data):∙Splash proof (IPX5 Rating)∙No external power needed.Flexible Inspection Scope Software Requirements:∙Compatible with Windows 10 Operating systems.∙USB flash drive includes software.Unpacking Flexible Inspection Scope:Carefully inspect for shipping damage. If there is any damage contact the shipping carrier and Heatlhmarkcustomer service 800-521-6224 immediately.USB Control Module: (Fig. 1).1.Digital Inspection Scope Connection 2.Illumination Control 3.Power Cycle B (Type C) on the right side of the boxFigure 1Flexible Inspection Scope™: (Fig. 2).∙CT-101 1.90 mm O.D. and 110 cm length ∙CT-102 1.06 mm O.D. and 110 cm lengthLarge1.90 mmSmall 1.06 mmFigure 2Flexible Inspection Scope™ Features3214Light/Illumination Settings: (Fig. 3).∙Five (5) light settingso Light on control indicats setting levelo Fifth setting is OFF∙Press light button to advance to next setting.∙Fifth setting turns the light OFF.Figure 3Power Cycle ButtonPress button to RESET camera (Fig. 4).Figure 41.Flexible Inspection Scope™ Plug (Fig. 5).Contains camera video connection as well as LED Light for illumination.1Figure 52.Flexible Working Length (Fig. 6).The portion of the Flexible Inspection Scope™ that is inserted into an item during visual inspection.The measuring scale markings on the Flexible Working Length are in centimeters (accuracy = ± 0.5 cm)2Figure 63.Distal Camera (Fig. 7).Distal portion of Flexible Inspection Scope™ that contains the camera lens3Figure 7SOFTWARE INSTALLATION:Note: This section is done only once when connecting the scope to the computer for the first time.∙System Requirements: MS Windows 10∙Install the Flexible Inspection Scope™ Software from the USB flash drive on a computer.Note: If you have any IT policies that may block this installation, please contact your IT team to give access to Healthmark scope viewer to install.1. Insert the USB Flash drive into your computer, and double click on the Healthmark Scope Viewer installer package to begin installation.2. The “Welcome to the Healthmark Scope Viewer Setup Wizard” screen pops up. Click on Next.3. Select the first tab Typical or setup type of your choice, click Next.4. Click Install and wait for installation to complete.5. Click Finish.STARTING SOFTWARE & CONNECTING SCOPE TO PC:(Fig 8).1.Open the Windows PC viewer software.2.Connect the Control Module to PC using USB Cable.3.Plug the Flexible Inspection Scope into the Control Module.4.In the viewer software, click Settings and Select USB Video Device, click on the desiredresolution, select the preferred Video Output Format, and then Click OK.5.Press the Power Cycle Button.Figure 86.Now you can start using the scope.Verifing OperationFollowing the steps listed below will ensure the proper use and performance of the Flexible Inspection Scope™. The Flexile Inspection Scope™ can be checked for normal operation by connecting it as described in the Startup section of this IFU.Normal operation includes:∙An image appearing on your computer monitor or HDMI Monitor.∙ A blinking light on Control Module near the Power Cycle button that indicates the image feed is transmitting.∙White light emitting from the distal end of the Digital Inspection Scope.∙An LED light on the control module top panel that indicates the light intensity of the device. Using SoftwareHealthmark Scope Viewer Software (Fig. 9).1.Capture button: Captures a Reference Image and saves it to the Reference Image folder.2.Main Image Window: Displays the image from the camera.3.Reference Image Window: Displays a reference image.4.Clear Button: Removes the image from the Reference image window.5.Open Reference Image button: Allows selection of a reference image from the Reference Imagefolder.6.Settings Button: Click to select the video camera and resolution settings.7.File Location Button: Click to change location where captured images are being saved.8.File Location Window: Shows the file path where captured images are being saved currently.9.Capture Image Button: Captures images and adds them to the File Location selected by the user(as shown in the File Location Window).10.Capture Video button: Click to record video. Click again to stop recording video.11.File Prefix: Type in text that you would like included in the file name of Captured Images.Figure 9Selecting Video Device or CameraFollow the directions below to select the video device or camera used to capture images using the Flexible Inspection Scope™ Viewer Software. (Fig. 10).1.Click Settings button in the lower left of the Scope Viewer software to display a list of videodevices or cameras being detected by your computer2.Select a device for capturing images using the Scope Viewera.The example below shows a webcam and USB Video Device in the Settings box. Select theUSB Video Device for the Flexible Inspection Scope™.b.You can also select your preferred Video Output Format from the dropdown box3.Click OK to view the selected Video Device.231Figure 10Capturing Still PicturesFollow the instructions for capturing still pictures from the Main Image Window.Select the Capture Image button. (Fig. 11).Figure 11Note: When an image is captured, “Image Captured” in red text will flash on the lower portion of the screen and a new file will appear in the Files Location.Capturing Video ImagesFollow the instructions below for capturing video from the Main Image Window.1.Select the Capture Video Button (Fig. 12).Figure 122.When the video is recording “Recording…” in red text will appear toward the bottom of thesoftware window.3.To stop recording, click Stop Capture. (Fig. 13).Figure 13Setting File PrefixFollowing the steps below allows you to create a file prefix that will appear after the underscore of image file names save to the File Location specified by the user.1.Click in the field next to File Prefix.2.Enter the characters that you would like to be included in the file name. (Fig 14).Figure 14Setting Location for Saved FilesFollowing the steps below allows you to set the file location of saved images using the Scope Viewer software.1.Click the File Location button.2.Select the file location you want to save captured images. (Fig 15).Figure 15Displaying Reference ImageThere are two ways to display a still image in the Reference Image Window on the Scope Viewer software.1.To display an image currently being displayed in the Main Image Window, click the Capture button. Note: The images will be saved in a file folder titled Reference Images in the designated File Location that the user specified in the File Location field. (Fig. 16).Figure 162.To display a saved image in the Reference Image Window from your File Location:a.Click the Open Reference Image button (Fig. 16 above).b.Select the file you want to display (Fig. 17 below).c.Click the OK Button, to display the image in the Reference Image Window. (Fig. 17).Figure 17Switching to a Different Flexible Inspection Scope™ on the Control Module:1.Press the Power button on the Control Module once.2.Disconnect the current Flexible Inspection Scope from the Control Module.3.Repeat the steps in the “STARTING SOFTWARE & CONNECTING SCOPE TO PC” procedure.Inserting Scope in ItemFigure 1Rotating Device to Avoid ObstacleFigure 2 Performing InspectionWipe down the Flexible Inspection Scope™ with a compatible wipe. Follow the manufacturer’s (Mfr.’s)Instructions for Use (IFU) for appropriate wipe usage. Click here to see the Chemical Compatibility Chart(PDF) for approved cleaning.The Flexible Inspection Scope™ is made of the same material as other common endoscopes. Any wipe,solution, or low temperature (≤ 60 °C [140 °F]) method intended for the reprocessing of endoscopes is likelycompatible with the Generation II Flexible Inspection Scope™ Catheters if used according to the productlabeling.Solutions Containing (Flexible Inspection Scope Only)Alcohol Ethoxylates Neutral or Near-Neutral pH DetergentsEnzymatic Cleaning Solutions Enzymatic DetergentsSodium Borated, Decahydrate Tetrapotassium PyrophosphateFlexible Inspection Scope™ has a fluid ingress protection rating of IPX7 (Waterproof) and can withstandimmersion in fluid up to one (1)-meter in depth for up to 30 minutes.Control Module USB has a fluid ingress protection rating of IPX5 (Water resistant) and can withstand asustained, low pressure water jet spray for up to three minutes.For Thorough Cleaning: CablesFollow the cleaning agent Mfr.’s IFU.1.Unplug and disconnect all components from the Control box prior to cleaning.2.Do not submerge or soak the cable for disinfection (cable is not waterproof).3.Wipe thoroughly with non-linting wipe moistened with facility approved neutral detergent. Use theappropriate brushes with detergent solution to remove any residues from areas that cannot bereached with the wipes.For Thorough Cleaning: Control Module1.Unplug and disconnect all components from the Control box prior to cleaning.2.Do not submerge or soak the cable for disinfection (Control Box is not waterproof).3.Wipe thoroughly with non-linting wipe moistened with facility approved neutral detergent. Use theappropriate brushes with detergent solution to remove any residues from areas that cannot bereached with the wipes.Note: Do NOT soak. Control Module and cables are not waterproof and should not be immersed.N/ACleaning –AutomatedDisinfection Control Module and CablesThese may be cleaned with alcohol based disinfectant wipes.Compatible agents (wipes and solutions) for disinfecting Flexible Inspection Scope™ and ControlModule:∙Hydrogen peroxide∙Isopropyl alcohol (IPA)∙Sodium hypochlorite (Bleach)∙Ortho-phenylphenol∙Quaternary ammonium.High-Level Disinfection (Flexible Inspection Scope™ Only)∙Select only disinfecting solutions listed in the compatible disinfecting methods.∙Follow all recommendations regarding health-hazards, dispensing, measuring, and storage from the Mfr. of cleaning and disinfecting agents.∙Soak the Flexible Inspection Scope™ in selected disinfecting solution per Mfr.’s IFU.∙Rinse the Flexible Inspection Scope™ with critical (sterile) water, again, following the disinfecting solutions Mfr.’s instructions.Reprocessing Chemical Compatibility Chart (PDF): Click here.。
RK DDR SupportList Ver2.0
Rockchip Solutions DDR SDRAM Support ListVer 2.002012-12-24◆ Revision HistoryRevision No.History Date2.00ORG.2012.12.24◆ SymbolSymbol Description√Fully Tested and Mass productionT/A Fully Tested and ApplicableD/A Datasheet ApplicableN/A Not ApplicableN/T No testing◆The Latest Reference Circuits VersionChip DRAM Support Type RK Reference Circuit VersionRK281x DDR2RK2818_REF_V1.3RK2906DDR2/DDR3RK2906_PMIC_REF_V20_0418RK2918DDR2/DDR3RK2918_REF_V13_20110517RK2926DDR32926_86v_v1.2_20121109RK2928DDR3TR726H_V12_1112RK3066DDR2/DDR3/LPDDR2RK3066_REF_TPS659102_V12_20121024_1CELL Application Note:[1] Following SOCs not support the 512Mx8 DDR3 because of the package without Address Input pin A15:RK2906-6,RK2906-8,RK3066.[2]The DRAM Part Number is usually consists of two parts divided by '-', which the first part contains memory type,density, orgainization, package, and the second part usually means data rate.[3]RockChip platform can support all the chips that match the first part of Part Number which marks '√' or 'T/A',and do not need to care the second part. If you want your system running more effective , you may need to find out the exact data rate in DRAM datasheet and config in kernel menuconfig.[4]Since DDR is high speed device. Please directly copy our PCB DRAM Part Template and follow our PCB productguide.Contact information: fae@Manufacturer Part Number Density Organization Type RK281x RK290xRK2918RK2928RK2926RK3066Elpida E1116AEBG-8E-F1G bit64M×16DDR2√√N/A N/A D/A EDJ1108DJBG1G bit128M x8DDR3N/A√D/A D/A D/AEDJ1116DJBG1G bit64M×16DDR3N/A D/A D/A D/A D/AEDJ2116DEBG2G bit128M×16DDR3N/A√D/A D/A D/AEDJ2116EEBG2G bit128M×16DDR3L N/A D/A D/A D/A D/AEDJ2108DEBG2G bit256M×8DDR3N/A√T/A T/A√EDJ2108BDBG2G bit256M×8DDR3N/A√T/A T/A√EDJ2108EEBG2G bit256M×8DDR3L N/A D/A D/A D/A D/AEDJ4216BASE4G bit256M×16DDR3N/A√D/A D/A D/AEDJ4216BBBG4G bit256M×16DDR3N/A√D/A D/A√EDJ4216EBBG4G bit256M×16DDR3L N/A D/A D/A D/A T/AEDJ2108EDBG2G bit256M×8DDR3L N/A D/A D/A D/A T/AEDJ4216EFBG4G bit256M×16DDR3L N/A D/A D/A D/A D/AEDJ4208BBBG4G bit512M×8DDR3N/A D/A [1]T/A T/A T/A [1] EDJ4208EFBG4G bit512M×8DDR3L N/A D/A [1]D/A D/A T/A [1] EDJ4208EBBG4G bit512M×8DDR3L N/A D/A [1]T/A N/A D/A [1] EDB4032B2MA4Gb/2CS64M×32×2pcsLPDDR2N/A N/A N/A N/A T/AEDB8132B3MA8Gb/2CS128M×32×2pcLPDDR2N/A N/A N/A N/A T/AEDB8132B3MC8Gb/2CS128M×32×2pcLPDDR2N/A N/A N/A N/A D/A Micron MT47H64M16HR-251G bit64M×16DDR2√√N/A N/A D/A MT41J128M8JP-15E:G1G bit128M x8DDR3N/A√D/A D/A D/AMT41J128M16HA-15E:D2G bit128M×16DDR3N/A√D/A D/A D/AMT41J256M8HX-15E:D2G bit256M×8DDR3N/A√T/A T/A T/AMT41K128M16HA-15E:D2G bit128M×16DDR3L N/A√D/A D/A D/AMT41K256M16RE-15E:D4G bit256M×16DDR3L N/A√D/A D/A D/AMT41K512M8RA-15E:D4G bit512M×8DDR3L N/A D/A [1]D/A D/A D/A [1] MT41K256M8DA-125:K2G bit256M×8DDR3L N/A√T/A T/A T/AMT41K128M16JT-125:K2G bit128M×16DDR3L N/A√D/A D/A D/AMT41K512M8RH-125:E4G bit512M×8DDR3L N/A D/A [1]T/A T/A T/A[1] MT41K256M16HA-125:E4G bit256M×16DDR3L N/A√D/A D/A D/AMT41K256M8DA-125:M2G bit256M×8DDR3L N/A D/A T/A T/A T/AManufacturer Part Number Density Organization Type RK281x RK290xRK2918RK2928RK2926RK3066Hynix H5PS1G63CFP1G bit64M×16DDR2√√N/A N/A D/A H5PS1G63EFR1G bit64M×16DDR2√√N/A N/A D/AH5TQ1G83DFR1G bit128M×8DDR3N/A√D/A D/A T/AH5TQ2G63BFR2G bit128M×16DDR3N/A√D/A D/A D/AH5TQ2G83CFR2G bit256M×8DDR3N/A√√√√H5TQ2G83BFR2G bit256M×8DDR3N/A D/A T/A T/A√H5TQ1G83TFR 1G bit128M×8DDR3N/A√D/A D/A D/AH5TQ4G63MFR4G bit256M×16DDR3N/A√D/A D/A D/AH5TQ2G63DFR2G bit128M×16DDR3N/A√D/A D/A D/AH5TQ2G83EFR2G bit256Mx8DDR3N/A D/A T/A T/A T/AH5TQ4G83AFR4G bit512M×8DDR3N/A D/A [1]T/A T/A D/A [1] H5TQ1G63DFR1G bit64M×16DDR3N/A D/A D/A D/A D/AH5TQ4G63MFR4G bit256Mx16DDR3N/A D/A D/A D/A√H9TCNNN4JDMMPR4Gb/2CS128M×32LPDDR2N/A N/A N/A N/A D/AH9TP33A8LDMCMR8Gb/2CS256M×32LPDDR2+eNAND N/A N/A N/A N/A D/A Nanya NT5TU32M16CG-3C512M bit32M×16DDR2√√N/A N/A D/A NT5TU64M16GG1G bit64M×16DDR2√D/A N/A N/A D/ANT5CB128M8DN 1G bit128M×8DDR3N/A√D/A D/A D/ANT5CB128M16BP2G bit128M×16DDR3N/A√D/A D/A D/ANT5CB128M16HP2G bit128M×16DDR3N/A T/A D/A D/A D/ANT5CC128M8DN1G bit128M×8DDR3L N/A√D/A D/A T/ANT5CC128M16BP2G bit128M×16DDR3L N/A√D/A D/A D/ANT5CB256M8GN2G bit256M×8DDR3N/A√T/A T/A T/ANT5CB256M8BN2G bit256M×8DDR3N/A√T/A T/A T/ANT5CB256M16BP4G bit256M×16DDR3N/A√D/A D/A D/ANT5CB256M8FN2G bit256M×8DDR3N/A√T/A T/A T/ANT5CB128M16FP4G bit256M×16DDR3N/A√D/A D/A D/ANT5CB512M8BN4G bit512M×8DDR3N/A D/A [1]T/A T/A D/A [1] NT5CC256M16CP4G bit256M×16DDR3N/A T/A D/A D/A D/ANT5CC512M8CN4G bit512M×8DDR3L N/A D/A [1]T/A T/A T/A[1] NT6TL256F32AI8G bit256M×32LPDDR2N/A N/A N/A N/A T/AManufacturer Part Number Density Organization Type RK281x RK290xRK2918RK2928RK2926RK3066Samsung K4T1G164QE1G bit64M×16DDR2√√N/A N/A D/A K4B2G1646C2G bit128M×16DDR3N/A√D/A D/A D/AK4B1G0846G1G bit128M×8DDR3N/A√D/A D/A T/AK4B2G0846C2G bit256M×8DDR3N/A√D/A D/A D/AK4B4G1646B4G bit256M×16DDR3N/A√D/A D/A D/AKMKJS000VM8Gb/2CS256M×32LPDDR2+eMMC N/A N/A N/A N/A D/ASPECTEK PE918-15E(PRN256M8V79DG8GQF-15E)2G bit256M×8DDR3N/A N/T T/A T/A T/AElixir N2TU1G16GG-AC1G bit64M×16DDR2√√N/A N/A N/T N2CB1G80GN-CG2G bit128M×8DDR3N/A√N/T N/T N/TN2CB2G80GN2G bit256M×8DDR3N/A√N/T N/T√N2CB2G16BP-CG2G bit128M×16DDR3N/A√N/T N/T N/TN2CB4G08DN-CG4G bit512M×8DDR3N/A N/T[1]N/T N/T N/T[1] eorex EM47DM1688SBA2G bit128M×16DDR3N/A N/A N/T N/T N/T GEIL IGL1L128M168BA15H2G bit128M×16DDR3N/A D/A N/T N/T N/T IGL1L256M88BA15BW2G bit256M×8DDR3N/A√N/T N/T N/TIGL1L256M88BA15C2G bit256M×8DDR3N/A N/T T/A N/A T/AIGL1L256M88BA15N2G bit256Mx8DDR3N/A N/T N/T N/T N/T πPM PME810816BBR-E6DN1G bit64M×16DDR2D/A D/A N/A N/A N/T PMF510816ABR-G8DN1G bit64M×16DDR3N/A√N/T N/T N/TPMF511816ABR-G8DN2G bit128M×16DDR3N/A√N/T N/T N/TPMF510808ABR-I9DN1G bit128M x8DDR3N/A N/T N/T N/T N/TPMF511816ABR-I9DN2G bit256Mx8DDR3N/A N/T N/T N/T N/T MEZZA Z3P1GF3FGF1G bit128M×8DDR3N/A D/A N/T N/T N/T Z3P2GF3CKF-GDJ2G bit256M×8DDR3N/A D/A T/A T/A N/AZDJ2108DEBG2G bit256M×8DDR3N/A D/A N/T N/T N/TZDJ2116DEBG-DJF2G bit128M×16DDR3N/A√N/T N/T N/TManufacturer Part Number Density Organization Type RK281x RK290xRK2918RK2928RK2926RK3066SCSemicon HXB18T2G160AF-25D2G bit128M×16DDR2√√N/A N/A N/T HXB18T1G160AF-25D1G bit64M×16DDR2√√N/A N/A N/THXB15H2G800BF-15H2G bit256M×8DDR3N/A N/T T/A N/A T/AMIRA P3R1GE4CFF-G8E1G bit64M×16DDR2√√N/A N/A N/T P3R1GE3FGF-G8E1G bit128M×8DDR2√√N/A N/A N/TWINS VP5TQ2G1635FFP-F92G bit128M×16DDR3N/A√N/T N/T N/T VP5TQ2G0835L-F92G bit256M×8DDR3N/A√N/T N/T N/TVP5TQ1G0835-F91G bit128M×8DDR3N/A√N/T N/T N/TVP5TQ1G0835L-F91G bit128M×8DDR3N/A N/T N/T N/T N/TProMOS V59C1G01168QBASXJ251G bit64M×16DDR2√√N/A N/A N/T V59C1G02168QB2G bit128M×16DDR2N/A√N/A N/A N/TV73CAG01808RA JI91G bit128M×8DDR3N/A√N/T N/T N/T Etron Tech EM68B16CWPA-25H512M bit32M×16DDR2√√N/A N/A N/T Anucell ANU3AC256M82G bit256M×8DDR3N/A N/T N/T N/T N/A。
RK3168内部测试文档爆光

RK3168 28nm全球首测瑞芯微在本月发布了最新双核RK3168,采用先进的28nm工艺,双核心Cortex-A9,主打低端市场,以低功耗为卖点,管脚与高端的四核RK3188兼容,实现“四双共板”,降低了厂商的开发难度。
下面我们为大家带来瑞芯微RK3168双核7英寸工程机的抢先测试。
外观:机器的外观比较普通,不过像前后双摄像头、接口等方面的基本配置还是比较齐全的。
拆解:由于是工程样机,没有拧螺丝,很容易拆开。
配置的电池只有2100mAh,一方面是由于RK3168非常省电,另一方面,这个机器本身是开发的工程机,根据内部预留的空间,放下一个3000mAh以上的电池似乎没啥问题。
主板PCB占据了机器一半的空间。
瑞芯微最新发布的RK3168主控,采用GlobalFoundries的28SLP工艺,28nm制程结合HKMG,属于目前相对领先的工艺之一。
Rockchip能在中低端芯片中也采用28nm先进工艺,侧面反映出RK力推这款芯片的决心。
其中集成了2个Cortex-A9的核心,共享256KB的L2缓存,规格上相对RK3188减半。
出于对功耗的控制,最高主频有所降低,从RK3188的1.6GHz@1.35V 下降到1.2GHz@1.20V。
GPU则从高主频的Mali-400 MP4更换成了能效比更优秀的PowerVR SGX540,最高主频达到600MHz,基本上有300MHz的PowerVR SGX544水平,性能同样不俗。
在视频解码方面,依旧采用Hantro的方案,保留了1080p解码的水平。
两颗南亚易胜的DDR3颗粒,单颗容量4Gbit (512MB),位宽16bit,两颗共同组成32bit 的位宽,1GB的RAM容量。
8GB的NAND FLASH闪存,作为平板电脑的存储空间。
电源管理芯片是来自TI(德州仪器)的TPS659102,支持11路输出,原本用于搭配单核的RK29系列主控,而RK3168可以兼容这款电源管理芯片,或许是RK3168功耗相对较低的缘故。
ARTISAN TECHNOLOGY GROUP 设备购买和维修服务说明

MPT SERIESFax (406) 587-4911INTERNAL JUMPER SELECTIONSensor Type: Factory default is for operation with Thermistors, RTD, or LM335. If you are using an AD590, move the jumper from “ALL OTHERS” to “AD590”. An AD590 must be biased by at least +8V. If V+ exceeds +8V, it can be used for bias. Use pin 10 for the other AD590 connection, and do not connect pin 9. (See the Quick Connection diagram on page 3.)Sensor Current: The resistance of the sensor you choose, in conjunction with the sensor current, must produce a voltage between 0 V and 5 V in order to be used in the control loop. The 10 µA and 100 µA sensor currents are used with thermistors. The 1 mA sensor current is used with the LM335 IC Sensor and 500 or 1000Ω RTDs. The 10mA bias current (available on Rev. E) is for 100Ω RTDs.The voltage produced by your sensor is given by: V = R SENSOR * I SENSORCurrent Limit: Factory default is 0 A for the Current Limit Trimpot. Rotate this Trimpot clockwise to the desired maximum output current. The following charts detail the current limit settings available for each unit. PRODUCT REVISION CURRENT LIMIT TRIMPOT POSITIONSRev. G (Introduced 10/2014.)Tick Marks012345678 MPT25000A0.312A0.625A0.937A 1.25A 1.56A 1.87A 2.19A 2.5A MPT50000A0.4A1A 1.6A 2.2A 2.8A 3.75A 4.3A5A MPT100000A1A 2.5A 3.75A5A 6.25A7.75A8.75A10ARev. E (Introduced 9/2003.) &Rev. F(introduced 3/2005.)012345678910 MPT25000A250mA500mA750mA1A 1.25A 1.5A 1.75A2A 2.25A 2.5A MPT50000A500mA1A 1.5A2A 2.5A3A 3.5A4A 4.5A5A MPT100000A1A2A3A4A5A6A7A8A9A10ARev. D(Each setting represents a 20% increment of full scale current.)12345 MPT25000.5A1A 1.5A2A 2.5A MPT50001A2A3A4A5A MPT100002A4A6A8A10AProportional Gain: Measure resistance across the two test points labeled above to determine the gain setting. Factory default is a gain of 25.For MPT2500, Resistance = Gain * 4000; Default 100kΩFor MPT5000, Resistance = Gain * 2000; Default 51kΩFor MPT10000, Resistance = Gain * 1000; Default 25kΩMPT2500-00400-K © 2014 Wavelength Electronics, Inc. 6MPT2500-00400-K © 2014 Wavelength Electronics, Inc. 7A BCBBFIGURE AFIGURE B* All Other Tolerances are +/-5%MPT SERIES SELECTION GUIDE FIGMPT-2500 2.5 A Temperature Controller A MPT-5000 5 A Temperature Controller A MPT-1000010 A Temperature Controller B OPTIONAL ACCESSORIES AVAILABLE FOR SYSTEMDEVELOPMENT:CKT-202A connector kit includes the appropriate 15 pin D-sub connector, hood and hardware.WCB-101A Cable Kit includes one meter of cable soldered to a mating connector on one end and unterminated on the other.Precision thermistors for various temperature ranges areoffered with detailed R-T charts for quick system integration.MODEL R @ 25°C10 µA RANGE100 µA RANGETCS-605 5 k Ω- 55°C to - 2°C -20°C to +33°C TCS-61010 k Ω- 45°C to +13°C -8°C to +50°C TCS-10K510 k Ω- 45°C to +13°C -8°C to +50°C TCS-62020 k Ω- 35°C to +28°C +6°C to +69°C TCS-65050 k Ω- 18°C to +49°C +25°C to +92°CTCS-651100 k Ω- 6°Cto+67°C+41°Cto+114°CMPT2500-00400-K © 2014 Wavelength Electronics, Inc. 10Connector Kit CKT-202Cable KitWCB-101CAT-203 MPT I/O CABLECABL E #1CABL E #2RED/BLACK 2GREEN WHITE/BLACK WHITE BLUE WHITEBLACK BLUE ORANGE REDGREEN/BLACK ORANGE 1115131412109784563BLACK RED WIRE COLOR PIN 1GREEN 1111211211222CABLE #21Modulation Input Modulation GND (for pin 6)Temp Setpoint Monitor V+Temp MonitorMonitor GND (for 11 & 12)GND (For pins 7 & 8)V+Sensor +Sensor - (GND)TEC+TEC+TEC-TEC-FUNCTIONGND (For pins 7 & 8)WCB-101 MPT I/O CABLEArtisan Technology Group - Quality Instrumentation ... Guaranteed | (888) 88-SOURCE | 。